#debug.log
Explore tagged Tumblr posts
Visit Tumblr Blog
Explore Tumblr blogs with no restrictions, modern design and the best experience.
Last Seen Tumblr Blogs


Fun Fact
Average visit duration of Tumblr.com is 10 mins and 25 secs.
Text


#tag sharing#actually debug.log(prevTag) would be really funny as a tag in this context#anyway yeah favourite gender#more games need a cool disembodied voice to react to what you're doing
21K notes
·
View notes
Note
Hey, I'm going to use unity to make a game with my friends for a class, any advice?
public GameObject inbox;
public Inbox questions;
public bool silly;
on Start{
questions = inbox.getComponent<question>;
if(question.question = "Hey, I'm going to use unity to make a game with my friends for a class, any advice?"){
if(silly = true){ Debug.Log("silly: make sure that every single variable is named similarly, and its impossible to find a single item in your project :)") } else if(silly = false){ Debug.Log("serious: Make sure to outline your plans clearly, and write psudocode before you start actually coding. Focus on the coding aspect before how it looks; use a square as a player and get that square moving and working before you make player animations and such. I've had less than a year of experience with unity though, so I may not be the best person the ask."); }
}
}
silly: make sure that every single variable is named similarly, and its impossible to find a single item in your project :)
serious: Make sure to outline your plans clearly, and write psudocode before you start actually coding. Focus on the coding aspect before how it looks; use a square as a player and get that square moving and working before you make player animations and such. I've had less than a year of experience with unity though, so I may not be the best person the ask.
#man i didn't expect this post to be so long#unity is the silliest :p#is this even readable?#tell me if it isn't please
2 notes
·
View notes
Text
Development - 04/04
Today, I want to get some playtesting done, though at the moment there isn't much to playtest:
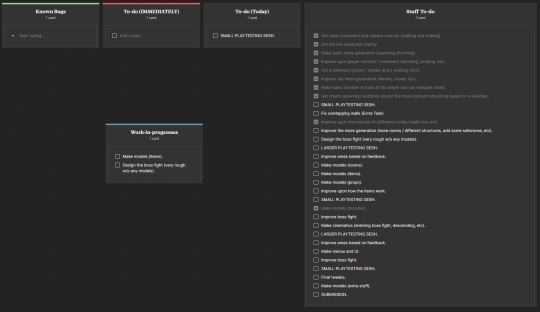
So I think I will add sounds to my game and get people to playtest the pacing between the monster and exploring the dungeon.
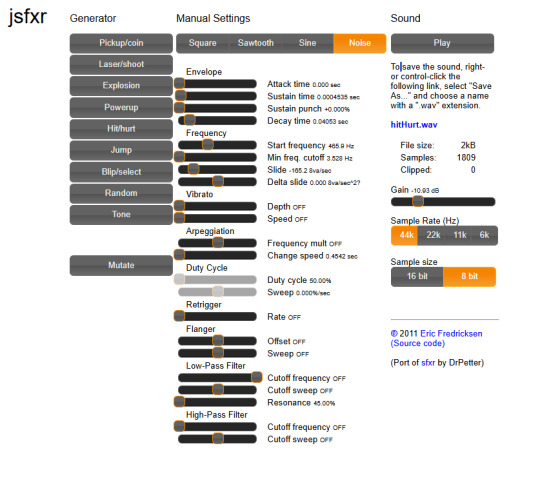
To do this, I make a couple of sounds on jsfxr and export them to Unity:
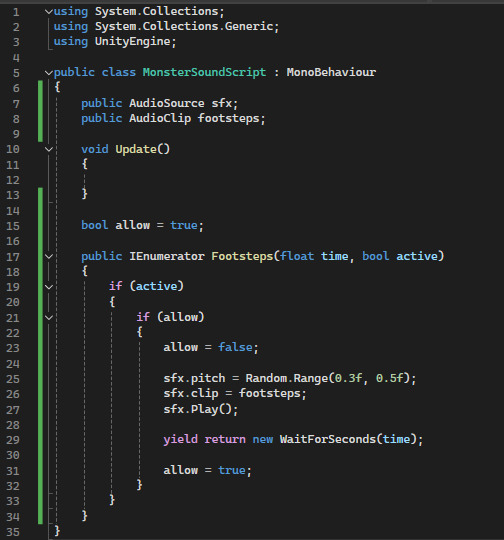
The two sounds I made are for the monster's and player's footsteps. Starting with the player footsteps, I make a new coroutine where it plays the sound on a delay depending on whether the player is sprinting or not:

For the monster, I made a new script that would receive information about how to play the footsteps from the monster script. The reason I can't just do this in the monster script is because the timers on the flee state would stop the sound from playing:
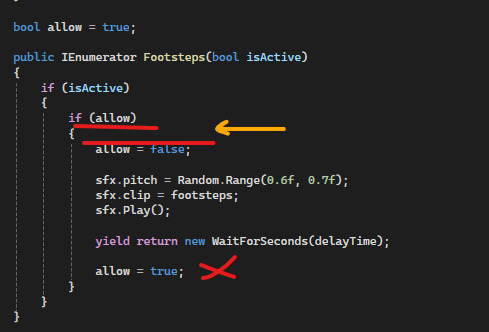
So I have link this up , but the fleeing state is giving me even more problem. Basically, this line should be triggering but isn't (even though the Debug.Log line UNDER it is triggering):

So after a while of bashing my head against the monitor attempting to workout why this won't work, I had an idea. I believe that it is resetting the timer before it can start again, though this doesn't explain why ONLY the flee state won't work:
So I try with these if statements making sure the timer can be reset:

No luck.
I think I am putting this on hold for now, as it isn't too important.
0 notes
Text
Virtual Reality Application Programming Using Unity

Virtual Reality (VR) is reshaping the way we experience games, education, simulations, and even healthcare. With Unity, one of the most powerful game engines available, developers can build immersive VR experiences across a wide range of platforms, including Oculus, HTC Vive, and PlayStation VR. In this post, we'll walk through the basics of VR programming using Unity.
Why Unity for VR Development?
Cross-platform support: Easily build apps for multiple VR headsets.
Powerful editor: Drag-and-drop tools for 3D design and prototyping.
Rich asset store: Access to a wide range of VR-ready models and plugins.
C# scripting: Intuitive programming with Unity's API and MonoBehavior system.
Setting Up Your VR Project
Install Unity Hub and the latest Unity version with XR Plugin Management.
Create a new 3D project.
Install XR Plugin Packages: Use the Package Manager to install:
XR Plugin Management
Oculus XR Plugin
OpenXR Plugin
Enable XR: Go to Project Settings > XR Plugin Management and enable your target headset.
Basic VR Interaction Example
Here's a simple example of C# code to grab and throw objects in VR:using UnityEngine; using UnityEngine.XR.Interaction.Toolkit; public class GrabObject : MonoBehaviour { public XRGrabInteractable grabInteractable; void Start() { grabInteractable = GetComponent<XRGrabInteractable>(); grabInteractable.onSelectEntered.AddListener(OnGrab); grabInteractable.onSelectExited.AddListener(OnRelease); } void OnGrab(XRBaseInteractor interactor) { Debug.Log("Object grabbed!"); } void OnRelease(XRBaseInteractor interactor) { Debug.Log("Object released!"); } }
Tips for VR Development
Optimize performance: VR requires high FPS to prevent motion sickness.
Use spatial audio: Enhance immersion with 3D sound sources.
Test frequently: Always test on the target device to ensure comfort and interactivity.
Design for comfort: Avoid fast movement, flickering, or close-up objects.
Popular VR Use Cases
VR Games (e.g., Beat Saber, Half-Life: Alyx)
Medical Simulations and Therapy
Virtual Training for Industries
Immersive Education Platforms
Virtual Tours and Real Estate Showcases
Conclusion
Unity makes it easier than ever to develop high-quality VR applications. Whether you're building an immersive game or a professional training simulator, mastering Unity’s XR tools opens the door to the limitless potential of virtual reality. Start small, iterate fast, and always keep user comfort and interaction design at the forefront of your VR development journey.
0 notes
Text
ScriptableObjects for Weapons
A recent GameJam gave me a chance to jump into Scriptable Objects for my weapons system. Generally I work with enums to build the framework for reuseable components and shared object parameters, but this worked nicely as well.
Here's a reusable Unity C# script for managing weapon pickup and switching. This script allows your character to pick up different weapons, each with unique attributes like damage, fire rate, and prefab.
Setup Steps:
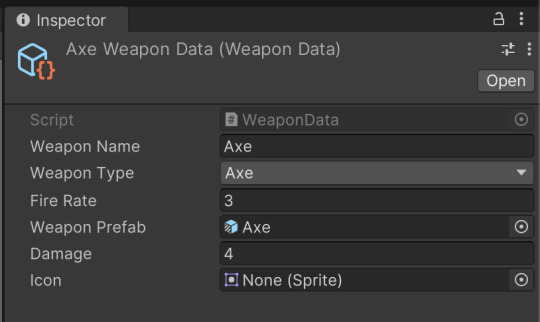
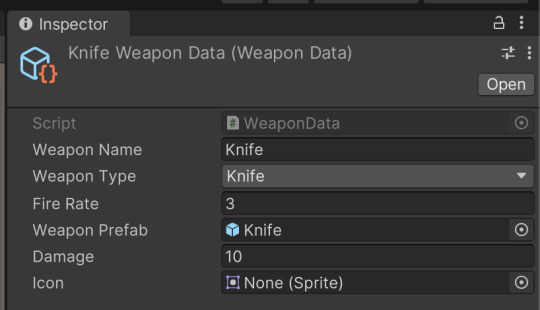
Create Weapon Scriptable Objects: Define each weapon as a ScriptableObject for easy customization.
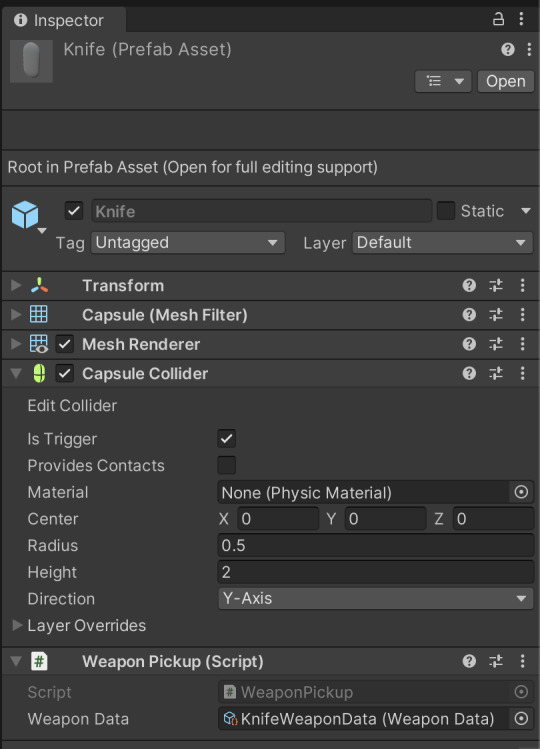
Attach Pickup Script to Weapons: Add a trigger collider to each weapon prefab and apply this script.
1. Weapon ScriptableObject (WeaponData.cs)
using UnityEngine;
[CreateAssetMenu(fileName = "NewWeapon", menuName = "Weapons/Weapon")]
public class WeaponData : ScriptableObject
{
public string weaponName;
public WeaponType weaponType;
public float fireRate;
public GameObject weaponPrefab;
public int damage;
public Sprite icon; // Optional: For UI representation
public enum WeaponType { Axe, Knife, Sword, Bow }
}
2. Weapon Pickup System (WeaponPickup.cs)
using UnityEngine;
public class WeaponPickup : MonoBehaviour
{
public WeaponData weaponData; // Assign the weapon data in the inspector
void OnTriggerEnter(Collider other)
{
if (other.CompareTag("Player")) // Ensure the player has a "Player" tag
{
PlayerWeaponManager weaponManager = other.GetComponent<PlayerWeaponManager>();
if (weaponManager != null)
{
weaponManager.PickupWeapon(weaponData);
Destroy(gameObject); // Destroy the weapon pickup object after pickup
}
}
}
}
3. Player Weapon Manager (PlayerWeaponManager.cs)
using System.Collections;
using System.Collections.Generic;
using UnityEngine;
public class PlayerWeaponManager : MonoBehaviour
{
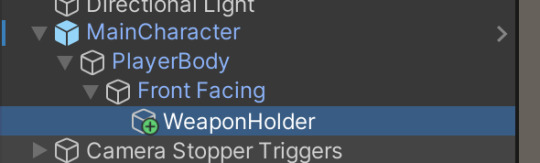
public Transform weaponHolder; // Assign an empty GameObject where weapons will be held
public GameObject currentWeapon;
public WeaponData currentWeaponData;
public void PickupWeapon(WeaponData newWeaponData)
{
// If the player already has a weapon, destroy it
if (currentWeapon != null)
{
Destroy(currentWeapon);
}
// Instantiate the new weapon prefab and set it as a child of the weapon holder
currentWeapon = Instantiate(newWeaponData.weaponPrefab, weaponHolder.position, weaponHolder.rotation, weaponHolder);
currentWeaponData = newWeaponData;
}
// Example method to simulate attacking
public void Attack()
{
if (currentWeaponData != null)
{
Debug.Log($"Attacking with {currentWeaponData.weaponName}, dealing {currentWeaponData.damage} damage.");
}
}
}
How to Use:
Create Weapon Data:
Right-click in the project window.
Select Create -> Weapons -> Weapon Data.
Configure attributes like name, damage, fire rate, and assign a weapon prefab.
Create Weapon Prefabs:
Design a weapon prefab with a trigger (Box, capsule, etc.) and then add a checkbox for "IsTrigger"
Add the WeaponPickup script and assign the WeaponData ScriptableObject.

Setup Player:
Ensure the player has a collider with the tag "Player."
Add the PlayerWeaponManager script to the player.
Create an empty GameObject (e.g., WeaponHolder) as a child of the player, and assign it in the weaponHolder field.
Customizable Features:
You can extend WeaponData with additional attributes like ammo, reload time, or special effects.
Enhance PlayerWeaponManager to switch between multiple weapons or add weapon dropping functionality.
This script allows you to create various weapon pickups with unique characteristics, promoting code reusability and easy weapon customization.
0 notes
Text
Week 2
This week I started developing the interaction system for the game, its currently really basic and it works by detecting if the player game object has touched the money game object. if it does, it simply deletes the money object and then outputs a debug.log.
Below I added a picture for demonstration.

0 notes
Note
on Start{
Debug.Log(" :0 ");
Debug.Log("你喜欢人渣反派自救系统吗?我忘了😭");
Debug.Log("using this to practice lol");
}
:0
你喜欢人渣反派自救系统吗?我忘了😭
using this to practice lol
你说中文吗?i’m learning :p
-@unity-real
是的
3 notes
·
View notes
Text
Start, Awake, Update and StartCoroutine in Unity.
In Unity, Coroutines leverage C#'s IEnumerator/yield syntax feature to easily let you write stepwise behaviors that execute over a longer amount of time/over multiple update cycles within just one method.
But when exactly do they get executed?
Of course, some of it is documented in their classic manual page: Order of Execution (2021.3)
But there's a strange thing I didn't really think of when I started using Coroutines so I thought I'd document it here.
When does the first step of a coroutine execute? And if I started a coroutine in Awake, and another in Start, would the code after yield null execute sequentially after the next Update?
The answer may not be what you expect.
Here's some code to test:
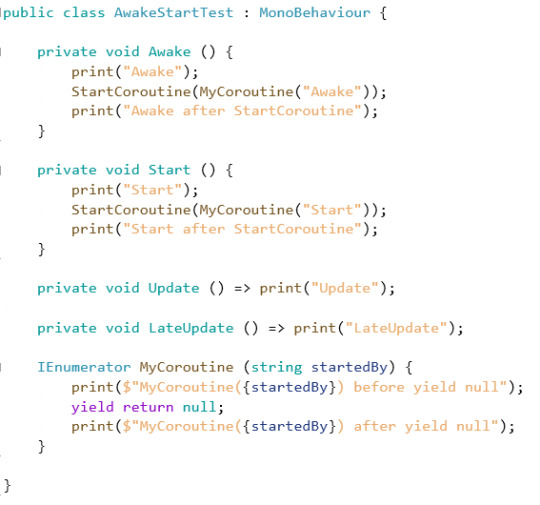
Stick it on a GameObject, run the scene and let's see what we got.
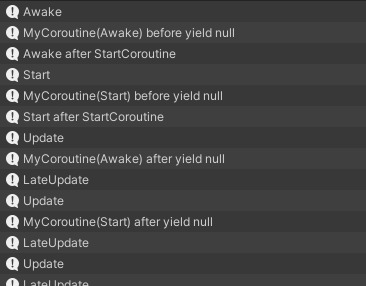
huh...
A few notable observations:
Stuff before the first yield null execute immediately as if they were where the StartCoroutine call is.
Using StartCoroutine in Start seems to make the first yield null skip one Update. This kind of makes practical sense, since the common intention of a yield return null is you want it to wait for one update. If it happened in the first update after Start, it would be as if it didn't wait at all.
So really, the thing to remember is: Stuff after the first yield null in Awake executes right after the first update. Stuff after the first yield null in Start executes right after the second update.
1 note
·
View note
Note
Opinion on public transit
public GameObject inbox;
public Inbox questions;
on Start{
questions = inbox.getComponent<question>;
if(question.question = "Opinion on public transit"){
Debug.Log("it's pretty silly!");
}
}
it's pretty silly!
3 notes
·
View notes
Text
Development - 13/03
Continuing on from the maze I had made a few days ago, I want to try adding rooms randomly about the place. I will also be continuing the player movement, as I have been meaning to do that for a bit:
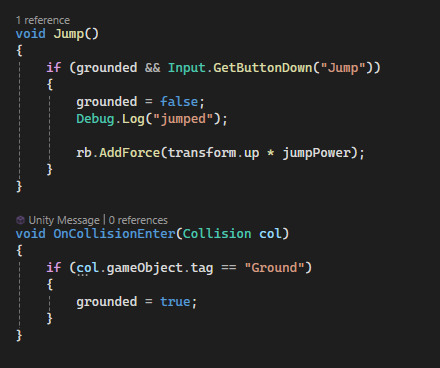
Starting off with the jumping mechanic, I simply look for new colliders which if they come under the tag "Ground" - I set the bool, grounded, to true. Then if I press the "jump" button, the player will grounded is set to false and I get a message in my console:

When I mention the jump button, I mean the key that the button "jump" is bound to in the project settings (I used this before when looking for the "Mouse X" and "Mouse Y"):

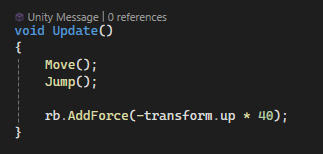
Now I just have to add a force whenever the two conditions are met:
And like that it is done, although something else I want to do is make the player a whole lot less floaty. There are two ways I can go about this, increasing the general gravity scale in the project settings or having a constant downwards force on the player.
I chose the latter as changing the gravity could mess things up for me later. The reason I'm using -transform.up instead of transform.down is because I find it easier and more simple:
Something I has also just realized is that if I set the smoothness of my materials to 1 (max) and turn off reflections, they absorb more light. For now I'm only doing this with the floor:

Here is a little showcase of the improved movement (sprinting, jumping and proper gravity):
Now for the rooms; I start by copy and pasting the maze cell prefab, removing the script and adding 2 extra walls to each side and hiding one of them. This is the 3x3 room:

Then I add a for loop that will be spawning the rooms in a random place within the grid based on the value 'roomCount'. This room can be placed anywhere as long as it is at least 3 cells away from the border. It has a 1/1 chance of spawning as it is easier to work with one room type before I have it all figured out:

So after trying it out, I got this as a result:
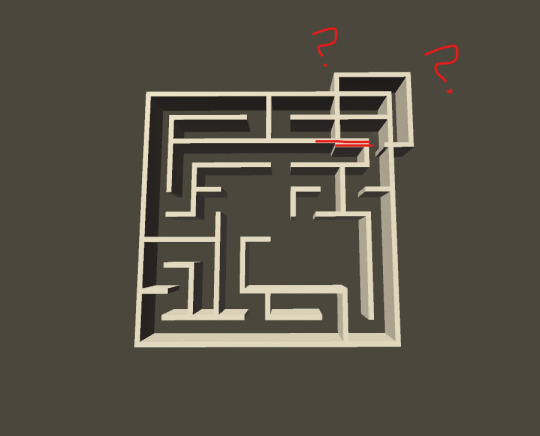
Not only is it not within the grid, but it is not even inline with the grid itself... Further inspecting this using Debug.Log to show me its position, something isn't right:

By dividing the desired position by the actual position gives me roughly 30 when doing it for both X and Z values:

So my first thought was multiplying the position by 30 to hopefully get it on the grid:

And this fixed both problems:
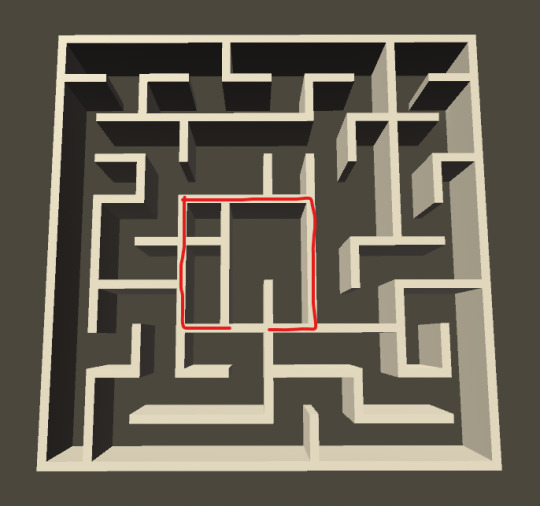
Lastly, I need the inside of the room to be empty. This shouldn't be too difficult to achieve as the rooms are placed before the maze is generated, so I just need to tell the maze what parts of the grid NOT to spawn on.
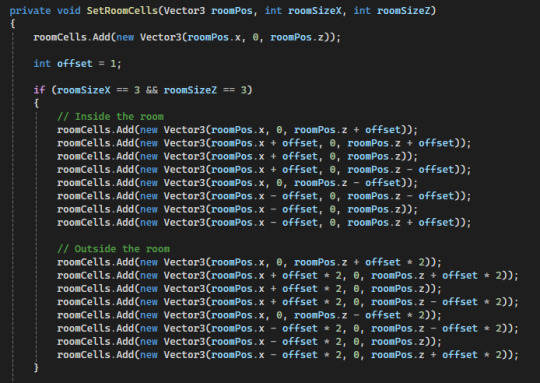
To do this, I made a function that takes the size of the room that's inputted and adds each cell within the room to a list (I'll go over this in the next post) then clearing it the same way I clear the random cells:

I'm using the variable "offset" to find these cells, as if I need to change the number, it'll be a whole lot easier changing the value of "offset" once, rather than changing a number 12 times.
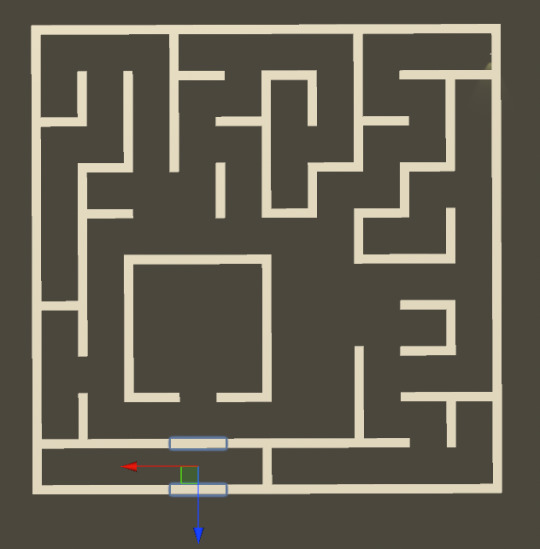
This works... but:
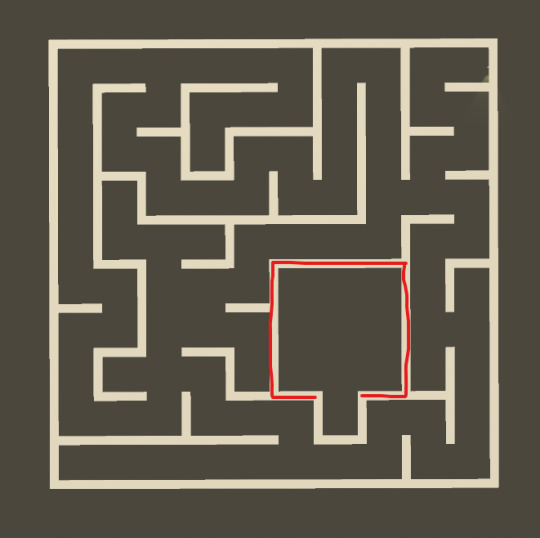
A simple fix would be adding the surrounding outside cells to the list as well:
Again, this works... but:

If I try to delete the cell that is not on the edge rather than delete both of them:

I get this, it seems like it doesn't like this use of the null value:

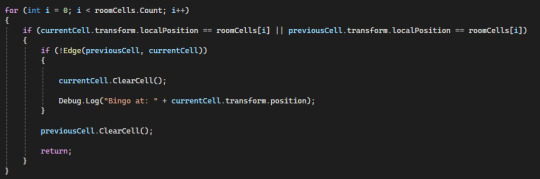
So I try to single out the cell that is on the edge for both previous and current cells and delete the one that isn't on the edge:

Now I see the problem! It's not the fact that it's the edge that's being deleted... its the fact that it's NOT being deleted:
So pretty much I have to delete walls based on what edge the cell is on.
I can do this by separating some of the conditions to see whether it is on the edge and giving that it's own value.
Afterwards I get said value and delete a certain wall:
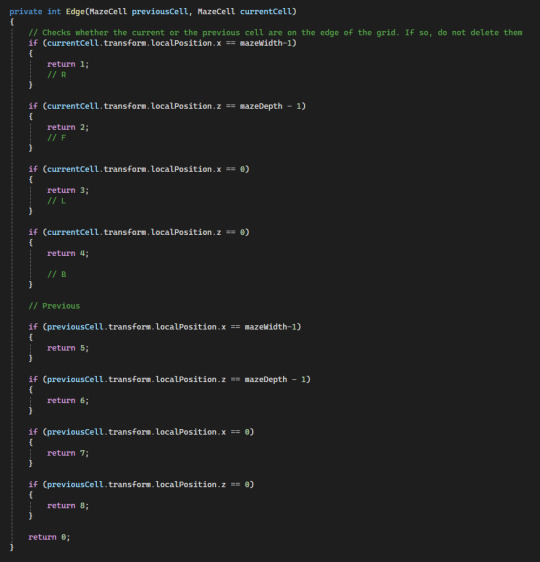

And now it works perfectly!

1 note
·
View note
Text
Started vault hunters, and I was inspired by @theminecraftbee to write out some vault logs to keep me playing! (Because I am so lost. I have no idea what to do in the slightest) (if you don't want to be tagged just let me know!)
Buckle in for the back half of completely unexplained oc/persona lore. I'm writing it as if it's an audio log so I'm going to try and style it like auto-generated captions!
The littlest bit of context: This Scopop (5C0) is a robot built to imitate the actual Scopop, who died a couple hundred years prior to this audio log. Due to an accident, 5C0 recently reactivated and found himself server hopping with increasingly large gaps in his memory and a sense of dread about his identity he can't seem to shake
SERVER LOG - ENTRY 0001
-
MODEL 5C0 - REBOOT INITIATED
MODEM CONNECTION SEARCH INITIATED:
| MODEM IS DISCONNECTED. PREPARING TO PROCESS MULTIPLE RESTART ATTEMPTS |
MODEM DISCONNECT - MODEM DISCONNECT - MODEM DISCONNECT - MODEM DISCONNECT - MODEM CONNECTION FOUND. PREPARING TO CONNECT.
deBug.Log("Connection Found! Preparing To Enter Server!");
CONNECTED - PRIMARY MOBILITY=> BEGIN ACTIVATION - SECONDARY MOBILITY=> BEGIN ACTIVATION - OPTICAL UNITS => BEGIN ACTIVATION - INTERNAL TEMPERATURE SELF REGULATION=> BEGIN ACTIVATION - PROCESSING AND MEMORY STORAGE => BEGIN ACTIVATION
CODE REALIGNMENT COMPLETED, ALL ACTIVATION SEQUENCES PROCESSED
-
-
---
SERVER LOG - ENTRY 0002
0002
00:00 ●──────────────── 4:34
⇆ ◁ㅤㅤ❚❚ㅤㅤ▷
( THE FOLLOWING IS TRANSCRIBED FROM AUDIO RECORDING "0002" WITHIN THE PLAYER-SERVER-LOG SYSTEM )
Okay... Uh, do I know how... Yeah... (Shuffling) And there we go! We are recording! Here I am, your wonderful host, and this... Is the server!
Oh.
We aren't recording video. Awesome. Okay. Uh. Remember to edit this part out later. Actually I'm just going to... Yeah I'm gonna stop it and try again. Give me a sec.
...
We're back up! Okay, log entry número uno. Okay. Uh... Sorry, I'm trying to think of what I want to, I don't know, log.
Oh! It seems like before I got access- well, technically- the server was just recording my activation sequences. That was actually número uno. I'll try and wipe it later since there's about a billion pages of shit. You know, new server, code realignment and all that. First time doing it as- first time in a while I've server hopped, but feelings still the same I think. Nothing like the warm welcome of passing out and falling flat on your face at spawn. And, uh, speaking of the server, I have approximately zero idea where I am! That's a good thing to note. Absolutely no clue. Nothing except the book at spawn tells me where I got dumped, and even that's just a server name. 'Vault Hunters'. Or a pack name? It doesn't seem like a server, really. I think I'm completely alone.
Lots of new stuff here. Biomes, animals... Ores mostly. Almost made me have another system shutdown because I couldn't turn it back to manual when it was freaking out. Got pockets full of it now, and a nice little house going. Nothing with the mods. I don't know if I could deal with any of that stuff. (laughter) ... (Sigh) The only thing I'm missing is a roof, because I can't find enough copper. Admin knows you need help when you're getting drenched and the thing you're desperately wishing for is copper.
...This, uh, server seems to have completely rewired- Changed my code from the last one, though, so I do have to find things to eat. Er- yeah. Not so bad, I've already started up a wheat farm, and there's tons of sheep around here. Something about that last bit feels weird, but everything feels weird and if I knew why I would've already fixed it. Not like I know much of anything at this point.
(Sharp exhale) Okay, uh, no more melodramatics. I'm already talking to myself in an empty house, let's not make it any worse. I'm... gonna start digging though my chests. Get a basic inventory of everything I've got, and type it under this if I think anything seems important. Also a goal- Try and download some info about this server so I'm not completely in the dark. Before that, though, I have to fix my interface from when that creeper blew right the fuck up in my face. Respawn didn't want to fix that one. I guess because it's more of a mechanical or aesthetic problem than a functional one. But it still sucks. I had to loot my own corpse, by the way. Which was awesome. Glad this server lets you see your own dead body on the ground and makes you pick up your stuff from it. Not existential crisis inducing at all. But yeah- back on track.
Here's my list of goals. Uno, sort my stuff, find what I think is important. Dos, read the book I got at spawn over a couple more times. Doesn't help because it's more like a glossary than anything but maybe it'll finally get through my thick skull. (Metallic clang) (sharp inhale). Right. Uh. Tres, fix my interface and download the crafting recipes at least. Give me some idea of what's happening here.
(Shuffling) (Chair briefly drawing across the floor)
Alright. Goodnight Chicago, thank you for tuning in to the podcast. I'll catch you next episode. And next episode is when anything important happens or I figure something out. And Chicago is me in the future listening to this. Hi me. Anyway. Ending it now. Goodb-
( END OF TRANSCRIPT )
USER INPUT:
List of important things: dimensional crystal (o smth close to that i forgot), 2 dias. Nothing else seems important. Check back later. i keep finding vases in the caves n they might have smth cool
( PLAYER-SERVER-LOG 0002 END )
I'll get into actual vault hunters stuff in the next one, I just wanted to have fun with this one, setting it up and seeing how I would want to write it!
#honestly this is just for me to get back into writing stuff in an easy way and fun style#i know its long- i promise no one who sees this is required to read it#also sorry if the writing style is really weird#im trying to make it seem more like a transcribed audio log than a journal#it might work and it might not ill change it later if I dont like it#sco drabble
28 notes
·
View notes
Text
Fixing a bug
After a while banging my head against a bug - the dreaded NullReferenceException - I went back to best practices:
1) Think about what the bug means.
NullReferenceException means something in the program is trying to get/present info from somewhere else and the place it’s talking about straight-up has no info in it or doesn’t exist.
The most common place where this comes up in Unity is when you’re using their convenient drag-and-drop system to make references to gameObjects and you miss one of the “slots” you’ve made for yourself and leave it empty. Now your code is trying to manipulate a gameObject but nothing’s there.
Sadly, this bit didn’t solve my problem. I couldn’t find any empty slots and it really did look like the variables the system was calling bad were set up properly.
2) See whether the bug tagging was accurate.
For errors involving not having your {} lined up or not having a ; somewhere, the error messages can be wildly inaccurate about where the mistake actually happened. So I commented out the bit it was complaining about and ran the program again.
For those who don’t know coding stuff, if you type // before a line of code that bit won’t be part of the actual code the computer tries to compile. Programmers use this to leave themselves/each other comments about what bits of their code do. You can also use them to temporarily turn a line of code into a comment instead of deleting it, so that you can put it back in (delete the //) easily. When you’re changing a bunch of code you can “comment out” entire blocks of your code to keep them preserved as an easy backup if your new plan falls apart. That’s what “commenting out” means.
The error message disappeared. Okay. So it really was throwing a fit about that specific line of code.
3) Get More Specific.
My code was saying “thingOne = thingTwo” and it was throwing an error. So was the problem in thingOne, in thingTwo, or somehow in the relationship between the two of them?
For this I used Debug.Log, which lets you write little messages to yourself. With the line of code still commented out, I wrote a line of “Debug.Log(thingOne);” and tested that. It worked fine. I wrote a line of “Debug.Log(thingTwo);” and tested that. It broke.
So thingTwo was the problem. (Obviously these weren’t actually named thingOne and thingTwo. The variable names have been changed to protect the innocent)
4) Finally, I changed how I was getting access to thingTwo. Honestly I still don’t see why the way I had it before was a problem, but the new way is more direct so it’s probably more stable going forward anyway. I tested the Debug.Log again and it worked, so I uncommented the line I’d commented out, changing the language for how I was getting to thingTwo to match what I’d fixed, and at long last that got rid of the bug.
As huge as all the description is, once I got going on this “best practices” plan I bet the whole thing only took a couple minutes. And it got me out of a problem I’d been banging my head against for upwards of an hour. And that’s why they call ‘em Best Practices. Because they’re better than the other practices.
2 notes
·
View notes
Text
Project Blog 10: Getting the game ready for testing: The gameplay build
The next stage of developing the game involved getting it ready for wider testing:
This involved creating a pause screen that could edit the parameters of the game which would then be saved, and could be re-edited. As well as creating the test paper and the sliders and buttons people would test with.
First I needed to decide what variables I wanted to test and was unsure about, and wanted feedback on. I needed to create new functionality to alter certain variables and create new ones for the game to interact with. I also created some new gameplay mechanics/ styles for the purposes of testing and comparison.
First order of business was adding a pause screen. I was initially panicked at this prospect because I hadnt planned for this and was worried my audio intensive game that hadn’t been designed with this in mind would struggle to have everything sync up. It turned out to be surprisingly easy!
Following the info here: https://gamedevbeginner.com/the-right-way-to-pause-the-game-in-unity/
Simply changing the time scale to 0 stopped all game activity. No variables mechanics were running outside of time.deltatime. Those that didnt use it were being updated in update in a way which still worked.
I created a pause canvas ui which displayed over the whole of the screen when the game was paused on key press, and wrote instructions for the game’s controls on the pause menu.
The resource for the player was still regenerating while paused so I rewrote the meter to run on time.deltatime this also had the benefit of making the variables used to control it more legible to me, so that I could see the meter for player inactivity would last 6 seconds. -A relatively long time as I wanted the play experience to be somewhat relaxed and approachable. I also thought players might be able to change its duration but I ended up not testing for this as I felt there was already too much being tested and it did not fit into the other variables I was testing.
I also changed the music tracks from the more synth and strings oriented temporary ones to a more pleasing and cohesive generic rock output. These too were made in soundation. While I intended for the game to be closely tied to desert rock, I was limited on time and my own emotional resources in composing new music. I felt that composing something quicker that was close to my original intent and theming was the best use of my time, without going on a massive tanget, recording my playing. Finding stoner rock samples is not easy. The set I used in soundation from the ‘arena rock’ collection was more accessible and a better match than the previous audio track.
Next I changed the dash so that dashing while in the inactive state deleted enemies without triggering them. This let people clear the field and once again collect themselves while maintaining a ‘rest’ period in the music track. There was some trouble in checking for the player when dashing as the way I stopped triggering sound obejct was to turn the players trigger to ‘off’. Making it so that the player had acces to the spawner allowed me to get the location of the sound agent to call the spawn particles function, spawning the particle prefab on the sound agents position, By calling the function onCollisionStay, instead of onCollisionEnter
```
void OnCollisionStay(Collision collision) { if (dashing && !active) { //if (collision.gameObject.name != "Player") //{ spawnController.SpawnParticles(collision.gameObject.transform.position); Destroy(collision.gameObject); Debug.Log("Destroyed : " + collision.gameObject.name); //} }
}
```
I could check for the player dashing while also satisfying the inactive state. the check only occured on collision stay instead of all the time so it did require too many additional processes, thought I see it could have been optimised further.
Using the default Unity Slider ui I added sliders for the spawn rate: the time added on to each spawn interval. this was changed to ‘spawn delay’ as raising this value increased the time between spawns unlike the implications of ’spawn rate’ where you might think being high would make it so spawning happened more often.
I also added ‘spawn variance’ to control the random range that the spawn interval was affected by, this was added on to the spawn delay.
In this way you could make the game consistently spawn stuff with 0 variance/ randomness. Or make it less consistent. A spawn variance of 10 would have longer pauses, but also sometimes shorter ones, but this was always added on as time to the interval, which was a major limitation of this spawn system.
‘Spawn change’ originally called ‘spawn coefficient ‘, changed the coefficient of the calc adjustment value described in a previous post. Explaining this algortihm was seen as unnecessary to testers and coefficient too confusing so it was left as the vague: spawn change.
The next variable people were able to choose initially by ticking one of two boxes that switched on and off and later to a drop down menu that implied a discrete chocie between one of two options was inverting the player inactive state behaviour. This would invert the default state to be the inative one and the right click limited resource meter state to be the active one. I wanted to see whether people prefered this more active play style which I felt was more like the activity of playing music in some ways because rest is easier than playing an instrument; it is an active choice. I know this game is abstracted and I prefered the first original behaviour myself but I was curious what peoples reactions would be. I wonder if it would be biased by the defaults.
Also fixed a bug where dashing while inactive didnt change the sound agent count which would mess with the calc adjustment function. Essentially increasing time between spawns as the player deleted enemies while dashing while inactive even though there were lesss enemies on screen.
Recognising that the way the current enemy movement worked was based on transform, somewhat inelegant, and sound agents could be launched offscreen I added boundaries to delete sound agents pushed offscreen and removing them from the total count. Also let people edit the sound agent speed. And let people choose between the transform and velocity based sound agent movement. This is a very subtle change, and velocity may be more consistent but without further editing so that it could be psuhed by the player, the transform method of movement allowed the player to bunt enemies away while inactive. Which I thought was fun, but so was having enemies cling to you like a mish pit in some ways. I left the choice up to testing.
1 note
·
View note
Text
Debug.log("lolol ok boomer");

7 notes
·
View notes
Text
Unity 2018 and PlayerLoop
Introduction
This is a repost of a blog post I made on my old website, pretty much all of this information still applies in 2020!
Before Unity 5.X (specifically 5.0), control over the application lifecycle was basically nonexistent. For application startup/initialization code you could’ve created a script that was sorted earliest in the Script Execution Order window and used Awake, but you would’ve ran into issues. An object with that script would need to exist in any scene that required that initialization code to run, a state that is really difficult to maintain while in the editor. It’s too easy to forget that object needs to be around, and that functionality needs to be explained to other developers working on the project.
With Unity 5.0 we were provided RuntimeInitializeOnLoad, an attribute placed on a static function which is then executed automatically at runtime consistently. Its a foolproof way of ensuring that some code always executes, regardless of scene setup. In 5.2 an optional argument in form of the RuntimeInitializeLoadType enum was added, allowing developers to decide if the marked function should execute before or after the initial scene is loaded (before the Awake message is sent). With this single feature it suddenly became viable to use Unity without scenes, slightly closer to using a game framework, such as MonoGame.
However, the systems that are updated each frame (some more often) were still out of reach. These systems are otherwise known as the main/game update loop. Systems could not be disabled for performance, reordered for preference, and, most importantly, new arbitrary systems could not be added into the update loop. Of course you could always use functions like Update, FixedUpdate and LateUpdate to hook into the built in update systems, but these always occurred inbetween Unity’s internal systems, beyond user control.
With Unity 2018.1, the PlayerLoop and PlayerLoopSystem classes and the UnityEngine.Experimental.PlayerLoop namespace have been introduced, allowing users to remove and reorder engine update systems, as well as implement custom systems.
The Default PlayerLoop
The first step to understanding the PlayerLoop is to find a way of viewing what the out-of-the-box loop is actually made of. You can get the default loop thusly:
PlayerLoopSystem loop = PlayerLoop.GetDefaultPlayerLoop()
PlayerLoopSystem is a struct that is organized in a recursive, tree-like structure. From this object you can get some information about the system:
type: For default systems this is a System.Type object that acts as a representation of what update system this is. These types are only used as identifiers, and don’t actually contain anything. For example, the type of the PlayerLoopSystem responsible for updating AI is UnityEngine.Experimental.PlayerLoop.AIUpdate. We’ll use this field later to search for built-in types from the default player loop. This field is mostly useless for custom systems, except for its use as a label for the system in the Profiler.
subSystemList: As previously stated, PlayerLoopSystem is a recursive structure, so this is an array of all of the PlayerLoopSystems underneath this system. Traversing this array recursively will let us inspect the default loop.
updateFunction: For default systems this is a pointer to the native-side function that is executed for this update system. This field is unused for custom systems.
updateDelegate: This is a C# delegate that is primarily used for custom systems. However, it seems that it is possible to use this to add a callback to default systems as well. When we implement a custom system this is where all the work will happen.
loopConditionFunction: For default systems this is a pointer to a native-side function that is executed to check if this system and all of the systems below it should be executed. This field is unused for custom systems.
The system returned by GetDefaultPlayerLoop() is somewhat bogus. The only field that has a value is subSystemList. This is because this system is used as a “root node”, which every recursive structure requires. It’s fairly trivial to write a quick recursive function to pretty-print the contents of the default loop:
[RuntimeInitializeOnLoadMethod] private static void AppStart() { var def = PlayerLoop.GetDefaultPlayerLoop(); var sb = new StringBuilder(); RecursivePlayerLoopPrint(def, sb, 0); Debug.Log(sb.ToString()); } private static void RecursivePlayerLoopPrint(PlayerLoopSystem def, StringBuilder sb, int depth) { if (depth == 0) { sb.AppendLine("ROOT NODE"); } else if (def.type != null) { for (int i = 0; i < depth; i++) { sb.Append("\t"); } sb.AppendLine(def.type.Name); } if (def.subSystemList != null) { depth++; foreach (var s in def.subSystemList) { RecursivePlayerLoopPrint(s, sb, depth); } depth--; } }
Running this gives us a pretty large tree of systems:
ROOT NODE Initialization PlayerUpdateTime AsyncUploadTimeSlicedUpdate SynchronizeInputs SynchronizeState XREarlyUpdate EarlyUpdate PollPlayerConnection ProfilerStartFrame GpuTimestamp UnityConnectClientUpdate CloudWebServicesUpdate UnityWebRequestUpdate ExecuteMainThreadJobs ProcessMouseInWindow ClearIntermediateRenderers ClearLines PresentBeforeUpdate ResetFrameStatsAfterPresent UpdateAllUnityWebStreams UpdateAsyncReadbackManager UpdateTextureStreamingManager UpdatePreloading RendererNotifyInvisible PlayerCleanupCachedData UpdateMainGameViewRect UpdateCanvasRectTransform UpdateInputManager ProcessRemoteInput XRUpdate TangoUpdate ScriptRunDelayedStartupFrame UpdateKinect DeliverIosPlatformEvents DispatchEventQueueEvents DirectorSampleTime PhysicsResetInterpolatedTransformPosition NewInputBeginFrame SpriteAtlasManagerUpdate PerformanceAnalyticsUpdate FixedUpdate ClearLines NewInputEndFixedUpdate DirectorFixedSampleTime AudioFixedUpdate ScriptRunBehaviourFixedUpdate DirectorFixedUpdate LegacyFixedAnimationUpdate XRFixedUpdate PhysicsFixedUpdate Physics2DFixedUpdate DirectorFixedUpdatePostPhysics ScriptRunDelayedFixedFrameRate ScriptRunDelayedTasks NewInputBeginFixedUpdate PreUpdate PhysicsUpdate Physics2DUpdate CheckTexFieldInput IMGUISendQueuedEvents NewInputUpdate SendMouseEvents AIUpdate WindUpdate UpdateVideo Update ScriptRunBehaviourUpdate ScriptRunDelayedDynamicFrameRate DirectorUpdate PreLateUpdate AIUpdatePostScript DirectorUpdateAnimationBegin LegacyAnimationUpdate DirectorUpdateAnimationEnd DirectorDeferredEvaluate UpdateNetworkManager UpdateMasterServerInterface UNetUpdate EndGraphicsJobsLate ParticleSystemBeginUpdateAll ScriptRunBehaviourLateUpdate ConstraintManagerUpdate PostLateUpdate PlayerSendFrameStarted DirectorLateUpdate ScriptRunDelayedDynamicFrameRate PhysicsSkinnedClothBeginUpdate UpdateCanvasRectTransform PlayerUpdateCanvases UpdateAudio ParticlesLegacyUpdateAllParticleSystems ParticleSystemEndUpdateAll UpdateCustomRenderTextures UpdateAllRenderers EnlightenRuntimeUpdate UpdateAllSkinnedMeshes ProcessWebSendMessages SortingGroupsUpdate UpdateVideoTextures UpdateVideo DirectorRenderImage PlayerEmitCanvasGeometry PhysicsSkinnedClothFinishUpdate FinishFrameRendering BatchModeUpdate PlayerSendFrameComplete UpdateCaptureScreenshot PresentAfterDraw ClearImmediateRenderers PlayerSendFramePostPresent UpdateResolution InputEndFrame TriggerEndOfFrameCallbacks GUIClearEvents ShaderHandleErrors ResetInputAxis ThreadedLoadingDebug ProfilerSynchronizeStats MemoryFrameMaintenance ExecuteGameCenterCallbacks ProfilerEndFrame
A Simple Custom PlayerLoopSystem
Creating a complete replacement system is quite easy:
[RuntimeInitializeOnLoadMethod] private static void AppStart() { var systemRoot = new PlayerLoopSystem(); systemRoot.subSystemList = new PlayerLoopSystem[] { new PlayerLoopSystem() { updateDelegate = CustomUpdate, type = typeof(PlayerLoopTest) } }; PlayerLoop.SetPlayerLoop(systemRoot); } private static void CustomUpdate() { Debug.Log("Custom update running!"); }
A few things to take notice of: It seems that root system execution is completely ignored. If you specify a value for updateDelegate on the root system it will not be executed. This is why we need to define a root node and place our system underneath. Also note that this is a complete replacement. None of the default systems are running here. If you place a dynamic physics object in the scene it won’t move. The values in the Time class won’t be updated, and neither will input. Clearly, the default player loop is extremely sensitive to changes.
Borrowing Default Systems
Just for fun, why don’t we add one default system back into the mix? We can once again use recursion to find a default system by type and include it in our subsystem list:
[RuntimeInitializeOnLoadMethod] private static void AppStart() { var defaultSystems = PlayerLoop.GetDefaultPlayerLoop(); var physicsFixedUpdateSystem = FindSubSystem<FixedUpdate.PhysicsFixedUpdate>(defaultSystems); var systemRoot = new PlayerLoopSystem(); systemRoot.subSystemList = new PlayerLoopSystem[] { physicsFixedUpdateSystem, new PlayerLoopSystem() { updateDelegate = CustomUpdate, type = typeof(PlayerLoopTest) }, }; PlayerLoop.SetPlayerLoop(systemRoot); } private static void CustomUpdate() { Debug.Log("Custom update running!"); } private static PlayerLoopSystem FindSubSystem<T>(PlayerLoopSystem def) { if (def.type == typeof(T)) { return def; } if (def.subSystemList != null) { foreach (var s in def.subSystemList) { var system = FindSubSystem(s, type); if (system.type == typeof(T)) { return system; } } } return default(PlayerLoopSystem); }
There’s more efficiency to be gained here if we’re looking for multiple systems by type, but this works for now. You’ll notice that this creates incorrect behavior; physics forces are way too powerful! That’s because we’re updating physics on a framerate dependent update loop instead of on a fixed time update loop. The FixedUpdate PlayerLoopSystem handles timing and using correct delta times for all of the subsystems beneath it, which we aren’t doing here. Fixing this would be both daunting and freeing; you could implement your own timestep! We won’t be covering that here, though.
Replacing a Default System
You may have read the 10000 Update() calls article on the official Unity blog. In this article the author discusses implementing a managed-side custom update loop as a replacement for the Update call. We can do this better by actually replacing the default Update call, which was printed in our list as Update.ScriptRunBehaviourUpdate. We can modify our previous function to replace the system we found by type with our own system, maintaining the execution order. However, PlayerLoopSystem is a struct, and will be passed by value into our function. In order to modify what we pass in, we’ll use the ref keyword:
[RuntimeInitializeOnLoadMethod] private static void AppStart() { var defaultSystems = PlayerLoop.GetDefaultPlayerLoop(); var customUpdate = new PlayerLoopSystem() { updateDelegate = CustomUpdate, type = typeof(PlayerLoopTest) }; ReplaceSystem<Update.ScriptRunBehaviourUpdate>(ref defaultSystems, customUpdate); PlayerLoop.SetPlayerLoop(defaultSystems); } private static void CustomUpdate() { Debug.Log("Custom update running!"); } private static bool ReplaceSystem<T>(ref PlayerLoopSystem system, PlayerLoopSystem replacement) { if (system.type == typeof(T)) { system = replacement; return true; } if (system.subSystemList != null) { for (var i = 0; i < system.subSystemList.Length; i++) { if (ReplaceSystem(system.subSystemList[i], replacement, toReplace)) { return true; } } } return false; }
If you create a new script with an Update() call and add it to an object in your scene, you’ll notice it won’t be called anymore. Note that this example doesn’t cover the other required steps to actually replace all of the functionality of Update(), such as creating an object management system to add and remove updatable objects from a global collection and calling update functions on them. The ideal implementation would probably use an IUpdatable interface to allow nearly any object to be included in the custom update loop (and eliminate the need for “magic methods”).
…And More
There’s certainly more to be experimented with this wonderful new access to the low level systems that literally makes Unity tick. Hopefully this post gives you a good head start to shaping Unity to fit your needs. A few quick ideas as to interesting additions that you can try to add as utility API:
Inserting systems. Some modifications to the replacement example could allow you to insert a system into a subsystem array instead of replacing it.
Explore different ways of disabling systems temporarily. If your game is in a pause menu you don’t need AI updates running!
Create a visualizer. This could be in-game or in-editor. The Profiler does list every system using the PlayerLoopSystem type field as a label, but knowing in a debug build what systems are currently enabled could be very beneficial when doing heavy customization to the default PlayerLoop.
High performance update loops. This could be used for mobile games that don’t need systems like physics, AI or XR.
Let me know what you think on Twitter or Reddit about this new API, how you might use it for your games, and what else you’re looking for in the Unity application lifecycle.
3 notes
·
View notes