#deploy node js api for free
Explore tagged Tumblr posts
Visit Tumblr Blog
Explore Tumblr blogs with no restrictions, modern design and the best experience.
Last Seen Tumblr Blogs


Fun Fact
Tumblr.com is the 103rd most visited website in the world.
Text
Master Google Cloud: Deploying Node JS APIs on VM
Full Video Link - https://youtu.be/gxZ-iJNCbAM Check out this new video on the CodeOneDigest YouTube channel! Learn how to create Virtual Machine in Google Cloud Platform, Setup Google Compute Engine VM & Deploy run JS APIs in VM. #codeonedigest
In this tutorial, we will create & setup Google Compute Engine Virtual Machine in Google Cloud Platform. We will be deploying & running javascript APIs in google compute engine virtual machine. We will be opening firewall port for incoming API request in VM. We will also learn how to deploy API code and run API service in google compute engine virtual machine. I will provide step by step guide to…

View On WordPress
#compute engine#deploy api for free#deploy api in google cloud#deploy node js api#deploy node js api for free#deploy node js application#deploy node js project on server#gcp compute engine interview questions#gcp google cloud platform#google cloud creating a virtual machine#google cloud platform#google cloud platform tutorial#google compute engine#virtual machine setup
0 notes
Text
What is Express.js? A Comprehensive Guide to Beginners

Let’s start with web development.
When we talk about web development, we are basically essentially talking about the front-end and back-end (also referred to as server-side). Express is a backend development Nodejs framework.
What is a Nodejs Framework?
This section is for those who are not familiar with frameworks. If you already know what a framework is, please feel free to skip ahead.
Writing an application from scratch is time-consuming and tedious, especially in today’s fast-paced world, and initial setup may involve a lot of boilerplate code, such as setting up ports and defining route handlers; frameworks help to save time and effort by providing a pre-built set of tools and libraries that can be used to quickly and easily create a web application. This can free up developers to focus on the things that matter most — writing logic and advanced functionalities.
What is Express js?
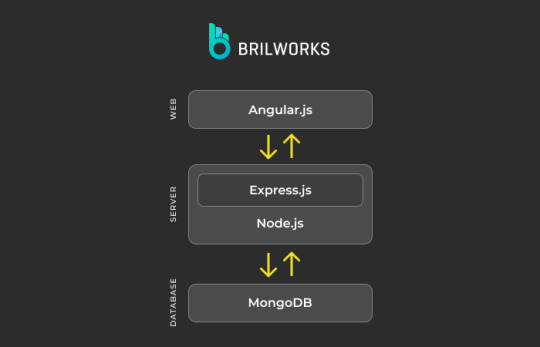
The image shows how a tech stack contributes to complete web development. For instance, when it comes to data storage, a Database (e.g., MongoDB) is required, and for writing the front end, various frameworks exist today, such as Angular.js.(in MEAN stack).
Similarly, you need to use a backend-specific language or framework for the backend. Some popular backend languages include Python, Java, JavaScript (Node.js), and PHP, while Django, Express.js, and Flask are some of the popular backend frameworks.
If you want to use JavaScript in the backend, you typically need to use the Node.js runtime environment. Node.js allows you to run JavaScript code outside of a web browser, which makes it possible to use JavaScript for both the front end and back end of a web application.
On top of Nodejs, several frameworks have been created, among which is Express. More precisely, it is a layer built around Node.js that significantly simplifies the process of working within the Node.js environment and reduces development complexity.
Express is an open-source web application framework for Node.js. It provides a robust set of features for building web and mobile applications, including routing, middleware, template engines, seamless database integration, and a wealth of features for developing advanced features and functions.
Note: In this article, when we refer to web applications with Express, we are explicitly referring to the development of “back-end services or APIs.”
Features of Express
1. An array of pre-built tools
The framework includes an array of tools for web applications, routing, and middleware for building and deploying large-scale, enterprise-ready applications.
2. Node package manager
It comes up with a Node package manager and a command-line interface(CLI), allowing you to create project structures, generate routes, controllers, and other components, as well as manage dependencies and configuration settings.
3. Middleware
Middleware in Express is used as snippets of code that intercept requests and responses, manage errors, and perform various other tasks, helping you to perform actions like validation, logging, and authentication in a reusable and modular way.
4. Routing
ExpressJS offers developers a straightforward routing system that simplifies the handling of HTTP requests. In addition, it allows you to define your own special paths and rules for these requests.
Applications of Expressjs
It is termed as a versatile framework that developers employ for constructing APIs, single page and real-time applications, microservices, proxy servers, CMSs, backend for mobile applications, authentication, authorization mechanisms, and many more services. Below is a list of the application you can build using Express js.
1. APIs for Single Page Application
Single-page applications (SPAs) are a popular type of web application that loads all of the content for the page in one go. This means that the user does not have to wait for the page to reload when they interact with it, which can provide a smoother and more responsive experience.
Some popular examples of SPAs include Gmail, Google Maps, and Spotify. These apps are able to provide a great user experience because they only need to load the content once, and then they can dynamically update the content based on the user’s actions. This makes for a very fluid and interactive experience. Express is used for developing back-end services, or APIs, for single-page applications to fetch data.
2. Real-time applications
Real-time applications are increasingly popular as they allow users to interact with each other in real time. Some popular examples of real-time applications include multiplayer games, chat apps, and collaboration tools. Express is used in developing real-time applications.
It helps you build the basic structure, like handling web pages and buttons, and when you want your website to instantly update without needing to refresh the page, Express.js and socket.io can work together.
Express.js can take care of the regular stuff your website needs, like showing pages and handling regular requests. While WebSockets enables real-time data exchange between the server and clients.
3. Streaming applications
Streaming applications are becoming increasingly popular as they allow users to watch movies, TV shows, and other content on demand. Some popular examples of streaming applications include Netflix, Hulu, and Disney+.
You can leverage Express in streaming applications for a variety of tasks, including handling requests, serving media files, developing authentication and authorization modules, implementing search and recommendations, and many more functionalities.
4. Fintech application
Some popular fintech applications that are built with Express.js include Robinhood, Coinbase, and PayPal. Leveraging the robust functionalities of Express.js, these applications efficiently manage intricate financial transactions.
5. APIs
APIs are software intermediaries that allow different systems to communicate with each other. They are widely utilized by different systems for integrating payment gateways, social media integrations, and e-commerce integrations. Brillworks has developed a suite of APIs and applications for the business consulting and media preservation industries, which includes critical functions such as company setup, visa services, corporate services, file management, customer portal, CMS portal, bulk upload, etc.
Read more: https://www.brilworks.com/blog/what-is-express-js-comprehensive-guide-to-beginners/
0 notes
Text
Everything You Need To Know About Nodejs!
Node.js is one of the most widely used technologies for creating scalable and efficient REST APIs nowadays. It’s also used to create hybrid mobile apps, desktop apps, and even Internet of Things applications.
Web applications were created using a client/server architecture, in which the client requested resources from the server, and the server responded with the requested resources. The server only answered when the client requested it, and after each response, the connection was closed.
Because each request to the server requires time and resources, this approach is efficient (memory, CPU, etc.). The server must finish the previous request before responding to the following one. So the server only deals with one request at a time? Well, not quite; when the server receives a new request, it is handled by a thread that is generated when you Hire Node js App Developer.
Assume you’re creating an internet store with the help of a Nodejs Development Services Provider, and you’ll need a page where users can see all of your items.
The visitor visits http://yourstore.com/products, and the server generates an HTML file that contains all of your items from the database. Isn’t it straightforward? But what occurs behind the scenes?
When a user accesses /products, a certain method or function must be run to respond to the request. Thus a little piece of code (either yours or the framework’s) parses the requested URL and looks for the appropriate method or function. The thread is up and running.
Important features of NodeJS
Free and Open Source Software
Node.js is an open-source framework with an MIT license that has a large community behind it. Its active community has contributed to the addition of new features to Node.js apps.
Simple and quick
Because Node.js is based on Google Chrome’s V8 JavaScript Engine, its libraries can execute code quickly. You must look for the best Nodejs App Development Consultant to offer you the right help for a better growth/
Asynchronous
Node.js libraries are all asynchronous, which means that Node. js-based servers never wait for an API to respond before moving on to the next one.
Exceptional scalability
Node.js is very scalable and helps the server respond in a non-blocking manner thanks to its event system.
Single-Threaded
Node.js is able to follow the single-threaded approach thanks to event looping. This allows a single application to handle a large number of queries.
There will be no buffering.
One of the most important features of Node.js applications is that no data is ever buffered. Node.js may be quickly created and deployed on a variety of platforms, including Windows, Mac OS X, and Linux.
Advantages
Even though Node.js operates on a single thread with event looping, it can handle more requests than, say, the Apache HTTP server due to its asynchronous non-blocking manner of handling code execution. The API calls do not block the other requests because they do not wait. It can handle many requests at once.
It employs Google Chrome’s V8 JavaScript Engine, which speeds up the execution of javascript code. It is possible to create extremely scalable networked programs using Node.js’ event system.
You’ll be able to code in the same language on both the server and front ends. In most of our projects, we’re all used to employing various programming languages. Even so, maintaining server-side and front-end code in the same language may save you a lot of time when it comes to debugging.
The event loop manages real-time communication without consuming a lot of memory. This allows developers to focus on the app’s functionality rather than worrying about the app becoming clogged with too many requests.
Disadvantages
Because Node.js is single-threaded, it eliminates the need to worry about thread synchronization or shared mutable state. However, unlike preemptive concurrency, it also implies that programmers must chose how to handle concurrency, with the default being no concurrency at all.
Because it’s entirely asynchronous by default, you’ll probably wind up with a lot of nested callbacks. Of course, this is a JavaScript issue rather than a Node.js one, and there are workarounds.
The majority of the core libraries are quite reliable, and you can rely on them to perform as expected. However, the ecology as a whole is still developing. It’s also tough to judge the quality of a module because there aren’t many features for assuring the quality of JavaScript code.
It doesn’t function well with jobs that need a lot of processing power. Node.js is better suited for I/O tasks, such as the web server.
There aren’t enough libraries. Things like these are either still in the works or brand-new and largely untested because JavaScript hasn’t yet experienced years of popularity on the server side.
Node.js isn’t simply for web development anymore.
We already know that Node.js is adaptable. However, it’s crucial to remember that because of its versatility, it may be utilised for a variety of reasons. Yes, the library’s community is mostly focused on developing online apps, but it’s also a great tool for people working in operations or infrastructure.
This is due to the fact that Node.js is an excellent tool for creating other development tools. It might be crucial in allowing you to be creative and design your own support tools if you’re trying to support a team of engineers or even help manage a whole distributed software infrastructure.
Microservices are well-suited to Node.js.
Microservices are a fast-growing architectural approach that provides more agility and flexibility than a typical monolith. Microservices have a lot of benefits, and whether or not they’re suitable for you right now, they’re likely to take over the software landscape as the world moves away from monolithic design.
This fact just adds to the case that you should learn Node.js because the library is so well suited to this type of development. This is because it pushes you to create in a modular and focused way, allowing you to practically build an application using particular components.
Conclusion: Before you start utilising Node.js at work, spend some time learning about it.
That is only a small sample of the reasons why you should learn Node.js. There are many more, but these all highlight its significance in today’s developing environment. Get in touch with our team at Whiz Solutions and we will help you understand the concept in detail. Our experts will make sure you get what you want in the best manner.
#whizsolutions#whiz solutions#nodejs#nodejs development company#nodejs developers#nodejs development services#hire node js developer
1 note
·
View note
Text
Looking For Professional Full Stack Developer Training Online?

If you’re looking for professional full stack developer training online, there are many options out there. Which one is best for you depends on your learning preferences, career goals, time zone, availability, and budget.
Before you sign up for a full stack development course, read reviews and ratings. Also, make sure the instructor is both competent and compatible with your goals.
1. IBM Full Stack Software Developer Professional Certificate provided by Coursera
If you’re a developer looking to learn more about full stack development, this course from IBM is worth a look. It’s an affordable option that will teach you all the essential skills and tools you need to get started in web development.
This professional full stack developer training online will provide you with the knowledge and experience to build, deploy, and test a wide range of cloud-native applications. You’ll also learn how to use GitHub and Git, two of the most popular code management platforms in the industry.
Through Franklin’s partnership with Coursera, you can earn a Certificate that lets you demonstrate your skills to employers. The hands-on projects give you real-world examples and help you show off your abilities and potential.
2. Udemy Full Stack Web Developer Course
If you want to learn to be a professional full stack developer, Udemy is the place to be. It offers a variety of web development courses that cover the basics and come with hands-on projects to help you learn.
In addition to teaching you the basics of web development, this course will also teach you how to work with databases, server-side languages, and more. You will be able to build websites that are responsive, data-driven, and multi-user.
The courses are taught by one of the best instructors on Udemy, and her clear explanations, interesting slides, and enthusiastic presentation style make this course an excellent choice for aspiring web developers.
The course covers HTML, CSS, JavaScript, and Bootstrap, as well as jQuery, NodeJS, database, SQL, Git and Github, APIs, and more. The courses are a great choice for beginners and for those who have prior programming experience. There are also a few projects that will give you the chance to practice what you’ve learned, and there’s a TA available for any questions you have.
3. Udemy Web Design and Development Course
Full stack developers are in huge demand in the tech industry. They are highly sought after because they have expertise in all aspects of development, including frontend, backend, and database.
You can get professional full stack developer training online from Udemy, which is an eLearning platform with a live community of over 900,000+ developers. These courses are self-paced and teach you the fundamentals of the technologies required to design web pages, apps, and websites.
The course covers HTML, CSS, JS, and Node to create an interactive website. It also teaches you to build a mobile-friendly website that conforms to accessibility laws and regulations.
This course is offered by one of the top-rated instructors on Udemy. She explains hard concepts in a fun way, which makes it easy to grasp. She also uses tons of explanations and animations to help you learn the skills quickly.
4. Udemy Web Development Course
If you are looking for a professional full stack developer training online, Udemy is the place to go. Here, you can find a wide range of courses that are designed to teach you how to build websites and applications with HTML, CSS, JavaScript, Node, and more.
The best part about these web development courses is that they are usually beginner-friendly and come with hands-on projects. They also provide you with support if you have any questions along the way.
In addition, some of these courses are free to try out before you decide if they are right for you. Some of these free web development courses include a lot of extra learning resources like printable and articles.
This course is perfect for anyone who wants to learn how to create full-stack web apps. It covers front-end web technologies such as HTML and CSS and back-end programming languages such as Node, PHP, and MySQL.
0 notes
Text

Develop your web applications in react, node js, and MongoDB
Do you need web applications in react, node js, and MongoDB with beautiful designs, responsive and user-friendly?
You are at the right place. Build super-fast, secure & SEO-friendly, responsive web applications in react, node js, and MongoDB ( MERN Stack web application.)
Who am I?
I am a professional Full stack web developer with 2+ years of experience in web application development with various technologies.
My Services:
Build a high-quality web application in react, node js, and MongoDB (MERN STACK TECHNOLOGY)
Complete and customize Admin Panel
State management using Redux or Context API
Easy navigation using React Router
API Integration in React web app
Payment Gateway Integration
Convert PSD/Figma or any format to React
Fix bugs in your existing react application
Responsive design & Super-fast loading speed
Deploy your application on AWS, Azure, or any Linux-based web hosting
Why Choose Me?
High Quality work
100% client satisfaction
Quick updates on the project (Screenshots + Loom)
Bug-free, clean, and structured code
Super-fast delivery
N.B: Before placing the order please contact me.
0 notes
Text
Flutter Vs React Native – Which technology to choose for Mobile APP Development?
Are you confused in the debate of Flutter Vs React Native and couldn’t decide which technology you should choose for your next project? Flutter launched by Google in 2018 & React Native launched by Facebook in 2015, are cross-platform mobile APP development frameworks to reduce the time, effort and cost of development.
Do you also want to develop your Mobile APP in lesser time & at a lesser cost? To give you clarity about both frameworks, let’s compare them on few parameters and decide which technology suits you the best.

Introduction:
Flutter: It is a free & open-source portable UI toolkit to develop natively compiled APPs on a single codebase. It uses the Dart programming language, which is a fast object-oriented programming language.
React Native: It also an open-source cross-platform development framework that uses JavaScript language. React native enables both android app development & iOS app development using a single codebase.
Technical Architecture:
Flutter has the Dart framework which uses Skia. Skia is a C++ engine having all the components, protocols and channels inbuilt. Since it has everything required to develop Mobile APPs, therefore, it does not require any bridge to facilitate communication with native modules.
React Native uses the Flux architecture that is highly based on JS runtime environment architecture (JavaScript Bridge). During the runtime, JavaScript code is compiled into native code. JavaScript Bridge facilitates the communication of React Native with Native code.

Installation:
React Native is installed using NPM i.e., Node Package Manager without any hassle. The packages can be installed locally or globally, developers need to find where is the binary located. JavaScript developers can easily locate the binary, whereas other developers need to learn the NPM.
To install the React Native on MacOS, HomeBrew Package Manager is also needed.
Flutter installation requires some extra efforts; it can be installed by downloading binary for a specific platform. It does not support any package managers for installation. For macOS, you need to download the flutter.zip file and add it as a PATH variable.
Project Setup & Configuration:
React Native guide book has very little information about project setup and takes the developer directly to creating a new project. It assumes that the developer already has the required setup & configuration for Android & iOS.
Flutter provides all the detailed information for IDE setup and platform setup for both Android & iOS in its guide book. In addition to this, it also has Flutter Doctor, a CLI tool to guide developers through the setup. Flutter Doctor finds out which tools are already installed in the local machine and what tools are required to be installed.
Once all tools are installed and the environment is successfully set up, you can create a new project from CLI.
It also separately discusses how to set up the editors to work with Flutter.
UI components and APIs:
React Native provides very few development components; it highly depends on third-party libraries to access most of the native modules. At its core, it just provides UI rendering & device access APIs.
Flutter, on the other hand, is very rich in UI rendering and device access APIs. It also provides advanced components like navigation, testing, stately management, etc. Flutter has widgets for Material Design & Cupertino to easily render the UI on both Android & iOS.
Productivity:
React Native is easy for skilled JavaScript developer. It has a hot reload feature which saves a good amount of the developer’s time while testing the changes in UI. Developers can use any text editor or IDE they have hands-on.
Flutter is easy to start with the demo app but becomes complex as the app grows. It also has a hot reload function. Flutter uses Dart, which is a new programming language and does not support many IDEs and text editors. Developers need to update themselves with new Flutter concepts regularly.
Testing Support:
React Native have some unit level testing frameworks available in JavaScript such as Jest for snapshot testing. But for integration and UI testing, requires support from third-party tools such as Appium and Detox, but they are not officially supported.
Flutter is rich in testing features to test the APP on the unit. Integration, UI and widget parameters. Its widget testing feature can be used to create widget tests for unit testing and running them at the speed of unit testing.
APP Release Support:
React Native provides the manual process to deploy the APP from XCode, it does not have any automated steps to deploy the iOS APPs on the APP store. But, the third-party tools can be used to deploy the iOS and Android APPs on the store for built and release automation.
Flutter has a pre-defined process to deploy the iOS and Android APPs using Fastlane. Its command-line interface is very strong, therefore, it has a good release automation tooling to deploy the APPs from the command line.
Both Flutter and React Native are big cross-platform development tools and have their own pros and cons. So, on the basis of your project specifications and team skills, you can choose what better suits you: Flutter or React Native.
If you are fluent in JavaScript then React Native is a good choice but if you know dart or want to hand on it, then Flutter is the logical choice. If you want to build your APPs GUI using Native UI components then React Native is good to go, but if you want brand first design, then Flutter is the correct choice.
Both frameworks are known to reduce the time, cost and effort of the project.
#mobile app development#cross platform app development#AndroidAppDevelopment#ios App Development#flutter#dart#react native
0 notes
Text
Microservices competitive tests
Microservices is an engineering approach, which is based on building an app as a collection of small services. The main advantage is the maintainability of code. It is a surrogate method to a serverless approach. Microservices certainly bring more business value but at the same time, it requires a stable and secure technology such as Node.js to develop apps without complexities. Microservices developed in Node.js is most appropriate for enterprise-level projects for improving maintainability.
Microservices are a single self-functional system which, along with other units, form a complex system. Each small unit of the system is a fully functional, scalable, and deployable system. Each unit can be written in different programming languages and tested separately without causing an impact on other parts of the system. Microservices are the big block made up of smaller sub-blocks (Services), with each sub-block being an independent operating unit. If any of the unit (services) goes wrong, it will not take long to replace that service, which in turn reduces the risk of development and the costs involved in the operation of the infrastructure. This architecture is widely used by world-famous organizations including Uber, Netflix, Amazon, eBay, Groupon, and many more. Microservices are not coupled with any technology say Java or Node. You are free to choose any technology to build systems with Microservices style.
Monolithic
Understanding a huge code base becomes difficult, especially for new developers.
Large code files make the development environment slow, like IDE.
Changing technology or language becomes complicated as the code base is tightly coupled.
CI/CD becomes challenging and time-consuming and needs a dedicated team to manage it.
Microservices
They are small and specific to business requirement.
Loosely coupled and can be easily developed and deployed.
Development can be done using different technologies.
Microservices can be built with new technology stack enabling faster development cycles.
Can be easily scaled on demand.
Compared to monolithic architecture, microservices are hands down more beneficial. You don’t need to stuff all software components and services in one big container and pack them tightly.
Building JavaScript applications on microservices help you focus on developing monofunctional modules with clearly defined operations and precise interfaces. The application development process becomes more agile, and the challenges of continuous testing are mitigated. When you build applications on a monolithic architecture, the entire application needs to be deployed with every update.
On the other hand, microservices have no dependency on the type of framework, technique, or programming language being used to build them. Your ability to release REST-ful APIs for communication and other services is the only requisite for microservice architecture.
Note: Different enterprises like Go Daddy, Paypal, Netflix have used this strategy to create scalable applications.
The projects steps that we covered in this project are:
1. Why externalize configuration properties 2. Dynamic routing using Netflix Zuul 3. Client-side load balancing using Netflix Ribbon
The competitive tests we cover in SkillPractical are:
1. Spring Rest Test 2. Node JS and etc..
For more details on Microservices competitive tests please visit our website.
SkillPractical has Microservices learning path that helps the user to learn the Java from scratch. If user have any questions on Java Microservices while attempting tests, he can post a question in SkillPractical community. They will get an answer from our expert consultants.
0 notes
Link
In our last post we learn about Introduction about Heroku from the scratch. In this post we will learn about how to Integrate Salesforce with Heroku and deploy app on Heroku platform. Deploy Code on Heroku account Let’s quickly deploy an Node JS app on the Heroku platform and see how it works! Before we get started, if you don’t have a Heroku account please go ahead and create one! In our case we will deploy the sample NodeJs app from GIT, head over to the repository and click on the “Deploy to Heroku” button. Create Heroku app This will navigate you to the Heroku app creation page. Enter a name for the app, let the region be default as “United States” and then click on deploy app. Add-ons Once the app creation is complete you will be navigated to the Heroku Dashboard. Click on the “Resources” tab on the dashboard. On the “Add ons” search box type “Heroku Postgres” and provision(add) the resource to your app. Choose the default “Hobby Dev Free” plan and click on provision. Similarly search for “Heroku Connect” and provision the resource. Heroku connect Heroku Connect makes it easy for you to build Heroku apps that share data with your Salesforce deployment. Using bi-directional synchronization between Salesforce and Heroku Postgres, Heroku Connect unifies the data in your Postgres database with the contacts, accounts and other custom objects in the Salesforce database. After provisioning both the resources, click on the “Heroku Connect” add on which you just provisioned. Setup Connection It’s time that we establish a connection between our Salesforce org and our Heroku app. After clicking on the Heroku Connect resource(which we just provisioned) you will be navigated to a page where we would need to set up our org connection. Click on the “Setup Connection” button. We need not make any changes further, click on next. In our case we will be authorizing a Developer Edition org so we will choose production from the dropdown of “Environment” and then click on Authorize. If you want to authorize a Sandbox/Org with a custom domain you can select and change the options from the environment list. API versions will be pre-populated as per Salesforce’s current Release. Clicking on the authorize button will navigate you to the login page for your Salesforce org. Enter the credentials for your Salesforce org and click on login. Once you successfully authorize your org you will be able to see the connection status Create Mapping Now click on the mappings tab. And then click on the “Create Mapping” button. This will initialize all your Salesforce Objects with your authorized org. In our case we will be choosing the contact object..so search for “Contact” in the search box and click on the row. Next step for us would be to choose the fields that we want to be polled into our Heroku App’s database. We will be choosing the firstname, lastname, Mobile phone, phone and email fields. Check the Accelerate Polling box on the top right. Any changes in Salesforce stream to Heroku in near real-time. Also Check the Write to Salesforce any updates to your database box and select the External_Id__c field. Now we’re syncing both ways from SF to our heroku app and Heroku app to SF!! If you don’t have an external ID field in your contact, go ahead and create one. Finally click on the “Save” button on top. This will start polling of data from the“Contact” object in Salesforce org to our Heroku app. Time to give our app a Spin!! Click on the launcher icon from top click on the dashboard option and navigate to the “Heroku Dashboard”. Time for Testing: Open App Click on your app name and then finally click on “Open App”. This will open your Heroku app in the browser. Type in a contact name matching with a one in your Salesforce org and then modify/update the phone number once you have filled the details click on the “Update phone number” button which will make changes to your contact record. In my case I’ll be updating a contact’s phone number to a different one(refer images below): After updating the phone number using the Heroku app, we can see the record detail changed to a new phone number. Hooray! Don’t feel shy to pat yourself you just deployed your first heroku app, synchronized data from your Salesforce org to the Heroku app, Enabled bi-derictional Sync. and modified a record with just using a few clicks!! Recording I hope you have enjoyed reading, in our next blog we will dive deep into the technical capabilities of the Heroku platform and also discuss various design capabilities and solutions achievable using the powerful polyglot platform. Till the next time Stay Safe and Happy Learning!! 57 total views, 48 views today The post Salesforce & Heroku Integration appeared first on Apex Hours.
0 notes
Link
Javascript is considered the most universal web-programming language in software development. Previously, it was used as web front-end development tool, but now it has become a major cross-platform mobile development tool as a fundamental technology for platforms such as React Native, NativeScript, PhoneGap and others.
But the areas for implementing javascript does not end here. Afterwards, there was a lot of buzz in using javascript for server-side programming.
But the big question is whether it is good choice for your back-end projects ?
A brief intro to Node.js
Node.js is a open-source application runtime environment which enables you to write server-side applications using Javascript. It’s lightweight, efficient and its capable enough to use javascript on both front-end and back-end which opens new channels for web development.
How is Node.js is different from web javascript ?
Building apps which are used for running in browser is completely different from building a Node.js application. Both browser and Node.js use javascript as their programming language but the difference is, in Node.js you control the environment. If you are building an open source application which anyone can deploy anywhere, you are aware of which version of Node.js will be used to run the application. In case of browser environment, you don’t have the option to choose which browsers your visitors will use.
Is it a good idea to use Node.js ?
If you’re implementing Node.js as server technology, it is great for your development team as it is the same technology for front-end and back-end. This indicates your team is more efficient and cross functional which leads to less development costs. As javascript is the most popular programming language, the applications code will be easily understood by more developers. It also allows you to reuse and share the code between front-end and back-end of your application which improves the development speed.
On the other hand, Node.js has a vast community where the number of discussions are increasing rapidly, so the knowledge is sufficiently available.
Finally, Node.js offers a package manager, npm where the number of tools in npm’s registry is vast and growing at a faster pace.
We have listed down some points which goes in favour of Node.js and might help you to decide faster whether to choose Node.js or not.
1. Real- Time Applications
Node.js architecture is used in many collaborative apps such as Trello, live-chatting apps, instant-messaging, online gaming and many others. These applications work within a particular time-frame that the users feel as immediate and current. Node.js specifications are ultimate solution for low-latency needed for these applications to work efficiently.
2. Fast and Event-based
When node.js is used as common language for both client and server side, where synchronisation occurs fast , which is very helpful for event-based, real time apps. As Node.js runs on Google’s V8 engine, where it compiles the javascript straight into machine code making it faster than ever. Now, a single thread takes care of several client requests with the help of ‘event loop’. Node.js becomes handy, especially when you are processing high volumes of IO-bound requests.
3. Good for Single Page Applications
SPAs are applications that fit into a single webpage. Once the site loads, the page does not load thereafter. The goal of such apps is to provide a seamless user experience by lowering the page load time and providing easy navigation to different pages like the desktop apps.
This is why programmers tend to use Node.js along with React for SPAs, because you can control the logic of the app in client and only make calls whenever you need to dynamically change or update the DOM.
4. Scalable technology for Microservices
As it is a lightweight technology tool, using Node.js for microservices architecture is a good choice.
Accordingly, dividing the application logic into smaller modules, instead of creating a single, large monolithic core, you allow better flexibility and lay the groundwork for further growth. Hence, it is easy to add more microservices on top of previous ones than to combine additional features with basic app functionality.
5. Enables Data Streaming
I/O bound apps are very advantageous the way streams are managed in Node.js. Data streaming is the most powerful implementations of Node.js but there are very few to choose from.
As majority of data that come into systems are in form of streams, so a lot of time can be saved during this process. The goal is to utilize the time during another operation and Node.js just does that.
6. The Hosting deal
The functioning of the application depends on the hosting you choose, but with Node.js you don’t face any issues. It is because it can be hosted almost anywhere and everywhere including cloud hosting providers and web servers. Even corporate giants like Google and Amazon have implemented it so well.
7. Ease of Installation
If any framework needs time and effort to install, no matter how feature-rich it might be, it removes the whole purpose of facilitating operations at backend. The built-in support of NPM tool which come default with Node.js installation provides much ease for developers.
8. Node.js is Highly Extensible
Node.js is highly expandable, that means you can customize and extend as per your requirements. Developers can make use of JSON to provide the opportunity for exchange of data between the server and the client. It also has facilities such as built-in APIs for developing TCP,HTTP and DNS servers.
End Note
If you are looking for real-time web apps, then Node.js might be the best choice for Back-end development as it has all the above features which is very great in delivering excellent performance. It is built on a single-threaded, non-blocking event loop, Google V8 engine and low-level API. Several techniques including cluster module, makes Node.js apps to perform beyond a single CPU core.
After all, its the developer’s job to think carefully about the requirements of project when choosing the right Back-end Platform.
Moreover, what matters is the skills and proficiency of the developers and how they apply to the project. We here at Fortunesoft IT Innovations have several skilled developers who are experienced in Node.js Development projects. If you looking for developers to work on Node.js project, please feel free to Contact us.
0 notes
Text
Top Node js Frameworks to Rule in 2020
The modern software development industry has been greatly influenced by JavaScript language and artificial intelligence in recent times.
According to a Gartner study, in 2019 it, total global spending on the IT sector is expected to cross $ 3.8 trillion; an increase of 3.2% over the previous year’s spending.

In this scenario, the demand for full-stack developers will be high not only in the coming years but also for many years to come.
Node.js is a framework that is a combination of libraries, assistants, and various tools that help you build and operate advanced and high web applications. Node.js enables your web with a robust foundation for building and protecting your online presence with the help of web application development.
1. Express.js Here is a fast, popular, and flexible platform that provides a powerful collection for application development for the web as well as mobile. It came with a high-end API that allows its users to send and receive requests and makes coordination between the front end and database easier.
2. Meteor.js The framework is very simplified and is smooth for the user. This JS Framework is best compatible with iOS, Android, and Windows. Application development via Meteor.js is quite simple and easy and can serve large projects at the same time.
3. Nest.js A framework that enables the application to be built, which is highly scalable. It has a robust base of typescript and is highly motivated by Angular in its features.
4. Koa.js It is a comparatively smaller version, but a more explicit and robust base builder for web applications and APIs. It is very much seamless and allows you to structural components in the way you want. Koa.js has a vast user base and has 28K Github stars.
Robust functionalities making Node.js 2020 ready:
1. Scalability The services are performance-oriented and can significantly affect the execution speed and scalability of the project. A significant advantage of this is that instead of changing the full coding structure, only a part of the affected code will have to be replaced.
2. Reusability The framework logic reduces excessive replication and can be used by many applications.
3. GraphQL According to data recorded by Facebook and Shopify, GraphCall is expected to grow from its current level in 2019 and accelerate in 2020 as well.
4. Microservices Supporting the maintenance of Microsoft code provided by the Node.js framework, it serves to support a Serverless approach and shows excellent effectiveness in large projects.
5. Serverless and Hardware Free Solution: The most useful functionality of Node.js is that it eliminates factors such as hardware and server maintenance from performance decision-making factors.
6. Powered with IoT For geo-delivery systems, real-time features, and tracking, Node.js make you implement real-time based capabilities, micro-services, and data-driven approaches and are a good fit for building IoT applications.
7. Cloud Solutions Node.js can be added to deploy efficiency, ranging from creating new cloud apps to scaling existing cloud apps. Its Serverless architecture is the main reason behind its superior capabilities.
8. Real-Time Apps We routinely use large-scale real-time applications. Food delivery app with many other online collaboration tools, including Google Docs, our iconic food locations, and many other business platforms.
Node.js promising for 2020
1. It has simplified the application of various features and services in both horizontal and vertical positions.
2. Due to its capabilities and uses, it is easy to learn and easy to follow with high demand.
3. It empowers developers to make the client as well as server applications work at the same time and is, therefore, one of the most advanced full-stack software development frameworks.
4. It is powered by the Google V8 engine, which adds fuel to its already high performance.
5. Supported by a vast community that helps solve problems quickly and easily. Thus, Node.js has emerged as one of the universal frameworks for developing a large variety of applications & eStores through eCommerce website development. The benefit of the Node.js framework is steadily increasing across time and environments, and the language is providing customers with a larger platform based on requirements and desires features.
Summing up
The Node.js ecosystem is gaining significant traction due to its features and efficiency. With many global brands increasingly using it on their platforms, the framework is seeing good growth.
We, at Panacea Infotech, a Katalyst group company, offers end to end mobile and web application development services as per client’s need and requirement. Email us at [email protected].
Connect with us!
Source Link - https://www.bloglovin.com/@vivek9522/top-nodejs-frameworks-to-rule-in-2020
0 notes
Text
What’s new in Angular 8.0?

Angular 8 is the first major release from Google in the year 2019. It has focused on the toolchain and also making Angular easier for users for different applications development with performance improvements. But this, major version release also contains some new features and upgradation with respect to the previous versions. New Angular version is much lighter, faster and easier. Angular 8 supports the TypeScript version 3.4. So, using the new TypeScript version, it is easy to code with faster subsequent build with the incremental flag, type checking for globalThis, and generic type arguments. With the new release now available, it’s important to understand what has changed so you’ll know how to approach Angular 8.

New features of Angular 8-
1. Angular Ivy-
If you’re not familiar with Ivy, is it something you should think about? If the case is that, user experience of your apps is significant for you, then Ivy is definitely something you should think about. In spite of the fact that the system has made huge upgrades in file size and runtime speed since the times of Angular 2, Angular applications frequently will in general be on the substantial side with regards to file size and memory use.
Compared with the current Angular View Engine, Ivy provides the following benefits:
The code generated by the Angular compiler is now much simple to read and understand.
Rebuild times are significantly faster
Decreased payload size, so it will take browsers less time to download and parse your applications.
Better template type checking, so you can catch more errors at build time and prevent your users from encountering them at runtime
Over this, Angular Ivy aims to be broadly compatible with existing Angular applications, so preferably, you’ll have the option to get the majority of Ivy’s advantages without changing your applications at all. There will be some bugs and hiccups, however. So it’ll be helpful to develop your current Angular apps using Angular 8 and Ivy. There are some areas where Ivy is lacking—in particular, internationalization and Angular Universal support aren’t yet fully compatible. So if your Angular app supports multiple languages and additionally uses server-side rendering, don’t expect it to be ready to work with Ivy just yet.
2. Web Worker support-
As we all know that JavaScript executes in a single-threaded manner. So, to perform any huge data call or any consecutive Rest API call in an asynchronous manner is essential. But, in real application based scenario, this concept will not help us. This is because today all the web browser support the web worker process. Basically, the web worker process is the scripts executed by the browser in a separate thread. Communication with that thread in the browser tab will be carried out by sending messages. So, in general, web worker is not related to Angular from any point-of-view. But, the main point is that these scripts should be considered in the build process of the application. So, that after deployment of application the same process can be performed continuously. Hence, the main objective is to provide one single bundle for every web worker. Now, in Angular 8 this task can be performed by the Angular CLI.
Also, we can configure our Angular CLI project if we add the web worker for the first time. In this process, CLI will exclude the worker.ts files from the tsconfig.json files and also, add a new TypeScript configuration file named tsconfig.worker.json which handles the worker.ts file. Also, this information also added to the angular.json file as
“webWorkerTsConfig”: “tsconfig.worker.json”
3. Support for typescript-
Finally, Angular 8 is updates to the latest and greatest versions of Angular’s dependencies, which include tools like RxJS and TypeScript. In spite of the fact that this might seem like a small improvement, it’s also an appreciated one. Keeping up with TypeScript, in particular, is great because the TypeScript team consistently appears to pack useful new features into every release. In spite of the fact that there’s nothing preventing you from manually upgrade to the latest version of TypeScript in your projects, it’s great to see that the Angular team is keeping up with everything that TypeScript has to offer and that new apps generated via the Angular CLI will also use the newest version of TypeScript by default.
4. Bazel support-
In new version of Angular, Google introduced another build tool called Bazel. In reality, it is not a new tool. Google used this tool internally since a long time but now, they released this tool as open source. But Bazel is not totally ready in Angular 8. It is introduced as pick in choice with Angular 8 and is expected to be included in the Angular CLI in version 9.
Benefits of using Bazel-
It will provide a faster build time. Generally, It takes time for the first build but taking less time from the concurrent builds.
Using this tool, we can develop the application as an incremental build and deploy only what has been changed rather than the entire app.
We can eject the Bazel file which is normally hidden.
We can add Bazel Support using the below Angular CLI Command,
ng add @angular/bazel
Also, we can create a new app with Bazel with the help of below command,
npm install -g @angular/bazel
ng new my-app –collection=@angular/bazel
5. Differential Loading for performance optimization-
It is one of the best new features in the Angular CLI 8. Because with the assistance of these features, we will determine which browser we will target and the CLI will build the application with related necessary JS bundles with the necessary polyfills. The default target browser in the tsconfig.json file is now es2015. This means that when CLI build the application, it will build for the modern browser that supports ES6 features. But, we have to run the application in an older browser like IE9, then we have to specify it in the browser list file. This file exists in the root folder of the CLI project. Previously, it is used for the CSS part only. Now, it can be used for JS generation.
6. Changes in Lazy Loading in Route-
In Angular from the starting, the router mechanism always supports the concept of lazy loading. Till Angular 7, it was done by the string value of the loading module as below,
{
path: ‘lazy’,
loadChildren: () => ‘./admin/admin.module#AdminModule’
}
The value up to the #(hash) sign represents the path of the module file. In this the target component exists and the value after the hash sign represent the class name of that module. This style will continuously work in Angular 8. Only the way of writing lazy module has been changed. The string value of the loadchildren has been deprecated because of the support of ECMAScript and Ivy will only support this. So, now the loadchildren declaration will be like this,
{
path: ‘lazy’,
loadChildren: () => import(‘./admin/admin.module’).then(m => m.AdminModule)
}
7. Use Analytics Data-
In Angular 8, Angular CLI use analytics data so that Angular team can prioritize the features and improvements. So, when we update the CLI projects, it will opt-in with ng analytics on options. If we allow this globally, then it will collect some data like command used, the flag used, Operating System, Node Version, CPU Count, RAM Size, execution time and error with crash data if any to the Angular team for the improvement purpose in the future releases.
8. Support SVG Template-
Now, Angular 8 supports the template features with a file extension SVG. This means that, we can use the SVG extension file as a template in place of HTML file without any extra configuration settings. But why we will use a .svg file as a template instead of using the image in an HTML file? The reason is when we use SVG as a template, then we can use that as a directive and as a result, we can bind it just like HTML templates. With this approach, we can dynamically generate interactive graphics in our Angular Applications.
@Component({
selector: “app-icon”,
templateUrl: “./icon.component.svg”,
styleUrls: [“./icon.component.css”]
})
export class DashboardComponent {…}
9. PNPM Support-
In Angular 8, Angular CLI also support PNPM including NPM and Yarn. Also, in the command ng add now provide a new flag called – registry for adding packages from any private NPM registry. This command is already available in the Angular CLI version for ng update command.
Conclusion-
These are the new features in Angular 8, that you can use for effective development. If your apps are going to need changes, it’s better to find out immediately than to wait. You can know the comparison between Angular, React and Vue at out blog- Angular vs. React vs. Vue: A 2019 Comparison (Updated).
Are you looking to develop software with Angular? We suggest you the development with Angular 8. Solace is the perfect place to start with. Developers at Solace are well trained in Angular 8 development to give you the best solution. Get a free quote for software development that helps your business to stand out in the wide market competition.
0 notes
Text
Building Mobile Apps With Ionic And React
Building Mobile Apps With Ionic And React
Ahmed Bouchefra
2019-08-07T12:30:00+02:002019-08-07T10:36:12+00:00
Ionic has recently added support for React; so now, React developers can get the advantages of Ionic to build hybrid mobile apps and progressive web apps (PWAs). In this post, we’ll show you how to get started using Ionic with React by building a simple demo app from scratch.
Prerequisites
In order to properly follow this tutorial, you’ll need the following prerequisites:
recent versions of Node.js and npm installed on your system,
working knowledge of TypeScript and React.
You can check that you have the latest Node.js version (v10) installed by running the following command:
$ node -v
Introducing React And Ionic
Let’s start with brief introductions to both React and Ionic.
According to the official website:
“React is a declarative, efficient, and flexible JavaScript library for building user interfaces. It lets you compose complex UIs from small and isolated pieces of code called ‘components’.”
React focuses on building UIs and doesn’t provide any built-in tools for the common tasks required in web development, such as fetching remote data and routing, so you’ll need to use some existing third-party libraries for these tasks.
According to the Ionic website:
“Ionic Framework is the free, open-source mobile UI toolkit for developing high-quality cross-platform apps for native iOS, Android, and the web — all from a single codebase.”
Basically, it’s a set of UI components that you can use with plain JavaScript or any popular front-end framework or library, such as Angular, React or Vue, to build a hybrid mobile app and PWA.
In this tutorial, we’ll see and use some Ionic UI components such as the following:
IonMenu: With this, a navigation drawer will slide in from the side of the current view.
IonToolbar: These top bars are positioned above or below the content.
IonHeader: This parent component holds the toolbar component.
IonContent: This component provides a content area, with methods to control the scrollable area and other things. You need only one content component inside a single view.
IonList: This component contains items with similar data content, such as images and text. It’s made up of IonItem objects.
IonItem: This component may contain text, icons, avatars, images, inputs and any other native or custom element.
IonButton: This component provides a clickable element, which can be used in a form or anywhere that needs simple, standard button functionality.
Installing Ionic CLI v5
Ionic’s command line interface (CLI), version 5, has support for creating Ionic projects based on React. So, let’s get started by installing the tool from npm.
Open a CLI, and run the following command:
$ npm install -g ionic
At the time of writing, Ionic’s CLI v5.2.3 is the latest.
Note: *According to how you installed Node.js in your system, you may need to add sudo before your command in macOS or Linux or run the command prompt as administrator in Windows if you get any permission errors. You can also simply fix your npm permissions or use a tool such as nvm.*
Next, install Cordova Resources (which is used to generate Cordova resources locally) and Native Run (used to deploy app binaries to devices):
$ npm install -g cordova-res native-run
These are required only if you want to test your application on a real mobile device or emulator.
Creating An Ionic And React Project
Now, let’s create a project based on React. Go back to your terminal, make sure you are in your working directory, and run the following command:
$ ionic start myApp --type=react
We use --type=react to generate a project based on React. You’ll next need to choose a starter template from the available ones. Let’s pick sidemenu for a starter template with a side menu and navigation.
After generating the project and installing the dependencies, you can serve your app locally using the following commands:
$ cd ./myApp $ ionic serve
Your app will be available from the http://localhost:8100 address, and you can actually use your web browser to start playing with it.
Ionic is called a hybrid mobile framework because it makes use of web technologies that were originally designed to create web apps, along with a native container (Cordova or Capacitor), to build mobile apps without using native technologies for the target platforms, such as Java or Kotlin for Android or Swift for iOS.
Because your mobile app is actually a web application, you can do most development by testing in a web browser without using an emulator or a real mobile device, except for testing native device features such as the camera or the SQLite storage, in case you’ve used them in your app. In fact, it’s even possible to use certain techniques to mimic the plugins that provide the native features and do the entire testing during development in your web browser.
Cleaning Our Project
We have the app’s basic structure, with two pages (home and list) and a menu. Let’s remove the list page since it’s just boilerplate code.
First, remove the src/pages/List.tsx file, then open the src/App.tsx file, and remove the entry for the list page from the appPages array:
const appPages: AppPage[] = [ { title: 'Home', url: '/home', icon: home } ];
Also, remove the import of the list page from the file:
import List from './pages/List';
Next, remove <Route path="/:tab(home)/list" component={List} exact={true} /> from the App component:
const App: React.FunctionComponent = () => ( <IonApp> <IonReactRouter> <IonSplitPane contentId="main"> <Menu appPages={appPages} /> <IonPage id="main"> <IonRouterOutlet> <Route path="/:tab(home)" component={Home} exact={true} /> <Route exact path="/" render={() => <Redirect to="/home" />} /> </IonRouterOutlet> </IonPage> </IonSplitPane> </IonReactRouter> </IonApp> ); export default App;
The App component is the root component that gets rendered by our application. If you open the src/index.tsx file, you’ll find the following code:
import React from 'react'; import ReactDOM from 'react-dom'; import App from './App'; ReactDOM.render(<App />, document.getElementById('root'));
The render() method is used to render a React element into the DOM in the supplied root element.
Theming The App
Having created, served and cleaned our Ionic project, let’s now see how we can change the colors of the UI so that it looks more professional.
Let’s get started with the side menu. Open the src/components/Menu.tsx file, and add a color attribute with a primary value to the IonToolbar, IonContent, IonList and IonItem UI components:
const Menu: React.FunctionComponent = ({ appPages }) => ( <IonMenu contentId="main"> <IonHeader> <IonToolbar color="primary"> <IonTitle>Menu</IonTitle> </IonToolbar> </IonHeader> <IonContent color="primary"> <IonList style= color="primary"> {appPages.map((appPage, index) => { return ( <IonMenuToggle key={index} auto-hide="false"> <IonItem color="primary" href={appPage.url}> <IonIcon slot="start" icon={appPage.icon} /> <IonLabel>{appPage.title}</IonLabel> </IonItem> </IonMenuToggle> ); })} </IonList> </IonContent> </IonMenu> );
Ionic provides some default colors (primary, secondary, tertiary, success, warning, danger, light, medium and dark) that can be used to change the color of UI components. A color can be applied to an Ionic component in order to change the default colors using the color attribute. See “Colors” for more information.
These colors have default values, but you can customize them via some predefined CSS variables. See “Modifying Colors“.
This is a screenshot of our menu:
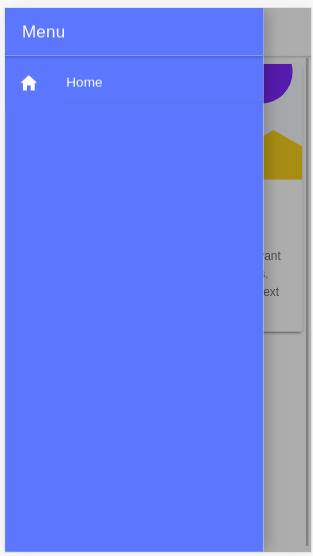
Ionic menu. (Large preview)
Next, let’s change the color of the Home page. Open the src/pages/Home.tsx file, and set the color attribute of the IonToolbar and IonContent components to primary:
const HomePage: React.FunctionComponent = () => { return ( <> <IonHeader> <IonToolbar color="primary"> <IonButtons slot="start"> <IonMenuButton /> </IonButtons> <IonTitle>Home</IonTitle> </IonToolbar> </IonHeader> <IonContent color="primary" > </IonContent> </> ); };
This is a screenshot of the page:

Ionic home. (Large preview)
Installing Axios And Consuming A REST API
We’ll see how to install Axios and consume a third-party RESTful API in our application, and we’ll also see how to display the fetched data using Ionic card and list components.
Having themed our application, let’s now see how to fetch data using Axios. We’ll use the third-party API available from NewsAPI.org.
First, we need to grab an API key, so that we can communicate with the API. Go to the registration page, enter your information, and register an account. You’ll be given an API key; note it, and let’s continue.
Head back to your terminal, and run the following command to install Axios:
$ npm install axios --save
Next, open the src/pages/Home.tsx file, and start by importing Axios and IonButton:
import { IonButton } from '@ionic/react'; import axios from 'axios';
Next, define the API_KEY and URL constant variables:
const API_KEY = "<YOUR_API_KEY_HERE>"; const URL = `https://newsapi.org/v2/top-headlines?sources=techcrunch&apiKey=${API_KEY}`;
In the URL variable, we’ll add an endpoint to get the top headlines from our source, TechCrunch. You can use any source you want from the available sources.
Note: Make sure to put your own API key in the API_KEY variable.
Next, define the fetchArticles() method as follows:
const fetchArticles = () => { return axios({ url: URL, method: 'get' }).then(response => { console.log(response); return response.data; }) };
We simply call the axios() method to send a GET request to the news endpoint, and the result from the method is a promise that needs to be resolved in order to get the news data.
Next, update the HomePage component as follows to call the fetchArticles() method and resolve the returned promise:
const HomePage: React.FunctionComponent = () => { const [articles, setArticles] = React.useState([]); const items: any[] = []; React.useEffect(() => { fetchArticles().then(data => setArticles(data.articles)); }, []); return ( <> <IonHeader> <IonToolbar color="primary"> <IonButtons slot="start"> <IonMenuButton /> </IonButtons> <IonTitle>Home</IonTitle> </IonToolbar> </IonHeader> <IonContent color="primary" > <IonList color="primary"> { articles.map(a => { return ( <IonItem> {a['title']} <IonButton href={a['url']} color="primary" slot="end">Read</IonButton> </IonItem> ); }) } </IonList> </IonContent> </> ); };
In our function component, we first call the useState() hook of React to create the articles state variable, which will hold the news articles after we fetch them from the API.
useState() returns the state variable, which has the empty array as its initial value and a function that we can use to change the value of the variable. We use destructuring assignment to unpack the values from the returned pair into distinct variables (i.e. articles and setArticles()).
Next, we call the useEffect() hook to perform a side effect in our component. In our case, the side effect is to fetch data from the news API using the fetchArticles() method, which returns a promise. Once the promise is resolved, we call the setArticles() method to assign the news data to the articles variable.
Both useState() and useEffect() are built-in React hooks that were introduced in React 16.8; they simply let you use state and other React features without having to write a class. The useEffect() hook is equivalent to calling the componentDidMount, componentDidUpdate and componentWillUnmount lifecycle methods combined in class-based components.
Finally, in the view template, we iterate over the articles array using the map() method, and we display the title of each news article inside an IonItem element of the IonList component, and also a button that takes us to the page of the full article.
This is a screenshot of the page:
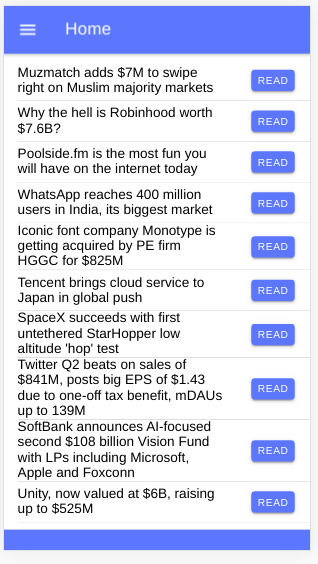
Ionic news app (Large preview)
You can find the source code in this GitHub repository.
Conclusion
In this tutorial, we have started using both Ionic and React and used them to build a simple mobile application that fetches and displays news data from a third-party API using the Axios client. We have also seen how to use hooks in React — namely, the useState() and useEffect() hooks — to create state and perform side effects inside React function components. With Ionic, we’ve seen how easy it is to generate a project based on React and how we can theme the application using the color attributes of components.

(dm, al, yk, ra, il)
0 notes
Text
Deploying a Client-Side Rendered create-react-app to Microsoft Azure
New Post has been published on https://headacheshelp.com/awesome/deploying-a-client-side-rendered-create-react-app-to-microsoft-azure/
Deploying a Client-Side Rendered create-react-app to Microsoft Azure

Deploying a React app to Microsoft Azure is simple. Except that … it isn’t. The demon is in the details. If you’re looking to deploy a create-react-app — or a similar style front-end JavaScript framework who are in need of pushState-based routing — to Microsoft Azure, I believe this article will serve you well. We’re going to try to avoid the headaches of client and server side routing reconciliation.
First, a quick story.
Back in 2016, when Donovan Brown, a Senior DevOps Program Manager at Microsoft, had given a “but it works on my machine speech” at Microsoft Connect that year, I was still in my preliminary stages as a web developer. His talk was about micro-services and containers.
[…] Gone are the days when your manager comes running into your office and she is frantic and she has found a glitch. And no matter how hard I try, I can’t reproduce it and it runs perfectly on my machine. She says: fine Donovan, then we are going to ship your machine because that is the only place where it runs. But I like my machine, so I’m not going to let her ship it…
I had a similar sort of challenge, but it had to do with routing. I was working on a website with a React front end and ASP.NET Core back end, hosted as two separate projects that were deployed to Microsoft Azure. This meant we could deploy both apps separately and enjoy the benefits that comes with separation of concern. We also know who to git blame if and when something goes wrong. But it had downsides as well, as front-end vs. back-end routing reconciliation was one of those downsides.
One day I pushed some new code to our staging servers. I received a message shortly after telling me the website was failing on page refresh. It was hurling a 404 error. At first, I didn’t think it was my responsibility to fix the error. It had to be some server configuration issue. Turns out I was both right and wrong.
I was right to know it was a server configuration issue( though at the time, I didn’t know it had to do with routing ). I was wrong to deny it my responsibility. It was only after I went on a web searching rampage that I discovered a utilize case for deploying a create-react-app to Azure under the Deployment tab on the official documentation page.
Building React for production
When building a React app for production( assuming we’re are using create-react-app ), it’s worth noting the folders that get produced. Running npm running construct will generate a build folder where an optimized static version of its implementation lives. To get the application on a live server, all we need do is feed the server the content of the construct folder. If we were working on localhost, there is no live server involved, so it is not always equivalent to having the application on a live server.
Generally, the construct folder will have this structure :P TAGEND- constructed
– static
– css
– css files
– js
– js files
– media
– media files
– index.html
– other files … Client-side routing with React Router
React Router uses the HTML5 pushState history API internally. What pushState does is quite interesting. For example, navigating( or using Link in react router) from the page https :// css-tricks.com to the page https :// css-tricks.com/ archives/ will cause the URL bar to display https :// css-tricks.com/ archives/ but won’t cause the browser to load the page/ archives or even check that it exists. Couple this with the component-based model of React, it becomes a thing to change routes while displaying different pages based on those routes — without the all-seeing eye of the server trying to serve a page in its own directory. What happens, then, when we introduce servers by pushing the code to a live server? The docs tell it better :P TAGEND
If you use routers that use the HTML5 pushState history API under the hood( for example, React Router with browserHistory ), many static file servers will fail. For example, if you used React Router with a road for/ todos/ 42, the development server will respond to localhost: 3000/ todos/ 42 properly, but an Express serving a production build as above will not. This is because when there is a fresh page loading for a/ todos/ 42, the server looks for the file construct/ todos/ 42 and does not find it. The server needs to be configured to respond to a request to/ todos/ 42 by serving index.html.
Different servers involve different configuration. Express, for example, involves this :P TAGEND app.get(‘*’,( req, res) =>
res.sendFile( path.resolve( __dirname, ‘client’, ‘build’, ‘index.html’ )); );
…as documented in the create-react-app docs. Keep in intellect though, this assumes that we’re hosting create-react-app at the server root, which is making employ of a wildcard road (*) that catches all road and respond to all route request by serving the index.html file in the build folder which sits at the root of the server application. Also, this is tightly coupled with the back-end. If that’s the case, we would most likely have this kind of folder structure( assuming the back-end is in NodeJS ):
– Server
– Client( this is where your react code runs)
– construct( this is the build folder, after you npm running build)
– src
– node_modules
– package.json
– other front-end files and folders
– Other back-end files and folders
Since my front-end( create-react-app) and back-end( ASP.NET) were two different projects, serving static files by navigating the directory was sort of an impossibility.
In fact, since we are deploying a static app, we do not need the back-end. As Burke Holland set it: “Static” means that we aren’t deploying any server code; simply the front-end files.
I keep mentioning ASP.NET here because during the course of my research, I figured configuring Azure required a configuration file in a wwwroot folder and ASP.NET’s folder structure typically has a wwwroot folder. Remember the application’s back-end was in ASP.NET? But that’s just about it. The wwwroot folder seemed to be hidden somewhere on Azure. And I can’t show you without deploying a create-react-app. So let’s go do that.
Getting started with App Services on Microsoft Azure
To get started, if you do not already have a Azure account, get a free trial then head over to the Azure portal.
Navigate to All services- Web- App Services Navigating on the Azure portal from All services, to Web, to App services
We want to add a new app, give it a name, subscription( should be free if you’re on a free trial, or if you already have one ), resource group( create one or utilize existing ), then click on the Create button down at the bottom of the panel.
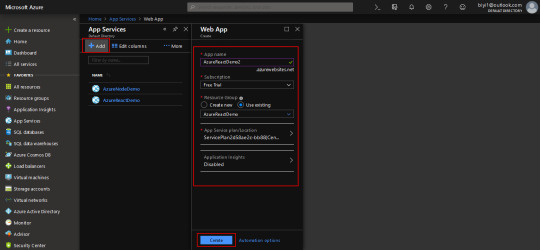
Creating a new App service on the Azure portal.
We should get a notification that the resource has been created. But it won’t immediately show up, so hit “Refresh” — I have other resources, but the AzureReactDemo2 is what I’m employing here. You’ll click on the name of your newly created app, which is AzureReactDemo2 in my occurrence.

Displaying all App Services on the Azure portal.
The blade shows you information about your app, the navigation to the left has everything you need to manage your application( overview, activity log, deployment center …).
For example, the Deployment Center is where the app deployment is managed, Slots is where things like staging, production, test are managed. Configuration is where things like environmental variables , node versions and — an important one — Kudu are managed.
The overview screen shows a general position of the application Status, URL … Click on the URL to see the live site.

Showing the various parts of an App Service on the Azure CLI.
The app is up and running!

Showing the default live page of an App Service.
What we’ve done is create a new App Service, but we have none of our code on Azure yet. As said earlier, all we need to do is to feed Azure the content of the build folder generated by building React for production, but we don’t have one yet. So let’s go local and get some React app.
Going local
We need to create a new React app, and install react-router as a dependency.
npx create-react-app azure-react-demo cd azure-react-demo
We also want to install react-router( react-router-dom, actually)
npm i react-router-dom
All things being equal, starting the app with npm start, we should get the default page.

Showing the default page generated by React.
Because this will be about testing routes, I needed to induce some pages. I’ve modified my local version and uploaded it to GitHub. I’m banking on the fact that you can find your route around react and react-router. Download a demo .
My folder looks like this :P TAGEND

Showing the folders and files in the modified create-react-app app.
The altered files have the following code :P TAGEND // App.js import React, Component from “react”; import ” ./ App.css”; import Home from ” ./ pages/ Home”; import Page1 from ” ./ pages/ Page1″; import Page2 from ” ./ pages/ Page2″; import BrowserRouter as Router, Switch, Route from “react-router-dom”;
class App extends Component
render()
return(
);
exportation default App; // Page1. js import React from “react”; import Link from “react-router-dom”;
const Page1=() =>
return(
Argentina( PAGE 1)
Nigeria
Home
); ; exportation default Page1; // Page2. js import React from “react”; import Link from “react-router-dom”;
const Page2=() =>
return(
Nigeria( PAGE 2)
Argentina
Home
); ; exportation default Page2; /* App.css */ html
box-sizing: border-box; body
margin: 0;. page
display: grid;
grid-template-rows: repeat( 3, 1fr );
height: 100 vh;. page1. flagTop, .page1. flagBottom
background-color: blue;. page2. flagTop, .page2. flagBottom
background-color: green;. flagCenter
display: flex;
align-items: centre;
flex-direction: column;
justify-content: center;
text-align: centre;. page a
perimeter: 2px solid currentColor;
font-weight: bold;
margin: 0 30 px;
padding: 5px;
text-decoration: none;
text-transform: uppercase;. flags
display: flex;
thicknes: 100%;. flags>. page
flex: 1;
Running the app runs locally, so the roads deliver when links are clicked and even when the page is refreshed.
Deploy the app to Azure
Now, let’s get it up on Azure! There are a few steps to make this happen.
Step 1: Head to the Deployment Center
On Azure, we need to go to the Deployment Center. There are quite a few options each with its pros and cons. We’ll be using Local Git( which means your local git app straight immediately to Azure) for source control, Kudu for Build Provider.
Remember to click continue or finish when you select an option, or else, the portal will just keep staring at you.

Showing Deployment Center on the Azure portal and choosing a source control as the first step in deploying a new App Service.
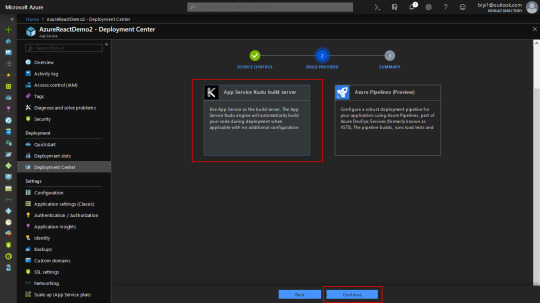
Showing the Build Provider section in the Deployment Center on Azure portal.
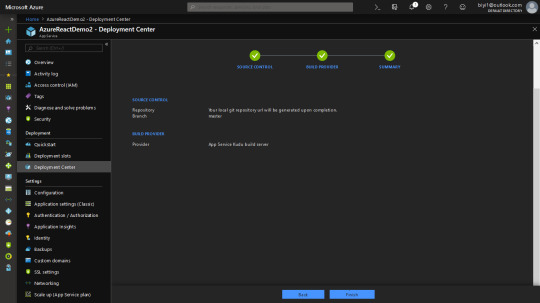
After the third step, Azure produces a local git repo for you. And it gives you a remote link to point your react app to.
One thing to note at this phase. When you push, Azure will ask for your GitHub credentials. It is under the deployment tab. There are two: App and User. App credential will be specific to an app. User will be general to all the apps you as a user has Read/ Write access to. You can do without User Credentials and use App credentials, but I find that after a while, Azure stops asking for credentials and just tells me authentication failed automatically. I defined a custom User Credentials. Either way, you are able to get past that.

Showing the Deployment Credentials for the App Service on Azure portal.
In the React app, after modification, we need to build for production. This is important because what we want to upload is the content of the build folder.
We need to tell Kudu what node engine we’ll be using, or else, the construct will most likely fail, due to the reported fact that react-scripts requires a node version higher than the default set on Azure. There are other ways to do that, but the simplest is to add a nodes engine in package.json. I’m utilizing version 10.0 here. Regrettably, we can’t only add what we like, since Azure has Node versions it supports and the rest are unsupported. Check that with the CLI with the command: az webapp list-runtimes
Add the preferred node version to the package.json file, as in :P TAGEND “engines”:
“node”: “1 0.0 ”

Displaying a list of Azure runtimes in the Azure CLI. Step 2: Build the App
To build the React app, let’s run npm build in the Terminal.
Step 3: Initialize the Git repo
Navigate into the build folder and initialize a Git repo in there. The URL to clone the repo is in the overview page. Depending on what credentials you’re employing( App or User ), it will be slightly different.

Showing the overview of the App Service on Azure and the Git clone URL. git init git add. git commit -m “Initial Commit” git remote add azure git push azure master
Now, visit the live app by using the URL on the overview page. As you can see, the app fails on/ page2 freshen. Looking at the network tab, a 404 is thrown because the page tried to be fetched from the server — with client-side routing, as we have already set up, the page shouldn’t even be server fetched at all.

Showing the failed page request and the network tab to verify. Configuring Azure to reconcile client and server side routing
In the public folder, let’s add a web.config XML file with the following content :P TAGEND
I’ve intentionally decided to not format the code snippet because XML is strict about that. If you miss the formatting, the file has no effect. You can download an XML formatter for your text editor. For VSCode, that would be the XML Tools plugin.

Showing an XML formatter and an XML formatted file in VSCode.
The app can be built again at this point, although we’ll lose the Git info in the construct folder since the new construct overrules the old build. That means it would have to be added again, then pushed.
Now the app runs as shown below! Whew.
We don’t want to have to npm run build every time — that’s where continuous deployment comes in. Check out the link below for appropriate references.
Conclusion
There is a lot to Azure, as it can do a lot for you. That’s nice because there are times when you need it to do something that seems super specific — as we’ve seen here with client and server side routing reconciliation — and it already has your back.
That said, I’ll leave you with a couple of related resources you can turn to as you look to deploying a React app to Azure.
Custom NodeJs Deployment on Azure Web App by Hao Luo: Learn more about Kudu and NodeJS deployment. Deploying a React App As a Static Site On Azure by Burke Holland: Even more options for deploying create-react-app to Microsoft Azure.
The post Deploying a Client-Side Rendered create-react-app to Microsoft Azure seemed first on CSS-Tricks.
Read more: css-tricks.com
0 notes
Link
Udemy Free Course, Udemy Coupon Discount – Free Lectures – 9 Lectures Skill Level –Beginner Level Language – English Published –9/2018 Take this course! Course Includes Create a REST API from scratch and deploy to a staging server with Mongo DB connection. Take this course! What Will I learn? 📺 2 hours on-demand video 💓 Full lifetime access 📱 Access on […]
The post Create a REST API With Node JS and Mongo DB [Udemy Free Course] appeared first on The Top Proggrammer.
0 notes
Photo

Do all JavaScript tools lead to Rome?
#501 — August 14, 2020
Unsubscribe | Read on the Web
JavaScript Weekly
Rome: Unifying The Frontend Development Toolchain — We first casually mentioned this in-beta tool, dubbed the “spiritual successor of Babel”, back in April, but things have come a long way since then. Rome aims to replace Babel, ESLint, Webpack, Prettier, Jest, and more, to ostensibly simplify the frontend workflow. We’re all for it if it works. Here’s the introductory blog post.
Sebastian McKenzie
React 17.0 Release Candidate: No New Features but Still Lots That's Interesting — When a new major release comes along after two-and-a-half years the absence of new features is going to disappoint many. However, the ability to incrementally upgrade React sites both now and in the future is welcome news. There's still lots about which to be excited, so definitely have a skim at the least.
Dan Abramov and Rachel Nabors
Quickly Find Front-End Issues Like JavaScript or Network Errors — Get proactively alerted on any client-side issues such as JavaScript and network errors, optimize the load time of your front-end resources, and detect any UI issues that affect critical user journeys. Try it free with Datadog Synthetics.
Datadog sponsor
Tabris.js 3.6 Released with Support for Redux, PDFs and More — Tabris is a toolkit for building native mobile apps with JavaScript (including iOS apps without having a Mac). 3.6 adds support for building apps based on Redux.
Tim Buschtoens
⚡️ Quick bytes:
To commemorate our 500th issue (last week), Michael Rambeau kindly put together a timeline of 20 JavaScript projects between 2006-2020. It's not without its omissions but it's a good reminder of how things have progressed.
Node 14.8.0 has been released with (unflagged) top level await support.
BuckleScript and Reason have rebranded to ReScript. It's a popular way to write JavaScript by way of OCaml.
Gatsby has made a bunch of announcements around their new home page, the project's roadmap, and Gatsby Cloud.
Last week we mentioned Salesforce's $10K donation to ESLint and said we'd mention other similarly big donations to JavaScript projects. ESLint is double lucky, as Microsoft has donated $10K to it too.
As of this coming Saturday, GitLab will not be doing MFA resets on free accounts - so double check your backup login methods (e.g. recovery codes) if you use GitLab.
💻 Jobs
Full Stack Developer @ Huckberry (Columbus, Ohio) — We're striving to build the most beloved men's retail site on the planet, with React / Redux / Ruby on Rails.
Huckberry
Find a Job Through Vettery — Use Vettery to connect with hiring managers at startups and Fortune 500 companies. It's free for job-seekers.
Vettery
📚 Tutorials, Opinions and Stories

Natively Formatting JavaScript Numbers — Leverage native formatting capabilities such as locale, currency, units, compact mode, etc…
Elijah Manor
▶ A 30 Minute Chat with Allen Wirfs-Brock — Allen is a true JavaScript expert and has a wealth of programming experience dating from the 60s as well as through working on the ECMAScript spec.
TC39er Podcast podcast
Become a Node.js Cloud Developer - Free Book and Video Course — Learn how to deploy, manage, secure and ship Node.js applications like a pro with this practical, hands-on course.
Kati Frantz sponsor
Supercharging <input type=number> with JavaScript — The number input type provides a nice control for working with numbers on most platforms, with min and max bounds, stepping up and down, etc. But what if you want to add more power to it with custom stepping types and controls? Kilian has a go at this here.
Kilian Valkhof
Building Single Page Applications Using Rust — WebAssembly continues to throw up all sorts of interesting options for the future development of Web applications. This isn't about JavaScript at all, but shows how Rust could perhaps act as, conceptually, a successor to it (or things like Elm) in some domains.
Sheshbabu Chinnakonda
Using Node Modules in Deno — Ada calls this ‘a bad practice’ but notes that ‘sometimes there is no alternative’ especially considering how huge the npm ecosystem is compared to Deno’s nascent one.
Ada Rose Cannon
Building a Programming Language in JavaScript From Scratch
Dmitry Soshnikov Education sponsor
How I Became A Senior JS Developer with Personal Projects — An inspiring tale. “One of the best decisions in my developer career was to go beyond just using tools, I decided to create them.”
Afonso Pacifer
Using ESLint to Improve Your App’s Performance
Pawel Wolak
🔧 Code & Tools

Mock Service Worker: API Mocking Library for Browser and Node — Interestingly uses the Service Worker API to intercept requests which you can then mock. Capture outgoing requests using an Express-like routing syntax, complete with parameters, wildcards, and regexes. GitHub repo.
Artem Zakharchenko
Deno 1.3.0 Released — Deno 1.0 came out in May and work has continued on the Rust and V8-based JavaScript/TypeScript runtime. We’re still publishing Deno Weekly too – here’s the latest issue.
Deno Land
omg-curry: A Feature Complete JavaScript Currying Library
Debdut Karmakar
Vest: Validations Library Inspired by Testing Frameworks — If you’re used to unit testing, the syntax will be familiar. We linked this quite recently but the author has added a variety of new features since.
Evyatar
AppSignal Automatically Instruments Apollo for Node.js Applications — With AppSignal’s automatic instrumentation, you get to debug GraphQL queries that seem to take a long time with ease.
AppSignal sponsor
React Sortable Tree: Maintain Your Trees Intuitively — Dragging-and-dropping is what many users expect of apps these days. Why not give them what they want? The gif demo illlustrates the promise of this hierarchy maintenance component.
Frontend Collective
crypto-hash: A Hashing Module Using the Native Crypto API in Node and Browser — Get the same hashing API in both environments. Uses the crypto module on Node and window.crypto in the browser.
Sindre Sorhus
babel-plugin-native-error-extend: Babel Plugin for Native Error Extending
Ivan Nikolić
🆕 Quick releases:
Storybook 6.0 — UI component building system.
Hapi 20.0 — Batteries included Node webapp framework.
MQTT.js 4.2 — MQTT client library.
Fetch 3.4 — window.fetch polyfill by GitHub.
Prism 1.21 — Syntax highlighter.
by via JavaScript Weekly https://ift.tt/3kSulPV
0 notes
Link
React Node FullStack - Social Network from Scratch to Deploy ##udemycourses ##UdemyDiscount #Deploy #FullStack #Network #Node #React #Scratch #Social React Node FullStack - Social Network from Scratch to Deploy Welcome to Learn React with Node JS from Absolute Scratch - Build A FullStack Social Network from Scratch and Deploy to the Cloud Hosting. EXCITED TO EXPERIENCE WHAT YOU WILL BUILD BY THE END OF THIS COURSE? CHECK OUT THE LIVE DEMO!! (see the introduction video for more information) In this course you will learn: Node JS From Scratch Node JS API Development from Scratch React JS from Scratch Modern JavaScript from Scratch A FullStack Social Network Application from Scratch Build Rock Solid Authentication with Password Forgot/Password Reset using JWT Authorization Implement Social Login using JWT CRUD, Image Upload, User Posts Relationships, follow, unfollow, likes, comments and more Super Admin based on Role Custom reCAPTCHA Pagination Deploy FullStack React Node Social Network to Digital Ocean Cloud Hosting Full Source Code is available for each major section and lectures Direct help from Instructor if you ever get stuck! In depth understanding of Modern JavaScript, React and Node JS Each line of code is explained! Easy to understand (Course starts from absolute basic and gradually makes progress) Follow the best practices while coding Fully understand the code you are writing Best way of structuring Node Js and React application so that it scales in future This course has so much more, It does not make sense to write them all here. But I can guarantee that this course is your gateway to become a FullStack JavaScript Developer. Enroll into this course. This is revolutionary :) You will master your JavaScript skills, Understand Core Node JS programming, Build fast, flexible and scalable API with Node JS. Not only that, you will also learn React JS from scratch. You will learn to build lightning fast frontend web app that will consume the data from the API you build. This course is unlike any other course you have seen online. This course first focuses on giving you the deep understanding of the topic before diving into building practical projects. This course shows you how to master the most in demand technologies of present time in easy, fast and effective way. Grab this opportunity, don't let it go! * Full support from the instructor himself on each lesson, if you ever get stuck! * Even though I called this project A Social Network, It is much more than that. The skill you learn from this course can be applied to build various kinds of applications. Sooo what are you waiting for :) Let me take you on a Journey to Learn Node JS and React JS from Scratch and build A FullStack Node React Social Network Project along the way! Who this course is for: A Web Developer looking to build API with Node JS and MongoDB A Web Developer looking to build web apps with React JS 👉 Activate Udemy Coupon 👈 Free Tutorials Udemy Review Real Discount Udemy Free Courses Udemy Coupon Udemy Francais Coupon Udemy gratuit Coursera and Edx ELearningFree Course Free Online Training Udemy Udemy Free Coupons Udemy Free Discount Coupons Udemy Online Course Udemy Online Training 100% FREE Udemy Discount Coupons https://www.couponudemy.com/blog/react-node-fullstack-social-network-from-scratch-to-deploy/
0 notes