#dialogfragment
Explore tagged Tumblr posts
Visit Tumblr Blog
Explore Tumblr blogs with no restrictions, modern design and the best experience.
Last Seen Tumblr Blogs


Fun Fact
Post activity is at the highest at 4:00 pm EDT; notes peak at 10:00 pm EDT.
Text
2 notes
·
View notes
Text
WeDialog
A simple dialog library based on DialogFragment
from The Android Arsenal https://ift.tt/2m72C40
0 notes
Text
ラジオボタン
ラジオボタン
MyDialogFragment.java package to.msn.wings.dialogradio; import android.app.AlertDialog; import android.app.Dialog; import android.app.DialogFragment; import android.content.DialogInsterface; import android.os.Bundle; import android.wiget.Toast; public class MyclassFragment extends DialogFragment { int selected = 0; @Override public Dialog onCreateDialog(Bundle savedInstanceState) { final String[] items = {"A", "B", "O", "AB"}; // AlertDialog.Builder builder = new AlertDialog.Builder(getActivity()); .setIcon(R.drawable("text") .setIcon(R.drawable.wings) // .setSingleChoiceItem(items, selected, new DialogInterface.OnClickListener() { public void onClick(DialogInterface dialog, int which) { selected = which; } } ) // .setPositiveButton("OK", new DialogInterface.OnClickListener() { new DialogInterface.OnClickListener() { public void onClick(DialogInterface dialog, int which) { Toast.makeText(getActivity(), String.format("[%s]", items[selected]), Toast.LENGTH_SHORT).show(); } } ) .create(); } }
setSingleChoiceItemメソッド public AlertDialog.Builder setSingleChoiceItems(CharSequence[] items, int checkedItem, DialogInterface.OnClickListener listener)
onClickメソッド public abstract void onClick(DialogInterface dialog, int which)
1 note
·
View note
Text
Implementing the location aware apps on Android
Android provide the platform to build the location aware applications. You can implement the location based application using the android.location package classes. The core of the android location framework is Location Manager. You can request the location manager service from system using the getSystemService API call. See below the implementation for the activity requesting the location of the user from GPS location provider. //create the object for the location manager private LocationManager mLocationManager; //create the object for the GPS location private Location gpsLocation; //frequency for location determination private static final int TEN_SECONDS = 10000; //distance for location determination private static final int TEN_METERS = 10; // Get a reference to the LocationManager object. mLocationManager = (LocationManager) getSystemService(Context.LOCATION_SERVICE); Now implement a check for the location services are enabled on the device or not. protected void onStart() { super.onStart(); // Check if the GPS setting is currently enabled on the device. // This check should be implement in onStart Method as the system calls this method every time the activity resume LocationManager locationManager = (LocationManager) getSystemService(Context.LOCATION_SERVICE); final boolean gpsProvider = locationManager.isProviderEnabled(LocationManager.GPS_PROVIDER); if (!gpsProvider) { // Create an alert dialog to request user to enable the location services new EnableGpsDialogFragment().show(getSupportFragmentManager(), "enableGpsDialog"); } } Now add the following method to call the settings interface using the intents (Start another activity) // Method to launch Settings interface private void enableLocationSettings() { Intent settingsIntent = new Intent(Settings.ACTION_LOCATION_SOURCE_SETTINGS); startActivity(settingsIntent); } Now implement the dialog interface for user to choose the option to enable the location services /** * Dialog to prompt users to enable GPS on the device. */ private class EnableGpsDialogFragment extends DialogFragment { @Override public Dialog onCreateDialog(Bundle savedInstanceState) { return new AlertDialog.Builder(getActivity()) .setTitle(R.string.enable_gps) .setMessage(R.string.enable_gps_dialog) .setPositiveButton(R.string.enable_gps, new DialogInterface.OnClickListener() { @Override public void onClick(DialogInterface dialog, int which) { enableLocationSettings(); } }) .create(); } } Now request the location provider from location manager requestUpdatesFromProvider( LocationManager.GPS_PROVIDER, R.string.not_support_gps); Call this method upon the activity resume by the user. @Override protected void onResume() { super.onResume(); gpsLocation = requestUpdatesFromProvider(); } Now implement the above method to register the provider private Location requestUpdatesFromProvider(final String provider, final int errorResId) { Location location = null; if (mLocationManager.isProviderEnabled(provider)) { mLocationManager.requestLocationUpdates(provider, TEN_SECONDS, TEN_METERS, listener); location = mLocationManager.getLastKnownLocation(provider); } else { Toast.makeText(this, errorResId, Toast.LENGTH_LONG).show(); } return location; } Now create the location listener with the handler methods private final LocationListener listener = new LocationListener() { @Override public void onLocationChanged(Location location) { // A new location update is received. Do something useful with it. Update the UI with // here you will get the location update which you can update in UI } @Override public void onProviderDisabled(String provider) { } @Override public void onProviderEnabled(String provider) { } @Override public void onStatusChanged(String provider, int status, Bundle extras) { } }; Make sure that you will remove the location updates from activity on onStop method // Stop receiving location updates whenever the Activity becomes invisible. @Override protected void onStop() { super.onStop(); mLocationManager.removeUpdates(listener); } Create your first app to get your location and enjoy with Android.
0 notes
Text
Using Fragments in Android
You can use the fragments to display the multiple user-interface panes in single screen. The fragments can be create by creating a subclass of the Fragment class. You can use the standard class also to create your own fragments. The standard fragment classes are as follows DialogFragment - displays the floating dialog windowListFragment - display the list of items managed by the adapterPreferencesFragment - displays a hierarchy of objects (settings)The fragment class provide the similar methods like activity to implement its lifecycle. The methods which you must implement while designing the fragment are as follows OnCreate() - The system calls this when the system is creating the fragment. OnCreateView() - The system calls this when first time the fragment is drawing its user interface. OnPause() - The system calls this when user is leaving the fragment and the fragment is moving to back-stack. For Example the SampleFragment extending the Fragment class. The onCreateView method provides the UI for the fragment. getFragmentManager() FragmentTransaction fragmentTransaction = fragmentManager.
0 notes
Text
Use Dialog Fragments in Honeycomb
Using Dialog Fragments in Honeycomb
Honeycomb (Android 3.x) introduced the Fragments to better utilize the UI areas and logic across the multiple activities of the in an application. The showDialog/dismissDialog methods in Activity are being deprecated to promote the DialogFragments This post shows a simple DialogFragment example. The example layout file for the dialog is as follows Create the Dialog Class The dialog class extends the DialogFragment (to support the DialogFragment on other devices I included the DialogFragment from version 4)import android.support.v4.app.DialogFragment; // ... public class SampleDialog extends DialogFragment { private EditText mEditText; public SampleDialog() { // Empty constructor required for DialogFragment } @Override public View onCreateView(LayoutInflater inflater, ViewGroup container, Bundle savedInstanceState) { View view = inflater.inflate(R.layout.fragment_edit_name, container); mEditText = (EditText) view.findViewById(R.id.txt_your_name); getDialog().setTitle("Hello!CreativeAndroidApps"); return view; } }Showing the Dialog Box in a Fragment Activityimport android.support.v4.app.FragmentActivity; import android.support.v4.app.FragmentManager; // ... public class FragmentDialogDemo extends FragmentActivity implements SampleDialogListener { @Override public void onCreate(Bundle savedInstanceState) { super.onCreate(savedInstanceState); setContentView(R.layout.main); showSampleDialog(); } private void showSampleDialog() { FragmentManager fm = getSupportFragmentManager(); SampleDialog sampleDialog = new SampleDialog(); sampleDialog.show(fm, "fragment_edit_name"); } @Override public void onFinishEditDialog(String inputText) { Toast.makeText(this, "Hi, " + inputText, Toast.LENGTH_SHORT).show(); } } Please provide your most valuable comments to improve this post.
0 notes
Link
Parcerable つよい Array100 てがる AlertDialog DialogFragmentどうするの?
0 notes
Photo


Im Banne des blonden Satans (OT: La Môme vert-de-gris) | Frankreich 1953 | Regie: Bernard Borderie
Die Frauen schmachten Lemmy Caution an. Unten: Eddie Constantine und Jacqueline Noëlle.
Dialogfragment:
Lemmy Caution (flirtet mit der Barfrau im Flughafen): „Meine Mutter hat gesagt, daß es zwei Sorten Frauen gibt: die einen verderben uns und die anderen nicht. Mir sind die lieber, die uns verderben.“
Barfrau: „Und warum?“
Lemmy Caution (nach unten blickend): „Ja, die haben meist viel hübschere Beine.“
Barfrau: „Und Sie? Sie sind wohl aus dem heißen Süden Amerikas?“
0 notes
Link
Honeycomb introduced Fragments to support reusing portions of UI and logic across multiple activities in an app. In parallel, the showDialog / dismissDialog methods in Activity are being deprecated in favor of DialogFragments. In this post, I’ll show how to use DialogFragments with the v4 support library (for backward compatibility on pre-Honeycomb devices) to show a simple edit dialog and return a result to the calling Activity using an interface. For design guidelines around Dialogs, see the Android Design site....
9 notes
·
View notes
Text
0 notes
Text
Barcode Kaiteki
An easy to use library for barcode detection. Based on the new AndroidX Camera2 api. Uses the zxing barcode detection library. Comes with a BarcodeView, which combines a camera preview and an automatic overlay for detected barcodes.
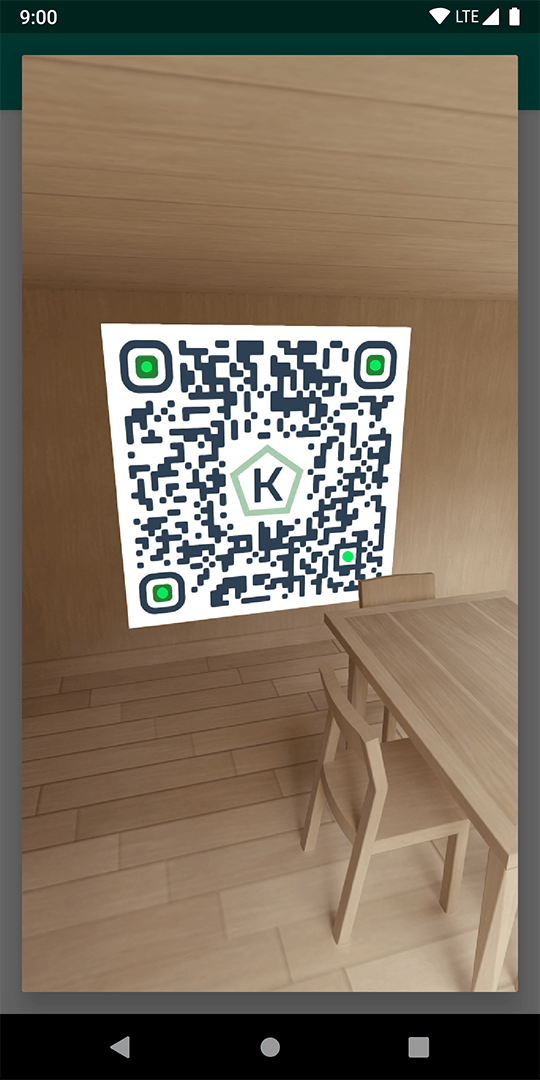
Also contains three differend ready to use dialogs
BarcodeDialog (DialogFragment)
BarcodeBottomSheet (BottomSheetDialogFragment)
BarcodeAlertDialog (AlertDialog)
Features
camera permission handling
customize the displayed result points
customize the barcode type (can be a list)
from The Android Arsenal https://ift.tt/2YOTf6E
0 notes
Text
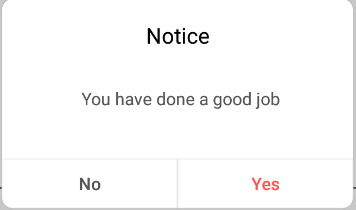
ダイヤログ作成2 Y/N
activity_main.xml<?xml version="1.0" encoding="utf-8"?> <RelativeLayout xmlns:android="http://schemas.android.com/apk/res/android" xmlns:tools="http://schemas.android.com/tools" ...> <Button android:layout_width="match_parent" android:layout_height="wrap+content" android:text="text" android:id="@+id/btn" android:onClick="btn_onClick" /> </RelativeLayout>
MainActivity.java package to.msn.wings.dialogbutton; import android.app.DialogFragment; import android.support.v7.app.AppComatActivity; import android.os.Bundle; import android.view.View; public class MainActivity extends AppCompatActivity { @Override protected void onCreate(Bundle savedInstanceState) { super.onCreate(savedInstanceState); setContentView(R.layout.activity_main); } // public void btn_onClick(View view) { DialogFragment dialog = new MyDialogFragment(); dialog.show(getFragmentManager(), "dialog_button"); } }
MyDialogFragment.java package to.msn.wings.dialogbutton; import android.app.AlertDialog; import android.app.Dialog; import android.app.DialogFragment; import android.content.DialogInterface; import android.os.Bundle; import android.widget.Toast; public class MyDialogFragment extends DialogFragment { @Overridepublic Dialog onCreateDialog(Bundle savedInstanceState) { return builder.setTitle("text") .setMessage("text") .setIcon(R.drawable.wings) // .setPositiveButton("text", new DialogInterface.OnClickListener() { public void onClick(DialogInterface dialog, int which) { Toast.makeText(getActivity(), "text", Toast.LENGTH_SHORT) .show(); } } ) // .setNegativeButton("text", new DialogInterface.OnClickListener() { public void onClick(DialogInterface dialog, int which) { Toast.makeText(getActivity(), "text", Toast.LENGTH_SHORT) .show(); } } ) // .setNeutralButton("text", new DialogInterface.OnClickListener() { public void onClick(DialogInterface dialog, int which) { } } ) .create(); } }
setXxxxメソッド public AlertDialog.Builder setXxxxButton( CharSequence text, DialogInterface.OnClickListener listener)
1 note
·
View note
Video
Android DialogFragment Example
0 notes
Link
APIレベル13からActivity.showDialog(int id)は非推奨となってしまいました。 DialogFragmentを使ってダイアログを表示させる方法が推奨されています。 (2013年12月12日現在) 参考 ...
0 notes
Text
Use Dialog Fragments in Honeycomb
Using Dialog Fragments in Honeycomb
Honeycomb (Android 3.x) introduced the Fragments to better utilize the UI areas and logic across the multiple activities of the in an application. The showDialog/dismissDialog methods in Activity are being deprecated to promote the DialogFragments This post shows a simple DialogFragment example. The example layout file for the dialog is as follows Create the Dialog Class The dialog class extends the DialogFragment (to support the DialogFragment on other devices I included the DialogFragment from version 4)import android.support.v4.app.DialogFragment; // ... public class SampleDialog extends DialogFragment { private EditText mEditText; public SampleDialog() { // Empty constructor required for DialogFragment } @Override public View onCreateView(LayoutInflater inflater, ViewGroup container, Bundle savedInstanceState) { View view = inflater.inflate(R.layout.fragment_edit_name, container); mEditText = (EditText) view.findViewById(R.id.txt_your_name); getDialog().setTitle("Hello!CreativeAndroidApps"); return view; } }Showing the Dialog Box in a Fragment Activityimport android.support.v4.app.FragmentActivity; import android.support.v4.app.FragmentManager; // ... public class FragmentDialogDemo extends FragmentActivity implements SampleDialogListener { @Override public void onCreate(Bundle savedInstanceState) { super.onCreate(savedInstanceState); setContentView(R.layout.main); showSampleDialog(); } private void showSampleDialog() { FragmentManager fm = getSupportFragmentManager(); SampleDialog sampleDialog = new SampleDialog(); sampleDialog.show(fm, "fragment_edit_name"); } @Override public void onFinishEditDialog(String inputText) { Toast.makeText(this, "Hi, " + inputText, Toast.LENGTH_SHORT).show(); } } Please provide your most valuable comments to improve this post.
0 notes