#disable elasticsearch magento 2
Explore tagged Tumblr posts
Visit Tumblr Blog
Explore Tumblr blogs with no restrictions, modern design and the best experience.
Last Seen Tumblr Blogs


Fun Fact
Forty percent of Tumblr users are between the ages of 18 to 25.
Text
Could not validate a connection to elastic search magento
Could not validate a connection to elastic search magento
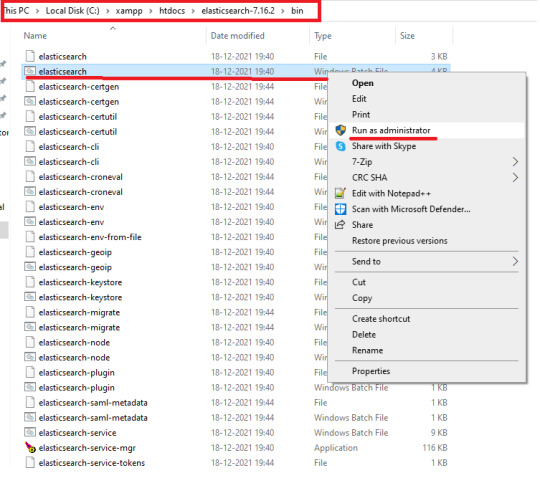
Hey buddy, I hope you are doing well, and you surf over the entire internet to overcome this issue could not validate a connection to elastic search in magento 2. By looking up at this error message you would understand that the issue is from the elastic search either it is not installed in your system or it is not running. which means we have to skip elastic search while installing…
View On WordPress
#attention no alive nodes found in your cluster magento 2#could not resolve host elasticsearch#could not validate a connection to elasticsearch windows#disable elasticsearch magento 2#enable elasticsearch magento 2 command#magento 2 4 elasticsearch not working#missing required argument engines of magentosearchmodelengineresolver#no alive nodes found in your cluster magento 2
0 notes
Link
Configure Commerce and Magento to use Elasticsearch

This part examines the base settings you should decide to test Elasticsearch with Magento 2. For extra insights regarding designing Elasticsearch, see the elasticsearch for magento 2.
Configure Elasticsearch within Magento
To configure Magento to use Elasticsearch:
Log in to the Magento Admin as an administrator.
Click Stores > Settings > Configuration > Catalog > Catalog > Catalog Search.
From the Search Engine list, select your Elasticsearch version.
The following table lists the required configuration options to configure and test the connection with Magento. Unless you changed Elasticsearch server settings, the defaults should work. Skip to the next step.
Elasticsearch Server Hostname- Enter the fully qualified hostname or IP address of the machine running Elasticsearch. Cloud for Adobe Commerce: Get this value from your integration system.
Elasticsearch Server Port- Enter the Elasticsearch web server proxy port. The default is 9200. Cloud for Adobe Commerce: Get this value from your integration system.
Elasticsearch Index Prefix- Enter the Elasticsearch index prefix. If you use a single Elasticsearch instance for more than one Magento installation (Staging and Production environments), you must specify a unique prefix for each installation. Otherwise, you can use the default prefix magento2.
Enable Elasticsearch HTTP Auth- Click Yes only if you enabled authentication for your Elasticsearch server. If so, provide a username and password in the provided fields.
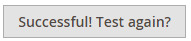
Click Test Connection.
You will see either:
Continue with:
Configure Apache and Elasticsearch
Configure nginx and Elasticsearch
or you will see:
If so, try the following:
Make sure the Elasticsearch server is running.
If the Elasticsearch server is on a different host from Magento, log in to the Magento server and ping the Elasticsearch host. Resolve network connectivity issues and test the connection again.
Examine the command window in which you started Elasticsearch for stack traces and exceptions. You must resolve those before you continue. In particular, make sure you started Elasticsearch as a user with root privileges.
Make sure that UNIX firewall and SELinux are both disabled, or set up rules to enable Elasticsearch and Magento to communicate with each other.
Verify the value of the Elasticsearch Server Hostname field. Make sure the server is available. You can try the server’s IP address instead.
Use the netstat -an | grep **listen-port** command to verify that the port specified in the Elasticsearch Server Port field is not being used by another process.
For example, to see if Elasticsearch is running on its default port, use the following command:
netstat -an | grep 9200
Reindexing catalog search and refreshing the full page cache
After you change Magento’s Elasticsearch configuration, you must reindex the catalog search index and refresh the full page cache using the Admin or command line.
To refresh the cache using the Admin:
In the Admin, click System > Cache Management.
Select the checkbox next to Page Cache.
From the Actions list in the upper right, click Refresh. The following figure shows an example.

To clean the cache using the command line, use the magento cache:clean command.
To reindex using the command line:
Log in to your Magento server as, or switch to, the Magento file system owner.
Enter any of the following commands:
Enter the following command to reindex the catalog search index only:
bin/magento indexer:reindex catalogsearch_fulltext
Enter the following command to reindex all indexers:
bin/magento indexer:reindex
Wait until reindexing completes.
Unlike the cache, indexers are updated by a cron job. Make sure cron is enabled before you start using Elasticsearch. for more visit our site: mirasvit
1 note
·
View note
Text
How to Configure Elastic Search in Magento 2?
Planning to improvise the quest enjoy in your store? Having a massive catalog of merchandise on your eCommerce shop? Well, we’ve got a exceptional Magento 2 Extension that will help you with this. Magento 2 ElasticSearch Extension will now not most effective improvise the search, however it comes along side autocomplete characteristic as nicely. Magento 2.Four enhancements make it obligatory for a shop to provide a user-friendly purchasing experience and stay beforehand of the competition.
Refer to the set up of our ElasticSearch Magento 2 Extension right here!. In these days’s tutorial, we can guide you with a little by little educational to configure Mirasvit Magento 2 ElasticSearch.

Select the type of settings you are making plans to implement on the store with our Magento 2 ElasticSearch Extension.
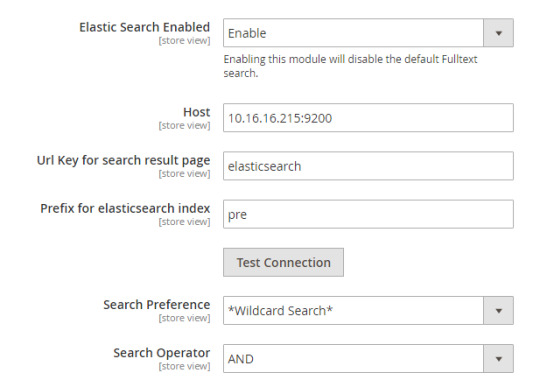
Enable ElasticSearch in Magento 2
ElasticSearch Enabled – Enable/Disable the extension.
Host – Here, the configuration of servers is cited inside the [host]:[port] format. You can indicate the ElasticSearch nodes in this.
URL Key for Search Result Page – Mention the described search end result URL key.
Prefix for elasticsearch index – Admin is facilitated to set prefix to create elasticsearch index. This is helpful while you use the equal elasticsearch on multiple web sites. Note – Reindex all indexes after changing the prefix.
Test Connection – With the help of this button, admin can check if elasticsearch server were configured nicely or not.
Search Preference – Search preference supports wildcard aid, the alternatives for the same are:
“Wildcard Search” – supports any individual earlier than seek string and after search string
“*Wildcard search at begin” – supports any person earlier than search string
“Wildcard search at end*” – helps any character after search string
“Precise Search” – helps actual in shape for the quest string
Search Operator – Search operator helps “AND” or “OR” operator to healthy for seek result
AND – If you are seeking out ‘virtual watch’ with “AND” operator then it’s going to show you an identical end result which has both words ‘digital’ and ‘watch’
OR – if you are seeking out ‘virtual watch’ with “OR” operator then it will show you a matching result both have words ‘virtual’ or it has word ‘watch’
0 notes
Link

What to Expect Magento Website Development from Magento 2.4 Open Source and Cloud Commerce Platform The two-step verification is enabled by default in the admin area. These features are impossible to disable.
0 notes
Text
Upgrade Magento Version from 2.3.X to 2.4.0
New Post has been published on http://www.justwebdevelopment.com/blog/upgrade-magento-version-from-2-3-x-to-2-4-0/
Upgrade Magento Version from 2.3.X to 2.4.0
Magento 2.4.0 is require PHP 7.4, Elasticsearch 7.6.x and MySQL 8.0.
First check with your server:
=> Make sure your server is configured to work with PHP 7.4. Magento 2.4.0 officially support only PHP 7.4. Though you can install Magento 2.4.0 with PHP 7.3 but it is not tested. So it is recommended to use PHP 7.4 with Magento 2.4.0.
=> Make sure your composer is pointing to correct PHP version 7.4.
=> Make sure your server has installed and configured Elasticsearch 7.6.x. Magento 2.4.0 does not support MySQL as a catalog search engine.
=> Take a code and database backup.
Follow below step to upgrade Magento version from 2.3.X to 2.4.0
Step 1: If you are directly performing the upgrade on your live site then first put your site into maintenance mode by running below command.
php bin/magento maintenance:enable
Step 2: Update composer.json file with latest version. In our case, it is Magento Version 2.4.0. Navigate to your Magento 2 installation root path and run below command
composer require magento/product-community-edition=2.4.0 --no-update
Step 3: Run below command
composer update
After completed update, run another SSH command and upgrade the Magento database:
php bin/magento setup:upgrade
After that you will want to recompile and deploy content and refres cache with below command.
php bin/magento setup:di:compile
php bin/magento setup:static-content:deploy -f
rm -rf var/cache/*
rm -rf var/page_cache/*
rm -rf generated/code/*
php bin/magento cache:clean
php bin/magento cache:flush
Step 4: Disable maintenance mode
php bin/magento maintenance:disable
Successfully performed a Magento 2 upgrade! Now go to the frontend and backend and check everything.
Justwebdevelopment can also help you in... Magento Development | PSD To Magento | Magento Theme Development | Magento Development Services
#Magento Developer#Upgrade Magento 2#Upgrade Magento 2 latest version#Upgrade Magento 2 Version#Upgrade Magento 2.3.x to 2.4.0#Upgrade Magento Version
0 notes
Text
Why Should You Use Magento 2 Template Hints For Your Store?
Magento 2 includes 3 structures to present your website to customers that are layout, block, and container.
The page structure looks the same as the XML (Extensible Markup Language) file that is much like the HTML (HyperText Markup Language) structure to create one or several columns.
Do you ever wonder how to identify each structure to design your website?
Magento 2 Template Hints are a useful tool to help you identify each block added to each page. Moreover, if you want to make a change, you need to know where that block is generated.
Let’s go to check with us how to enable this Magento Template hints!
Why Should You Use Magento 2 Template Hints For Your Store?
>>> Don’t miss this: The Best Magento Tutorials for eCommerce Store in 2020!
Debug is a crucial part of processing development in building an eCommerce store. The developer always knows what they should do when creating a website to ensure that it runs smoothly.
Magento 2 Template Hints is the part of this Debug process. It is a debugging tool that applies notions with a path on each template of the Magento 2 platform.
This mode displays the errors directly on the screen. In fact, it is a convenient way to debug even failed modules that show a blank page or 500 errors on the screen.
Here is the default Magento homepage with the images and banners installed.
And here is the thing you see at the backend store.
>>> Read more: Magento 2 MFTF to improve your eCommerce Store!
You can also check out Xdebug combination with PHP to help you with debugging and developing the website.
It helps you to establish breakpoints in your code and interrupt the PHP interpreter for displaying the application data on each executed line at such breakpoints.
So, do you know how to enable the Template Path of Magento? Let’s scroll down to check how to turn it on to help you manage your site faster.
How To Enable Magento Template Path Hints?
#1. Enabling Magento 2 Template Path Hints via Admin Panel
First, you log in to your Magento 2 account and go to Dashboard -> Stores -> Configuration.
Secondly, in tab Advanced, you click Developer.
>>> Don’t miss this: Elasticsearch Magento 2 to support your store performing!
Allowed IPs: fills your IP.
Template Path Hints: choose Yes
Add Block Names to Hints: choose Yes
After doing all the steps, your website will look like this in the storefront:
#2. Enabling Magento 2 Template Hints via Command Line
At first, you have to connect your Magento 2 store with SSH terminal and then go to your Magento 2 store file.
Enable Magento template path hints for frontend:
<?php bin/magento dev:template-hints:enable
Disable Magento template hints for frontend:
<?php bin/magento dev:template-hints:enable
Clean and flush cache:
<?bin/magento cache:clean
bin/magento cache:flush
However, you cannot enable or disable Magento 2 Template Hints for the Admin if you use this method.
#3. Enabling Magento 2 Template Hints via Source Code
Opening your file following the address below:
Vendor\magento\module-developer\Model\TemplateEngine\Plugin\DebugHints.php
Then, you copy this code on your file:
<?public function afterCreate( TemplateEngineFactory $subject, TemplateEngineInterface $invocationResult ) { $storeCode = $this->storeManager->getStore()->getCode(); // if ($this->scopeConfig->getValue($this->debugHintsPath, ScopeInterface::SCOPE_STORE, $storeCode) // && $this->devHelper->isDevAllowed()) { $showBlockHints = $this->scopeConfig->getValue( self::XML_PATH_DEBUG_TEMPLATE_HINTS_BLOCKS, ScopeInterface::SCOPE_STORE, $storeCode ); return $this->debugHintsFactory->create([ 'subject' => $invocationResult, 'showBlockHints' => $showBlockHints, ]); //} return $invocationResult; }
#4. Enabling Magento 2 Template Hints via MySQL
First, you log into your Magento account and go to System > Configuration > Developer page, switch to Website view.
Next, you can copy this code to enable the template:
<?SET @template_hints = 1; INSERT INTO `core_config_data` ( `scope`, `scope_id`, `path`, `value`) VALUES ('websites','1','dev/debug/template_hints', @template_hints) ON DUPLICATE KEY UPDATE `value`=@template_hints; -- Enable block hints SET @template_hints_blocks = 1; INSERT INTO `core_config_data` ( `scope`, `scope_id`, `path`, `value`) VALUES ('websites','1','dev/debug/template_hints_blocks', @template_hints_blocks) ON DUPLICATE KEY UPDATE `value`=@template_hints_blocks;
If you want to disable Magento 2 Template Hints, you can copy and paste the code below:
<?SET @template_hints = 0; INSERT INTO `core_config_data` ( `scope`, `scope_id`, `path`, `value`) VALUES ('websites','1','dev/debug/template_hints', @template_hints) ON DUPLICATE KEY UPDATE `value`=@template_hints; -- Enable block hints SET @template_hints_blocks = 0; INSERT INTO `core_config_data` ( `scope`, `scope_id`, `path`, `value`) VALUES ('websites','1','dev/debug/template_hints_blocks', @template_hints_blocks) ON DUPLICATE KEY UPDATE `value`=@template_hints_blocks;
However, there are many developers/users after following all steps that they still cannot enable from magento2 back-end section, it’s not showing.
>>> Interested? Check more TOP 6 Magento 2 Performance Tips to rocket your store!
We’re going to help you solve the problems after this part.
#5. Enabling Template Path Hints via env.php file
If you cannot change the value through the Admin Panel, you can search for the value on app/etc/env.php
In this file, you can check template_hints_storefront and template_hints_admin to change the value.
<?<?php return array( ... 'system' => array( 'default' => array( 'dev' => array( 'debug' => array( 'template_hints_storefront' => '1', 'template_hints_admin' => '1' ), ), ), ), ); Run the following command after the changes: php bin/magento setup:upgrade
How To Fix Magento 2 Template Hints Not Showing?
Firstly, you go to Dashboard -> Stores -> Configuration -> Advanced -> Developer.
And, next, you need to set Main Website in your Default store view.
Then, you can check your Configuration again whether Magento Template Hints working or not.
If still, your Magento 2 Template Hints not showing, you can open vendor/magento/module-developer/Model/TemplateEngine/Plugin/DebugHints.php
write this code inside afterCreate function : (at the start, above the storecode line)
<?if(isset($_GET['shreyasPathHints']) && $_GET['shreyasPathHints'] == 'on'){ return $this->debugHintsFactory->create([ 'subject' => $invocationResult, 'showBlockHints' => 1, ]); }
Now, you can open any Magento page and append
??shreyasPathHints=on
to the URL.
Conclusion
That is the way how to deal with Magento Template Path Hints for your store. In this article, I’ve shown you the benefits of Magento 2 Template Path Hints, how to enable and disable it, and how to solve if you cannot enable the Template Hints Path.
Again, Magento Template Path Hints is very important for your store because it shows the errors for you on the backend and helps you save your time to fix errors.
If you have any questions, you can comment on the comment section below.
We’re 24/7 support you!
Thank you for reading!
The post Why Should You Use Magento 2 Template Hints For Your Store? appeared first on Mageguides.
from Mageguides https://ift.tt/2Vhm4tT via IFTTT
0 notes