#enable elasticsearch magento 2 command
Explore tagged Tumblr posts
Visit Tumblr Blog
Explore Tumblr blogs with no restrictions, modern design and the best experience.
Last Seen Tumblr Blogs


Fun Fact
The most popular pages on Tumblr are about Minecraft, GIFs, and David J. Peterson.
Text
Could not validate a connection to elastic search magento
Could not validate a connection to elastic search magento
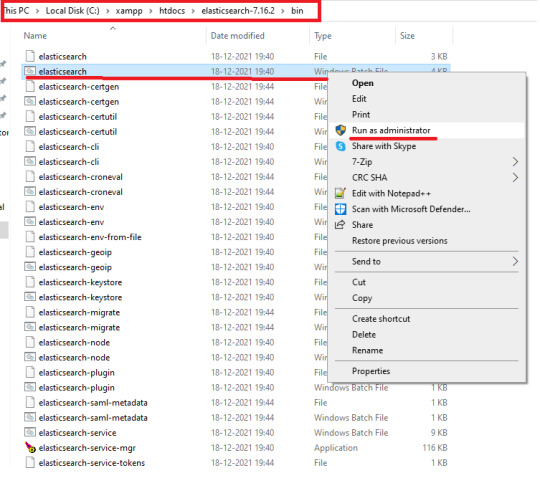
Hey buddy, I hope you are doing well, and you surf over the entire internet to overcome this issue could not validate a connection to elastic search in magento 2. By looking up at this error message you would understand that the issue is from the elastic search either it is not installed in your system or it is not running. which means we have to skip elastic search while installing…
View On WordPress
#attention no alive nodes found in your cluster magento 2#could not resolve host elasticsearch#could not validate a connection to elasticsearch windows#disable elasticsearch magento 2#enable elasticsearch magento 2 command#magento 2 4 elasticsearch not working#missing required argument engines of magentosearchmodelengineresolver#no alive nodes found in your cluster magento 2
0 notes
Link
Configure Commerce and Magento to use Elasticsearch

This part examines the base settings you should decide to test Elasticsearch with Magento 2. For extra insights regarding designing Elasticsearch, see the elasticsearch for magento 2.
Configure Elasticsearch within Magento
To configure Magento to use Elasticsearch:
Log in to the Magento Admin as an administrator.
Click Stores > Settings > Configuration > Catalog > Catalog > Catalog Search.
From the Search Engine list, select your Elasticsearch version.
The following table lists the required configuration options to configure and test the connection with Magento. Unless you changed Elasticsearch server settings, the defaults should work. Skip to the next step.
Elasticsearch Server Hostname- Enter the fully qualified hostname or IP address of the machine running Elasticsearch. Cloud for Adobe Commerce: Get this value from your integration system.
Elasticsearch Server Port- Enter the Elasticsearch web server proxy port. The default is 9200. Cloud for Adobe Commerce: Get this value from your integration system.
Elasticsearch Index Prefix- Enter the Elasticsearch index prefix. If you use a single Elasticsearch instance for more than one Magento installation (Staging and Production environments), you must specify a unique prefix for each installation. Otherwise, you can use the default prefix magento2.
Enable Elasticsearch HTTP Auth- Click Yes only if you enabled authentication for your Elasticsearch server. If so, provide a username and password in the provided fields.
Click Test Connection.
You will see either:

Continue with:
Configure Apache and Elasticsearch
Configure nginx and Elasticsearch
or you will see:
If so, try the following:
Make sure the Elasticsearch server is running.
If the Elasticsearch server is on a different host from Magento, log in to the Magento server and ping the Elasticsearch host. Resolve network connectivity issues and test the connection again.
Examine the command window in which you started Elasticsearch for stack traces and exceptions. You must resolve those before you continue. In particular, make sure you started Elasticsearch as a user with root privileges.
Make sure that UNIX firewall and SELinux are both disabled, or set up rules to enable Elasticsearch and Magento to communicate with each other.
Verify the value of the Elasticsearch Server Hostname field. Make sure the server is available. You can try the server’s IP address instead.
Use the netstat -an | grep **listen-port** command to verify that the port specified in the Elasticsearch Server Port field is not being used by another process.
For example, to see if Elasticsearch is running on its default port, use the following command:
netstat -an | grep 9200
Reindexing catalog search and refreshing the full page cache
After you change Magento’s Elasticsearch configuration, you must reindex the catalog search index and refresh the full page cache using the Admin or command line.
To refresh the cache using the Admin:
In the Admin, click System > Cache Management.
Select the checkbox next to Page Cache.
From the Actions list in the upper right, click Refresh. The following figure shows an example.

To clean the cache using the command line, use the magento cache:clean command.
To reindex using the command line:
Log in to your Magento server as, or switch to, the Magento file system owner.
Enter any of the following commands:
Enter the following command to reindex the catalog search index only:
bin/magento indexer:reindex catalogsearch_fulltext
Enter the following command to reindex all indexers:
bin/magento indexer:reindex
Wait until reindexing completes.
Unlike the cache, indexers are updated by a cron job. Make sure cron is enabled before you start using Elasticsearch. for more visit our site: mirasvit
1 note
·
View note
Text
How To Migrate Magento 1 To 2 Without Any Issues?
The most recent versions of PHP 7.4, Apache 2.4, NGINX 1. x, and Elasticsearch 7.9.x are all compatible with Magento. Your website will run faster and perform more effectively because of this combination. Also, it helps in processing more orders and speeds up loading time.

If we talk about Magento 2 extensions, they are more dependable and have better code. Better SEO performance with schema.org and rich snippets on the catalog pages in Magento2 Migration. More importantly, when compared to Magento 1, Magento 2 is much more mobile-friendly. The checkout process is also updated, and the themes are more responsive. PWA is compatible with Magento 2 and enables you to create a mobile native application experience for your online business.
If you are looking to Migrate, we will suggest you hire Magento 2 developer because the developer works professionally and understand all technical issues: here are some steps that need to be followed while migrating:
Theme Migration
Magento 2 gives merchants and customers a better shopping and store experience, it uses new technologies and techniques. Developers can use innovative approaches to create exceptional Magento 2 themes or modify the existing ones and make them compatible with Magento 2. Remember that migrating your Magento 1 theme directly to Magento 2 is not possible.
Extension Migration
Extension migration Extensions are essential components of your Magento website that add new features and expand its functionality. Installing the required Magento 2 extensions that are available on the Magento Marketplace is the next step in the migration process for Magento.
Keep in mind that Magento 2 extensions will not be compatible with Magento 1 extensions. You will face serious compatibility problems if you try to integrate them into Magento 2. It is recommended to only install extensions that are required for your Magento 2 stores.
Customization
Magento 1 store's custom code is usually compatible with Magento 2. To help you in this process, Magento offers a Code Migration Toolkit. It should be noted that the Magento migration may require significant changes to ensure that the custom code successfully integrates with Magento 2.
Data Migration
Data migration is the final step in the Magento migration process. The Magento 2 Data Migration Tool helps developers to migrate their store data and settings using CLI commands in the Magento migration process. It helps to transfer important data easily (products, categories, orders, store setups & settings, etc.) to Magento 2 and ensures smooth migration.
Take Magento 2 migration services from an experienced agency, they will ensure minimal downtime and protect your data.
Original Source: https://bityl.co/GGhp
0 notes
Text
Deploy Magento on MDS & HeatWave
Magento is an Open-Source e-commerce platform written in PHP using multiple other PHP frameworks such as Laminas and Symphony. Magento source code is distributed under Open Software License v3.0. Deploying Magento is not always easy as it often requires registration. However the source code is also availble on GitHub. Magento supports MySQL 8.0 since version 2.4.0 (July 28th 2020). In Magento’s documentation, there is a warning about GTID support: This is not anymore a problem since MySQL 8.0.13 ! Also MDS uses always the latest version of MySQL. Requirements To deploy Magento on Oracle Cloud Infratructure (OCI) using MySQL Database Service (MDS) and HeatWave you need: an Internet Connectionan OCI account (you can get a free trial on https://www.oracle.com/mysql)And… nothing else 😉 Once ready, the OCI dashboard is similar to this: Deployment The easiest was to deploy a full stack architecture on OCI is to use Resource Manager and a Stack. The complexity will be handled by the stack itself and Terraform will deploy automatically all required resources. You can get a stack to deploy the Magento architecture with all the required resources on my GitHub repository: https://github.com/lefred/oci-magento-mds The zip file is what you need if you want to deploy it manually: If you want to deploy everything automatically, you just need to click on the button If you click on it, you will launch the Stack Creation wizard and you need to first accept the Oracle Terms of Use: Once accepted, all information will be pre-filled and you will need to just fill some mandatory variables: Architectures With this stack, you have to possibility to deploy different architectures. It’s up to you to decide which one will match your needs. Architecture 1 – default The default architecture is this one: As you can see there is only one Magento Webserver (compute instance) using one MySQL Database Service instance and one OpenDistro for ElasticSearch compute instance. MDS must always be on a private subnet. Architecture 2 – multiple webservers With this deployment, one single Database and OpenDistroES are working as backend for multiple Magento Webservers. This is common when you want to have a load-balancer in front of your Magento serving the same site. Architecture 3 – multiple isolated sites As you can see, in this third and final architecture, you can deploy multiple Magento completely isolated. They each use their own MDS instance and their own OpenDistroES instance. You can deploy on of these architecture simply from the Stack Creation screen: It’s also possible to use an existing infrastructure in case you already have a VCN, an Internet Gateway, subnets, security lists, etc… and you want to use them. When you choose to deploy multiple Webservers, you need to fill this form too: Deploy ! When everything is filled as you want, you can directly deploy all the resources: Now, the apply job will run for some time (approximately 10 to 15 minutes). And you can follow all the steps in the log console: Important information will also be printed at the end. You can also retrieve those output variables from the menu on the left: Created Resources You can also verify what has been created for you like the instances for example: Magento We can copy the public IP of the Magento Webserver in our browser and we will see the Magento’s empty home page: If you are familiar with Magento, you should know that now, you require the Magento Admin URI to access the administration dashboard. This URI can be found in the Stack’s log output: If you add the URI to the public IP in your browser, you will reach the sign in form: Cron Job You will then see that the cron jobs are not enabled: To enable the cron jobs, you will need to access the Webserver in SSH. SSH to Compute Instances In OCI, to access in ssh to a compute instance in the public subnet, we need the IP but also a key. Usually, when you deploy manually your resources, you are requested to paste, upload or generate such key. Resource Manager generated one for us. We need to retrieve that key and save it in our computer. As usual we can find it in Stack’s outputs: We will paste it into a file called oci.key and use it: [fred@imac ~/keys] $ chmod 600 oci.key [fred@imac ~/keys] $ ssh -i oci.key [email protected] The authenticity of host '130.xx.xx.xxx (130.xx.xx.xxx)' can't be established. ECDSA key fingerprint is SHA256:+gVvfYsXMfqoUEHuw6myhIfm9ov748jN+Vf20zr573o. Are you sure you want to continue connecting (yes/no/[fingerprint])? yes Warning: Permanently added '130.xx.xx.xxx' (ECDSA) to the list of known hosts. Activate the web console with: systemctl enable --now cockpit.socket Last login: Mon Mar 15 11:38:21 2021 from 132.xxx.xxx.xxx [opc@magentoserver1 ~]$ We can now enable to cron job using the magento command line utility: [opc@magentoserver1 ~]$ cd /var/www/html [opc@magentoserver1 html]$ sudo -u apache bin/magento cron:install Crontab has been generated and saved The magento utility can also be used to retrieve the admin URI: [opc@magentoserver1 html]$ sudo -u apache bin/magento info:adminuriAdmin URI: /admin_1s35px Magento Sample Data As I’m not a Magento developer, I will add some sample data. I will use Magento2’s official sample data using git: [opc@magentoserver1 ~]$ sudo dnf -y install git ... [opc@magentoserver1 ~]$ cd /var/www/html/ [opc@magentoserver1 html]$ sudo -u apache git clone https://github.com/magento/magento2-sample-data ... [opc@magentoserver1 html]$ sudo -u apache php -f magento2-sample-data/dev/tools/build-sample-data.php -- --ce-source="/var/www/html/" All symlinks you can see at files: /var/www/html/magento2-sample-data/dev/tools/exclude.log It’s recommended to also increase the max memory allowed for PHP processes: [opc@magentoserver1 html]$ sudo sed -i 's/memory_limits*=.*/memory_limit=512M/g' /etc/php.ini [opc@magentoserver1 html]$ sudo systemctl reload httpd When done, we can finish the sample data’s installation: [opc@magentoserver1 html]$ sudo -u apache bin/magento setup:upgrade ... block_html: 1 full_page: 1 Nothing to import. [opc@magentoserver1 html]$ sudo -u apache bin/magento cache:flush Let’s verify is something has changed on the site (we use again the public IP in the browser): MySQL HeatWave HeatWave is a flagship technology that is only available in MDS and that considerably accelerates queries that are too long or too complex. The first requirement to use HeatWave is to have a MDS Instance Shape compatible with it. I recommend to always use a HeatWave compatible shape for MDS even if you don’t plan to directly use HeatWave. In this example, the shape used is MySQL.HeatWave.VM.Standard.E3. You can directly see that the shape is compatible with HeatWave. If you have such shape, you can immediately enable HeatWave on it (if not you will have to deploy a new instance): And you follow the wizard. As soon as the HeatWave nodes are ready, you will see them as active in OCI’s dashboard: Using MySQL HeatWave Now from the Magento Compute Instance, we can use MySQL Shell to connect to our MDS instance and verify if HeatWave is ready: SQL> SHOW GLOBAL STATUS LIKE 'rapid_plugin_bootstrapped'; +---------------------------+-------+ | Variable_name | Value | +---------------------------+-------+ | rapid_plugin_bootstrapped | YES | +---------------------------+-------+ 1 row in set (0.0018 sec) It seems it’s all correct. We also have status variables: SQL> show status like 'rapid%' ; +---------------------------------+------------+ | Variable_name | Value | +---------------------------------+------------+ | rapid_change_propagation_status | ON | | rapid_cluster_ready_number | 2 | | rapid_cluster_status | ON | | rapid_core_count | 16 | | rapid_heap_usage | 67109005 | | rapid_load_progress | 100.000000 | | rapid_net_authentication | ON | | rapid_plugin_bootstrapped | YES | | rapid_preload_stats_status | Available | | rapid_query_offload_count | 0 | | rapid_service_status | ONLINE | +---------------------------------+------------+ And Performance_Schema tables: SQL> show tables like 'rpd%'; +-------------------------------------+ | Tables_in_performance_schema (rpd%) | +-------------------------------------+ | rpd_column_id | | rpd_columns | | rpd_exec_stats | | rpd_nodes | | rpd_preload_stats | | rpd_query_stats | | rpd_table_id | | rpd_tables | +-------------------------------------+ Choosing tables to be used with HeatWave It’s necessary to tell to MySQL which tables can be used for HeatWave. This means which tables have their data off-loaded in HeatWave’s in-memory cluster. For this Magento site, I will use the catalog tables. This is an example using catalog_product_index_price: SQL> ALTER TABLE catalog_product_index_price SECONDARY_ENGINE = RAPID; SQL> ALTER TABLE catalog_product_index_price SECONDARY_LOAD; I used a script to perform those statements on all catalog% tables. It’s time to surf a bit on our Magento Shop and then verify is some queries used HeatWave. To perform this operation, we can use the rapid_query_offload_count status vatiable in MySQL: SQL> SHOW STATUS LIKE 'rapid_query_offload%' ; +---------------------------+-------+ | Variable_name | Value | +---------------------------+-------+ | rapid_query_offload_count | 3 | +---------------------------+-------+ 1 row in set (0.0015 sec) We can see that 3 queries used HeatWave already. And of course, it’s possible to see which ones using Performance_Schema table called rpd_query.stats: SQL> SELECT query_text, JSON_PRETTY(QEXEC_TEXT) FROM performance_schema.rpd_query_statsG ************************** 1. row *************************** query_text: SELECT MAX(count) AS `count` FROM ( SELECT count(value_table.value_id) AS `count` FROM `catalog_product_entity_varchar` AS `value_table` GROUP BY `entity_id`, `store_id`) AS `max_value` json_pretty(QEXEC_TEXT): { "timings": { "queryEndTime": "2021-03-17 09:26:29.208009", "queryStartTime": "2021-03-17 09:26:29.016203", "joinOrderStartTime": "2021-03-17 09:26:29.016116" }, ... With HeatWave in MDS we can also compare those queries. Let’s have a look: SQL> SELECT MAX(count) AS `count` FROM (SELECT count(value_table.value_id) AS `count` FROM `catalog_product_entity_varchar` AS `value_table` GROUP BY `entity_id`, `store_id`) AS `max_value`; +-------+ | count | +-------+ | 10 | +-------+ 1 row in set (0.0507 sec) SQL> SET SESSION use_secondary_engine=OFF; SQL> SELECT MAX(count) AS `count` FROM (SELECT count(value_table.value_id) AS `count` FROM `catalog_product_entity_varchar` AS `value_table` GROUP BY `entity_id`, `store_id`) AS `max_value`; +-------+ | count | +-------+ | 10 | +-------+ 1 row in set (2.3843 sec) As you can see, there is already a lot of difference for such a small query ! Maintenance For some operations, like reindexing everything, Magento runs some DDLs that are not supported while HeatWave is active. So if you encounter errors similar to this one: SQLSTATE[HY000]: General error: 3890 DDLs on a table with a secondary engine defined are not allowed., query was: TRUNCATE TABLE `catalog_category_product_index_store1_replica` Product Categories index process unknown error You only need to disable HeatWave for the time of the maintenance: SQL> ALTER TABLE catalog_product_index_store1 SECONDARY_ENGINE NULL; And the maintenance can happen this time without error: $ sudo -u apache bin/magento indexer:reindex catalog_product_price Product Price index has been rebuilt successfully in 00:14:03 When finished, you can enable back HeatWave: SQL> ALTER TABLE catalog_product_index_store1 SECONDARY_ENGINE = RAPID; SQL> ALTER TABLE catalog_product_index_store1 SECONDARY_LOAD; As you can see, it’s very easy to deploy Magento on OCI using Resource Manager and you can see that Magento benefits immediately from HeatWave. You can also check this post on video: https://lefred.be/content/deploy-magento-on-mds-heatwave/
0 notes
Text
Why Should You Use Magento 2 Template Hints For Your Store?
Magento 2 includes 3 structures to present your website to customers that are layout, block, and container.
The page structure looks the same as the XML (Extensible Markup Language) file that is much like the HTML (HyperText Markup Language) structure to create one or several columns.
Do you ever wonder how to identify each structure to design your website?
Magento 2 Template Hints are a useful tool to help you identify each block added to each page. Moreover, if you want to make a change, you need to know where that block is generated.
Let’s go to check with us how to enable this Magento Template hints!
Why Should You Use Magento 2 Template Hints For Your Store?
>>> Don’t miss this: The Best Magento Tutorials for eCommerce Store in 2020!
Debug is a crucial part of processing development in building an eCommerce store. The developer always knows what they should do when creating a website to ensure that it runs smoothly.
Magento 2 Template Hints is the part of this Debug process. It is a debugging tool that applies notions with a path on each template of the Magento 2 platform.
This mode displays the errors directly on the screen. In fact, it is a convenient way to debug even failed modules that show a blank page or 500 errors on the screen.
Here is the default Magento homepage with the images and banners installed.
And here is the thing you see at the backend store.
>>> Read more: Magento 2 MFTF to improve your eCommerce Store!
You can also check out Xdebug combination with PHP to help you with debugging and developing the website.
It helps you to establish breakpoints in your code and interrupt the PHP interpreter for displaying the application data on each executed line at such breakpoints.
So, do you know how to enable the Template Path of Magento? Let’s scroll down to check how to turn it on to help you manage your site faster.
How To Enable Magento Template Path Hints?
#1. Enabling Magento 2 Template Path Hints via Admin Panel
First, you log in to your Magento 2 account and go to Dashboard -> Stores -> Configuration.
Secondly, in tab Advanced, you click Developer.
>>> Don’t miss this: Elasticsearch Magento 2 to support your store performing!
Allowed IPs: fills your IP.
Template Path Hints: choose Yes
Add Block Names to Hints: choose Yes
After doing all the steps, your website will look like this in the storefront:
#2. Enabling Magento 2 Template Hints via Command Line
At first, you have to connect your Magento 2 store with SSH terminal and then go to your Magento 2 store file.
Enable Magento template path hints for frontend:
<?php bin/magento dev:template-hints:enable
Disable Magento template hints for frontend:
<?php bin/magento dev:template-hints:enable
Clean and flush cache:
<?bin/magento cache:clean
bin/magento cache:flush
However, you cannot enable or disable Magento 2 Template Hints for the Admin if you use this method.
#3. Enabling Magento 2 Template Hints via Source Code
Opening your file following the address below:
Vendor\magento\module-developer\Model\TemplateEngine\Plugin\DebugHints.php
Then, you copy this code on your file:
<?public function afterCreate( TemplateEngineFactory $subject, TemplateEngineInterface $invocationResult ) { $storeCode = $this->storeManager->getStore()->getCode(); // if ($this->scopeConfig->getValue($this->debugHintsPath, ScopeInterface::SCOPE_STORE, $storeCode) // && $this->devHelper->isDevAllowed()) { $showBlockHints = $this->scopeConfig->getValue( self::XML_PATH_DEBUG_TEMPLATE_HINTS_BLOCKS, ScopeInterface::SCOPE_STORE, $storeCode ); return $this->debugHintsFactory->create([ 'subject' => $invocationResult, 'showBlockHints' => $showBlockHints, ]); //} return $invocationResult; }
#4. Enabling Magento 2 Template Hints via MySQL
First, you log into your Magento account and go to System > Configuration > Developer page, switch to Website view.
Next, you can copy this code to enable the template:
<?SET @template_hints = 1; INSERT INTO `core_config_data` ( `scope`, `scope_id`, `path`, `value`) VALUES ('websites','1','dev/debug/template_hints', @template_hints) ON DUPLICATE KEY UPDATE `value`=@template_hints; -- Enable block hints SET @template_hints_blocks = 1; INSERT INTO `core_config_data` ( `scope`, `scope_id`, `path`, `value`) VALUES ('websites','1','dev/debug/template_hints_blocks', @template_hints_blocks) ON DUPLICATE KEY UPDATE `value`=@template_hints_blocks;
If you want to disable Magento 2 Template Hints, you can copy and paste the code below:
<?SET @template_hints = 0; INSERT INTO `core_config_data` ( `scope`, `scope_id`, `path`, `value`) VALUES ('websites','1','dev/debug/template_hints', @template_hints) ON DUPLICATE KEY UPDATE `value`=@template_hints; -- Enable block hints SET @template_hints_blocks = 0; INSERT INTO `core_config_data` ( `scope`, `scope_id`, `path`, `value`) VALUES ('websites','1','dev/debug/template_hints_blocks', @template_hints_blocks) ON DUPLICATE KEY UPDATE `value`=@template_hints_blocks;
However, there are many developers/users after following all steps that they still cannot enable from magento2 back-end section, it’s not showing.
>>> Interested? Check more TOP 6 Magento 2 Performance Tips to rocket your store!
We’re going to help you solve the problems after this part.
#5. Enabling Template Path Hints via env.php file
If you cannot change the value through the Admin Panel, you can search for the value on app/etc/env.php
In this file, you can check template_hints_storefront and template_hints_admin to change the value.
<?<?php return array( ... 'system' => array( 'default' => array( 'dev' => array( 'debug' => array( 'template_hints_storefront' => '1', 'template_hints_admin' => '1' ), ), ), ), ); Run the following command after the changes: php bin/magento setup:upgrade
How To Fix Magento 2 Template Hints Not Showing?
Firstly, you go to Dashboard -> Stores -> Configuration -> Advanced -> Developer.
And, next, you need to set Main Website in your Default store view.
Then, you can check your Configuration again whether Magento Template Hints working or not.
If still, your Magento 2 Template Hints not showing, you can open vendor/magento/module-developer/Model/TemplateEngine/Plugin/DebugHints.php
write this code inside afterCreate function : (at the start, above the storecode line)
<?if(isset($_GET['shreyasPathHints']) && $_GET['shreyasPathHints'] == 'on'){ return $this->debugHintsFactory->create([ 'subject' => $invocationResult, 'showBlockHints' => 1, ]); }
Now, you can open any Magento page and append
??shreyasPathHints=on
to the URL.
Conclusion
That is the way how to deal with Magento Template Path Hints for your store. In this article, I’ve shown you the benefits of Magento 2 Template Path Hints, how to enable and disable it, and how to solve if you cannot enable the Template Hints Path.
Again, Magento Template Path Hints is very important for your store because it shows the errors for you on the backend and helps you save your time to fix errors.
If you have any questions, you can comment on the comment section below.
We’re 24/7 support you!
Thank you for reading!
The post Why Should You Use Magento 2 Template Hints For Your Store? appeared first on Mageguides.
from Mageguides https://ift.tt/2Vhm4tT via IFTTT
0 notes
Text
How To Install Elasticsearch On Magento 2 | Magento Tutorial 2020
E-commerce stores are facing the issue of the lag search. Product information that customers are looking for has taken too much time to retrieve and show up.
It makes shoppers feel uncomfortable, leading to more cart abandonment and making the store owners lose their potential customers.
Nowadays, businesses are finding an alternative way to help the data stored retrieve quickly. For that reason, Magento 2 has developed Elasticsearch for e-commerce stores.
Install Elasticsearch Magento 2 is a NoSQL (originally referring to “non SQL” or “non-relational”) to support in performing a variety of search mechanisms and achieve fast search responses.
What Is Elasticsearch & Why Does It Work?
What Is Elasticsearch?
Elasticsearch bases on Lucene library being released by Elasticsearch N.V in 2010. It is an open search engine and analyzes various databases, including texts, numbers, geography,…
It is also developed in Java and Application Programming Interface (API) in order to help the achievement of fast responses. Moreover, because of using Lucene StandardAnalyzer, which can predict the text automatically and accurately.
Why We Should Use Elasticsearch?
Elasticsearch is a faster search engine than another different search engine. As it is built with HTTP API, it allows you to run any databases on any platform and shows the result in one second.
By using Lucene, it lets you combine and write large volumes of full-text search databases, from numerical to geographical.
Elasticsearch also uses ICU Analysis Plugin, API, and Lucene to support multilingual content. It can translate indexes in any language in multiple fields to bring better experiences, including Chinese, Korean,…
It provides the auto-completion functionality to suggest the customers when typing a search product, improving the correction search and help shoppers save their time.
Elasticsearch is also a very security engine to help you prevent unauthorized access and preserve the data of your store and customers.
How to Install Elasticsearch Magento 2 For Your Website?
If you follow the guide below correctly, you can quickly install Elasticsearch Magento for your ecommerce store site. However, you can only install Elasticsearch Magento 2 with the 2.3.x and Commerce edition version.
First, you should log-in to your Magento 2 Admin account and configure your Magento to use Elasticsearch.
Then, you have to click to Catalog under the CATALOG section and choose Catalog Search.
Next, you scroll down and, you select the right version of Elasticsearch and enable EAV Indexer.
The table lists require you to choose the option that you install for your website.
Option
Description
Elasticsearch
It almost doesn’t work anymore.
Elasticsearch 5.0+
It almost doesn’t work anymore.
Elasticsearch 6.0+
We recommend you should this version.
Server Hostname
Enter your hostname or IP addresses.
Server Port
Enter your website server proxy.
Index Prefix
Enter your Elasticsearch prefix according to installations, each demands its own prefix. You can use the index such as Magento2
Enable Elasticsearch HTTP Auth
Select YES and the server will suggest the passwords and usernames for you to access Elasticsearch.
And, you will connect the Elasticsearch to your Magento and run the test to see whether the Elasticsearch works or not.
If you see this, it means your Magento 2 store is connected to the Elasticsearch.
But if you see this,
you can following these below:
Ensure that your Elasticsearch server is still running.
Log-in to the Magento server and connect to Elasticsearch again.
Check the command of Elasticsearch to verify the Elasticsearch Server Port field to make sure that the server port is not running with another process. In general, it runs on its default port 9200.
<?netstat -an | grep 9200
After that, you configure the Suggestions and Recommendations search by enabling the Search Recommendation field.
Last but not least, Re-index and refresh the page by clicking System in Admin section. You will select the checkbox besides Page Cache, and select Refresh in the checkbox.
These are all the steps to help you install Elasticsearch Magento 2 for your website.
Top 4 Magento 2 Elasticsearch Extension Reviews
Magento 2 Elasticsearch Extension is a powerful tool to make the search engine faster and more accurate. It reduces the searching time and enhances customers’ experiences.
It has 4 well-known extensions: Amasty, Wyomind, Magedelight, Mirasvit. Let’s take a look at the feature sets of each Elasticsearch Magento 2 Extension.
#1. Wyomind – $120
The Elasticsearch Extension allows improving the search results by using autocomplete and display relevant results such as products, brands, categories with suggestions.
Specific features:
Autocomplete.
Product attributes.
Manage index.
Customize search details.
Fast and flexible searching.
Responsive box.
#2. Magedelight – $149
Increasing your sales and your customers’ experience by using the Elasticsearch published by Magelight. With the synonyms and stop words for searching, the results that customers search will show up timely with prices, brands, and categories.
Specific features
Autocomplete search.
Automatic spell correction.
Synonyms and stop words searching.
Attributes products.
Responsive box.
Search pop layout.
#3. Mirasvit – $249
Elasticsearch is the fastest tool to enhance your e-commerce store search results and permit customers to perform a search for any items they like on your website.
Specific features
Autocomplete.
Automatic spell correction.
Synonyms and stop words.
Redirect from 404 pages to products.
Cart button.
Reports.
Attribute weight.
#4. Amasty – $279
Magento 2 Elasticsearch Extension by Amasty can provide an accurate fast, flexible, and multiplex search.
Moreover, by using the Smart Search Analytics tool, Amasty can access the volume of databases that customers’ activities search in daily, weekly, and monthly.
Specific features
Smart search analytics.
Extensible Search Query.
Match modes.
Promote features.
Attribute weight products.
Autocomplete.
Spell correction.
Long-tail search.
Responsive box.
Wyomind – Magedelight – Mirasvit – Amasty Comparison
Amasty
Wyomind
Magedelight
Mirasvit
Autocomplete
+
+
+
+
Automatic spell correction
+
-
+
+
Synonyms and Stop words
+
-
+
+
Context search
+
+
+
+
Attribute weight
+
+
+
+
Popular and recent searches
+
-
-
+
Cart button
+
-
-
+
Reviews and ratings of products.
+
-
-
+
Search layout
+
+
+
+
Flexible index search
+
+
+
+
Responsive box
+
+
+
+
Reports
-
-
-
+
Wrapping Up
Once you install Elasticsearch Magento 2, your e-commerce store will successfully work and be ready to boost your store sales and decrease cart abandonment.
Elasticsearch Magento 2 Extension can give you full of functionalities that you need on Elasticsearch such as information and search results box, add to cart without leaving the other page,…
If you need any support, feel free to comment below.
We are 24/7 to support you.
You also can visit our website here for more information about Magento 2.
Read later:
Magexts.com – Magento 2 Extensions Review and Comparison
How To Refresh Statistics In Magento 2
5 Basic Samples Of Markup Tags In Magento 2
An Insight Into Attributes In Magento 2 Store
The post How To Install Elasticsearch On Magento 2 | Magento Tutorial 2020 appeared first on Mageguides.
from Mageguides https://ift.tt/3924uyu via IFTTT
0 notes