#disk2vhd
Explore tagged Tumblr posts
Visit Tumblr Blog
Explore Tumblr blogs with no restrictions, modern design and the best experience.
Last Seen Tumblr Blogs


Fun Fact
Celebrities use Tumblr as well.
Text
How to convert physical to virtual machines P2V in Windows and Linux
Case
You need to convert an existing physical machine running Windows or Linux to its virtual machine equivalent. This article provides instructions on how to carry out a physical to virtual (P2V) conversion.
Solution
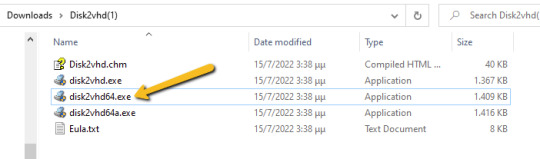
Windows Disk2VHD If you are running a Windows 7 or Windows 10 physical machine, you should download the Disk2VHD application from Windows Sysinternals. After extracting the contents of the downloaded .zip file the following executables are available. Run the "disk2vhd64.exe" on Windows 64-bit systems.
The Disk2VHD user interface lists the available system partitions and offers the following configuration options. Option for MBR partition, does not need the extra bootable partition for the final vhd(x) to be bootable.
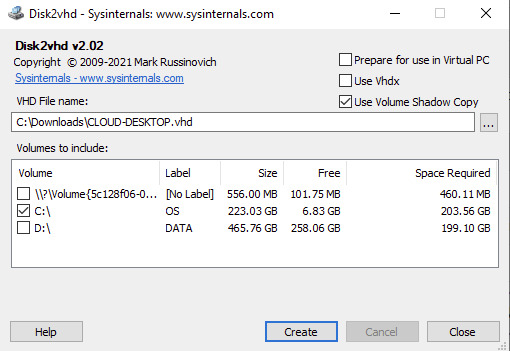
Option for GPT partition, needs also the bootable partition for the final vhd(x) to be bootable.
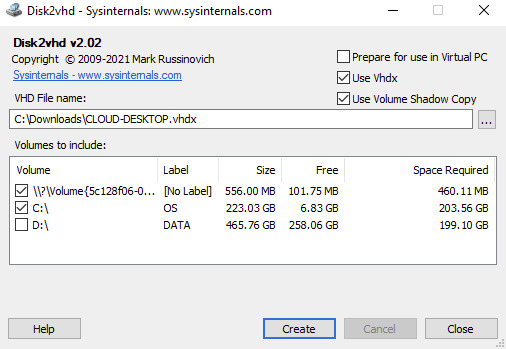
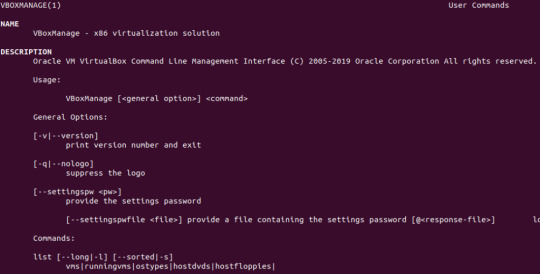
Disk2VHD has an option for .vhdx for HyperV or .vhd for compatibility with other hypervisors. There is a also a CLI-based equivalent of the GUI. Details about running CLI commands in Disk2VHD can be found at https://docs.microsoft.com/en-us/sysinternals/downloads/disk2vhd. Linux In a separate KB article, i have provided instructions on how to use Linux dd to clone a memory card to another memory card: https://stefanos.cloud/kb/how-to-clone-a-memory-card-in-linux/. In a similar fashion, you can first boot your Linux computer with a Linux Live CD, such as Ubuntu Live, Kali Linux, System Rescue CD or any other live CD of your preference. Then you can run the dd command with the necessary parameters to clone a physical machine into a virtual disk (file image), as shown in the example command below. dd if=/dev/hdc bs=4k conv=noerror,sync | ssh -c blowfish sampleuser@sampleserverIP 'dd of=filename.dd' #The below commands transform the created image file above to vhd format by using VirtualBox and VirtualBox Extensions on Linux sudo apt-get update sudo apt-get install virtualbox VBoxManage convertfromraw filename.dd filename.vhd --format VHD
An alternative method would be to make use of the ntfsclone2vhd (https://github.com/yirkha/ntfsclone2vhd) tool in Linux by running the following example bash command. ntfsclone --save-image -o - /dev/sdc | ntfsclone2vhd - /mnt/usb/myfile.vhd Mac OSX In case you are a Mac OSX user, you should follow instructions in the below article for P2V conversion of your physical Mac to a virtual machine. https://superuser.com/questions/870811/how-to-convert-a-physical-os-x-machine-to-virtual-machine. Virtual to virtual (V2V) conversion After you have completed the Physical to Virtual (P2V) conversion process, you may need to further convert the P2V output file to another file format (.vhd), so that it can be supported by a hypervisor other than Hyper-V or Virtual PC. You can further make use of the free Starwind V2V converter, to convert the .vhd file to a vmware hypervisor file format: StarWind V2V Converter / P2V Migrator is a free software for cloning and transforming VMs from one format to another, as well as converting physical machines into virtual ones. It is utilized when migration or Hypervisor Switch is required. Compared to the typical converters built into hypervisors, StarWind V2V Converter / P2V Migrator offers bi-directional conversion between all the major VM formats: VMDK, VHD/VHDX (Windows Repair Mode aware), QCOW2, and StarWind native IMG. Further guidance on Virtual to Virtual (V2S) conversion can be found at: https://www.nakivo.com/blog/how-to-convert-vhd-to-vmdk-a-step-by-step-guide/.
Sources
https://docs.microsoft.com/en-us/sysinternals/downloads/disk2vhd https://superuser.com/questions/410940/how-to-create-vhd-disk-image-from-a-linux-live-system https://tech.webit.nu/virtualbox-convert-raw-image-to-vdi-and-otherwise/ https://superuser.com/questions/1383079/clone-physical-disk-to-vdi-virtual-disk-virtualbox Read the full article
0 notes
Text
Disk2vhd 將實體作業系統轉虛擬機【Server2008R2示範教學】
中途接手維護伺服器時,客戶以前伺服器安裝了哪些功能或軟體剛接手的維護工程師一時間會看不出來,偏偏伺服器又一直當機異常,使用Disk2vhd工具將實體轉虛擬機是相對快速解決問題方法之一,能幫助客戶救援伺服器先上線辦公的同時工程師也有充裕時間研究安裝了哪些功能及設定… (more…)

View On WordPress
0 notes
Text
Microsoft disponibiliza nova versão da Suite Sysinternals para Windows, Nano Server e ARM64
A Microsoft disponibilizou recentemente uma nova atualização (build 2023.03.30) da Suite Sysinternals para Windows, Nano Server e ARM64. Esta Suite gratuita é destinada a IT Pros e Power Users e inclui ferramentas para monotorização de processos (Process Explorer e Process Monitor), monotorização e conversão de Discos Rígidos (DiskMon e Disk2vhd), analise de Dumps (ProcDump), entre…

View On WordPress
#ARM64#build 2023.03.30#Microsoft#Nano Server#Process Explorer v17.03#PsTools v2.5#Sysinternals#Sysmon 1.1.1 for Linux#TCPView v4.18#Windows
0 notes
Text
Microsoft virtual pc for windows 8

#Microsoft virtual pc for windows 8 how to
Next, you need to point the link to the *. To find out if your processor is supported: Press Windows key + X. This requires that your processor supports Secondary Address Translation. Windows 8 includes a built in Hypervisor called Hyper-V. Select the system file storage directory of the virtual machine:Ĭlick Create here to finish the initial initialization process:Īnd VirtualBox starts creating the system based on the user's specifications: Windows 8 does not support Windows Virtual PC/Windows XP Mode. Next is the storage partition of the virtual machine with a minimum capacity of 20GB to be able to install Windows 8:Īnd continue to select as the following pictures:Ĭhoose Fixed Size here to make the virtual machine system work faster, but it will take more space than Dynamically allocated: Next to the Memory section, set the memory to the virtual machine to operate, a minimum of 1GB (corresponding to 1024MB ): In this test, we set the Windows 8 Developer Review Disk2vhd is a utility that creates VHD (Virtual Hard Disk - Microsoft's Virtual Machine disk format) versions of physical disks for use in Microsoft Virtual PC or Microsoft Hyper-V virtual machines (VMs). > See more article to guide creating USB boot to install Windows 8Ĭlick Next, here you change the settings as shown below, name the virtual machine in the Name : Download Disk2vhd (564 KB) Run now from Sysinternals Live.
#Microsoft virtual pc for windows 8 how to
In the following article, we will show you how to install Windows 8 Developer Preview on VirtualBox. The appearance of Windows 8 has made the user community "staggered" constantly since yesterday.
0 notes
Text
Acronis Boot Loader No Configuration File Present
Configure DHCP relay on the router/switch
Acronis Boot Loader No Configuration File Present Free
Acronis Boot Loader No Configuration File Present Full
PXE-No Configuration file present. In OS Deployer. 3 years ago. Then i get Acronis Loader: No configuration file present. I have uploaded the configuration components, created a PE boot environment and uploaded that as well. Option 66 and 67 have been configured. No other PXE exist on the network. Starting Acronis Loader. Jul 23, 2007 It is using Acronis in it and we are trying to make a bootable media with option ' Create Bootable Media'.It creates the bootable media in ISO format.I have used that ISO to make a CD and then i have tried to boot the PC with that CD.It boots but it gives this message ' Acronis Loader: No configuration file present'.
Acronis Boot Sequence Manager just adds virtual disks (vhd files) to the Windows boot loader’ list of disks available for booting to Windows 7. If you do not select from where to boot, then by default the computer boots from the first entry in the booting list after waiting for a time interval specified in the Boot Timeout field.
The bootwiz files will still be in the OS but it worked fine in this condition in my machine. Another possible fix is to run a recovery console repair (fixmbr, bootcfg /add, bootcfg /rebuild, or even chkdsk /r). Previously when I used OSS and the 'configuration file not present' was listed it booted into windows when I pressed the ENTER key.
I ran disk2vhd on a recently built Windows 8.1 x64 machine. The conversion completed successfully, but I'm having no luck finding the right recipe to booting it in Hyper-V on a Server 2012 R2 machine. I've tried both Gen 1 and Gen 2 (with and without Secure Boot enabled). In both cases it apparently fails to find a boot loader.
This article applies to:
Acronis Backup 11.5 (Acronis Backup & Recovery 11.5)
Symptoms
You install Acronis PXE Server.
You set up Agent machines located in another subnet for PXE boot.
PXE boot starts: Starting Acronis Loader… Downloading bootwiz.cfg…
And fails with: Acronis Loader: No configuration file present
Cause
Issue in the DHCP relay configuration of your router/switch.
Solution
Set up DHCP relay (forwarding DHCP packets beetwen machines residing in different subnets) on your router/switch.
E.g. on your Cisco router or switch add the IP address of Acronis PXE server to the ip-helper address of the router/switch. This allows dhcp brodacasts sent by the Agent machines to be forwarded to another network where the PXE server resides.
Tags:
Introduction
This article instructs how to use Acronis True Image to recover Windows from a boot failure.
Use the present article only if the system is damaged to a state when you can't get to the Desktop screen and launch Acronis True Image normally. If you are able to access Acronis True Image within running Windows, please follow instructions from that article instead.
Pre-requisites
1. Acronis Bootable Media - a bootable USB thumb drive, CD or DVD with Acronis software on it. Click here for instructions on how to get it.
If you already have the bootable media, you can use it, including media created on a different computer. There is no need to create a new bootable media.
2. A previously created backup.
If you do not have a backup, you cannot restore the system using Acronis True Image. In such a case try Windows built-in recovery options.
Solution
Insert Acronis Bootable Media
Reboot the computer
If at this point the computer boots into Acronis Bootable Media environment, then click here to skip to the part of configuring the recovery task.
Otherwise, if you observe the same Windows boot failure symptom, instead of seeing Acronis boot menu, it means that you need to configure BIOS/UEFI to boot from Acronis Bootable Media.
Configuring BIOS/UEFI to boot from Acronis Bootable Media
Reboot one more time and pay attention to the text displayed on the screen. One of the first screens after the beep sound should be telling you which key to press on the keyboard to access UEFI or BIOS settings. The button to press varies across computer makes and models. Usually, it is either of the following: Esc, Del, F2, F9, F10, F11, F12. Press the indicated key quickly, before the message disappears.
For example, one of the initial splash screens may say: 'Please press DEL or F2 to enter UEFI BIOS Setting'. In that case you should press either Delete (Del) key on the keyboard or F2 quickly, while the message stays on the screen.
Once you are in the BIOS / UEFI settings, navigate to Boot Options, or Boot Order, or Boot Priority list - the name of the section varies across computer makes and models. Look for the section with 'Boot' or 'Storage' in the name. Bvh files free download. Follow on-screen instructions to navigate through the menu and put the device with Acronis Bootable Media at the very top of the boot order/priority list.
Verify that the system disk is still above other hard disks in the boot priority list, but below the device with Acronis Bootable Media.
Save changes and exit BIOS/UEFI setup utility.
On Windows 8 or Windows 10 machine, if Secure Boot is enabled then bootable media may fail to load or may be absent in the list of boot devices. Disable Secure Boot temporarily to perform recovery.
Launching Acronis True Image application
The first Acronis Bootable Media screen looks different depending on whether the media was booted in 1) UEFI or 2) Legacy BIOS/CSM modes
If you see a black and white text menu (Acronis UEFI loader), press '1' on the keyboard to launch Acronis True Image application:
If you see a blue graphical menu (Acronis Legacy BIOS/CSM loader), move the mouse pointer over 'Acronis True Image (64-bit)' or 'Acronis True Image' and click it to launch the program:
Configuring recovery task
When the main program window appears, click 'My disks' just below 'Recover' in the center of the screen. The recovery wizard will walk you through the settings.
1. Browse to the backup location
Click the Browse button to locate the backup:
Case A. Backup is on a NAS
Use either of these three methods to browse to the backup location:
1) expand 'Computers Near Me' section on the left panel and browse to the folder with the backup
2) click in the 'File name' field and type two backward slashes, followed by the NAS' name or IP-address, followed by another backward slash, e.g. MyNAS, or 192.168.0.12. After you type the last backward slash, wait for the program to connect to the NAS, enter credentials if asked, and browse to the folder with the backup
3) NAS may or may not be discovered automatically as a 'NAS' device, depending on the NAS make, its settings and router configuration. If the automatic detection succeeded, you will see it under 'My NAS connections' section
Case B. Backup is on external USB disk or on internal disk
Select the disk where the backup is stored, and browse to the folder where the backup file is located
Case C. Backup is in Acronis Cloud
If you are restoring from Acronis Cloud, click 'Acronis Cloud', enter your Acronis account credentials and click Sign in:
Click on the backup name, then click OK:
If the backup is encrypted for extra protection, type in the encryption password and click OK:
Click Next:
2. Select backup version
Case A. Backup is on a NAS or on internal or external disk
Click on the backup file that you would like to restore. If there are several backup files (recovery points), look at the Date column to find the newest backup, click it, then click OK button:
Verify backup selection and click Next:
Click Next button to confirm that entire disks/partitions will be restored, not individual files and folders:
Case B. Backup is in Acronis Cloud
At 'Recovery point' step you will be offered to select the backup version to restore. Days when at least one backup version was created will be marked in green:

Click on the latest day marked in green:
Click on the backup creation time on the right side. Selected time is marked with a blue background. If there are several items in the list, choose the latest:
Click Next:
3. Mark the system disk for restoration
Disks and partitions in the selected backup version are listed at this step:
Locate the system disk and mark the checkbox next to it. To avoid unnecessary configuration steps further in the wizard, click on the checkbox next to the disk title, e.g. 'Disk 1', and not on the checkboxes next to partitions (EFI System Partition, C:, Recovery partition, etc):
Click Next:
4. Define recovery destination
Case A. Left panel offers steps 'Destination of Disk 1', 'Destination of Disk 2' etc
Click on the disk where the system currently resides, but fails to boot, and click Next:
Click OK to confirm that everything on the selected disk will be deleted and replaced with the previous state of the system disk from the backup:
Case B. Left panel offers steps 'Settings of Partition 1-1', 'Settings of Partition 1-2' etc
Before proceeding, try switching to Case A by following instructions here, section Solution - Bootable Media, to simplify the recovery process.
If it was not possible to change recovery mode from partitions mode to disks, there are two possible outcomes:
1) the 'Next' button is not grayed out:
When recovering to the original disk with unchanged internal disks order and partition structure, the program will be able to map partitions from the backup to existing partitions on the original disk automatically. In such case recovery settings for each partition are pre-filled, the 'Next button' is not grayed out and you can press it right away. Keep clicking 'Next' to move through the list of partitions on the left panel. Going through some partitions may make the program 'think' for 5-20 seconds to correctly match the disk - just wait till the interface responds and click the 'Next' button:
2) the 'Next' button is grayed outThe 'Next' button is grayed out, when either internal disks order or partition structure has changed and the software was unable to automatically find the original partition:
Click 'New location':
Locate the original disk on the list and click on its first partition:
Click Accept:
Click Next to move the second partition's settings:
Click New location, this time to set the destination for the second partition:
Select the second partition under the system disk:
Click Accept:
Click Next:
Repeat the process till reaching 'MBR recovery' point on the left panel. When working with big partitions, the program may require 5-20 seconds to respond - just wait till it finishes reading them and responds.
When asked about 'MBR recovery': click on the system disk:
Mark the checkbox 'Recover disk signature':
Click Next:
When the 'Finish' step is highlighted on the left panel, that is the last chance when you can safely cancel the recovery and undo any changes made on the configuration screens before the program starts applying them:
Performing the actual restoration
Click Proceed to start the actual process of replacing the current failing system state with a healthy system state from the backup:
When the recovery finishes, take out Acronis Bootable Media and close Acronis True Image window.
Computer will reboot.
Windows will boot in a state as it was exactly when the backup was taken.
Troubleshooting
If possible, take notes and photos of the actions you undertake during troubleshooting. If you will be contacting Acronis directly for assistance, step-by-step pictures would help to resolve the issue quicker.
Recovery fails with an error
Click on the Log tab, then click on the plus sign to see the log of the failed operation. To facilitate further issue investigation and troubleshooting, save the recovery log and a system report:
1) Open the Log tab, right-click anywhere in the log, select 'Save all' and save the log file.
2) Click on a small triangle next to the question mark in the upper top corner of the window, select 'Generate System Report'. When the report generating finishes, click 'Save as' and browse to the same folder where the recovery log was saved previously.
CRC, Write and Input/Output (I/O) errors in the log may indicate the need of system disk replacement. Take the system disk out of the computer box, connect it to another computer and run diagnostic checks against it:
Acronis Boot Loader No Configuration File Present Free
1) Free CrystalDiskInfo instantly reads the disk health status as reported by the disk itself and displays it as Good, Caution or Bad. It is the quickest way to identify a disk hardware failure.
2) Dedicated diagnostic utilities from the disk manufacturers take the longest time to complete the checks, but provide the most accurate methods of checking whether the disk is good or needs replacement:
- Western Digital drives: Data Lifeguard Diagnostic for Windows
- Seagate disks: SeaTools for Windows
- HGST disks: HGST Windows Drive Fitness Test (WinDFT)
- Intel SSDs: Intel Solid State Drive Toolbox
- Samsung drives: Samsung Magician
- ADATA drives: ADATA SSD ToolBox
- Kingston SSDs: Kingston SSD Toolbox, Kingston SSD Manager
- Transcend SSDs: Transcend SSD Scope
- Silicon Power disks: SP ToolBox
- Toshiba disks: Toshiba PC Diagnostic Tool Utility
If no issues were found with the disk, contact Acronis Customer Central for further help with system recovery as explained here.
Recovered system does not boot
Verify that the bootable media mode (UEFI/Legacy BIOS) corresponds to the system disk type (GPT/MBR)
Before you start the actual recovery, look at the pictures in the comparative table in this article to be able to determine whether Acronis Bootable Media starts in 1) UEFI mode or 2) Legacy BIOS/CSM mode.
While on the disks/partitions selection screen ('What to recover' tab of the recovery wizard), move the mouse pointer over the system disk title, e.g. 'Disk 1' or 'Disk 2'.
Right-click on the disk title, e.g. on 'Disk 1'. Do not click on the disk partitions on that screen.
Click on 'Properties':
Look at the value of 'Partition scheme' parameter. It could be either 1) GUID Partition Table (GPT):
or 2) Master Boot Record (MBR):
1. If it says 'GUID Partition Table (GPT)', then the bootable media should have started in UEFI mode (black and white text menu with keyboard-only navigation). If you observed the Legacy BIOS/CSM boot mode instead, please reboot the computer, enter UEFI/BIOS settings and enable UEFI boot for the device with Acronis Bootable Media. If you are unsure about how to do that, follow instructions here.
2. If it says 'Master Boot Record (MBR)', then the bootable media should have started in Legacy BIOS/CSM boot mode (colorful graphic boot menu with mouse and keyboard navigation).If you observed the UEFI boot mode instead, please reboot the computer, enter UEFI/BIOS settings and enable Legacy BIOS/CSM boot for the device with Acronis Bootable Media. If you are unsure about how to do that, follow instructions here, but choosing the opposite values from indicated there (e.g. choose 'Legacy Support On').
There may be situations when you see two entries, referencing the same Acronis Bootable Media device in the boot order list: one with 'UEFI' or 'EFI' prefix, and one without it. In such case you need to pick the one that matches the boot mode of the internal disk where the restored Windows will run. Boot options, such as 'UEFI first', 'Launch CSM: Disabled', suggest that Acronis Bootable Media entry with 'UEFI' or 'EFI' prefix should be used.
Acronis Boot Loader No Configuration File Present Full
Avoid resetting BIOS/UEFI settings to their default values. Otherwise the UEFI/Legacy BIOS switch for the internal disk may change, complicating the recovery.
Acronis Bootable Media fails to boot, freezes, closes or reboots unexpectedly
Create Acronis Bootable Media, based on WinPE, using Advanced mode, as explained in this article. Then reattempt the restoration.
Unable to select a destination partition in the recovery wizard
Click Cancel button to exit recovery wizard window, click on the Tools tab and use 'Add new disk' wizard to quickly clear disk contents. Be careful when selecting the disk for 'adding' as the tool completely deletes everything on the selected disk and that action cannot be undone.
The disk with backup file is shown as empty in the 'Browse' dialog
Make sure that the disk, storing the backup is not formatted in ExFAT format. Acronis Bootable Media(Linux-based) is not able to read from ExFAT-formatted disks. If this is your case, either create a WinPE/WinRE-based bootable media, or use another computer to move your backups from ExFAT disk to some other location, re-format the disk in NTFS format, move backup back onto the disk and reattempt the restoration.
Wrong number of physical disks are listed at 'Where to recover' step
If you do not see the original disk in the list or it appears as two separate disks, it may be set to run in RAID mode, unsupported by the standard bootable media (Linux-based). In such case you need to get to a second computer and create a special WinPE-based bootable media there, with drivers for the RAID controller. The fastest way to get it is use MVP WinPE builder (choose Advanced version).
Installed software/system behaves unusually after restoration
After the recovery is completed, installed programs and the system may seem to behave unusually slow, requesting reboots etc. These are required to complete the missed maintenance tasks, such as downloading and installing updates and running regular checkups. If that happens, just let the required operations complete and after one or several reboots the system should be back to normal.
Acronis True Image reports 'You've exceeded the maximum number of activations for this serial number' status under Account tab after system restoration
Click 'Resolve problem' button under Account tab, select 'I have changed hardware..' option, then 'Move license from another computer', click on the computer name and, finally, click 'Move license'. Click here for more information.
Third-party software programs/Microsoft Windows ask for license reactivation
If the system disk failed and you had to replace it with a new one, installed software and Windows may or may not ask for their licenses reactivation after the recovery. It they do, that is due to a significant hardware change detected and cannot be and should not be prevented or avoided by Acronis software. Contact the respective third-party software vendors or Microsoft for help with license reactivation.
Computer locks up at entering UEFI/BIOS settings
If the invitation to press a key to entier UEFI/BIOS stays on the screen forever after you press the key, it could indicate a failure of one of the computer components (hardware). Power off the computer, physically disconnect the power cord (if it is a desktop), open the case and unplug the system disk. Then connect the power cable back and start the computer, press the required key and see if you get to the BIOS / UEFI setup screen. If this does not help - keep disconnecting other devices (all USB devices, SD cards, network cable etc) one-by-one until you find the culprit. The failing device then may need repair or replacement. If you feel uncomfortable working with computer parts, bring the computer to a professional service center to diagnose and fix the issue with entering BIOS / UEFI settings.
More information
Contact Acronis Customer Central if you have any questions or need help:
1) Sign into your Acronis account at https://account.acronis.com/. If you do not have one yet, click Sign Up to create it.
2) (step for perpetual licenses owners) If you have not registered your license key yet, click 'Add keys' button in the upper top corner of the screen, copy and paste the serial number and click 'Add' to register it.
3) Click on the Support tab on the left panel.
4) For technical questions and issues click 'Technical issue'. For all other matters click 'Trial/Pre-sales/Licensing question'.
5) Enter Live Chat ('Instant Chat') or submit a ticket by email ('Submit a ticket'). Owners of subscription and PPI licenses also get support by phone for technical issues. Providing us recovery log, system report, step-by-step screen photos and the list of the undertaken steps would allow for quicker issue resolution.
See also:
Tags:
0 notes
Text
物理ディスクを仮想ディスクイメージとして丸ごとバックアップできる「Disk2vhd」
物理HDDやSSDを丸ごと仮想ディスクイメージに変換するMicrosoft謹製のイメージ化ツール「Disk2vhd」のご紹介です。 (more…)

View On WordPress
0 notes
Text
Parallels For Mac Tpb
Parallels For Mac Phone Support
Parallels For Mac Pricing
Free Parallels For Mac Download
Parallels For Mac Reviews
Parallels Desktop 14 Crack for Mac with Activation Serial Keys
Parallels Desktop 13 Crack Plus Keygen 2018 Full Free version. It is the full offline installer and standalone setup for mac. The perfect product of the month is now on hand, especially for Mac users. Parallels Desktop 12 Crack provides you to run Windows on Mac.
Parallels Desktop 11 Crack 2018 Full version is really a software produced by parallels company for Mac customers to set up windows on their own mac. Use a Crack or Serial key, license code onto it to really make its full version and employ for as many as you would like for a lifetime.
Parallels Desktop for Mac Feature Suggestions Share your suggested feature requests for Parallels Desktop for Mac in this forum. Vote for the ideas you love and share the new ones!
There often comes the need in life of a developer when he/ she has to use more than one operating systems. Using dual boot takes way too much time and energy plus you can’t use both operating systems simultaneously. There was time when I was using Windows for my personal use but we were given a practical assignment to do with Linux kernel. At such time, it is way too much trouble to use dual boot and way too expensive to buy a new computer. So, of course, I came across a new solution called virtualization. This is exactly the job of Parallels Desktop 14 Crack.
Parallels Desktop is a software that allows you to use Windows operating system inside a Mac. This way you don’t have to buy a new computer and you can use both operating systems simultaneously. You will get a window of Parallels Desktop inside Mac that you can close, minimize and maximize according to your need. You can install Windows operating system inside Parallels Desktop window and perform every operation you want. We can even copy and paste files between Windows and Mac. Parallels Desktop 13 is the latest version that was released in August 22, 2017. Here we have Parallels Desktop 14 crack with activation key and setup for you.
• Uncheck ‘Use Volume Shadow Copy’ • Specify filename using mapped drive (e.g. • Check ‘Prepare for use in Virtual PC’ • Uncheck ‘vhdx’. Parallels desktop 11 for mac. Desktop) • Run Disk2vhd.
Aug 21, 2018 This update for Parallels Desktop 14 for Mac 14.0.1 (45154) addresses overall stability and performance issues, and includes the following fixes and improvements: General enhancements. Resolves an issue with the camera connected to Mac, shared. Parallels Desktop for Mac Pro Edition is the easiest and most powerful solution for developers, power users, and other demanding pros looking to increase productivity. Parallels Desktop is powerful software that permits the users to easily create the virtual machine and it enables to run Windows OS on a Mac Computers. Through this software, you can basically use any application like it on Windows, Android, Mac or Linux.
Parallels For Mac Phone Support
What is New in Parallels Desktop 14?
More than 47% faster access to Windows files and documents.
Move, copy, and transfer with modern USB 3.0 mass storage devices and external SSD devices.
Parallels Desktop 13 is featuring up to 32 vCPU and 128 GB vRAM per virtual machine.
Optimized for Windows 10 Fall Creators Update and macOS High Sierra.
Additional 30+ Tools to make Everyday Tasks easier on Mac and Windows.
There is included a Touch Bar that supports Microsoft Office and additional integration for Windows Start Menu and Desktop.
You can now add your favorite program of Windows to the Touch Bar of MacBook Pro.
Improvements in rebooting Windows and changing windows size with better resolution result.
You can now see new or recent contacts in the Mac Dock or Windows Taskbar.
What is Parallels Desktop 14 Crack?
Parallels Desktop 13 for mac is a very useful software but you have to pay it price in order to use it. They offer a 14 day trial version and after that you are required to pay for it otherwise it will stop working. Parallel Desktop 13 Pro version requires you to pay $100 each year to use it. Parallels Desktop 14 crack will activate the full version from the trial edition. We have here shared Parallels Desktop 14 crack with activation key free to download.
How to Install Parallels Desktop 14 Crack?
First download the Desktop 14 Trial version from the link given below.
Once the download has completed install it.
Look for the option to ‘Buy’ or ‘Activate’ after the installation has completed.
Now copy the Key given below and paste there.
Parallels Desktop 14 Working Keys:
Serial Keys:
Internet explorer for mac os. Cause 3rd party network related drivers presence. Symptoms There is no internet connection in the virtual machine after updating Parallels Tools.
HJERE-JHGRU-W4YWK-EUGRE-YKTJR
Activation Keys:
74YFU-RE7TT-IERYT-ITU5T-5YTI5
Parallels For Mac Pricing
Product Keys:
364789876545679876545657234
System Requirements:
MacOS v10.12, OS X v10.11.5, OS X v10.10.5, or any later version
Intel Core 2 Duo processor or faster
Minimum 850MB free space in hard disk
Free Parallels For Mac Download
Click the below link to download Parallels Desktop 14:
(sociallocker) Mirror(/sociallocker)
How can the answer be improved? I ordered Parallels Desktop 12 to upgrade my computer from Parallels 7 and an old operating system. First call to Parallels support was ok, the tech recommended that I upgrade the iOS system first, and then upgrade the Parallels. Parallels desktop 12 for mac review.
Marry
Parallels Desktop
Parallels For Mac Reviews
5
0 notes
Text
How to Convert a Physical Server to a Citrix Xen Virtual Server (P2V)
How to Convert a Physical Server to a Citrix Xen Virtual Server (P2V)

October 2017 Update Citrix no longer provides the XenConvert tool for download and no longer supports it. You now have the only option to convert the physical computer to XenServer is to first convert it to VHD format (using a tool like Disk2VHD) and then import it. If you want to convert a VMware virtual machine to XenServer, you can try using the XenServer Conversion Manager feature.
Citri…
View On WordPress
0 notes
Text
WinPE 10-8 Sergei Strelec indir 2020.06.09

Önyüklenebilir disk Windows 10 ve 8 PE - bilgisayarların, sabit disklerin ve bölümlerin bakımı, yedekleme ve diskler ve bölümler, bilgisayar tanılama, veri kurtarma, Windows yükleme geri yükleme için. WinPE10x64 WinPE10x86 WinPE8x86 WinPE8x86(Native) Yedekleme ve Restore # Acronis True Image 2020 Build 25700 # Acronis True Image 2019 Build 17750 # Acronis True Image 2017 Build 8058 # Acronis True Image 2014 Build 6673 # Acronis Backup Advanced 11.7.50230 # EASEUS Todo Backup 13.2 # Active Disk Image 9.5.2.0 # StorageCraft Recovery Environment 5.2.5.37836 # FarStone Recovery Manager 10.10 # R-Drive Image 6.3 Build 6303 # Veritas System Recovery 21.0.0.57158 # Symantec Ghost 12.0.0.10695 # TeraByte Image for Windows 3.40 # AOMEI Backupper 5.7.0 # Isoo Backup 4.2.2.760 # Drive SnapShot 1.48.0.18798 # Macrium Reflect 7.2.4473 # Disk2vhd 2.01 # Vhd2disk v0.2 Hard disk # Disk Management, System # Acronis Disk Director 12.5 Build 163 # EaseUS Partition Master 13.8 # Paragon Hard Disk Manager 15 10.1.25.1137 # MiniTool Partition Wizard 12.0 # AOMEI Partition Assistant 8.8 # AOMEI Dynamic Disk Manager 1.2.0 # Macrorit Disk Partition Expert 5.3.9 # DiskGenius 5.2.1 Build 941 # Active Partition Manager 6.0.15 # DriveClone 11.10 Build 20150827 (WinPE10) # EaseUS Disk Copy 3.5 # Defraggler 2.22.995 # Auslogics Disk Defrag 8.0.24.0 # O&O Defrag 23.0 # HDD Low Level Format Tool 4.40 # Active KillDisk 12.0.25 # Diskpart Read the full article
0 notes
Text
Microsoft disponibiliza nova versão da Suite Sysinternals para Windows, Nano Server e ARM64
A Microsoft disponibilizou uma nova atualização (build 2023.01.26) da Suite Sysinternals para Windows, Nano Server e ARM64. Esta Suite gratuita é destinada a IT Pros e Power Users e inclui ferramentas para monotorização de processos (Process Explorer e Process Monitor), monotorização e conversão de Discos Rígidos (DiskMon e Disk2vhd), analise de Dumps (ProcDump), entre outros. (more…) “”

View On WordPress
#ARM64#build 2023.01.26#Microsoft#Nano Server#RDCMan (v2.92)#Sysinternals#Sysmon (v14.14)#Windows#ZoomIt (v6.12)
0 notes
Text
「Disk2vhd」を使用したUEFI/GPTベースシステムのHyper-VへのP2V移行 記事を読む March 11, 2020 at 05:15AM
0 notes
Photo

WinPE 10-8 Sergei Strelec (x86/x64/Native x86) 2018.09.20 English version Full[BabuPC] WinPE 10-8 Sergei Strelec WinPE 10-8 Sergei Strelec — Bootable disk Windows 10 and 8 PE for maintenance of computers, hard disks and partitions, backup and restore disks and partitions, computer diagnostics, data recovery, Windows installation.Features:Composition of assembly: WinPE10x86 WinPE10x64 WinPE8x86 WinPE8x86(Native)X86 Image containsBackup and restore Acronis True Image 2017 20.0 Build 8058 Acronis True Image Premium 2014 Build 6673 Acronis Backup Advanced 11.7.50064 Active Disk Image 8.0.3 StorageCraft Recovery Environment 5.2.5.37836 FarStone Recovery Manager 10.10 QILING Disk Master 4.3.6.20170806 R-Drive Image 6.2 Build 6201 Veritas System Recovery 2018 18.0.0.56426 Symantec Ghost 12.0.0.10561 TeraByte Image for Windows 3.16 AOMEI Backupper 4.0.6 Eassos System Restore 2.0.3.571 Drive SnapShot 1.46.0.18038 Macrium Reflect 7.1.2801 Disk2vhd 2.01 Vhd2disk v0.2Hard disk Disk Management, System Acronis Disk Director 12.0.3297 EASEUS Partition Master 12.9 WinPE Edition Paragon Hard Disk Manager 15 10.1.25.1137 MiniTool Partition Wizard 10.2.2 AOMEI Partition Assistant 6.6.0 AOMEI Dynamic Disk Manager 1.2.0 Macrorit Disk Partition Expert 4.9.3 NIUBI Partition Editor 7.1.0 Eassos PartitionGuru 4.9.5.508 Defraggler 2.21.993 Auslogics Disk Defrag 7.1.0 HDD Low Level Format Tool 4.40 Active KillDisk 11.0.83 FarStone DriveClone 11.10 Build 20150825 (WinPE10) Diskpart GUI Micro 1.3 Active Disk Editor 7.0.15Diagnostics HD Tune Pro 5.70 Check Disk GUI Victoria 4.47 HDD Regenerator 2011 HDDScan 4.0.0.13 Hard Disk Sentinel Pro 5.20 Build 9372 Western Digital Data LifeGuard Diagnostics 1.31.0 CrystalDiskInfo 7.6.0 CrystalDiskMark 6.0.0 AIDA64 Extreme Edition 5.92.4300 BurnInTest 9.0 Build 1003 PerformanceTest 9.0 Build 1024 ATTO Disk Benchmark 3.05 RWEverything 1.7 CPU-Z 1.84 PassMark MonitorTest 3.2 Build 1004 HWiNFO32 5.74 Build 3360 OCCT Perestroika 4.5.1 Keyboard Test Utility 1.4.0 IsMyLcdOK 3.03Network programs Opera 46 Opera 12 PENetwork 0.58.2 TeamViewer 6 Ammyy Admin 3.5 AeroAdmin 4.1 Build 2767 µTorrent 3.1.3 FileZilla 3.24.0 Internet Download Accelerator 6.10.1.1527 OpenVpn 2.4.4 PuTTY 0.70 Advanced IP Scanner 2.5 Build 3567Other programs Active Password Changer 8.0.7 PCUnlocker 4.5.0 Reset Windows Password 4.2.0.470 Password Reset 5.0 UltraISO 9.7.1.3519 Total Commander 9.00 Remote Registry (х86/64) FastStone Capture 7.7 IrfanView 4.38 STDU Viewer Bootice 1.3.4 Unlocker 1.9.2 7-ZIP WinNTSetup 3.8.8.6 Double Driver 4.1.0 Imagex GImageX 2.1.1 Media Player Classic EasyBCD 2.3 EasyUEFI 3.0 SoftMaker Office Far Manager 3.0 Build 5151 BitLocker 78Setup (author conty9) Dism++ 10.1.1000.62 WinHex 19.3 FastCopy 3.41 UltraSearch 2.12 Everything 1.4.1.877 Linux Reader 2.6 WinDirStat 1.1.2 Recover Keys 10.0.4.201 NirLauncher 1.20.34 Remote Registry Editor Windows Recovery Environment (WinPE 10)Data Recovery R-Studio 8.5 Build 170237 Active File Recovery 17.0.2 Active Partition Recovery 16.0.3 Runtime GetDataBack for NTFS 4.33 Runtime GetDataBack for FAT 4.33 DM Disk Editor and Data Recovery 2.10.0 UFS Explorer Professional Recovery 5.23.1 Hetman Partition Recovery 2.8 Eassos Recovery 4.2.1.297 EaseUS Data Recovery Wizard 11.9 Ontrack EasyRecovery 12.0.0.2 [spoiler text=X64 Image contains id=userspoiler2]Backup and restore Acronis True Image 2017 20.0 Build 8058 Acronis True Image Premium 2014 Build 6673 Acronis Backup Advanced 11.7.50064 Active Disk Image 8.0.3 StorageCraft Recovery Environment 5.2.5.37836 FarStone Recovery Manager 10.10 QILING Disk Master 4.3.6.20170806 R-Drive Image 6.2 Build 6201 Veritas System Recovery 2018 18.0.0.56426 Symantec Ghost 12.0.0.10561 TeraByte Image for Windows 3.16 AOMEI Backupper 4.0.6 Eassos System Restore 2.0.3.571 Drive SnapShot 1.46.0.18038 Macrium Reflect 7.1.2801 Disk2vhd 2.01 Vhd2disk v0.2Hard disk Acronis Disk Director 12.0.3297 EASEUS Partition Master 12.9 WinPE Edition Paragon Hard Disk Manager 15 10.1.25.1137 MiniTool Partition Wizard 10.2.2 AOMEI Partition Assistant 6.6.0 AOMEI Dynamic Disk Manager 1.2.0 Macrorit Disk Partition Expert 4.9.3 NIUBI Partition Editor 7.1.0 Eassos PartitionGuru 4.9.5.508 Defraggler 2.21.993 Auslogics Disk Defrag 7.1.0 HDD Low Level Format Tool 4.40 Active KillDisk 11.0.83 FarStone DriveClone 11.10 Build 20150825 (WinPE10) Diskpart GUI Micro 1.3 Active Disk Editor 7.0.15Diagnostics HD Tune Pro 5.70 Check Disk GUI Victoria 4.47 HDD Regenerator 2011 HDDScan 4.0.0.13 Hard Disk Sentinel Pro 5.20 Build 9372 Western Digital Data LifeGuard Diagnostics 1.31.0 CrystalDiskInfo 7.6.0 CrystalDiskMark 6.0.0 AIDA64 Extreme Edition 5.92.4300 BurnInTest 9.0 Build 1003 PerformanceTest 9.0 Build 1024 ATTO Disk Benchmark 3.05 RWEverything 1.7 CPU-Z 1.84 PassMark MonitorTest 3.2 Build 1004 HWiNFO32 5.74 Build 3360 OCCT Perestroika 4.5.1 Keyboard Test Utility 1.4.0 IsMyLcdOK 3.03Network programs Opera 46 PENetwork 0.58.2 TeamViewer 6 Ammyy Admin 3.5 AeroAdmin 4.1 Build 2767 µTorrent 3.1.3 FileZilla 3.24.0 Internet Download Accelerator 6.10.1.1527 OpenVpn 2.4.4 PuTTY 0.70 Advanced IP Scanner 2.5 Build 3567Other programs Active Password Changer 8.0.7 Reset Windows Password 4.2.0.470 PCUnlocker 4.5.0 Password Reset 5.0 UltraISO 9.7.1.3519 Total Commander 9.00 Remote Registry (х86/64) FastStone Capture 7.7 IrfanView 4.38 STDU Viewer Bootice 1.3.4 Unlocker 1.9.2 7-ZIP WinNTSetup 3.8.8.6 Double Driver 4.1.0 Imagex GImageX 2.1.1 Media Player Classic EasyBCD 2.3 EasyUEFI 3.0 SoftMaker Office Far Manager 3.0 Build 5151 BitLocker 78Setup (author conty9) Dism++ 10.1.1000.62 WinHex 19.3 FastCopy 3.41 UltraSearch 2.12 Everything 1.4.1.877 Linux Reader 2.6 WinDirStat 1.1.2 Recover Keys 10.0.4.201 NirLauncher 1.20.34 Remote Registry Editor Windows Recovery Environment (WinPE 10)Data Recovery R-Studio 8.5 Build 170237 Active File Recovery 17.0.2 Active Partition Recovery 16.0.3 Runtime GetDataBack for NTFS 4.33 Runtime GetDataBack for FAT 4.33 DM Disk Editor and Data Recovery 2.10.0 UFS Explorer Professional Recovery 5.23.1 Hetman Partition Recovery 2.8 Eassos Recovery 4.2.1.297 EaseUS Data Recovery Wizard 11.9 Ontrack EasyRecovery 12.0.0.2 MS-DOS programsHDD Regenerator 2011 HDDaRTs 21.02.2018 HDD Regenerator 2011 MHDD 4.6 Victoria 3.52 MemTest86+ 5.01 MemTest86 6.3.0 (PassMark) HDAT2 6.0 beta 7 GoIdMemory PRO 7.85 Active Password Changer Professional 5.0 Ghost 11.5 BootIt Bare Metal 1.45 Eassos PartitionGuru Kon-Boot for Windows 2.7 NetworkSystem RequirementsRAM 1 GB / Native 512 MB. PC with the ability to boot from CD/DVD-drive or USB.
0 notes
Photo

Disk2vhd: Convierte instalaciones de Windows en imágenes para entornos virtuales http://ift.tt/2gPGgy0
0 notes
Text
Disk2vhd Fiziki bir windows partition’dan sanal disk üretmek.
Microsoft’un kendi sitelerinde tavsiye ettiği ender araçlardan birisi.Disk2vhd fiziksel bir windows partition’ı kolayca sanallaştırmak için bire bir.
https://docs.microsoft.com/tr-tr/sysinternals/downloads/disk2vhd
https://download.sysinternals.com/files/Disk2vhd.zip

0 notes
Text
Is there an easier way to migrate a workload into AHV?
Is there an easier way to migrate a workload into AHV? #Sureline #nutanix
DoubleTake, Sureline, VMware Converter, Disk2vhd
Over the last couple month I have been working on migration strategies for P2V and V2V into AHV (Nutanix Acropolis). During this time I found the following products:
Double Take
VMware Converter
Disk2vhd(Hyper-V)
Sureline
So here is the current break down.
Disk2vhd (Hyper-V)
This software works great for Physical to Hyper-V. It was originally…
View On WordPress
0 notes
Text
Microsoft disponibiliza nova versão da Suite Sysinternals para Windows, Nano Server e ARM64
Microsoft disponibiliza nova versão da Suite Sysinternals para Windows, Nano Server e ARM64
A Microsoft disponibilizou ontem uma nova atualização (build 2022.10.26) da Suite Sysinternals para Windows, Nano Server e ARM64. Esta Suite gratuita é destinada a IT Pros e Power Users e inclui ferramentas para monotorização de processos (Process Explorer e Process Monitor), monotorização e conversão de Discos Rígidos (DiskMon e Disk2vhd), analise de Dumps (ProcDump), entre outros. (more…)

View On WordPress
#ARM64#Microsoft#Nano Server#Process Explorer (v17.0)#Process Monitor (v3.92)#Sysinternals#Sysmon (v14.11)#Windows
0 notes