#elementdiffupgrades
Explore tagged Tumblr posts
Visit Tumblr Blog
Explore Tumblr blogs with no restrictions, modern design and the best experience.
Last Seen Tumblr Blogs


Fun Fact
Users from the US are the majority of Tumblr visitors.
Text
Part 2 CRV Differential Disassembly!

Continuing from our last post where we disassembled the rear differential from the carrier and talked about what we will be installing into our customers differential. Today we will be removing the nose cap from the differential carrier, the clutch assembly, and the dual pump assembly for the Dual Pump Quick Spool Mod and Racing Diffs Clutch Upgrade Install! So without further adieu Lets Get it! To begin this process we will need to get some tools like last time to prepare for our disassembly! I'd recommend a "Strait Blade Screw Driver" always at the ready! But here are the tools that will be required to accomplish this task!
Required Tools
3/8ths" Drive Ratchet.3/8ths" Drive 3" extension.3/8ths" 8mm 6pt Socket.1/2" Drive Ratchet or Breaker Bar.1/2" Drive 24mm or 34mm Socket.1/4" Drive Ratchet.1/4" Drive 6mm Socket.1/4" Drive 3" Extension.Driveshaft Flange Support Bar.6" Long #3 Strait Blade Screw Driver.A Hammer.Small Center Punch.6" Pry-bar.Small Razor for Gasket removal.Drip Pan.Gloves.45 Degree Scribe.
Differential Nose Cap Removal
First I needed to get some illustrations from the CRV Master Service Manual. I acquired them from Honda thanks to a couple of good friends! This should help support this episode for you all to follow along. The procedure is pretty strait forward. Using a center punch you will need to take your hammer and remove the dimple on the pinion nut that locks the differential pinion nut. This dimple keeps the pinion nut from backing off and from loosening under normal driving conditions.

Hammer and Center Punch Pinion Dimple Removal Procedure

Pinion Nut Dimple Relief
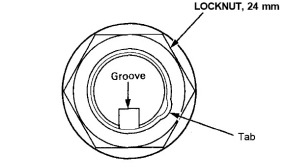
Turn the Pinion Nut Counter Clockwise to remove. While supporting the weight of the differential install the driveshaft flange support bar and hardware onto the U joint flange of the differential. Install the driveshaft flange support bar onto the differential and grab your 1/2" drive breaker bar and (24mm or 34mm) socket. Place the socket into the differential and break the TQ of the 24mm pinion nut and remove it.

Note: 1997 to 2005 Honda CRV and 2003-2011 Element use 24mm pinion nut. 2006-2011 CRV & Accord Crosstour use 34mm pinion nut.

Remove the Driveshaft Flange and lock nut from the Differential Nose Cap Assembly. (TCD) Next we will remove the 8x8mm bolts from the differential nose cap cover. Pay particular attention to not strip the bolts when removing them. Using your 3/8ths" drive ratchet, 3/8ths" drive 3" extension, and 3/8ths" Drive 8mm 6pt socket remove all 8 bolts from the differential nose cap cover and place them in a safe area.

Separate the Torque Control Differential "TCD" Nose Cap from the Differential Carrier Assembly. Once this step is complete use your 6" strait blade screw driver and pry-bar to separate the nose cap cover from the differential by prying at the separation tabs on the nose cap and carrier assembly. Remove the nose cap cover over your drain pan to alleviate spills and messes. Separate the nose cap cover from the differential carrier assembly and place in a safe location. This should expose the differential TCD and Dual Pump Assembly. Remove the differential clutch assembly and clutch cage by lifting them from the pinion shaft and placing them to the side. Warning! The TCD Clutch RAMP Assembly for the 2006 - 2011 RT-AWD differential have 8 small ball bearings that ride under the clutch assembly. Use caution when removing. Any damage to these ball bearings will render the TCD clutch RAMP assembly non-operational.
Dual Pump Assembly Removal!
I think it's important to give some characteristics of both differential dual pump assemblies we support! At first glance the dual pump assemblies from the 1997-2005 CRV are noticeably different in size.

The 2006-2011 CRV differential with RAMP is exactly 76.2mm tall and is 118mm in diameter.

The 1997-2005 CRV differential is 101.6mm tall and 115.6mm diameter.

RT-AWD Dual Pump Assemblies

Carrier Assembly Preparation!
Since we are not replacing the pinion in this differential we will start with removing the strainer from the differential carrier assembly.

Using your strait blade screw driver use the side of the case to gain leverage to pry the strainer from the carrier assembly. *CAUTION! Please be careful not to damage the screen of the strainer during removal.

Lift the strainer from the carrier and place it to the side. Repeat this step for the magnet to the left if the strainer below the pinion. In the next part of this build documentary we will perform the inspection of the internal differential components We will then compare the older CRV differential carrier assembly to the new and remove the pinion from the differential for bearing inspection. Stay tuned and we will be back soon! Thanks for following! Like!/ Share!/ Comment! Read the full article
#AKDINC#Automotiveknd#AWDHonda#CrosstourDiffUpgrades#CRVDiffUpgrades#DPQSKit#DPQSUpgrades#ElementDiffUpgrades#GEARX#GTSMotorsports#Honda#HondaDualPump#HondaNation#LSD_Upgrades#Molybdenum#RacingDiffs#Rebuild_Service#RTAWD
0 notes
Photo

Time to install a 50/50 GEAR X/ GTS Transmission ring and pinion! 2.545:1 (RD1) Non-Ramp Differential being assembled to test our Dual Pump Clutch Delete kit! Will definitely see this one out on the auto cross circuit and possibly another set being tested off road in 1 of our volunteer vehicles featuring a Honda CRV lifted on 30's! A lot of applications for the new technology that we have built with our friends in manufacturing! So now it is time to start building a differential to show you exactly what they are capable of and exceed some factory parameters! #akdbuilt #mcsmachine #bdperformance #ewerkz #bisimoto #bumskiespeedshop #speedfactorracing #crvrd1 #crv #CRVDiffUpgrades #ElementDiffUpgrades #rtawdto4wd #autocross #clutchless #racingdiffs #wagonkilla #performancedifferentials #modulardesigns #mechanicalengineering #innovatorsmindset (at Automotive Koncepts & Designs INC) https://www.instagram.com/p/BxI2gUDnb_j/?utm_source=ig_tumblr_share&igshid=4nh6f6tx6f9g
#akdbuilt#mcsmachine#bdperformance#ewerkz#bisimoto#bumskiespeedshop#speedfactorracing#crvrd1#crv#crvdiffupgrades#elementdiffupgrades#rtawdto4wd#autocross#clutchless#racingdiffs#wagonkilla#performancedifferentials#modulardesigns#mechanicalengineering#innovatorsmindset
0 notes
Text
Another Built Diff Leaving the Lab!

Finally finished! Another RT-AWD Crv differential done and shipped to it's new owner!

Featuring our Dual Pump Quick Spool kit and @RacingDiffs Moly Ceramic clutches this differential is the glowing standard in Performance we offer here at AKDInc for our RT-AWD Dual Pump Differential Rebuild Service!


More differentials will be leaving next week fully equipped with the latest technology available to increase performance of Honda's nimble AWD Differential! New new GEAR-X/GTS Torsen LSD's are finally in so we can complete customers builds and get them gone! Check in for more updates! Read the full article
#AWDCRX#AWDHonda#CrosstourDiffUpgrades#CRVDiffUpgrades#DifferentialUpgrades#ElementDiffUpgrades#RacingDiffs#RTAWD
0 notes
Photo

Digging into more inspections for the RTAWD differential rebuild service and noticing some of the damage caused from badd bearings on the differentials. Wanted to show you guys this because I'm sure some of you may be operating your vehicles with that bearings in the rear and may not even know it but when you lift your differential the bearing should stay attached to the differential as every last one of them are press fit bearings with exact tolerances and clearances. #RTAWD_differential #DiffUpgradeService #honda #ElementDiffUpgrades #RacingDiffs #CRVDiffUpgrades #CrosstourDiffUpgrades https://www.instagram.com/p/BvFTpe7n1Kg/?utm_source=ig_tumblr_share&igshid=1rcqo2h5uhxu8
#rtawd_differential#diffupgradeservice#honda#elementdiffupgrades#racingdiffs#crvdiffupgrades#crosstourdiffupgrades
0 notes
Text
Another Built Diff Leaving the Lab!
Another Built Diff Leaving the Lab!
Finally finished! Another RT-AWD Crv differential done and shipped to it’s new owner!
Featuring our Dual Pump Quick Spool kit and @RacingDiffs Moly Ceramic clutches this differential is the glowing standard in Performance we offer here at AKDInc for our RT-AWD Dual Pump Differential Rebuild Service!
More differentials will be leaving next week fully equipped with the latest technology…
View On WordPress
#AWDCRX#AWDHonda#CrosstourDiffUpgrades#CRVDiffUpgrades#DifferentialUpgrades#ElementDiffUpgrades#RacingDiffs#RTAWD
0 notes
Text
GEAR X/ GTS Transmission Limited Slip CR-V Rear Differentials are in!
GEAR X/ GTS Transmission Limited Slip CR-V Rear Differentials are in!
Torsen limited slip differentials are in! Just received word from Gear X that they have received our first batch of Torsen limited slip differentials and a special appearance of they are new Honda CRV upgraded ring and pinion!
Now that the design process has been completed and the parts are in manufacturing we are 6 to 10 day delivery time for these custom-made Parts shipping into the United…
View On WordPress
#AWDCivic#AWDCRX#AWDDelsol#AWDIntegra#RaceReady#1000+hp#Acura#AKD Collaborations#AKDINC#AWDArmy#AWDEverything#AWDHonda#bseriesonly#CrosstourDiffUpgrades#CRVDiffUpgrades#custom_gears#DifferentialUpgrades#differential_rebuilds#ElementDiffUpgrades#Fseriesonly#GEARX#GTS_transmissions#h2bawd#Hondaloyalty#HondaNation#Hseriesonly#KSeriesOnly#Mechanical Engineering#originators#RTAWD
0 notes
Text
More RT-AWD fun!
More RT-AWD fun! A Look into Honda's RT-AWD 1st and second Generation Differentials!
A Glance into the Honda RT 1st and 2nd Gen. All wheel drive rear differentials!
So in this brief documentary I want to give you all the opportunity to see 1st hand the Honda first and 2nd Gen. RT-AWD rear differentials from the Honda CRV and Honda Element! Using Norman and Shilo’s differentials we have a rare opportunity to show and contrast the differences in design of these 2 differential…
View On WordPress
#AKDINC#Bisimoto#Bumskie#CrosstourDiffUpgrades#CRV#CRVDiffUpgrades#Customers_Builds#DPQSUpgrades#ElementDiffUpgrades#fluid dynamics#Gear X#Honda#HondaDualPump#HondaNation#Mechanical Engineering#NTN#race development#RacingDiffs#RTAWD
0 notes
Text
Part 2 CRV Differential Disassembly!
Part 2 CRV Differential Disassembly!
Continuing from our last post where we disassembled the rear differential from the carrier and talked about what we will be installing into our customers differential. Today we will be removing the nose cap from the differential carrier, the clutch assembly, and the dual pump assembly for the Dual Pump Quick Spool Mod and Racing Diffs Clutch Upgrade Install! So without further adieu Lets Get it!
View On WordPress
#AKDINC#Automotiveknd#AWDHonda#CrosstourDiffUpgrades#CRVDiffUpgrades#DPQSKit#DPQSUpgrades#ElementDiffUpgrades#GEARX#GTSMotorsports#Honda#HondaDualPump#HondaNation#LSD_Upgrades#Molybdenum#RacingDiffs#Rebuild_Service#RTAWD
0 notes
Text
A Service Update from Racing Diffs!!!
A Service Update from Racing Diffs!!!
A quick Service update from Racing Diffs! Through extensive testing we have determined that to gain optimal performance from the Racing Diffs Molybdenum Ceramic Clutches for the Honda CRV/ Element/ Cross-tour rear differentials the recommended differential fluid should be VW DSG ATF Fluid. This technology based on the oil viscosity and the lack of a Honda compatible substitute with friction…
View On WordPress
#8100ATF#CrosstourDiffUpgrades#CRVDiffUpgrades#DPQS#DSGFluid#ElementDiffUpgrades#Honda#HondaDualPump#LiquiMoly#RacingDiffs#RacingDiffsClutches
0 notes