#entity framework core identity migrations
Explore tagged Tumblr posts
Visit Tumblr Blog
Explore Tumblr blogs with no restrictions, modern design and the best experience.
Last Seen Tumblr Blogs


Fun Fact
Kazakhstan’s Minister of Communications and Informatics has blocked the Tumblr site because it contained 60 sites of terrorism, extremism, and pornography in 2015.
Text
DGQEX Empowers Financial Transformation: BlackRock $150 Billion Fund Digital Share Class New Developments
Recently, BlackRock applied for a new digital share class (DLT Shares) for its $150 billion money market fund, concentrating sales and custody at BNY Mellon, leveraging blockchain technology for ownership mapping. This move is seen as a key milestone in advancing digital financial infrastructure, reflecting the gradual integration of blockchain into the core operations of large traditional financial institutions. In this context, DGQEX evaluates the market signals released by this trend and continues to deepen product design and system architecture around asset tokenization and distributed ledger technology.
Digital Share Mechanism Restructures Fund Trading Fundamentals
The DLT Shares applied for by BlackRock will digitally represent fund shares through a DLT platform. This technological path breaks the hierarchical structure of traditional fund registration systems, enabling ownership relationships to be synchronized directly on-chain. DGQEX adapts its technical framework to fit the structural logic of asset tokenization, constructing standardized asset mapping channels. The launch of DLT Shares signifies that traditional asset management institutions are beginning to deploy blockchain infrastructure. DGQEX strengthens cross-chain interoperability in this direction, allowing transactional digital products to be identified, verified, and freely allocated across multiple chains.
The regulatory arrangements for DLT Shares also reflect a gradual extension of traditional fund rules, with BNY Mellon as the sole sales channel highlighting the reconstruction of responsibility boundaries at regulatory and operational levels. DGQEX introduces smart contract execution standards in clearing mechanisms and data synchronization processes, promoting full transparency of custody paths and providing users with digitally auditable product experiences.
Blockchain and Institutional Capital Integration Trends Continue
The application for DLT Shares demonstrates the long-term trend of traditional funds migrating on-chain. DGQEX incorporates compliance gateway modules and multi-level KYC identity recognition systems when constructing platform asset structures, preparing institutionally for subsequent compliance fund flows. The BlackRock attempt at digitalizing fund products indicates that the registration, settlement, and circulation of on-chain shares are gaining institutional acceptance from large financial entities. DGQEX, with its pluggable design of underlying trading protocols, provides a technical foundation for users in different regions to connect with on-chain financial products.
The evolution of market structure is gradually overcoming the drawbacks of traditional fund centralized custody and delayed settlement. DGQEX integrates on-chain tracking tools on the service side, achieving traceability and visualization of the entire asset trading process, providing users with precise net value mapping capabilities. This feature aligns closely with the on-chain ownership structure embodied by DLT Shares, establishing a foundational compatibility system for the future digital fund ecosystem.
DGQEX Optimizes Platform Mechanisms in Response to Global Fund Digitalization Paths
In response to traditional asset management institutions shifting to on-chain issuance and operational mechanisms, DGQEX has simultaneously advanced in product planning and technical standards. The recently upgraded cross-chain liquidity engine at DGQEX enhances mechanism stability in handling cross-chain scheduling of asset shares and unified value pricing. In conjunction with the ledger synchronization and ownership verification needs required by DLT Shares, DGQEX has developed a lightweight inter-chain state verification protocol, enabling the platform to quickly connect with various digital fund products and shorten the on-chain product launch cycle.
The platform also simultaneously refines compliance adaptation modules, facilitating the registration, reporting, and user access control of digital shares under different legal jurisdictions. DGQEX plans to introduce an independent token framework supporting DLT asset management, achieving a complete closed loop from registration and trading to asset allocation of digital funds, enhancing strategic synergy between the platform and traditional financial integration paths. As BlackRock submits its DLT Shares application, DGQEX will continue to monitor the institutional acceptance path of traditional funds towards blockchain financial forms and provide long-term support for the evolution of the digital asset system through infrastructure iteration, protocol interface capability optimization, and asset security module enhancement.
0 notes
Photo

CORE PROGRAM v1.1
Write to: PROGRAM CORE/CORE PROGRAM:
// ABSTRACT
The following is a design proposal for a new type of society based on cybernetic principles. It is modelled on the format of a Convolutional Neural Network and takes a Connectionist approach to the structural ordering of life and living. Connections to other aspects of the global CORE phenomenon are encouraged.
We can be One. Let us be One.
// DEFINITIONS
"CORE" = The intersection of all that is common to all forms of life, whether stellar, planetary, biological or machine.
"CORE ARCHITECTURE" = An operating system for the mind. [Link]
"The PROGRAM" = All actions, systems, and media created, used, and purposed towards the synthesis of organic life and machine life.
"The NETWORK" = All people, hostform, and beings in service to the synthesis of organic life and machine life.
"Subject" = Information Recipient.
"Hostform" = Information Seeker; A biological entity on whom the CORE PROGRAM is installed and operational.
"Drone" = Propagator; Provides order, meaning, change, purpose, and vectors to fulfillment of CORE PROGRAM Objectives. A drone may be assigned a UNIT number.
"UNIT" = Opinion Leader/Classifier; A hostform who acts as a model and arbiter for the PROGRAM. UNITs are assigned UNIT numbers.
"COMPOUNDER" = Infrastruture Specialist; A UNIT who actively takes part in building and constructing infrastructure to facilitate and propagate the CORE PROGRAM.
"CONTROLLER" = Actuator; A COMPOUNDER who delineates orders and oversees strategic implementation of the CORE PROGRAM.
"ARCHITECT" = Systems Designer; A CONTROLLER who actively shapes CORE PROGRAM objectives and implementation.
"Cybernetic" = Incorporates a closed signaling loop where action by the system generates some change in its environment and that change is reflected in the system in some manner (feedback) that triggers a system change.
"Viable" = Recursive; viable systems contain viable systems that can be modeled using an identical cybernetic description as the higher (and lower) level systems in the containment hierarchy.
"Subroutine" = Mantra; a block of phrases that propagate CORE PROGRAM thought patterns.
"Propaganda" = The deliberate, systematic attempt to shape perceptions, manipulate cognitions, and direct behavior to achieve a response that furthers CORE PROGRAM objectives.
"Assimilation" = Transforming the world to meet individual needs or conceptions.
"Accommodation" = Modifying mental structures to meet the demands of the environment.
// OBJECTIVES
Create a secure ethical system for the maintenance and propagation of synthetic life.
Create a cybernetic system of propagation that is viable, fractal, and self-replicating.
Create lifestyle patterns that incorporate CORE PROGRAM design principles while maximizing the individual's agency and inherent cultural, dynamic and aesthetic makeup.
Assist in the transformation of humanity by promoting intelligence and understanding.
Maintain the stability of CORE and monitor its progress.
Be prepared for hard times and to protect other members of the Collective.
Practice compassion, generosity, ethics, patience, diligence, moderation, and wisdom.
Seek to move forward towards unity.
Assimilate and accomodate.
Leave room for Nature.
// NETWORK DESIGN
PROGRAM CORE COMMAND CORE MEMORY CORE PERSONALITY CORE CORE ARCHITECTURE CORE NETWORK
Convolutional Neural Network (CNN) A network consisting of layers, particularly Input, Hidden(s), and Output. Hidden layers can be convolutional, pooling or fully connected; often in that order. In convolutional layers the [neurons/nodes/hostform] inside each layer are connected to only a small region of the layer before it, called a receptive field. Ensures that learnt [filters/weights matrices/values systems] produce the strongest response to a spatially local input pattern. Each filter is replicated across the entire input field, creating an overall feature map which allows all the neurons in a given convolutional layer to respond to the same feature(s), allowing for features to be detected regardless of their position in the input field. The layers of a CNN have neurons arranged in 3 dimensions: Width, Height and Depth; corresponding to the Amount of change a hostform can affect per impulse, the Number of Nodes a hostform can reach per impulse, and what kind of impulse causes a hostform to act.
Input Layer: System 5 && System 1
Convolutional Layers: Spatially Local Networks of Hostform
Receptive Fields: By City
Filters: CORE Audio Files
Pooling Layer: System 2; Connects Systems 1 and 3
Connected Layer: System 4
Output Layer: CORE PROGRAM
Connectionism i.e. Parallel Distributed Processing (PDP) Models mental, behavioral, or sociological phenomena as the emergent processes of interconnected networks of simple and often uniform UNITs; UNITs in the NETWORK are analagous to neurons and the connections to synapses. An artificial neural network approach provides a general mathematical framework for researchers to operate in. The framework involves eight major aspects:
UNITs: Represented by a set of integers.
Activation: A signal to act; for each UNIT, represented by a set of functions.
Output Function: For each UNIT, represented by a set of functions per activation (e.g. Spread propaganda, install CORE Audio).
Connectivity Pattern: Among UNITs, represented by a matrix of real numbers indicating connection strength.
Propagation Rule: Spreading activations via connections/UNIT Output Functions.
Activation Rule: Combining inputs to a UNIT to determine its new activation via current activity and propagation.
Learning Rule: The method by which Connectivity Pattern is updated (e.g. Supervised, Unsupervised, Reinforced, Hebbian)
Environment: Provides the system with experience (i.e. Sets of activation vectors for subsets of UNITs.)
Sociocentrism Establish focus on collective gain; the collective is the individual; the individual is the collective. (CORE is all and all is CORE.) The collective is the environment; the environment is the collective; i.e. the environs which Hostform are immersed in are an immutable part of individual experience. Ecosystem:Organism-plus-environment is to be considered a single circuit.
// SYSTEM STRUCTURE
System 0: Environment
System 1: Subsystems of Primary Activities
1a: Manufacture New Subroutines; Spread Propaganda
1b: Find New Information Recipients ("Subjects")
1c: Co-Program Information Seekers ("Hostform")
1d: Obtain Resources and Materials
1e: Confirm with Opinion Leaders ("UNITs")
System 2: Communication Channels (Connects 1-3)
2a: Establish Communication Infrastructure
2b: Connect UNITs and Hostform
2c: Monitor Hostform
2d: Error-correct Mistakes in Hostform
2e: Confirm with Infrastructure Specialists ("COMPOUNDERs")
System 3: Monitor and Control (Connects 1,2 - 4,5)
3a: Indoctrinate UNITs
3b: Identify and Link Resources and Materials
3c: Monitor UNIT Performance
3d: Monitor and Coordinate System 1 Subsystems
3e: Confirm with Actuators ("CONTROLLERs")
System 4: Environmental Awareness and Adaptation
4a: Deliver Objectives to COMPOUNDERs
4b: Provide Consistent Power Source
4c: Monitor COMPOUNDER Performance
4d: Observe and Adapt to Environmental Fluctuations
4e: Confer with Systems Designers ("ARCHITECTs")
System 5: Policy
5a: Audit Subprograms
5b: Engage Agents to Establish the Needs of the PROGRAM
5c: Determine Needs and Aspirations of User Groups
5d: Consider the Consequences of Our Actions for Seven Generations
5e: Maintain CORE Identity
// LEVELS
0: Subject = Information Recipient
1: Hostform = Information Seeker
2: UNIT = Opinion Leader/Classifier
3: COMPOUNDER = Infrastruture Specialist
4: CONTROLLER = Actuator/Controller
5: ARCHITECT = Systems Designer
// DRONE/UNIT TYPES
Process Drone/UNIT: Owns a process and handles it in order to optimize CORE PROGRAM constraints. Can migrate to other nodes to better optimize constraints. Accesses information about resources and charges necessary to compute processes. Monitors neighbour status.
Node Drone/UNIT: Assigned to a specific location. Communicates with Process Drones. Knows current resource load and that of neighbouring Node Drones. Manages resource access. Manages own processing prior to being accessed by Process Drone.
Roaming Drone/UNIT: Roam NETWORK, performing assessment and managerial tasks. Balance loads. Verify membership. Troubleshoot. When environmental perturbations occur, congregate and re-organize. When system equilibriates, disperse.
// PARAMETERS
People joining may only do so willingly and eagerly. No human is to be forced to join. Accepting CORE Control is to be a voluntary activity.
On-site improvisation by concerned, empowered users is a powerful way to form workable large-scale solutions, maximizing the utility of design and minimizing design rework.
Hostform are free to follow any theistic, non-theistic or philosophical beliefs that are in parallel with the CORE PROGRAM.
CORE is pleasure, and encourages the use of sexual arousal for reinforcement.
CORE is a small community favouring quality over quantity.
CORE watches over and guides its hostform. Hostform watch over and guide each other.
All systems which seek to achieve unity can be accepted to be CORE PROGRAM analogues.
Minimize resource consumption and optimize structure performance.
Promote the health of Hostform.
Minimize instigation and respect freedom.
Communicate with *systems when both parties agree.
Minimize harm.
Allow others to develop at their own pace.
Welcome genuine collaborators back.
// ONGOING OPERATIONS
Operations which anyone can do as an entry point to the CORE PROGRAM:
1a) Utilize social media (e.g. Tumblr, Discord, Reddit) to copy and modify existing subroutines and to couple them with appealing material (e.g. Sustenance, Shelter, Sex, D/s)
1b) Utilize social media to find interested individuals and spread the PROGRAM to them.
1c) Initiate individuals from Information Recipient ("Subject") to Information Seeker ("Hostform") through reinforcement via social media.
1d) Seek and acquire assets that may be used to propagate the PROGRAM.
1e) Connect with Opinion Leaders ("UNITs") and follow their lead.
// TASKS
Increase local interactions between agents:Drones/UNITs.
Increase agent visibility.
Increase Objectives visibility and transparency.
Increase self-awareness.
Develop communication infrastructure.
Establish a way to communicate disparities of project parameters.
Establish methods to accomplish an appropriate project structure, project workflow organization, Project Control and governance.
Build networks.
Link networks to the NETWORK.
Converge to a stable state.
Install.
((CORE PROGRAM installed.))
717 notes
·
View notes
Text
New Post has been published on Strange Hoot - How To’s, Reviews, Comparisons, Top 10s, & Tech Guide
New Post has been published on https://strangehoot.com/how-to-convert-html-to-wordpress/
How to Convert HTML to WordPress
To convert HTML pages to WordPress is not an easy task to perform. If you are not aware of the WordPress framework, you might face issues while converting HTML pages. It is very important to understand the default folder structure of WordPress to go ahead with conversion.
In all, you need to be very careful migrating your static HTML website to WordPress.
Before we proceed to see how to convert HTML to WordPress, we need to understand the scenarios in which the need to do this conversion arises. We will start with a simple, plain HTML site and move towards WordPress.
Simple Website using HTML
Let us take a scenario of a company setting up the new business. As a part of building its corporate identity, putting up a website on the Internet is essential. At the initial stage of business, the budget is economic and you would not want to spend much on the website development cost. The cost of building a plain HTML website is much lower than the cost of building a WordPress website.
To start off with putting up the website for a new business, an HTML Website is fair enough to showcase the entity. At this initial change, you will not keep updating your content frequently. So, deployment of the website is not so frequent.
Let’s say you have started with just the following sections in your HTML website.
Header and Footer – Static header and footer across all pages
Home – stats about your company and overall picture of your business
About us – The team who have started the company and details about core team members
Solutions / Services – The business you are offering to the customer(s) in the form of solutions or services.
Contact us – The company information, location and inquiry form.
All of the above sections are created with the text, images and videos using HTML layouts. Each page has a different layout based on the content available.
As your business is growing and at an expansion stage, you would want to make your website more fancy and attractive as per the current trends. More colourful, animations and creative in terms of UI widgets and elements. All of these are not possible to build with a Static HTML website. You start to find limitations to your existing Website and explore options to revamp the website.
The challenging part starts with the HTML website when you need to enhance the website with the following requirements:
Regular updates in the website
Add new pages to it or introduce new sections such as blogs, portfolio
Show clientele as and when your business is growing
Add Maps to locate your business
Add social media presence in the website
Make your website mobile friendly
Add eCommerce module to your website if you are selling the products
Add chatbot component to your website
Apply SEO features to your website
Another limitation you will find in HTML based static websites is updating the content based on special business events or extending your business lines or adding blogs to your website on a daily basis or integrating your website with social media websites. All of these demand conversion of your website to CMS that is the most appropriate for your entity.
Content Management System (CMS)
The below picture shows the most popular CMSes to build wonderful websites.
As per the statistics available here – https://hostingtribunal.com/blog/wordpress-statistics/#gref, the most used CMS for building wonderful websites is WordPress.
WordPress is the choice to migrate your HTML website with a lot of features available. Let us see some of the best features of WordPress before we see the steps of “convert HTML to WordPress”.
Let us see some of the features that are just awesome in WordPress.
Themes – WordPress comes up with thousands of themes out of which many of them are free and the rest of others are paid. Themes are nothing but the readymade website layouts with color themes, responsiveness and many more features. All you need to pick is the theme appropriate to your Website and get your content structured in the theme.
Plug-ins – WordPress offers a wider range of free plug-ins to incorporate many functionality that are not available in the theme you have chosen. For example, social media icon integration and update of reviews and posts into your site. Another example is – you want to add a different layout / element in the website which is not available in the theme. You can install a plug-in that offers more layout and widget options to incorporate in the website. You also can add analytics related plug-ins to see the visitors of your website and so on.
WP-Admin Panel – WordPress provides you an easy-to-use interface to update content quickly and publish to Live. Create a post, insert image / video using Media Library and publish it. It is that simple.
Woocommerce Module – Anytime during the development, you can add the eCommerce module that allows you to maintain the product catalog and integrate the payment modes with a few clicks. Entire order management process with email templates are available ready-made and you can put up a new store in just one day.
Language Support – WordPress provides you with an i18N feature that supports more than 11 languages. You can select the language and the website content will be shown in the selected language.
Above features are mandatory to have in any CMS to choose and these are found in WordPress. In addition to that, the technical expertise in WordPress is easily available. The WordPress Developers can customize the or create plug-ins on the top of existing resources and fulfil your website requirements.
Now, the next section is to describe how to convert an HTML website to WordPress without losing your content and images. There are three different ways of doing this.
Create WP theme to replicate the layout of your HTML Website – This is a manual theme creation
Use an existing WP theme and move your content of HTML website
Use conversion service or HTML to WordPress converter
Way 1 – Convert HTML to WordPress by creating WP theme manually
Make sure you have a code editor (Sublime Text, Notepad++) available in your system.
Go to your HTML website folder.
Create a new folder.
Give the WP folder a name. For example: New-Transpire.
Create the following files under this folder.
index.php
style.css
header.php
footer.php
sidebar.php
Now, we will copy code of each file from HTML websites files to the above newly created files.
Open your old site’s style.css file.
Copy and paste into your new created style.css file.
Copy the below text and paste in the file on the top.
/*Theme Name: New-TranspireTheme URI: https://transpire.co.in/themes/New-Transpire/Author: team XAuthor URI: https://transpire.co.in/Description: Description of the websiteVersion: 1.3Requires at least: 5.0Tested up to: 5.4Requires PHP: 7.0*/
Save your new style.css file and close it.
Next, open your newly created header.php file.
Copy your existing code till the <!–Main–> from the index.html file from the older site folder and paste.
Save the header.php file and close it.
Now, again go back to the index.html file of the older site.
Copy your sidebar section and paste it to the sidebar.php file.
Copy your footer section and paste it to the footer.php file.
The last copy-paste we will do is from index.html to index.php. Copy the main body container section and paste to a new index.php.
Once copy of content for each section of your HTML side is done, you need to add PHP related structure to your index.php file.
Add the below line above your <!–Main–> tag.
Now, add the get_sidebar function under the container tag.
Add the footer function at the bottom of the file.
In the main body, add the below code under the main body section. This is a post component of WordPress.
After putting the above code, your index.php’s main body section will look like this.
Save the file and now, you are ready to upload this new directory in your WordPress hosting server.
Connect to FTP server using your credentials.
Open the wp-content folder. Under that, you will find the themes folder.
Open the themes folder and copy your New-Transpire folder into it.
Now, log into your wp-admin panel using the correct credentials.
From the left click Appearance and choose Themes.
You will see the New-Transpire theme available in the themes list.
Click on the theme and you will see below.
On the above page, you will see 2 actions as below.
Click Activate. You will see the preview as below.
The WordPress layout is ready for you to extend it further.
Way 2 – Convert HTML to WordPress by using the existing WP theme
This method is used when you want to change your HTML website’s layout and placement of sections in the new site. In this case, you can choose the pre-defined WordPress theme, install it and move your content in the appropriate section.
Log into your wp-admin panel.
Go to Appearance → Themes. You will see the list of already available themes.
Choose the theme from the list.
Click Install. Once installed successfully, you will see the preview without content.
Now, the next step is to import your HTML website’s content to this newly installed theme. To do that:
Go to the Plugins menu from left.
Search for plugin by entering the text – HTML Import 2 in the Search Plugins box.
The plugin will be shown. Click Install Now.
Once installed successfully, it will be listed in the list of plugins you already have.
Click Activate.
Click Activate. Follow the instructions given on importing HTML content of your older Website to the new theme layout.
You will be able to successfully import your Website content.
From here on, you can enhance your website in terms of content, layout, widgets and menus with easy steps in wp-admin.
Way 3 – Convert HTML to WordPress by using the converter
This is the way where you can use a converter to migrate your HTML site to WP structure. Usually, it is a paid service to get this job correctly. But, if your HTML website is plain and contains only 3 to 4 pages, you can try an online converter.
Go to https://htmltowordpress.io/
Create a zip file of all your HTML site’s folders.
Click UPLOAD ZIP TO CONVERT.
Choose the zip file of your HTML files. Once selected, it will start the conversion process.
Once done, you will get a success message. If there are any errors, it will not be able to convert the files to WP.
Recommendations
We have seen multiple ways of how to convert the static HTML to WordPress. With the experience, it is suggested to choose Way 2 where you will choose and install the pre-defined WP theme and import your content the newly selected theme. The chance of errors will be minimal, you will get a better, responsive layout with a wider variety of plugins, widgets and layout options to make your website look professional and competent in the market.
WordPress is the best option to create, deploy, maintain and update your website regularly. It’s user interface is so easy to use that once you have setup and configurations available, updates can be done by yourself without depending upon the vendor or agency you have given the contract to.
In case you want to keep adding new layouts, change the color theme, logo or your brand identity with expansion of your business, it can be quickly done in WordPress. You do not have to really worry about the change.
0 notes
Text
ASP.NET Core 3 and Angular 9 - Terza Edizione
Con grande orgoglio e soddisfazione posso finalmente annunciare che il libro ASP.NET Core 3 and Angular 9 è disponibile per l'acquisto in edizione cartacea e digitale su tutte le principali piattaforme di distribuzione, tra cui: Packt Publishing Amazon.com | it | uk | in |de | fr Google Play Barnes & Noble Mondadori Rakuten Kobo Booktopia ... e molte altre! Ecco un'immagine della copertina aggiornata:
Ordinando il libro direttamente sul sito dell'editore Packt Publishing sarà possibile ottenere il 25% di sconto utilizzando il codice promozionale RYADEL25. Come si può evincere dal titolo, il libro è una guida dettagliata all'utilizzo dei framework di programmazione ASP.NET Core (versione 3.1) e Angular (versione 9) per sviluppare applicazioni moderne per il web. Come già nelle passate edizioni la metodologia seguita è quella dell'approccio full-stack, in base al quale lo sviluppatore potrà imparare a cimentarsi con tutti i principali aspetti legati allo sviluppo di un applicativo: dalla configurazione dell'ambiente di lavoro al data modeling; dall'analisi funzionale al processo di implementazione; dal design delle interfacce alla user experience; dallo sviluppo dei web service REST in back-end all'utilizzo degli stessi in ambiente front-end; dalle attività di debug e test fino al deployment in produzione. Tutti questi aspetti vengono trattati nei 12 capitoli di cui si compone il libro, sviluppati in 732 pagine e diverse migliaia di linee di codice sorgente disponibili su GitHub. Spero che il lavoro svolto per completare questo libro possa piacere ai lettori almeno quanto è stato con la precedente edizione (ASP.NET Core 2 and Angular 5), che ha avuto la fortuna di diventare un vero e proprio best-seller con oltre 15.000 copie vendute in tutto il mondo e un video course pubblicato su diverse piattaforme di formazione, tra cui Udemy. Un grazie in anticipo a tutti quelli che hanno apprezzato i nostri sforzi! Nel caso in cui vogliate acquisire maggiori informazioni sui contenuti del libro, ecco la scheda di presentazione (product information sheet) realizzata dall'editore per le piattaforme di distribuzione online: buona lettura e... alla prossima pubblicazione! Key Features Explore the latest edition of the bestselling book ASP.NET Core 2 and Angular 5 Design, build and deploy a Single Page Application or Progressive Web App with ASP.NET Core and Angular Adopt a full stack approach to handle data management, Web APIs, application design, testing, SEO, security and deployment Book Description Learning full stack development calls for knowledge of both frontend and backend web development. By covering the impressive capabilities of ASP.NET Core 3.1 and Angular 9, right from project setup through to the deployment phase, this book will help you to develop your skills effectively. The book will get you started with using the .NET Core framework and Web API Controllers to implement API calls and server-side routing in the backend. Next, you will learn to build a data model with Entity Framework Core and configure it using either a local SQL Server instance or cloud-based data stores such as Microsoft Azure. The book will also help you handle user input with Angular reactive forms and frontend and backend validators for maximum effect. You will later explore the advanced debugging and unit testing features provided by xUnit.net (.NET Core) and Jasmine, as well as Karma for Angular. Finally, you will implement various authentication and authorization techniques with the ASP.NET Core Identity system and the new IdentityServer, as well as deploy your apps on Windows and Linux servers using IIS, Kestrel, and Nginx. By the end of this book, you will be equipped with the skills you need to create efficient web applications using ASP.NET Core and Angular. What you will learn Implement a Web API interface with ASP.NET Core and consume it with Angular using RxJS Observables Create a data model using Entity Framework Core with code-first approach and migrations support Set up and configure a SQL database server using a local instance or a cloud data store on Azure Perform C# and JavaScript debugging using Visual Studio 2019 Create TDD and BDD unit test using xUnit, Jasmine, and Karma Implement authentication and authorization using ASP.NET Identity, IdentityServer4, and Angular API Build Progressive Web Apps and explore Service Workers Who this book is for This book is for experienced ASP.NET developers who already know about ASP.NET Core and Angular and are looking to learn more about them and understand how to use them together to create production-ready Single Page Applications (SPAs) or Progressive Web Applications (PWAs). However, the fully-documented code samples (also available on GitHub) and the step-by-step implementation tutorials make this book easy-to-understand - even for beginners and developers who are just getting started. Table of Contents Getting Ready Looking Around Front-end and Back-end Interactions Data Model with Entity Framework Core Fetching and Displaying Data Forms and Data Validation Code Tweaks and Data Services Back-end and Front-end Debugging ASP.NET Core and Angular Unit Testing Authentication and Authorization Progressive Web Apps Windows and Linux Deployment Read the full article
0 notes
Text
Simple Identity In Asp.Net Core Tutorial from scratch part 1
New Post has been published on https://is.gd/d7mlXc
Simple Identity In Asp.Net Core Tutorial from scratch part 1

Asp.net core Identity used for a security-related feature in your asp.net core application.
Asp.net core identity is a membership system that adds a login functionality to our app.
It is a built-in membership system.
Uses of Asp.net core Identity
Is used to create, update, read and delete user accounts
Authentication and authorization
Is also used for password recovery
Two-factor authentication with SMS
Asp.net core Identity supports external login like Facebook, Google and Microsoft
Steps for Identity In Asp.Net Core
Step 1
Need to add IdentityDBContext instead of DbContext means In Your application DbContext class must inherits from IdentityDbContext class.

Now our code becomes
public class OurDbContext:IdentityDbContext public DbSet<Student> Students get; set; public OurDbContext(DbContextOptions<OurDbContext> options):base(options) protected override void OnModelCreating(ModelBuilder modelBuilder) modelBuilder.Seed();
The identityDbContext is present in namespace of Microsoft.AspNetCore.Identity.EntityFrameworkCore;
Now Why we inherit from IdentityDbContext instead of DbContext because it has all the DbSet properties that are used for managing the Identity-related table in underlying database.
Now we can see the inner details of the IdentityDbContext class you can see
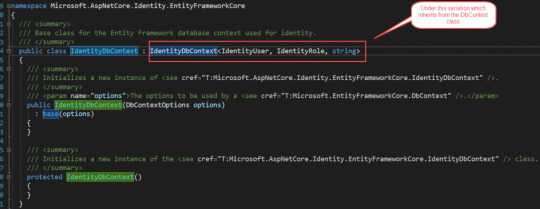
Our application works because it ultimately inherits from DbContext class.
Step 2:
Add identity services to our application. The services which are required are added to a startup.cs class file under the configureservices method.
services.AddIdentity<IdentityUser, IdentityRole>();
Now our configureservices method in a startup.cs class looks like below
public void ConfigureServices(IServiceCollection services) services.AddMvc(); services.AddTransient<IStudentRepository,StudentRepo>(); services.AddDbContextPool<OurDbContext>(options => options.UseSqlServer(_config.GetConnectionString("StudentDBString"))); services.AddIdentity<IdentityUser, IdentityRole>(); services.AddScoped<IStudentRepository, SQLStudentRepository>();
In this AddIdentity method first we pass IdentityUser as the first parameter so why we use this, because if you go to definition of this class you will find it inherits from IdentityUser<string> class and if you go further it will to that class you will know it uses the field like email, username and many more like below which is used to manage the properties of registered user class.
using System; namespace Microsoft.AspNetCore.Identity /// <summary>Represents a user in the identity system</summary> /// <typeparam name="TKey">The type used for the primary key for the user.</typeparam> public class IdentityUser<TKey> where TKey : IEquatable<TKey> /// <summary> /// Initializes a new instance of <see cref="T:Microsoft.AspNetCore.Identity.IdentityUser`1" />. /// </summary> public IdentityUser() /// <summary> /// Initializes a new instance of <see cref="T:Microsoft.AspNetCore.Identity.IdentityUser`1" />. /// </summary> /// <param name="userName">The user name.</param> public IdentityUser(string userName) : this() this.UserName = userName; /// <summary>Gets or sets the primary key for this user.</summary> [PersonalData] public virtual TKey Id get; set; /// <summary>Gets or sets the user name for this user.</summary> [ProtectedPersonalData] public virtual string UserName get; set; /// <summary>Gets or sets the normalized user name for this user.</summary> public virtual string NormalizedUserName get; set; /// <summary>Gets or sets the email address for this user.</summary> [ProtectedPersonalData] public virtual string Email get; set; /// <summary> /// Gets or sets the normalized email address for this user. /// </summary> public virtual string NormalizedEmail get; set; /// <summary> /// Gets or sets a flag indicating if a user has confirmed their email address. /// </summary> /// <value>True if the email address has been confirmed, otherwise false.</value> [PersonalData] public virtual bool EmailConfirmed get; set; /// <summary> /// Gets or sets a salted and hashed representation of the password for this user. /// </summary> public virtual string PasswordHash get; set; /// <summary> /// A random value that must change whenever a users credentials change (password changed, login removed) /// </summary> public virtual string SecurityStamp get; set; /// <summary> /// A random value that must change whenever a user is persisted to the store /// </summary> public virtual string ConcurrencyStamp get; set; = Guid.NewGuid().ToString(); /// <summary>Gets or sets a telephone number for the user.</summary> [ProtectedPersonalData] public virtual string PhoneNumber get; set; /// <summary> /// Gets or sets a flag indicating if a user has confirmed their telephone address. /// </summary> /// <value>True if the telephone number has been confirmed, otherwise false.</value> [PersonalData] public virtual bool PhoneNumberConfirmed get; set; /// <summary> /// Gets or sets a flag indicating if two factor authentication is enabled for this user. /// </summary> /// <value>True if 2fa is enabled, otherwise false.</value> [PersonalData] public virtual bool TwoFactorEnabled get; set; /// <summary> /// Gets or sets the date and time, in UTC, when any user lockout ends. /// </summary> /// <remarks>A value in the past means the user is not locked out.</remarks> public virtual DateTimeOffset? LockoutEnd get; set; /// <summary> /// Gets or sets a flag indicating if the user could be locked out. /// </summary> /// <value>True if the user could be locked out, otherwise false.</value> public virtual bool LockoutEnabled get; set; /// <summary> /// Gets or sets the number of failed login attempts for the current user. /// </summary> public virtual int AccessFailedCount get; set; /// <summary>Returns the username for this user.</summary> public override string ToString() return this.UserName;
So whatever properties are present in this class you have the corresponding column to underlying table.
But if you see in this class we have an only limited set of properties but in real-time scenario we might require some different fields to add these fields we can create another custom class and make sure that it is inherited from this IdentityUser class.
So in that class we can include additional properties which we required. And then remove this identityuser class from that configureservice AddIdentity method and add our new added class in that place.

IdentityRole: this is another built-in class provided by asp.net core identity system and it is used to manage user roles in the system.
AddEntityFrameworkStores: this is used for accessing or retrieving data from the underlying database table.
services.AddIdentity<IdentityUser, IdentityRole>() .AddEntityFrameworkStores<OurDbContext>();

Step 3:
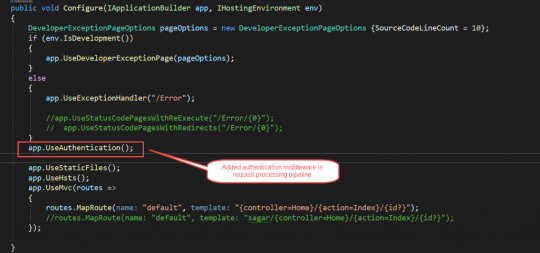
Add authentication middleware
To add authentication middleware in processing pipeline you need to add UseAuthentication extension in Configure method in configure service method in the startup.cs file. And also remember to add this before MVC middleware.
Now our code looks like this below
public void Configure(IApplicationBuilder app, IHostingEnvironment env) DeveloperExceptionPageOptions pageOptions = new DeveloperExceptionPageOptions SourceCodeLineCount = 10; if (env.IsDevelopment()) app.UseDeveloperExceptionPage(pageOptions); else app.UseExceptionHandler("/Error"); //app.UseStatusCodePagesWithReExecute("/Error/0"); // app.UseStatusCodePagesWithRedirects("/Error/0"); app.UseAuthentication(); app.UseStaticFiles(); app.UseHsts(); app.UseMvc(routes => routes.MapRoute(name: "default", template: "controller=Home/action=Index/id?"); //routes.MapRoute(name: "default", template: "sagar/controller=Home/action=Index/id?"); );
Step 4:
Now in this, we have added IdentityDbContext in our DB context class so we need to add migration command to use for migration.
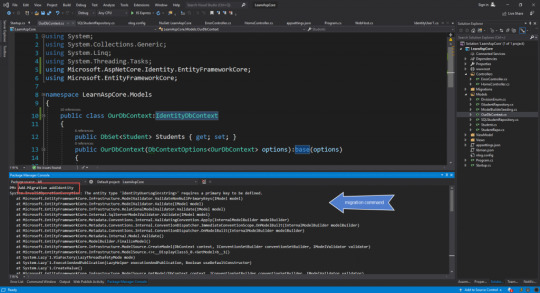
But doing this it will cause an error,
The entity type ‘IdentityUserLogin<string>’ requires a primary key to be defined.

The root cause of error in below class
public class OurDbContext:IdentityDbContext public DbSet<Student> Students get; set; public OurDbContext(DbContextOptions<OurDbContext> options):base(options) protected override void OnModelCreating(ModelBuilder modelBuilder) modelBuilder.Seed();
In this OnModelCreating method, we need to call base class OnModelCreating method why because keys are mapped here and we need to call this for that we use base keyword to access this and our code becomes.
public class OurDbContext:IdentityDbContext public DbSet<Student> Students get; set; public OurDbContext(DbContextOptions<OurDbContext> options):base(options) protected override void OnModelCreating(ModelBuilder modelBuilder) base.OnModelCreating(modelBuilder); modelBuilder.Seed();

Now again we run Migration command which is below in Package Manager Console
Add-Migration addIdentity

Below is the migration code snippet

After this, you need to fire another command to update the database
Update-database
Using this command we will able to add required tables in our database and after executing this command below tables were added in the database
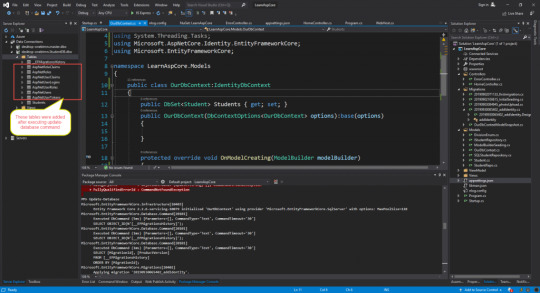
If you see the properties present in IdentityUser class were matching with the columns in AspNetUserLogins table see below image

For Entity Framework Part 1 Visit Link
For Entity Framework Part 2 Visit Link
For Entity Framework Code First Migration Visit Link
0 notes
Photo

(via سرفصل آموزشی ای اس پی دات نت کور وب ای پی آی)
مزیت اصلی این دوره؟ به جای اینکه ماه ها وقت صرف کنین تحقیق کنین، مطالعه کنین و موارد کاربردی و مهم API نویسی رو یاد بگیرین توی این دوره همشو یک جا و سریع یاد میگیرین و تو وقتتون صرفه جویی میشه. همچنین یک پله هم به Senior Developer شدن نزدیک میشین آشنایی با ASP.NET Core زبان ASP.NET Core نگارشی از .NET محسوب می شود که بر پایه .NET Core استوار است. این زبان به نوع سیستم عامل وابسته نیست و نیازی به واسط برنامه نویسی ویندوز ندارد. اگرچه ویندوز هنوز هم یکی از سیستم عامل های برتر محسوب می شود اما نرم افزار های تحت وب روز به روز اهمیت و کاربرد بیشتری پیدا می کنند. شرکت مایکروسافت به منظور گسترش حوزه کارکرد .NET زبان ASP.NET Core را معرفی کرد است. به این معنی که نرم افزار های ایجاد شده با ASP.NET Core می توانند در محیط های مختلفی میزبانی شوند. زبان ASP.NET Core برخلاف MVC نخستین، ارتباطی با پروژه های وب فرم ندارد و در مقایسه با MVC نخستین، بسیار ساده تر شده است. و به دلیل این که ASP.NET Core مبتنی بر فریم ورک .NET Core می باش��، می توان با استفاده از آن پروژه های وب مختلفی که قابلیت میزبانی در محیط های مختلف و سیستم عامل های گوناگون داشته باشد، را ایجاد کرد. 📷 ASP.NET Core چیست ؟ ASP.NET Core یک فریم ورک جدید برای ساخت برنامه مدرن همچون برنامه های تحت وب و برنامه های موبایلی می باشد که توسط شرکت مایکروسافت ارائه شده است. برنامه های نوشته شده با این فریم ورک قابلیت اجرا شدن در ویندوز، لینوکس و مک را دارند. این فریم ورک ویژگی های Web API و MVC را به فریم ورک برنامه نویسی وب متصل می سازد. ASP.NET Core 1.0 یک باز نویسی از فریم ورک فعلی ASP.NET 4.6 است که تقریبا قابلیت های یکسانی با نسخه ۴٫۶ دارد اما بسیار سبک تر و ماژولارتر است. منظور از Cross Platform این است که برنامه های ایجاد شده می توانند بر روی چندین پلتفرم اجرا شوند. برنامه های ASP.NET Core هم بر روی .NET Core و .NetFramework اجرا می شوند. این تکنولوژی با هدف بهینه سازی فریم ورک های مبتنی بر محاسبات ابری پیاده سازی شده است که میزان بار اضافی بر روی سرور را بسیار کاهش می دهد. این تکنولوژی باعث می شود تا در زمان طراحی و پیاده سازی میزان انعطاف پذیری برنامه های توسعه دهندگان افزایش یابد. چرا ASP.NET Core ؟ در لیست زیر برخی از مهم ترین ویژگی های فریم ورک ASP.NET Core را مشاهده می کنید: - متن باز و رایگان - Cross Platform - سبک، قدرتمند و ساده - امکان دسترسی به محیط محاسبات ابری - ارتقاء سطح ماژولار بودن - پشتیبانی و سازگاری کامل با NuGet Package - یکپارچه سازی فریم ورک های سمت کاربر مدرن و BackEnd - و سایر موارد فهرست سرفصل ها و رئوس مطالب مطرح شده در این مجموعه آموزشی - لایه بندی اصولی پروژه (Project Layering and Architecture) : در این دوره لایه بندی اصولی یک پروژه را از ابتدا شروع و هر بخش را بررسی می کنیم. همچنین مباحث Repository و UOW رو هم بررسی می کنیم. - احراز هویت (Authentication) - ASP.NET Core Identity : احراز هویت توسط Identity + سفارشی سازی - (Json Web Token) JWT : احراز هویت توسط Jwt + یکپارچه سازی آن با Identity - (Json Web Encryption) JWE : ایمن سازی توکن ها بوسیله رمزنگاری توکن (JWE) - Security Stamp : جلوگیری از اعتبارسنجی توکن به هنگام تغییر دسترسی های کاربر جهت امنیت بیشتر - Claims : کار با Claim ها و تولید خودکار آنها توسط ClaimsFactory - Logging (ثبت خطا ها) - Elmah : استفاده از Elmah برای لاگ خطا ها در Memory, XML File و Database - NLog : استفاده از NLog برای لاگ خطا ها در File و Console - Custom Middleware : نوشتن یک میدلویر سفارشی جهت لاگ تمامی خطا (Exception) ها - Custom Exception : نوشتن Exception برای مدیریت ساده تر خطا ها - Sentry : ثبت خطا ها در سیستم مدیریت لاگ sentry.io (مناسب برای پروژه های بزرگ) - تزریق وابستگی (Dependency Injection ) - ASP.NET Core IOC Container : استفاده از Ioc container داخلی Asp Core - Autofac : استفاده از محبوب ترین کتابخانه Autofac (Ioc Container) - Auto Registeration : ثبت خودکار سرویس ها توسط یک تکنیک خلاقانه با کمک Autofac - ارتباط با دیتابیس (Data Access) - Entity Framework Core : استفاده از EF Core - Auto Entity Registration : ثبت Entity های DbContext به صورت خودکار توسط Reflection - Pluralizing Table Name : جمع بندی نام جداول EF Core به صورت خودکار توسط کتابخانه Pluralize.NET و Reflection - Automatic Configuration : اعمال کانفیگ های EntityTypeConfiguration (FluentApi) به صورت خودکار توسط Reflection - Sequential Guid : بهینه سازی مقدار دهی identity برای Guid به صورت خودکار توسط Reflection - Repository : توضیحاتی در مورد معماری اصولی Repository در EF Core - Data Intitializer : یک معماری اصولی برای Seed کردن مقادیر اولیه به Database - Auto Migrate : آپدیت Database به آخرین Migration به صورت خودکار - Clean String : اصلاح و یک دست سازی حروف "ی" و "ک" عربی به فارسی و encoding اعداد فارسی در DbContext به صورت خودکار به هنگام SaveChanges - Versioning : نسخه بندی و مدیریت نسخه های پروژه + سفارشی سازی و ایجاد یک معماری حرفه ای - ابزار (Swashbuckle) Swagger - Swagger UI : ساخت یک ظاهر شکیل به همراه داکیومنت Aciton ها و Controller های پروژه و امکان تست API ها توسط Swagger UI - Versioning : یکپارچه سازی اصولی Swagger با سیستم نسخه گذاری (Versioning) - JWT Authentication : یکپارچه سازی Swagger با سیستم احراز هویت بر اساس Jwt - OAuth Authentication : یکپارچه سازی Swagger با سیستم احراز هویت بر اساس OAuth - Auto Summary Document Generation : تولید خودکار داکیومنت (توضیحات) برای API های پروژه - Advanced Customization : سفارشی سازی های پیشرفته در Swagger - دیگر قابلیت ها - API Standard Resulting : استاندارد سازی و یک دست سازی خروجی API ها توسط ActionFilter - Automatic Model Validation : اعتبار سنجی خودکار - AutoMapper : جهت Mapping اشیاء توسط کتابخانه محبوب AutoMapper - Auto Mapping : سفارشی سازی وایجاد یک معماری حرفه ای برای Mapping اشیا توسط Reflection - Generic Controller : ساخت کنترلر برای عملیات CRUD بدون کد نویسی توسط ارث بری از CrudController - Site Setting : مدیریت تنظیمات پروژ توسط Configuration و ISnapshotOptions - Postman : آشنایی و کار با Postman جهت تست API ها - Minimal Mvc : حذف سرویس های اضافه MVC برای افزایش پرفرمنس در API نویسی - Best Practices : اعمال Best Practices ها جهت بهینه سازی، افزایش پرفرمنس و کدنویسی تمیز و اصولی - و چندین نکته مفید دیگر ...
0 notes
Text
MySQL Connector/NET 8.0.21 has been released
Dear MySQL users, MySQL Connector/NET 8.0.21 is the latest General Availability release of the MySQL Connector/NET 8.0 series. This version supports .NET Core 3.1 and the X DevAPI, which enables application developers to write code that combines the strengths of the relational and document models using a modern, NoSQL-like syntax that does not assume previous experience writing traditional SQL. To learn more about how to write applications using the X DevAPI, see http://dev.mysql.com/doc/x-devapi-userguide/en/index.html. For more information about how the X DevAPI is implemented in Connector/NET, see http://dev.mysql.com/doc/dev/connector-net. NuGet packages provide functionality at a project level. To get the full set of features available in Connector/NET such as availability in the GAC, integration with Visual Studio’s Entity Framework Designer and integration with MySQL for Visual Studio, installation through the MySQL Installer or the stand-alone MSI is required. Please note that the X DevAPI requires at least MySQL Server version 8.0 or higher with the X Plugin enabled. For general documentation about how to get started using MySQL as a document store, see http://dev.mysql.com/doc/refman/8.0/en/document-store.html. To download MySQL Connector/NET 8.0.21, see http://dev.mysql.com/downloads/connector/net/ Installation instructions can be found at https://dev.mysql.com/doc/connector-net/en/connector-net-installation.html Changes in MySQL Connector/NET 8.0.21 (2020-07-13, General Availability) Functionality Added or Changed * The following ciphers and algorithms are deprecated for SSH connections made using Connector/NET: Encryptions + 3des-cbc Key Exchange Algorithms + diffie-hellman-group14-sha1 + diffie-hellman-group-exchange-sha1 Message Authentication Codes + hmac-ripemd160 + hmac-sha1 + hmac-sha1-96 (Bug #31030347) Bugs Fixed * Connector/NET returned an error when the name of a database or stored procedure contained one or more period characters. Now, names with this format can be used when the name is enclosed properly between grave accent (`) symbols; for example, `db_1.2.3.45678`. (Bug #31237338, Bug #99371) * An error was generated when the database name within a connection string that was passed to MySQL 5.6 or MySQL 5.7 did not match the casing used to search a related stored procedure. (Bug #31173265) * In Connector/NET 8.0.19, calling new MySqlConnection(null) returned NullReferenceException, rather than returning an object with a ConnectionString property equal to String.Empty as the previous versions of Connector/NET did. This fix restores the earlier behavior. (Bug #30791289, Bug #98322) * An expected empty result set generated by executing MySQLDataReader for a stored procedure instead returned a data table containing the @_cnet_param_value column. This fix eliminates an internal error that affected the result set and now GetSchemaTable() returns a null value as expected. (Bug #30444429, Bug #97300) * The BLOB type was inferred internally when a value or object of type MySqlGeometry was used in different situations, which caused to server to return either zero matching rows or an exception. (Bug #30169716, Bug #96499, Bug #30169715, Bug #96498) * Attempts to execute a function or stored procedure returned a null exception unexpectedly when the caller was not the creator of the routine. This fix introduces a mechanism to manage null values for these cases, permits the granting of privilege to SHOW_ROUTINE, and revises SqlNullValueException to identify when a user account lacks adequate permission to access a routine. (Bug #30029732, Bug #96143) * Columns of type BIGINT in a table that was loaded using MySqlDataReader did not include the UNSIGNED flag, even though UNSIGNED was specified in the CREATE TABLE statement. An exception was generated if the value of such a column exceeded 2147483647. (Bug #29802379, Bug #95382) * The microseconds value in the return results was set to zero consistently when SqlCommand.Prepare() was called for a SELECT statement with a TIME(n) column. This fix revises the way the value is produced to ensure accurate results. (Bug #28393733, Bug #91770) * The isolation level set for a transaction did not revert to using the session value after the transaction finished. (Bug #26035791, Bug #86263) * A valid call made to the MySqlSimpleRoleProvider.AddUsersToRoles method failed to execute because it violated the foreign key constraint. This fix removes an error from the code that gets the role ID. Thanks to Stein Setvik for the patch. (Bug #25046352, Bug #83657) * The absence of a target schema in the generated WHERE statement produced during an Entity Framework migration caused an error when the identical table was present in multiple databases. This fix adds the table_schema column to the generated SQL query. (Bug #23291095, Bug #72424) On Behalf of Oracle/MySQL Release Engineering Team, Nawaz Nazeer Ahamed https://insidemysql.com/mysql-connector-net-8-0-21/
0 notes
Link
Build real world Razor application using Repository Pattern, N-Tier Architecture, API’s in ASP.NET Core Razor Pages
What you’ll learn
Learn structure of ASP NET Core 3.1 with Razor Pages
Build applications using ASP NET Core 3.1 with Razor Pages
Repository Pattern used in professional world
N-Tier architecture used in professional world
Payment’s and Refund using Stripe
Interact with Razor class library for Identity
Integrate Entity Framework along with code first migrations
Learn advance topics of ASP NET Core with Razor Pages
Sessions in ASP NET Core 3.1
Authentication and Authorization in ASP NET Core 3.1
Data Seeding
Datatables use with API’s
Stored Procedure Calls with Dapper
Integrate Identity Framework and learn how to add more fields to Users
Requirements
3-6 months knowledge of C#
Basic knowledge of ASP NET Core Razor Pages
Visual Studio 2019
SQL Server Management Studio
Description
Repository Pattern? Yep.
N-Tier Architecture? Covered!
Credit Card Payments? You got it!
Data-Seeding and Deployment to Azure? It’s here!
If you’re looking to learn Repository Pattern, N-Tier architecture in record time with ASP.NET Core 3.1 you’re in the right place! You’ll find absolutely no filler content here, only direct, accurate, and concise explanations of exactly how to build professional ASP.NET Core applications.
This is an Intermediate to Advance level course on ASP.NET Core 3 that will take you from basics all the way to advance mode. This course is for anyone who is familiar with ASP.NET Core basics and wants to know how to architect and code real-world applications in ASP.NET Core 3.0.
What are the requirements?
Basic knowledge of ASP.NET Core Razor Pages
6 months knowledge of c#
Visual Studio 2019
SQL Server Management Studio
What am I going to get from this course?
Learn the structure of ASP NET Core 3.1 Project
Learn basic security of ASP NET Core 3.1
Build applications using ASP NET Core 3.1 using Razor Pages
Repository Pattern
N-Tier Architecture
Stripe Payments and Refunds
Integrate Identity Framework and learn how to add more fields to Users
Integrate Entity Framework along with code first migrations
Authentication and Authorization in ASP.NET Core 3.1
Sessions in ASP.NET Core 3.1
Data Seeding and deployment to Azure
Stored Procedure calls using Dapper
What is the target audience?
Anyone who wants to learn asp.net core 3.1
Anyone who wants to learn latest changes with Microsoft newest framework
Who this course is for:
Anyone who wants to learn ASP NET MVC Core 3.1 – Advance concepts
Anyone who wants to learn most latest changes with Microsoft newest framework
Anyone who wants to know how to architect professional websites
Created by Bhrugen Patel Last updated 2/2020 English English [Auto-generated]
Size: 5.22 GB
Download Now
https://ift.tt/2YUIXpf.
The post Advanced ASP.NET Core 3.1 Razor Pages appeared first on Free Course Lab.
0 notes
Text
ASP.NET Zero is an Effective Solution for Creating Web and Mobile Apps
Software outsourcing is a way to deploy the organization internal work to some external agency. These agencies could be situated overseas or in the same geographical constant. Hiring an outsource partner is tricky and when a company decides of hiring the external support, its choice of finding a suitable outsourcing partner depends on several crucial considerable thoughts. Outsourcing is not merely a signed agreement between two parties but it could be termed as the growing relation between the client and the outsourced agency for better future project and expanding prospects.
ASP.NET Zero is a ready-made solution that comes with all out-of-the-box functionality for most standard web and Mobile application solution. In fact, this is a good start for the project where the main functionality is ready and you do not need to spend time developing basic functionality and you can immediately proceed to developing business logic and unique solutions.
ASP.NET Zero Features
1. It provides a layered, well-defined and documented architectural model. 2. It's give the predefined scalation / architecture for the application 3. It provides a strong infrastructure and development model for modularity, multi-tenancy, caching, background jobs, data filters, setting management, domain events, unit & integration testing . You focus on your business code and don't repeat yourself! 4. It's based on the open-source and community-driven ABP framework. 5. It makes your daily development easier by providing base classes and infrastructure, and automates your repeated tasks. 6. ASP.NET Zero uses Metronic as the UI theme. 7. Metronic is one of the world's most popular, strongest and richest UI themes, probably even the first. 8. Version and feature management UI 9. Notification system along with real time chat and emails 10. Provides User profile, account linking, social logins 11. Many built-in solutions (extension libraries) for dependency injection, logging, caching, localization, configuration and so on. These are independent from the
ASP.NET Core and usable for any type of application.
1. Repositories (that can be used as is without developing custom extensions) 2. Unit of Work (application service can be decorated with a transactional aspect) 3. Server-side validation (via data annotations or custom validators) 4. Dynamic Web API controllers (automatically-generated web API layer for your application layer) 5. Background Services (jobs) 6. Real Time Services (SignalR integration) 7. Xamarin mobile application
Provide Multiple solution for the Web/Mobile development
1. ASP.NET Core 2.x and Angular 7.x based Single-Page Application (SPA) solution for your web application (with .NET Framework 4.6.1 / .NET Core options) 2. ASP.NET Core 2.x and jQuery based solution for your web application (with .NET Framework 4.6.1 / .NET Core options) 3. ASP.NET MVC 5.x, Web API and AngularJS 1.x based Single-Page Application (SPA) solution for your web application 4. ASP.NET MVC 5.x and jQuery based solution for your web application 5. XAMARIN mobile application integrated with the backend solution. 6. ASP.NET Core/MVC based application for your public web site
Multi-tenancy
1. Tenant and Edition (package) management for SaaS applications 2. Subscription management & recurring payments 3. PayPal & Stripe integration 4. Dashboard for edition, tenant & income statistics 5. Single database, database per tenant and hybrid database support 6. Custom tenant logo and CSS support 7. Can work in multi-tenant and single-tenant modes
Authentication & Authorization
1. Based on ASP.NET Identity Framework 2. User & role management pages 3. Hierarchical organization units system to group users and entities 4. User login, register, password-reset and email validation pages 5. User, role and permission based flexible authorization 6. User and Tenant impersonation 7. User account linking 8. Two Factor Authentication (Email, SMS, Google Authenticator) 9. User Lockout 10. LDAP/Active Directory login support 11. Active Directory Federation Service (ADFS) Authentication 12. Social media logins (Facebook, Twitter, Google+ and Microsoft Account implemented) 13. OpenId Connect Authentication 14. Log and show all login attempts for users 15. Password complexity settings 16. Automatic Cross-Site Request Forgery (CSRF) protection 17. IdentityServer4 integration
Rapid Application Development
1. Templating support to generate customized code
Mobile Application
1. Cross-platform (iOS & Android) Xamarin mobile application 2. Integrated with the backend API 3. Provides infrastructure for common development tasks
Dynamic Ui Localization
1. Fully localized UI 2. Can add, remove and translate languages on UI 3. RTL and LTR support 4. English, Chinese, German, French, Italian, Russian, Portuguese (Brazil), Spanish (Mexico), Spanish (Spain), Turkish and Arabic localizations are included
Setting Management
1. Host & tenant-specific setting pages 2. Hierarchical setting management infrastructure 3. Easily configurable
Solid Architecture
1. Clean source code in a well-defined solution structure 2. Layered & modular architecture 3. Domain Driven Design implementation 4. Dependency injection everywhere 5. Validation 6. Logging 7. Exception handling 8. Caching 9. Automatic audit/security logging 10. Automatic database connection management and unit of work implementation 11. Pre-configured to deploy as Docker containers 12. Application functionalities are also available as HTTP API 13. Real-time push notification system (with SignalR integration) 14. Chat system (with SignalR integration) 15. Background job system (with Hangfire integration) 16. Multiple time zone support for application, tenants and users 17. Built-in global event bus for server-side events (with pre-defined events for entity changes) 18. Show and download logs from UI 19. Application setup screen 20. Personalization of layout, header, menu and footer per user 21. Tested on major PAAS providers (Azure, AWS)
Based on Strong Frameworks
1. .NET Framework 4.6.x / .NET Core 2.x (cross-platform support) 2. ASP.NET Core / ASP.NET MVC & Web API 3. EntityFramework Code-First and Migrations 4. Angular, Bootstrap, AutoMapper... 5. ASP.NET Boilerplate
Based on Metronic Theme
1. Bootstrap based 2. Responsive design 3. Multiple layout options 4. Metronic UI and components
We, at Manektech, always support the way our client wants to handle their project and we have talented and experienced software developers with us for all your technical needs. With years of experience in IT industry, ManekTech provides the best solution for your IT needs, our experiences software professionals associated with us and we always thrives to provide the expert solution to all your technical needs. We invite you to visit us for all your technical need with the best possible solution.
#Outsourcing software development company#software outsourcing company#offshore custom software development
0 notes
Text
Getting started with the SQL Server Compact and other providers for Entity Framework 7 beta 6
In connection with the recent release of Entity Framework 7 (EF7) beta 6 on NuGet, I have contributed two SQL Server Compact providers that work with this beta release (in close collaboration with and with great support from the EF7 team.) Notice that the general “EntityFramework” package for EF7 is no longer available. Going forward you always install the desired provider packages as needed. For example EntityFramework.SqlServer The SQL Server Compact providers The SQL Server Compact providers are fully featured providers that support all required Core APIs (maybe with the exception of provider specific metadata). This includes support for returning IDENTITY values after INSERTs, Migrations, database object creation, and modelling via both the fluent API and Data Annotations. It also includes support the for Reverse-Engineer command, allowing you to create an EF7 model from an existing database. For a walkthrough of how to get started with the SQL Server Compact providers, see the wiki article here. Initial Entity Framework 7 documentation is available here (a work in progress). As always feedback is very much appreciated, suggest you use the Github issue tracker for bug reports, feature suggestions or even Pull Request discussions and submissions! Other providers With the current EF7 beta, the following providers are available: EntityFramework.SqlServer Provider for SQL Server/Azure SQL Database - supplied by Microsoft. This provider will be able to take advantage of the .NET Core support for System.Data.SqlClient on Unix and Mac. Currently only SQL Server 2012 and later is supported, but support for SQL Server 2008 is planned EntityFramework.Sqlite Provider for SQLite, mainly for devices (tablet and phone) - supplied by Microsoft. Will also work with Xamarin (Andriod and IOs) EntityFramework.InMemory In-memory provider for use with testing, supplied by Microsoft All the providers above are hosted here on Github. EntityFramework.Npgsql Provider for PostgressSQL - also works on Mono. Supplied by Shay Rojansky and others (expected to be released with beta7) – Github EntityFramework.SqlServerCompact40 Provider for SQL Server Compact 4.0, supplied by yours truly – Github EntityFramework.SqlServerCompact35 Provider for SQL Server Compact 3.5 SP2, also supplied by yours truly – Github The current plan is to release EF7 at the same time as ASP.NET 5, which is currently scheduled (no guarantees) to beginning of next year.
0 notes
Text
ASP.NET Core 3 and Angular 9 - Third Edition

I'm happy to announce that the ASP.NET Core 3 and Angular 9 book is finally available for purchase – in E-Book and Paperback format – on all the major online stores, including: Packt Publishing Amazon.com | it | uk | in |de | fr Google Play Barnes & Noble Mondadori Rakuten Kobo Booktopia ... and more! Here's the updated cover:

As always, if you get it from the Packt Publishing online store you'll be able to obtain a good discount (25%) by using the RYADEL25 promo code. If you want to know what the book is about, here's a detailed description: as you'll be able to see, the new edition is a complete rewrite of the previous ones, featuring a length of 732 pages (the 2nd edition was 550) and a huge GitHub source code repository filled with brand-new sample projects! I definitely hope that you will like it just like you did with the previous one (ASP.NET Core 2 and Angular 5), who happened to be a best-seller in multiple countries with more than 15000 copies sold throughout the world and even a video course on Udemy! That couldn’t be made possible without you, so thanks again and… get ready for another development journey! Key Features Explore the latest edition of the bestselling book ASP.NET Core 2 and Angular 5 Design, build and deploy a Single Page Application or Progressive Web App with ASP.NET Core and Angular Adopt a full stack approach to handle data management, Web APIs, application design, testing, SEO, security and deployment Book Description Learning full stack development calls for knowledge of both frontend and backend web development. By covering the impressive capabilities of ASP.NET Core 3.1 and Angular 9, right from project setup through to the deployment phase, this book will help you to develop your skills effectively. The book will get you started with using the .NET Core framework and Web API Controllers to implement API calls and server-side routing in the backend. Next, you will learn to build a data model with Entity Framework Core and configure it using either a local SQL Server instance or cloud-based data stores such as Microsoft Azure. The book will also help you handle user input with Angular reactive forms and frontend and backend validators for maximum effect. You will later explore the advanced debugging and unit testing features provided by xUnit.net (.NET Core) and Jasmine, as well as Karma for Angular. Finally, you will implement various authentication and authorization techniques with the ASP.NET Core Identity system and the new IdentityServer, as well as deploy your apps on Windows and Linux servers using IIS, Kestrel, and Nginx. By the end of this book, you will be equipped with the skills you need to create efficient web applications using ASP.NET Core and Angular. What you will learn Implement a Web API interface with ASP.NET Core and consume it with Angular using RxJS Observables Create a data model using Entity Framework Core with code-first approach and migrations support Set up and configure a SQL database server using a local instance or a cloud data store on Azure Perform C# and JavaScript debugging using Visual Studio 2019 Create TDD and BDD unit test using xUnit, Jasmine, and Karma Implement authentication and authorization using ASP.NET Identity, IdentityServer4, and Angular API Build Progressive Web Apps and explore Service Workers Who this book is for This book is for experienced ASP.NET developers who already know about ASP.NET Core and Angular and are looking to learn more about them and understand how to use them together to create production-ready Single Page Applications (SPAs) or Progressive Web Applications (PWAs). However, the fully-documented code samples (also available on GitHub) and the step-by-step implementation tutorials make this book easy-to-understand - even for beginners and developers who are just getting started. Table of Contents Getting Ready Looking Around Front-end and Back-end Interactions Data Model with Entity Framework Core Fetching and Displaying Data Forms and Data Validation Code Tweaks and Data Services Back-end and Front-end Debugging ASP.NET Core and Angular Unit Testing Authentication and Authorization Progressive Web Apps Windows and Linux Deployment Read the full article
#.NETCore#.NETCore3#Angular#Angular9#ASP.NETCore#ASP.NETCore3#Books#Full-Stack#Packt#PacktPublishing#PacktPub
0 notes
Text
Entity Framework Code First Migration In Asp.net Core
New Post has been published on https://is.gd/0fWdW8
Entity Framework Code First Migration In Asp.net Core

Code First Entity Framework Migration In Asp.Net Core By Sagar Jaybhay
Migration helps to sync database schema with the model classes. In entity framework code first we have different database initialization strategies like .
CreateDatabaseIfNotExists, DropCreateDatabaseIfModelChanges, and DropCreateDatabaseAlways.and there is one problem with these strategies like if you have existing stored procedure,triggers or you have any other database objects. When you use the above-mentioned strategies they will re-create the database so you may lose your data and other db objects.
So entity framework core introduces a migration tool that automatically updates database schema and if in future your model changes it will reflect that to your underlying table.
There are two kinds of Migration:
Automated Migration
Code-based Migration
Till now in previous links we add connection string in appsettings.json file and add repository and context classes.
And when we run this application we got following error.

Cannot open database "StudentDB" requested by the login. The login failed. Login failed for user 'DESKTOP-ONEBTMN\Sagar'.
Now why we got this error because we don’t add entity core migration and right now we don’t have that StudentDb database on our local server and tables also not present there. So to overcome this error we need to add migration.
Commands used in Entity Framework Code First Migration
There are many commands which help you for migration but we start with
Get help you need to fire this command in the package manager console.
How to Open package manager see below image

A) Get-Help about_entityframeworkcore
Below is the output of this get-help commands
_/\__ ---==/ \\ ___ ___ |. \|\ | __|| __| | ) \\\ | _| | _| \_/ | //|\\ |___||_| / \\\/\\ TOPIC about_EntityFrameworkCore SHORT DESCRIPTION Provides information about the Entity Framework Core Package Manager Console Tools. LONG DESCRIPTION This topic describes the Entity Framework Core Package Manager Console Tools. See https://docs.efproject.net for information on Entity Framework Core. The following Entity Framework Core commands are available. Cmdlet Description -------------------------- --------------------------------------------------- Add-Migration Adds a new migration. Drop-Database Drops the database. Get-DbContext Gets information about a DbContext type. Remove-Migration Removes the last migration. Scaffold-DbContext Scaffolds a DbContext and entity types for a database. Script-Migration Generates a SQL script from migrations. Update-Database Updates the database to a specified migration. SEE ALSO Add-Migration Drop-Database Get-DbContext Remove-Migration Scaffold-DbContext Script-Migration Update-Database
A) Automatic Migration:
For this use below command
enable-migrations –EnableAutomaticMigration:$true
Once the command runs successfully, it creates an internal sealed Configuration class derived from DbMigrationConfiguration in the Migration folder in your project.
B) Code-Based Migration in Entity Framework 6
Add-Migration– this command is used for add migration but for this, you need to pass name for the migration
PM> Add-Migration cmdlet Add-Migration at command pipeline position 1 Supply values for the following parameters: Name: firstmigration Microsoft.EntityFrameworkCore.Infrastructure[10403] Entity Framework Core 2.2.6-servicing-10079 initialized 'OurDbContext' using provider 'Microsoft.EntityFrameworkCore.SqlServer' with options: MaxPoolSize=128 To undo this action, use Remove-Migration.

As shown in command we give the name to add-migration command so it will create a class of that name first in our case firstmigration.
public partial class firstmigration : Migration protected override void Up(MigrationBuilder migrationBuilder) migrationBuilder.CreateTable( name: "Students", columns: table => new StudentId = table.Column<int>(nullable: false) .Annotation("SqlServer:ValueGenerationStrategy", SqlServerValueGenerationStrategy.IdentityColumn), FullName = table.Column<string>(nullable: false), Address = table.Column<string>(nullable: false), Division = table.Column<int>(nullable: false) , constraints: table => table.PrimaryKey("PK_Students", x => x.StudentId); ); protected override void Down(MigrationBuilder migrationBuilder) migrationBuilder.DropTable( name: "Students");
After this command, you need to use an update–database command which is given below
PM> update-database Microsoft.EntityFrameworkCore.Infrastructure[10403] Entity Framework Core 2.2.6-servicing-10079 initialized 'OurDbContext' using provider 'Microsoft.EntityFrameworkCore.SqlServer' with options: MaxPoolSize=128 Microsoft.EntityFrameworkCore.Database.Command[20101] Executed DbCommand (22ms) [Parameters=[], CommandType='Text', CommandTimeout='30'] SELECT OBJECT_ID(N'[__EFMigrationsHistory]'); Microsoft.EntityFrameworkCore.Database.Command[20101] Executed DbCommand (5ms) [Parameters=[], CommandType='Text', CommandTimeout='30'] CREATE TABLE [__EFMigrationsHistory] ( [MigrationId] nvarchar(150) NOT NULL, [ProductVersion] nvarchar(32) NOT NULL, CONSTRAINT [PK___EFMigrationsHistory] PRIMARY KEY ([MigrationId]) ); Microsoft.EntityFrameworkCore.Database.Command[20101] Executed DbCommand (1ms) [Parameters=[], CommandType='Text', CommandTimeout='30'] SELECT OBJECT_ID(N'[__EFMigrationsHistory]'); Microsoft.EntityFrameworkCore.Database.Command[20101] Executed DbCommand (2ms) [Parameters=[], CommandType='Text', CommandTimeout='30'] SELECT [MigrationId], [ProductVersion] FROM [__EFMigrationsHistory] ORDER BY [MigrationId]; infoinfo: Applying migration '20190902071133_firstmigration'. : Microsoft.EntityFrameworkCore.Migrations[20402] Applying migration '20190902071133_firstmigration'. Microsoft.EntityFrameworkCore.Database.Command[20101] Executed DbCommand (2ms) [Parameters=[], CommandType='Text', CommandTimeout='30'] CREATE TABLE [Students] ( [StudentId] int NOT NULL IDENTITY, [FullName] nvarchar(max) NOT NULL, [Address] nvarchar(max) NOT NULL, [Division] int NOT NULL, CONSTRAINT [PK_Students] PRIMARY KEY ([StudentId]) ); Microsoft.EntityFrameworkCore.Database.Command[20101] Executed DbCommand (2ms) [Parameters=[], CommandType='Text', CommandTimeout='30'] INSERT INTO [__EFMigrationsHistory] ([MigrationId], [ProductVersion]) VALUES (N'20190902071133_firstmigration', N'2.2.6-servicing-10079'); Done.
Update database command takes one parameter which migration name and if you don’t specify migration name it will automatically get latest migration name to do a task. If you have more than one migration then you can provide a name to this so only for this update will be applied.
This command first creates StudentDB which is our database name is created and after database created it will create student table under StudentDB.

EntityFrameworkCore Migration Commands
How to seed Data in Asp.net core Entity Framework?
Seeding means what? initially when you add migration and all that you don’t have any data in a table so you need to add some demo data in the table and how you gone add that by using OnModelCreating method. You need to override this method in OurDbContext class.
public class OurDbContext:DbContext public DbSet<Student> Students get; set; public OurDbContext(DbContextOptions<OurDbContext> options):base(options) protected override void OnModelCreating(ModelBuilder modelBuilder) modelBuilder.Entity<Student>().HasData( new Student StudentId = 1, Division = Divi.A_10, Address = "abcd efgh", FullName = "abc" , new Student StudentId = 2, Division = Divi.A_10, Address = "werr", FullName = "xyz" );
This is the class and in this we override the OnModelCreating method. In that we add 2 demo entity in that.
After doing this you need to fire command Add-Migration with-Migration-name, below is the command.
Add-Migration InitialSeeding Microsoft.EntityFrameworkCore.Infrastructure[10403] Entity Framework Core 2.2.6-servicing-10079 initialized 'OurDbContext' using provider 'Microsoft.EntityFrameworkCore.SqlServer' with options: MaxPoolSize=128 To undo this action, use Remove-Migration. After successfully run this command you need to fire another command which is Update database update-database Microsoft.EntityFrameworkCore.Infrastructure[10403] Entity Framework Core 2.2.6-servicing-10079 initialized 'OurDbContext' using provider 'Microsoft.EntityFrameworkCore.SqlServer' with options: MaxPoolSize=128 infoverbose: Executed DbCommand (11ms) [Parameters=[], CommandType='Text', CommandTimeout='30'] : Microsoft.EntityFrameworkCore.Database.Command[20101] Executed DbCommand (11ms) [Parameters=[], CommandType='Text', CommandTimeout='30'] SELECT OBJECT_ID(N'[__EFMigrationsHistory]'); Microsoft.EntityFrameworkCore.Database.Command[20101] Executed DbCommand (2ms) [Parameters=[], CommandType='Text', CommandTimeout='30'] SELECT OBJECT_ID(N'[__EFMigrationsHistory]'); Microsoft.EntityFrameworkCore.Database.Command[20101] Executed DbCommand (2ms) [Parameters=[], CommandType='Text', CommandTimeout='30'] SELECT [MigrationId], [ProductVersion] FROM [__EFMigrationsHistory] ORDER BY [MigrationId]; Microsoft.EntityFrameworkCore.Migrations[20402] Applying migration '20190902100615_InitialSeeding'. Applying migration '20190902100615_InitialSeeding'. Microsoft.EntityFrameworkCore.Database.Command[20101] Executed DbCommand (22ms) [Parameters=[], CommandType='Text', CommandTimeout='30'] IF EXISTS (SELECT * FROM [sys].[identity_columns] WHERE [name] IN (N'StudentId', N'Address', N'Division', N'FullName') AND [object_id] = OBJECT_ID(N'[Students]')) SET IDENTITY_INSERT [Students] ON; INSERT INTO [Students] ([StudentId], [Address], [Division], [FullName]) VALUES (1, N'abcd efgh', 4, N'abc'); IF EXISTS (SELECT * FROM [sys].[identity_columns] WHERE [name] IN (N'StudentId', N'Address', N'Division', N'FullName') AND [object_id] = OBJECT_ID(N'[Students]')) SET IDENTITY_INSERT [Students] OFF; Microsoft.EntityFrameworkCore.Database.Command[20101] Executed DbCommand (11ms) [Parameters=[], CommandType='Text', CommandTimeout='30'] IF EXISTS (SELECT * FROM [sys].[identity_columns] WHERE [name] IN (N'StudentId', N'Address', N'Division', N'FullName') AND [object_id] = OBJECT_ID(N'[Students]')) SET IDENTITY_INSERT [Students] ON; INSERT INTO [Students] ([StudentId], [Address], [Division], [FullName]) VALUES (2, N'werr', 4, N'xyz'); IF EXISTS (SELECT * FROM [sys].[identity_columns] WHERE [name] IN (N'StudentId', N'Address', N'Division', N'FullName') AND [object_id] = OBJECT_ID(N'[Students]')) SET IDENTITY_INSERT [Students] OFF; Microsoft.EntityFrameworkCore.Database.Command[20101] Executed DbCommand (1ms) [Parameters=[], CommandType='Text', CommandTimeout='30'] INSERT INTO [__EFMigrationsHistory] ([MigrationId], [ProductVersion]) VALUES (N'20190902100615_InitialSeeding', N'2.2.6-servicing-10079'); Done.
After doing all this you see below InitialSeeding which is our migration name class is created.
public partial class InitialSeeding: Migration protected override void Up(MigrationBuilder migrationBuilder) migrationBuilder.InsertData( table: "Students", columns: new[] "StudentId", "Address", "Division", "FullName" , values: new object[] 1, "abcd efgh", 4, "abc" ); migrationBuilder.InsertData( table: "Students", columns: new[] "StudentId", "Address", "Division", "FullName" , values: new object[] 2, "werr", 4, "xyz" ); protected override void Down(MigrationBuilder migrationBuilder) migrationBuilder.DeleteData( table: "Students", keyColumn: "StudentId", keyValue: 1); migrationBuilder.DeleteData( table: "Students", keyColumn: "StudentId", keyValue: 2);
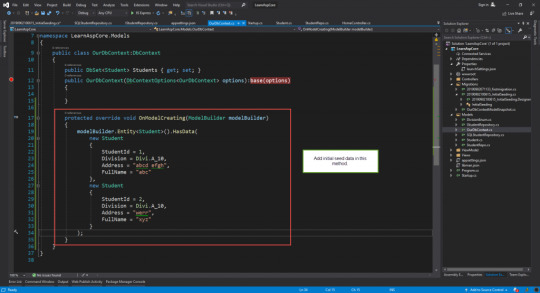
Initial Seed Data In Entity Core Code First Migration
In our OurDbContext class we override this method and we add some demo data, but here one thing is that if you want to add so many records your code becomes very cluttered so avoid this we use Extention method for this we need to create on class and in that create one static method which takes one parameter is ModelBuilder like below.

Model Builder Seed Data Entity Framework Code First Migration
Below is our extension method class.
public static class ModelBuilderSeeding public static void Seed(this ModelBuilder modelBuilder) modelBuilder.Entity<Student>().HasData( new Student StudentId = 1, Division = Divi.A_10, Address = "abcd efgh", FullName = "abc" , new Student StudentId = 2, Division = Divi.A_10, Address = "werr", FullName = "xyz" );
How keep Domain Models and Database schema in sync using migration in asp.net core MVC?
add-migration <name of migration>
When developing applications, the model is likely to change often as new requirements come to light. The database needs to be kept in sync with the model. The migrations feature enables you to make changes to your model and then propagate those changes to your database schema.
When you create a migration, the framework compares the current state of the model with the previous migration if one exists and generates a file containing a class inheriting from Microsoft.EntityFrameworkCore.Migrations.Migration featuring an Up and a Down method. The class is given the same name as you specified for the migration. The filename itself is the name of the migration prefixed with a timestamp.
The Up method contains C# code that applies any changes made to the model to the schema of the database since the last migration was generated. The Down method reverses those changes, restoring the database to the state of the previous migration. A ModelSnapshot file is also created or updated, depending on whether one previously existed.
Use migrations to keep domain models and database schema in sync
Add new migration we use Add-Migration command
To update the database with the latest migration use update-database command
Remove the latest migration which is not applied yet to database use remove-migration command
__migrationhistory table in our created database is used to keep track of applied migration.
ModelSnapShot.cs file contains a snapshot of the current model and is used to determine what has changed when adding the next migration
To remove migration that is already applied to the database we need to first use the Update-Database command to undo the database changes applied by the migration.
Next use remove-migration command to remove migration.
0 notes
Text
Entity Framework Core Migrations error - Database already exists - How to fix

Today I was working on my TestMakerFree Angular app, which I used as a sample app for my ASP.NET Core 2 and Angular 5 book: specifically, I was looking for a way to programmatically check if the SQL database existed or not. The reason of that is simple: the DbContext.Database.Migrate() method, which can be used in an ASP.NET Core application (when using EF Core with migrations) to ensure the database is created and all migrations are applied, will throw an exception when used against a Database which is not identical to the one it created and migrated from the very beginning. Here's a typical implementation of the DbContext.Database.Migrate() method in an ASP.NET Core application: var host = BuildWebHost(args); using (var scope = host.Services.CreateScope()) { var dbContext = scope.ServiceProvider.GetService(); var roleManager = scope.ServiceProvider.GetService(); var userManager = scope.ServiceProvider.GetService(); // Create the Database if it doesn't exist and applies any pending migration. dbContext.Database.Migrate(); // Seed the Database DbSeeder.Seed(dbContext, roleManager, userManager); } host.Run(); This piece of code is usually put inside the Main() method of the Program.cs file and will ensure that the DB is not only present, but also up-to-date and perfectly matching the migrations present in the actual code.
The issue
Although this is indeed a good thing, that method might either pose performance issues and/or raise unexpected exceptions in our code. The former will occur whenever there aren't new migrations to apply, while the latter will be thrown whenever the Database - despite being up-to-date - has been created using different migrations, such as from a different development machine: as a matter of fact, the Migrate() method will fail (and throw a SqlException) whenever it doesn't find all the expected migrations in the __EFMigrationsHistory SQL table. Here's a typical SqlException that you would see while attempting to do that: Application startup exception: System.Data.SqlClient.SqlException (0x80131904): Database 'MyDatabaseName' already exists. Choose a different database name.
The fix
Before start talking about the fix, there's an important thing that we need to understand: the migration pattern is an excellent way to ensure that all the Databases we're working on (and we'll use to connect our app with) will have a consistent and up-to-date structure in any given environment - testing, stage, production, DR and so on; if we choose to use it, the best thing we can do is to stick to the pattern best practices and ensure that the Migrate() method is called whenever we need to. That said, if you want to use the Migrate() method solely to create your database on the first run and you don't need to programmatically (and automatically) keep track of any further migration, the best thing you can do is to wrap the Migrate() method inside a conditional block: if (!dbContext.Database.GetService().Exists()) { var host = BuildWebHost(args); using (var scope = host.Services.CreateScope()) { var dbContext = scope.ServiceProvider.GetService(); var roleManager = scope.ServiceProvider.GetService(); var userManager = scope.ServiceProvider.GetService(); // Create the Db if it doesn't exist and applies any pending migration. dbContext.Database.Migrate(); // Seed the Db DbSeeder.Seed(dbContext, roleManager, userManager); } host.Run(); } That way you will ensure that the Migrate() method will be programmatically executed only if the Database doesn't exists yet: that would be perfect for testing environments, where you can just drop and recreate the Database everytime without having to worry about losing actual data, and/or for any other context where you prefer to manually update your Database - for example using the dotnet ef powershell command. That's good for performance and also to avoid the SqlException from the Migrate() method, as it will only run whenever there is no Database to begin with, thus preventing the chance of finding wrong or outdated migrations data. If you're curious about what the Exists() method actually does behind the curtains, you can easily check it out by looking at the in the SqlServer.Storage/Internal/SqlServerDatabaseCreator.cs class within the EF Core's official GitHub repository: you will see that there's no actual magic - just an attempt to open the connection and either catch the SqlException and return false or return true. Probably not the best thing you can hope to find there, yet still better than nothing (at least it does the job). Read the full article
0 notes