#fake tattoo photoshop tutorial
Video
youtube
Photoshop Tutorial | Add Realistic Tattoo | The Learning Ship
#photoshop tutorial#thelearningship#realistictattoo#tattoo photo editing#add realistic tattoo in photoshop#tattoo photoshop tutorial#tattoo photoshop tutorial 2021#tattoo photoshop effect#how to add realistic tattoo in photoshop#fake tattoo photoshop tutorial#realistic tattoo#tattoo in photoshop#photoshop tattoo#how to create realistic body tattoo in photoshop#hindi photoshop tutorial#the learning ship#how to add tattoos#body art#liquify#apply realistic tattoo in photoshop#make a tattoo in photoshop#photoshop a tattoo on someone#add tattoos on body#photoshop tattoos ideas#photoshop tattoos techniques
0 notes
Video
How to add realistic tattoo in photoshop | fake tattoo tutorial in photo...
#photoshop tutorial#photoshop#photoshop training channel#photoshop tutorial in hindi#piximperfect#realistic tattoo in photoshop#how to add realistic tattoo in photoshop
1 note
·
View note
Text
May's tutorial on how to take 2000s looking pics! This is not just for scene and/or emo kids, although ofcourse yall can use this!
Here are a few things you can do to make pictures look like they were taken in the 2000s!
What better way to look 2000s than when you use 2000s technology?
Exemples of things you could take a pic with are: an ipod, or any mp3 player actually, 2000s looking cd players, PS2 controllers (make sure it actually looks like you're playing or believe me, someone will notice!) or xbox controller (if you use older consoles of any type, the vibe might look more 90s but if you manage you can still make it work)
If you can't take a picture next to or with 2000s technology... anything? Well maybe you can take a selfie with a fliphone, or a T Mobile Sidekick (if you have one, lucky you!) or even a Nintendo DS if you've got one of those with the camera! Mirror selfies were also a thing of the (mid?) 2000s if they were taken with an actual camera! Let's also not forget the webcam pictures!
Here's one I took for example:
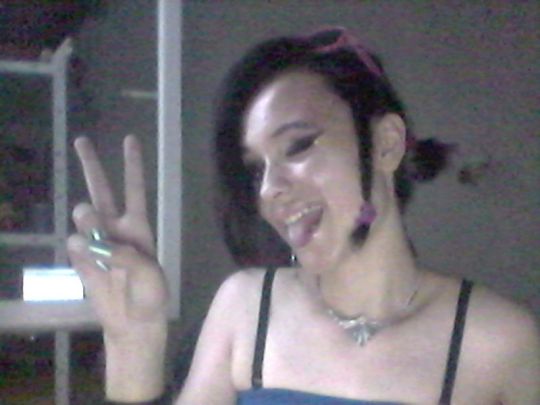
Special "effects"/ Editing:
One thing that makes almost all pictures look so much more aesthetic/better: putting the flash on! I promise it works almost all of the time, the picture will look more high quality and clearer even though it is the same quality as without! If you think your outfit might not be too great or you'd like to make it look like it was taken with a low quality phone, blur the picture! It could also just look artistic, which works just as good.
As for the editing, Glitter, like edits made on Blingee, turning up the contrast, putting a filter (or a few) that give off a blue hue or darker, add in your FriendProject profile number, or your nickname in a grungy font, or photoshop yourself in front of a cute butterfly background!
The poses and angles!
Taking a picture with only this information might not be enough to make it look as 2000s as you want it to be, so now let's see another thing; the poses and the angles! Especially when you take a selfie, do not understimate the power of the "myspace angle" as you might've heard before, the super high angle from which you take the selfie, in which you could include your whole outfit. I know, out of experience, that the position in which you have to try and stand to get your whole outfit in the picture is very, VERY uncomfortable, but trust me it's worth it!
Here's an example:
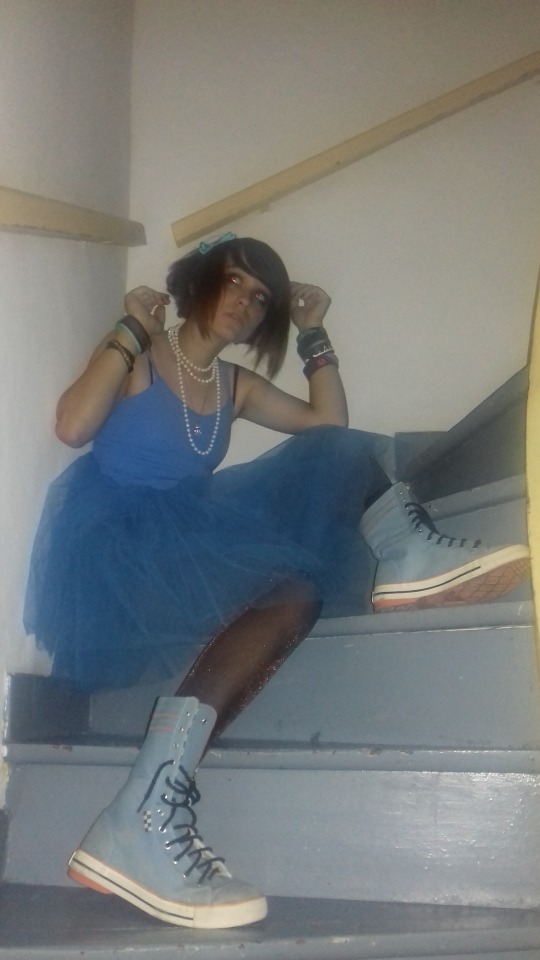
Other angles/poses you could use are for example the ones in which you position the camera, phone or whatever you take your pictures with at your feet, put a timer or make someone take the picture for you, in an angle at which your feet will look bigger than your head and your whole outfit will be visible again! This one's hard to explain but here's an example, again from one of my pics because I couldn't find one from someone else: (putting "myspace picture big feet" on google, does in fact, not work)
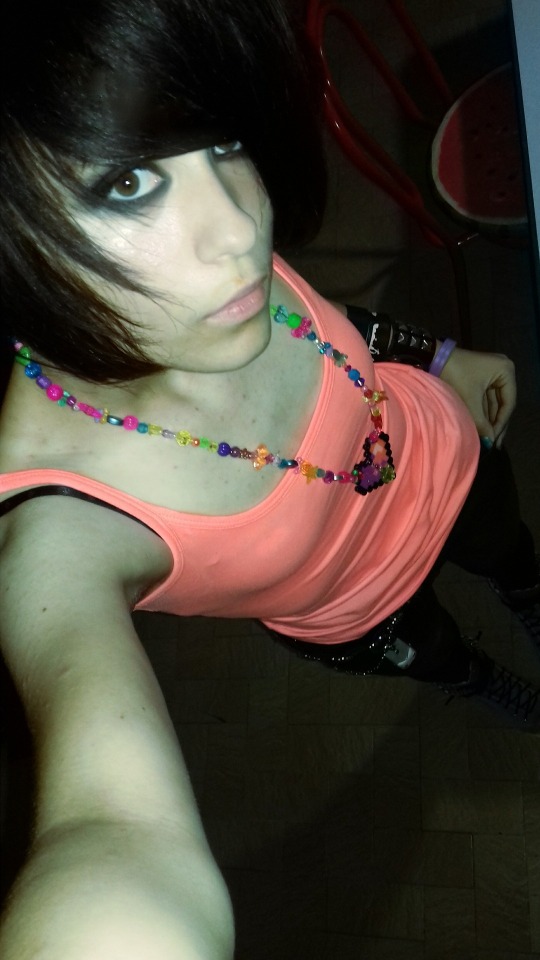
Shoutouts from most known myspace celebs were a big thing back then, with the name of someone (or their own, partly to prove they aren't catfish) written on their hand or a piece of paper, as well as showing off fake tattoos made with sharpies, or something like "I love you!" on the palm of your head, so standing there showing it, could, somehow be a pose? I guess so... oh well, this is still something that would've been on this list!
There are many more (like for example the ones where your legs look broken as you sit on the floor, or the one where you are showing off your room plastered with posters..) but just know not to just stand there looking lost (unless that's what you're going for), be either VERY dramatic with the poses or super casual, no in betweens or you'll probably look awkward!
Dramatic makeup and hair!
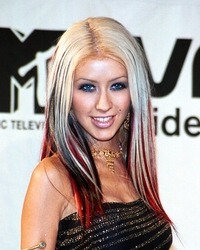
Of course... To keep on being dramatic, because the 2000s very much were, (as every decade, in their own way, but you get what I mean) hair was often in crazy colors and or haircuts! Even if you were neither emo nor scene, celebrities like Christina Aguilera or Kelly Clarkson, to Matt Tuck (that's right!) had highlights in their hair, or just dyed parts of their hair, usually blonde, black or red, but chalk haircolor exists in many colors, so go crazy on that!
See here:

Not only that but side ponytails, extensions, crimped hair, face framing bangs, spiky gelled hair etc. Even if you aren't emo or scene, your hair can cover one of your eyes for the picture!
Makeup had to be very visible, especially as a scene kid or emo kid with the overflowing amount of eyeliner, and colorful mascara or anything that you could find to be original and "artsy" really, but also for any other person! Makeup looks that were usual attire were for example: LIPGLOSS, blue, purple, white or eyeshadow, frosty pink lipstick, a lot of mascara, colorful eyeliner, rosy cheeks, or lined lips (darker on the outside) but none of that would be complete without thin eyebrows! Fake tans are also a go-to if you're feeling it!
Now, if you're too scared to use hairchalk or dye your hair, and you aren't too good at makeup, no worries, you've still got other options!
Props and accessories!
Big sunglasses.. yes, even indoors! Rimmed glasses, Colored lenses, "Bug eye" sunglasses, there are many to choose from! Scarves, very unnecessary but pretty cool looking! Hoop earrings were also in! For guys too, jewelry was often worn, for example diamond earrings, shell necklaces, as well as the typical "gangsta wear", you would've guessed it: the dollar sign necklace or chunky golden chains/necklaces. They were ofcourse not first worn during the 2000s, but they were definitely still very much worn then! Other jewelry often worn were silly bands, wristbands, kandi bracelets and necklaces. You can even wear fake piercings!
As for headwear, still many to choose from, like trucker hats, both for guys and girls and anyone who'd like to wear those, bandanas, fedora hats, (do not recommend, 80% of the time you'll look awkward, but you can't know if you're part of the 20% that could rock the look if you don't atleast try, I guess) "baker boy hats" and big huge bows for all my scene beans out there. Belts. BeLtS! A lot, too much, 3 of them, or one big one, just find whatever you have and wear the goddamn belts! Fishnets! Fingerless gloves! They were very much in, and not just for scemo kids!
Not only is it about things you can wear, but also things you can use for the picture, you can look cute while holding a plush toy, (bonus points if you've got a gloomy bear, hello kitty or gir plush!) mysterious while holding a notebook/ diary of some sort or nerdy with your favorite book, but a lot of pictures get much more fun when they are super random, for example like kiki kannibal, just casually holding a lamp in her garden...

Clothing!
Now, this one will be short as I will mainly give you guys links to some articles that talk about 2000s fashion, but here's a thing: If you're going for a very "in your face" kind of style, go fully crazy lol! Scene kids get your neon green tights or red ripped skinnies out and wear all of the colors, preps wear your shiniest Playboy logo shirt, goths and emos you better wear your nicest black knee high converse, all of it!! Go fucking over the top because truly, it was rarely ever over the top in the 2000s! Also, did I mention? Cringe culture is dead, nobody cares if you somehow manage to truly go a little too far! If you're feeling yourself, don't hesitate to show a little skin, (I don't mean totally naked, duh, especially if you're a minor plz no it's usually a very bad idea) ain't nothing wrong with mini skirts or crop tops! (guys, GUYS please wear them too if you feel like it, I promise you a lot of us think that's hot okaythatsall)
Anyway, here's a few articles on the fashion/clothes! Most of these include also accessories etc but you'll find a lot about clothes!
Includes men's clothing too!
https://www.complex.com/style/best-fashion-trends-of-early-2000s/
Yes.. I know.. Buzzfeed.. But oh well, it's still showing the clothes and fashion like we need! There isn't much for guys here, but there is inspo to take from it lol!
https://www.buzzfeed.com/leonoraepstein/forgotten-early-2000s-trends
Now, I know what this one says... apparently all of these trends were"mistakes"... Well who's gonna laugh when 2000s style makes a comeback? Definitely not them, once they look back on this article!
https://www.goodhousekeeping.com/beauty/fashion/g2898/worst-2000s-fashion-trends/
This article includes men's fashion and also includes a link to buy the items! That is, if you've got 35$ to spend on a cap for example... Which I don't, but that's okay, it's got pretty good examples of the fashion!
https://spy.com/gallery/2000s-fashion-trends-throw-back-style/
And since I couldn't find a good article on 2000s alt fashion, I made a Pinterest board with a few exemples for Scene, Emo, Goth, Mallgoth/Goth, Visual Kei and Cybergoth! There isn't a lot yet, but you'll get the general idea :)
https://www.pinterest.fr/mayskelly/2000s-alt-styles/
I hope you guys like it, and try it! I think I may share my favorite attempts if enough people do it on my instagram story and here, and tumblr as well if anyone participates in this!
#emo#scene#scemo#scenecore#emocore#fun#tutorial#2000s core#2000s#2000#2001#2002#2003#2004#2005#2006#2007#2008#2009#2010#preps#goths#everyone#contest#participate!#participate
637 notes
·
View notes
Text
50 Awesome Photo Effect Tutorials
Photoshop is clearly our favorite photo editing software. In this article, we have listed 50 best Photoshop tutorial effects that will show you how to perform a wide range of tasks including age progression, Instagram-like effects, lomo effects, and light leaks, as well as vintage and retro effects that you can use to help improve your photo editing workflow.
If you're looking for a quick way to make pro photo effects, then browse through our premium Photoshop photo effects and Photoshop actions, which can be purchased on GraphicRiver. There are thousands of creative options to choose from.
Or try our free course on making a double exposure effect in Photoshop.
Now, let's take a look at these free photo effect tutorials!
50 Best Photoshop Effect Tutorials
Learn how to do just about anything to your photos, from double exposure effects to cut-outs and so much more. Dive into these amazing tutorials created just for you by Envato Tuts+.
Photo Manipulation
How to Make Someone Look Older in Adobe Photoshop
Kirk Nelson
Photo Manipulation
How to Age a Photo in Adobe Photoshop
Kirk Nelson
Photo Effects
Quick Tip: Create Light Leaks and Lomo Effects Using Actions in Photoshop
Mike Moloney
Photo Effects
How to Combine a Crocodile and a Frog in Photoshop
Jason Stanley
Photo Effects
Swap Faces With Photoshop
Martin Perhiniak
Photo Effects
Use Split Frequency Healing to Retouch a Photo in Photoshop
Daniel Meadows
Photo Effects
How to Create Masks of Transparent Elements in Photoshop
Arindam Bhaduri
Photo Effects
Integrate a 3D Render Into a Macro Photograph Using Photoshop
Nacho Riesco
Photo Effects
Create Hipstamatic and Instagram Style Effects With Photoshop and Retrographer
Mark Heaps
Photo Effects
Photo Effects Week: Create a Cutout Photograph in Photoshop
Mark Heaps
Photo Effects
Photo Effects Week: Create a Lamb's Coat in Photoshop
Alexandra Fomicheva
Photo Effects
How to Turn Humdrum Photos Into Cinematic Portraits
James Davies
Photo Effects
Quick Tip: How To Fake a Tilt-Shift Photo
Cory Cohoon
Photo Effects
How to Apply Textures to Uneven Surfaces
James Davies
Photo Effects
How to Simulate X-Ray Photography in Photoshop
Jonathan Lam
Photo Effects
Adding a Realistic Tattoo the Easy Way with Photoshop
Dennis Dunbar
Tools & Tips
Changing Your Background
Martin Perhiniak
Tools & Tips
How to Make the Most of the Info Panel
Martin Perhiniak
Photo Effects
Quick Tip: Remove a Person From a Photo With Photoshop CS5’s Content Aware Feature
Martin Sitar
For Kids
Adobe Photoshop for Kids: Become the Wizard of Oz!
Kirk Nelson
Photoshop Actions
How to Create an Awesome Dispersion Action in Adobe Photoshop
Marko Kožokar
Photo Manipulation
How to Create a Frankenstein's Monster Photo Manipulation in Adobe Photoshop
Melody Nieves
Spirit Day
How to Create an Awareness Avatar Action in Adobe Photoshop
Melody Nieves
Adobe Photoshop
Create a Hot Air Balloon Scene From The Wizard of Oz in Adobe Photoshop
Kirk Nelson
Music Video
How to Create a Tous-Les-Memes-Inspired, Isometric Scene Effect in Photoshop
Kirk Nelson
Photoshop Actions
How to Create a Dark Photo Effect Action for Beginners in Adobe Photoshop
Marko Kožokar
Photo Effects
Photoshop in 60 Seconds: How to Create an Easy Sketch Effect With Actions
Melody Nieves
Typography
How to Combine Photography & Type for a Dramatic Effect
Grace Fussell
Grunge
How to Create a Retro 90s Grunge Photo Effect in Adobe Photoshop
Melody Nieves
Photo Effects
How to Create a Ghosted Dancer Effect in Adobe Photoshop
Kirk Nelson
Illustration
Create an Illustrated Watercolor and Ink Photo Effect in Photoshop
Sheridan Johns
Music Video
How to Create a Kaleidoscope Effect in Adobe Photoshop
Kirk Nelson
Photo Effects
How to Create a Strip Fractal Mirror Effect in Adobe Photoshop
Kirk Nelson
Photo Effects
Create a Devastating Twister With Photo Manipulation Techniques
Shardul
Photo Editing
How to Colourise an Old Photograph in Adobe Photoshop
Marie Gardiner
For Kids
Adobe Photoshop for Kids: Mini-Me!
Kirk Nelson
Fan Art
Create a Glass Shard Reflection Double Exposure Effect in Adobe Photoshop
Kirk Nelson
Photo Manipulation
Create a City Destruction Scene Photo Manipulation in Adobe Photoshop
Jenny Le
Photo Effects
Create a Taylor Swift "Style" Inspired Double Exposure Effect in Photoshop
Kirk Nelson
Photo Effects
How to Create a Painted Pet Portrait Effect in Adobe Photoshop
Kirk Nelson
Caricature
How to Create a Photo Caricature in Adobe Photoshop
Kirk Nelson
Photo Effects
Manipulate a Portrait Photo to Create a Splatter Paint Effect
Brandon Spahn
Photo Effects
Use Retouching Techniques to Create a Caricature From a Photo
Gabor Richter
Photo Effects
Add Dramatic Rain to a Photo in Photoshop
Tony Aube
Photo Effects
How to Add Realistic Falling Snow to a Photo in Photoshop
Tony Aube
Photo Effects
How to Apply a Plastic Mask Effect to a Portrait
Stefka Pavlova
Photo Effects
Create a Soil Cake for Pie Charts and Infographics
Anton Egorov
Photo Effects
Create a Fantasy City Using Architectural Photographs
Jonas De Ro
Photo Effects
Photoshop in 60 Seconds: How to Create a Cinematic Photo Effect With Actions
Melody Nieves
Day of the Dead
How to Create a Glamorous Calavera Portrait in Adobe Photoshop
Melody Nieves
20 Best Photoshop Effect Video Tutorials
If you're a visual person and prefer to watch Photoshop effects in action, I've got you covered with these free Photoshop photo effect tutorials.
The videos you're about to watch come from our playlist Learn Photo Effects. And don't forget to visit our Envato Tuts+ YouTube channel, where you'll find more easy Photoshop effect tutorials.
1. How to Create a Cool Glitch Photo Effect in Adobe Photoshop
Looking for out-of-the-box, creative photo editing ideas? Then this glitch Photoshop effect is for you. A glitch is a software error or bug that's often caused by a corrupted signal.
The kind of glitch created in this easy Photoshop effect tutorial is common to television or video games.
2. How to Make a Glowing Photo Effect to a Portrait in Photoshop
From our selection of the best Photoshop effect tutorials, we've got this one for you. This photo effect for Photoshop is inspired by African tribal makeup. You'll end up with a glowing Adobe portrait effect.
3. How to Apply a 3D Anaglyph Effect in Photoshop
3D anaglyphs are really cool types of photo editing effects. To achieve the 3D photo effect, you'll learn how to create an image that contains two different colored images, one for each eye, using filters of typically red and cyan.
To experience that pop-out stereoscopic effect, you'll need 3D red cyan glasses. Nevertheless, it's worth checking this cool free Photoshop effect tutorial!
4. How to Create a Rainbow Lens Flare Overlay Effect in Photoshop
Rainbow effects are creative photo editing ideas. In this easy Photoshop effect tutorial, you can learn how to create a rainbow lens flare Photoshop effect in a few steps.
5. How to Create a Color Double Exposure Effect in Adobe Photoshop Using an Action
We've got plenty of photo editing ideas, like a color double exposure photo effect. This is one of the best Photoshop effect tutorials because it'll teach you how to combine two color images into one.
6. Make a Photoshop Action to Create a Portrait Photo Effect
Adobe portrait effects are always among the most useful types of photo editing effects.
In this free Photoshop effect tutorial, you'll learn to turn a photo into a ballpoint pen drawing. Then, once you have the action, you can easily apply it to other photos.
7. How to Apply a Photo Filter or Effect in Photoshop
If you need photo filters, then this is the best Photoshop effect tutorial for you. This video is full of amazing Photoshop picture editing ideas and Adobe portrait effects.
8. How to Create a Photoshop Painting Effect
Painting effects are cool photo editing ideas. Why don't you check this free Photoshop photo effect tutorial to learn how to turn your pictures into paintings!
9. How to Create a Sketch Effect Action in Adobe Photoshop
This is one of our popular Photoshop effect tutorials. You'll learn how to turn your photos into advanced sketches in a few steps. Everyone can create Photoshop effects, even those who've just opened Photoshop for the first time!
10. How to Create a Dreamy Glow Effect Photoshop Action
This free Photoshop photo effect tutorial explains how to create a Photoshop dreamy glow effect, with soft blur and bokeh in the background. It can be used as a pretty Adobe portrait effect as well.
11. How to Create a Rubber Stamp Effect in Adobe Photoshop
Want more creative photo editing ideas? Have you ever seen a rubber stamp photo effect for Photoshop? We're sure this free Photoshop effect tutorial will blow your mind.
12. How to Create a Sparkle Overlay Effect in Photoshop
Sparkles are cool Photoshop picture editing ideas! Do you know how to create particle effects? You can use this technique for many magical photo effects. In this easy Photoshop effect tutorial, you’ll learn how to create a sparkle overlay effect for your pictures.
13. How to Create a Photoshop Sepia Effect Action
We've got more useful types of photo editing effects for you, like this sepia tone effect. You'll learn how to recreate the traditional look of old photos in this free Photoshop photo effect tutorial.
14. How to Create a Photo to Pencil Drawing Effect in Photoshop
Want more Photoshop tutorials on photo effects? Check this cool photo editing idea. In this easy Photoshop effect tutorial, you'll learn to turn a photo into a pencil drawing by following some simple steps!
15. How to Make a Distressed Effect Photoshop Action
Here's an excellent video from our selection of Photoshop effect tutorials. In this Photoshop tutorial on photo effects, you'll learn how to create a distressed effect using smart filters, adjustment layers, and overlay textures in Adobe Photoshop.
16. How to Turn a Photo Into Comic Book Art in Adobe Photoshop
Fan of comic books? Then this Photoshop effect tutorial is for you. Learn how to turn a picture into comic book art by following one of the best Photoshop effect tutorials we've got.
17. How to Create a Light Leak Photoshop Color Effect
This Photoshop tutorial will teach you how to create Photoshop color effects for pictures using a light leak overlay and how to add an atmospheric fade effect with gradient fills and gradient maps.
18. How to Create a Photo to Art Text Effect Photoshop Action
We've got more creative photo editing ideas to share, like this Photoshop tutorial about a photo effect to turn photos into art text effects. Just follow this free Photoshop effect tutorial.
19. How to Create a Vintage Fade Effect Photoshop Action
This free Photoshop photo effect tutorial will teach you how to create a vintage faded effect using such Photoshop effects as smart filters, adjustment layers, and overlay textures. Some cool types of photo editing effects, right?
20. How to Create a Smoke Effect Photoshop Action
To close our selection of brilliant photo editing ideas, we've got this great photo effect for you. It'll teach you how to create a smoke Photoshop effect from scratch. These are some fantastic Photoshop picture editing ideas, don't you think?
10 Premium Photo Effects From Envato Market
The tutorials above cover a wide range of effects you can achieve through practice and persistence. Additionally, you can always check our Envato Tuts+ YouTube channel, where you'll find more Photoshop picture editing ideas like this video:
But if you're short on time, you can always turn to the amazing selection of Photoshop actions on GraphicRiver and photo effects for Photoshop on Envato Elements for more awesome photo effects. Here we have a collection of ten premium Photoshop actions guaranteed to transform your photos in a few short clicks. Enjoy!
1. 25 HDR Photo FX V.2 - Photoshop Action (ATN)
HDR or High-Dynamic Range photography is an incredible technique that results in powerful imagery. And you can achieve the look of pristine HDR photography with this Photoshop action. Included in this package are 25 adjustable effects, four sharpness levels, and even a starburst generator action as a bonus!
2. Realistic Painting Effect V2 - Painting Action (ATN)
Get artsy with this realistic painting effect. Designed to simulate the look of traditional oil paintings, these photo effects for Photoshop include three actions, fully editable layers, and 15 different color presets. Explore your creative side with just a few simple clicks!
3. 90 Premium Actions Set (ATN)
You can never have enough Photoshop actions! And with this set of amazing premium actions, you can download 90 different looks. This package comes complete with retro-vintage effects, stunning black and white results, and so much more!
4. Cosmic Photoshop Action (ATN)
Explore the wonders of the universe with this spacey photo effect. With ten incredible color looks included, simply brush over the area you would like to apply the effect and press play. Enjoy this amazing cosmic effect in only a matter of seconds!
5. Soft Focus 2 Photoshop Action (ATN)
Create a legendary photo effect with this soft focus action. It has well-organized layers and simple instructions, and you'll even find a video tutorial included for additional help. Download these photo effects for Photoshop to gain access to this professional lighting effect.
6. Noire Photoshop Actions Vol 1 (ATN)
Looking for a cinematic photo effect? Well, you can turn your photo into a glamorous movie-style image with this noir-inspired Photoshop action. This package features 12 Photoshop actions along with helpful instructions and fully adjustable effects.
7. Dimension Photoshop Action (ABR, ATN, PAT)
Explode your photos into a million pieces with just a few simple clicks! This incredible package includes eight different glass patterns that can be scaled to various sizes, along with ten color options for even more variety.
8. Matte & Faded Photoshop Actions (ATN)
Love the look of vintage photography? Explore that matte and faded style with this stunning action set. This set includes 17 amazing Photoshop actions that come in a variety of subdued and faded effects. Get that professional retro look you love in almost no time at all!
9. Fury Photoshop Action (ABR, ATN)
If you're feeling furious, then you might want to express it with a powerful Photoshop action. Simply brush over the area where you would like to apply the effect and press play! It's just that simple! Download this package to gain access to this action and additional instructional materials.
10. Advanced Double Exposure - Photoshop Action (ATN)
Double exposure photography is a super trendy technique that merges two photos together for an amazing effect. And you can achieve an advanced level of manipulation with this incredible Photoshop action. With 18 color presets included, the effects are outstanding and truly limitless.
Conclusion
Want to see more photo effects? Browse the incredible collection of Photoshop actions and cool Photoshop effects designed to transform your photos through GraphicRiver and Envato Elements.
And for even more design help, enlist the help of the wonderful folks at Envato Studio to fulfill your photo effect needs!
from Envato Tuts+ Design & Illustration https://ift.tt/2i9FRsS via http://www.webmasterforum.ws/rankwyz-discount-code-2015-coupons/
0 notes
Text
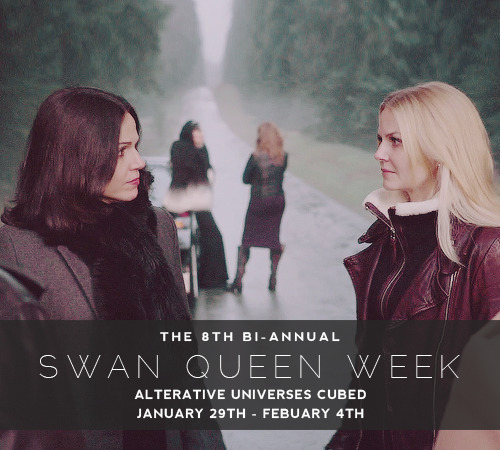
Swan Queen Week 8: Alternative Universes Cubed
Once again for everyone, our winning prompts are:
Day 1, January 29th is Celebrity AU; An alternative universe where our ladies are living lifestyles of the rich and famous. (Celebrity/Fan Meet Up, Celebrity Beef/Rival, Celebrity Secret Romance). Submitted by @jeanyoo1
Day 2, January 30th is Coffee Shop AU; An alternative universe where our ladies are working or frequenting a coffee shop. (Baristas AU, Coffee Shop Meet-Cute, etc.). Submitted by @emalinourie, @ilovett
Day 3, January 31st is Medical AU; An alternative universe where our ladies are saving lives. (Doctors, Surgeons, Med Students, Paramedics, etc.). Submitted by @erzaanderson.
Day 4, February 1st is Soulmate AU; An alternative universe where our ladies are soulmates, and soulmates are a known and accepted thing (Finding your Soulmates allows you to see in color, Tattooed Soulmate). Submitted by @bleachontshirt and 2 anons.
Day 5, February 2nd is Enchanted Forest AU; An alternative universe where our ladies where there was no Storybrooke. (No Curse, Cora was the Evil Queen, etc.). Submitted by 1 anon.
Day 6, February 3rd is Trapped in an AU; An alternative universe where our ladies are trapped in an alternative universe. Submitted by Joshua.
Day 7, February 4th is Creator’s Choice; You choose. It could be anything. Sky’s the limit. Submitted by @anotherouatwriter.
You are now welcome to start working on your creations! Please remember that while you are welcome to work on/finish them early, you may not post until the appropriate day. If you are interested in participating in the event at all, please read the text below the cut, which details important event and participation information.
Like previous SQWs, I will be making a masterlist of entries at the beginning of the week and updating it as the week progresses (generally at the end of the night). The official tag to track is #swanqueenweek, so if you would like to see things as they are posted (as I queue the entries to be reblogged), please track that tag.
Participation will also run similarly to past events, and you can read the FAQ for some of the general questions (or send me an ask/IM). Now that the prompts have been posted, you may begin working on your fanworks as soon as you’d like. While you can make them as early as today, please do not post until the appropriate day in your timezone (i.e., don’t post for day 1 until January 29th in your timezone). If you want/need to work on your creations early because you won’t be able to post them yourself, or you want them housed on the SQW blog, feel free to submit them. You can do this at any time, and I will hold on to your creation until it is time to post.
If you are interested in or planning to create some form of fanwork for the 8th SQW, please note the following guidelines on how to participate.
Anyone is eligible to participate in SQW. You don’t need to have declared participation or registered in any way. You do not need to be on tumblr, and if you post off-site, please just drop a link in the submission box (or send a fanmail message).
I will be going by EST, so no posts will be reblogged until midnight EST of each day.
If you post your creation to your blog to be reblogged here, please tag it with “swanqueenweek” in the first five tags. (I’ve seen posts that say the first five tag rule is no longer applicable, however I haven’t verified this, so to be safe please still use the main #swanqueenweek tag in the first five.)
I will make periodic announcements when the queue is full/empty so that you have an idea of if your post was seen, but you can always submit a link to the submission box to make sure I see it (if I’ve already queued your post I’ll just ignore the submission), or send me an ask/IM checking on if yours is queued. I will respond as soon as possible to let you know.
You do not have to participate in all seven days, you can pick and choose the prompts you like/are inspired by, one for each of the eight, or multiple creations for each day. Go crazy!
There are no minimums/maximums for participation.
You may make late creations and post them any time after the day of the prompt has passed (e.g., post a Day 1 creation on day 3, or a day 4 creation three days after the event has ended, etc.).
Creations can be stand-alone, or they can be connected, either by content or by post (e.g., you can make it a multi-chapter fic with each chapter being a prompt, or you can make a post that just collates all content).
There is no content restriction, but please tag your submissions with any necessary warnings/ratings/etc. to keep this a healthy environment for all!
This time, our prompts are pretty general, but as always feel free to interpret the prompt however you see fit.
You are welcome to collaborate with others. This event isn’t strictly for collaboration the way the Swan Queen Big Bang was/Supernova will be, but you are more than welcome to buddy up with someone else if you’d like.
Creations must be made specifically for this event. You may not add on to a pre-posted fic/art/etc. to fit it to the prompt. However, if there is a project you’ve been working on and it has not been posted prior to January 29th, you may use that work.
There is an AO3 collection for all Swan Queen Week creations and one specifically for the 8th SQW here. When you post, please feel free to add yours to this collection, which is linked in the sidebar of the main blog.
If you would like to participate, but don’t want to make a fanwork or don’t know how, there are plenty of other things you can do to be a part of the 8th bi-annual SQW. Below are a few suggestions:
Betaing: If you are interested in volunteering to be a beta between now and the end of the event, please let me know and I will add you to this resource list. When you send me a message (ask/IM/submit) please give a little bit of info about what you will/won’t beta, and an estimated turn-around time.
Consultants: If you are interested in helping others either learn a new skill, or possibly serve as a sounding board for ideas, let me know and I will add you to this resource list. When you send me a message (ask/IM/submit) please give a little bit of info about what kinds of stuff you can help with (e.g., photoshop, music suggestions, video editing, etc.).
Creating Tutorials: SQW is obviously for celebrating our favorite ladies, but it can also be an awesome catalyst to learn a new skill or pick up some new tips. If you’re feeling uninspired by the prompts but still want to participate, tutorials can be a really helpful thing for those wanting to get their toes wet.
Pimping: It seems a bit obvious, but people need to know the event is happening to be able to participate! SWEN is an ever-growing family, and our newbies need to know this is going on. Pimping out the event to other sites or on your own blog will help spread the word and let all those new to SWEN about SQW.
Excitement Posts: Are you just so excited for SQW you can’t stand it?! I don’t blame you, because our shippers definitely know how to celebrate. So, fanperson it out in a post!
Further Prompting: Maybe you have a plot bunny but no time to write it. Or you see a screencap that is just perfect, but don’t like making graphics. Send them in, and for those creators that are just a bit stuck, maybe your specific prompt will get their juices flowing. Please also feel free to send in suggestions for types of creations people could make that maybe are less obvious (e.g., fake facebook threads, fake trailers, poetry, etc.).
Just as a reminder, SQW is meant to be a fun event to flood our dashboards with Swan Queen, but it can also be a great opportunity to put yourself out there and try something new. If you don’t know how to make something, or are nervous to post, I hope you feel comfortable enough to give it a shot. (Participating in SQW is a great way to pick up some lovely SWEN followers, hint hint!)
There will be a gifset promo post like usual coming soon, but if anyone else would like to make promo posts or anything feel free to do so, and drop a link in the submission box (or tag it #swanqueenweek) and I’ll reblog it here.
As always, if you have any questions or comments, you can always contact me. Have fun planning your creations, and I can’t wait to see them!
#SQW 8#SQW AU III#SQW#Swan Queen Week#SwanQueenWeek#SwanQueen#Swan Queen#emma x regina#Regina x Emma#Regina Mills#emma swan
107 notes
·
View notes
Text
Evaluation
Our brief was to choose a piece from the BMAG ‘I want, I want’ exhibition and develop a narrative from there to then present in a flipbook. I chose Rachel Maclean’s Feed Me video. My final outcome is a flipbook which narrates a character going through different social media like Facebook, Instagram and Twitter and it ends with an overload of use, throughout the emoticon on the head indicates the actual emotion of the character although her facial expression doesn’t show it. I conveyed this by having symbols from each social media popping up on the characters facing like a tattoo.
As flipbooks were new to me I started to research different types and try and work how imagery can be made animated. I then researched Rachel Maclean’s Feed Me and found out the reasons why she conveyed certain themes such as paedophilia, this idea about happiness, society’s problems and consumerism and this idea we always need to be fed like greed. She took inspiration from children’s TV shows like Teletubbies. What stood out to me which I further developed was the way the characters had smiley faces indicating their emotion on their foreheads like a stamp. A part in the video where the grandma asks the granddaughter if she’s happy and she said yes however the smiley face indicated she was sad was what I was drawn to. I felt like the piece was quite disturbing in some parts and it really made you think it was difficult to sit through the whole of it as it was odd.
From picking the piece I started to develop some initial ideas from the idea about fake happiness and trying to show yourself as something you are not. I thought of the flipbook having a character where on every page something was added eg makeup, clothes, waist trainer to convey this idea. I also thought of the idea of a line of puppets moving across the page suggesting everyone follows the crowd just to fit in but one who is different is actually happy. I also began picking out social media symbols which are easily recognisable this was because thinking of a narrative I felt like the way the character in the video was saying something different to how she actually feels is similar to the way social media is used as a platform where people hide who they actually are and quite often convey they are happy. At this point I was confused in which idea to further develop.
During the tutorials Jo suggested that the idea of placing emoticons on the face was different and to further develop that. I then began to experiment with this idea of the character from the Feed Me video showing an opposite facial expression to the way she was actually feeling which was indicated by the emoticon on her forehead. I used pencils and pencil crayons on the eyes, mouth and emoticon for them to stand out. I experimented with Photoshop to combine the imagery which at first I found hard but I worked it out. I did actually like the outcome of this however as I liked the social media idea I started to develop placing them on the face and whilst doing this I thought how incorporating colours of the app could be effective in adding to the hair. I looked at the common features of the app and what people would recognise as I would want my audience to know which social media is which. I used watercolour to experiment with and I really liked the soft skin tones it created, as I had only used watercolour once before in the previous module I felt like my skills have improved in creating that 3d facial structure compared to last time. I used gouache and acrylic to add the symbols for them to standout. I also looked at popular Snapchat filters which are used by everyone for example the flower crown and dog filter are easily recognised and I experimented with pencil crayon for this, again like the watercolour I liked the soft tonal effect.
At this point again I became a little bit stuck in how else to develop my work as I felt like in the time I had I could’ve done more. As my project is based on these symbols it linked quite well to tattoos I researched tattoos in weird places which were more jarring e.g. in the mouth, eyes etc. I experimented with acrylic paints and I really liked using them as they blended in well, although it was suggested in the tutorials that some of the colours would be a lot darker which I understood. Some things needed to be improved for example the writing on the teeth rather than just placing them there needed to form some shape so they looked as though they were actually on the teeth and same for the lips and around the hands. I considered and improved this when working on the final pieces.
After the tutorial I was more confident in creating my flipbook however I found coming up with a narrative and working out how to actually create the animated imagery difficult. I felt like my first narrative idea overcomplicated when using a flipbook the details may not be necessary hence I changed my idea to keep it simple yet still be able to convey that effect of overuse of social media throughout the flipbook by adding the symbols on the face and them popping up like a notification as they do on the social media.
Joel’s workshop helped in order for me to understand movement from and in between frames, I worked out how if the symbols popping up worked and changing the hair colour did. I also experimented working out the amount of frames and what movement would occur e.g. closing and opening of eyes etc. From this I finalised the idea that the flipbook would show the character using the social media and then closing her eyes and opening them to then show her switching to normal and another app.
Empathy workshop helped me to identify my audience and what I needed to convey, I thought more about their interaction with the world for example as my audience were young people and social media users who could relate I began to think that in this digital world social media and phones take over lives etc therefore having a flipbook may be different to how they usually access information when at the same time it takes the attention away from using something digital and just passing by therefore handling it physically gives them more time to process the information. However to reach the wider audience having a digital version is important as if they use their phones a lot they can access it easier. The research of the social media artists like Banksy and Asaf Hanuka showed the way social media is an addiction and placed at such high value this helped in order to see what is already conveyed and related by my audience and what works.
As I used both acrylic and watercolour I wanted to experiment to see which one I would chose I liked using watercolour as I liked the soft effect it created allowing the symbols to standout. Acrylic paint was good to use although the colours were bolder so I felt that layering more paint may not allow the symbols to stand out like I wanted it to. I also experiment with paint markers for the first time which I found different to use at first I couldn’t get the blended effect I wanted however using water as a base helped it to. As I had already developed the face with symbols on it with watercolour and liked it I decided to do my final piece in the same medium.
When developing the flipbook I thought about the main facial expressions that would be used and I used watercolour on the face, I left the eyes, lips and hair colour blank so that they could be changed as they would in the flipbook. I then checked whether the movement in order worked with the facial expression on a Slideshow putting them in order. Next I rotated the imagery after scanning them to fit them to do fit the hairstyle as it wouldn’t fit on the portrait version. Then I started with face with the most amount of emojis and on each other page reduced them to where there was none. I felt like this method worked to make sure there was a good pace. I did this for all of the apps. With the Facebook app it was however thinking of how to get the hair from a dark brown to white which I thought like in hair dressers it was to lighten it throughout the pages. I also had issues when thinking of how to end the flipbook, as it was focused on this over use of social media I thought that having a mix of symbols appearing on the face so it fully covered it to create this jarring effect and make it quite uncomfortable. I also thought about changing the whole hair with different colours to show how social media was taking over the character whereas the emoticon showed her actual feeling.
I felt like as I had limited time to create the flipbook I did rush the illustrations hence the hair and some of the faces didn’t come out as proportionate as I wanted them to. I liked the first few watercolour illustrations which I spent more time on were better so I realised I need to work on my time management. Also when aligning the images I felt like if I had drawn the hair as a template they would’ve been aligned a lot better to have a neater movement between frames. Also some of the imagery had different lighting which I would’ve improved the next time if I did the module again.
I feel as though the idea behind the flipbook did match what I wanted to convey however the illustrations could’ve been a lot better if I had spent more time on them. Also I would’ve liked to have included more social media’s such as Youtube and Snapchat. The movement between the images could’ve been a lot tighter and if I was to do this project again I would’ve wanted to improve that. I also would’ve wanted to add more movement from the character for example her turning her head 180o and the symbols appearing on all parts of her face like I explored around the ear etc. Also with the digital version of the flipbook I would’ve wanted to experiment with adding the actual notification sounds to coincide with the popping up of each of the images so it conveyed it like it was popping up like actual notification as it does on a phone. Something I researched at the beginning of the project was the Human flipbook and I really liked how it was presented on a t-shirt so if I did do the project again I would’ve wanted to have had my illustrations on something like a t-shirt (which links to putting on this fake emotion – putting on shirt) or even think about using makeup/face paint on an actual face and photographing this. However I feel like I have learnt a lot in considering moving images and thinking about narratives and the approach I took that works is not overcomplicating my idea like I have done in previous modules.
0 notes
Text
60 Beauty Retouching Photoshop Tutorials
Do you love taking photos and capturing all the memories on and emotions during the photoshoot? But once you get back to the office you dread the post photoshoot editing? Well we are here to help today. We have rounded up 60 beauty-retouching photoshop tutorials to help you speed up your post work processing.
Now sometimes we know the photo you saw with your eyes during the shoot doesn’t always look like what you see when you get it back to the computer. But don’t worry luckily photoshop can help you transform that mediocre photo into a masterpiece in no time. You can:
smooth out skin
replace blemishes
make silky shiny hair
and even whiten teeth
To help you further save more time we have gathered up 50 photoshop tutorials on beauty-retouching for you to learn. These photoshop techniques and strategies show you how to make your photos even better. In the tutorials below you will find step-by-step guides as well as video guides. They are simple tips you can follow along with in photoshop.
All about beauty retouching and how to use adjustment layers, lighting, dodging and burning, and frequency separation to create stunning skin tones.
Ultimate Guide to Beauty
3 Techniques for Retouching Skin
Learn three great techniques for retouching skin in Adobe Photoshop. And two quick tips that you can apply with all techniques to put a final polish on retouched skin.
How to Retouch and Airbrush Skin in Photoshop
How to retouch skin professionally in Photoshop without making it look fake or blurry.
Using Frequency Separation in Photoshop
Take a look at the technique of frequency separation, including how it works and how it can improve skin.
Easily Smooth And Soften Skin
How to smooth and soften skin in Photoshop without blurring out important image details.
How to select skin tones in Photoshop
Select a model’s skin tones in Photoshop in just a few quick clicks. Adjust hue, brightness or skin texture.
Create a Porcelain Skin Effect in Photoshop
Create a porcelain skin effect using a portrait of a woman and Photoshop’s blending modes.
How to make Glamour Skin Glow
Smooth skin and hide blemishes and give a glamour look on photo.
Retouching Portraits in Photoshop
This tutorial shows you how to spot heal blemishes in the skin.
Softening Skin & Adding Texture Back
Professional Portrait Retouching Techniques in Adobe Photoshop with Softening Effect.
How to Create a Porcelain Skin Effect
Create this stunning porcelain skin effect with non-destructive method of photo editing.
Photoshop tutorial: Wrinkle reduction
Some easy ways you can use channels to produces the smoothest skin.
<
Airbrushing Skin Photoshop Tutorial
How to make skin look healthy without looking plastic or blurred.
Skin Retouching Photoshop
Heal, mattify, and airbrush skin by painting over the skin areas that you want to retouch.
Easy Facial Retouch using Photoshop
Use Quick Mask with Brush Tool to select the skin and make the skin texture more uniform.
Skin Retouching Tutorial
A quick Skin Retouching Tutorial in Adobe Photoshop.
Shadows – Photoshop Retouching
Add detail-enhancing effects to your images
Go through three very common ways to make local color and tone adjustments.
Black & White Is the Key to Better Color
Convert your photo temporarily to black and white and perform some editing to make your photographs more appealing in color.
Shadow Recovery of Backlight Problem
Two ways to fix backlight problems in Photoshop: first avoid this problem and second fix it quick.
Pro techniques for Dodge and Burn in Photoshop
Advanced techniques for Dodge and Burn in Photoshop which use Curves adjustment layers
The Ultimate Guide to the Dodge & Burn Technique
Variations for the Dodge & Burn technique in Photoshop. The fundamentals and tools.
Hair
How to Master Hair Issues
An in depth look at how to fix hair and skin issues with texture grafting.
How to change hair colour in Photoshop
How to use Photoshop to change hair colour, lighten hair colour, tint hair colour and create Ombre hair effects.
How to retouch Hair in Photoshop
Fill in areas that are missing hair and cleaning up dark streaks in the hair to start to get a very smooth finish to the hair.
3 Ways to Retouch Fly-Away Hair
Three techniques that will give you options when tackling strands of hair while keeping the final result natural-looking.
Skin and Hair Retouching with Photoshop
The first thing you do when editing a photo is retouch the Skin and Hair.
How to Change Hair Color in Photoshop
Change hair color in such a manner that it looks like natural hair color.
Creating Facial Hair in Photoshop
Create a custom brush to paint facial hair whether for fun or for professional retouching.
Inverted High Pass
Use inverted high pass to smooth an area of skin or anything including fabrics and seamless backdrops.
Selecting & Extracting Hair
Create a mask to extract hair in Adobe Photoshop.
Eyes, mouth and teeth
Eye Color Change
Go through a very easy process of changing the color of the eyes.
Bright Eyes Effect
Get some light in eyes with this photoshop action and a mask.
How to fix lipstick and correct lip lines
How you can correct the lip line in Photoshop using a mixture of cloning techniques.
Glossy Lips in 2 Minutes
Glossing up the lips with a dodge and burn layer.
Changing Lip Shade in Photoshop
Making the lips stand out by shifting the shade of the lip color, brightening the natural highlights.
How To Whiten And Brighten Teeth
How to easily whiten and brighten teeth in Photoshop using a simple Hue/Saturation adjustment layer.
How to whiten teeth in Photoshop
Make yellow teeth look white again and giving your portrait the perfect smile.
2 Easy Ways to Whiten Teeth in Photoshop
Look at two different methods to whitening teeth in Photoshop.
How to fix and whiten Teeth
Clean teeth by creating 3 different layers and the use of some blending modes.
Eye Sharpening – Photoshop Tutorial
With this tutorial you can create amazing, bright eyes within minutes
Galleries
Amy Dresser
Amy has been a full-time photoshop retoucher since early 2000.
Natalia Taffarel
Certified Adobe Expert with great skills.
Vitaly Druchinin
Author and High End Retoucher.
Krunoslav Stifter
High End Retoucher from Croatia.
Jonathan
Web developer and designer since 2002.
Complete Workflow
The 15 Minute Makeover: Photoshop Beauty Retouching
A combination of techniques that results in beautiful, smooth skin that still looks totally real.
How to Enhance & Retouch an Image
Some great enhancing and retouching techniques.
Retouch photos with realistic perfect skin
Removing blemishes from photos without making models look plastic and unreal.
My Beauty Retouching Workflow
The main steps of a retouching process, from exporting images from a RAW Converter to polishing them up before publishing.
Beautify a Face
Fix skin, remove blemishes and wrinkles, whiten and fix teeth, fix hair, fix eyebrows and increase definition in the eyes.
More beauty
Adding a Realistic Tattoo
Adding a tattoo to an image while making it look like it’s really a part of the original photo.
Photographic Toning Retouch Method
Create this effect from experimenting with other adjustment tools.
Easy Digital Nose Job
Learn how incredibly easy it is to give someone a digital nose job.
Digital Nip Tuck
How to do your own plastic surgery with a nose job.
5 Really Easy, Yet Essential Photo Retouch Techniques
5 very simple, however very important techniques for Photoshop beginners when it comes to photo retouch.
Fairy Night
How to correct the photos colors, change the eyes color, work with the layers, applying ready brushes and designs.
How To Use Face-Aware Liquify
Learn all about the new Face-Aware Liquify feature in Photoshop CC.
Retouch a Model Portrait with Flawless Natural Skin
How to make a glamour retouch for a model portrait in Photoshop.
Photoshop Tutorial: Frequency Separation
How to do Frequency Separation for Retouching a Portrait.
Videos
High End Beauty Retouch
A complete 1hr 24min High End Beauty Retouch.
Let us know what your favorite Beauty Retouching photoshop tutorial was in the comments below.
The post 60 Beauty Retouching Photoshop Tutorials appeared first on Photographic Blog.
from Photographic Blog http://photographicblog.com/60-beauty-retouching-tutorials/
0 notes
Text
50 Awesome Photo Effect Tutorials
Photoshop is clearly our favorite photo editing software. In this article, we have listed 50 best Photoshop tutorial effects that will show you how to perform a wide range of tasks including age progression, Instagram-like effects, lomo effects, and light leaks, as well as vintage and retro effects that you can use to help improve your photo editing workflow.
If you're looking for a quick way to make pro photo effects, then browse through our premium Photoshop Photo Effects and Photoshop Actions, which can be purchased on GraphicRiver. There are thousands of creative options to choose from. Or find an expert designer on Envato Studio to customize graphics for you.
Now, let's take a look at these free photo effect tutorials!
50 Best Photoshop Effects Tutorials
Learn how to do just about anything to your photos. From double exposure effects to cut-outs and so much more, dive into these amazing tutorials created just for you from Envato Tuts+.
Photo Manipulation
How to Make Someone Look Older in Adobe Photoshop
Kirk Nelson
Photo Manipulation
How to Age a Photo in Adobe Photoshop
Kirk Nelson
Photo Effects
Quick Tip: Create Light Leaks and Lomo Effects Using Actions in Photoshop
Mike Moloney
Photo Effects
Quick Tip: Combine a Crocodile and a Frog in Photoshop
Jason Stanley
Photo Effects
Swap Faces With Photoshop
Martin Perhiniak
Photo Effects
Use Split Frequency Healing to Retouch a Photo in Photoshop
Daniel Meadows
Photo Effects
How to Create Masks of Transparent Elements in Photoshop
Arindam Bhaduri
Photo Effects
Integrate a 3D Render Into a Macro Photograph Using Photoshop
Nacho Riesco
Photo Effects
Create Hipstamatic and Instagram Style Effects With Photoshop and Retrographer
Mark Heaps
Photo Effects
Photo Effects Week: Create a Cutout Photograph in Photoshop
Mark Heaps
Photo Effects
Photo Effects Week: Create a Lamb's Coat in Photoshop
Alexandra Fomicheva
Photo Effects
How to Turn Humdrum Photos Into Cinematic Portraits
James Davies
Photo Effects
Quick Tip: How To Fake a Tilt-Shift Photo
Cory Cohoon
Photo Effects
How to Apply Textures to Uneven Surfaces
James Davies
Photo Effects
Quick Tip: How to Simulate X-Ray Photography in Photoshop
Diego Monzon
Photo Effects
Adding a Realistic Tattoo the Easy Way with Photoshop
Dennis Dunbar
Tools & Tips
Changing Your Background
Martin Perhiniak
Tools & Tips
How to Make the Most of the Info Panel
Martin Perhiniak
Photo Effects
Quick Tip: Remove a Person From a Photo With Photoshop CS5’s Content Aware Feature
Martin Sitar
For Kids
Adobe Photoshop for Kids: Become the Wizard of Oz!
Kirk Nelson
Photoshop Actions
How to Create an Awesome Dispersion Action in Adobe Photoshop
Marko Kožokar
Photo Manipulation
How to Create a Frankenstein's Monster Photo Manipulation in Adobe Photoshop
Melody Nieves
Spirit Day
How to Create an Awareness Avatar Action in Adobe Photoshop
Melody Nieves
Adobe Photoshop
Create a Hot Air Balloon Scene From The Wizard of Oz in Adobe Photoshop
Kirk Nelson
Music Video
How to Create a Tous-Les-Memes-Inspired, Isometric Scene Effect in Photoshop
Kirk Nelson
Photoshop Actions
How to Create a Dark Photo Effect Action for Beginners in Adobe Photoshop
Marko Kožokar
Photo Effects
Photoshop in 60 Seconds: How to Create an Easy Sketch Effect With Actions
Melody Nieves
Typography
How to Combine Photography & Type for a Dramatic Effect
Grace Fussell
Grunge
How to Create a Retro 90s Grunge Photo Effect in Adobe Photoshop
Melody Nieves
Photo Effects
How to Create a Ghosted Dancer Effect in Adobe Photoshop
Kirk Nelson
Illustration
Create an Illustrated Watercolor and Ink Photo Effect in Photoshop
Sheridan Johns
Music Video
How to Create a Kaleidoscope Effect in Adobe Photoshop
Kirk Nelson
Photo Effects
How to Create a Strip Fractal Mirror Effect in Adobe Photoshop
Kirk Nelson
Photo Effects
Create a Devastating Twister With Photo Manipulation Techniques
Shardul
Photo Editing
How to Colourise an Old Photograph in Adobe Photoshop
Marie Gardiner
For Kids
Adobe Photoshop for Kids: Mini-Me!
Kirk Nelson
Fan Art
Create a Glass Shard Reflection Double Exposure Effect in Adobe Photoshop
Kirk Nelson
Photo Manipulation
Create a City Destruction Scene Photo Manipulation in Adobe Photoshop
Jenny Le
Photo Effects
Create a Taylor Swift "Style" Inspired Double Exposure Effect in Photoshop
Kirk Nelson
Photo Effects
How to Create a Painted Pet Portrait Effect in Adobe Photoshop
Kirk Nelson
Caricature
How to Create a Photo Caricature in Adobe Photoshop
Kirk Nelson
Photo Effects
Manipulate a Portrait Photo to Create a Splatter Paint Effect
Brandon Spahn
Photo Effects
Use Retouching Techniques to Create a Caricature From a Photo
Gabor Richter
Photo Effects
Add Dramatic Rain to a Photo in Photoshop
Tony Aube
Photo Effects
How to Add Realistic Falling Snow to a Photo in Photoshop
Tony Aube
Photo Effects
How to Apply a Plastic Mask Effect to a Portrait
Stefka Pavlova
Photo Effects
Create a Soil Cake for Pie Charts and Infographics
Anton Egorov
Photo Effects
Create a Fantasy City Using Architectural Photographs
Jonas De Ro
Photo Effects
Photoshop in 60 Seconds: How to Create a Cinematic Photo Effect With Actions
Melody Nieves
Day of the Dead
How to Create a Glamorous Calavera Portrait in Adobe Photoshop
Melody Nieves
10 Premium Photo Effects From Envato Market
The tutorials above cover a wide range of effects you can achieve through practice and persistence. But if you're short on time, you can always turn to the amazing selection of Photoshop Actions on GraphicRiver and Envato Elements for more awesome photo effects.
Here we have a collection of ten premium Photoshop actions guaranteed to transform your photos in a few short clicks. Enjoy!
25 HDR Photo FX V.2 - Photoshop Action
HDR or High-Dynamic Range photography is an incredible technique that results in powerful imagery. And you can achieve the look of pristine HDR photography with this Photoshop action. Included in this package are 25 adjustable effects, four sharpness levels, and even a starburst generator action as a bonus!
Realistic Painting Effect V2 - Painting Action
Get artsy with this realistic painting effect. Designed to simulate the look of traditional oil paintings, this set includes three Photoshop actions, fully editable layers, and 15 different color presets. Explore your creative side with just a few simple clicks!
90 Premium Actions Set
You can never have enough Photoshop actions! And with this set of amazing premium actions, you can download 90 different looks. This package comes complete with retro-vintage effects, stunning black and white results, and so much more!
Cosmic Photoshop Action
Explore the wonders of the universe with this spacey photo effect. With ten incredible color looks included, simply brush over the area you would like to apply the effect and press play. Enjoy this amazing cosmic effect in only a matter of seconds!
Soft Focus 2 Photoshop Action
Create a legendary photo effect with this soft focus action. It has well-organized layers and simple instructions, and you'll even find a video tutorial included for additional help. Download this action to gain access to this professional lighting effect.
Noire Photoshop Actions Vol 1
Looking for a cinematic photo effect? Well, you can turn your photo into a glamorous movie-style image with this noir-inspired Photoshop action. This package features 12 Photoshop actions along with helpful instructions and fully adjustable effects.
Dimension Photoshop Action
Explode your photos into a million pieces with just a few simple clicks! This incredible package includes eight different glass patterns that can be scaled to various sizes, along with ten color options for even more variety.
Matte & Faded Photoshop Actions
Love the look of vintage photography? Explore that matte and faded style with this stunning action set. This set includes 17 amazing Photoshop actions that come in a variety of subdued and faded effects. Get that professional retro look you'll love in almost no time at all!
Fury Photoshop Action
If you're feeling furious then you might want to express it with a powerful Photoshop action. Simply brush over the area where you would like to apply the effect and press play! It's just that simple! Download this package to gain access to this action and additional instructional materials.
Advanced Double Exposure - Photoshop Action
Double exposure photography is a super trendy technique that merges two photos together for an amazing effect. And you can achieve an advanced level of manipulation with this incredible Photoshop action. With 18 color presets included, the effects are outstanding and truly limitless.
Conclusion
Want to see more photo effects? Browse the incredible collection of Photoshop Actions designed to transform your photos through GraphicRiver and Envato Elements.
And for even more design help, enlist the help of the wonderful folks at Envato Studio to fulfill your photo effect needs!
from Envato Tuts+ Design & Illustration https://ift.tt/2i9FRsS via http://www.webmasterforum.ws/rankwyz-discount-code-2015-coupons/
0 notes
Text
50 Awesome Photo Effect Tutorials
Photoshop is clearly our favorite photo editing software. In this article, we have listed 50 best Photoshop tutorial effects that will show you how to perform a wide range of tasks including age progression, Instagram-like effects, lomo effects, and light leaks, as well as vintage and retro effects that you can use to help improve your photo editing workflow.
If you're looking for a quick way to make pro photo effects, then browse through our premium Photoshop Photo Effects and Photoshop Actions, which can be purchased on GraphicRiver. There are thousands of creative options to choose from. Or find an expert designer on Envato Studio to customize graphics for you.
Now, let's take a look at these free photo effect tutorials!
50 Best Photoshop Effect Tutorials
Learn how to do just about anything to your photos. From double exposure effects to cut-outs and so much more, dive into these amazing tutorials created just for you from Envato Tuts+.
Photo Manipulation
How to Make Someone Look Older in Adobe Photoshop
Kirk Nelson
Photo Manipulation
How to Age a Photo in Adobe Photoshop
Kirk Nelson
Photo Effects
Quick Tip: Create Light Leaks and Lomo Effects Using Actions in Photoshop
Mike Moloney
Photo Effects
Quick Tip: Combine a Crocodile and a Frog in Photoshop
Jason Stanley
Photo Effects
Swap Faces With Photoshop
Martin Perhiniak
Photo Effects
Use Split Frequency Healing to Retouch a Photo in Photoshop
Daniel Meadows
Photo Effects
How to Create Masks of Transparent Elements in Photoshop
Arindam Bhaduri
Photo Effects
Integrate a 3D Render Into a Macro Photograph Using Photoshop
Nacho Riesco
Photo Effects
Create Hipstamatic and Instagram Style Effects With Photoshop and Retrographer
Mark Heaps
Photo Effects
Photo Effects Week: Create a Cutout Photograph in Photoshop
Mark Heaps
Photo Effects
Photo Effects Week: Create a Lamb's Coat in Photoshop
Alexandra Fomicheva
Photo Effects
How to Turn Humdrum Photos Into Cinematic Portraits
James Davies
Photo Effects
Quick Tip: How To Fake a Tilt-Shift Photo
Cory Cohoon
Photo Effects
How to Apply Textures to Uneven Surfaces
James Davies
Photo Effects
Quick Tip: How to Simulate X-Ray Photography in Photoshop
Diego Monzon
Photo Effects
Adding a Realistic Tattoo the Easy Way with Photoshop
Dennis Dunbar
Tools & Tips
Changing Your Background
Martin Perhiniak
Tools & Tips
How to Make the Most of the Info Panel
Martin Perhiniak
Photo Effects
Quick Tip: Remove a Person From a Photo With Photoshop CS5’s Content Aware Feature
Martin Sitar
For Kids
Adobe Photoshop for Kids: Become the Wizard of Oz!
Kirk Nelson
Photoshop Actions
How to Create an Awesome Dispersion Action in Adobe Photoshop
Marko Kožokar
Photo Manipulation
How to Create a Frankenstein's Monster Photo Manipulation in Adobe Photoshop
Melody Nieves
Spirit Day
How to Create an Awareness Avatar Action in Adobe Photoshop
Melody Nieves
Adobe Photoshop
Create a Hot Air Balloon Scene From The Wizard of Oz in Adobe Photoshop
Kirk Nelson
Music Video
How to Create a Tous-Les-Memes-Inspired, Isometric Scene Effect in Photoshop
Kirk Nelson
Photoshop Actions
How to Create a Dark Photo Effect Action for Beginners in Adobe Photoshop
Marko Kožokar
Photo Effects
Photoshop in 60 Seconds: How to Create an Easy Sketch Effect With Actions
Melody Nieves
Typography
How to Combine Photography & Type for a Dramatic Effect
Grace Fussell
Grunge
How to Create a Retro 90s Grunge Photo Effect in Adobe Photoshop
Melody Nieves
Photo Effects
How to Create a Ghosted Dancer Effect in Adobe Photoshop
Kirk Nelson
Illustration
Create an Illustrated Watercolor and Ink Photo Effect in Photoshop
Sheridan Johns
Music Video
How to Create a Kaleidoscope Effect in Adobe Photoshop
Kirk Nelson
Photo Effects
How to Create a Strip Fractal Mirror Effect in Adobe Photoshop
Kirk Nelson
Photo Effects
Create a Devastating Twister With Photo Manipulation Techniques
Shardul
Photo Editing
How to Colourise an Old Photograph in Adobe Photoshop
Marie Gardiner
For Kids
Adobe Photoshop for Kids: Mini-Me!
Kirk Nelson
Fan Art
Create a Glass Shard Reflection Double Exposure Effect in Adobe Photoshop
Kirk Nelson
Photo Manipulation
Create a City Destruction Scene Photo Manipulation in Adobe Photoshop
Jenny Le
Photo Effects
Create a Taylor Swift "Style" Inspired Double Exposure Effect in Photoshop
Kirk Nelson
Photo Effects
How to Create a Painted Pet Portrait Effect in Adobe Photoshop
Kirk Nelson
Caricature
How to Create a Photo Caricature in Adobe Photoshop
Kirk Nelson
Photo Effects
Manipulate a Portrait Photo to Create a Splatter Paint Effect
Brandon Spahn
Photo Effects
Use Retouching Techniques to Create a Caricature From a Photo
Gabor Richter
Photo Effects
Add Dramatic Rain to a Photo in Photoshop
Tony Aube
Photo Effects
How to Add Realistic Falling Snow to a Photo in Photoshop
Tony Aube
Photo Effects
How to Apply a Plastic Mask Effect to a Portrait
Stefka Pavlova
Photo Effects
Create a Soil Cake for Pie Charts and Infographics
Anton Egorov
Photo Effects
Create a Fantasy City Using Architectural Photographs
Jonas De Ro
Photo Effects
Photoshop in 60 Seconds: How to Create a Cinematic Photo Effect With Actions
Melody Nieves
Day of the Dead
How to Create a Glamorous Calavera Portrait in Adobe Photoshop
Melody Nieves
10 Premium Photo Effects From Envato Market
The tutorials above cover a wide range of effects you can achieve through practice and persistence. But if you're short on time, you can always turn to the amazing selection of Photoshop Actions on GraphicRiver and Envato Elements for more awesome photo effects.
Here we have a collection of 10 premium Photoshop actions guaranteed to transform your photos in a few short clicks. Enjoy!
25 HDR Photo FX V.2 - Photoshop Action
HDR or High-Dynamic Range photography is an incredible technique that results in powerful imagery. And you can achieve the look of pristine HDR photography with this Photoshop action. Included in this package are 25 adjustable effects, four sharpness levels, and even a starburst generator action as a bonus!
Realistic Painting Effect V2 - Painting Action
Get artsy with this realistic painting effect. Designed to simulate the look of traditional oil paintings, this set includes three Photoshop actions, fully editable layers, and 15 different color presets. Explore your creative side with just a few simple clicks!
90 Premium Actions Set
You can never have enough Photoshop actions! And with this set of amazing premium actions, you can download 90 different looks. This package comes complete with retro-vintage effects, stunning black and white results, and so much more!
Cosmic Photoshop Action
Explore the wonders of the universe with this spacey photo effect. With 10 incredible color looks included, simply brush over the area you would like to apply the effect and press play. Enjoy this amazing cosmic effect in only a matter of seconds!
Soft Focus 2 Photoshop Action
Create a legendary photo effect with this soft focus action. It has well-organized layers and simple instructions, and you'll even find a video tutorial included for additional help. Download this action to gain access to this professional lighting effect.
Noire Photoshop Actions Vol 1
Looking for a cinematic photo effect? Well, you can turn your photo into a glamorous movie-style image with this noir-inspired Photoshop action. This package features 12 Photoshop actions along with helpful instructions and fully adjustable effects.
Dimension Photoshop Action
Explode your photos into a million pieces with just a few simple clicks! This incredible package includes 8 different glass patterns that can be scaled to various sizes, along with 10 color options for even more variety.
Matte & Faded Photoshop Actions
Love the look of vintage photography? Explore that matte and faded style with this stunning action set. This set includes 17 amazing Photoshop actions that come in a variety of subdued and faded effects. Get that professional retro look you'll love in almost no time at all!
Fury Photoshop Action
If you're feeling furious then you might want to express it with a powerful Photoshop action. Simply brush over the area where you would like to apply the effect and press play! It's just that simple! Download this package to gain access to this action and additional instructional materials.
Advanced Double Exposure - Photoshop Action
Double exposure photography is a super trendy technique that merges two photos together for an amazing effect. And you can achieve an advanced level of manipulation with this incredible Photoshop action. With 18 color presets included, the effects are outstanding and truly limitless.
Conclusion
Want to see more photo effects? Browse the incredible collection of Photoshop Actions designed to transform your photos through GraphicRiver and Envato Elements.
And for even more design help, enlist the help of the wonderful folks at Envato Studio to fulfill your photo effect needs!
from Envato Tuts+ Design & Illustration https://ift.tt/2i9FRsS via http://www.webmasterforum.ws/rankwyz-discount-code-2015-coupons/
0 notes
Last Seen Blogs
worthiestsuccessor
the artist formerly known as fuckyeahukemello
shuacoustic
btsvtxt

pacoglezr-blog
Sin título