#galvanized concrete anchors
Video
youtube
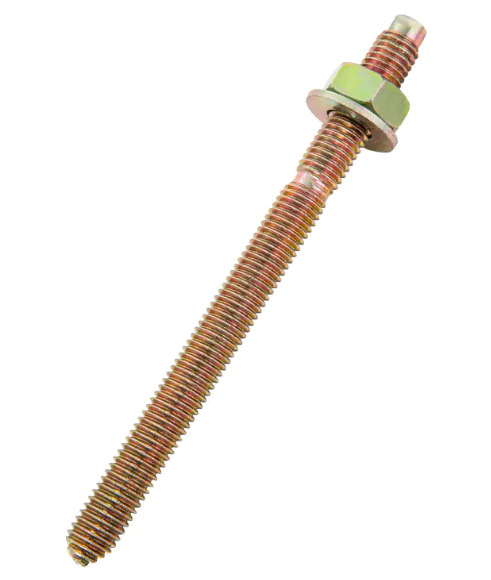
👍 Wedge anchor All production processes are inside our factory
#youtube#Concrete Expansion Anchors#Wedge Type Anchor Bolt#Wedge Type Anchor Fastener#Galvanized Concrete Anchors#Stainless Wedge Anchors#Wedge Bolts For Concrete#Concrete Wedge Anchor Bolts#Expansion Wedge#Wedge Anchor Bolts For Concrete#Wej It Anchor#Wedge Screws#Through Bolt#Trubolt#Through Bolt Concrete#316 Threaded Rod#Galvanized Threaded Bar#Threaded Bar And Nuts#Threaded Bar Anchors#Galvanised Threaded Bar#Threaded Bar In Concrete#Fully Threaded Bar#Ss Threaded Bar#Threaded Rod Manufacturer#XYLAN Coated Stud Bolt#concrete screw sizes#concrete screw anchor bolts#concrete screw bolts#concrete fixing bolts#concrete bolt
0 notes
Text


On July 2nd 1971 The Erskine bridge was officially opened.
Construction on the project began in April 1967 at a cost of £10.5m, which is the equivalent of almost £150m today.
The bridge was designed by Freeman Fox & Partners for the Erskine Bridge Joint Committee. Dr Oleg Kerensky was the partner in charge and the chief design engineer was Dr William Brown under the supervision of Sir Gilbert Roberts. The piers and foundations were designed by W. A. Fairhurst & Partners. The consultant architect was R. E. Slater.
The central span is 305m (1000ft) flanked by anchor spans of 110m each. The total length including approach spans is 1322m. The aerofoil box-girder deck is supported by fourteen diamond-plan, single-shaft concrete piers at a maximum height of 45m above the river. Two central pylons extend 38m above the level of the deck. A 6x4 cluster of galvanized steel cables passes over the saddle of each pylon in a centralised, single plane.
The dual carriageway has cycle lanes and footpaths with metal safety barriers, renewed in 2012. The underside of the deck carries four water mains pipes and two gas pipes. In 2017 the cables were painted and aluminium lighting columns were installed.
The Bridge was a state-of-the-art infrastructure landmark in Scotland for its time and remains one of the country's most architecturally and technically distinguished bridges of the post-war period and beyond its date of construction. It is the first example of a large-scale cable-stayed bridge in Scotland and is recognised for its structural simplicity, economy of materials and slender appearance.
It was designed and built during a period of substantial development in civil engineering and road infrastructure. It illustrates the aspirations for economic and social progress in Scottish society and is directly associated with the period of ambitious transformation of Scotland's modern infrastructure during the 1960s.
The Erskine Bridge is one of only three road bridges in Scotland with a main span exceeding 300 metres. Its minimalistic single-cable design remains exceptionally rare for large-scale road bridges. On completion, the Erskine Bridge is understood to have had the longest span of this type in the world. The appearance of many bridges on this scale have been altered by later alteration and engineering works. The largely unchanged appearance of the Erskine Bridge contributes to its special interest.
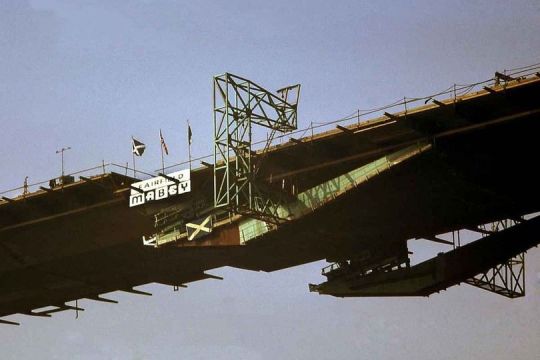
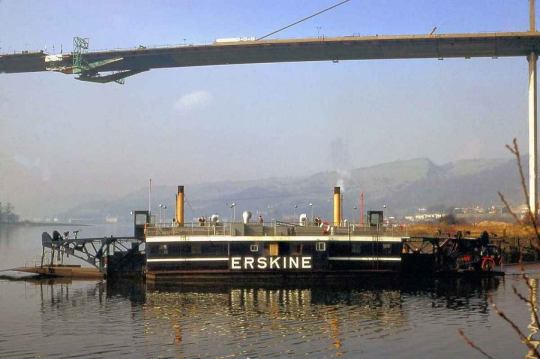
Some of these pics I unearthed are brilliant, my faves are, probably the first person to cross the bridge, no health and safety back then, and the photo with the PS Waverley passing by during construction.
21 notes
·
View notes
Photo

What are the main materials used in the construction of the Brooklyn Bridge?
The Brooklyn Bridge stands as an iconic symbol of engineering prowess and architectural marvel, connecting the boroughs of Manhattan and Brooklyn in New York City. Its construction, which began in 1869 and was completed in 1883, marked a significant leap forward in bridge engineering during the 19th century. At the heart of this magnificent structure lie a variety of materials that were carefully selected to withstand the test of time and provide the strength and stability needed to support the bridge's massive weight and endure the forces of nature.
Foundations and Substructure:
The foundations of the Brooklyn Bridge are built upon a series of caissons—watertight chambers that were sunk to the bedrock below the East River. These caissons served as the base upon which the towers of the bridge would rise. Constructed using timber and brick, the caissons were then filled with compressed air to keep water out, allowing workers to excavate the riverbed and lay the bridge's foundations. Granite blocks were used to create the towers' outer layer, providing a sturdy and enduring base.
Superstructure:
The superstructure of the Brooklyn Bridge, including its towers and main span, is primarily composed of limestone, granite, and Rosendale cement. The limestone and granite provide the necessary strength and durability, while the Rosendale cement—a type of natural cement produced in Rosendale, New York—acted as the binding agent in the construction of the bridge's arches and towers.
Suspension Cables:
The most distinctive feature of the Brooklyn Bridge is its elegant web of suspension cables. These cables are made of high-tensile strength steel, a revolutionary material for the time. The steel cables were galvanized to protect against corrosion, ensuring the long-term stability of the bridge. The cables were meticulously woven and anchored into the bridge's towers and anchorages, distributing the load and supporting the immense weight of the bridge deck.
Decking and Walkways:
The decking and walkways of the Brooklyn Bridge were constructed using wooden planks. Originally made from longleaf yellow pine, the wooden decking has undergone various replacements and renovations over the years, adapting to the evolving demands of modern traffic. Today, the bridge features a reinforced concrete deck topped with asphalt, providing a smooth surface for vehicles and pedestrians alike.
Decorative Elements:
The Brooklyn Bridge's towers and other decorative elements showcase an array of materials, including granite, limestone, and limestone blocks. The neo-Gothic arches and intricate details that adorn the towers contribute to the bridge's aesthetic appeal and make it a true work of art.
Conclusion:
The construction of the Brooklyn Bridge stands as a testament to the innovation and engineering prowess of the 19th century. A careful selection of materials, combining strength, durability, and aesthetic appeal, was crucial to the success of this historic structure. Today, as the Brooklyn Bridge continues to serve as a vital link between two bustling boroughs, its enduring legacy serves as a reminder of the importance of thoughtful material selection in the world of civil engineering and architecture.
#New York City#new york#newyork#New-York#nyc#NY#manhattan#urban#city#USA#buildings#visit-new-york.tumblr.com#Bridge#Brooklyn Bridge
118 notes
·
View notes
Note
Let's transform a 0 point 0 1 square meter space into a functional house. Mannequin Mark lived frugally and worked diligently in a woodworking business for two years managing to save up half a million to buy a house in New York.
However, upon moving in, he was shocked by how small it was, tripping upon walking in but was saved by his childhood eagle. He couldn't even fit his grandma's coffin.
Poor Mark had to tie himself up to the doorframe to get a proper night's rest. He would lay on his eagle's and cry. Eventually, he got sick of it and decided for renovation.
Now, let's explore how we can help Mannequin Mark transform it into a functional home.
First, we'll construct a durable frame using galvanized square steel anchored firmly to the wall with expansion screws borrowed from his aunt filled with grid steel bars and concrete for lasting strength.
We'll also install thermally broken aluminum windows, expanding the living space by 2 square meters.
Next, we'll build a multifunctional sitting platform on the floor with hidden storage underneath for bulky items, saving precious space and providing a seating area for Mark and his husband, Wallter. This platform doubles as a comfortable bed that can fit two people, surrounded by cushion panels in blue and yellow for a better rest.
We'll add a movable table on the bed to serve as both a workspace and dining area, with an outlet switch nearby for charging devices, making it perfect for work and meals.
After use, the table can be stored beside the bed, keeping the space organized. Add a projector and projector screen so he can watch his Korean Dramas.
We'll then construct a bedframe from galvanized square steel, enhancing its appearance with eco-friendly wood veneers.
Incorporate a pre-buried drainage system for convenience. Build a set of wall cabinets with a countertop drilled to embed a sink. Underneath, install a build in washing-machine to keep dirty laundry at bay.
Convert the countertop for dual use by placing an induction cooker for cooking, and install a mirror cabinet above. Next to the mirror, add a cabinet for spices and toiletries. Install a showerhead on the wall and an enlarged stand, allowing even space to ride a horse while showering.
Now his tiny space has everything he needs
"Did tou just send me an entire fucking home decor story or whatever. For MANNEQUIN_MARK.?"
6 notes
·
View notes
Note
Let's transform a 0 point 0 1 square meter space into a functional house. Sergei lived frugally and worked diligently for two years managing to save up half a million to buy a house in New York. However, upon moving in, he was shocked by how small it was. He couldn't even stretch out his fingers. Now, let's explore how we can help Sergei transform it into a functional home. First, we'll construct a durable frame using galvanized square steel anchored firmly to the wall with expansion screws filled with grid steel bars and concrete for lasting strength. We'll also install thermally broken aluminum windows, expanding the living space by 2 square meters. Next, we'll build a multifunctional sitting platform on the floor with hidden storage underneath for bulky items, saving precious space and providing a seating area for Sergei and his girlfriend. This platform doubles as a comfortable bed that can sleep two, surrounded by cushion panels in lucky colors for a better rest. We'll add a movable table on the bed to serve as both a workspace and dining area, with an outlet switch nearby for charging devices, making it perfect for work and meals. After use, the table can be stored beside the bed, keeping the space organized. We'll then construct a bedframe from galvanized square steel, enhancing its appearance with wood veneers. Incorporate a pre-buried drainage system for convenience. Build a set of wall cabinets with a countertop drilled to embed a sink. Underneath, install a build in washing-machine to keep dirty laundry at bay. Convert the countertop for dual use by placing an induction cooker for cooking, and install a mirror cabinet above. Next to the mirror, add a cabinet for spices and toiletries. Install a showerhead on the wall and an enlarged stand, allowing even space to ride a horse while showering.
we get free pet mice from the city new york. hell yes
6 notes
·
View notes
Text
Bolt Manufacturers: Crafting the Backbone of Modern Industry

In the world of construction, automotive, aerospace, and manufacturing industries, bolts may seem small, but their role is anything but insignificant. These humble fasteners hold together the structures that define our daily lives. But what makes a great bolt, and how do bolt manufacturers ensure they meet the rigorous demands of modern engineering?
What Are Bolts, and Why Are They So Essential?
Bolts are more than just pieces of metal. They are the building blocks of infrastructure, machinery, and countless other applications. Without reliable bolts, our bridges would crumble, vehicles would fall apart, and manufacturing processes would grind to a halt.
At their core, bolts serve a simple purpose: they fasten two or more objects together. But not all bolts are created equal. From materials to design, the factors that go into producing a high-quality bolt are numerous and complex.
The Bolt Manufacturing Process: Precision in Every Step
Bolt manufacturing involves a highly intricate process designed to ensure durability, strength, and reliability. Each bolt undergoes several critical stages to meet industry standards.
Material Selection: The first step in creating a top-tier bolt is selecting the right material. Typically, bolts are made from high-strength steel alloys, but stainless steel, titanium, and other metals can also be used depending on the application. The choice of material determines the bolt's strength, corrosion resistance, and durability.
Forging: Once the material is selected, the bolt is forged. This process involves heating the metal to a high temperature and shaping it using specialized machines. Forging gives the bolt its basic shape and enhances its structural integrity.
Threading: After forging, the bolt is threaded. This step is crucial because the threading ensures that the bolt can be fastened securely. Precision is vital here, as even the slightest deviation in the threading process can compromise the bolt's functionality.
Heat Treatment: To further enhance strength, bolts often undergo heat treatment. This involves heating the bolt to specific temperatures and then cooling it rapidly, altering its internal structure to increase hardness and durability.
Surface Coating: Finally, bolts are coated to protect them from corrosion and wear. Depending on the application, coatings such as zinc plating or galvanization may be applied.
Different Types of Bolts and Their Applications
The variety of bolts produced by manufacturers is staggering. Each type is designed for a specific purpose, and selecting the right bolt for the job is crucial to ensure the integrity of the structure or machinery.
Hex Bolts: One of the most common types, hex bolts are used in a wide range of applications, from construction to machinery. Their six-sided head allows for easy tightening and loosening with a wrench.
Carriage Bolts: With a rounded head and a square section beneath it, carriage bolts are often used in wood construction. The square section locks the bolt in place, preventing it from spinning as the nut is tightened.
Anchor Bolts: These are designed to secure objects to concrete. They are commonly used in construction to anchor structural elements to foundations.
Lag Bolts: Known for their large size and strength, lag bolts are used to fasten heavy materials like wood and metal. They are commonly used in construction and deck building.
Eye Bolts: Featuring a loop at one end, eye bolts are used for lifting or attaching cables and chains. They are often found in rigging and lifting applications.
The Future of Bolt Manufacturing: Innovation and Sustainability
As industries evolve, so too does the demand for better, stronger, and more sustainable bolts. Manufacturers are continuously innovating to meet these demands.
Advanced Materials: New materials, such as carbon fiber composites and advanced alloys, are being developed to create bolts that are lighter yet stronger than ever before.
Automation and Precision Engineering: The rise of automation in manufacturing is enabling greater precision in bolt production. Robotic systems and computer-aided design (CAD) ensure bolts are produced with minimal deviation, improving both efficiency and quality.
Sustainable Manufacturing: With increasing emphasis on environmental responsibility, bolt manufacturers are adopting greener production methods. This includes using recycled materials, reducing energy consumption, and minimizing waste in the manufacturing process.
Superb Quality Bolt Manufacturer in India
Bhansali Fasteners is one of the biggest bolt manufacturers in India. Bolts are an excellent choice for fluid transfer in a variety of sectors, including as food, chemicals, oil & gas, pharmaceuticals, and construction. They also provide advantages for sustainability and cheap maintenance costs. They offer dependability and security.
We provide low-cost, high-quality bolts to ensure efficient and effective work. Our bolts meet numerous standards, including ASTM, ASME, ANSI, UNS, and DIN. Our collection, which includes various sizes, thicknesses, bars, and grades, meets a diverse variety of requirements. In addition, we are a major screw manufacturer in India.
One of the top bolt manufacturers in India is Bhansali Fasteners. Bolts are polished in compliance with the dimensions and thickness of the wall specified by the client. An additional choice for situations with greater requirements is heat treatment. We manufacture, provide, and stock a wide variety of bolts in different sizes at competitive prices. Additionally, look at the bolt weight chart.
We are also a Bolt Manufacturers in UAE, Bolt Manufacturer in Bangladesh.
For More Detail
Website: bhansalibolt.com
Product: SS Bolt Manufacturer
Other Product: Fasteners Manufacturers In Saudi Arabia.
#Bolt Manufacturers In India#Bolt Manufacturers#SS Bolt Manufacturer#Bolt Suppliers#Fasteners Manufacturers In Saudi Arabia
0 notes
Text
How to Effectively Install and Maintain Wire Mesh

Wire mesh is a versatile material widely used in construction, fencing, and industrial applications. Proper installation and maintenance are key to ensuring its durability and effectiveness. Here’s a concise guide on how to install and maintain wire mesh effectively.
Understanding Wire Mesh
Wire mesh consists of intersecting wires arranged in a grid pattern, available in materials like stainless steel, galvanized steel, and plastic. Each type is suited to specific applications, from reinforcing concrete to providing secure fencing.
Installation Guide
Planning and Preparation:
Site Assessment: Determine the type and quantity of wire mesh needed based on your application.
Tools and Materials: Gather necessary tools like wire cutters, posts, and fasteners.
Preparing the Area:
Clear the Site: Remove debris and level the ground.
Mark the Layout: Use stakes and string lines to outline the installation area.
Installing Posts and Supports:
Post Placement: Secure posts at regular intervals, ensuring they are anchored firmly.
Support Structure: For concrete reinforcement, position the mesh correctly before pouring.
Securing the Wire Mesh:
Attach to Posts: Unroll and secure the mesh to posts, ensuring it’s taut and properly aligned.
Positioning in Concrete: Center the mesh within the formwork to avoid shifting.
Final Checks:
Inspect and Test: Ensure the mesh is secure, properly aligned, and tensioned.
Maintenance Tips
Regular Inspections:
Visual Checks: Look for rust, broken wires, or loose fittings.
Functional Testing: Test the mesh’s stability and tension.
Cleaning:
Debris Removal: Clean the mesh regularly to prevent buildup.
Rust Removal: Treat rust spots on galvanized or stainless steel mesh promptly.
Corrosion Prevention:
Protective Coatings: Apply coatings or rust inhibitors to prolong the mesh’s life.
Repairing Damage:
Patch Repairs: Address minor damage quickly.
Replacement: Replace severely damaged sections to maintain integrity.
Adjustments and Reinforcements:
Tightening: Regularly check and tighten fasteners.
Reinforcements: Add supports as needed for high-stress areas.
Why Choose Al Miqat Hardware?
High-Quality Products: Offering a wide range of durable wire mesh options.
Expert Guidance: Providing technical support and custom solutions.
Competitive Pricing: Affordable pricing with bulk discounts available.
Reliable Service: Timely delivery and responsive customer support.
Conclusion
Proper installation and maintenance are vital to maximizing the performance and lifespan of your wire mesh. Al Miqat Hardware offers high-quality products and expert support to ensure your projects are successful. For all your wire mesh needs in Saudi Arabia and the UAE, trust Al Miqat Hardware to deliver reliable solutions.
#al miqat hardware#wire mesh Sharjah#wire mesh oman#hexagonal wire mesh oman#galvanized fencing mesh#fencing mesh stockiest#wire mesh stockiest UAE#chain link fencing stockiest
0 notes
Text
5 ways to make a strong garden trellis tomatoes
A strong Garden Trellis Tomatoes are essential for growing thriving tomato plants. Proper support not only helps your tomatoes grow upright but also ensures a better yield. Here are five ways to build a robust garden trellis for your tomatoes:

Select Durable Materials: Use materials like treated wood, galvanized steel, or heavy-duty PVC. These materials are durable and can handle the weight of mature tomato plants and withstand various weather conditions.
Build for Height: Construct your trellis to stand at least 6-8 feet tall. This height provides ample support as tomato plants grow, preventing them from bending or breaking under their weight.
Secure the Base: Ensure that the base of your trellis is firmly anchored in the ground. Use concrete footings or sturdy stakes to keep the structure stable and prevent it from toppling over.
Add Crossbars for Support: Incorporate horizontal crossbars or supports to distribute the weight of the tomato plants evenly. This additional support helps keep the vines from sagging and provides stability.
Maintain Proper Spacing: Space the vertical supports adequately to allow for the expansion of your tomato plants. Proper spacing enhances air circulation and reduces the risk of diseases.
With a little planning and effort, you can use garden trellises to create a beautiful and productive vegetable garden. If you’re looking for more ideas, then, visit the Seattle Urban Farm website today!
#garden trellises#trellis#farming#gardening companies near me#gardening#garden#vertical trellis#trellis clip#hemp twine
1 note
·
View note
Text
Solar Module Mounting Structure
Solar module mounting structures, also known as solar panel racking systems or solar mounting solutions, are essential components in solar photovoltaic (PV) installations. These structures provide the necessary support, stability, and orientation for solar panels to capture sunlight effectively and convert it into usable electricity. The design and type of solar module mounting structure depend on the specific installation site and requirements. Here are the key aspects and types of solar module mounting structures:
Importance of Solar Module Mounting Structures:
a. Optimal Sunlight Exposure: Solar module mounting structures are designed to position solar panels at the optimal tilt and orientation to maximize sunlight exposure throughout the day. Proper alignment ensures that the panels receive the highest amount of sunlight, leading to increased energy production.
b. Durability and Safety: Solar module mounting structures must withstand various environmental conditions, such as wind, snow, rain, and temperature variations. High-quality materials and sturdy construction ensure the longevity and safety of the solar PV system.
c. Shading Prevention: Shading can significantly reduce the energy output of solar panels. Mounting structures are strategically designed to minimize shading and obstruction, ensuring each panel operates efficiently.
d. Adaptability to Different Installations: Solar module mounting structures are versatile and can be customized to suit various installation scenarios, including rooftop, ground-mounted, floating, and tracking systems. This adaptability allows solar PV systems to be deployed in diverse locations and environments.
Types of Solar Module Mounting Structures:
a. Rooftop Mounting Systems: Rooftop mounting structures are designed for residential and commercial rooftops. They can be classified as ballasted systems (using weighted blocks without roof penetration), penetrating systems (using fasteners to attach to the roof), or non-penetrating systems (using clamps and weighted bases).
b. Ground-Mounted Systems: Ground-mounted solar structures are installed on open land or large outdoor spaces. They can be fixed-tilt (with a stationary angle) or tracking systems (single-axis or dual-axis), which follow the sun's path for optimized energy capture.
c. Floating Solar Structures: Floating solar installations involve mounting solar panels on water bodies, such as reservoirs or ponds. These structures offer advantages such as water conservation, reduced evaporation, and the potential for higher energy production due to the cooling effect of water.
d. Solar Carport Structures: Solar carport structures serve a dual purpose by providing shade for parked vehicles while generating solar energy. They are commonly used in parking lots and commercial premises.
Installation Considerations:
a. Engineering and Design: Solar module mounting structures require careful engineering and design to ensure they can bear the weight of the panels, withstand wind loads, and meet local building codes and regulations.
b. Material Selection: High-quality and corrosion-resistant materials, such as galvanized steel or aluminum, are commonly used for solar module mounting structures to ensure durability and longevity.
c. Foundation and Anchoring: Proper foundation and anchoring methods are essential to provide stable support for the mounting structures. Depending on the installation type, this may involve concrete footings, ground screws, or specialized roof attachments.
d. Weatherproofing: To ensure the long-term performance of the solar PV system, it is essential to weatherproof all connections and components of the mounting structure to protect against moisture and corrosion.
Solar module mounting structures are crucial components of solar PV installations, providing the foundation and support for solar panels to capture sunlight efficiently. By positioning solar panels for maximum sunlight exposure, preventing shading, and offering adaptability to various installation scenarios, these structures contribute to the efficiency and effectiveness of solar energy generation. As the world continues to embrace renewable energy solutions, solar module mounting structures play a pivotal role in harnessing the power of the sun and paving the way for a sustainable and clean energy future.
0 notes
Text
Inner Hexagon Chemical Anchor
Product name:Inner Hexagon Chemical AnchorBase Material:1.Concrete (wall)
2.Natural hard stoneApplication and Features:Small pitch, small margin heavy-duty fixed, with a variety of head type need to be used with chemical adhesive.Surface Treatment:Zinc, Yellow Zinc, Hot Dip Galvanized and passivate ect.Material:Carbon Steel or Satinless SteelHead Style:Hex,inner hexagon,flat, torx ect.Products Size:If you have any demand, please feel free to contact us.Sorry for the inconvenience.
0 notes
Video
youtube
FIXDEX & GOODFIX successful conclusion of Manufacturing Expo 2023
#youtube#Manufacturing Expo 2023#wedge anchor#ETA APPROVED wedge anchor#Wedge anchor bolts#Wedge anchors for brick#stainless steel wedge anchors#galvanized wedge anchors#m10 wedge anchor#galvanized concrete anchors#wedge bolts for concrete#wej it anchor#din975#galvanized threaded rod#self drilling screws#chemical anchor#drop in anchor#din933#din934#foundation bolt#hex nut#hex bolt#DIN125#Photovoltaic Bracket#Bracket Clamp#Clamp Bracket#Stainless steel bracket
1 note
·
View note
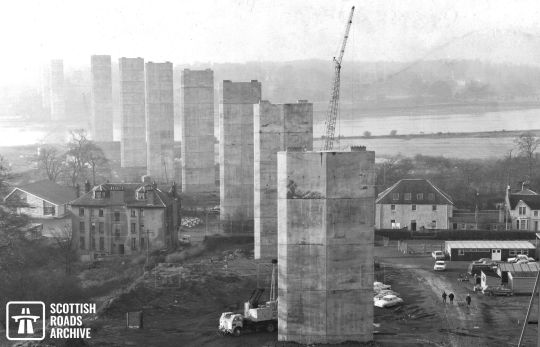
Text


On July 2nd 1971 The Erskine bridge was officially opened.
Construction on the project began in April 1967 at a cost of £10.5m, which is the equivalent of almost £150m today.
The bridge was designed by Freeman Fox & Partners for the Erskine Bridge Joint Committee. Dr Oleg Kerensky was the partner in charge and the chief design engineer was Dr William Brown under the supervision of Sir Gilbert Roberts. The piers and foundations were designed by W. A. Fairhurst & Partners. The consultant architect was R. E. Slater.
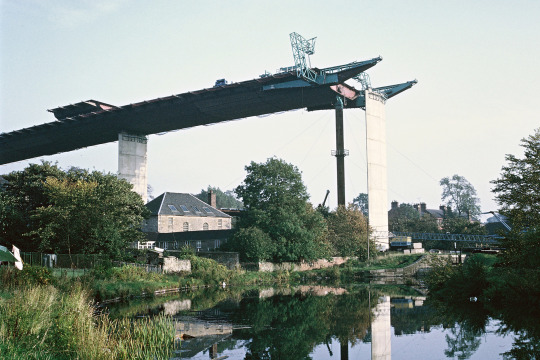
The central span is 305m (1000ft) flanked by anchor spans of 110m each. The total length including approach spans is 1322m. The aerofoil box-girder deck is supported by fourteen diamond-plan, single-shaft concrete piers at a maximum height of 45m above the river. Two central pylons extend 38m above the level of the deck. A 6x4 cluster of galvanized steel cables passes over the saddle of each pylon in a centralised, single plane.
The dual carriageway has cycle lanes and footpaths with metal safety barriers, renewed in 2012. The underside of the deck carries four water mains pipes and two gas pipes. In 2017 the cables were painted and aluminium lighting columns were installed.
The Bridge was a state-of-the-art infrastructure landmark in Scotland for its time and remains one of the country's most architecturally and technically distinguished bridges of the post-war period and beyond its date of construction. It is the first example of a large-scale cable-stayed bridge in Scotland and is recognised for its structural simplicity, economy of materials and slender appearance.
It was designed and built during a period of substantial development in civil engineering and road infrastructure. It illustrates the aspirations for economic and social progress in Scottish society and is directly associated with the period of ambitious transformation of Scotland's modern infrastructure during the 1960s.
The Erskine Bridge is one of only three road bridges in Scotland with a main span exceeding 300 metres. Its minimalistic single-cable design remains exceptionally rare for large-scale road bridges. On completion, the Erskine Bridge is understood to have had the longest span of this type in the world. The appearance of many bridges on this scale have been altered by later alteration and engineering works. The largely unchanged appearance of the Erskine Bridge contributes to its special interest.
7 notes
·
View notes
Text
Key Advice for Choosing the Right Bolt Fasteners for Your Project | Akbarali Enterprises

Akbarali Enterprises, a leading bolt manufacturer in India, provides experienced advice on how to choose the right bolts for your needs. Choosing the appropriate bolt fasteners for your project is critical to ensuring the structural integrity and endurance of your structure. Bolts are essential components in a variety of applications, including machinery, automobiles, structures, and bridges. Choosing the right type and quality will help you avoid potential failures and pricey repairs.
Understand the Types of Bolts
The first step in selecting the proper bolt is to understand the many varieties available. Common types include:
Hex Bolts: They are known for their six-sided heads and are employed in a variety of applications due to their adaptability and strength.
Carriage Bolts: These have a rounded head and a square neck and are typically used for wood connections.
Lag Bolts: Also called as lag screws, these are great for anchoring heavy wood or metal.
Machine Bolts: Used in precision applications that demand exceptional strength and durability.
Anchor Bolts: Designed to attach structural elements to concrete.
Each type has a distinct function, and understanding their applications will help you make an informed decision.
Consider the Material
Bolts are made of a variety of materials, each with its own set of qualities.
Steel Bolts: The most common material, offering a good balance of strength and affordability.
Stainless Steel Bolts: These provide excellent corrosion resistance, making them ideal for outdoor and marine applications.
Brass Bolts: Known for their corrosion resistance and aesthetic appeal, often used in electrical and decorative applications.
Titanium Bolts: Lightweight and strong, suitable for high-stress environments.
Choosing the proper material is determined by the ambient conditions and your project's specific requirements.
Evaluate the Strength
Bolts are graded according to their strength, which is critical for assuring the safety and dependability of your project. The grading system differs by country; nevertheless, common grades include:
Grade 2: Low or medium-carbon steel is ideal for non-critical applications.
Grade 5: Medium carbon steel, quenched and tempered, provides greater strength.
Grade 8: High carbon alloy steel quenched and tempered for maximum strength.
It's essential to match the bolt strength to the demands of your project to avoid failures.
Check the Bolt Manufacturer's Certification
When sourcing bolts, it is critical to select a trustworthy bolt manufacturer. Akbarali Enterprises, India's leading bolt manufacturer, ensures high-quality goods through rigorous quality control and testing. Check that the producer follows industry standards and certifications to ensure you receive dependable and long-lasting fasteners.
Check for Proper Coatings
Coatings can greatly improve the performance and longevity of bolts. Common coatings include:
Zinc Plating: Offers basic corrosion resistance and is cost-effective.
Hot-Dip Galvanizing: Provides superior corrosion resistance, ideal for outdoor applications.
Black Oxide: Enhances appearance and provides mild corrosion resistance.
Consider the Application Environment
The environment in which the bolts will be used plays a significant role in your selection process. Factors to consider include:
Exposure to Moisture: Requires corrosion-resistant materials and coatings.
Temperature Extremes: Needs bolts that can withstand thermal expansion and contraction.
Chemical Exposure: Necessitates materials resistant to specific chemicals.
Understanding the environmental conditions ensures you choose bolts that will perform reliably over time.
Consult with Experts
Finally, speaking with professionals can provide helpful insights and ideas based on your project's specific requirements. Akbarali Enterprises, a prominent bolts supplier in India, provides expert advice to help you pick the best decision for your application.
Conclusion
Choosing the right bolt fasteners is a critical aspect of any project, impacting both safety and longevity. By understanding the types, materials, strengths, threads, and coatings, and by consulting with reputable bolts suppliers like Akbarali Enterprises, you can ensure your project's success. As a leading bolt manufacturer and supplier in India, Akbarali Enterprises is committed to providing high-quality, reliable fasteners for a wide range of applications.
Website: akbarfasteners.com
0 notes
Text
artificial grass installation sydney top tips
Installing artificial grass in Sydney requires careful planning and execution to ensure optimal results and longevity. Here's a comprehensive guide to help you navigate through the process:
Understanding Your Needs
Before diving into the installation process, it's crucial to assess your specific requirements and goals for artificial grass. Consider factors such as the intended use of the area (e.g., backyard, playground, sports field), desired aesthetic appeal, and maintenance preferences. Each of these aspects will influence the type of artificial grass you choose and how it should be installed.
Choosing the Right Type of Artificial Grass
synthetic turf comes in various types, each designed with specific characteristics suited for different applications. Factors to consider include pile height, density, yarn type, and backing material. For instance, shorter pile artificial grass sydney heights are ideal for high-traffic areas like sports fields, while longer piles may provide a more lush appearance suitable for residential lawns.
Climate is also a significant factor in Sydney. Opt for artificial grass designed to withstand the local climate conditions, including UV resistance to prevent fading under the intense Australian sun. Additionally, consider drainage capabilities to ensure efficient water runoff during rainy seasons.
Preparing the Site
Proper site artificial grass installation preparation is crucial for the long-term performance of your artificial grass. Start by removing existing turf, vegetation, and debris from the area. Ensure the ground is level and adequately compacted to prevent uneven surfaces and future sinking or shifting installation of the artificial grass. Depending on the soil conditions, you may need to add a base material such as crushed rock or decomposed granite to improve drainage and stability.
Installing the Base
Creating a solid base is essential for the durability and performance of your artificial grass. Begin by laying down a weed barrier fabric to prevent weed growth through the artificial turf. Next, spread and compact a base material, such as decomposed granite or a specially formulated aggregate, to achieve a smooth and stable surface. Aim for a thickness of 2-4 inches, depending on the soil type and intended use of the area.
Laying the Artificial Grass
Once the base is prepared artificial grass near me, it's time to lay the artificial grass. Carefully roll out the turf and allow it to acclimate to the environment for a few hours, particularly if it has been stored tightly rolled. Trim any excess turf as needed and ensure seams are securely joined using adhesive and seam tape. Take care to avoid overlaps or gaps between turf sections to maintain a seamless appearance.
Securing the Edges
Securing the edges of the artificial grass is essential to prevent shifting and ensure a neat finish. Use galvanized nails or landscape staples to anchor the perimeter of the turf every 6-12 inches. Alternatively, you can use flexible adhesive to bond the edges to a hard surface, such as concrete or timber edging.
Adding Infill (Optional)
Infill material helps to support the artificial grass fibers, enhance durability, and provide a natural feel underfoot. Common infill materials include silica sand, rubber granules, or a combination of both. Spread the infill evenly across the turf using a drop spreader or by hand, ensuring the fibers are adequately filled while maintaining drainage capabilities.
Grooming and Maintenance
Regular grooming and maintenance are essential for keeping your artificial grass looking its best. Use a stiff brush or rake to periodically brush the turf fibers upright and redistribute infill material. Remove leaves, debris, and pet waste promptly to prevent odors and maintain cleanliness. Additionally, rinse the turf occasionally with water to remove dust and pollen buildup.
Special Considerations
In Sydney's climate, where temperatures can soar during the summer months, consider installing artificial grass with cooling properties to minimize heat absorption. These types of turf are designed with lighter colors and specialized yarns that reflect sunlight and reduce surface temperatures, providing a more comfortable experience for users and pets alike.
Professional Installation vs. DIY
While some homeowners may opt for a DIY approach to save costs, professional installation offers several advantages, including expertise in site preparation, access to specialized equipment, and knowledge of local building codes and regulations. Moreover, professional installers can ensure proper drainage, seam integration, and long-term performance of the artificial grass, ultimately maximizing your investment.
Installing artificial grass in Sydney requires careful planning, attention to detail, and adherence to best practices to achieve optimal results. By selecting the right type of turf, preparing the site correctly, and following proper installation techniques, you can create a durable, low-maintenance outdoor space that enhances the aesthetics and functionality of your property. Whether for residential lawns, commercial landscapes, or recreational areas, artificial grass offers a versatile solution that withstands the rigors of Sydney's climate while providing a lush, green environment year-round.
0 notes
Text
Choosing the Right Hardware
“Screws, Nails, and Anchors: Choosing the Right Hardware for Wood”

Introduction
1. Screws:
·When to Use: Screws are versatile and ideal for projects where you need a strong and secure connection. They are excellent for joining pieces of wood, assembling furniture, and attaching hardware.
·Where to Choose: For indoor projects, standard wood screws are suitable. For outdoor or treated wood applications, use corrosion-resistant screws like stainless steel or coated screws to prevent rust and corrosion.
2. Nails:
·When to Use: Nails are great for fastening lighter materials or when you need a quick, temporary solution. They are often used in framing, moldings, and other structural applications.
·Where to Choose: Use galvanized or stainless steel nails for outdoor or moist environments to prevent rust. For interior projects, common nails or finish nails work well.
3. Anchors:
·When to Use: Anchors are essential for securing heavy objects or fixtures to walls or ceilings. They provide additional support and prevent items from falling.
·Where to Choose: Select anchors based on the wall material. For drywall, use plastic or self-drilling anchors. For concrete or masonry walls, choose expansion anchors or sleeve anchors. Make sure the anchor’s weight capacity matches the load you intend to hang.

General Tips
1. Wood Type:
· Grain Orientation: Consider the grain orientation of the wood. When fastening into the end grain of a piece of wood, it’s more prone to splitting. In such cases, pre-drilling pilot holes is crucial to preventing this issue.
2. Length and Diameter:
· Thread Length: The length of the threaded portion of a screw should be sufficient to pass through the material you’re joining and provide enough grip. However, be cautious about using screws that are too long, as they can weaken the wood or protrude on the other side.
· Diameter: The diameter of the screw or nail affects its holding power. Larger diameter fasteners generally provide better grip, but be mindful of not making the hole too big, which can weaken the wood.
3. Fastener Head:
· Head Type: Different screw head types have specific uses. For example, flathead screws are ideal for countersinking, while pan head or round head screws provide a finished look. The choice of head type depends on both functionality and aesthetics.
4. Weight and Load:
· Load Calculation: Calculate the anticipated load on your woodworking project and ensure that the selected hardware can bear it. For heavy loads, consider using multiple fasteners and distributing the weight evenly.
· Weight Distribution: Keep in mind that the weight may not be evenly distributed. For instance, shelves may have more weight concentrated at certain points. Choose hardware and attachment points accordingly.
5. Weather Exposure:
· Material Selection: In outdoor applications or areas with high humidity, opt for hardware made of corrosion-resistant materials like stainless steel or brass. These materials can withstand exposure to moisture and prevent rust or corrosion.
· Finish: Some screws and nails come with specialized finishes, such as galvanization or zinc coating, to enhance their resistance to weather and corrosion.
6. Pilot Holes and Clearance Holes:
· Pilot Holes: Drilling pilot holes before inserting screws or nails is essential to prevent wood splitting, especially in hardwoods. The pilot hole should be slightly smaller in diameter than the fastener.
· Clearance Holes: When using screws, consider using a clearance hole for the screw’s shank to pass through, allowing the threads to grip only in the material you’re attaching to, not the initial piece of wood.
7. Tools and Equipment:
· Quality Tools: Invest in high-quality drill bits, screwdrivers, and hammers. Good tools make the installation process easier and ensure a more secure attachment.
· Driver Bits: Use driver bits that match the fastener type (e.g., Phillips, Torx, square) to prevent stripping the screw heads.
8. Safety Considerations:
· Eye and Ear Protection: When drilling or hammering, wear appropriate eye and ear protection to safeguard against flying wood chips and loud noise.
· Proper Techniques: Ensure you’re using proper techniques when fastening hardware to avoid accidents or injury.
By taking into account these suggestions you can make informed choices when it comes to selecting and utilizing screws, nails and anchors for your woodworking endeavors. Thoughtfully considering these factors will lead to a secure woodworking journey.
How Yoobuy can help
https://yoobuy.in/wp-content/uploads/2023/09/Untitled-design-1.png
Yoobuy is your one-stop solution for sourcing a wide variety of hardware materials, including screws, nails, anchors, and more. Here’s how Yoobuy can assist you:
1. Extensive Selection: Yoobuy offers an extensive range of hardware options, ensuring you can find the perfect fasteners for your woodworking project.
2. Convenience: You can browse and purchase hardware materials from the comfort of your home, eliminating the need to visit multiple stores.
3. Quality Assurance: Yoobuy sources high-quality hardware, so you can trust that the materials you receive will meet your project’s needs.
4. Expert Guidance: If you’re unsure which hardware to choose, Yoobuy often provides product descriptions and recommendations, helping you make an informed decision.
Conclusion
Selecting the hardware for your woodworking project is crucial to ensure its success. By taking into account your requirements and the recommendations provided above along, with the convenience of Yoobuy you can effortlessly acquire the materials for your woodworking endeavors.
#interiordesign#onlineshopping#yoobuy#yoobuybathroomessentials#homedecor#homeimprovement#buildingmaterialsatyourfingertips#hardware
0 notes
Text
The Role of Fasteners in Construction

Fasteners are the unsung heroes of the construction industry, playing a crucial role in the integrity, safety, and longevity of buildings and structures. Ananka Group is the Prominent Fasteners Manufacturers in India. We supply high-quality fasteners to a wide range of businesses globally. Fasteners come in many sizes, shapes, and dimensions. Many things can be linked or fastened using fasteners. They are vital parts of many sectors, such as building, manufacturing, transportation, and household goods. We are the best Fasteners Manufacturer.
Types of Fasteners Used in Construction
Fasteners come in various shapes, sizes, and materials, each designed to meet specific requirements. The most common types of fasteners used in construction include:
Nails: Typically used in wood construction, nails are hammered into materials to hold them together. They come in various lengths and thicknesses, designed for different applications.
Screws: Offering more holding power than nails, screws are used in both wood and metal construction. They provide a tighter fit and are easier to remove and replace.
Bolts and Nuts: Essential for heavy-duty applications, bolts and nuts provide a strong, reliable connection. They are commonly used in steel construction and for securing heavy components.
Anchors: Used to attach objects to concrete or masonry, anchors come in several types, including wedge anchors, sleeve anchors, and drop-in anchors.
Washers: Often used in conjunction with bolts and screws, washers distribute the load of the fastener, preventing damage to the material and ensuring a secure fit.
Applications of Fasteners in Construction
Fasteners are used in nearly every aspect of construction, from framing and roofing to finishing and furnishing. Some key applications include:
Framing: Nails and screws are extensively used in framing walls, floors, and roofs. The choice between nails and screws depends on the specific requirements of the structure and the materials being used.
Structural Connections: Bolts and nuts are critical in connecting steel beams and columns, ensuring the structural integrity of the building. These fasteners must be chosen based on their strength and durability to withstand loads and stresses.
Drywall Installation: Screws are the preferred fasteners for attaching drywall to wooden or metal studs. They provide a secure hold and are less likely to pop out over time compared to nails.
Concrete and Masonry: Anchors are used to secure fixtures and fittings to concrete and masonry surfaces. They must be selected based on the type of load they will bear and the material they will be embedded in.
Importance of Choosing the Right Fasteners
Selecting the appropriate fasteners for a construction project is crucial for several reasons:
Structural Integrity: The wrong fastener can compromise the strength and stability of a structure. For example, using nails instead of screws in certain applications may result in a weaker connection that can fail under stress.
Durability: Fasteners must be able to withstand environmental conditions such as moisture, temperature changes, and exposure to chemicals. Corrosion-resistant materials like stainless steel or galvanized fasteners are essential for outdoor or humid environments.
Safety: Using the correct fasteners ensures the safety of the structure and its occupants. Inadequate or improper fastening can lead to structural failures, causing accidents and injuries.
Efficiency: The right fasteners can simplify the construction process, making it faster and more efficient. For instance, self-tapping screws reduce the need for pre-drilling, saving time and effort.
Best Practices for Fastener Selection and Installation
To ensure the optimal performance of fasteners in construction, it is essential to follow best practices in selection and installation:
Consult Standards and Guidelines: Refer to building codes and industry standards to determine the appropriate fasteners for specific applications.
Consider Material Compatibility: Choose fasteners that are compatible with the materials being joined to prevent galvanic corrosion and other issues.
Use Proper Tools: Ensure that the right tools are used for installing fasteners to achieve a secure and accurate fit.
Inspect and Maintain: Regularly inspect fasteners for signs of wear or damage and replace them as needed to maintain the integrity of the structure.
We now provide our excellent fasteners and rapid shipping to all major Indian cities. We are the most reliable Stainless Steel Fasteners Manufacturer in India. We provide our clients with the greatest prices available on global stainless steel fasteners. These are also used for delicate applications in harsh settings.
0 notes
Last Seen Blogs

codecarpenterbee
Just a Logan in a World of Creativitwins

nvc-pr
hi,

beautiful-travesty
----

starryv0idz
A Cosmic Cafe Of Chaos ! 🌸

artemis-of-the-wild
Khaire, Lady Artemis