#getclass method in java
Explore tagged Tumblr posts
Visit Tumblr Blog
Explore Tumblr blogs with no restrictions, modern design and the best experience.
Last Seen Tumblr Blogs


Fun Fact
69% of Tumblr users are millennials.
Text
How are hashCode and equals methods related?
In Java, the hashCode() and equals() methods play a critical role in determining object equality and behavior in hash-based collections like HashMap, HashSet, and Hashtable.
The equals() method is used to compare two objects for logical equality. By default, the equals() method in the Object class compares memory references. However, in most custom classes, this method is overridden to provide meaningful comparison logic—such as comparing object content (fields) rather than memory addresses.
The hashCode() method returns an integer representation of an object’s memory address by default. However, when overriding equals(), it is essential to also override hashCode() to maintain the general contract:
If two objects are equal according to the equals() method, then they must have the same hashCode() value.
Failing to do this can lead to unexpected behavior in collections. For instance, adding two logically equal objects (via equals()) to a HashSet may result in duplicates if hashCode() returns different values for them. This is because hash-based collections first use the hashCode() to find the correct bucket, and then use equals() to compare objects within the same bucket.
Example:
@Override public boolean equals(Object obj) { if (this == obj) return true; if (obj == null || getClass() != obj.getClass()) return false; MyClass other = (MyClass) obj; return this.id == other.id; } @Override public int hashCode() { return Objects.hash(id); }
In summary, always override both methods together to ensure correct object behavior in collections. A strong grasp of these concepts is crucial for building reliable applications and is a core topic in any full stack Java developer course.
0 notes
Link
0 notes
Text
Buttonbar style java

#Buttonbar style java how to#
#Buttonbar style java skin#
Finally, the show() method is called to display the final results. Then a tile pane is created, on which addChildren() method is called to attach the button inside the scene. The function setTitle() is used to provide title to the stage.
#Buttonbar style java how to#
Specifically, the code shows you how to use JavaFX ButtonBar setStyle (String value) Example 1. The button will be created inside a scene, which in turn will be hosted inside a stage. The following code shows how to use ButtonBar from.
Program to create a button and add it to the stage: This program creates a Button indicated by the name b.
#Buttonbar style java skin#
Gets the value of the property cancelButton.Ī Cancel Button is the button that receives a keyboard VK_ESC pressĪ default Button is the button that receives a keyboard VK_ENTER pressĬreate a new instance of the default skin for this control.īelow programs illustrate the use of Button in JavaFX. Gets the value of the property defaultButton.
Sets the value of the property defaultButton ButtonBar.AlertDialog> f00You can vote up the ones you like or vote down the ones you don't like, and go to the original project or source file by following the links above. These examples are extracted from open source projects. In other words, any Node may be annotated (via the setButtonData (Node, ButtonData) method, placed inside a ButtonBar (via the getButtons () list), and will then be positioned relative to all other nodes in the button list based on their annotations, as well as the overarching button order specified for. The following examples show how to use (). Sets the value of the property cancelButton. A ButtonBar is essentially a HBox, with the additional functionality for operating system specific button placement. <li>Button(String t, Node g): creates a button with the specified text and icon for its label. <li>Button(String t): creates a button with the specified text as its label. <li>Button(): creates a button with an empty string for its label. Buttons can also respond to mouse events by implementing an EventHandler to process the MouseEvent. In this program, we need to import another new package because we are dealing with event handling and this package provides classes and interfaces that are used for event handling in awt and Swing. This Action Event can be managed by an EventHandler. In the first step, we need to import all essential packages. This region also has a custom style applied to the button container Dec 12. When the button is pressed an Action Event is sent. demonstrates a button bar that can be used to navigate between widgets. <li>Cancel Button: A cancel button that receives a keyboard VK_ENTER press. It was primarily designed for the Java ME platform, as a low-end sibling for Opera Mobile. <li>Default Button: A default button that receives a keyboard VK_ENTER press at any loca-tion on the Internet in a plug-and-play fashion. In all other situations, the dialog will refuse to respond to all close requests, remaining open until the user clicks on one of the available buttons in the DialogPane area of the dialog. Button order code:L RIGHT public static final ButtonBar. <li>ISRO CS Syllabus for Scientist/Engineer Examīutton in JavaFX can be of three different types: The button has a ButtonType whose ButtonBar.ButtonData returns true when () is called. Methods declared in class getClass, notify, notifyAll, wait, wait, wait Enum Constant Detail LEFT public static final ButtonBar.ButtonDataLEFT Buttons with this style tag will statically end up on the left end of the bar. <li>ISRO CS Original Papers and Official Keys. <li>GATE CS Original Papers and Official Keys. Note that, like the HTML style attribute, this variable contains style properties and values and not the selector portion of a style rule. This is analogous to the 'style' attribute of an HTML element. The most convenient approach is probably a simple subclass of VBox: import . A string representation of the CSS style associated with this specific Node. Example The following code shows how to use ButtonBar from . This is useful if you want to lay out a button bar that includes a button with a long text. You need two things: to set fillWidth to true on the VBox, and to set maxWidth on each button. The method getStylesheets() returns the list of stylesheets to use with this Parent. <a href="https://tumbadental.com/?q=cT1CdXR0b25iYXIlMjBzdHlsZSUyMGphdmEmcD1Wb3ZhbiZzPVR1bWJsZVIgUFJPJnI9VHVtYmxyLmNvbSZjPUNBVDExJnNjPWJ1dHRvbiZkPTEwLjIwMjImdD10dW1iYWRlbnRhbC5jb20mbV9yPXRvbmtpamF6ei50dW1ibHIuY29tJms9VGV4dA==" target="_blank"><img style="cursor: pointer; display: block; margin-left: auto; margin-right: auto;" src="https://64.media.tumblr.com/825f76cc91ecb7f90539fb8b01a92acf/b190bc32b32ab97c-97/s540x810/794795c8b3de0768b9ed336716efabfabc08832e.jpg" alt="Buttonbar style java"/>
0 notes
Text
Spring Digging Road8 -> Special-CGLIB
###JDK
#####If the proxied class implements the interface, the JDK dynamic proxy is used by default:
pom.xml Structural reference:
https://blog.csdn.net/qq_33811662/article/details/80488046
AopAdvice Code is as follows:
package proxy;
import org.aspectj.lang.JoinPoint;
import org.aspectj.lang.ProceedingJoinPoint;
import org.aspectj.lang.annotation.Around;
import org.aspectj.lang.annotation.Aspect;
import org.aspectj.lang.annotation.Pointcut;
@Aspect
public class AopAdvice {
@Pointcut("execution(** proxy.RealizeClass.print(..))")
public void doSomething() {
}
public void beforeAdvice(JoinPoint point) {
System.out.println("method = " + point.getSignature().getName());
System.out.println("target = " + point.getTarget().getClass().getName());
}
public void afterAdvice(JoinPoint point) {
System.out.println("method = " + point.getSignature().getName());
System.out.println("target = " + point.getTarget().getClass().getName());
}
@Around("doSomething()")
public void aroundAdvice(ProceedingJoinPoint proc) {
beforeAdvice(proc);
try {
proc.proceed();
} catch (Throwable e) {
e.printStackTrace();
}
afterAdvice(proc);
}
}
RealizeClass Code is as follows:
package proxy;
public class RealizeClass implements TestInterface{
public void print() {
System.out.println("In the method of the RealizeClass class ");
}
}
interface TestInterface {
void print();
}
TestSpring Code is as follows:
package proxy;
import org.junit.Test;
import org.springframework.context.annotation.AnnotationConfigApplicationContext;
import org.springframework.context.annotation.Bean;
import org.springframework.context.annotation.Configuration;
import org.springframework.context.annotation.EnableAspectJAutoProxy;
import org.springframework.context.support.AbstractApplicationContext;
@EnableAspectJAutoProxy
@Configuration
public class TestSpring {
@Bean
RealizeClass a() {
return new RealizeClass();
}
@Bean
AopAdvice aopAdvice() {
return new AopAdvice();
}
@Test
public void test() {
AbstractApplicationContext context = new AnnotationConfigApplicationContext(TestSpring.class);
TestInterface realizeClass = (TestInterface) context.getBean(TestInterface.class);
realizeClass.print();
}
}
Run the program, and the output result is:
method = print
target = proxy.RealizeClass
In the method of the RealizeClass class
method = print
target = proxy.RealizeClass
At this time, the result is correct, but we want to know what kind of dynamic proxy mode it uses, so in realizeClass.print (); (Line 27 in TestSpring) This line breaks, runs in debug mode, and puts the mouse on realizeClass:

###CGLIB
####If the proxied class does not implement the interface, CGLIB dynamic proxy is used by default:
Remove the inheritance relationship of the RealizeClass class, and change the RealizeClass class to:
public class RealizeClass{
public void print() {
System.out.println("In the method of the RealizeClass class ");
}
}
Modify the test code:
@Test
public void test() {
AbstractApplicationContext context = new AnnotationConfigApplicationContext(TestSpring.class);
RealizeClass realizeClass = (RealizeClass) context.getBean(RealizeClass.class);
realizeClass.print();
}
Output result:
method = print
target = proxy.RealizeClass
In the method of the RealizeClass class
method = print
target = proxy.RealizeClass
At this time, interrupt the debugging:

###Use CGLIB dynamic proxy if CGLIB is enforced:
Change back to the previous code of JDK dynamic agent:
@Test
public void test() {
AbstractApplicationContext context = new AnnotationConfigApplicationContext(TestSpring.class);
TestInterface realizeClass = (TestInterface) context.getBean(TestInterface.class);
realizeClass.print();
}
RealizeClass Code:
public class RealizeClass implements TestInterface{
public void print() {
System.out.println("In the method of the RealizeClass class ");
}
}
interface TestInterface {
void print();
}
At this time, make a few changes in the annotations:
@EnableAspectJAutoProxy(proxyTargetClass = true)
Commissioning of break points:

In the version of Spring2.x, it can be used in xml : <aop:aspectj-autoproxy proxy-target-class="true" />
##Principle
See about EnableAspectJAutoProxy:
public @interface EnableAspectJAutoProxy {
/**
* Indicate whether subclass-based (CGLIB) proxies are to be created as opposed
* to standard Java interface-based proxies. The default is {@code false}.
*/
boolean proxyTargetClass() default false;
}
It is stated in the note that you can choose whether to use CGLIB dynamic proxy, but by default it is not used.
0 notes
Text
Grafische Benutzeroberflächen mit JavaFX in Scenebuilder erstellen und in BlueJ einbinden
Programmieranfänger, die das Programmieren in Java mit BlueJ erlernen, werden nach einiger Zeit an den Punkt gelangen, Anwendungen mit grafischer Benutzeroberfläche zu als JavaFX-Applikation realisieren. Obwohl dies der richtige Zeitpunkt wäre, auf eine professionelle IDE wie IntelliJ umzusteigen, kann man die ersten Schritte auch in BlueJ gehen. Als weiteres Werkzeug kommt Gluons Scenebuilder zum Einsatz.
Hintergrund: Das MVC-Programmiermuster

Diagramm der Interaktionen innerhalb des MVC-Programmiermusters (Quelle: en.wikipedia.org/wiki/Model–view–controller).
Applikationen mit grafischen Benutzeroberflächen sind meist nach dem sogenannten MVC-Programmiermuster aufgebaut. MVC steht für Model-View-Controller und bezeichnet die Vorgehensweise, die Kernfunktionalität einer Anwendung (Model) von der Anwendungsdarstellung (View) und der Anwendungssteuerung (Controller) zu trennen. Die Mensch-Maschine-Interaktion wird von der Kernfunktionalität entkoppelt und kann - zumindest theoretisch - somit leichter an unterschiedliche Anwendungskontexte angepasst werden. Die Interaktion des Nutzers mit der Anwendung erfolgt über die grafische Benutzeroberfläche (View), die häufig als GUI (graphical user interface) bezeichnet wird. Davon wiederum entkoppelt ist die Behandlung von Ereignissen aus der Nutzerinteraktion (Controller). Jede Anwendung, die nach diesem Muster aufgebaut ist, wird letztlich mindestens 3 Klassen enthalten: eine für jeden der drei Teile.
Grundgerüst einer JavaFX-Anwendung
Damit eine Java-Anwendung als JavaFX-Applikation laufen und eine grafische Benutzeroberfläche erzeugen kann, muss sie in einem sogenannten JavaFX-Thread gestartet werden und eine Instanz der JavaFX-Basisklasse javafx.application.Application sein. Der folgende Quelltext zeigt das Grundgerüst so einer Klasse.
import javafx.application.Application;
/** * Die Hauptklasse einer JavaFX-Applikation * @author (Ihr Name) * @version (eine Versionsnummer oder ein Datum) */ public class Main extends Application {
// Ggf. hier Instanzvariablen deklarieren
/** * Init-Methode für die JavaFX-Applikation. * In dieser Methode werden Konstruktor-typische Initialisierungen vorgenommen. * Sie wird einmalig nach dem Launch der JavaFX-Applikation und nicht im JavaFX-Thread ausgeführt. * Deshalb DARF NICHT in dieser Methode die GUI erzeugt werden. */ public void init() throws Exception {
// Hier die Instanzvariablen initialisieren
}
/** * Start-Methode für die JavaFX-Applikation. * In dieser Methode wird insbesondere die grafische Benutzeroberfläche erzeugt. * Sie wird einmalig nach der Init()-Methode und im JavaFX-Thread ausgeführt. */ public void start(Stage stage) throws Exception {
// Hier die GUI initialisieren
}
/** * Stop-Methode für die JavaFX-Applikation. * In dieser Methode können "Aufräumarbeiten" vorgenommen werden. * Sie wird einmalig beim Beenden der Applikation und im JavaFX-Thread ausgeführt. */ public void stop() throws Exception {
// Hier Ressourcen frei geben, z.B. Streams schließen.
}
/** * Programmeinstiegspunkt fuer das Java-Programm. Es ist lediglich die launch()-Methode aufzurufen. * Initialisierungen passieren dann in der init()-Methode sowie der start()-Methode. Die MainLoop verbirgt * sich sozusagen in der Anwendung selbst. * Nach dem Ausstieg aus der "Mainloop" können notwendige Aufräumarbeiten in der stop()-Methode erfolgen. * * @param args Kommandozeilenparameter zu Übergabe an den Application Launcher */ public static void main(String [] args) {
launch(args);
}
// Hier weitere interne/private Methoden implementieren
}
JavaFX-Applikationen in BlueJ
JavaFX-Applikationen laufen als eigenständige Anwendungen. Sie können wie normale Java-Programme aber auch aus BlueJ heraus gestartet werden. Dazu muss BlueJ mitgeteilt werden, dass die Anwendung im JavaFX-Thread laufen soll. Das kann man in den Einstellungen festlegen. Anschließend kann man eine Anwendung als JavaFX-Application laufen lassen.

Die Registerkarte "Diverses" in den BlueJ-Einstellungen
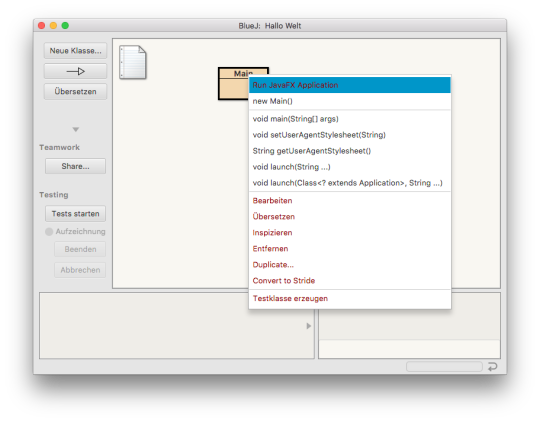
Eine Klasse mittels Kontext-Menü als JavaFX-Application starten
Gestaltung einer GUI für eine JavaFX-Applikation mit dem Scenebuilder
Auf JavaFX aufbauende Benutzeroberflächen müssen nicht zwangsläufig als Java-Quelltext geschrieben werden. Statt dessen können sie in ihrer Struktur mit Hilfe von XML beschrieben und als FXML-Datei abgespeichert werden. Dafür gibt es unter anderem den Gluon-Scenebuilder. Er findet sich als Tool (Scenebuilder Kit) in professionellen Entwicklungsumgebungen, kann aber auch als separates Programm genutzt werden. Es gibt zahlreiche Tutorials, wie Benutzeroberflächen mit dem Scenebuilder erstellt werden können. Zumeist wird die Nutzung des Scenebuilders aus Entwicklungsumgebungen wie Eclipse oder Netbeans heraus eingeführt. Fast immer läuft der Scenebuilder dann aber als alleinstehende Anwendung.
youtube
Erstellung der GUI (View) aus einer FXML-Datei
Aus FXML-Dateien kann im Java-Quellcode die View erstellt werden. Dazu wird die Klasse FXMLLoader verwendet. Der folgende Quelltext-Ausschnitt zeigt, wie so etwas aussehen kann. Der richtige Ort in der Basisklasse der JavaFX-Applikation ist die Methode start().
...
...
...
/** * Start-Methode für die JavaFX-Applikation */ public void start(Stage stage) throws Exception {
String fxmlFile = "main.fxml";
try {
Parent root = FXMLLoader.load(getClass().getResource(fxmlFile)); Scene scene = new Scene(root); stage.setTitle("Meine JavaFX App"); stage.setScene(scene); stage.show();
} catch(IOException e) {
System.err.println("FXML-Ressource konnte nicht aus der Datei geladen werden: " + fxmlFile);
} catch(NullPointerException e) {
System.err.println("Beim Laden der FXML-Datei wurde kein Objekt der Basisklasse javafx.scene.Parent erzeugt.");
}
}
...
...
Erstellung der Controller-Klasse
Nach dem MVC-Programmiermuster muss es zu jeder View einen zugehörigen Controller geben. Der Scenebuilder stellt zu jeder gestalteten JavaFX-Szene ein passendes Grundgerüst für die zugehörige Controller-Klasse bereit. Dieses muss dann nur kopiert und im Quelltext-Editor eingefügt werden. Anschließend können die Methoden zur Ereignisbehandlung ausprogrammiert werden.

Eintragung eines Namens für die zu erstellende Controller-Klasse im Scenebuilder

Benennung einer Methode zur Behandlung eines Ereignisses im Scenebuilder
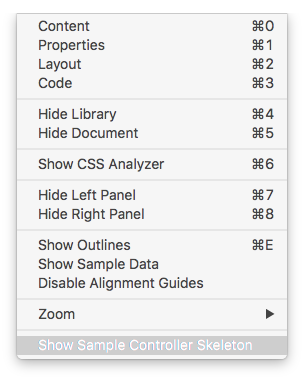
Der Menüpunkt "View" des Scenebuilder
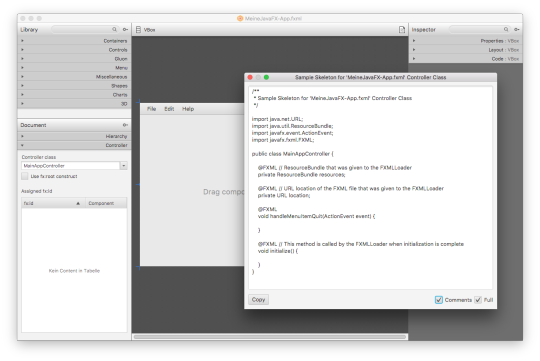
Ansicht des Quelltext-Grundgerüstes für die Controller-Klasse im Scenebuilder
Die im Beispiel gezeigte Methode handleMenuItemQuit() wird dann in BlueJ ausprogrammiert, d.h. der Methodenrumpf wird so verändert, dass die gewünschte Funktionalität erreicht wird. Das könnte z.B. wie folgt aussehen.
...
...
...
/** * Ereignisbehandlung für den Menüpunkt Quit im Menü File * * @param e Ereignis vom Typ ActionEvent, * das diesen Eventhandler ausgelöst hat */ @FXML void handleMenuItemQuit(ActionEvent e) {
// Damit die folgende Anweisung funktioniert, muss die Klasse // javafx.application.Platform importiert werden. Platform.exit();
}
...
...
0 notes
Text
Creating custom Log Entries in Audit Log from Java Proxy
When developing custom java-proxy often enough there is a situation when you want to log actions/steps during java-proxy work. Usually methods of com.sap.tc.logging.Location class can be used for that purpose. Those allow you to log events which you can see in Log Viewer(view / developer trace, fig.1). Fig.1 Example of developer trace logs @ Log Viewer. Using that Log Viewer developer trace approach has its own downsides such as if your java-proxy works under relatively high load finding log entries for certain message could be challenging because Log Viewer search tool listing capabilities are limited with page scroll option. Besides, message monitoring becoming separated on two stages: first you have to check audit log in Message Monitor, and then or even at the same time – try to find (your java-proxy made) records for that message in Log Viewer. Obviously there is a question: is that possible to create log entries during java-proxy execution (work) not in Log Viewer but in Message Monitor? Seems convenient to be able to see all log entries at the same page default and custom created as well as being able to monitor messages right in Message Monitor. By default SAP provides tools necessary to create custom audit log entries, when developing custom communication channel modules. In this case you can use related classes of standard XPI Adapter Library included in SAP NWDS. But what if we want to use this tool to create log entries during java-proxy execution? To be able to do that we need to create AuditAccess object which have methods that can be used to create audit log entries. You can create this object using following code: AuditAccess auditAccess = PublicAPIAccessFactory.getPublicAPIAccess().getAuditAccess(); If we’ll just create this object and deploy java-proxy to a server, during test message processing we’ll be able to see following error in Log Viewer (fig.2). Fig.2 Log Viewer error. Looks like this way won’t work. While experimenting, I’ve been able to find at least one way to create log entries in Audit Log from java-proxy. By using java reflection mechanism I was able to get all classes and methods needed to create audit log entries. I’ve created separate java class contains addLogEntry() method which will allow to log information needed to monitor/analyze java-proxy message processing in Audit Log. Following class code can be used: import java.lang.reflect.Constructor; import java.lang.reflect.Field; import java.lang.reflect.InvocationTargetException; import java.lang.reflect.Method; import javax.naming.Context; import javax.naming.InitialContext; import javax.naming.NamingException; import com.sap.engine.interfaces.messaging.api.MessageDirection; import com.sap.engine.interfaces.messaging.api.auditlog.AuditLogStatus; public class MessageMonitor { private Method mtdAddAuditLogEntry; private Object objAuditAccess; private Class clsMessageKey; private Class clsLogStatus; private Object objMessageKey; public MessageMonitor(String msgId, MessageDirection msgDirection) throws NamingException, Instantia-tionException, IllegalAccessException, SecurityException, NoSuchMethodException, IllegalArgumentException, InvocationTargetException, NoSuchFieldException { Context context = new InitialContext(); Class clsAPIPublick = context.lookup("com.sap.engine.interfaces.messaging.api.public").getClass(); Object objAPIPublick = clsAPIPublick.newInstance(); Method mtdGetAuditAccess = clsAPIPublick.getDeclaredMethod("getAuditAccess"); objAuditAccess = mtdGetAuditAccess.invoke(objAPIPublick); Class clsAuditAccess = objAuditAccess.getClass(); for (Method mtd : clsAuditAccess.getMethods()) { for (Class cls : mtd.getParameterTypes()) { if (cls.getCanonicalName().equals("com.sap.engine.interfaces.messaging.api.MessageKey")) { clsMessageKey = cls; } else if (cls.getCanonicalName().equals("com.sap.engine.interfaces.messaging.api.auditlog.AuditLogStatus")) { clsLogStatus = cls; } } if (clsMessageKey != null && clsAuditAccess != null) break; } mtdAddAuditLogEntry = clsAuditAccess.getMethod("addAuditLogEntry", new Class[]{clsMessageKey, clsLogStatus, String.class}); Class clsMessageDirection = null; outer: for (Constructor cnstr : clsMessageKey.getConstructors()) { for (Class cls : cnstr.getParameterTypes()) { if (cls.getCanonicalName().equals("com.sap.engine.interfaces.messaging.api.MessageDirection")) { clsMessageDirection = cls; break outer; } } } Constructor cnstrMessageDirection = clsMessageKey.getConstructor(new Class[]{String.class, cls-MessageDirection}); Field fldMessageDirection = clsMessageDirection.getField(msgDirection.toString()); objMessageKey = cnstrMessageDirection.newInstance(new Object[]{new String(msgId), fldMes-sageDirection.get(clsMessageDirection)}); } public void addLogEntry(AuditLogStatus logStatus, String logMsg) throws SecurityException, NoSuchMe-thodException, NoSuchFieldException, IllegalArgumentException, IllegalAccessException, InvocationTargetException { Field fldLogStatus; if (logStatus.toString().equals("S")) { fldLogStatus = clsLogStatus.getField("SUCCESS"); } else if (logStatus.toString().equals("W")) { fldLogStatus = clsLogStatus.getField("WARNING"); } else { fldLogStatus = clsLogStatus.getField("ERROR"); } mtdAddAuditLogEntry.invoke(objAuditAccess, new Object[]{objMessageKey, fldLogSta-tus.get(clsLogStatus), new String(logMsg)}); } } To make this code actually work we need to perform several following steps. Create an instance of this class using constructor MessageMonitor(String msgId, MessageDirection msgDirection). First parameter – message id, second – message direction(inbound/outbound). To get message id in java-proxy we are going to use following classes: com.sap.engine.services.webservices.espbase.server.additions.xi.ProviderXIMessageContext located in standard SAP NWDS: SAP Java EE 5 Libraries (tc~je~webservices~lib.jar). com.sap.guid.IGUID can be found in sap.com~tc~bl~guidgenerator~impl.jar. You can also find it using file path: /usr/sap///j2ee/cluster/bin/core_lib/ After adding those classes to your project following code can be used to get message id during java-proxy work: ProviderXIMessageContext context = ProviderXIMessageContext.getInstance() String msgId = context.getRequestMessageID().toString(); To get message direction we can use MessageDirection class static fields: for inbound java-proxy – MessageDirection.INBOUND, for outbound java-proxy – MessageDirection.OUTBOUNB. MessageDirection class is located in standard SAP NWDS – XPI Adapter Libraries (com.sap.aii.af.ifc.filter.jar). When instance of MessageMonitor class is created there is going to be available a method using which we can create custom log entries in Audit Log – addLogEntry(AuditLogStatus logStatus, String logMsg). First parameter – log entry type(Success, Warning or Error), it can be done by using static fields of AuditLogStatus class such as: AuditLogStatus.SUCCESS, AuditLogStatus.WARNING or AuditLogStatus.ERROR. AuditLogStatus class also can be found in standard SAP NWDS – XPI Adapter Libraries (com.sap.aii.af.ifc.filter.jar). Second parameter – custom log entry text. Code from java-proxy and audit log after test message run example(fig.3): ProviderXIMessageContext context = ProviderXIMessageContext.getInstance(); String msgId = context.getRequestMessageID().toString(); MessageMonitor monitor = new MessageMonitor(msgId, MessageDirection.INBOUND); monitor.addLogEntry(AuditLogStatus.ERROR, "Its my custom Error message log"); monitor.addLogEntry(AuditLogStatus.WARNING, "Its my custom Warning message log"); monitor.addLogEntry(AuditLogStatus.SUCCESS, "Its my custom Success message log "); Fig. 3. Custom audit log entries example. Glad is this short article helped you with developing your own java-proxy and logging its message processing. Thanks for help to Ivan Mamontov. http://bit.ly/2hs9XWz #SAP #SAPCloud #AI
0 notes
Text
How to use JavaFX CSS? - tccicomputercoaching.com
CSS - Cascading Style Sheets, handles the look and feel part of a web page.CSS saves a lot of work. It can control the layout of multiple web pages all at once.
We can implement CSS in JavaFX like HTML.
In JavaFX you have the ability to create, modify, or use existing themes to skin your applications.

CSS files are bundled inside a jar application or they can reside on the local file system or a remote web server.
To load the CSS file from the classpath, call getClass().getResource("path/some_file.css").toExternalForm() method. It will find the CSS file and produce a URL String.
The following code loads the sample.css file as the current look and feel.
The sample.css file and Java class are in the same directory, so there is no need for a path in front of the file name.
Application.setUserAgentStylesheet(getClass().getResource("sample.css")
.toExternalForm());
TCCI Teach Java from Basic Introduction to Advance Level to the school students, Engineering Students, IT Professionals Online and Offline.
Call us @ 9825618292
Visit us @ www.tccicomputercoaching.com
#learn java Online in Ahmedabad#TCCI computer coaching#Online Engineering coaching#Online summer Batch#Online Excel course
0 notes
Text
What is the use of class in Java training course?
Java.long.Class is one of the most important classes in java, but mostly overlooked by Java developers. It is very useful in the sense that it provides several helper methods, such as getClass (), forName() , which you can use to find and load a class. Exltech is providing best Java training course in pune.
It also provides methods like class.newInstance () is the backbone of reflection and allows you to create an instance of a class without a new () operator. The class has no public constructor, and its instance is created by JVM when a class is loaded. The class class object is also used to represent classes, enum, interfaces, and annotations in a running Java application. The primitive types such as byte, short, char, int, float, double, and boolean are also represented by class instances.
You can use class literals, such as int, to use the appropriate class instance.Great float.Class, or boolean.Class. It is also used to represent an instance of the array in Java. Each array with the same type and dimension shares the same instance of the class class.
Another use of java.long.Class implements the equals () method to check whether two objects are of the same type or not.
Java.long.Class class in Java
Each time JVM creates an object, it also creates a java.long.Class object that describes the type of object. All instances of the same class share the same class object and you can obtain the class object by calling the object's getClass () method. By the way, this method is inherited from java.long.Object class.
For example, suppose you create two instances of the class named Person Z.
Person
A = new Person();
Person B = new Person();
if (A. getClass () = = B. getClass()){
System.from.println ("A and B are instances of the same class");
}else{
System.from.println ("A and B are instances of different classes");
}
In this case," A and B are instances of the same class " is printed because they are both instances of the Person class.
We need forName() and newInstance () because we often know the name of the class to instantiate while writing code,we can get it from config files, database, network or from any upstream Java or C++ application.
https://www.exltech.in/java-training.html
This is what we have called the reflective way of creating an object that is one of the most powerful features of Java and makes room for many frameworks ,such as Spring, Struts, which use Java reflection.
The object-oriented design principles are the core of OOP programming, but I have seen that most Java programmers hunt for design patterns such as Singleton pattern, Decorator pattern or Observer pattern and do not pay enough attention to Object-Oriented Analysis and design. It is important to learn the basics of object-oriented programming such as abstraction, encapsulation, polymorphism and inheritance. But at the same time it is equally important to know object-oriented design principles. They help you create a clean and modular design that would be easy to test, debug and wait in the future.
I have regularly seen Java programmers and developers of different levels of experience who have either never heard of these OOP and SOLID design principles or simply do not know what benefits a particular design principle offers and how to apply this design principle in coding.
To do my part, I have written down all the important object-oriented design principles and set it here for a quick reference. They give you at least an idea of what they are and what benefit they offer.
I don't have examples, only the article short, but you can find a lot of examples for these design principles in my blog, just use the search box at the top of the page.
If you can't understand a design principle, you should try to do more than one example, because sometimes we better connect with another example or author, but you need to understand these design principles and learn how to use it in your code.
Read more:
https://www.exltech.in/
0 notes
Link
Amazon Web Services (AWS) is a cloud services platform, providing compute power, database storage, content delivery, security options and other functionality to allow businesses to build sophisticated applications with increased flexibility, scalability and reliability. Amazon Elasticsearch is one of the services provided by AWS.
Amazon Elasticsearch Service, also called Amazon ES, is a managed service that makes it easy to create a domain, deploy, operate, and scale Elasticsearch clusters in the AWS Cloud. Elasticsearch is an open-source, highly scalable full-text search and analytics engine. In the previous blog, we have discussed how to access its API specific methods using High-level Rest Client.
With Amazon ES, you get direct access to the Elasticsearch APIs so that existing code and applications work seamlessly with the service.
Amazon ES offers a number of benefits :
Cluster scaling options
Supports Open-Source APIs and Tools
Self-healing clusters
Replication for high availability
Data durability
Enhanced security
Node monitoring
Tightly Integrated with Other AWS Services
Getting Started with Amazon Elasticsearch Service
Here are the steps to get started with Amazon ES and creating your own Elasticsearch cluster.
Step 1: Sign up for an AWS account. If you are not an AWS user, your first step is to create an AWS account. If you already have one, you are automatically signed up for Amazon ES. Your AWS account enables you to access Amazon ES and other AWS services. As with other AWS services, you pay only for the resources that you use. Look for the Elasticsearch service in the search box.
Step 2: Accessing Amazon Elasticsearch Service. You can access Amazon ES through the Amazon ES console, the AWS SDKs, or the AWS CLI. The Amazon ES console lets you create, configure, and monitor your domains. It is the easiest way to get started with Amazon ES.
Step 3: Create an Amazon ES domain. To get started using the service, you need to create an Amazon ES domain.
An Amazon ES domain is an Elasticsearch cluster in the AWS Cloud that has the compute and storage resources that you specify. For example, you can specify the number of instances, instance types, and storage options.
Step 4: Define domain. A domain is a collection of all the resources needed to run your Elasticsearch cluster.
Step 5: Configure cluster. You need to configure the instance and storage settings for your cluster based on the traffic, data, and availability requirements of your application. A cluster is a collection of one or more data nodes, optionally dedicated master nodes, and storage required to run Elasticsearch and operate your domain.
Step 6: Set up access. Next step is to configure your network and attach policies that let you control access to your domain.
Step 7: Done. Just Review and You are ready to go.
It takes up to ten minutes to initialize new domains. After your domain is initialized, you can upload data and make changes to the domain.
Because Elasticsearch uses a REST API to perform operations like index, update, search, get, delete, and many more. You can use standard clients like curl or any programming language that can send HTTP requests to your ES cluster.
A simple example to create an Index using Curl command on your Elasticsearch cluster :
curl -XPOST elasticsearch_domain_endpoint/user-index/user -d '{"id" : "1", "name": "user1", "age" : 20}' -H 'Content-Type: application/json'
where, elasticsearch_domain_endpoint is the endpoint of your cluster.
To check whether the document exists or not, you can perform the following curl operation :
curl -XGET elasticsearch_domain_endpoint/user-index/_search?pretty
Also, you can click on the Indices tab, to view all the indices created on your cluster, documents count and its mapping details.
Apart from that, you can use the Kibana endpoint. Kibana enables visual exploration and real-time analysis of your data in Elasticsearch. You can learn about it here.
In the next blog, we will look how we can authenticate access to Amazon ES cluster and how we can interact with it programmatically.
For more details on Amazon Elasticsearch Service, check its documentation here.
Happy Blogging.!!
0 notes
Photo

Kotlin From Scratch: Advanced Properties and Classes
Kotlin is a modern programming language that compiles to Java bytecode. It is free and open source, and promises to make coding for Android even more fun.
In the previous article, you learned about classes and objects in Kotlin. In this tutorial, we'll continue to learn more about properties and also look into advanced types of classes in Kotlin by exploring the following:
late-initialized properties
inline properties
extension properties
data, enum, nested, and sealed classes
1. Late-Initialized Properties
We can declare a non-null property in Kotlin as late-initialized. This means that a non-null property won't be initialized at declaration time with a value—actual initialization won't happen via any constructor—but instead, it will be late initialized by a method or dependency injection.
Let's look at an example to understand this unique property modifier.
class Presenter { private var repository: Repository? = null fun initRepository(repo: Repository): Unit { this.repository = repo } } class Repository { fun saveAmount(amount: Double) {} }
In the code above, we declared a mutable nullable repository property which is of type Repository—inside the class Presenter—and we then initialized this property to null during declaration. We have a method initRepository() in the Presenter class that reinitializes this property later with an actual Repository instance. Note that this property can also be assigned a value using a dependency injector like Dagger.
Now for us to invoke methods or properties on this repository property, we have to do a null check or use the safe call operator. Why? Because the repository property is of nullable type (Repository?). (If you need a refresher on nullability in Kotlin, kindly visit Nullability, Loops, and Conditions).
// Inside Presenter class fun save(amount: Double) { repository?.saveAmount(amount) }
To avoid having to do null checks every time we need to invoke a property's method, we can mark that property with the lateinit modifier—this means we have declared that property (which is an instance of another class) as late-initialized (meaning the property will be initialized later).
class Presenter { private lateinit var repository: Repository //... }
Now, as long as we wait until the property has been given a value, we're safe to access the property's methods without doing any null checks. The property initialization can happen either in a setter method or through dependency injection.
repository.saveAmount(amount)
Note that if we try to access methods of the property before it has been initialized, we will get a kotlin.UninitializedPropertyAccessException instead of a NullPointerException. In this case, the exception message will be "lateinit property repository has not been initialized".
Note also the following restrictions placed when delaying a property initialization with lateinit:
It must be mutable (declared with var).
The property type cannot be a primitive type—for example, Int, Double, Float, and so on.
The property cannot have a custom getter or setter.
2. Inline Properties
In Advanced Functions, I introduced the inline modifier for higher-order functions—this helps optimize any higher-order functions that accept a lambda as a parameter.
In Kotlin, we can also use this inline modifier on properties. Using this modifier will optimize access to the property.
Let's see a practical example.
class Student { val nickName: String get() { println("Nick name retrieved") return "koloCoder" } } fun main(args: Array<String>) { val student = Student() print(student.nickName) }
In the code above, we have a normal property, nickName, that doesn't have the inline modifier. If we decompile the code snippet, using the Show Kotlin Bytecode feature (if you're in IntelliJ IDEA or Android Studio, use Tools > Kotlin > Show Kotlin Bytecode), we'll see the following Java code:
public final class Student { @NotNull public final String getNickName() { String var1 = "Nick name retrieved"; System.out.println(var1); return "koloCoder"; } } public final class InlineFunctionKt { public static final void main(@NotNull String[] args) { Intrinsics.checkParameterIsNotNull(args, "args"); Student student = new Student(); String var2 = student.getNickName(); System.out.print(var2); } }
In the generated Java code above (some elements of the generated code were removed for brevity's sake), you can see that inside the main() method the compiler created a Student object, called the getNickName() method, and then printed its return value.
Let's now specify the property as inline instead, and compare the generated bytecode.
// ... inline val nickName: String // ...
We just insert the inline modifier before the variable modifier: var or val. Here's the bytecode generated for this inline property:
// ... public static final void main(@NotNull String[] args) { Intrinsics.checkParameterIsNotNull(args, "args"); Student student = new Student(); String var3 = "Nick name retrieved"; System.out.println(var3); String var2 = "koloCoder"; System.out.print(var2); } // ...
Again some code was removed, but the key thing to note is the main() method. The compiler has copied the property get() function body and pasted it into the call site (this mechanism is similar to inline functions).
Our code has been optimized because of no need to create an object and call the property getter method. But, as discussed in the inline functions post, we would have a larger bytecode than before—so use with caution.
Note also that this mechanism will work for properties that don't have a backing field (remember, a backing field is just a field that is used by properties when you want to modify or use that field data).
3. Extension Properties
In Advanced Functions I also discussed extension functions—these give us the ability to extend a class with new functionality without having to inherit from that class. Kotlin also provides a similar mechanism for properties, called extension properties.
val String.upperCaseFirstLetter: String get() = this.substring(0, 1).toUpperCase().plus(this.substring(1))
In the Advanced Functions post we defined a uppercaseFirstLetter() extension function with receiver type String. Here, we've converted it into a top-level extension property instead. Note that you have to define a getter method on your property for this to work.
So with this new knowledge about extension properties, you'll know that if you ever wished that a class should have a property that was not available, you are free to create an extension property of that class.
4. Data Classes
Let's start off with a typical Java class or POJO (Plain Old Java Object).
public class BlogPost { private final String title; private final URI url; private final String description; private final Date publishDate; //.. constructor not included for brevity's sake @Override public boolean equals(Object o) { if (this == o) return true; if (o == null || getClass() != o.getClass()) return false; BlogPost blogPost = (BlogPost) o; if (title != null ? !title.equals(blogPost.title) : blogPost.title != null) return false; if (url != null ? !url.equals(blogPost.url) : blogPost.url != null) return false; if (description != null ? !description.equals(blogPost.description) : blogPost.description != null) return false; return publishDate != null ? publishDate.equals(blogPost.publishDate) : blogPost.publishDate == null; } @Override public int hashCode() { int result = title != null ? title.hashCode() : 0; result = 31 * result + (url != null ? url.hashCode() : 0); result = 31 * result + (description != null ? description.hashCode() : 0); result = 31 * result + (publishDate != null ? publishDate.hashCode() : 0); return result; } @Override public String toString() { return "BlogPost{" + "title='" + title + '\'' + ", url=" + url + ", description='" + description + '\'' + ", publishDate=" + publishDate + '}'; } //.. setters and getters also ignored for brevity's sake }
As you can see, we need to explicitly code the class property accessors: the getter and setter, as well as hashcode, equals, and toString methods (though IntelliJ IDEA, Android Studio, or the AutoValue library can help us generate them). We see this kind of boilerplate code mostly in the data layer of a typical Java project. (I removed the field accessors and constructor for brevity's sake).
The cool thing is that the Kotlin team provided us with the data modifier for classes to eliminate writing these boilerplate.
Let's now write the preceding code in Kotlin instead.
data class BlogPost(var title: String, var url: URI, var description: String, var publishDate: Date)
Awesome! We just specify the data modifier before the class keyword to create a data class—just like what we did in our BlogPost Kotlin class above. Now the equals, hashcode, toString, copy, and multiple component methods will be created under the hood for us. Note that a data class can extend other classes (this is a new feature of Kotlin 1.1).
The equals Method
This method compares two objects for equality, and returns true if they're equal or false otherwise. In other words, it compares if the two class instances contain the same data.
student.equals(student3) // using the == in Kotlin student == student3 // same as using equals()
In Kotlin, using the equality operator == will call the equals method behind the scenes.
The hashCode Method
This method returns an integer value used for fast storage and retrieval of data stored in a hash-based collection data structure, for example in the HashMap and HashSet collection types.
The toString Method
This method returns a String representation of an object.
data class Person(var firstName: String, var lastName: String) val person = Person("Chike", "Mgbemena") println(person) // prints "Person(firstName=Chike, lastName=Mgbemena)"
By just calling the class instance, we get a string object returned to us—Kotlin calls the object toString() under the hood for us. But if we don't put the data keyword in, see what our object string representation would be:
com.chike.kotlin.classes.Person@2f0e140b
Much less informative!
The copy Method
This method allows us to create a new instance of an object with all the same property values. In other words, it creates a copy of the object.
val person1 = Person("Chike", "Mgbemena") println(person1) // Person(firstName=Chike, lastName=Mgbemena) val person2 = person1.copy() println(person2) // Person(firstName=Chike, lastName=Mgbemena)
One cool thing about the copy method in Kotlin is the ability to change properties during copying.
val person3 = person1.copy(lastName = "Onu") println(person3) //Person3(firstName=Chike, lastName=Onu)
If you're a Java coder, this method is similar to the clone() method you are already familiar with. But the Kotlin copy method has more powerful features.
Destructive Declaration
In the Person class, we also have two methods auto-generated for us by the compiler because of the data keyword placed in the class. These two methods are prefixed with "component", then followed by a number suffix: component1(), component2(). Each of these methods represents the individual properties of the type. Note that the suffix corresponds to the order of the properties declared in the primary constructor.
So, in our example calling component1() will return the first name, and calling component2() will return the last name.
println(person3.component1()) // Chike println(person3.component2()) // Onu
Calling the properties using this style is difficult to understand and read, though, so calling the property name explicitly is much better. However, these implicitly created properties do have a very useful purpose: they let us do a destructuring declaration, in which we can assign each component to a local variable.
val (firstName, lastName) = Person("Angelina", "Jolie") println(firstName + " " + lastName) // Angelina Jolie
What we have done here is to directly assign the first and second properties (firstName and lastName) of the Person type to the variables firstName and lastName respectively. I also discussed this mechanism knows as destructuring declaration in the last section of the Packages and Basic Functions post.
5. Nested Classes
In the More Fun With Functions post, I told you that Kotlin has support for local or nested functions—a function that is declared inside another function. Well, Kotlin also similarly supports nested classes—a class created inside another class.
class OuterClass { class NestedClass { fun nestedClassFunc() { } } }
We even call the nested class's public functions as seen below—a nested class in Kotlin is equivalent to a static nested class in Java. Note that nested classes can't store a reference to their outer class.
val nestedClass = OuterClass.NestedClass() nestedClass.nestedClassFunc()
We're also free to set the nested class as private—this means we can only create an instance of the NestedClass within the scope of the OuterClass.
Inner Class
Inner classes, on the other hand, can reference the outer class it was declared in. To create an inner class, we place the inner keyword before the class keyword in a nested class.
class OuterClass() { val oCPropt: String = "Yo" inner class InnerClass { fun innerClassFunc() { val outerClass = this@OuterClass print(outerClass.oCPropt) // prints "Yo" } } }
Here we reference the OuterClass from the InnerClass by using this@OuterClass.
6. Enum Classes
An enum type declares a set of constants represented by identifiers. This special kind of class is created by the keyword enum that is specified before the class keyword.
enum class Country { NIGERIA, GHANA, CANADA }
To retrieve an enum value based on its name (just like in Java), we do this:
Country.valueOf("NIGERIA")
Or we can use the Kotlin enumValueOf<T>() helper method to access constants in a generic way:
enumValueOf<Country>("NIGERIA")
Also, we can get all the values (like for a Java enum) like this:
Country.values()
Finally, we can use the Kotlin enumValues<T>() helper method to get all enum entries in a generic way:
enumValues<Country>()
This returns an array containing the enum entries.
Enum Constructors
Just like a normal class, the enum type can have its own constructor with properties associated to each enum constant.
enum class Country(val callingCode: Int) { NIGERIA (234), USA (1), GHANA (233) }
In the Country enum type primary constructor, we defined the immutable property callingCodes for each enum constant. In each of the constants, we passed an argument to the constructor.
We can then access the constants property like this:
val country = Country.NIGERIA print(country.callingCode) // 234
7. Sealed Classes
A sealed class in Kotlin is an abstract class (you never intend to create objects from it) which other classes can extend. These subclasses are defined inside the sealed class body—in the same file. Because all of these subclasses are defined inside the sealed class body, we can know all the possible subclasses by simply viewing the file.
Let's see a practical example.
// shape.kt sealed class Shape class Circle : Shape() class Triangle : Shape() class Rectangle: Shape()
To declare a class as sealed, we insert the sealed modifier before the class modifier in the class declaration header—in our case, we declared the Shape class as sealed. A sealed class is incomplete without its subclasses—just like a typical abstract class—so we have to declare the individual subclasses inside the same file (shape.kt in this case). Note that you can't define a subclass of a sealed class from another file.
In our code above, we have specified that the Shape class can be extended only by the classes Circle, Triangle, and Rectangle.
Sealed classes in Kotlin have the following additional rules:
We can add the modifier abstract to a sealed class, but this is redundant because sealed classes are abstract by default.
Sealed classes cannot have the open or final modifier.
We are also free to declare data classes and objects as subclasses to a sealed class (they still need to be declared in the same file).
Sealed classes are not allowed to have public constructors—their constructors are private by default.
Classes which extend subclasses of a sealed class can be placed either in the same file or another file. The sealed class subclass has to be marked with the open modifier (you'll learn more about inheritance in Kotlin in the next post).
// employee.kt sealed class Employee open class Artist : Employee() // musician.kt class Musician : Artist()
A sealed class and its subclasses are really handy in a when expression. For example:
fun whatIsIt(shape: Shape) = when (shape) { is Circle -> println("A circle") is Triangle -> println("A triangle") is Rectangle -> println("A rectangle") }
Here the compiler is smart to ensure we covered all possible when cases. That means there is no need to add the else clause.
If we were to do the following instead:
fun whatIsIt(shape: Shape) = when (shape) { is Circle -> println("A circle") is Triangle -> println("A triangle") }
The code wouldn't compile, because we have not included all possible cases. We'd have the following error:
Kotlin: 'when' expression must be exhaustive, add necessary 'is Rectangle' branch or 'else' branch instead.
So we could either include the is Rectangle case or include the else clause to complete the when expression.
Conclusion
In this tutorial, you learned more about classes in Kotlin. We covered the following about class properties:
late initialization
inline properties
extension properties
Also, you learned about some cool and advanced classes such as data, enum, nested, and sealed classes. In the next tutorial in the Kotlin From Scratch series, you'll be introduced to interfaces and inheritance in Kotlin. See you soon!
To learn more about the Kotlin language, I recommend visiting the Kotlin documentation. Or check out some of our other Android app development posts here on Envato Tuts!
Android SDK
Concurrency in RxJava 2
Chike Mgbemena
Android SDK
Sending Data With Retrofit 2 HTTP Client for Android
Chike Mgbemena
Android SDK
Java vs. Kotlin: Should You Be Using Kotlin for Android Development?
Jessica Thornsby
Android SDK
How to Create an Android Chat App Using Firebase
Ashraff Hathibelagal
by Chike Mgbemena via Envato Tuts+ Code http://ift.tt/2yKtcoo
0 notes
Text
Graph class in Java
This is a Graph class in java including methods for building and printing graphs.
package com.fakrudeen; import java.util.*; /** * A Graph class * Author: Fakrudeen Ali Ahmed * Date: 3 Sep 2017 */ public class Graph { private Map<Vertex, List<Vertex>> edges; private Map<Map.Entry<Vertex, Vertex>, Integer> edgeWeights; public Graph(Map<Vertex, List<Vertex>> edges) { this.edges = edges; } public Graph(Map<Vertex, List<Vertex>> edges, Map<Map.Entry<Vertex, Vertex>, Integer> edgeWeights) { this.edges = edges; this.edgeWeights = edgeWeights; } public Set<Vertex> vertices() { return edges.keySet(); } public List<Vertex> adjacencyList(Vertex v) { return edges.getOrDefault(v, null); } public int getWeight(Vertex source, Vertex destination) { if(null == edgeWeights) { // unweighted graph return (edges.get(source).contains(destination)? 1:Integer.MAX_VALUE); } return edgeWeights.getOrDefault(new AbstractMap.SimpleEntry<>(source, destination), Integer.MAX_VALUE); } @Override public String toString() { if(null == edgeWeights) { return "Graph{" + "edges=" + edges + '}'; } return "Graph{" + "edges=" + edges + ", edgeWeights=" + edgeWeights + '}'; } public static class Vertex { public int id; public int val; public Vertex(int id, int val) { this.id = id; this.val = val; } @Override public boolean equals(Object o) { if (this == o) return true; if (o == null || getClass() != o.getClass()) return false; Vertex vertex = (Vertex) o; return id == vertex.id; } @Override public int hashCode() { return id; } @Override public String toString() { return String.valueOf(id); } } public static Graph buildRandomGraph(boolean withWeights, boolean isUndirected) { int verticesCount = 10; int edgesCount = verticesCount*2; Map<Vertex, List<Vertex>> edges = new HashMap<>(); for(int i = 0; i < verticesCount; ++i) { edges.put(new Vertex(i, 1), new ArrayList<>()); } Random random1 = new Random(); Random random2 = new Random(); for(int i = 0; i < edgesCount; ++i) { int source = random1.nextInt(verticesCount); int destination = random2.nextInt(verticesCount); if(source != destination) { // avoid self loop addEdge(edges, source, destination); if(isUndirected) { addEdge(edges, destination, source); } } } if(!withWeights) { return new Graph(edges); } Random random3 = new Random(); Map<Map.Entry<Vertex, Vertex>, Integer> edgeWeights = new HashMap<>(); for(Vertex vertex:edges.keySet()) { List<Vertex> neighbors = edges.get(vertex); for(Vertex neighbor:neighbors) { int edgeWeight = random3.nextInt(edgesCount * 10); edgeWeights.put(new AbstractMap.SimpleEntry<>(vertex, neighbor), edgeWeight); if(isUndirected) { edgeWeights.put(new AbstractMap.SimpleEntry<>(neighbor, vertex), edgeWeight); } } } return new Graph(edges, edgeWeights); } private static void addEdge(Map<Vertex, List<Vertex>> edges, int source, int destination) { List<Vertex> neighbors = edges.get(new Vertex(source, 1)); Vertex destinationNode = new Vertex(destination, 1); if(!neighbors.contains(destinationNode)) { // avoid duplicate elements in adjacency list neighbors.add(destinationNode); } } }
0 notes
Text
Java Q/A Part XI
Java Q/A Part XI
1.How many methods in Object class? This question is not asked to test your memory. It tests you how well you know Java. Ten in total. clone() equals() & hashcode() getClass() finalize() wait() & notify() toString()
2.How does Java handle integer overflows and underflows? It uses low order bytes of the result that can fit into the size of the type allowed by the operation.
3.What is the numeric…
View On WordPress
0 notes
Text
Java : Class : The Object of Class
###Question1:
**Objects have compile type and run type**
For example:
Object obj = new java.util.Date();
compile type : Object
run type : java.util.Date();
Demand : Invoke the toLocaleString method in the java.util.Date class through the obj object.
obj.toLocaleString() : If the method exists, the compilation is successful; otherwise, the compilation fails.
Solution: Because the real type of obj is java.util.Date class, we can cast obj object into java.util.Date type.
java.util.Date date = (java.util.Date)obj;
date.toLocaleString();// Call succeeded
f you don't know the true type of obj, you can't force it (there is a method at the bottom that returns a java.util.Date Object of type object)
####Question2:
In object-oriented, everything can be regarded as an object, so the question comes, what kind of object is the transaction like class, and what kind of class should be used to represent the object like class?
Underlying code:
public static Object getObject(){
return new java.util.Date();
}
###metadata:
Description data of description data.
###Reflection:
The process of getting the metadata of a class-> at runtime, dynamically get the member information (constructor, method, field, internal class, interface, parent class, etc.) of a certain class, and describe each member of the class as a new class.
```
Class : Represents all classes
Construction : Represents all constructors
Method : Represents all methods
Field : Represents all fields
```
Class : Used to describe the type of class or interface, describe the class of class
Examples of Class classes : There are byte codes (.class) in JVM, and the class instance represents the class or interface in JVM (enumeration is a special class and annotation is a special interface).
When a program uses a java.util.Date Class for the first time, it will load the bytecode object of the class into the JVM and create a class object.
At this time, the Class object represents the bytecode of java.util.Date ..At this time, the Class object represents the bytecode of java.util.Date .
Class can represent n Classes as bytecode objects, so the question comes: how to distinguish class classes and which class bytecode is represented at this time?
**To solve this problem, the designer of Class class provides generics --> Class<T> **
>Byte code type of java.lang.String class : Class<java.lang.String>
>Byte code type of java.util.Date class : Class<java.util.Date>
>Byte code type of java.util.ArrayList class : Class<java.util.ArrayList>;
If you create a Class object, how do you represent a bytecode object? --> Requirements, get the bytecode object of java.util.Date class
####Mode1 : Use the class attribute
Class<java.util.Date> clz1 = java.util.Date.class;
####Mode2 : Get it through the getClass method of the Object, which is a method in the object class
java.util.Date date = new java.util.Date();
Class<?> clz2 = date.getClass();
####Mode3 : Through the static method forName in the Class class(String className)
Class<?> clz3 = class.forName("java.util.Date");
####Mode4 : Get through the class loader
ClassLoader classLoader = this.getClass().getClassLoader();
Class<?> clz4 = classLoader.loadClass("java.util.Date");
Note that there is only one bytecode object in the JVM for the same class, that is, the above claz1==clz2==clz3==clz4。
**Note: The third type will be used most frequently in the future, and it will be widely used in the framework.**
###Question3:
In the above, there are four ways to obtain Class objects. The basic data type cannot be expressed as an object, so it cannot use getClass. The basic data type has no concept of class name, and it cannot use Class.forName. How to express the bytecode object of the basic type?
**All data types have a class attribute**:
Class clz = dataType.class;
####Nine built-in Class instances: Class instances provided in advance in JVM are as followsbyte,short,int,long,float,double,boolean,char,void.
In the packaging classes of the eight basic data TYPEs, there is a constant: type. Used to return the bytecode object of the basic class corresponding to the wrapper class:
Integer.TYPE == int.class
----
System.out.println(Integer.class == int.class);//false
**Note: Integer and int are different data types.**
Class instance of array: array is a reference data type-> array is actually an object
###How to represent a Class instance of an array:
Mode1:arrayType.class;
Mode2:arrayObject.getClass();
**Note: All arrays with the same dimension and the same element type share the same bytecode object, which has nothing to do with elements.**
##Attached:
Class : All types are described, so the Class class should have the same methods for all types.
Object : Describe all objects, so there should be common methods for all objects in the Object class.
0 notes
Text
Creating custom Log Entries in Audit Log from Java Proxy
When developing custom java-proxy often enough there is a situation when you want to log actions/steps during java-proxy work. Usually methods of com.sap.tc.logging.Location class can be used for that purpose. Those allow you to log events which you can see in Log Viewer(view / developer trace, fig.1). Fig.1 Example of developer trace logs @ Log Viewer. Using that Log Viewer developer trace approach has its own downsides such as if your java-proxy works under relatively high load finding log entries for certain message could be challenging because Log Viewer search tool listing capabilities are limited with page scroll option. Besides, message monitoring becoming separated on two stages: first you have to check audit log in Message Monitor, and then or even at the same time – try to find (your java-proxy made) records for that message in Log Viewer. Obviously there is a question: is that possible to create log entries during java-proxy execution (work) not in Log Viewer but in Message Monitor? Seems convenient to be able to see all log entries at the same page default and custom created as well as being able to monitor messages right in Message Monitor. By default SAP provides tools necessary to create custom audit log entries, when developing custom communication channel modules. In this case you can use related classes of standard XPI Adapter Library included in SAP NWDS. But what if we want to use this tool to create log entries during java-proxy execution? To be able to do that we need to create AuditAccess object which have methods that can be used to create audit log entries. You can create this object using following code: AuditAccess auditAccess = PublicAPIAccessFactory.getPublicAPIAccess().getAuditAccess(); If we’ll just create this object and deploy java-proxy to a server, during test message processing we’ll be able to see following error in Log Viewer (fig.2). Fig.2 Log Viewer error. Looks like this way won’t work. While experimenting, I’ve been able to find at least one way to create log entries in Audit Log from java-proxy. By using java reflection mechanism I was able to get all classes and methods needed to create audit log entries. I’ve created separate java class contains addLogEntry() method which will allow to log information needed to monitor/analyze java-proxy message processing in Audit Log. Following class code can be used: import java.lang.reflect.Constructor; import java.lang.reflect.Field; import java.lang.reflect.InvocationTargetException; import java.lang.reflect.Method; import javax.naming.Context; import javax.naming.InitialContext; import javax.naming.NamingException; import com.sap.engine.interfaces.messaging.api.MessageDirection; import com.sap.engine.interfaces.messaging.api.auditlog.AuditLogStatus; public class MessageMonitor { private Method mtdAddAuditLogEntry; private Object objAuditAccess; private Class clsMessageKey; private Class clsLogStatus; private Object objMessageKey; public MessageMonitor(String msgId, MessageDirection msgDirection) throws NamingException, Instantia-tionException, IllegalAccessException, SecurityException, NoSuchMethodException, IllegalArgumentException, InvocationTargetException, NoSuchFieldException { Context context = new InitialContext(); Class clsAPIPublick = context.lookup("com.sap.engine.interfaces.messaging.api.public").getClass(); Object objAPIPublick = clsAPIPublick.newInstance(); Method mtdGetAuditAccess = clsAPIPublick.getDeclaredMethod("getAuditAccess"); objAuditAccess = mtdGetAuditAccess.invoke(objAPIPublick); Class clsAuditAccess = objAuditAccess.getClass(); for (Method mtd : clsAuditAccess.getMethods()) { for (Class cls : mtd.getParameterTypes()) { if (cls.getCanonicalName().equals("com.sap.engine.interfaces.messaging.api.MessageKey")) { clsMessageKey = cls; } else if (cls.getCanonicalName().equals("com.sap.engine.interfaces.messaging.api.auditlog.AuditLogStatus")) { clsLogStatus = cls; } } if (clsMessageKey != null && clsAuditAccess != null) break; } mtdAddAuditLogEntry = clsAuditAccess.getMethod("addAuditLogEntry", new Class[]{clsMessageKey, clsLogStatus, String.class}); Class clsMessageDirection = null; outer: for (Constructor cnstr : clsMessageKey.getConstructors()) { for (Class cls : cnstr.getParameterTypes()) { if (cls.getCanonicalName().equals("com.sap.engine.interfaces.messaging.api.MessageDirection")) { clsMessageDirection = cls; break outer; } } } Constructor cnstrMessageDirection = clsMessageKey.getConstructor(new Class[]{String.class, cls-MessageDirection}); Field fldMessageDirection = clsMessageDirection.getField(msgDirection.toString()); objMessageKey = cnstrMessageDirection.newInstance(new Object[]{new String(msgId), fldMes-sageDirection.get(clsMessageDirection)}); } public void addLogEntry(AuditLogStatus logStatus, String logMsg) throws SecurityException, NoSuchMe-thodException, NoSuchFieldException, IllegalArgumentException, IllegalAccessException, InvocationTargetException { Field fldLogStatus; if (logStatus.toString().equals("S")) { fldLogStatus = clsLogStatus.getField("SUCCESS"); } else if (logStatus.toString().equals("W")) { fldLogStatus = clsLogStatus.getField("WARNING"); } else { fldLogStatus = clsLogStatus.getField("ERROR"); } mtdAddAuditLogEntry.invoke(objAuditAccess, new Object[]{objMessageKey, fldLogSta-tus.get(clsLogStatus), new String(logMsg)}); } } To make this code actually work we need to perform several following steps. Create an instance of this class using constructor MessageMonitor(String msgId, MessageDirection msgDirection). First parameter – message id, second – message direction(inbound/outbound). To get message id in java-proxy we are going to use following classes: com.sap.engine.services.webservices.espbase.server.additions.xi.ProviderXIMessageContext located in standard SAP NWDS: SAP Java EE 5 Libraries (tc~je~webservices~lib.jar). com.sap.guid.IGUID can be found in sap.com~tc~bl~guidgenerator~impl.jar. You can also find it using file path: /usr/sap///j2ee/cluster/bin/core_lib/ After adding those classes to your project following code can be used to get message id during java-proxy work: ProviderXIMessageContext context = ProviderXIMessageContext.getInstance() String msgId = context.getRequestMessageID().toString(); To get message direction we can use MessageDirection class static fields: for inbound java-proxy – MessageDirection.INBOUND, for outbound java-proxy – MessageDirection.OUTBOUNB. MessageDirection class is located in standard SAP NWDS – XPI Adapter Libraries (com.sap.aii.af.ifc.filter.jar). When instance of MessageMonitor class is created there is going to be available a method using which we can create custom log entries in Audit Log – addLogEntry(AuditLogStatus logStatus, String logMsg). First parameter – log entry type(Success, Warning or Error), it can be done by using static fields of AuditLogStatus class such as: AuditLogStatus.SUCCESS, AuditLogStatus.WARNING or AuditLogStatus.ERROR. AuditLogStatus class also can be found in standard SAP NWDS – XPI Adapter Libraries (com.sap.aii.af.ifc.filter.jar). Second parameter – custom log entry text. Code from java-proxy and audit log after test message run example(fig.3): ProviderXIMessageContext context = ProviderXIMessageContext.getInstance(); String msgId = context.getRequestMessageID().toString(); MessageMonitor monitor = new MessageMonitor(msgId, MessageDirection.INBOUND); monitor.addLogEntry(AuditLogStatus.ERROR, "Its my custom Error message log"); monitor.addLogEntry(AuditLogStatus.WARNING, "Its my custom Warning message log"); monitor.addLogEntry(AuditLogStatus.SUCCESS, "Its my custom Success message log "); Fig. 3. Custom audit log entries example. Glad is this short article helped you with developing your own java-proxy and logging its message processing. Thanks for help to Ivan Mamontov. http://bit.ly/2hl2HvL #SAP #SAPCloud #AI
0 notes
Text
Creating custom Log Entries in Audit Log from Java Proxy
When developing custom java-proxy often enough there is a situation when you want to log actions/steps during java-proxy work. Usually methods of com.sap.tc.logging.Location class can be used for that purpose. Those allow you to log events which you can see in Log Viewer(view / developer trace, fig.1). Fig.1 Example of developer trace logs @ Log Viewer. Using that Log Viewer developer trace approach has its own downsides such as if your java-proxy works under relatively high load finding log entries for certain message could be challenging because Log Viewer search tool listing capabilities are limited with page scroll option. Besides, message monitoring becoming separated on two stages: first you have to check audit log in Message Monitor, and then or even at the same time – try to find (your java-proxy made) records for that message in Log Viewer. Obviously there is a question: is that possible to create log entries during java-proxy execution (work) not in Log Viewer but in Message Monitor? Seems convenient to be able to see all log entries at the same page default and custom created as well as being able to monitor messages right in Message Monitor. By default SAP provides tools necessary to create custom audit log entries, when developing custom communication channel modules. In this case you can use related classes of standard XPI Adapter Library included in SAP NWDS. But what if we want to use this tool to create log entries during java-proxy execution? To be able to do that we need to create AuditAccess object which have methods that can be used to create audit log entries. You can create this object using following code: AuditAccess auditAccess = PublicAPIAccessFactory.getPublicAPIAccess().getAuditAccess(); If we’ll just create this object and deploy java-proxy to a server, during test message processing we’ll be able to see following error in Log Viewer (fig.2). Fig.2 Log Viewer error. Looks like this way won’t work. While experimenting, I’ve been able to find at least one way to create log entries in Audit Log from java-proxy. By using java reflection mechanism I was able to get all classes and methods needed to create audit log entries. I’ve created separate java class contains addLogEntry() method which will allow to log information needed to monitor/analyze java-proxy message processing in Audit Log. Following class code can be used: import java.lang.reflect.Constructor; import java.lang.reflect.Field; import java.lang.reflect.InvocationTargetException; import java.lang.reflect.Method; import javax.naming.Context; import javax.naming.InitialContext; import javax.naming.NamingException; import com.sap.engine.interfaces.messaging.api.MessageDirection; import com.sap.engine.interfaces.messaging.api.auditlog.AuditLogStatus; public class MessageMonitor { private Method mtdAddAuditLogEntry; private Object objAuditAccess; private Class clsMessageKey; private Class clsLogStatus; private Object objMessageKey; public MessageMonitor(String msgId, MessageDirection msgDirection) throws NamingException, Instantia-tionException, IllegalAccessException, SecurityException, NoSuchMethodException, IllegalArgumentException, InvocationTargetException, NoSuchFieldException { Context context = new InitialContext(); Class clsAPIPublick = context.lookup("com.sap.engine.interfaces.messaging.api.public").getClass(); Object objAPIPublick = clsAPIPublick.newInstance(); Method mtdGetAuditAccess = clsAPIPublick.getDeclaredMethod("getAuditAccess"); objAuditAccess = mtdGetAuditAccess.invoke(objAPIPublick); Class clsAuditAccess = objAuditAccess.getClass(); for (Method mtd : clsAuditAccess.getMethods()) { for (Class cls : mtd.getParameterTypes()) { if (cls.getCanonicalName().equals("com.sap.engine.interfaces.messaging.api.MessageKey")) { clsMessageKey = cls; } else if (cls.getCanonicalName().equals("com.sap.engine.interfaces.messaging.api.auditlog.AuditLogStatus")) { clsLogStatus = cls; } } if (clsMessageKey != null && clsAuditAccess != null) break; } mtdAddAuditLogEntry = clsAuditAccess.getMethod("addAuditLogEntry", new Class[]{clsMessageKey, clsLogStatus, String.class}); Class clsMessageDirection = null; outer: for (Constructor cnstr : clsMessageKey.getConstructors()) { for (Class cls : cnstr.getParameterTypes()) { if (cls.getCanonicalName().equals("com.sap.engine.interfaces.messaging.api.MessageDirection")) { clsMessageDirection = cls; break outer; } } } Constructor cnstrMessageDirection = clsMessageKey.getConstructor(new Class[]{String.class, cls-MessageDirection}); Field fldMessageDirection = clsMessageDirection.getField(msgDirection.toString()); objMessageKey = cnstrMessageDirection.newInstance(new Object[]{new String(msgId), fldMes-sageDirection.get(clsMessageDirection)}); } public void addLogEntry(AuditLogStatus logStatus, String logMsg) throws SecurityException, NoSuchMe-thodException, NoSuchFieldException, IllegalArgumentException, IllegalAccessException, InvocationTargetException { Field fldLogStatus; if (logStatus.toString().equals("S")) { fldLogStatus = clsLogStatus.getField("SUCCESS"); } else if (logStatus.toString().equals("W")) { fldLogStatus = clsLogStatus.getField("WARNING"); } else { fldLogStatus = clsLogStatus.getField("ERROR"); } mtdAddAuditLogEntry.invoke(objAuditAccess, new Object[]{objMessageKey, fldLogSta-tus.get(clsLogStatus), new String(logMsg)}); } } To make this code actually work we need to perform several following steps. Create an instance of this class using constructor MessageMonitor(String msgId, MessageDirection msgDirection). First parameter – message id, second – message direction(inbound/outbound). To get message id in java-proxy we are going to use following classes: com.sap.engine.services.webservices.espbase.server.additions.xi.ProviderXIMessageContext located in standard SAP NWDS: SAP Java EE 5 Libraries (tc~je~webservices~lib.jar). com.sap.guid.IGUID can be found in sap.com~tc~bl~guidgenerator~impl.jar. You can also find it using file path: /usr/sap///j2ee/cluster/bin/core_lib/ After adding those classes to your project following code can be used to get message id during java-proxy work: ProviderXIMessageContext context = ProviderXIMessageContext.getInstance() String msgId = context.getRequestMessageID().toString(); To get message direction we can use MessageDirection class static fields: for inbound java-proxy – MessageDirection.INBOUND, for outbound java-proxy – MessageDirection.OUTBOUNB. MessageDirection class is located in standard SAP NWDS – XPI Adapter Libraries (com.sap.aii.af.ifc.filter.jar). When instance of MessageMonitor class is created there is going to be available a method using which we can create custom log entries in Audit Log – addLogEntry(AuditLogStatus logStatus, String logMsg). First parameter – log entry type(Success, Warning or Error), it can be done by using static fields of AuditLogStatus class such as: AuditLogStatus.SUCCESS, AuditLogStatus.WARNING or AuditLogStatus.ERROR. AuditLogStatus class also can be found in standard SAP NWDS – XPI Adapter Libraries (com.sap.aii.af.ifc.filter.jar). Second parameter – custom log entry text. Code from java-proxy and audit log after test message run example(fig.3): ProviderXIMessageContext context = ProviderXIMessageContext.getInstance(); String msgId = context.getRequestMessageID().toString(); MessageMonitor monitor = new MessageMonitor(msgId, MessageDirection.INBOUND); monitor.addLogEntry(AuditLogStatus.ERROR, "Its my custom Error message log"); monitor.addLogEntry(AuditLogStatus.WARNING, "Its my custom Warning message log"); monitor.addLogEntry(AuditLogStatus.SUCCESS, "Its my custom Success message log "); Fig. 3. Custom audit log entries example. Glad is this short article helped you with developing your own java-proxy and logging its message processing. Thanks for help to Ivan Mamontov. http://bit.ly/2yK7zEn #SAP #SAPCloud #AI
0 notes
Text
Introduction of JVM Architecture for java begineers
JVM(Java Virtual Machine) goes about as a run-time motor to run Java applications. JVM is the one that really calls the primary technique present in a java code. JVM is a piece of JRE(Java Runtime Environment).
In java training applications are called WORA (Write Once Run Anywhere). This implies a software engineer can create Java code on one framework and can anticipate that it will keep running on some other Java empowered framework with no alteration. This is all conceivable due to JVM.
When we gather a .java record, a .class file(contains byte-code) with a similar filename is produced by the Java compiler. This .class record goes into different advances when we run it. These means together depict the entire JVM.It is important to understand basic concept of JVM for java begineers
JVM mainly responsible for three activities.
Loading
Linking
Initialization
Loading :
The Class loader peruses the .class record, create the relating twofold information and spare it in strategy zone. For each .class document, JVM stores following data in technique territory.
Completely qualified name of the stacked class and its prompt parent class.
Regardless of whether .class document is identified with Class or Interface or Enum
Modifier, Variables and Method data and so on.
After loading.class file, JVM creates an object of type Class to represent this file in the heap memory. Please note that this object is of type Class predefined in java.lang package. This Class object can be used by the programmer for getting class level information like name of class, parent name, methods and variable information etc. To get this object reference we can use getClass() method of Object class.
Linking : Performs check, arrangement, and (alternatively) goals.
Check : It guarantees the rightness of .class record i.e. it check whether this record is legitimately organized and created by substantial compiler or not. On the off chance that check comes up short, we get run-time special case java.lang.VerifyError.
Readiness : JVM assigns memory for class factors and introducing the memory to default esteems.
Goals : It is the way toward supplanting representative references from the sort with direct references. It is finished via looking into technique region to find the referenced element.
Initialization: In this stage, every single static variable are doled out with their qualities characterized in the code and static block(if any). This is executed through and through in a class and from parent to youngster in class chain of importance.
As a rule, there are three class loaders :
Bootstrap class loader : Every JVM execution must have a bootstrap class loader, fit for stacking confided in classes. It loads center java API classes present in JAVA_HOME/jre/lib registry. This way is famously known as bootstrap way. It is actualized in local dialects like C, C++.
Expansion class loader : It is offspring of bootstrap class loader. It stacks the classes present in the augmentations registries JAVA_HOME/jre/lib/ext(Extension way) or some other registry indicated by the java.ext.dirs framework property. It is executed in java by the sun.misc.Launcher$ExtClassLoader class.
Framework/Application class loader : It is offspring of expansion class loader. It is dependable to stack classes from application class way. It inside utilizations Environment Variable which mapped to java.class.path. It is additionally executed in Java by the sun.misc.Launcher$AppClassLoader class.
Learn architecture of JVM is important in java training course
0 notes