#gitversion
Explore tagged Tumblr posts
Visit Tumblr Blog
Explore Tumblr blogs with no restrictions, modern design and the best experience.
Last Seen Tumblr Blogs


Fun Fact
In 2020, Tumblr had 29.4 million users in the US.
Photo

A Complete Introduction to cPanel Git Version Control In 2021
1 note
·
View note
Text
Gitversion azure devops
Gitversion azure devops Gitversion azure devops World news online Gitversion azure devops Loud & Abrasive If you blinked last year (or hiked the Appalachian trail) you may have missed Microsoft’s big continuous integration service redesign and rebranding; from Visual Studio Team Services to Azure DevOps. I’ve had the surprising pleasure to work extensively on the platform since returning;…

View On WordPress
0 notes
Text
New bug fixes and features - October 2022
Latest Updates - October 2022
Happy Halloween! Screwdriver team is pleased to announce our newest release which brings in new features and bug fixes across various components.
New Features
Add sorting on branch and status for Collections
Able to select timestamp format in user preferences
Click on User profile in upper right corner, select User Settings
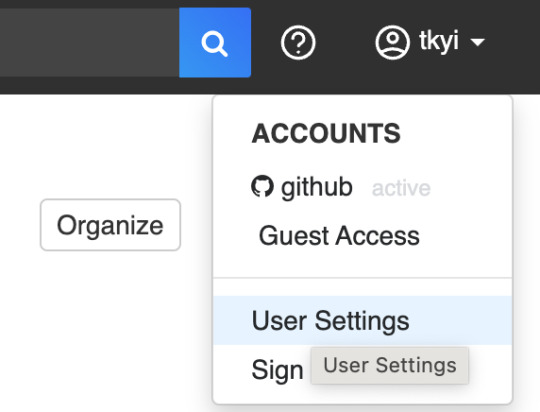
Select dropdown for Timestamp Format, pick preferred format

Click Save

Soft delete for child pipelines - still need to ask a Screwdriver admin to remove completely
Notify Screwdriver pipeline developers if pipeline is missing admin
Add audit log of operations performed on the Pipeline Options page - Screwdriver admins should see more information in API logs
API to reset user settings
Support Redis cluster connection
Add default event meta in launcher - set event.creator properly
New gitversion binary with multiple branch support - added homebrew formula and added parameter --merged (to consider only versions on the current branch)
Bug Fixes
UI
Show error message when unauthorized users change job state
Job state should be updated properly for delayed API response
Gray out the Restart button for jobs that are disabled
Modify toggle text to work in both directions
Display full pipeline name in Collections
Allow reset of Pipeline alias
Remove default pipeline alias name
Add tooltip for build history in Collections
API
Admins can sync on any pipeline
Refactor unzipArtifactsEnabled configuration
Check permissions before running startAll on child pipelines
ID schema for pipeline get latestBuild
Internals
Models
Refactor syncStages to fail early
Pull Request sync only returns PRs relevant to the pipeline
Add more logs to stage creation
Data-schema
Display JobNameLength in user settings
Remove old unique constraint for stages table
SCM GitHub
Get open pull requests - override the default limit (30) to return up to 100)
Change wget to curl for downloading sd-repo
Builds cannot be started if a pipeline has more than 5 invalid admins
Coverage-sonar
Use correct job name for PR with job scope
Queue-Service
Remove laabr
Launcher
Update Github link for grep
Update build status if SIGTERM is received - build status will be updated to Failure when soft evict. Then buildCluster-queue-worker can send a delete request to clean up the build pod
Compatibility List
In order to have these improvements, you will need these minimum versions:
API - v4.1.297
UI - v1.0.732
Store - v4.2.5
Queue-Service - v2.0.42
Launcher - v6.0.171
Build Cluster Worker - v2.24.3
Contributors
Thanks to the following contributors for making this feature possible:
Alan
Anusha
Kevin
Haruka
Ibuki
Masataka
Pritam
Sagar
Sheridan
Shota
Tiffany
Yoshiyuki
Yuki
Yuta
Questions and Suggestions
We’d love to hear from you. If you have any questions, please feel free to reach out here. You can also visit us on Github and Slack.
Author Tiffany Kyi, Sr Software Dev Engineer, Yahoo
0 notes
Text
KubeVirt technology enables you to manage virtual machines on Kubernetes. This solution addresses the need of running some bits of application that cannot be easily containerized in Virtual Machine on top of Kubernetes Cluster. This is helpful to Developers who have adopted or want to adopt Kubernetes but still have components of the application dependent on Virtual Machine. Teams with a reliance on existing virtual machine-based workloads are empowered to rapidly containerize applications. With virtualized workloads placed directly in development workflows, teams can decompose them over time while still leveraging remaining virtualized components as is comfortably desired. KubeVirt gives you a unified development platform where you can build, modify, and deploy applications residing in both Application Containers as well as Virtual Machines in a common, shared environment. As of today KubeVirt can be used to declaratively: Create a predefined VM Schedule a VM on a Kubernetes cluster Launch a VM Stop a VM Delete a VM In this tutorial we discuss the installation and use of KubeVirt on Minikube environment. Minikube is local Kubernetes which makes it easy to learn and develop for Kubernetes in your local machine – Personal Laptop or Home Desktop. KubeVirt is a We are a Cloud Native Computing Foundation sandbox project. Step 1: Install Minikube Start with the installation of Minikube using the commands below. Linux: wget https://storage.googleapis.com/minikube/releases/latest/minikube-linux-amd64 chmod +x minikube-linux-amd64 sudo mv minikube-linux-amd64 /usr/local/bin/minikube macOS: brew install minikube Windows: #Using winget $ winget install minikube # Using Chocolatey $ choco install minikube Check version of Minikube to confirm it is installed properly and working: $ minikube version minikube version: v1.19.0 commit: 15cede53bdc5fe242228853e737333b09d4336b5 The version output may vary depending on the time you’re running the commands. Refer to the official minikube guide for the installation on other systems. Step 2: Install kubectl Download kubectl command line tool to your system: curl -LO https://storage.googleapis.com/kubernetes-release/release/`curl -s https://storage.googleapis.com/kubernetes-release/release/stable.txt`/bin/linux/amd64/kubectl Make the kubectl binary executable. chmod +x ./kubectl Move the binary in to your PATH: sudo mv ./kubectl /usr/local/bin/kubectl Check version of kubectl installed. $ kubectl version -o json --client "clientVersion": "major": "1", "minor": "21", "gitVersion": "v1.21.0", "gitCommit": "cb303e613a121a29364f75cc67d3d580833a7479", "gitTreeState": "clean", "buildDate": "2021-04-08T16:31:21Z", "goVersion": "go1.16.1", "compiler": "gc", "platform": "linux/amd64" Step 3: Install Virtualization Platform of choice Depending on your system there are multiple options. The commonly used hypervisor is VirtualBox. Install VirtualBox on Debian Install VirtualBox on Ubuntu / Debian Install VirtualBox on Fedora Install VirtualBox on CentOS / RHEL 8 For KVM check below: How To run Minikube on KVM With everything set start Minikube instance: $ minikube start If minikube fails to start, see the drivers page for help setting up a compatible container or virtual-machine manager. Example output for macOS: 😄 minikube v1.19.0 on Darwin 11.2.3 ✨ Automatically selected the hyperkit driver. Other choices: vmware, parallels, virtualbox, ssh 💾 Downloading driver docker-machine-driver-hyperkit: > docker-machine-driver-hyper...: 65 B / 65 B [----------] 100.00% ? p/s 0s > docker-machine-driver-hyper...: 10.52 MiB / 10.52 MiB 100.00% 4.31 MiB p 🔑 The 'hyperkit' driver requires elevated permissions. The following commands will be executed: $ sudo chown root:wheel /Users/jkmutai/.minikube/bin/docker-machine-driver-hyperkit $ sudo chmod u+s /Users/jkmutai/.minikube/bin/docker-machine-driver-hyperkit
Password: 💿 Downloading VM boot image ... > minikube-v1.19.0.iso.sha256: 65 B / 65 B [-------------] 100.00% ? p/s 0s > minikube-v1.19.0.iso: 244.49 MiB / 244.49 MiB 100.00% 4.92 MiB p/s 49.90 👍 Starting control plane node minikube in cluster minikube 💾 Downloading Kubernetes v1.20.2 preload ... > preloaded-images-k8s-v10-v1...: 491.71 MiB / 491.71 MiB 100.00% 4.86 MiB 🔥 Creating hyperkit VM (CPUs=2, Memory=4000MB, Disk=20000MB) ... 🐳 Preparing Kubernetes v1.20.2 on Docker 20.10.4 ... ▪ Generating certificates and keys ... ▪ Booting up control plane ... ▪ Configuring RBAC rules ... 🔎 Verifying Kubernetes components... ▪ Using image gcr.io/k8s-minikube/storage-provisioner:v5 🌟 Enabled addons: default-storageclass, storage-provisioner 🏄 Done! kubectl is now configured to use "minikube" cluster and "default" namespace by default Step 4: Deploy KubeVirt KubeVirt can be installed using the KubeVirt operator, which manages the lifecycle of all the KubeVirt core components. The easiest installation method is from minikube addon: $ minikube addons enable kubevirt ▪ Using image bitnami/kubectl:1.17 🌟 The 'kubevirt' addon is enabled Check logs of the kubevirt-install-manager pod: $ kubectl logs pod/kubevirt-install-manager -n kube-system v0.40.0 namespace/kubevirt created customresourcedefinition.apiextensions.k8s.io/kubevirts.kubevirt.io created priorityclass.scheduling.k8s.io/kubevirt-cluster-critical created clusterrole.rbac.authorization.k8s.io/kubevirt.io:operator created serviceaccount/kubevirt-operator created role.rbac.authorization.k8s.io/kubevirt-operator created rolebinding.rbac.authorization.k8s.io/kubevirt-operator-rolebinding created clusterrole.rbac.authorization.k8s.io/kubevirt-operator created clusterrolebinding.rbac.authorization.k8s.io/kubevirt-operator created deployment.apps/virt-operator created use emulation configmap/kubevirt-config created kubevirt.kubevirt.io/kubevirt created Check deployment status: $ kubectl get kubevirt.kubevirt.io/kubevirt -n kubevirt -o=jsonpath=".status.phase" Deployed% By default KubeVirt will deploy 7 pods, 3 services, 1 daemonset, 3 deployment apps, 3 replica sets. $ kubectl get all -n kubevirt See below screenshot with actual command output. Install KubeVirt which provides an additional binary called virtctl for quick access to the serial and graphical ports of a VM and also handle start/stop operations. VERSION=$(kubectl get kubevirt.kubevirt.io/kubevirt -n kubevirt -o=jsonpath=".status.observedKubeVirtVersion") ARCH=$(uname -s | tr A-Z a-z)-$(uname -m | sed 's/x86_64/amd64/') || windows-amd64.exe echo $ARCH curl -L -o virtctl https://github.com/kubevirt/kubevirt/releases/download/$VERSION/virtctl-$VERSION-$ARCH chmod +x virtctl sudo install virtctl /usr/local/bin Validate installation: $ virtctl version Client Version: version.InfoGitVersion:"v0.40.0", GitCommit:"127736619519e6b914e75930fc467c672e766e42", GitTreeState:"clean", BuildDate:"2021-04-20T08:34:39Z", GoVersion:"go1.13.14", Compiler:"gc", Platform:"darwin/amd64" Server Version: version.InfoGitVersion:"v0.40.0-dirty", GitCommit:"127736619519e6b914e75930fc467c672e766e42", GitTreeState:"dirty", BuildDate:"2021-04-20T08:57:15Z", GoVersion:"go1.13.14", Compiler:"gc", Platform:"linux/amd64" Step 5: Using KubeVirt Now that you’ve installed KubeVirt in your Kubernetes Cluster powered by Minikube you can work through the labs to help you get acquainted with KubeVirt and how it can be used to create and deploy VMs with Kubernetes. Deploy test VM instance. wget https://raw.githubusercontent.com/kubevirt/kubevirt.github.io/master/labs/manifests/vm.yaml Apply manifest file $ kubectl apply -f vm.yaml virtualmachine.kubevirt.io/testvm created Run the command below to get a list of existing Virtual Machines and Status: $ kubectl get vms NAME AGE VOLUME testvm 76s Output in YAML format: $ kubectl get vms -o yaml testvm
To start a Virtual Machine you can use: $ virtctl start testvm VM testvm was scheduled to start Check the Virtual Machine status: $ kubectl get vmis NAME AGE PHASE IP NODENAME testvm 2m20s Running 172.17.0.11 minikube $ kubectl get vmis -o yaml testvm Connect to the serial console of the Cirros VM. Hit return / enter a few times and login with the displayed username and password. $ Virtctl console testvm Successfully connected to testvm console. The escape sequence is ^] login as 'cirros' user. default password: 'gocubsgo'. use 'sudo' for root. testvm login: Disconnect from the virtual machine console by typing: ctrl+]. Shutting down the VM: $ virtctl stop testvm VM testvm was scheduled to stop Delete the Virtual Machine: $ kubectl delete vm testvm virtualmachine.kubevirt.io "testvm" deleted Further readings: Second Lab “Experiment with CDI” – Shows how to use the Containerized Data Importer (CDI) to import a VM image into a Persistent Volume Claim (PVC) and then how to attach the PVC to a VM as a block device. The third lab is “KubeVirt upgrades”. This lab shows how easy and safe is to upgrade the KubeVirt installation with zero down-time.
0 notes
Text
DockerやKubernetesを使ってFaaS環境を構築できる「OpenFaaS」
from https://knowledge.sakura.ad.jp/15941/
ここ数年「FaaS」というサービス運用アーキテクチャが注目されている。しかし、FaaSではサービスを提供するプロバイダによって大きく仕様が異なり、相互運用性の面ではまだ課題があった。OpenFaaSはこういった課題を解決できる可能性があり、またオンプレミスでFaaSを利用したいという需要にも答えるものだ。今回はこのOpenFaaSの環境構築や、基本的な使い方を紹介する。
ロックインなしでFaaSを実現できる
前回記事では、ここ数年注目されているプラットフォームである「FaaS」について紹介した。FaaSは小規模なサービスを実装するには便利なプラットフォームだが、サービスを提供するプロバイダによって仕様が大きく異なる。そのため、利用するサービスの仕様に関する知識が必要なほか、もし利用するサービスを変えようとした場合、コードの修正も必要となる。
そういった背景で登場したのが、Dockerを使ったFaaSのような環境を目指す「OpenFaaS」というプラットフォームだ。OpenFaaSはオープンソースで開発されているFaaSプラットフォームで、リクエストに応じてコードを実行、状況に応じて自動的にインスタンスをスケールさせるといった、FaaSで実現される機能を実装している。
OpenFaaSはDockerやKubernetesが利用できる環境であればどこでも利用できるため、自前で管理するサーバー上だけでなく、各社のクラウドサービス上で利用することも可能だ。
ただ、OpenFaaSはあくまでコンテナ上でFaaS環境を構築するというものであり、そのためFaaSの特徴の1つである、コードを実行していない時間・リクエストを処理していないには課金されないというメリットは享受できない。とはいえ、開発コストの削減目的でFaaSを利用したい、という場合には十分実用的だろう。
OpenFaaSの構成
OpenFaaSは次の3つの要素から構成されている。
Function Watchdog
API Gateway / UI Portal
CLI
Function Watchdogは、処理を実行するプログラム(以下、「ファンクション」と呼ぶ)の起動・終了などの管理を行うコンポーネントだ。リクエストを受けるHTTPサーバーもここに含まれている。Function Watchdogはリクエストを受信すると、ファンクションを起動してリクエストに含まれた情報をファンクションに与える。ファンクションがそれを処理して何らかの結果を出力すると、レスポンスとしてリクエストの送信元にそれを返すようになっている。
API Gateway / UI Portalは、OpenFaaS自体の管理を行うコンポーネントだ。Webブラウザから操作できるユーザーインターフェイスと、このユーザーフェイスやコマンドラインインターフェイス(CLI)から各種操作を実行するために使われるAPIエンドポイントを提供する。そのほか、各種統計情報の管理や、クラスタ外からファンクションにリクエストを送信するために利用できるゲートウェイといった機能も提供する。統計情報の集積にはモニタリングツールであるPrometheusを使用している。
CLIはコマンドラインでOpenFaaSクラスタの管理をおこなったり、ファンクションのデプロイやビルドなどを実行したりするツールだ。必ずしも必須ではないが、これによってアプリケーション開発などを効率化できる。
OpenFaaSで利用できる言語
OpenFaaSではファンクションとのやり取りに標準入力および標準出力を利用できるため、さまざまな言語でファンクションを実装できる。また、PythonやGo言語など、特定の言語向けにコードのひな形をテンプレートから生成する機能も用意されている。
OpenFaaS環境を構築してみる
それでは、実際にOpenFaaS環境を構築してシンプルなファンクションを実行する例を紹介していこう。
前提となる環境
OpenFaaSは、KubernetesもしくはDocker Swarmクラスタ上で利用できる。要件としてはKubernetesを利用する場合はKubernetes 1.8もしくは1.9、Docker Swarmを利用する場合はDocker 17.06以降となっている。今回はFedora 28上でKubernetes 1.9.3を使って構築した環境を使って検証を行っている。Dockerのバージョンは1.13.1だ。
$ kubectl version Client Version: version.Info{Major:"1", Minor:"9", GitVersion:"v1.9.3", GitCommit:"d2835416544f298c919e2ead3be3d0864b52323b", GitTreeState:"archive", BuildDate:"2018-02-13T11:42:06Z", GoVersion:"go1.10rc2", Compiler:"gc", Platform:"linux/amd64"} Server Version: version.Info{Major:"1", Minor:"9", GitVersion:"v1.9.3", GitCommit:"d2835416544f298c919e2ead3be3d0864b52323b", GitTreeState:"archive", BuildDate:"2018-02-13T11:42:06Z", GoVersion:"go1.10rc2", Compiler:"gc", Platform:"linux/amd64"} $ docker -v Docker version 1.13.1, build c301b04-unsupported
また、Kubernetesクラスタ上でDNS(kube-dns)が利用できるよう設定されている必要がある。
さて、OpenFaaSを構成するコンポーネントはDocker上で動作するコンテナとして提供されており、Kubernetes上で動作させるための設定ファイルがGitHub上で公開されている。次のようにこのリポジトリをクローンし、含まれるYAMLファイルからデプロイを行えば良い。
$ git clone https://github.com/openfaas/faas-netes $ cd faas-netes $ kubectl apply -f ./namespaces.yml,./yaml
この場合、OpenFaaSのコンポーネントは「openfaas」というネームスペース上で動作するようになっている。
$ kubectl -n openfaas get deploy NAME DESIRED CURRENT UP-TO-DATE AVAILABLE AGE alertmanager 1 1 1 1 32m faas-netesd 1 1 1 1 32m gateway 1 1 1 1 32m nats 1 1 1 1 32m prometheus 1 1 1 1 32m queue-worker 1 1 1 1 32m
デプロイが完了すると、「gateway」コンポーネントが提供する「OpenFaaS Portal」にWebブラウザからアクセスできるようになる。OpenFaaS PortalはOpenFaaSの設定やファンクションの管理をWebブラウザから行えるユーザーインターフェイスだ。
デフォルトの設定では次のようにKubernetesのNodePort機能を利用して外部から31112番ポートでOpenFaaS PortalにアクセスできるようServiceが設定されている。
$ kubectl -n openfaas get svc NAME TYPE CLUSTER-IP EXTERNAL-IP PORT(S) AGE alertmanager ClusterIP 10.254.58.247 <none> 9093/TCP 1d faas-netesd ClusterIP 10.254.36.18 <none> 8080/TCP 1d gateway NodePort 10.254.49.118 <none> 8080:31112/TCP 1d nats ClusterIP 10.254.202.183 <none> 4222/TCP 1d prometheus NodePort 10.254.180.15 <none> 9090:31119/TCP 1d
実際に「https://<KubernetesクラスタノードのIPアドレス>:31112/」というURLにWebブラウザでアクセスすると、次のような画面が表示される(図1)。

図1 OpenFaaSの管理を行える「OpenFaaS Portal」
なお、デフォルトでは特に認証などによるアクセス制限は設けられていないため注意したい。外部から自由にアクセスできるサーバーで運用する場合は適宜アクセス制限などの対応が必要だろう。
ファンクションをデプロイする
OpenFaaS Portalの「Deploy New Function」リンクをクリックすると、新たにファンクションをデプロイできる。OpenFaaS Portalでは独自に作成したファンクションだけでなく、あらかじめ登録されているファンクションを選んでデプロイできる機能もある(図2)。

図2 「Deploy New Function」の「FROM STORE」タブでは登録されたファンクションを選んでデプロイできる
たとえば、ドメインやURLに対応するIPアドレスを返すファンクションである「nslookup」(「nslookup_faas」として公開されている)を選択して「DEPLOY」をクリックすると、このファンクションがデプロイされ、その稼動状況がOpenFaaS Portalから確認できるようになる(図3)。

図3 ファンクションをデプロイするとその状況がOpenFaaS Portal上に表示される
デプロイしたファンクションを削除するには、この画面で右上に表示されているゴミ箱アイコンをクリックすれば良い。
ちなみに、デプロイしたファンクションはKubernetes上では「openfaas-fn」というネームスペース上にdeployment(deploy)として作成される。
$ kubectl -n openfaas-fn get deploy NAME DESIRED CURRENT UP-TO-DATE AVAILABLE AGE nslookup 1 1 1 1 11m $ kubectl -n openfaas-fn get pod NAME READY STATUS RESTARTS AGE nslookup-758f6c8bd4-gqdxf 1/1 Running 0 11m
デプロイしたファンクションのテスト
OpenFaaS Portalでは、デプロイしたファンクションのテストも実行できる。OpenFaaS Portal上でデプロイしたファンクションを選択すると、「Invoke function」というフォームが表示されるので、ここで「Request body」に送信したいリクエストを入力して「INVOKE」ボタンをクリックすると、それがファンクションに送信され、その結果が「Response body」欄に表示される。
たとえば先ほどデプロイしたnslookupファンクションは、送信した文字列を引数としてnslookupコマンドを実行し、その結果を返すという動作を行う。「Request body」に適当なドメインを入力して「INVOKE」をクリックすると、nslookupを実行した結果が「Response body」欄に表示される(図4)。

図4 「nslookup」ファンクションのテスト結果
任意のHTTPクライアントからリクエストを送ることも可能だ。ファンクションをデプロイすると自動的にKubernetesのService(svc)が作成されるので、クラスタ内からはこのServiceのcluster-IP宛にリクエストを送れば良い。
たとえば先に紹介したnslookupファンクションの場合、次のようにServiceが作成されていた。この場合、「10.254.53.135」の「8080」番ポートにリクエストを送信すれば良い。
$ kubectl -n openfaas-fn get svc NAME TYPE CLUSTER-IP EXTERNAL-IP PORT(S) AGE nslookup ClusterIP 10.254.53.135 <none> 8080/TCP 13m
curlコマンドで次のようにしてリクエストを送信すると、OpenFaaS Portalで実行したのと同様の結果が返ってくる。
$ curl -X POST http://10.254.53.135:8080 -d "osdn.jp" Name: osdn.jp Address 1: 202.221.179.11 osdn.jp
Kubernetesクラスタ外からは「http://<KubernetesクラスタにアクセスできるIPアドレスもしくはホスト名>:31112/function/���ファンクション名>」というURLを使ってリクエストを送信できる。
$ curl -X POST http://<KubernetesクラスタにアクセスできるIPアドレスもしくはホスト名>:31112/function/nslookup -d "osdn.jp" Name: osdn.jp Address 1: 202.221.179.11 osdn.jp
CLIを使ってファンクションをデプロイする
OpenFaaSではコマンドラインからファンクションのデプロイなどを実行するためのCLI(Command Line Interface)である「faas-cli」も用意されている。このCLIはGitHubのリリースページで公開されているので、ここから利用するプラットフォームに対応するものをダウンロードし、必要に応じて実行権限を付けたりパスの通ったディレクトリにコピーすれば良い。
faas-cliコマンドでは、「faas-cli store list」コマンドで登録済みのファンクションを表示できる。
$ faas-cli store list FUNCTION DESCRIPTION Colorization Turn black and white photos to color ... Inception This is a forked version of the work ... Figlet OpenFaaS Figlet image. This repositor... NodeInfo Get info about the machine that you'r... Dockerhub Stats Golang function gives the count of re... Tesseract OCR This function brings OCR - Optical Ch... QR Code Generator - Go QR Code generator using Go Nmap Security Scanner Tool for network discovery and securi... YouTube Video Downloader Download YouTube videos as a function OpenFaaS Text-to-Speech Generate an MP3 of text using Google'... SSL/TLS cert info Returns SSL/TLS certificate informati... nslookup Uses nslookup to return any IP addres... mememachine Turn any image into a meme. Left-Pad left-pad on OpenFaaS Docker Image Manifest Query Query an image on the Docker Hub for ... SentimentAnalysis Python function provides a rating on ...
登録されているファンクションのデプロイは「faas-cli store deploy <ファンクション名>」コマンドで行える。このとき、「–gateway <ホスト名/IPアドレス>:<ポート番号>」でOpenFaas Portalにアクセスできるホスト/IPアドレスの情報を指定��る必要がある。
$ faas-cli store deploy nslookup --gateway <ホスト名/IPアドレス>:31112 Deployed. 202 Accepted. URL: http://<ホスト名/IPアドレス>:31112/function/nslookup
また、「faas-cli invoke <ファンクション名>」コマンドでファンクションをテストできる。このコマンドの標準入力に与えた値がファンクションに送信され、その結果が標準出力に表示される。たとえばnslookupファンクションを「osdn.jp」という文字列を与えて実行するには次のようにする。なお、この場合も「–gateway <ホスト名/IPアドレス>:<ポート番号>」でOpenFaas Portalにアクセスできるホスト/IPアドレスの情報を指定しておく。
$ echo osdn.jp | faas-cli invoke nslookup --gateway <ホスト名/IPアドレス>:31112 Name: osdn.jp Address 1: 202.221.179.11 osdn.jp
デプロイされたファンクションのリストは「faas-cli list」コマンドで確認できる。
$ ./faas-cli list --gateway <ホスト名/IPアドレス>:31112 Function Invocations Replicas nslookup 3 1
デプロイ済みファンクションの削除は「faas-cli remove <ファンクション名>」で行える。
$ ./faas-cli remove nslookup --gateway <ホスト名/IPアドレス>:31112 Deleting: nslookup. Removing old function.
ファンクションを作成する
続いては、OpenFaaSを使って独自のファンクションを作成する流れを紹介しよう。OpenFaaSでは、リクエストとレスポンスを管理するための「Watchdog」という仕組みが提供されている。
Watchdogは受け取ったHTTPリクエストのパースや実際に処理を実行するプログラムの起動、レスポンスの送信といった処理を実行するプログラムだ。Watchdogはプログラムの起動後、そのプログラムにHTTPリクエストとして受け取ったパラメータを送信し、続いてプログラムが出力したデータをHTTP��スポンスとして送信する。これによって開発者はデータの入出力だけに注力できるようになる。
ちなみに、OpenFaaSではDockerやKubernetesと同様、コンテナイメージ単位でファンクションを管理する。そのため、作成したファンクションをOpenFaaSに実際にデプロイするには処理を実行するプログラムをWatchdogとともに格納し、Watchdogがプログラムを呼び出せるよう適切に設定したコンテナイメージを作成する必要がある。
OpenFaaSのCLI(faas-cli)では、このコンテナイメージ作成に必要な設定ファイルを、テンプレートを使って自動作成する機能があるので、以下ではこの機能を使ってシンプルなファンクションを作成してみよう。
テンプレートの準備
faas-cliコマンドでテンプレート機能を利用するには、まず適当なディレクトリで「faas-cli template pull」コマンドを利用して最新のテンプレートをダウンロードする。このコマンドを実行すると、次のように作業ディレクトリ内に「template」というディレクトリが作成され、そこにテンプレートファイルが格納される。
$ faas-cli template pull Fetch templates from repository: https://github.com/openfaas/templates.git 2018/05/18 18:23:09 Attempting to expand templates from https://github.com/openfaas/templates.git 2018/05/18 18:23:10 Fetched 12 template(s) : [csharp dockerfile go go-armhf node node-arm64 node-armhf python python-armhf python3 python3-armhf ruby] from https://github.com/openfaas/templates.git $ ls template
続いて、「faas-cli new」コマンドを使ってテンプレートから設定ファイルなどのひな形を作成する。このとき、「–lang <言語名>」オプションで使用する言語を指定する必要がある。指定で��る言語は「faas-cli new –list」コマンドで確認できる。
$ faas-cli new --list Languages available as templates: - csharp - dockerfile - go - go-armhf - node - node-arm64 - node-armhf - python - python-armhf - python3 - python3-armhf - ruby
なお、サポートされている言語について詳しくはOpenFaaSのドキュメントにまとめられているので、そちらも参照して欲しい。
コマンドを実行するファンクションを作成する
それでは、まずはシンプルなファンクションの例として、与えられた入力をsortコマンドでソートして返す、というファンクションを作成してみよう。このようにコマンドを実行させてその結果を返すというファンクションを作成する場合、「–lang」オプションで「dockerfile」を指定すれば良い。また、ここでは作成するファンクション名を「sort」とした。
$ faas-cli new sort --lang dockerfile Folder: sort created. ___ _____ ____ / _ \ _ __ ___ _ __ | ___|_ _ __ _/ ___| | | | | '_ \ / _ \ '_ \| |_ / _` |/ _` \___ \ | |_| | |_) | __/ | | | _| (_| | (_| |___) | \___/| .__/ \___|_| |_|_| \__,_|\__,_|____/ |_| Function created in folder: sort Stack file written: sort.yml
コマンドを実行すると、作業ディレクトリ内に指定したファンクション名を持つディレクトリと、「<ファンクション名>.yml」というファイルが作成され、前者には指定したプログラミング言語でファンクションを実装するためのひな形となるファイルが格納される。
今回の例の場合、「sort」というディレクトリと「sort.yml」というファイルが作成される。sortディレクトリ内には「Dockerfile」ファイルが用意されており、ここに実行するコマンドなどの情報を記述したり、コンテナ内に追加するファイルなどを記述したりする。
今回はサンプルということで、標準入力に入力されたデータをソートして標準出力に出力する次のようなシェルスクリプト(sort.sh)をsortディレクトリ内に作成した。
#!/bin/sh cat - | sort
続いて、sortディレクトリ内のDockerfileを編集し、このsort.shスクリプトを作成するコンテナ内にコピーする処理と、実行するコマンドを指定する処理を追加する。次のリスト中、太字の部分が追加した部分だ。
FROM alpine:3.7 # 1. Use any image as your base image, or "scratch" # 2. Add fwatchdog binary via https://github.com/openfaas/faas/releases/ # 3. Then set fprocess to the process you want to invoke per request - i.e. "cat" or "my_binary" #ADD https://github.com/openfaas/faas/releases/download/0.8.0/fwatchdog /usr/bin #RUN chmod +x /usr/bin/fwatchdog RUN mkdir -p /home/app RUN apk --no-cache add curl \ && echo "Pulling watchdog binary from Github." \ && curl -sSL https://github.com/openfaas/faas/releases/download/0.8.0/fwatchdog > /usr/bin/fwatchdog \ && chmod +x /usr/bin/fwatchdog \ && cp /usr/bin/fwatchdog /home/app \ && apk del curl --no-cache ↓実行するスクリプトを追加する ADD sort.sh /home/app/sort.sh RUN chmod +x /home/app/sort.sh # Add non root user RUN addgroup -S app && adduser -S -g app app RUN chown app /home/app WORKDIR /home/app USER app # Populate example here - i.e. "cat", "sha512sum" or "node index.js" ↓fprocess環境変数で実行するコマンドを指定する #ENV fprocess="cat" ENV fprocess="/home/app/sort.sh # Set to true to see request in function logs ENV write_debug="false" HEALTHCHECK --interval=5s CMD [ -e /tmp/.lock ] || exit 1 CMD [ "fwatchdog" ]
続いて「faas-cli new」コマンドを実行したディレクトリ(sort.ymlファイルが存在するディレクトリ)で「faas-cli build」コマンドを実行すると、コンテナの作成が行われる。
$ ./faas-cli build -f ./sort.yml [0] > Building sort. Building: sort with Dockerfile. Please wait.. Sending build context to Docker daemon 4.096 kB Step 1/13 : FROM alpine:3.7 ---> 3fd9065eaf02 : : Removing intermediate container d334da38982f Successfully built 19a60337d628 Image: sort built. [0] < Building sort done. [0] worker done.
作成されたイメージをデプロイするには、これをKubernetesからアクセスできるコンテナイメージリポジトリにプッシュしておく必要がある。今回の例の場合、「sort」という名称でイメージが作成されているので、これに適切にタグを付けて「docker push」コマンドを実行する。なお、今回はパブリックリポジトリサービスであるDockerHub上を利用しているが、もしプライベートリポジトリを利用したい場合、Kubernetesからそのリポジトリにアクセスできるよう設定を行っておく必要がある。
↓「sort」という名前でイメージが作成されている $ docker images REPOSITORY TAG IMAGE ID CREATED SIZE sort latest 19a60337d628 11 minutes ago 13.1 MB ↓DockerHubにログインする $ docker login Login with your Docker ID to push and pull images from Docker Hub. If you don't have a Docker ID, head over to https://hub.docker.com to create one. Username: <ユーザー名> Password: <パスワード> Login Succeeded ↓タグを付けてプッシュする $ docker tag sort <ユーザー名>/sort $ docker push <ユーザー名>/sort The push refers to a repository [docker.io/<ユーザー名>/sort] 3e0c67c23573: Pushed 0c5d6e20706a: Pushed 2c4be372ef98: Pushed 6fe49c1140af: Pushed 4c20f56aa0ab: Pushed fc76639c0830: Pushed cd7100a72410: Mounted from library/alpine latest: digest: sha256:a01f080c597ef8fc8ba7e8c0ce1487e2c345357923242d7dfed09f270e89266f size: 1775
これでファンクションをデプロイするための準備は完了だ。OpenFaaS Portal、もしくはfaas_cliコマンドを使い、プッシュしたイメージを指定してファンクションをデプロイすれば良い(図5)

図5 OpenFaaS Portalの「Deploy A New Function」画面で「MANUALLY」を選択し、イメージとファンクション名を指定してデプロイする
デプロイの完了後、OpenFaaS Portal上から適当な文字列を与えてテストを実行してみると、レスポンスとして与えた文字列をソートした結果が返ってくることが確認できる(図6)。

図6 適当な文字列を与えて「INVOKE」を実行すると、与えた文字列がソートされて返ってくる
Pythonを使ってファンクションを作成する
OpenFaaSでは標準入出力経由でデータをやり取りするプログラムだけでなく、各言語に特化した形でデータをやり取りするプログラムを利用できる。続いては、Python(Python 3系)を使ってファンクションを作成してみよう。この場合、「faac-cli new」コマンドのオプションには「–lang python3」を指定すれば良い。
ここでは、入力として与えられた数値の平方根を返すファンクションを作成してみよう。ファンクション名は「sqrt」とする。この場合、次のようにfaas-cliコマンドを実行することになる。
$ ./faas-cli new sqrt --lang python3 Folder: sqrt created. ___ _____ ____ / _ \ _ __ ___ _ __ | ___|_ _ __ _/ ___| | | | | '_ \ / _ \ '_ \| |_ / _` |/ _` \___ \ | |_| | |_) | __/ | | | _| (_| | (_| |___) | \___/| .__/ \___|_| |_|_| \__,_|\__,_|____/ |_| Function created in folder: sqrt Stack file written: sqrt.yml
今回の例の場合、「sqrt」というディレクトリと「sqrt.yml」というファイルが作成される。ここで作成されたsqrtディレクトリ内にある「handler.py」に実際に処理する内容を記述すれば良い。また、「requirements.txt」にはファンクションの実行に必要なモジュール(pipモジュール)を記載しておく。ただし、今回は特に外部モジュールには依存しないため、この作業は省略している。
さて、自動生成されたhandler.pyファイルには、次のように「handle()」関数が実装されている。この関数の引数にはリクエストとして受け取ったパラメータが渡され、さらにこの関数の戻り値がレスポンスとして返されるようになっている。
def handle(req): """handle a request to the function Args: req (str): request body """ return req
今回はこのhandler.pyを次のように編集した。
import math def handle(req): """handle a request to the function Args: req (str): request body """ try: res = math.sqrt(float(str)) except ValueError: # 例外が発生したら「NaN」という文字列を返す return "NaN" return res
コードの実装が終わったら、あとは先ほどと同様に「faas-cli build」コマンドを実行してイメージを作成してリポジトリにプッシュする。
↓イメージを作成する $ ./faas-cli build -f ./sqrt.yml [0] > Building sqrt. Clearing temporary build folder: ./build/sqrt/ Preparing ./sqrt/ ./build/sqrt/function Building: sqrt with python3 template. Please wait.. Sending build context to Docker daemon 7.68 kB Step 1/20 : FROM python:3-alpine : : Successfully built cef01fcf930e Image: sqrt built. [0] < Building sqrt done. [0] worker done. ↓イメージにタグを付けてプッシュする $ docker tag sqrt hylom/sqrt $ docker push hylom/sqrt
以上でOpenFaaSへのデプロイが可能になる。デプロイしてOpenFaaS Portal上でテストしてみると、適切に動作していることが分かる(図7)。

図7 OpenFaaSにデプロイし、OpenFaaS上で適当な数値をリクエストとして送信してみると、その平方根が返される
OpenFaaSまとめ
このように、OpenFaaSではKubernetesクラスタ上で簡単にFaaSのような仕組みを実現できる。独自のファンクションを実装するのも容易で、とりあえずFaaSという仕組みを体験してみたい、という開発者にもおすすめできる。
ただし、OpenFaaSではGoogleやAmazonなどが提供するFaaSプラットフォームとは異なり、ファンクションをデプロイするとその時点でコンテナが作成される。プログラム自体はリクエストに応じて起動/終了されるのだが、たとえばKubernetesクラスタをクラウドサービス上で構築していた場合、このアーキテクチャでは「リクエスト数に応じた料金支払い」は実現できない。自前でプラットフォームを管理するためのコストもかかる。
また、注目されているプロジェクトではあるものの、最初のリリースが行われたのは2017年というまだ比較的歴史の浅いプロジェクトであり、十分な導入実績はまだ足りない状況だ。そのため、実運用での導入にはまだ注意したほうが良いだろう。
https://knowledge.sakura.ad.jp/wordpress/wp-content/uploads/2018/05/opfaas01-440x201.png
0 notes
Text
[Course] Continuous Integration and Continuous Deployment
If you’re exploring the DevOps practices of continuous integration and continuous deployment with Visual Studio Team Services (VSTS) and Microsoft Azure, don’t miss this abridged version of the more comprehensive course by the same name, Continuous Integration and Continuous Deployment, available on edX.org. Whether you’re an IT Professional interested in crossing over into development territory and establishing a DevOps culture or you’re a Developer who wants to learn more about the development processes of DevOps in order to extend upon agile processes for rapid delivery, get the basics in this course. Get a look at continuous integration builds, automated testing, and continuous delivery and deployment. Take build, test, and release to the next level by understanding how they function within a DevOps development environment. Plus, see how Visual Studio Team Services (VSTS) integrates with third party and OSS tools, such as Git and Jenkins. NOTE: Students who do not have extensive experience with VSTS or Microsoft Azure but who are curious about DevOps practices as a culture shift should be able to follow the procedural and expository explanations of continuous integration and continuous delivery. 1 | Continuous Integration and Continuous Deployment Learn the knowledge and skills you need to implement the DevOps practices of continuous integration and continuous deployment with Visual Studio Team Services (VSTS) and Microsoft Azure. Post-Course Survey Complete the post-course survey. Learn Configure Git and Team Foundation Version Control (TFVC) VC for continuous integration. See how to manage Technical Debt and its sources and impact. Learn how to create a continuous integration build using Visual Studio Team Services (VSTS). Explore package management integration options, such as NuGet, SemVer, GitVersion, and others. Get the details on agents and pipelines, including how to release pipelines. Learn about continuous delivery and release management strategies. Gain an understanding of the various availability and performance testing options. Learn about integrating automated testing into your release pipelines. Explore automated provisioning and de-provisioning of infrastructure and databases. Look at deployment groups, feature flags, and recovery automation. Hear about database deployment in release pipelines. Learn about continuous deployment with Jenkins and VSTS. Complete the post-course survey. source https://ttorial.com/continuous-integration-continuous-deployment
0 notes
Text
[Course] Continuous Integration and Continuous Deployment
If you’re exploring the DevOps practices of continuous integration and continuous deployment with Visual Studio Team Services (VSTS) and Microsoft Azure, don’t miss this abridged version of the more comprehensive course by the same name, Continuous Integration and Continuous Deployment, available on edX.org. Whether you’re an IT Professional interested in crossing over into development territory and establishing a DevOps culture or you’re a Developer who wants to learn more about the development processes of DevOps in order to extend upon agile processes for rapid delivery, get the basics in this course. Get a look at continuous integration builds, automated testing, and continuous delivery and deployment. Take build, test, and release to the next level by understanding how they function within a DevOps development environment. Plus, see how Visual Studio Team Services (VSTS) integrates with third party and OSS tools, such as Git and Jenkins. NOTE: Students who do not have extensive experience with VSTS or Microsoft Azure but who are curious about DevOps practices as a culture shift should be able to follow the procedural and expository explanations of continuous integration and continuous delivery. 1 | Continuous Integration and Continuous Deployment Learn the knowledge and skills you need to implement the DevOps practices of continuous integration and continuous deployment with Visual Studio Team Services (VSTS) and Microsoft Azure. Post-Course Survey Complete the post-course survey. Learn Configure Git and Team Foundation Version Control (TFVC) VC for continuous integration. See how to manage Technical Debt and its sources and impact. Learn how to create a continuous integration build using Visual Studio Team Services (VSTS). Explore package management integration options, such as NuGet, SemVer, GitVersion, and others. Get the details on agents and pipelines, including how to release pipelines. Learn about continuous delivery and release management strategies. Gain an understanding of the various availability and performance testing options. Learn about integrating automated testing into your release pipelines. Explore automated provisioning and de-provisioning of infrastructure and databases. Look at deployment groups, feature flags, and recovery automation. Hear about database deployment in release pipelines. Learn about continuous deployment with Jenkins and VSTS. Complete the post-course survey. Via https://ttorial.com/continuous-integration-continuous-deployment
source http://ttorialcom.weebly.com/blog/course-continuous-integration-and-continuous-deployment
0 notes
Text
Gitversion azure devops
Gitversion azure devops Gitversion azure devops Headlines Gitversion azure devops Rory Primrose Learn from my mistakes, you don’t have time to make them yourself Versioning C# projects in Azure DevOps build pipeline I’m a big fan of using GitVersion to calculate an application version based on git history. I’m also a big fan of the new csproj format because of its simplicity. GitVersion provides…

View On WordPress
0 notes
Text
[Course] Continuous Integration and Continuous Deployment
If you’re exploring the DevOps practices of continuous integration and continuous deployment with Visual Studio Team Services (VSTS) and Microsoft Azure, don’t miss this abridged version of the more comprehensive course by the same name, Continuous Integration and Continuous Deployment, available on edX.org. Whether you’re an IT Professional interested in crossing over into development territory and establishing a DevOps culture or you’re a Developer who wants to learn more about the development processes of DevOps in order to extend upon agile processes for rapid delivery, get the basics in this course. Get a look at continuous integration builds, automated testing, and continuous delivery and deployment. Take build, test, and release to the next level by understanding how they function within a DevOps development environment. Plus, see how Visual Studio Team Services (VSTS) integrates with third party and OSS tools, such as Git and Jenkins. NOTE: Students who do not have extensive experience with VSTS or Microsoft Azure but who are curious about DevOps practices as a culture shift should be able to follow the procedural and expository explanations of continuous integration and continuous delivery. 1 | Continuous Integration and Continuous Deployment Learn the knowledge and skills you need to implement the DevOps practices of continuous integration and continuous deployment with Visual Studio Team Services (VSTS) and Microsoft Azure. Post-Course Survey Complete the post-course survey. Learn Configure Git and Team Foundation Version Control (TFVC) VC for continuous integration. See how to manage Technical Debt and its sources and impact. Learn how to create a continuous integration build using Visual Studio Team Services (VSTS). Explore package management integration options, such as NuGet, SemVer, GitVersion, and others. Get the details on agents and pipelines, including how to release pipelines. Learn about continuous delivery and release management strategies. Gain an understanding of the various availability and performance testing options. Learn about integrating automated testing into your release pipelines. Explore automated provisioning and de-provisioning of infrastructure and databases. Look at deployment groups, feature flags, and recovery automation. Hear about database deployment in release pipelines. Learn about continuous deployment with Jenkins and VSTS. Complete the post-course survey. source https://ttorial.com/continuous-integration-continuous-deployment
0 notes
Text
This is an opinionated cheat sheet created to serve as a reference point for daily Kubernetes operations and administration done on the command line interface with kubectl. If you are preparing for CKA or CKAD exams, the cheat sheet contains commands that will hep you to quickly complete exam tasks. For exam preparation don’t rely entirely on this document but rather go through the course content with lots of practice. If you have that time saver kubectl command that we’ve missed out in this post don’t hesitate to drop it in the comments section. We’ll be happy to update the document any time. We’ll start with the helpful generic commands before covering task specific commands used in Administration and Applications deployment in Kubernetes or an OpenShift Cluster. Kubernetes installation guides: Deploy Kubernetes Cluster on Debian 10 with Kubespray Install Kubernetes Cluster on Ubuntu 20.04 with kubeadm Install Kubernetes Cluster on CentOS 7 with kubeadm Helpful commands for general use Below are some of the most helpful general use commands when working with Kubernetes. # Display Kubernetes API Server URL $ kubectl cluster-info # Dump all cluster information $ kubectl cluster-info dump # Get kubeadm config $ kubectl -n kube-system get configmap kubeadm-config -o yaml # List all nodes in the cluster $ kubectl get nodes # Check health of cluster components $ kubectl get componentstatuses $ kubectl get cs # List all API resources $ kubectl api-resources # List API versions $ kubectl api-versions 1. Install kubectl This is how to install kubectl on Linux and macOS: Linux curl -LO "https://storage.googleapis.com/kubernetes-release/release/$(curl -s https://storage.googleapis.com/kubernetes-release/release/stable.txt)/bin/linux/amd64/kubectl" chmod +x ./kubectl sudo mv ./kubectl /usr/local/bin/kubectl macOS: curl -LO "https://storage.googleapis.com/kubernetes-release/release/$(curl -s https://storage.googleapis.com/kubernetes-release/release/stable.txt)/bin/darwin/amd64/kubectl" chmod +x ./kubectl sudo mv ./kubectl /usr/local/bin/kubectl Confirm installation by checking version: $ kubectl version --client Client Version: version.InfoMajor:"1", Minor:"19", GitVersion:"v1.19.3", GitCommit:"1e11e4a2108024935ecfcb2912226cedeafd99df", GitTreeState:"clean", BuildDate:"2020-10-14T12:50:19Z", GoVersion:"go1.15.2", Compiler:"gc", Platform:"darwin/amd64" 2. Enable Bash Completion By default Bash completion is not enabled after installation of kubectl command. Enable it with the commands below. Bash: echo 'source ~/.zshrc source ~/.zshrc 3. List and Switch context A context is a group of access parameters. Each context contains a Kubernetes cluster, a user, and a namespace. Listing contexts: kubectl config get-contexts Switch between clusters by setting the current-context in a kubeconfig file: $ kubectl config use-context Set a context entry in kubeconfig: kubectl config set-context If you want to change namespace preference use: kubectl config set-context --namespace= See current context: kubectl config current-context 4. Validate manifest yaml file syntax If you’ve created a deployment yaml file and would like to validate the syntax, use the command: kubectl create --dry-run --validate -f .yaml Example: $ kubectl create --dry-run=client --validate -f hello-world.yml pod/hello-world created (dry run) If there is a syntax errors you’ll get from output: error: error parsing hello-world.yml: error converting YAML to JSON: yaml: line 12: did not find expected '-' indicator 5. Drain a node while removing local data A node can be drained and the local data used by running containers cleared as well. For this the command syntax is: kubectl drain --ignore-daemonsets=true --delete-local-data=true To force drain you can add the --force flag though this is not recommended. 6. Apply yaml files and folders You can use apply argument to apply a configuration to a resource by filename or stdin. The command syntax is:
kubectl apply -f .yaml # Or for json: kubectl apply -f .json For folder with a number of yaml fils, use: kubectl apply -R -f . # If files are in current working directory With absolute path: kubectl apply -R -f /path/to/yaml/files 7. Create time saving aliases You can also create some aliases that make your command line usage much faster. $ vim ~/.bashrc # kubectl alias alias k='kubectl' # Create resources alias kcf='kubectl create -f' alias kaf='kubectl apply -f' # List resources alias kgp='kubectl get pods' alias kgpa='kubectl get pods --all-namespaces' alias kgd='kubectl get deployments' alias kgs='kubectl get service' alias kgh='kubectl get hpa' # Delete resources alias kd='kubectl delete' alias kdp='kubectl delete pods' alias kdd='kubectl delete deployments' alias kgs='kubectl delete service' 8. Start a temporary pod that dies on exit You can quickly create a temporary pod with shell session for testing purposes that is destroyed once you exit. kubectl run --rm -it --image= -- sh Example: $ kubectl run --rm -it --image=alpine alpine -- sh If you don't see a command prompt, try pressing enter. / # apk update fetch http://dl-cdn.alpinelinux.org/alpine/v3.12/main/x86_64/APKINDEX.tar.gz fetch http://dl-cdn.alpinelinux.org/alpine/v3.12/community/x86_64/APKINDEX.tar.gz v3.12.1-82-g0e1cfdcae4 [http://dl-cdn.alpinelinux.org/alpine/v3.12/main] v3.12.1-85-gd70a46ae6d [http://dl-cdn.alpinelinux.org/alpine/v3.12/community] OK: 12747 distinct packages available / # apk add wget curl vim (1/12) Installing ca-certificates (20191127-r4) (2/12) Installing nghttp2-libs (1.41.0-r0) (3/12) Installing libcurl (7.69.1-r2) (4/12) Installing curl (7.69.1-r2) (5/12) Installing xxd (8.2.0735-r0) (6/12) Installing lua5.3-libs (5.3.5-r6) (7/12) Installing ncurses-terminfo-base (6.2_p20200523-r0) (8/12) Installing ncurses-libs (6.2_p20200523-r0) (9/12) Installing vim (8.2.0735-r0) (10/12) Installing libunistring (0.9.10-r0) (11/12) Installing libidn2 (2.3.0-r0) (12/12) Installing wget (1.20.3-r1) Executing busybox-1.31.1-r19.trigger Executing ca-certificates-20191127-r4.trigger OK: 39 MiB in 26 packages / # curl google.com 301 Moved 301 Moved The document has moved here. / # exit Session ended, resume using 'kubectl attach alpine -c alpine -i -t' command when the pod is running pod "alpine" deleted $ kubectl get pods NAME READY STATUS RESTARTS AGE alpine 0/1 Terminating 0 80s 9. Create a namespace A namespace is created with the command: kubectl create namespace Or kubectl create ns To switch to the namespace for all operations use: $ kubectl config get-contexts $ kubectl config set-context --namespace= Examples: $ kubectl create ns dev namespace/dev created $ kubectl get ns dev -o yaml apiVersion: v1 kind: Namespace metadata: creationTimestamp: "2020-12-10T08:19:10Z" managedFields: - apiVersion: v1 fieldsType: FieldsV1 fieldsV1: f:status: f:phase: manager: kubectl-create operation: Update time: "2020-12-10T08:19:10Z" name: dev resourceVersion: "592755" selfLink: /api/v1/namespaces/dev uid: 8cd5639a-85db-4c84-927d-344bdec9acba spec: finalizers: - kubernetes status: phase: Active 10. Run shell command in a Pod without tty Let’s create a pod that runs in the background. cat nginx-deployment.yml You can the modify the file and apply resource creations. $ kubectl apply -f nginx-deployment.yml deployment.apps/nginx created Check deployment. $ kubectl get deploy nginx NAME READY UP-TO-DATE AVAILABLE AGE nginx 3/3 3 3 37s List Pods matching Nginx. $ kubectl get pods -l app=nginx NAME READY STATUS RESTARTS AGE nginx-f89759699-6hcng 1/1 Running 0 70s nginx-f89759699-dvqhf 1/1 Running 0 70s nginx-f89759699-hgbtq 1/1 Running 0 70s
Remove deployment. $ kubectl delete deploy nginx deployment.apps "nginx" deleted 16. Expose Pod or Deployment on a Service Use kubectl expose command to make a deployment or Pods exposed on ClusterIP or NodePort. $ kubectl expose -h See example below. $ kubectl expose deployment nginx --port=80 --type=ClusterIP service/nginx exposed $ kubectl get svc nginx NAME TYPE CLUSTER-IP EXTERNAL-IP PORT(S) AGE nginx ClusterIP 172.20.29.63 80/TCP 17s Supported types for the service: ClusterIP, NodePort, LoadBalancer, or ExternalName. $ kubectl expose deployment nginx --port=80 --type=NodePort $ kubectl get svc nginx NAME TYPE CLUSTER-IP EXTERNAL-IP PORT(S) AGE nginx NodePort 172.20.32.97 80:30292/TCP 3s This other example creates a service for a pod redis, which serves on port 6379 with the name “redis” $ kubectl expose pod redis --port=6379 --name=redis You can also manually specify the Port exposed by the container(Application port). $ kubectl expose pod redis --type=ClusterIP --port=6379 --target-port=6379 17. Scale up pods in a deployment You can scale up the number of Pods in a deployment without editing any file. $ kubectl get deploy NAME READY UP-TO-DATE AVAILABLE AGE nginx 3/3 3 3 7h $ kubectl scale --replicas=4 deployment nginx deployment.apps/nginx scaled $ kubectl get deploy NAME READY UP-TO-DATE AVAILABLE AGE nginx 4/4 4 4 7h3m $ kubectl get pods -l app=nginx NAME READY STATUS RESTARTS AGE nginx-f89759699-7x7q7 1/1 Running 0 2m21s nginx-f89759699-jz9cj 1/1 Running 0 7h3m nginx-f89759699-nm2nk 1/1 Running 0 7h3m nginx-f89759699-ppdzr 1/1 Running 0 7h3m $ kubectl scale --replicas=3 deployment nginx deployment.apps/nginx scaled $ kubectl get deploy NAME READY UP-TO-DATE AVAILABLE AGE nginx 3/3 3 3 7h4m 18. Migrate all Pods in a node and make it Unschedulable Identify node to action on: $ kubectl get nodes Next, tell Kubernetes to drain the node: $ kubectl drain You may need to ignore daemonsets and delete local container data. $ kubectl drain --delete-local-data --ignore-daemonsets Tell Kubernetes to stop scheduling new pods onto the node: $ kubectl cordon To resume scheduling on the node use command: $ kubectl uncordon 19. Create Multiple containers in a Pod First generate Pod manifest file. We’ll create pod called mypod with ubuntu image. kubectl run mypod --image=nginx --restart=Never --dry-run=client -o yaml >mypod.yaml Edit the file and add other containers to the named Pod. $ vim mypod.yaml apiVersion: v1 kind: Pod metadata: creationTimestamp: null labels: run: mypod name: mypod spec: containers: - image: nginx name: nginx - image: redis name: redis dnsPolicy: ClusterFirst restartPolicy: Never status: We’ve added two containers – nginx and redis. To apply configurations run the command: $ kubectl apply -f mypod.yaml pod/mypod created Confirm the pod has two containers. $ kubectl get pod mypod NAME READY STATUS RESTARTS AGE mypod 2/2 Running 0 39s Clean up: $ kubectl delete -f mypod.yaml pod "mypod" deleted 20. Create Service Account, Role and Roledinding Create service called demo. $ kubectl create sa demo serviceaccount/demo created Create a role named demo that allows user to perform “get”, “watch” and “list” on pods,deploy,ds,rs,sts: $ kubectl create role demo --verb=get,list,watch --resource=pods,deploy,ds,rs,sts role.rbac.authorization.k8s.io/demo created # All verbs $ kubectl create clusterrole demo --verb='*' --resource=pods,deploy,ds,rs,sts # For cluster role $ kubectl create clusterrole demo --verb=get,list,watch --resource=pods,deploy,ds,rs,sts clusterrole.rbac.authorization.k8s.io/demo created
Create a RoleBinding for the demo role. $ kubectl create rolebinding demo --role=demo --user=demo rolebinding.rbac.authorization.k8s.io/demo created # For Cluster role $ kubectl create rolebinding demo --clusterrole==demo --user=demo # Clusterrole binding $ kubectl create clusterrolebinding demo-admin --clusterrole=demo --user=demo Confirm: $ kubectl get sa,role,rolebinding NAME SECRETS AGE serviceaccount/default 1 2d21h serviceaccount/demo 1 4m48s serviceaccount/newrelic 1 3h51m NAME CREATED AT role.rbac.authorization.k8s.io/demo 2020-12-10T19:09:01Z NAME ROLE AGE rolebinding.rbac.authorization.k8s.io/demo Role/demo 21s Validate: kubectl auth can-i create deployment --as demo # yes kubectl auth can-i '*' ds --as demo # yes Clean up: kubectl delete sa demo kubectl delete role demo kubectl delete clusterrole demo kubectl delete rolebinding demo 21. Get Logs on Pod(s) Get recent logs on a named Pod: $ kubectl get pods NAME READY STATUS RESTARTS AGE newrelic-infra-hp8dt 1/1 Running 0 3h57m newrelic-infra-r4bpg 1/1 Running 0 3h57m nginx-f89759699-jz9cj 1/1 Running 0 8h nginx-f89759699-nm2nk 1/1 Running 0 8h nginx-f89759699-ppdzr 1/1 Running 0 8h ubuntu 1/1 Running 0 10h $ kubectl logs newrelic-infra-r4bpg Follow logs stream in realtime. $ kubectl logs newrelic-infra-r4bpg -f Get recent logs from all Pods in a deployment: $ kubectl get deployments NAME READY UP-TO-DATE AVAILABLE AGE nginx 3/3 3 3 8h $ kubectl logs deploy/nginx $ kubectl logs deploy/nginx -f Use regex to extract logs. $ kubectl logs newrelic-infra-r4bpg | grep 'connect got id' time="2020-12-10T15:19:37Z" level=info msg="connect got id" agent-guid=MjU4Mjg0NXxJTkZSQXxOQXw0NDQ3ODMzNDM1Nzk0NDYyMjgx agent-id=4447833435794462281 component=IdentityConnectService Write output to a file: $ kubectl logs newrelic-infra-r4bpg | grep 'connect got id' > logs.txt Print the logs for the previous instance of the container in a pod if it exists kubectl logs --previous 22. Get top pods Get top resource utilization pods. $ kubectl top pod Get top pods with high cpu utilization: $ kubectl top pod --sort-by='cpu' Filter using labels. $ kubectl top pod -l 'app=nginx' --sort-by='cpu' NAME CPU(cores) MEMORY(bytes) nginx-f89759699-jz9cj 0m 2Mi nginx-f89759699-nm2nk 0m 2Mi nginx-f89759699-ppdzr 0m 2Mi Get only one pod with highest CPU usage and write output to file. $ kubectl top pod -l 'app=nginx' --sort-by='cpu' | awk 'NR==2print $1' $ kubectl top pod -l 'app=nginx' --sort-by='cpu' | awk 'NR==2print $1' >top_cpu.txt 23. Roll out and roll back deployment Deploy Nginx container. $ kubectl create deploy web --replicas=2 --image=nginx:1.13.2 deployment.apps/web created $ kubectl get deploy web NAME READY UP-TO-DATE AVAILABLE AGE web 2/2 2 2 16s Update deployment to use nginx image version 1.14.2 # Syntax: $ kubectl set image CONTAINER_NAME_1=CONTAINER_IMAGE_1 ... CONTAINER_NAME_N=CONTAINER_IMAGE_N $ kubectl set image deployment web nginx=nginx:1.14.2 --record deployment.apps/web image updated Check rollout status $ kubectl rollout status deployment/web deployment "web" successfully rolled out View the rollout history of a deployment: $ kubectl rollout history deployment/web deployment.apps/web REVISION CHANGE-CAUSE 1 kubectl set image deployment web nginx=nginx:1.14.2 --record=true Rollback to the previous deployment: $ kubectl rollout undo deployment web deployment.apps/web rolled back Rolling out to particular revision $ kubectl rollout undo deployment/web --to-revision=3
24. Label Node and Assign Pods to Nodes How to add labels to a Node. $ kubectl label nodes = Example: kubectl label nodes k8snode01 disktype=ssd You can then assign Pods to the Nodes. spec: containers: - name: nginx image: nginx imagePullPolicy: IfNotPresent nodeSelector: disktype: ssd 25. Copy files to and from Pods The kubectl cp commands can be used to copy files into a Pod or from Pods. $ kubectl cp --help In this example we’ll copy files from a Pod to our local system. $ kubectl exec -ti mypod1 -- ls bin boot dev dump_ops_in_flight.txt etc home lib lib64 lost+found media mnt opt proc root run sbin session_ls.txt srv sys tmp usr var $ kubectl cp mypod1:/dump_ops_in_flight.txt dump_ops_in_flight.txt tar: Removing leading `/' from member names $ kubectl cp mypod1:/dump_ops_in_flight.txt session_ls.txt tar: Removing leading `/' from member names Let’s confirm the two files copied are available locally. $ file dump_ops_in_flight.txt session_ls.txt dump_ops_in_flight.txt: ASCII text session_ls.txt: ASCII text Copy file to the Pod. $ kubectl cp myfile.txt mypod1:/myfile.txt $ kubectl exec -ti mypod1 -- ls README.md bin boot dev dump_ops_in_flight.txt etc home lib lib64 lost+found media mnt opt proc root run sbin session_ls.txt srv sys tmp usr var For more examples check the help page. 26. DNS Debugging Run DNS Utils Pod: kubectl apply -f https://k8s.io/examples/admin/dns/dnsutils.yaml Confirm pod is running: kubectl get pods dnsutils Running nslookup: kubectl exec -i -t dnsutils -- nslookup Or gain shell access kubectl exec -i -t dnsutils -- sh Checking Local DNS configuration settings: kubectl exec -ti dnsutils -- cat /etc/resolv.conf Checking if DNS Pods are running: $ kubectl get pods --namespace=kube-system -l k8s-app=kube-dns NAME READY STATUS RESTARTS AGE coredns-5c59fd465f-777cw 1/1 Running 0 29m coredns-5c59fd465f-bwpj4 1/1 Running 0 29m coredns-5c59fd465f-sdndq 1/1 Running 0 29m coredns-5c59fd465f-wldl9 1/1 Running 0 29m Verify DNS endpoints are exposed: kubectl get endpoints kube-dns --namespace=kube-system
0 notes
Text
Azure devops gitversion
Azure devops gitversion Azure devops gitversion Latestnews Azure devops gitversion Super Simple Git Tagging & Releases in Azure DevOps I am going to be honest with all of you, I never really understood Git tags and releases inside of GitHub. In my old TFVC days I would just create a branch with the name of the release and call that my “tag” so I could always go back to it. What sparked my…

View On WordPress
0 notes
Text
Azure devops gitversion
Azure devops gitversion Azure devops gitversion Latest national news in english Azure devops gitversion Azure DevOps or TFS Build Pipeline SetupUsage Basic Usage In Azure DevOps Pipeline (the web based build system) you can call GitVersion either using the Command Line build step or install an extension / custom build step. The custom build step requires a one-time setup to import the GitVersion…

View On WordPress
0 notes
Text
Minikube is a tool developed to help you run a single cluster of Kubernetes on your local machine. Minikube works by starting a single node kubernetes cluster locally for purposes of development and testing. It packages and configures a Linux VM, Docker and all Kubernetes components, optimized for local development. In this guide you’ll learn to run Minikube on KVM Virtualization environment. Similar: Deploy Production Kubernetes Cluster with Ansible & Kubespray How To run Local Kubernetes clusters in Docker Deploy Lightweight Kubernetes with MicroK8s and Snap Minikube supports Kubernetes features such as: NS NodePorts ConfigMaps and Secrets Dashboards Container Runtime: Docker, CRI-O, and containerd Enabling CNI (Container Network Interface) Ingress PersistentVolumes of type hostPath Most Minikube setups available online are for VirtualBox as a hypervisor for the VM. If you’re a frequent visitor of my blog, you must have noticed I’m a big fan of KVM. So this guide is for those who want to run Minikube but on KVM. For VirtualBox users, follow the guide How to Install Minikube on Ubuntu Setup Requirements To run Minikube on KVM, you need to install some libraries and drivers required for communication with the Virtualization layer. These are: Docker machine – This is a tool that lets you install Docker Engine on virtual hosts, and manage the hosts with docker-machine commands Docker Machine KVM2: This is a plugin driver for docker-machine on KVM. Qemu and Libvirt – Hypervisor and Virtualization API Library Minikube and kubectl Step 1: Installing KVM – Libvirt and Qemu Refer to our guide in the link below: Install KVM on CentOS 7 / Ubuntu / Debian / SLES / Arch Linux Step 2: Install Docker-machine Installation of docker machine will vary from one distribution to another. But when you have docker community repository added to your System, you can install docker-machine from OS package manager. Our guide on installing Docker has a step of adding the repository: How to install Docker CE on Ubuntu / Debian / Fedora / Arch / CentOS You can also take a look at Official Docker machine page. Step 3: Download Minikube You need to download the minikube binary. I will put the binary under /usr/local/bin directory since it is inside $PATH. wget https://storage.googleapis.com/minikube/releases/latest/minikube-linux-amd64 chmod +x minikube-linux-amd64 sudo mv minikube-linux-amd64 /usr/local/bin/minikube Check version installed. $ minikube version minikube version: v1.19.0 commit: 15cede53bdc5fe242228853e737333b09d4336b5 For Arch Linux users, you can install minikube from AUR: $ yaourt -Sy minikube-bin Step 4: Install kubectl We need kubectl which is a command-line tool used to deploy and manage applications on Kubernetes. curl -LO https://storage.googleapis.com/kubernetes-release/release/`curl -s https://storage.googleapis.com/kubernetes-release/release/stable.txt`/bin/linux/amd64/kubectl Give the file executable bit and move to a location in your PATH. chmod +x kubectl sudo mv kubectl /usr/local/bin/ kubectl version -o json Confirm the version of kubectl installed. $ kubectl version -o json --client "clientVersion": "major": "1", "minor": "21", "gitVersion": "v1.21.0", "gitCommit": "cb303e613a121a29364f75cc67d3d580833a7479", "gitTreeState": "clean", "buildDate": "2021-04-08T16:31:21Z", "goVersion": "go1.16.1", "compiler": "gc", "platform": "linux/amd64" For Arch Linux users, you can also install this from AUR: $ yaourt -Sy kubectl-bin $ kubectl version Step 5: Install Docker Machine KVM driver The last item to install is the Docker machine driver for KVM. Download the binary and make it executable. curl -LO https://storage.googleapis.com/minikube/releases/latest/docker-machine-driver-kvm2 chmod +x docker-machine-driver-kvm2 sudo mv docker-machine-driver-kvm2 /usr/local/bin/
The package is available from AUR for Arch Linux users: yaourt -Sy docker-machine-driver-kvm2 You can confirm version: $ docker-machine-driver-kvm2 version version: v1.19.0 commit: 15cede53bdc5fe242228853e737333b09d4336b5 Step 6: Starting Minikube on KVM With all components installed, you should be ready to start minikube with KVM driver. Add your user account to libvirt group: sudo usermod -aG libvirt $USER newgrp libvirt Set KVM as default driver: $ minikube config set vm-driver kvm2 The minikube start command will download VM image and configure the Kubernetes single node cluster for you. Easy work!!.. $ minikube start ................................... 😄 minikube v1.19.0 on linux (amd64) 💿 Downloading Minikube ISO ... 129.33 MB / 129.33 MB [============================================] 100.00% 0s 🔥 Creating kvm2 VM (CPUs=2, Memory=2048MB, Disk=20000MB) ... 😄 minikube v1.19.0 on linux (amd64) 🐳 Configuring environment for Kubernetes v1.20.2 💾 Downloading kubeadm v1.20.2 💾 Downloading kubelet v1.20.2 🚜 Pulling images ... 🚀 Launching Kubernetes ... ⌛ Verifying: apiserver proxy etcd scheduler controller dns 🏄 Done! kubectl is now configured to use "minikube" Wait for the download and setup to finish then confirm that everything is working fine. You should see a running VM with a domain named minikube. $ sudo virsh list Id Name State -------------------------- 1 minikube running Minikube Basic operations Check cluster status: $ kubectl cluster-info Kubernetes master is running at https://192.168.39.188:8443 KubeDNS is running at https://192.168.39.188:8443/api/v1/namespaces/kube-system/services/kube-dns:dns/proxy To further debug and diagnose cluster problems, use 'kubectl cluster-info dump'. Minikube configuration file is located on: ~/.minikube/machines/minikube/config.json To View Config, use: $ kubectl config view ...................... apiVersion: v1 clusters: - cluster: certificate-authority-data: DATA+OMITTED server: https://192.168.42.106:8443 name: 192-168-42-106:8443 - cluster: certificate-authority: /home/jmutai/.minikube/ca.crt server: https://192.168.39.188:8443 name: minikube contexts: - context: cluster: minikube user: minikube name: minikube - context: cluster: 192-168-42-106:8443 namespace: myproject user: developer/192-168-42-106:8443 name: minishift - context: cluster: 192-168-42-106:8443 namespace: myproject user: developer/192-168-42-106:8443 name: myproject/192-168-42-106:8443/developer - context: cluster: 192-168-42-106:8443 namespace: myproject user: system:admin/192-168-42-106:8443 name: myproject/192-168-42-106:8443/system:admin current-context: minikube kind: Config preferences: users: - name: developer/192-168-42-106:8443 user: token: QdSKNK5DbaLA2AOFM__8-_fJ-Pt7BikZP1uFwsqyNx0 - name: minikube user: client-certificate: /home/jmutai/.minikube/client.crt client-key: /home/jmutai/.minikube/client.key - name: system:admin/192-168-42-106:8443 user: client-certificate-data: REDACTED client-key-data: REDACTED Check nodes: $ kubectl get nodes NAME STATUS ROLES AGE VERSION minikube Ready master 35m v1.15.0 Access minikube VM using ssh: $ minikube ssh _ _ _ _ ( ) ( ) ___ ___ (_) ___ (_)| |/') _ _ | |_ __ /' _ ` _ `\| |/' _ `\| || , < ( ) ( )| '_`\ /'__`\ | ( ) ( ) || || ( ) || || |\`\ | (_) || |_) )( ___/ (_) (_) (_)(_)(_) (_)(_)(_) (_)`\___/'(_,__/'`\____) $ cat /etc/os-release NAME=Buildroot VERSION=2018.05.3 ID=buildroot VERSION_ID=2018.05.3 PRETTY_NAME="Buildroot 2018.05.3" $ docker ps To stop a running local kubernetes cluster, run: $ minikube stop To delete a local kubernetes cluster, use: $ minikube delete Step 7: Enable Kubernetes Dashboard
Kubernete ships with a web dashboard which allows you to manage your cluster without interacting with a command line. The dashboard addon is installed and enabled by default on minikube. $ minikube addons list ........................... - addon-manager: enabled - dashboard: disabled - default-storageclass: enabled - efk: disabled - freshpod: disabled - gvisor: disabled - heapster: disabled - ingress: disabled - logviewer: disabled - metrics-server: disabled - nvidia-driver-installer: disabled - nvidia-gpu-device-plugin: disabled - registry: disabled - registry-creds: disabled - storage-provisioner: enabled - storage-provisioner-gluster: disabled To open directly on your default browser, use: $ minikube dashboard To get the URL of the dashboard $ minikube dashboard --url http://192.168.39.117:30000 Open the link on the browser to access the Dashboard. Cleaning up: $ minikube delete --all --purge
0 notes
Text
In this tutorial, I’ll take you through the steps to install minikube on Ubuntu 22.04|20.04|18.04 Linux system. To those new to minikube, let’s start with an introduction before diving to the installation steps. Minikube is an open source tool that was developed to enable developers and system administrators to run a single cluster of Kubernetes on their local machine. Minikube starts a single node kubernetes cluster locally with small resource utilization. This is ideal for development tests and POC purposes. For CentOS, check out: Installing Minikube on CentOS 7/8 with KVM In a nutshell, Minikube packages and configures a Linux VM, then installs Docker and all Kubernetes components into it. Minikube supports Kubernetes features such as: DNS NodePorts ConfigMaps and Secrets Dashboards Container Runtime: Docker, CRI-O, and containerd Enabling CNI (Container Network Interface) Ingress PersistentVolumes of type hostPath Hypervisor choice for Minikube: Minikube supports both VirtualBox and KVM hypervisors. This guide will cover both hypervisors. Step 1: Update system Run the following commands to update all system packages to the latest release: sudo apt update sudo apt install apt-transport-https sudo apt upgrade If a reboot is required after the upgrade then perform the process. [ -f /var/run/reboot-required ] && sudo reboot -f Step 2: Install KVM or VirtualBox Hypervisor For VirtualBox users, install VirtualBox using: sudo apt install virtualbox virtualbox-ext-pack KVM Hypervisor Users For those interested in using KVM hypervisor, check our guide on how to Install KVM on CentOS / Ubuntu / Debian Then follow How to run Minikube on KVM instead. Step 3: Download minikube on Ubuntu 22.04|20.04|18.04 You need to download the minikube binary. I will put the binary under /usr/local/bin directory since it is inside $PATH. wget https://storage.googleapis.com/minikube/releases/latest/minikube-linux-amd64 chmod +x minikube-linux-amd64 sudo mv minikube-linux-amd64 /usr/local/bin/minikube Confirm version installed $ minikube version minikube version: v1.25.2 commit: 362d5fdc0a3dbee389b3d3f1034e8023e72bd3a7 Step 4: Install kubectl on Ubuntu We need kubectl which is a command line tool used to deploy and manage applications on Kubernetes: curl -LO https://storage.googleapis.com/kubernetes-release/release/`curl -s https://storage.googleapis.com/kubernetes-release/release/stable.txt`/bin/linux/amd64/kubectl Make the kubectl binary executable. chmod +x ./kubectl Move the binary in to your PATH: sudo mv ./kubectl /usr/local/bin/kubectl Check version: $ kubectl version -o json --client "clientVersion": "major": "1", "minor": "24", "gitVersion": "v1.24.1", "gitCommit": "3ddd0f45aa91e2f30c70734b175631bec5b5825a", "gitTreeState": "clean", "buildDate": "2022-05-24T12:26:19Z", "goVersion": "go1.18.2", "compiler": "gc", "platform": "linux/amd64" , "kustomizeVersion": "v4.5.4" Step 5: Starting minikube on Ubuntu 22.04|20.04|18.04 Now that components are installed, you can start minikube. VM image will be downloaded and configure d for Kubernetes single node cluster. $ minikube start Starting local Kubernetes v1.10.0 cluster... Starting VM... Downloading Minikube ISO 150.53 MB / 150.53 MB [============================================] 100.00% 0s Getting VM IP address... Moving files into cluster... Downloading kubeadm v1.10.0 Downloading kubelet v1.10.0 Finished Downloading kubeadm v1.10.0 Finished Downloading kubelet v1.10.0 Setting up certs... Connecting to cluster... Setting up kubeconfig... Starting cluster components... Kubectl is now configured to use the cluster. Loading cached images from config file. Wait for the download and setup to finish then confirm that everything is working fine. Step 6: Minikube Basic operations To check cluster status, run: $ kubectl cluster-info Kubernetes master is running at https://192.168.39.117:8443
KubeDNS is running at https://192.168.39.117:8443/api/v1/namespaces/kube-system/services/kube-dns:dns/proxy To further debug and diagnose cluster problems, use 'kubectl cluster-info dump'. Note that Minikube configuration file is located under ~/.minikube/machines/minikube/config.json To View Config, use: $ kubectl config view apiVersion: v1 clusters: - cluster: certificate-authority: /home/jmutai/.minikube/ca.crt server: https://192.168.39.117:8443 name: minikube contexts: - context: cluster: minikube user: minikube name: minikube current-context: minikube kind: Config preferences: users: - name: minikube user: client-certificate: /home/jmutai/.minikube/client.crt client-key: /home/jmutai/.minikube/client.key To check running nodes: $ kubectl get nodes NAME STATUS ROLES AGE VERSION minikube Ready master 13m v1.10.0 Access minikube VM using ssh: $ minikube ssh _ _ _ _ ( ) ( ) ___ ___ (_) ___ (_)| |/') _ _ | |_ __ /' _ ` _ `\| |/' _ `\| || , < ( ) ( )| '_`\ /'__`\ | ( ) ( ) || || ( ) || || |\`\ | (_) || |_) )( ___/ (_) (_) (_)(_)(_) (_)(_)(_) (_)`\___/'(_,__/'`\____) $ sudo su - To stop a running local kubernetes cluster, run: $ minikube stop To delete a local kubernetes cluster, use: $ minikube delete Step 7: Enable Kubernetes Dashboard Kubernete ships with a web dashboard which allows you to manage your cluster without interacting with a command line. The dashboard addon is installed and enabled by default on minikube. $ minikube addons list - addon-manager: enabled - coredns: disabled - dashboard: enabled - default-storageclass: enabled - efk: disabled - freshpod: disabled - heapster: disabled - ingress: disabled - kube-dns: enabled - metrics-server: disabled - registry: disabled - registry-creds: disabled - storage-provisioner: enabled To open directly on your default browser, use: $ minikube dashboard To get the URL of the dashboard $ minikube dashboard --url http://192.168.39.117:30000 Access Kubernetes Dashboard by opening the URL on your favorite browser. For further reading, check: Hello Minikube Series: https://kubernetes.io/docs/tutorials/stateless-application/hello-minikube/ Minikube guides for newbies: https://kubernetes.io/docs/getting-started-guides/minikube/
0 notes