#hnd2c
Explore tagged Tumblr posts
Visit Tumblr Blog
Explore Tumblr blogs with no restrictions, modern design and the best experience.
Last Seen Tumblr Blogs


Fun Fact
28.6 is the average number of monthly visits per US mobile user.
Text
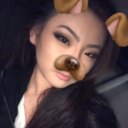
Lighting up the Dark ...previously illuminate (This is a reposting of my work from HND1)
So back to Pollok park and a bit more prepared this time.
checked on time of sunset
makeshift snoot for Rotolight
darker clothing for model & photographer
homemade mask
dog securely out of way
head torch for adjustments etc.
bribe (beer) for model
This was the latest I had been outdoors since the lockdown and to be frank I was a bit nervous, but I had dog walking as my reason to be in the park and, surprisingly, there were several dog-walkers there! I wasn’t confident I could explain the tripod, light, and camera if someone came along halfway through the shoot.
I used the “live comp” setting on my camera set at 15 second intervals and started by illuminating the ruined tree. First of all the grassy hillock in front of it and then the trunk itself. Next I lighted a pathway between the trees and then the second tree and the stick structure around it. Lastly I introduced the masked figure and illuminated him using an old flashgun triggered on my other camera.
Some of this went well, the trunk in particular, however I did still get some bleed from the LED on the back of the light which I had to sort in edit. The flash on the figure only partly illuminated him, fading off towards the feet, but I was quite happy with this effect as it added to the overall eeriness.
This post is an initial rough edit.
In an ideal world I would have had at least one other person to assist and that would have made all the difference. In an ideal world I would go back and do another shoot. However ,at the moment, this is not an ideal world, so I may shoot something else closer to home, or submit this less than perfect shot as my final submission...

10 notes
·
View notes
Text
Brand Narrative

Research


Brand: Sheila Fleet
Object: Neckless
The brand is based in Orkney and the majority of the advertisment images including models are taken on the beach. Using that for inspiration I plan to take my model images on a beach to remain true to the brands narrative.
Plan

testing hand positions


Use the jumper as the background of the product shoot. Linking the model and product shot together.
Model Shoot
Location: College Studio
Date/Time: 13/03/2019, 13:00
In studio
Location Shoot
Location: Irvine
Date/Time: 18/03/2019, 14:30
I will place/position my model around the beach some images will take place in the sand-dunes, on the beach, by the peer and resting on the rocks by the shore. My model will be waring comfortable trainers, blue jeans, pink/purple jumper (picture above) and a beige trench coat.
Contact Sheet Object

Contact Sheet Model

Final Images


#Brand Narrative#Brand#Portrait#Product#Advertising#Advertising Photography#Research#Portfolio 2#HeatherRowan#HND2C
2 notes
·
View notes
Text
MUA students Portraits


These photos where taken with a singe flash-gun and soft box. Amazing what can be done with just 1 flash and some natural light next to a window.
2 notes
·
View notes
Text
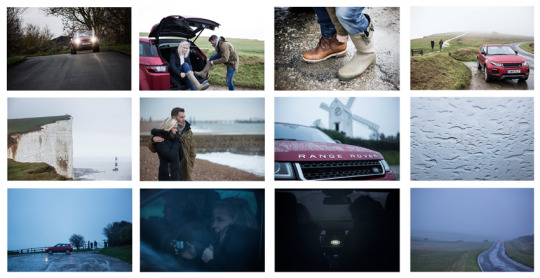
Fashion front cover research: Wes Anderson
For the ‘fashion front cover’ brief, I chose to take inspiration from ‘Moonrise Kingdom’, a film directed by Wes Anderson.
Wes Anderson is an American filmmaker and director. He’s created countless iconic, successful films such as: ‘the grand Budapest hotel’ (2014), ‘fantastic mr fox’ (2009) and his most recent film ‘isle of dogs’ (2018). Anderson is known for his unique style and colour palettes.


After researching his style I found out the following about his filming techniques:
• Wes Anderson heavily incorporates symmetry into his films. He does that by centering the subject right in the middle of the frame.

• Anderson uses flat lighting and composition, no harsh shadows or awkward lighting is used on the subjects which creates a more 2D appearance.
• He is also known to shoot directly above the subject to emphasise smaller details that tend to involve inanimate objects and hands that still convey things such as the time, place and the character.

• Lastly I found that he always sticks by a specific colour palette for each film. He mainly uses vibrant pastel and neutral tones.

As I’m basing my fashion front cover off of the film moonrise kingdom I’ll be taking inspiration from the scene shown below and aim to follow the colour palette of the specific scene.

I chose to take inspiration from this scene in particular as the composition and use of the rule of thirds really intrigued me as the frame is quite simple with few aspects to it which helps emphasise the subject.
For my front cover I aim to use a female model, one who has a younger/youthful appearance that could loosely resemble the character Suzy from the film. I will position the model directly in the middle of the frame and have her looking directly into the lens to create the symmetrical Wes Anderson look, I’ll also use even lighting to create a 2D effect.
For the set I’ll be using cloud wallpaper to replicate the background of the scene, I think this will work well as it will follow the colour palette I’m aiming to use. I will also include binoculars to add some contrast and personality.
In post optimisation I will colour grade it to follow the colour palette which will involve creating a vintage/yellow toned image.
9 notes
·
View notes
Text
Jill Todd Photography Award
The Jill Todd Award is an award in commemoration of Jill Todd who was a successful and impactful photographer who graduated with a first class honours degree in photography at Edinburgh Napier in 2009. Sadly she passed away in 2010 due to cancer. She focused mainly on gender and and media issues during her last two years of university.
Entry fee - £15 per entrant.
The award is based in Scotland, Northern Ireland and Republic Of Ireland. Entrants must have graduated in the last five years from a Photography or Art degree programme in these areas to enter.
The Jill Todd Trust is the organising body of the Jill Todd Photographic Award.
There is a timetable for submission deadlines available on the website, they are as follows:
Key Dates & Events
Award Launch date
Friday 2nd March 2018
Submissions closing date and time
Monday 17th September 2018 at 5pm
Judging date
Monday 1st October 2018
Winners’ announcement date
Saturday 6th October 2018
Technical requirements -
Between 5-12 photographic images. Files must be in jpg or jpeg format and no more than 800 pixels wide. If your file is bigger than 2MB, the system will reject it.
The images should be numbered, with dates of each image plus its caption and/or title where appropriate.
Higher resolutions will be requested after the winners have been selected.
A project statement of not more than 500 words.
This should clearly outline:
A short biographical statement of approximately 100 words.
The overall title of your project
The motivations and intentions behind your chosen theme or subject matter.
The dates of production.
Previous Winners:
2012: Tamara + Yoshi Kametani
2013: James Dixon
2014: Frank McElhinny - Unusual style. Drone shots but not stills, been shot while the drone is moving to give a blur and a sense of movement. Black and white also adds to the “drama” of the image. Not many drone shots are taken like this so this adds to the longevity of the image.

2015: Mhairi Law - Very simplistic composition and subject matter, not a normal object that is included in landscape photography.

2016: Mads Holm -

2017: Kathryn Polley -

Judges:
Robin Gillanders - Robin is a former reader at Edinburgh Napier University and is a practising photographic artist. He would most likely be looking for portraits in the entrants work as he has worked on multiple portraiture work with solo publications and collaborations with poet Ian Hamilton in the 90s.
Anne Lyden -
1 note
·
View note
Text
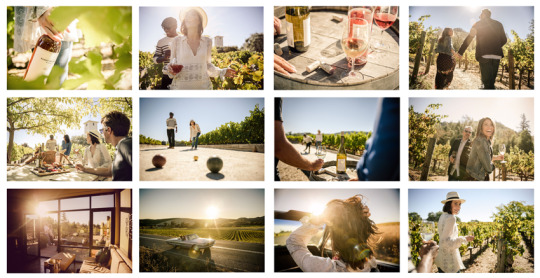
Documentary Project
For my documentary project i had chosen to take photos of my gran to document her and the loneliness that old people face when living on their own, however i then decided that i would instead put a positive spin on it.
i have now chosen to document my gran as she is living independently. Documenting her daily life and what/the things that make her happy.
Here are some example images of the type of thing that i will be shooting:


1 note
·
View note
Photo


SOMETHING NEW
For this brief the object used has to be brand new and blemish free, I plan to use a metal water bottle (chilly water bottle), which has a colourful abstract design on it, this giving the object more to it than just a plain bottle, I plan to use a clean white background so not to distract from the subject as I feel like if I was to use a coloured background this might be too in your face. In terms of lighting I want to have an even pool of light throughout the whole object, reflectors will be used to bounce the lighting source around the object. The original packaging will be used in the shot as I think this adds something more interesting to the image than if it was just the bottle on it’s own.
Idea - Metal water bottle against clean white background (product shot)
Need - Metal water bottle, white backdrop, reflectors.
1 note
·
View note
Text
personal work


back to my roots of photography
2 notes
·
View notes
Text
College Spaces
How well do you know the knew building?
Did you know this building is the biggest ���super campus’ in Scotland?
Go explore.
The college marketing department are looking for some new images for use in promotional press. They have specifically asked to be ‘surprised’ by the images and are not looking for the most obvious examples.
Think about the light, the architecture, the design, the detail!
Not time to research!
Your task is to submit 3 images made within the college building or grounds that fulfil the task of offering ‘surprising’ views of the campus.
You have 3 hours to shoot, edit, optimize and submit your final 3 images.
Deliverables
Present imaged on a A3 proof print and have placed on the studio all 1hr before the end os session.
Print ready digital files uploaded to Moodle.
Update the blog #explore #collegespaces.
There will be a group discussion reviewing the work undertaken today. This will give you an opportunity for you to see the various responses to this brief and discuss your approach.
DON’T BE LATE
Key words:
“Super Campus”
“Surprised”
“Light”
“Architecture”
“Design”
“Detail”
“No Time For Research!”
“3 Images”
“3 Hours”
“A3″
“DON’T BE LATE”
After reading over and braking down the brief we identified the key words of the task and what we felt were important and needed to focus on. Doing this over all gave us a better understanding of what the college is looking out of us. In my own words we have been tasked with finding new and creative ways that show off the appeal of the campus and to think out side the box. With 3 hours to shoot, edit and print our 3 chosen images to present to the rest of the year.
Contact sheets.


After walking around the building and and getting a few images i liked we were getting down to our final hour, meaning it was time to edit. i was struggling to narrow some down, finding some images didn’t watch the tone of another but after a while i found my 3. taking them from bridge and into photoshop i had to do some quick retouching but playing with the contrast, white balance and the crop.
Final


Evaluation
overall i found this to be just like the structure brief from year one but on a time crunch. it gave us a taste on what a last minute job would be like if we were hired for marketing.
1 note
·
View note
Link
2 notes
·
View notes
Text
Lighting up the Dark ...previously illuminate
A wee phone snap I took when I was out with my dog. I think I can build on this.

6 notes
·
View notes
Text
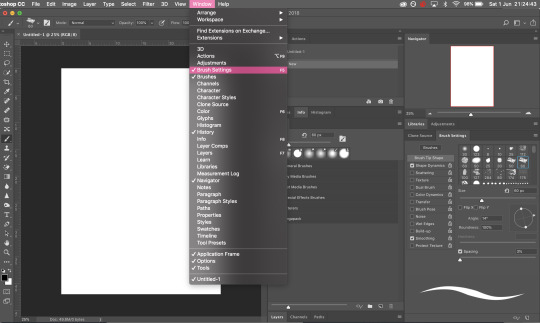
Brushes
https://helpx.adobe.com/photoshop/using/creating-modifying-brushes.html
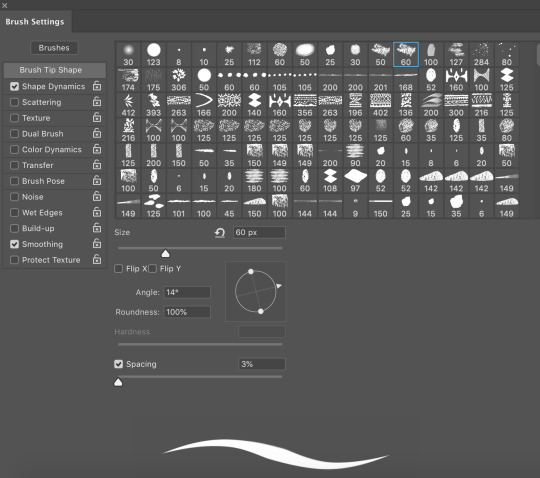
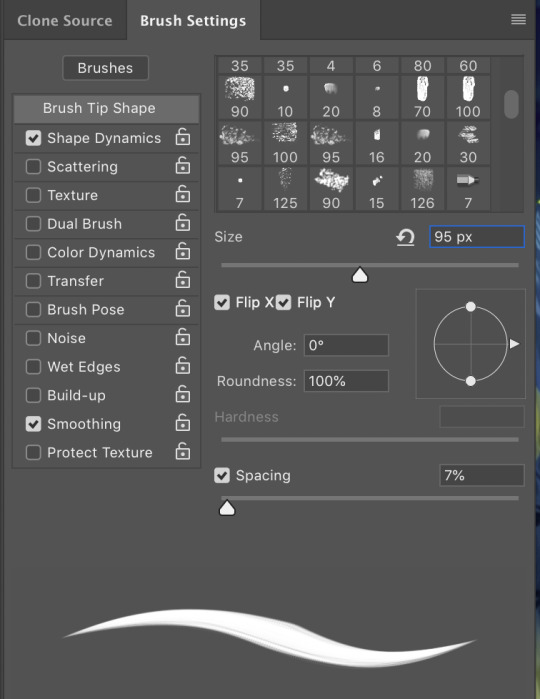
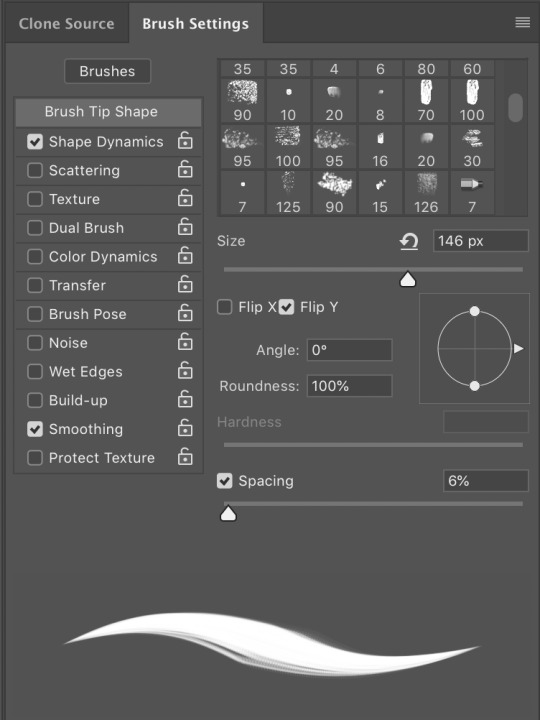
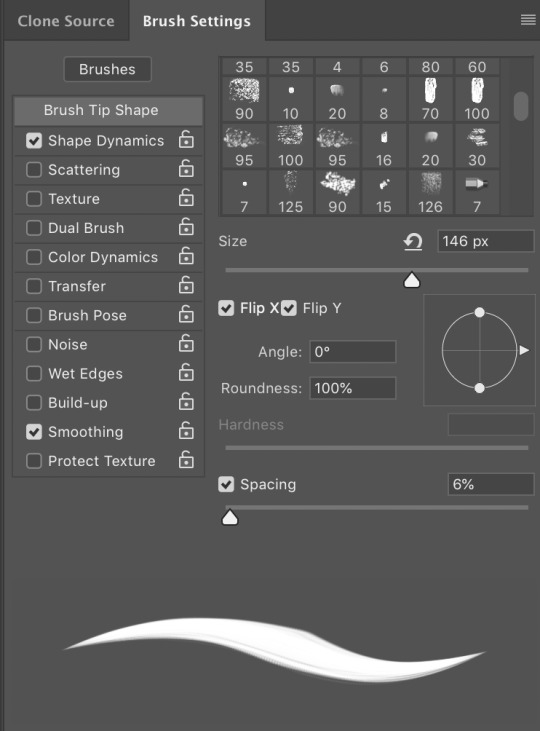
Brush Settings Panel Overview
The Brush Settings panel lets you modify existing brushes and design new custom brushes. The Brush Settings panel contains the brush tip options that determine how paint is applied to an image. The brush stroke preview at the bottom of the panel shows how paint strokes look with the current brush options.
1. Choose Window > Brush Settings. Or, select a painting, erasing, toning, or focus tool, and click the panel button on the left side of the options bar.
Import Brushes and Brush Packs
2. In the Brushes panel, from the flyout menu, choose Get More Brushes.
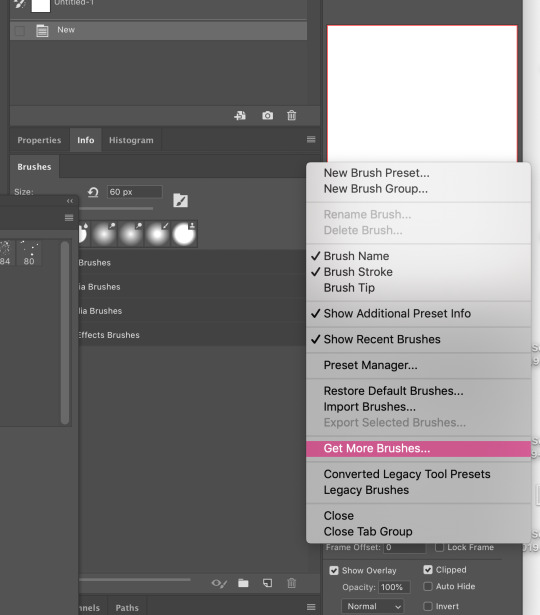
3. Download a brush pack. For example, download Kyle's "Megapack".
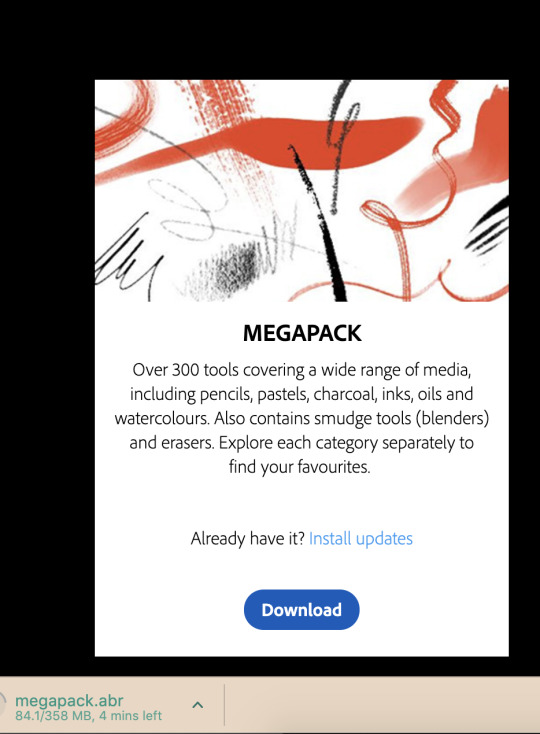
4. With Photoshop running, double-click the downloaded ABR file. The brushes you added are now displayed in the Brushes panel.
Create a Brush Tip from an Image
1. Using any selection tool, select the image area you want to use as a custom brush. The brush shape can be up to 2500 pixels by 2500 pixels in size.When painting, you can’t adjust the hardness of sampled brushes. To create a brush with sharp edges, set Feather to zero pixels. To create a brush with soft edges, increase the Feather setting.
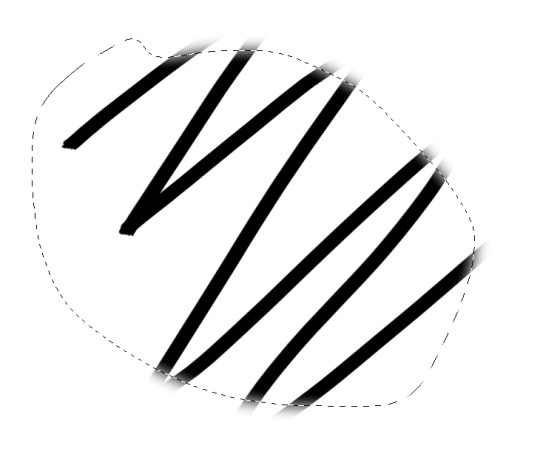
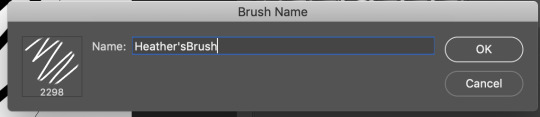
2. Choose Edit > Define Brush Preset.
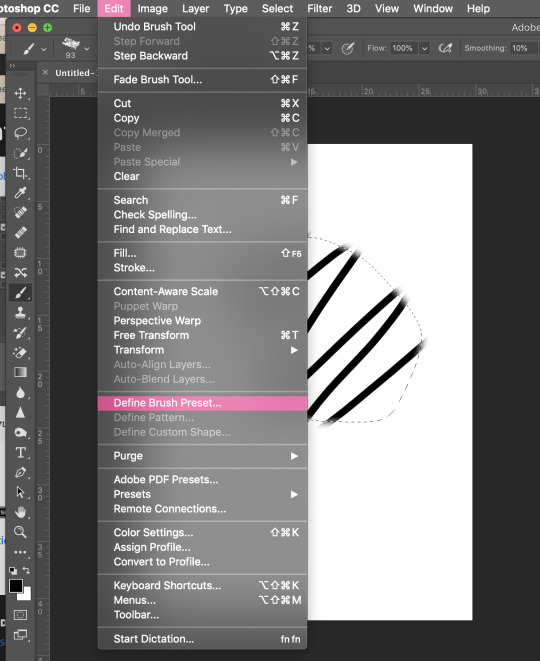
3. Name the brush, and click OK.
Create a Brush and Set Painting Options
1. Select a painting, erasing, toning, or focus tool. Then choose Window > Brush Settings.
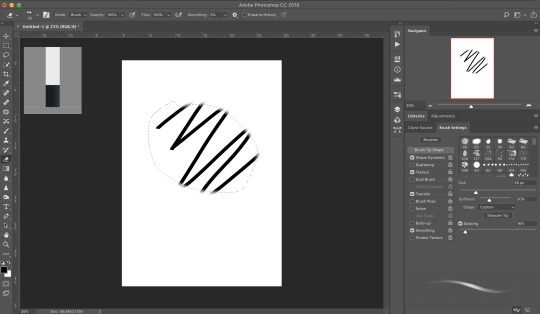
2. In the Brush Settings panel, select a brush tip shape, or click Brush Presets to choose an existing preset.
Standard Brush Tip Shape Options
For standard brush tips, you can set the following options in the Brush Settings panel:
Size: Controls the size of the brush. Enter a value in pixels or drag the slider.
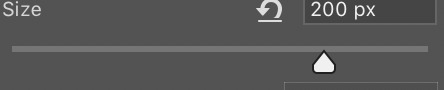
Use Sample Size: Resets the brush to its original diameter. This option is available only if the brush tip shape was created by sampling pixels in an image.
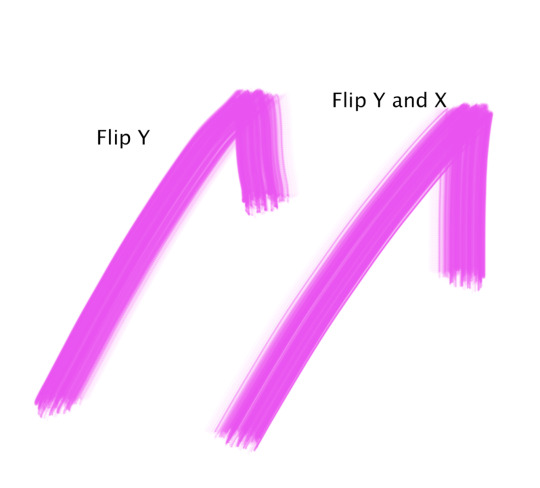
Flip X: Changes the direction of a brush tip on its x axis.
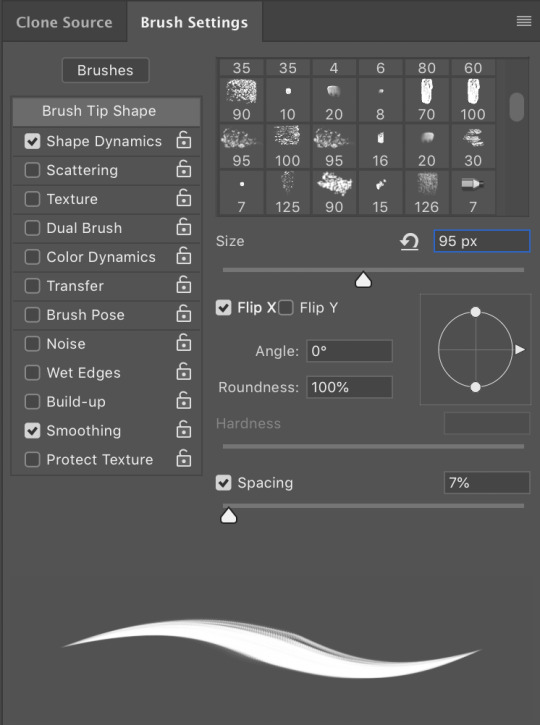
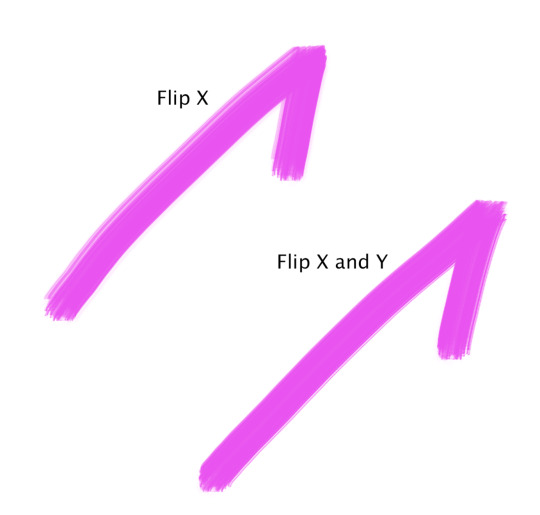
Flip Y: Changes the direction of a brush tip on its y axis.
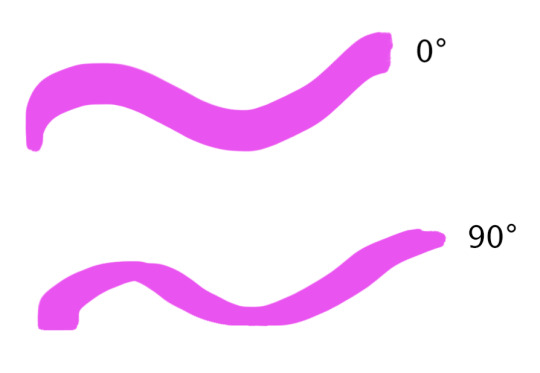
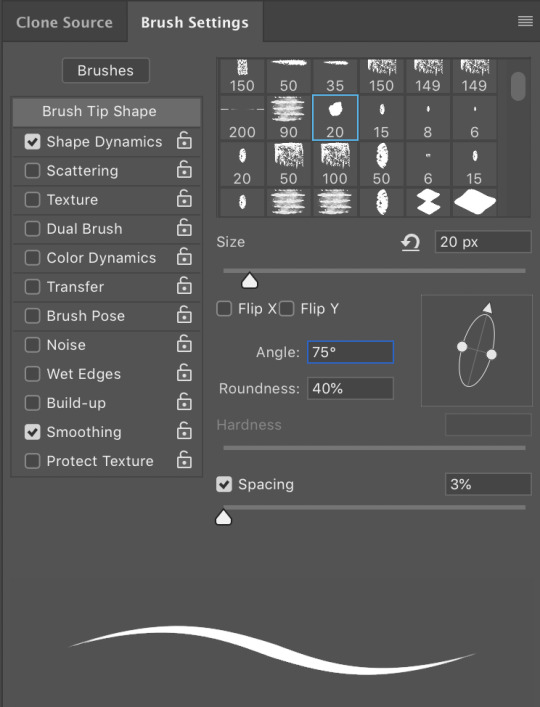
Angle: Specifies the angle by which an elliptical or sampled brush’s long axis is rotated from horizontal. Type a value in degrees, or drag the horizontal axis in the preview box.
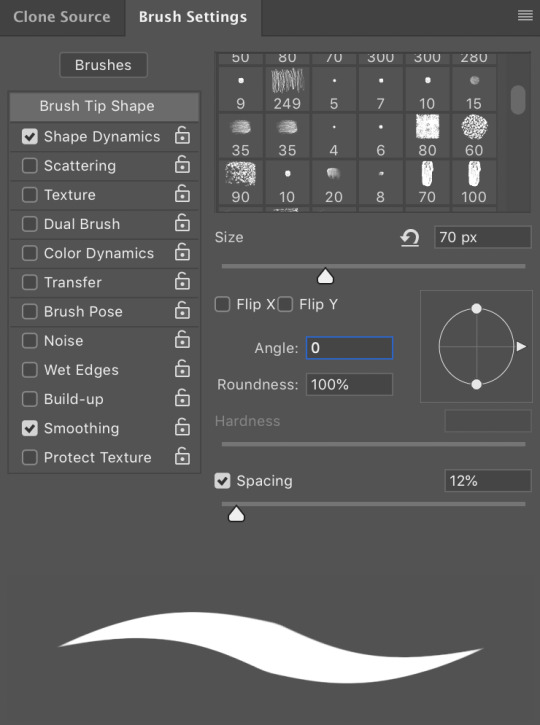
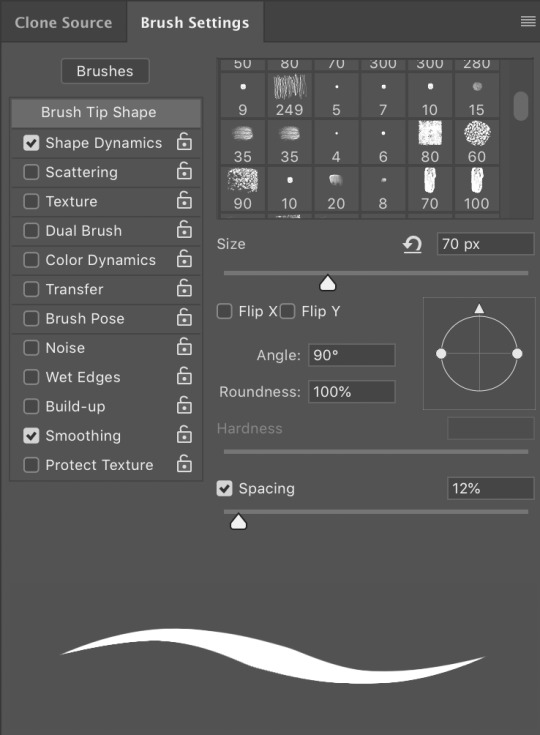
Roundness: Specifies the ratio between the brush’s short and long axes. Enter a percentage value, or drag the points in the preview box. A value of 100% indicates a circular brush, a value of 0% indicates a linear brush, and intermediate values indicate elliptical brushes.
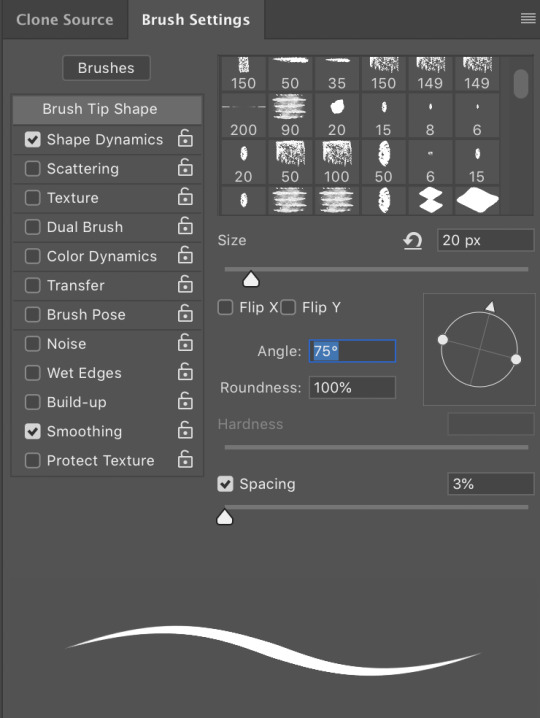
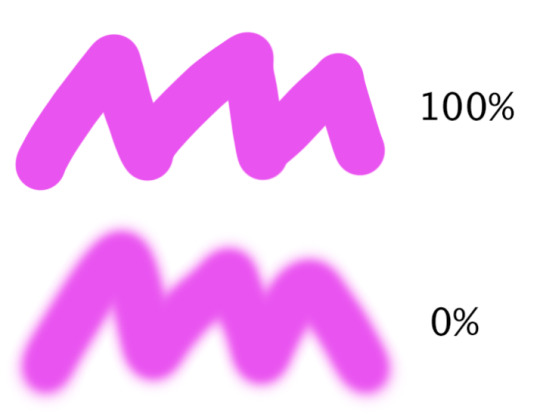
Hardness: Controls the size of the brush’s hard centre. Type a number, or use the slider to enter a value that is a percentage of the brush diameter. You can’t change the hardness of sampled brushes.

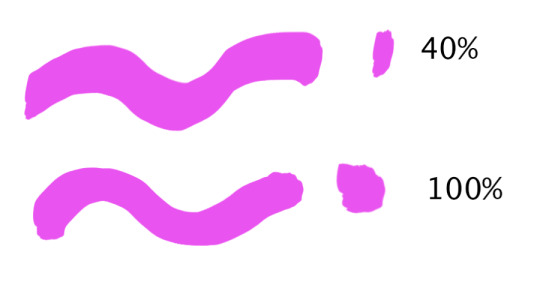
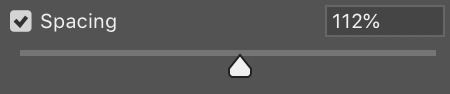
Spacing: Controls the distance between the brush marks in a stroke. To change the spacing, type a number, or use the slider to enter a value that is a percentage of the brush diameter. When this option is deselected, the speed of the cursor determines the spacing.
Bristle Tip Shape Options
Bristle tips let you specify precise bristle characteristics, creating highly realistic, natural-looking strokes. Set the following brush tip shape options in the Brush panel:
Shape: Determines the overall arrangement of bristles.
Bristles: Controls overall bristle density.
Length: Changes bristle length.
Thickness: Controls the width of individual bristles.
Stiffness: Controls bristle flexibility. At low settings, brush shape deforms easily.
Spacing: Controls the distance between the brush marks in a stroke. To change the spacing, type a number or use the slider to specify a percentage of the brush diameter. When this option is deselected, the speed of the cursor determines the spacing.
Angle: When painting with a mouse, determines the brush tip angle.
Brush preview: Shows brush tip that reflects changes to settings above, as well as current pressure and stroke angle. Click the preview window to see the brush from different sides.
Erodible Tip Options
Erodible tip brushes behave similar to pencils and crayons, and wear down naturally as you draw. You can see the amount of wear with the Live Brush Tip Preview to the upper left of the image.
Size: Controls the size of the brush. Enter a value in pixels or drag the slider.
Softness: Controls the rate of wear. Enter a value in percentage or drag the slider.
Shape: Controls the shape of the tip. Choose from a variety of tip options.
Sharpen Tip: Returns the tip to the original sharpness.
Spacing: Controls the distance between the brush marks in a stroke. To change the spacing, type a number or use the slider to specify a percentage of the brush diameter. When this option is deselected, the speed of the cursor determines the spacing.
Brush preview: Shows brush tip that reflects changes to settings above, as well as current pressure and stroke angle. Click the preview window to see the brush from different sides.
Airbrush Tip Options
Airbrush tips replicate spray cans with a 3D conical spray. With a stylus, you can alter the spread of sprayed strokes by changing pen pressure.
Size: Controls the size of the brush. Enter a value in pixels or drag the slider.
Hardness: Controls the size of the brush’s hard centre.
Distortion: Controls the distortion to apply to the spray of paint.
Granularity: Controls how grainy the paint drops look.
Spatter Size: Controls the size of the paint droplets.
Spatter Amount: Controls the number of paint droplets.
Spacing: Controls the distance between the droplets. If this option is deselected, the speed of the cursor determines the spacing.
Brush preview: Shows brush tip that reflects changes to settings above, as well as current pressure and stroke angle. Click the preview window to see the brush from different sides.
Brush Pose Options
Brush pose options let you achieve stylus-like effects and let you control the angle and position of the brush.
Tilt X: Determines the tilt angle of the brush from left to right.
Tilt Y: Determines the tilt angle of the brush from front to back.
Rotation: Determines the rotation angle of the bristles.
Pressure: Determines the pressure the brush applies on the canvas.
Enable Override options to maintain a static brush pose.
Other Brush Options
Noise: Adds additional randomness to individual brush tips. This option is most effective when applied to soft brush tips (brush tips that contain grey values).
Wet Edges: Causes paint to build up along the edges of the brush stroke, creating a watercolour effect.
Airbrush/Build-up: Applies gradual tones to an image, simulating traditional airbrush techniques. The Airbrush option in the Brush panel corresponds to the Airbrush option in the options bar.
Smoothing: Produces smoother curves in brush strokes. This option is most effective when you are painting quickly with a stylus; however, it may produce a slight lag time in stroke rendering.
Protect Texture: Applies the same pattern and scale to all brush presets that have a texture. Select this option to simulate a consistent canvas texture when painting with multiple, textured brush tips.
Stroke Smoothing
Photoshop performs intelligent smoothing on your brush strokes. Simply enter a value (0-100) for Smoothing in the Options bar when you're working with one of the following tools: Brush, Pencil, Mixer Brush, or Eraser. A value of 0 is the same as legacy smoothing in earlier versions of Photoshop. Higher values apply increasing amounts of intelligent smoothing to your strokes.
Stroke smoothing works in several modes. Clicking the gear icon to enable one or more of the following modes:
Pulled String Mode: Paints only when the string is taut. Cursor movements within the smoothing radius leave no mark.

Stroke Catch Up: Allows the paint to continue catching up with your cursor while you've paused the stroke. Disabling this mode stops paint application as soon as the cursor movement stops.

Catch-Up On Stroke End: Completes the stroke from the last paint position to the point where you released the mouse/stylus control.

Adjust For Zoom: Prevents jittery strokes by adjusting smoothing. Decreases smoothing when you zoom in the document; increases smoothing when you zoom out.
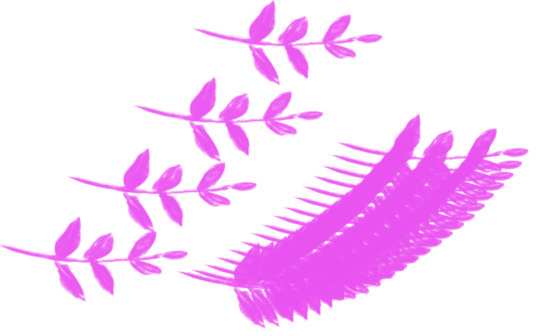
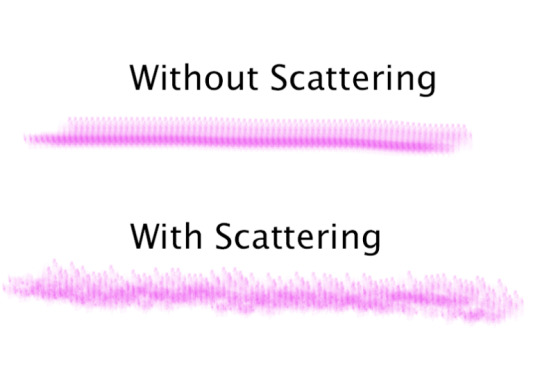
Brush Scattering
Brush scattering determines the number and placement of marks in a stroke.
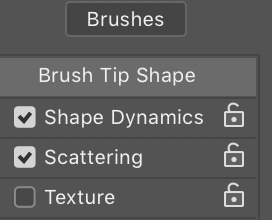
Scatter and Control: Specifies how brush marks are distributed in a stroke. When Both Axes is selected, brush marks are distributed in a radial direction. When Both Axes is deselected, brush marks are distributed perpendicular to the stroke path. To specify the maximum percentage of scattering, enter a value. To specify how you want to control the scattering variance of brush marks, choose an option from the Control pop‑up menu:
Off: Specifies no control over the scattering variance of brush marks.
Fade: Fades the scattering of brush marks from maximum scattering to no scattering in the specified number of steps.
Count: Specifies the number of brush marks applied at each spacing interval.
Count Jitter and Control: Specifies how the number of brush marks varies for each spacing interval. To specify the maximum percentage of brush marks applied at each spacing interval, enter a value. To specify how you want to control the count variance of brush marks, choose an option from the Control pop‑up menu:
Pen Pressure, Pen Tilt, Stylus Wheel, Rotation: Varies the number of brush marks based on the pen pressure, pen tilt, position of the pen thumbwheel, or rotation of the pen.
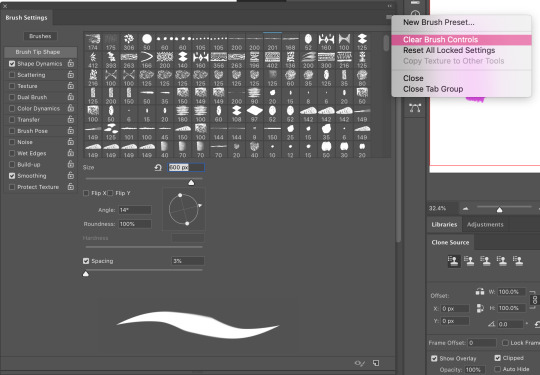
Clear Brush Options
1. Choose Clear Brush Controls from the Brush Settings panel menu.
1 note
·
View note
Text
Something Old

The above image was created during a day in the studios. I went through various sets on the day of the shoot. Below is the various sets I experimented with. I started off with using a table with some material placed over it and the machine sat on top of this. I used a gobo light to create additional interest in the image. I had one large soft box to my right and above. I had to use a long shutter so I could introduce the ambient light in to the image. I progressed this on to using two large flags and a light betweens them so the light had to bounce off both before lighting up the object. I swapped the sides of the flags from white to black to see what affect that would have in the image. In the afternoon I changed the set over to just the object on its own. Sitting on a white box With the back-ground being lite from both sides to give a clean white. I used a large soft box directly over the object and moved it to the front to introduce a bit more light. My next step was to use a reflector below the object to bounce light up from under it. In the final set up of the day I moved on to painting the object with light. I started off with a studio light on the front. It was gate so I was only putting light directly on the front. I used both the flash and the constant light from the studio light while the rest of the image was created using a torch. This however meant that any marks on the back-drop showed up. The studio light was then used to light up the back-ground in an attempt to clean up the back-ground. This gave fantastic colours but it didn’t remove the marks that are a distraction in an otherwise great set of images. I was unable to clean up the back-drop affectively so, I won't be using the images for the final submission. The image at above is my final submission. It came from the 2nd set of the day. I love the images from all the sets on the day but I feel the qualities are undeniable. The warm tones in the image are due to the longer shutter time used. the ambient light helps to create a warm tone in the final image.

1 note
·
View note
Text
Action on photoshop
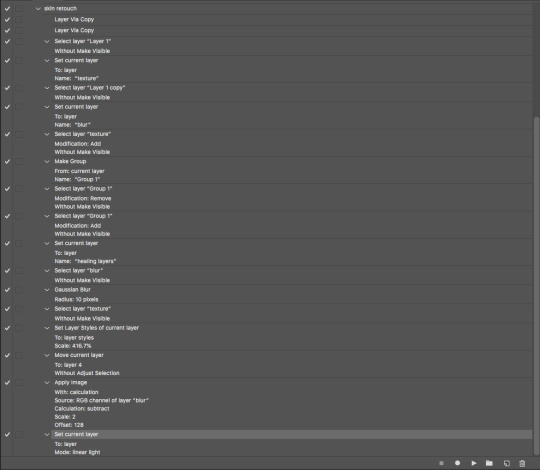
In lab class we were to create an action in photoshop. The above image was the action I created for skin retouching.
1 note
·
View note
Text

Final image for Glassware.
1 note
·
View note