#how to configure tp link range extender
Explore tagged Tumblr posts
Visit Tumblr Blog
Explore Tumblr blogs with no restrictions, modern design and the best experience.
Last Seen Tumblr Blogs


Fun Fact
The “We are the 99%” Tumblr blog became the slogan for the Occupy Wall Street movement.
Text
How to Configure TP-Link RE210 AC750 WiFi Range Extender?
To perform the Tp link RE210 AC750 wifi range extender setup, open the web browser and type the tplinkextender.net web address in the browser bar. Now, enter the admin credentials and you will reach the smart dashboard of the repeater. Hereon, visit the advanced settings or reach out to us on our website!
0 notes
Text
A brief tutorial to Tp-link wifi extender setup
Tp-Link extenders are one of the top-mentioned range boosters that increase the network coverage of your router and eliminate dead zones in your living space. Similarly, if you buy a new extender, it is necessary to access the repeater's admin panel and perform the Tp-link wifi extender setup to utilize all of its functions.
In addition, the primary methods to set a repeater up are through the web address or the app. Likewise, both methods are convenient to use but you need to follow the steps carefully. In this brief tutorial, we explore the TP-Link repeater setup using the web address and also explain the suitable troubleshooting methods to fix the configuration errors.
Prerequisites for the Tp-link wifi extender setup
While you begin with the process of extender setup ensure you have all the necessary equipment, such as:
TP-Link WiFi extender
Stable network connection
Ethernet cable
Web address
Admin credentials
Computer/Laptop
Steps to setup the TP-Link extender
In this section, we briefly explore the steps to begin and complete the setup procedure. All you need is a stable internet connection, for this, you can also opt for a wired connection using an Ethernet cable. Now, let’s move towards the steps to configure your range extender:
First and foremost, plug your range extender and power it on.
Now, ensure that your computer is connected to the extender network.
Next, open the web browser and type the tplinkextender.net web address or 192.168.1.1 IP address.
Hereon, a login window appears to you on the screen.
Further, mention the username and password here.
After that, click on Quick Set Up> Next> Select your Region> Next.
Here, your extender scans for the available networks, so wait patiently.
After scanning, you have to check the list of available networks and select the one you want to go ahead with.
After that, tap on Next and another window displays the password of your selected network.
After typing the password, click on the Copy from the main router to continue with the single network or click on Customize to create a different network.
Further, tap on Next> Finish.
Lastly, you have completed the TP-link extender setup successfully, now continue error-free browsing.
How to troubleshoot the TP-Link extender setup issues?
Additionally, the setup issues are common when a non-tech person configures his repeater for the first time. These can be due to incorrect IP addresses, login details, unstable networks, or faulty hardware. So, the primary thing is to fix these issues but how? No worries! We explain here:
Check the admin details you enter to access the web interface of the extender.
Also, enter the correct web or IP address to continue with the setup process.
Examine the network cables you use for a wired connection. Replace if there is any damaged cable preset.
Ensure your internet connection is stable.
Look at the extender network that is connected to your smart device is active properly.
Fix the browser issues and update if needed.
Ensure an adequate power supply on your range booster.
All in all, the information we share with you will assist you in carrying out the Tp-link wifi extender setup process easily. Similarly, if you have issues with the configuration process of your range booster, then walk through our troubleshooting section. If need more info, then stay tuned to our website.
#Tp-link wifi extender setup#Troubleshooting tp-link setup issues#tp-link extender setup#tplinkextender
0 notes
Text
How to Setup the TP-Link Extender?
A weak Wi-Fi network can be really frustrating, mainly when it causes dead zones and slow internet speeds in your home/office. To overcome such challenges, the TP Link Extender Setup acts as an excellent solution. Setting up the TP-Link extender is very easy to conduct, and you can do it very easily.
This blog post includes the complete TP Link Extender Setup through the WPS button, web browser, and the TP-Link Tether app. So read through the following blog post right away.
Steps for Setting Up the TP-Link Extender
Setting up your TP-Link extender is pretty simple and you can easily do it through the following steps:
Tplink Extender Setup through the WPS Button
The first thing you must do is place your extender near the router before you start the setup process.
After that, you need to plug your extender into a nearby power outlet and wait for it to completely power on. If you see the Green LED light, it means that the extender is successfully On.
Consequently, you must locate & hold down the “WPS Button” on your router and release it after a few seconds.
Next, you should also press the WPS button on the TP-Link extender within 2 minutes.
If you see the WPS LED blinking on the extender, you must know that it is successfully connecting to the router.
The WPS LED will become solid green once the connection is established between the extender and the router.
Tplink Extender Setup through the Web Browser
To set up the TP-Link extender through the Web Browser, plug the extender into a power plug in the first place.
After that, you must open a web browser and enter “192.168.0.1” or “tplinkrepeater.net” in the URL bar.
Next, you’ll be prompted to the TP-Link login page where you must enter the admin username & password.
Consequently, click on the “Login” button and choose your desired mode - Range Extender.
After that, the setup wizard will scan and connect to the available Wi-Fi network.
Finally, log into your extended Wi-Fi network and configure the Wi-Fi settings.
After configuring the Wi-Fi settings, you must click on the “Apply” button to save the settings.
Tplink Extender Setup through the “TP-Link Tether” App
To set up the extender through the app, download the “TP-Link Tether” from the Play Store or the App Store.
Next, you must open the app and follow the in-app instructions to create an account, if you don’t have one.
If you already have an account, try logging in to the app using your admin username & password.
After that, you must connect your smartphone to the TP-Link extender’s default network.
Then you must click on the “+” icon, choose the “Range Extender” and follow the on-screen setup wizard.
Finally, the app will guide you through the complete setup process, and customize the extender’s network issues.
Follow the above steps carefully and successfully complete the Tplink extender setup.
Wrapping It Up
With these effective methods, you can set up your TP-Link Extender easily to extend your Wi-Fi network, eliminate all the dead zones, and enjoy the internet experience across your office or home. Choose the appropriate method that befits your desire and prepare to improve your Wi-Fi network with ease.
But if you are unable to conduct the TP Link Extender Setup, feel free to connect with our technical experts. They’ll guide you through the complete setup process and help you resolve the possible setup issues. So, get in touch with our technical experts right away.
0 notes
Link
Here, we figured out "what is TP Link Wi-Fi Extender" and its best features along with its configuration. As mentioned above, TP Link Wi-Fi Extender Setup is used for expanding the Wi-Fi signals. Working without internet in the workplace environment is quite impossible. In such areas, usage of an extender is high in demand, and so we chose TP Link Extender at the top of the best list of extenders out there.
#configure tp link extender#how to configure tp link extender#how to configure tp link range extender#how to configure wifi extender
0 notes
Link
In this article, you will learn how TP-Link extender as an access point .TP –Link extender provides powerful connectivity from every corner of your house. It has miniature size, you can even move it simply or wall-mount it as per your satisfaction. This extender can also be used as a wireless adapter so you can connect wired devices with a single Ethernet port.
This extender boosts wireless signal to previously unreachable or hard-to-wire areas flawlessly
It is Compatible with 802.11 b/g/n and 802.11ac Wi-Fi devices
Dual band speeds up to 750Mbps*
TP link extender is Miniature in size and wall-mounted design makes it simple to deploy and move flexibly.
Moreover, Ethernet port allows the Extender to function as a wireless adapter to connect wired devices.
#tp link extender as an access point#how do i set up tp link extender#is access point better than extender#tp link range extender as access point#use tp link extender as access point#how do i connect tp link extender#tp link repeater access point mode#tp link access point vs range extender#how configure tp link extender#tp link wifi extender as access point#setup tp link extender as access point
0 notes
Text
TP-LINK EXTENDER SETUP

You need to be connected to the TP Link Network to set up your TPLink Wi-Fi extension. If you do not set up the tp-link extension, ensure that the original tplinkrepeater.net configuration procedure is connected with your extension next to the home router.
Trying to Install the WIFI Range Extender?
Using Tplinkrepeater.net Web Browser setup
to use Tplinkrepeater.net to configure your extension.
Get a mobile phone, tablet or computer with your wireless device.
Connect the 2.4 Ghz TP-Link with your device.
Open Chrome, Firefox, or Edge browsers.
Enter 192.168.0.254 on Tplinkrepeater.net or hit Type the address bar.
Enter your default password for your username.
Configuring your TP-Link extender
In order to start, you must connect your TP-Link extension to your computer through an Ethernet wire. This allows us to schedule and connect wireless settings.
Connect the power socket to the TP-link extension.
Connect to your PC now with your Tp Link extension.
Go to tplinkrepeater.net and open your computer's browser. If it does not work, try 192.168.0.254. The TP-Link web page should be listed.
Choose Next and Fast Setup.
Select your region and your neighbourhood next.
Allow TP-Link to search the wireless networks available. It may take a minute or two, depending on the number of networks close by.
After selecting the wireless network, pick Next from the list.
Enter your mobile password when requested.
To check network settings in the previous box, click Finish.
How to set up my TP Link WIFI repeater?
Make sure that the repeater is powered before setting the Tp-link extension.
See and click your device's WPS button. Look now. Look now.
On your Wi-Fi or modem, press the same button.
The splashing lights on both your devices are now visible.
If your repeater is connected to your modem or network successfully, On the extender, you can see a strong led light.
Immediately remove the extender and set it where poor internet signals are present.
TP-Link Extender Login 192.168.0.254
The WIFI TP extension IP address is 192.168.0.254. Use the default TP-Link Extensor IP 192.168.0.254, if the http://tplinkrepeater.net web URL does not work for you.
You merely need to open the web browser in the address bar to view the repeater and insert the default IP. This brings you to the default web page where your device may be easily installed and configured. This IP works as the web address of tplinkrepeater.net exclusively for installing your device.
Use a tablet or laptop for the network extension configuration and connect your device to the TP-Link.
Open every web browser when you have an online browser such as Google Chrome, Mozilla Firefox or Microsoft Edge.
And in the address bar type 192.168.0.254 IP.
TPlinkrepeater.net is now available on the setup page.
To access the installation page, create the device login password.
Follow on-screen directions to connect your device to the principal router or modem when you check in.
The 192.168.1.254 class C IP address includes the 192.168.1.1 number and 192.168.1.255 number. The address is included in RFC 1918's private IP address.
Upon accessing this URL, the user received an error notice that "this website cannot be reached" or "it takes too long to react to this URL."
Therefore, the IP address is not available on a public network only in a private area.
Private networks are private range IP packets. Network devices such as routers offer Network Address Translation Is private IP address (NAS). The current router utilises DHCP to assign these addresses. This IP is used for home network applications since 192.168.1.1 is the default IP extension for practically all of the routers. Please contact our support team if you have problems connecting to 192.168.1.254.
TPLINKREPEATER.NET LOGIN
TPlinkrepeater.net is an offline web URL for your wireless connection to your extension. A user may not only use tplinkrepeater.net to link an extension to change repeater settings
Why don't I get to the Tp Link settings page?
If a user cannot connect to the default connection site tplinkrepeater.net, either the error or a serious technical problem is typical.
The site URL is not used correctly.
Slow or incoherent WIFI connectivity.
The web browser version is obsolete.
Not the same extension and router settings.
Problems with Windows firewall setup
SSID and major concerns pre-shared.
The network of range extensors is not connected to you.
On http://tplinkreater.net you can't reach the server.
1 note
·
View note
Text
How to Install and Configure TP-link Wireless Router? tplinkwifi.net
How to Install and Configure TP-link Wireless Router — TP–Link router are including an High Speed Cable Modems, wireless routers, mobile phones, ADSL, range extenders, routers, switches, IP cameras, power line adapters, print servers, media converters, wireless adapters, power banks, USB Hub and SMART home technology devices. TP–Link router also manufactured the On Hub router for Google.
#tplinkwifi.net#tplink#tplinkwifi#tplink wifi router#How to Install and Configure TP-link Wireless Router?#How to Install and Configure TP-link Wireless Router? tplinkwifi.net
1 note
·
View note
Text
How do I know if TP Link Extender is working? tplinkrepeater.net
The Signal lights will offer you the precise information that whether you’ve got configured your Range Extender successfully. Once the range extender has connected to the router, the signal fire are going to be solid “on” (no matter what color it’s or what percentage signal bars there are). Connect with us at https://tplink-repeater.com/.
#tplinkrepeater.net#tplink#tplinkrepeater#TP-link repeater setup#Tplink Repeater#TP-Link WiFi Extender#tp-link repeater manual#How do I know if TP Link Extender is working? tplinkrepeater.net#How do I know if TP Link Extender is working?
1 note
·
View note
Text
How to reset your router
192.168.1.1 is the default gateway IP Address - - utilized to login as admin of router settings such as TP-Hyperlink, D-Link, Linksys, Netgear. The excellent news is that the default login name and password are usually admin.” If that does not operate, we advocate you Google one thing like default login name and password” followed by your router's model and manufacturer. For the initial connection it is needed to use an RJ-45 cable connecting the laptop and the router, to configure it! The subsequent step is to enter your credentials for the net interface (login and password). These default password and login are specified in the manufaturer's documentation.
The 192.168..1 IP address falls within this final range of reserved private IP addresses. To adjust your router's password, go to the settings menu and appear for an option titled password.” It is crucial that you select a password that is sufficiently secure. The router has to be configured. Prior to starting to get the important, you may possibly have to connect it to the routers or modem by employing an Ethernet wire. You will want a router login IP address, which can be 192.168.1.1 , , 192.168.1. 254, and so on. Now, if you don't know about Router Default IP, then check out its shipping box or make contact with manufacturer.
Thus, if it is a wireless router it will typically be configured with the WiFi function disabled, which means that the 1st configuration will call for connection employing RJ-45 cable. When you access a web site on-line, you are basically accessing that website's public IP address. The website itself is connected to the world wide web by means of a router and an ISP. When you're on-line, you have a public IP on the web and a private IP inside your network.
Out of these, D-Link, Linksys, and TP-Link have by far the most routers that use 192.168.0.1 as the default IP address. 192.168.0.1 is not opening or keeps on loading simply because your router could support distinct gateway IP address. Attempt 192.168.0.1, 10...1 or 192.168.1.254. When you connect to the internet, you join a larger network. Your private network is nevertheless private and your private IP isn't visible to any person. When you go on the web, you connect through your router, which connects via your ISP. Your ISP will assign your router and your computer a public IP address.
Next, a login web page will be displayed. Enter the default username and password written on the router. The default username and password is typically admin. Additionally, if the router does not accept the RJ-45 cable connection, it is typically adequate to restart the router or do a challenging reset (Please refer to manufacturer's documentation). There used to be a time when phone numbers and street addresses had been among the most private data that an person possessed. But times have changed, and we now reside in the era of the web, and IP addresses have largely replaced telephone numbers and street addresses.
Step 3. Click the Network & Internet” selection. Step 5. Pick how you are connected to your router. If you are hardwired to your router decide on Ethernet. If you are connected to your router by means of WiFi decide on Wi-Fi. Please post back here with the final results of the test and the information on specifically where your Computer network cable connects. But in most situations, the default IP Address for Modems and Routers is 192.168.0.1. Now you also need to Enter Default username and password in order to access its admin web page. The default username and password are different for a diverse manufacturer. Here we are going to share all the attainable Default Username and Password for 192.168.01 IP address.
Wait an additional 30 seconds Following releasing the Reset button for the router to totally reset and energy back on. You ought to be able to tell that the router has finished booting up by the state of its LED indicator lights. Step four: Enter Default username and password (admin-admin) if you have not changed. Or Enter your username and password. Of course, it's not just routers that can use the 192.168..254 IP address. All electronic devices that can connect to a local network can identify themselves to other folks with the 192.168..254 IP address, including webcams, laptops, servers, private computer systems, wise TVs, repeaters, or modems.
192.168.1.1 is the frequent IP address that is used by many modems and routers nowadays. It's a default IP address exactly where you can access your modem or wireless router to modify settings, adjust the WiFi name or password. 9) Go back into your PC's network settings, and have your Computer get an IP address automatically. 4) Try to access your router from your browser now. If you can, try resetting to factory defaults from there, and set your Pc to use DHCP once more.
Each router has an internal router IP address that is utilized to access its admin interface. Some routers have this IP address written on a sticker on the bottom, but many other folks don't make it practically as simple to find. Fortunately, there are web sites such as where you can find the router IP address details you need with just a few clicks. Then open a browser and enter IP address 192.168.0.1 in the address bar of the browser.
These private IPs total about 17.9 million distinct addresses, all reserved for use on private networks. This is why a router's private IP does not need to have to be special. The router then assigns a private IP address to each and every device in its network, regardless of whether it's a small residence network or an enterprise-level organization. Every single device inside the network can connect to an additional device in the network employing this private IP.
Verify the Manual how the reset button performs. Usually you want to hold the reset button for an extended period of time to restore to factory settings. The worth for IPv4 is your private IP address. Step 3: Open Browser and variety 192.168.1.1 and press Enter. Turn on your router and connect it to your computer with an Ethernet cable. Some routers let you to connect to them wirelessly, but Linksys routers have this feature disabled by default for security causes.
Soon after effective login, you have to alter the WiFi password and router username. Decide on a sturdy password, a mixture of letters, symbols, and numbers. Here are some examples of how various router modes and switches would assign IP addresses to computer systems in a network. You will see the IP address next to default” (in the instance under, the IP address is: 192.168.137.1). If you don't keep in mind your username and password, you can take benefit of default login particulars that are presented on the planet wide internet. When it really is worked, you ought to be asked for your password. Then you have to enter a username and password. Decide on a mix of letters and numbers to develop the password powerful.
Now that you know what the 192.168.1.1 IP address is and how to log into routers that use it as the default gateway, you can discover its admin panel and change many different settings to make your network safer and quicker. Now you know several things about IP Addresses, Private and Public IP Address, How to Access 192.168.1.1, What If You Can not Access 192.168.1.1, How To Alter 192.168.1.1 Router Password, Reset Router Settings, How To Find The Router IP Address and a lot a lot more.
Step 4: Go to Wireless Setting and alter settings that you want. Step 4: Change WiFi Password and Router Username. Step two: Kind 192.168.1.1 in browser > Enter. The router utilizes a distinct address than 192.168.1.1. Open a browser and type that IP address to log into the router making use of the administrative ID and password. In case you can't access your router admin configuration web page through , let's discover out which IP address your router is making use of.
Enter IP address 192.168.0.1 > Enter username and password listed in the above table. Enter the right administrator login name and administrator password. Step two. In this window highlight either Ethernet, Wi-Fi, or Thunderbolt adapter, based on which adapter is connected to your router. Then click the advanced tab at the bottom of the page. You will see the IP address subsequent to Default Gateway (in the instance below, the IP address is: 192.168.0.1).
1 note
·
View note
Text
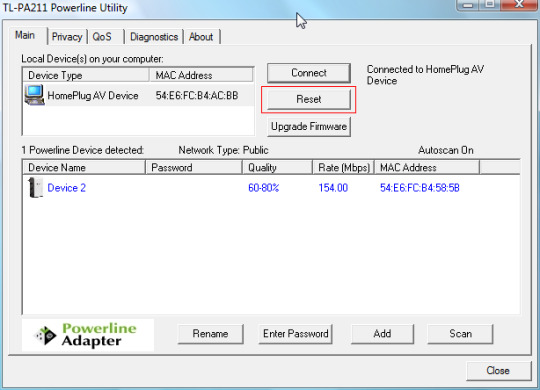
Tp link powerline utility reset device


Secure Your Powerline Network by Pairing.
Extend Your Wired Network by Plug & Play.
This chapter guides you on how to use the powerline adapter. Press and hold the button for more than 6 seconds to reset the powerline adapter to factory defaults.Ĭonnect the Ethernet port to your wired devices, such as a computer, a router or a game console, via an Ethernet cable. Go to Secure Your Powerline Network by Pairing for more information. Press and hold the button for 1 second to join a powerline network. The powerline adapter has a Plug that can be connected to any power socket. * If the device connected to the adapter is turned off or inactive for more than 5 minutes, the powerline adapter will automatically switch to Power-Saving Mode. The powerline adapter is not connected to any powerline network. The powerline adaptor is in a location with poor signal strength. The powerline adaptor is in a location with good signal strength. Once every 3 seconds: Power-Saving Mode* is on.
Once every second: Pairing is in process. For more details, please refer to the following table. LEDs indicate the powerline adapter’s working status. Your powerline adapter may differ in appearance slightly from that depicted because of the region and product version. TP-Link powerline adapter aims to extend your existing home network, with the help of your home’s electrical circuit. This chapter introduces what the powerline adapter can do and describes its appearance.
Our Technical Support contact information can be found at the Contact Technical Support page at.
A Technical Support Forum is provided for you to discuss our products at.
Specifications can be found on the product page at.
The Quick Installation Guide (QIG) can be found where you find this guide or inside the product package.
The latest software, management app and utility are available from the Download Center at.
Actual Powerline data throughput and Powerline range are not guaranteed and will vary as a result of network conditions and environmental factors, including electrical interference, the volume of traffic and network overhead, AFCI circuit breaker, and Powerline being located in a separate circuit. *Maximum Powerline signal rates are the physical rates derived from HomeplugAV/AV2 specifications. Actual wireless data throughput and wireless coverage are not guaranteed and will vary as a result of network conditions, client limitations, and environmental factors, including building materials, obstacles, volume and density of traffic, and client location. *Maximum wireless signal rates are the physical rates derived from IEEE Standard 802.11 specifications. This product may not be compatible with routers or gateways with firmware that has been altered, is based on open source programs, or are non-standard or outdated. *Compatible with all HomePlug AV and AV2 Standard Powerline adapters. Indicates important information that helps you make better use of your device. Ignoring this type of note might result in a malfunction or damage to the device. Key information appears in teal, including management page text such as menus, items, buttons, and so on. You can click to redirect to a website or a specific section. In this guide, the following conventions are used: All images, parameters, and descriptions documented in this guide are used for demonstration only.
When using this guide, please notice that features of the powerline adapter may vary slightly depending on the model and software version you have, and on your location, and language. The Quick Installation Guide provides instructions for quick internet setup, while this guide contains details of each function and demonstrates how to configure them in typical scenarios. This guide is a complement to the Quick Installation Guide. 6.2 Related Manuals / Resources About This Guide
0 notes
Text
How To Configure TP-Link Range Extender Using The WPS Button?
Wondering How to Configure TP-Link Range Extender using the WPS Button easily? Follow the information available on this page and finish the setup process in no time. If you face issues accessing the login page or configuring the network settings, reach out to the team at our end or access the troubleshooting guide available on our website now.
0 notes
Text
The TP Link RE400 extender is among the top devices of all time. This extender is known for it’s top-notch devices with impeccable features. To make the most of this extender, you must log in and set it up accurately. For the setup, you need the default IP address and login credentials. From the interface, you can set up the extender properly. You can also set up the extender using the WPS button. If you require help with anything else, connect with our team straight away.
0 notes
Text
How to Configure My TP- LINK Range Extender on MAC
No matter where you are looking for a strong network, a single router cannot meet your needs. To get a good speed internet along with a better range, you definitely should invest in a range extender. You can get range extenders for any kind of network.
0 notes
Photo

How to download firmware for tp link router | tplinkrepeater net - How to download firmware for tp link router (on Wattpad) https://www.wattpad.com/1196891796-how-to-download-firmware-for-tp-link-router?utm_source=web&utm_medium=tumblr&utm_content=share_reading&wp_uname=Tp-linkrepeater&wp_originator=K4DRROSY5K3CjaaTK5hXiLiherOj8Xm7wewpSZawyT%2FqWAhPcy1rRCH92aMh3vBUUampqC91QUiDp8zYDIDnV7LYyiRr5FHCr%2FMNk7D0MPNOBWODF52jhISHHQVAyYAC Update the firmware of TP-Link Range Extender. Confirm to keep your Wi-Fi Extender and Smart Home devices performing at peak and updated with all the newest upgrade or important fixes, we recommend that you simply update the firmware when updates are available. You'll perform firmware upgrade on a computer. To Update the firmware of TP-Link Range Extender.Remember to check these things: Ensure hardware version matches with latest firmware file. Also further check that your connection between the extender and computer is stable. We recommended not upgrading the Firmware wirelessly. Then confirm the backup your extender configuration.
#download#firmware#login#net#repeater#tp-link#tplinkrepeater#upgrade#wifi#short-story#books#wattpad#amreading
0 notes
Text
Change TP-Link ID for TP-Link RE200 AC750 Wi-Fi Range Extender
The router that you are using might be a dated one and you are not able to find the stability in the connection. If you have decided to upgrade the router setup, there are various options to choose from and you will find the one that will fit right with the specs you are looking for.
The users who are living in large spaces will need to also install an extender that can help you boost the existing wireless signals. A single router will not be able to cover the whole area. If you are worried about the setup process, we are here to ensure you that the steps you need to follow are quite simple and straightforward. The tplinkrepeater net is the portal that you will need to go to in order to configure the router.
The routers that are coming these days are loaded with features that are focused on the security of the network. You will get to use MAC filtering and parental controls along with a separate guest network to keep all the unwanted devices away. In this blog, we are going to discuss the steps that you need to follow to change the TP-Link ID.
The portal will also give you the guest network that will basically help in keeping the unknown devices away from the main network. It will add an extra layer of protection to your media server, as well.
How to change the TP-Link ID?
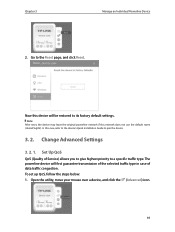
Now, if you are going to configure the router with a different TP-Link ID, you will need to reset the router to change the ID.
1. While the router is powered on, you will need to press the pinhole reset button. Keep the button pressed for 10 seconds.
2. You will see the power LED blinking fast and give it a few moments to boot up.
3. Launch a browser and enter tplink extender setup to configure it again with a different ID.
#http //tplinkrepeater.net login#tp link wireless repeater net admin setup#tp link extender http //tplinkrepeater.net configurar#tp link extender setup from Computer#tp link wifi extender setup#tp link wifi setup Steps#how to setup http //tplinkrepeater.net tp link router#tp link router setup not working#how to setup tp link extender#how to setup http //tplinkrepeater.net using computer#extender setup page tp link#tp link repeater.et admin page setup
0 notes