#How to Install and Configure TP-link Wireless Router?
Explore tagged Tumblr posts
Visit Tumblr Blog
Explore Tumblr blogs with no restrictions, modern design and the best experience.
Last Seen Tumblr Blogs


Fun Fact
China blocked Tumblr because of pornography and censorship problems in 2013.
Text
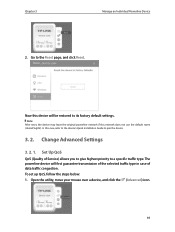
Guide to TP-Link C60 Archer Router Installation! The TP-Link C60 Archer Router Installation involves connecting the router to your modem and a power outlet. Then, connect your computer to the router via Ethernet or the default Wi-Fi network. Open a web browser and enter tplinkwifi.net. Follow the quick setup wizard to configure your internet connection and wireless settings. For a comprehensive installation guide, visit our website.
0 notes
Text
How to Install and Configure TP-link Wireless Router? tplinkwifi.net
How to Install and Configure TP-link Wireless Router — TP–Link router are including an High Speed Cable Modems, wireless routers, mobile phones, ADSL, range extenders, routers, switches, IP cameras, power line adapters, print servers, media converters, wireless adapters, power banks, USB Hub and SMART home technology devices. TP–Link router also manufactured the On Hub router for Google.
#tplinkwifi.net#tplink#tplinkwifi#tplink wifi router#How to Install and Configure TP-link Wireless Router?#How to Install and Configure TP-link Wireless Router? tplinkwifi.net
1 note
·
View note
Link
#TP-Link Router#TP Link Router Configuration#How to Setup TP-Link Router#TP-Link Router Login Steps#Install TP-Link Router#Wifi Router Settings#Wireless Settings#TP-Link A7 Router Setup#TP-Link Router Firmware#TP-Link Router Login Issues
2 notes
·
View notes
Photo

Tp-link is the smart signal indicator with three hundred twenty-four seven support. If you have faced an issue with Connect TP-Link WIFI Router. You can call our customer support toll-free number at +1-866-651-4555. They will solve all problems.
Visit here: https://setuprouters.com/tplink-router/
#How to Connect TP Link WIFI Router#TP Link Router Configuration#TP Link Router Settings#TP Link Router Setup#How to Install TP-Link Wireless Router
0 notes
Text
TP-LINK EXTENDER SETUP

You need to be connected to the TP Link Network to set up your TPLink Wi-Fi extension. If you do not set up the tp-link extension, ensure that the original tplinkrepeater.net configuration procedure is connected with your extension next to the home router.
Trying to Install the WIFI Range Extender?
Using Tplinkrepeater.net Web Browser setup
to use Tplinkrepeater.net to configure your extension.
Get a mobile phone, tablet or computer with your wireless device.
Connect the 2.4 Ghz TP-Link with your device.
Open Chrome, Firefox, or Edge browsers.
Enter 192.168.0.254 on Tplinkrepeater.net or hit Type the address bar.
Enter your default password for your username.
Configuring your TP-Link extender
In order to start, you must connect your TP-Link extension to your computer through an Ethernet wire. This allows us to schedule and connect wireless settings.
Connect the power socket to the TP-link extension.
Connect to your PC now with your Tp Link extension.
Go to tplinkrepeater.net and open your computer's browser. If it does not work, try 192.168.0.254. The TP-Link web page should be listed.
Choose Next and Fast Setup.
Select your region and your neighbourhood next.
Allow TP-Link to search the wireless networks available. It may take a minute or two, depending on the number of networks close by.
After selecting the wireless network, pick Next from the list.
Enter your mobile password when requested.
To check network settings in the previous box, click Finish.
How to set up my TP Link WIFI repeater?
Make sure that the repeater is powered before setting the Tp-link extension.
See and click your device's WPS button. Look now. Look now.
On your Wi-Fi or modem, press the same button.
The splashing lights on both your devices are now visible.
If your repeater is connected to your modem or network successfully, On the extender, you can see a strong led light.
Immediately remove the extender and set it where poor internet signals are present.
TP-Link Extender Login 192.168.0.254
The WIFI TP extension IP address is 192.168.0.254. Use the default TP-Link Extensor IP 192.168.0.254, if the http://tplinkrepeater.net web URL does not work for you.
You merely need to open the web browser in the address bar to view the repeater and insert the default IP. This brings you to the default web page where your device may be easily installed and configured. This IP works as the web address of tplinkrepeater.net exclusively for installing your device.
Use a tablet or laptop for the network extension configuration and connect your device to the TP-Link.
Open every web browser when you have an online browser such as Google Chrome, Mozilla Firefox or Microsoft Edge.
And in the address bar type 192.168.0.254 IP.
TPlinkrepeater.net is now available on the setup page.
To access the installation page, create the device login password.
Follow on-screen directions to connect your device to the principal router or modem when you check in.
The 192.168.1.254 class C IP address includes the 192.168.1.1 number and 192.168.1.255 number. The address is included in RFC 1918's private IP address.
Upon accessing this URL, the user received an error notice that "this website cannot be reached" or "it takes too long to react to this URL."
Therefore, the IP address is not available on a public network only in a private area.
Private networks are private range IP packets. Network devices such as routers offer Network Address Translation Is private IP address (NAS). The current router utilises DHCP to assign these addresses. This IP is used for home network applications since 192.168.1.1 is the default IP extension for practically all of the routers. Please contact our support team if you have problems connecting to 192.168.1.254.
TPLINKREPEATER.NET LOGIN
TPlinkrepeater.net is an offline web URL for your wireless connection to your extension. A user may not only use tplinkrepeater.net to link an extension to change repeater settings
Why don't I get to the Tp Link settings page?
If a user cannot connect to the default connection site tplinkrepeater.net, either the error or a serious technical problem is typical.
The site URL is not used correctly.
Slow or incoherent WIFI connectivity.
The web browser version is obsolete.
Not the same extension and router settings.
Problems with Windows firewall setup
SSID and major concerns pre-shared.
The network of range extensors is not connected to you.
On http://tplinkreater.net you can't reach the server.
1 note
·
View note
Text
192.168.0.1 Hardware IP Address
192.168.1.1 is the default gateway IP Address - - employed to login as admin of router settings such as TP-Link, D-Link, Linksys, Netgear. Back in the day, hardly anyone imagined that there could one day be billions of Web-connected devices in the planet. The reality that there will be more than 24 billion web-connected devices installed about the globe by 2020 would be a massive surprise to the individuals behind Internet Protocol version four (IPv4), which is 32-bits (232) in size and includes four,294,967,296 IPv4 addresses.
This gateway address is the IP address of your router. Step 2: Launch net browser > sort 192.168.0.1 in the address bar > Enter. Router is not discovered on 192.168.1.1. A message (pasted under in portuguese and translated soon after) show in the screen alternatively of the router web page. An IPv4 address consists of a series of four numbers, separated by a dot. Every single number may possibly have 1-three digits. They are normally expressed in decimal numbers for instance, the 192.168..1 IP address.
At the C:> prompt, sort ipconfig and press Enter. In case you do not keep in mind the information you can use the following technique to access the IP address. If you can't access 192.168.0.1, you need to very first restart your router and try once more. If that doesn't aid, you may need to have to erase your router's settings. Most routers have a unique button just for this goal that you can press with a pointy tool, such as a pen. Merely press and hold the button for at least ten seconds or until you see the LEDs commence flashing.
The equipment's manufacturers configure routers to develop a new network (kind 192.168.1.) if a 192.168.0.1 network sort currently exists! The router will have 192.168.1.1 as default address and will give other machines on the network addresses ranging from 192.168.1.2 to192.168.1.254. If all else fails, you can attempt resetting the router by pressing the reset button of the router for 15-20 seconds. Then click the Connected to” alternative in the list. It will also show the connected networks. From there, select the name of the wireless network you happen to be connected to.
Find your router's "Reset" button. You'll typically discover this button, which is fairly little, on the back of the router. If you don't know the correct administrator login name and administrator password, you should flip your router about and appear for a sticker on the bottom side. It really is quite widespread for router producers to print the default administrator login name and administrator password on a sticker, along with other helpful information, such as the name of the router or the website of the manufacturer.
192.168.0.1 is a single of a lot of private IP addresses, which are utilized by routers to recognize themselves on a network. If you have a router that utilizes this IP address and you know its login and password, you can type the address into the URL field of your net browser, log in, and adjust any router settings you want. Now you know a lot of issues about IP Addresses, Private and Public IP Address, How to Access 192.168.0.1, What If You Can not Access 192.168.0.1, How To Find The Router IP Address and much much more.
You need to see a login web page open in your net browser, asking you to enter the default admin username and password. Modifications have been produced to the IP address pu port number. You will now be disconnected from RT-N12D1. All Router has a single reset button. All you want to do is a press reset button for 20 seconds till all LEDs blinked and after carried out, release it. It will reset to default username and password which are listed above.
Ok, the output of the ipconfig although attached to nothing but the router (and it isolated) show's APIPA addressing which means you happen to be not getting something from DHCP on the router. Because the PC's network interface is DHCP enabled, that signifies your router has to have it's DHCP service shut off. Turn on your router and connect it to your personal computer with an Ethernet cable. If the private network demands to connect to the internet, is should use a proxy server or gateway.
The problem with the web is that not every destination has a public address. Some destinations have only what is known as a private address, and the IP address 192.168.0.1 is a single of them. 192.168.0.1 is a private IP address, comparable to 192.168.1.1 or ten...1 employed by a lot of vendors as the default gateway. A lot of Netgear and D-Link model routers use 192.168.0.1 as their default IP address. It is used in a private IPv4 network address as the router gateway. In order to avoid address conflicts, only 1 device can use 192.168.0.1 on a network. Other common default gateways are 192.168.1.1 and ten...1.
A new version of the Internet Protocol has also been developed, called IPv6. Unlike its predecessor, IPv6 makes use of a 128-bit address, permitting for approximately 3.4×1038 addresses, which is enough to assign a special IPv6 address to every single atom on the surface of the Earth. Step 4: Log in to the D-Link router with the administrator username and password. Pay a visit to this internet site for much more detailed directions and tools on locating your router's IP address.
Soon after successful login, you have to adjust the WiFi password and router username. Decide on a sturdy password, a combination of letters, symbols, and numbers. Here are some examples of how distinct router modes and switches would assign IP addresses to computer systems in a network. You will see the IP address next to default” (in the instance below, the IP address is: 192.168.137.1). If you never remember your username and password, you can take advantage of default login details that are provided on the globe wide web. When it is worked, you ought to be asked for your password. Then you have to enter a username and password. Determine on a mix of letters and numbers to develop the password robust.
1 note
·
View note
Text
192.168.0.1 Hardware IP Address
192.168.0.1 Hardware IP Address
192.168.1.1 is the default gateway IP Address - - employed to login as admin of router settings such as TP-Link, D-Hyperlink, Linksys, Netgear. Step 7. A new web page will open and this web page will inform you two critical things. The IPv4 Default gateway (router's IP address) and your device's IP address to that router which is the IPv4 Address. You should be greeted by a login prompt asking you for a username and password. In most circumstances, each the username and password are admin.” However, it is achievable to come across a router that makes use of a distinct password, and we clarify what to do in that predicament in the next chapter of this report.
As we've just said, it is not possible to enter the 192.168.1. IP address unless you happen to be connected to the identical neighborhood network as the router to which the IP address is assigned. That should not be a issue if you're attempting to connect to your own property router. In some circumstances, it is needed to connect directly by means of an Ethernet cable for safety factors. I did the original setup, changed the admin admin password, designed a wifi network, it worked fine for a year (changins passwords when in a while).
The good news is that the default login name and password are typically admin.” If that does not perform, we suggest you Google something like default login name and password” followed by your router's model and manufacturer. For the very first connection it is necessary to use an RJ-45 cable connecting the personal computer and the router, to configure it! The subsequent step is to enter your credentials for the net interface (login and password). These default password and login are specified in the manufaturer's documentation.
Step three. Click the Network & Internet” alternative. Step five. Choose how you are connected to your router. If you are hardwired to your router select Ethernet. If you are connected to your router by way of WiFi select Wi-Fi. Please post back here with the results of the test and the info on exactly exactly where your Pc network cable connects. But in most cases, the default IP Address for Modems and Routers is 192.168.0.1. Now you also require to Enter Default username and password in order to access its admin web page. The default username and password are various for a various manufacturer. Right here we are going to share all the possible Default Username and Password for 192.168.01 IP address.
You may possibly consider that nearly 4.three billion IP address would be adequate, but you would be wrong. There are now about 23 billion connected devices, and the quantity is expected to double by 2023. To cope with the IP address shortage, a single public IP address is often utilised to hide an complete IP address space consisting of private IP addresses using network address translation (NAT), a strategy of remapping 1 IP address space into an additional.
Soon after a productive router login, you should be able to alter router settings There are numerous settings you can change, but the ones you are going to likely be interested in the most all revolve around wireless net access and safety. This IP (a.k.a. Web protocol) tracking statistics is machine attained specifically for 192.168.0.1. The host has the computer IP address 192.168.0.1. This device IP address yields to right specifications of an IPv4 personal computer IP, which has a compressed worth of 3232235521.
Step 1: Plug D-Hyperlink router with your laptop or desktop with Ethernet cable. The number 192.168.0.1 is the default web protocol address (or IP address) for all types of TP-hyperlink, D-Link and Netgear models. This private IPv4 network address can be changed at any time using your network router's management console. In the case of other routers, you can kind ‘admin' as the default username and password. Occasionally, you can also kind ‘pass' or ‘password' in the password box.
Locate your router's "Reset" button. You will usually uncover this button, which is quite tiny, on the back of the router. If you don't know the right administrator login name and administrator password, you must flip your router about and look for a sticker on the bottom side. It's very common for router producers to print the default administrator login name and administrator password on a sticker, along with other beneficial details, such as the name of the router or the site of the manufacturer.
These private IPs total about 17.9 million different addresses, all reserved for use on private networks. This is why a router's private IP does not need to have to be exclusive. The router then assigns a private IP address to each device in its network, whether it is a little home network or an enterprise-level organization. Every single device inside the network can connect to one more device in the network utilizing this private IP.
Back in the day, hardly anybody imagined that there could a single day be billions of Net-connected devices in the globe. The reality that there will be far more than 24 billion internet-connected devices installed about the planet by 2020 would be a massive surprise to the people behind Internet Protocol version 4 (IPv4), which is 32-bits (232) in size and includes 4,294,967,296 IPv4 addresses.
Step 4: Go to Wireless Setting and change settings that you want. Step 4: Adjust WiFi Password and Router Username. Step two: Variety 192.168.1.1 in browser > Enter. The router utilizes a diverse address than 192.168.1.1. Open a browser and variety that IP address to log into the router using the administrative ID and password. In case you can't access your router admin configuration web page by means of , let's locate out which IP address your router is using.
The 192.168..1 IP address falls inside this final variety of reserved private IP addresses. To change your router's password, go to the settings menu and appear for an option titled password.” It is important that you pick a password that is sufficiently secure. The router has to be configured. Prior to starting to get the crucial, you may well have to connect it to the routers or modem by employing an Ethernet wire. You will require a router login IP address, which can be 192.168.1.1 , , 192.168.1. 254, and so on. Now, if you do not know about Router Default IP, then verify out its shipping box or get in touch with manufacturer.
1 note
·
View note
Text
DOWNLOAD FR-E700 USB DRIVER
Date Added: 23 September, 2019 Operating Systems: Windows NT/2000/XP/2003/2003/7/8/10 MacOS 10/X Uploader: Tia File Name: fr-e700 usb driver Price: Free Downloads: 5648 File Version: 716191727 Download Type: http File Size: 23 Mb File Format: exe

Change log: - Fixes TP can't be used at first time entering IOArcade with JP K/B. - Fixed BIOS hang-up problem(fr-e700 usb driver problem) which is caused by specific CPU cooling fan reporting error RPM to BIOS when CPU FanEQ 60% enabled. - Fixes sound output(fr-e700 usb driver output) failure in pure DOS mode. - Installer related fix.(fr-e700 usb driver fix.) - Network]: Fixed a bug where the iSCSI target IP address was detected although the service port was restricted. - VDRemoval of jetVD (service expired)- Fixed other bugsIt is highly recommended to always use the most recent driver version available. - (Fix) Fixed an issue that the User Credential tab will be lost when clicking it in EAP-FAST Properties. - Fixed(fr-e700 usb driver Fixed) bug of "the header section the line end is "LFLFCR" (0d0d0a), then destroy the E-Mail layout."18. - Fixed Seagate HDD ST320410 detection failed. - Compliant(fr-e700 usb driver Compliant) with DNSSEC. - Fixed bug Countdown string only lan change. Users content: Added: NTP Server. However, you can still get a newer software version for the same device: download ARCHOS 605 WiFi (20GB-160GB) Tablet Firmware 2.1. Negative scaling in F1 2017 may be observed on Radeon RX 580 Series Graphics products in multi-GPU system configurations. This is your indication that the firmware update was successful. - The first version of firmware for ASUS DSL-N12U B1It is highly recommended to always use the most recent driver version available. Restart your computer. The “Update” Message is showing onto the Screen- Click “OK” on the “reboot alert”, and choose the Firmware file- Progress bar. - Provides the WHQL driver to support Windows 10. HOW TO USE: 1. B1 It has recently been reported that multiple vulnerabilities are found on hardware version B1 of the D-Link DWR-932 4G LTE Mobile Router. Preventing DHCP reservation conflict. Here you can find your DOWNLOAD LINKSYS COMPACT WIRELESS G USB ADAPTOR DRIVER. Supported OS: Microsoft Windows 8 Enterprise (32-bit) Windows Server 2016 Windows 8 Windows 8.1 Microsoft Windows 8 (64-bit) Windows 2000 Windows Server 2003 64-bit Microsoft Windows 8.1 (32-bit) Microsoft Windows 8 Pro (32-bit) Windows 7 32-bit Microsoft Windows 8.1 (64-bit) Notebook 8.1/8/7 64-bit Microsoft Windows 8.1 Pro (32-bit) Microsoft Windows 10 (64-bit) Microsoft Windows 8.1 Pro (64-bit) Microsoft Windows 8 (32-bit) Windows XP 64-bit Microsoft Windows 8.1 Enterprise (32-bit) Windows Server 2003 32-bit Windows XP 32-bit Microsoft Windows 10 (32-bit) Windows Server 2008 Windows 8.1/8/7/Vista 64-bit Windows Vista 32-bit Windows Vista 64-bit Windows 7 Microsoft Windows 8.1 Enterprise (64-bit) Windows 8.1/8/7/Vista 32-bit Windows Server 2008 R2 Microsoft Windows 8 Pro (64-bit) Notebook 8.1/8/7 32-bit Windows 10 Microsoft Windows 8 Enterprise (64-bit) Windows Server 2012 R2 Windows Server 2012 Windows 7 64-bit Searches: fr-e700 usb driver for Microsoft Windows 8 Pro (64-bit); fr-e700 usb URYBH2046; fr-e700 usb driver for Windows 10; fr-e700 usb driver for Windows 8; fr-e700 usb Uxk204-xkr; fr-e700 usb U20x; fr-e700 usb driver; fr-e700 usb UR2046; fr-e700 usb U UR204-2; fr-e700 usb driver for Windows 8.1/8/7/Vista 64-bit; fr-e700 usb driver for Windows Server 2003 32-bit Compatible Devices: Mouse; Ipad; Gadget; Iphone; Samsung; Scanner To ensure the integrity of your download, please verify the checksum value. MD5: fae76f38c667b8ce32de4b0fd86ddb26 SHA1: 41eacabb3c80ee2c4b2b41f02abd3b35cd12a489 SHA-256: 2df63d104b172ab5e796d632af5e5bc118488c52a325e2a47ad75a34f231b1ec
1 note
·
View note
Text
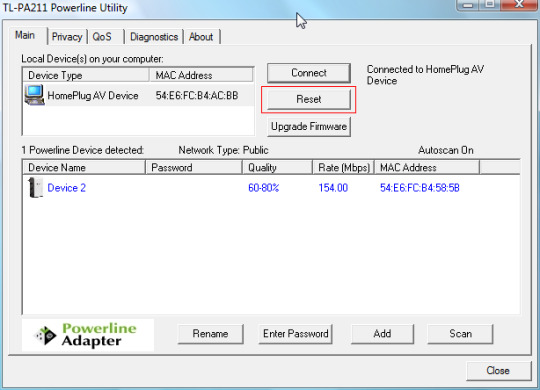
Tp link powerline utility reset device


Secure Your Powerline Network by Pairing.
Extend Your Wired Network by Plug & Play.
This chapter guides you on how to use the powerline adapter. Press and hold the button for more than 6 seconds to reset the powerline adapter to factory defaults.Ĭonnect the Ethernet port to your wired devices, such as a computer, a router or a game console, via an Ethernet cable. Go to Secure Your Powerline Network by Pairing for more information. Press and hold the button for 1 second to join a powerline network. The powerline adapter has a Plug that can be connected to any power socket. * If the device connected to the adapter is turned off or inactive for more than 5 minutes, the powerline adapter will automatically switch to Power-Saving Mode. The powerline adapter is not connected to any powerline network. The powerline adaptor is in a location with poor signal strength. The powerline adaptor is in a location with good signal strength. Once every 3 seconds: Power-Saving Mode* is on.
Once every second: Pairing is in process. For more details, please refer to the following table. LEDs indicate the powerline adapter’s working status. Your powerline adapter may differ in appearance slightly from that depicted because of the region and product version. TP-Link powerline adapter aims to extend your existing home network, with the help of your home’s electrical circuit. This chapter introduces what the powerline adapter can do and describes its appearance.
Our Technical Support contact information can be found at the Contact Technical Support page at.
A Technical Support Forum is provided for you to discuss our products at.
Specifications can be found on the product page at.
The Quick Installation Guide (QIG) can be found where you find this guide or inside the product package.
The latest software, management app and utility are available from the Download Center at.
Actual Powerline data throughput and Powerline range are not guaranteed and will vary as a result of network conditions and environmental factors, including electrical interference, the volume of traffic and network overhead, AFCI circuit breaker, and Powerline being located in a separate circuit. *Maximum Powerline signal rates are the physical rates derived from HomeplugAV/AV2 specifications. Actual wireless data throughput and wireless coverage are not guaranteed and will vary as a result of network conditions, client limitations, and environmental factors, including building materials, obstacles, volume and density of traffic, and client location. *Maximum wireless signal rates are the physical rates derived from IEEE Standard 802.11 specifications. This product may not be compatible with routers or gateways with firmware that has been altered, is based on open source programs, or are non-standard or outdated. *Compatible with all HomePlug AV and AV2 Standard Powerline adapters. Indicates important information that helps you make better use of your device. Ignoring this type of note might result in a malfunction or damage to the device. Key information appears in teal, including management page text such as menus, items, buttons, and so on. You can click to redirect to a website or a specific section. In this guide, the following conventions are used: All images, parameters, and descriptions documented in this guide are used for demonstration only.
When using this guide, please notice that features of the powerline adapter may vary slightly depending on the model and software version you have, and on your location, and language. The Quick Installation Guide provides instructions for quick internet setup, while this guide contains details of each function and demonstrates how to configure them in typical scenarios. This guide is a complement to the Quick Installation Guide. 6.2 Related Manuals / Resources About This Guide
0 notes
Text
How to complete TP-Link wireless router setup quickly with DSL Modem - ASK Router Experts
In this guide, we have shared simple and quick steps to install your TP-link Router. However, the instructions may vary with different TP-Link WiFi models and connection accessories that are available with you.
Please read the following conditions before starting the TP-link WiFi setup:
If you’re using a fiber/cable modem. The internet connection and access will be automatic without performing any other activity. But the connection is limited to only one user at a time, the internet cannot be shared with more than one user/ device. This installation type with TP-Link Router is done by using a cable/fiber modem. If you have received a static IP address from your Internet Service Provider, you need to configure your computer with manual IP before you get a new TPLink WiFi at home. For the TP-link router setup with the static IP, make sure to collect all the required information from your ISP before initiating the router setup. If you'd like to share your internet with multiple users without any additional activity while keeping the internet connection automatic. Then Setup your TP-Link router via ADSL model (Dynamic IP). If you’re looking forward to Installing TP-Link Router with the above-stated connections, this guide might be not relevant to you. Please follow the respective links to reach the rightful information as per your TP-link Router connection. Some Preparations before starting TP-Link Router Setup:- 1. Start by turning OFF your devices once by one, such as your modem first, then your TP-link router, and then the computer. 2. Fetch an ethernet cable included in the Router package, connect your modem to the WAN port of the TP-Link router with it, similarly connect the TP-Link router’s LAN port to your computer via ethernet cable. 3. Once all the devices are connected with each other, turn them ON. Firstly your TP-link router, computer, and then the modem thirdly. Follow the below instructions to setup TP-link WiFi with DSL Modem:- On your device that is connected to the internet, Log into the TPlink router’s web-based management page. If you don’t know-how, then follow this link to access the TP-link Web-Based Management page. (insert a link here) After logging in to TP-link Web Based Management Page, you have to configure your WAN type. Locate the Management Page and there you’ll see Network. Click it. On the left side of the web page, click WAN. You need to change the WAN Connection Type to PPPoE. Once you select the PPPoE, it will ask you to enter the PPPoE username and password which is generally provided by your ISP. If you do not have these credentials, you can simply contact your Internet Service provider to ask for a PPPoE username and password. Once done, click on Save to save and apply these settings. After a while, the TP-Link router will connect to the internet. Still, the job is not over, you need to wait for a few minutes to ensure the status of the WAN port. If the WAN status page shows any IP address 223.19.55.47, it means the connection is established between the TP-Link Router and the Modem. If the WAN status page doesn’t show any WAN IP address and also there’s no internet access, you need to Power cycle your TP-Link router. Follow the steps below: Firstly turn OFF the DSL modem, secondly your TP-Link Router, and thirdly your computer. Leave them turned OFF for 2 minutes. In the same pattern you turned them OFF, the first turn ON the DSL modem, then your TP-Link router, then lastly your computer. Common Issues & Queries TP-Link router setup address setup TP-Link Router as an access point Tp-link router setup manual PDF Tp-link 5G router setup How to setup TP-Link ADSL wireless router How to setup tp link router without modem Tp-Link router setup instructions
If you have similar concerns as stated above, For more information contact us: +1 (801) 516-6101
0 notes
Text
Change TP-Link ID for TP-Link RE200 AC750 Wi-Fi Range Extender
The router that you are using might be a dated one and you are not able to find the stability in the connection. If you have decided to upgrade the router setup, there are various options to choose from and you will find the one that will fit right with the specs you are looking for.
The users who are living in large spaces will need to also install an extender that can help you boost the existing wireless signals. A single router will not be able to cover the whole area. If you are worried about the setup process, we are here to ensure you that the steps you need to follow are quite simple and straightforward. The tplinkrepeater net is the portal that you will need to go to in order to configure the router.
The routers that are coming these days are loaded with features that are focused on the security of the network. You will get to use MAC filtering and parental controls along with a separate guest network to keep all the unwanted devices away. In this blog, we are going to discuss the steps that you need to follow to change the TP-Link ID.
The portal will also give you the guest network that will basically help in keeping the unknown devices away from the main network. It will add an extra layer of protection to your media server, as well.
How to change the TP-Link ID?
Now, if you are going to configure the router with a different TP-Link ID, you will need to reset the router to change the ID.
1. While the router is powered on, you will need to press the pinhole reset button. Keep the button pressed for 10 seconds.
2. You will see the power LED blinking fast and give it a few moments to boot up.
3. Launch a browser and enter tplink extender setup to configure it again with a different ID.
#http //tplinkrepeater.net login#tp link wireless repeater net admin setup#tp link extender http //tplinkrepeater.net configurar#tp link extender setup from Computer#tp link wifi extender setup#tp link wifi setup Steps#how to setup http //tplinkrepeater.net tp link router#tp link router setup not working#how to setup tp link extender#how to setup http //tplinkrepeater.net using computer#extender setup page tp link#tp link repeater.et admin page setup
0 notes
Text
How to Setup a Tp-Link Range Extender using tplinkrepeater.net?
Hello Tp-link users!
Installing a tp-link extender is easy when you are equipped with the right information and follow the standard guidelines. This blog will help you set up a link extender with the existing router at your home.
In this post, you will learn about the default IP of your tp link extender and the alternative URL i.e. tplinkreperter.net.
A TP-Link range extender will help you boost signal strength for your existing router and the access point Network. Nowadays, most routers come with good coverage capabilities. However, if you have a spacious home with multiple storeys to cover, a range extender is the best option.
Let’s get started on how you can set up a tp link range extender using tplinkrepeater.net.
Note- If you have an older tp link extender that you are trying to set up again, please consider a hard reset on it before installation.
Things You Need
A majority of range extenders are plug and play devices. However, there are a few things you will need before you begin installing a tplinkrepeater or doing tplinklogin.
● an ethernet cable (optional)
● main wireless device (wireless router) & information about wireless such as network name (SSID), wireless password, encryption type.
● default IP known as default gateway for tp-link range extender.
● device with a full browser such as chrome, firefox, safari, etc.
● working router and internet connection.
Look at the back or the bottom of your tp-link extender, you can see a label that contains default SSID(network name) & password for your new extender. You can also look for a configuration card under the box of tp-link router for the same information.
Let’s get started and install the tplinkrepeater:
Using www.tplinkrepeater.net for setup
1. Plug your tp link range extender to a power outlet near to your wireless router.
Power it on then wait for 20 seconds for it to boot up & so the lights on the repeater can go solid.
Tip- If you are using a smartphone or tablet to set up a TP-Link range extender, turn on the WiFi on your device. In case you are using a laptop, please disconnect any ethernet cables connected to it & make sure the wireless is turned on in the laptop.
2. Go to your computer & smartphone and refresh the available network list. You should be able to see a new unsecured tp-link network, please connect with it.
3. It should automatically take you to tplinkrepeater.net portal for configuration or you can open the browser manually and type 192.168.0.254 or tplinkrepeater.net and hit enter.
4. The setup page will present itself and may ask for default username & password for tp link extender. Please type admin in the username and password section. Use small caps as the password is case sensitive.
5. Follow the onscreen quick-step guide & hit next.
6. In the next step, select your region and press Next. The extender will search for the available network around you. Select the name of the one that corresponds to your main network (the wireless that you would like to extend).
Configuring the tplink repeater network
7. Enter the wireless password of your existing wireless router & click next.
8. The next screen will let you choose the security type, network name(SSID) for your new extended network. You can customize the network name & password & security mode.
9. Setup a different password if you want for your extender or leave it as it is. You can always change it by logging into the tp link extender console. Review the settings & click on the finish button.
10. The extender will reboot and save the settings. After a minute please unplug the extender & plug it somewhere between the place where you were having problems receiving the signals.
Now you will be able to see solid LED lights on the extender, which means the setup was successful. Use the password to connect with your new extender & enjoy extended wireless network.
Tip- Make sure you place your extender not far than 30-35 meters from the main wireless router.
In any case, if the setup fails to work please reset tplink range extender to default settings & configure it again using www.tplinkrepeater.net web address.
The information in this blog will be helpful to you in setting up a tplink range extender. Comment down below and mention about the problems/ issues you faced during the setup and how you resolved them.
0 notes
Text
TP-Link Archer C55 AC1200 Router DHCP Settings
When you are using a wireless network, there are high chances that you must have seen or heard about DHCP. These settings will allow you to provide the devices an IP address from the pool. How to Install TP-Link router to work with a Cable Modem

On the factory settings, the router will keep the DHCP enabled and if you want to change these settings, the dashboard will allow you to do so without any hassle. The tp link wifi router configuration is a very intuitive and user-friendly portal that provides all the features under a single dashboard.
These settings will be used primarily when you will need to reserve an IP address for any connected device. The router that are coming these days are equipped with a range of features that focus primarily on the network’s security.
You will get parental controls where the router will allow you to set the internet access time on the devices you don’t want on your network. There will also be MAC filtering where you will get the full list of connected devices and you will get to block or grant access right from there.
How to configure the DHCP settings?
In this section, we are going to go through the steps you need to follow to change the DHCP settings. Let’s dive into the steps right away.
1. Connect your device to the router and launch a browser. You will need to enter the router’s IP address.
2. You can also reach the dashboard through tp link wifi router configuration tplinkwifi.net.
3. Find the DHCP tab and then scroll to the DHCP Settings.
4. In the new dialog box, you will be required to enter the following details.
a. Click on Enable where it will turn on DHCP Server.
b. Provide the Start & End IP Address.
c. You will then need to enter the lease time followed by default gateway and domain.
d. At the last, you will need to provide the primary and secondary DNS server.
0 notes
Text
How to Configure Router Security Settings (Wi Fi Password, WPS, IP and MAC Filtering, Remote Access)

Hello every person! On this article, I'm going to tell you about security settings for a Wi-Fi router, and methods to at ease a Wi-Fi network from unauthorized access. Many customers forget about to configure their network security settings believing that their community is of no curiosity to someone, so why would an intruder try to enter it? Unfortunately, it is a false assumption: proper safety settings can guard you from identity theft as good as from unintended damage caused through other users of your community: out of curiosity, they'll exchange the settings which interrupts its average operation and even depart you stranded offline. This is the reason we propose checking your security settings proper now. I will exhibit you how to configure router security settings with the example of a well known mannequin, TP-hyperlink AC750 Archer C20. Nevertheless, nearly all routers have equivalent functionality, so these instructions will probably be valuable for different instruments as well, the only difference being the settings menu. For usual users, finishing a couple of steps would be sufficient. Exchange the identify and password required to access the router settings, change the Wi-Fi password, and disable WPS.Protecting the router with a password. The first thing to do is to change the default password protecting entry to the router settings. Such password will preclude strangers from gaining unauthorized access to your router. So whilst you exchange the default password, no one else will likely be competent to connect to the internet or adjust network settings. To make alterations to the routers title and password, hook up with this gadget by way of Wi-Fi or cable, and open a browser to enter its network handle. The routers network deal with is given on a sticky label on the bottom of the gadget. 192.168.1.1, 192.168.0.1, and so on. On this window, form the username and password- through default, they are admin and admin. Should you do the whole thing correct, the reveal will show you the settings menu. Go to the tab procedure instruments and find the Password line. You'll must give the previous username and password, and then enter the brand new data and click on save. That's all - the password for having access to the router has been modified. Weve completed step one in protection settings, so lets transfer on. Environment a password for Wi-Fi. The 2nd important step is to set a password for getting access to your Wi-Fi network. It will avoid strangers from connecting to this network. Many folks feel this option is unnecessary and in order that they go away their networks open to anybody. Nonetheless, by means of connecting to your community, other users can use torrent consumers to download content material, or play online video games - which eats up the traffic and places strain for your router. In its flip, the router could freeze and stutter, the connection velocity and high-quality will deteriorate. To vary the password, go to the tab wi-fi, appear for wireless safety and change the password. Don't use easy passwords consisting of eight digits 1 or 0, or digits from 1 to 8. Believe a couple of dependable password having both capital and lowercase letters, digits and specified symbols. Write down the brand new password simply in case you may fail to remember it. Disable WPS perform. The 0.33 step is to disable the WPS perform. This perform enables connecting to a wireless network quickly and with no password. In real existence, it's rarely used, and as it is too liable to hackers, I suggest disabling it. To do it, go to the tab wireless, open WPS and click right here to disable it. Conceal the network title. Conceal your network from the eyes of strangers. There is a specific function in the router settings to help you conceal the community. While you turn it on, other instruments will no longer see your Wi-Fi. In an effort to connect, they are going to have got to give not only the password but additionally the network identify (SSID). You can allow this function within the wireless network settings by way of unchecking the box next to allow SSID Broadcast. Different devices wont be able to look it, and from a Windows 10 computer, you are going to see a hidden network amongst other networks. Should you are attempting connecting, you will ought to enter the community title (SSID) after which the password; provided that the whole lot is correct, you will be able to join. From a smartphone, this community is solely invisible: so as to join, you should go to Wi-Fi settings and create a brand new network, then give the community title (SSID) and the password. Earlier than we proceed, a brief joke: A press release: "the day before today, for the primary time a hacker was once convicted of network penetration and went to penitentiary to serve a 12 years sentence. In step with the info of the principal computer of the police, the hacker goes to liberty the day after tomorrow when you consider that of expiration of the sentence." Filtering contraptions through MAC handle. The next stage is filtering gadgets by using theirMAC addresses. MAC tackle is a unique identifier of a gadget, as each device has its own MAC address. In the router settings, that you may add MAC addresses of the contraptions which can be allowed to connect with your community. When this function is enabled, most effective devices which are on this list can join. Alternatively, which you can list the instruments for which access should be blocked. It is a most efficient method to protect your router however it's only suitable for organizations with a precise quantity of users; for a home network, although, you're going to need to connect new users by coming into the router settings and including their MAC addresses, which is not too easy. To allow this option, open wireless MACFiltering which you can see in the wi-fi settings tab. Click on permit and check the field next to Deny the stations detailed via any enabled entries in the record to entry or permit, then add MAC addresses of such gadgets. Upgrading firmware Another most important side you must recollect when configuring protection settings is making sure your router has the today's firmware. It is going to fix mistakes and patch feasible vulnerabilities that can give strangers a foot within the door to hack your community. The guide to firmware can also be located right here in the settings. Options to improve firmware (specialized software)are most often somewhere within the procedure tools. Which you can down load the contemporary package from the official website of the routers brand certain here. Before downloading the firmware, you should verify the hardware version of your gadget. When you set up firmware for one other version, it will possibly injury the gadget or even make it inoperable. One can find the hardware variant on a sticker on the backside of the router. Choose a file and provides the trail to the firmware you have downloaded, and then click upgrade. After the process is over, the router will reboot routinely. Disabling faraway access. The next thing to configure is far flung entry. If in case you have faraway entry operate enabled but you don't use it - flip it off, due to the fact that such function lets anybody access your router is the web from every other gadget. In other words, any person understanding your routers IP address (WAN deal with) can enter its settings. With the intention to disable this function, go to the tab safety / far flung management, and form zeroes in the IP line. By way of default, this function is disabled. To permit faraway entry available to any one the IP deal with must look like this: 255.255.255.255. Deciding upon operation time. In some units, which you could mounted an operation schedule. For instance, you don't use the network at night so that you don't want any one else to attach either. This will also be achieved in one of the vital two approaches: by turning the router off (urgent the corresponding button) or establishing the time table for its work. To do it, open the tab entry control, go to agenda, and click Add New. On this window, you could specify days and time when you wish to have the router to operate, and confirm your alternative by using clicking retailer. Filtering via IP tackle (ARP binding, IP-MACbinding) if you have got to prevent web access for certain desktops within the community, use the ARP perform. Binding via ARP protocol is a easy function to control access for computer systems within a local community. To installed this filter, you should assign astatic IP to every pc linked to the community. For a home windows 10 computer, open Settings / community& internet / community and Sharing middle. Click on your community and pick houses. Open IP models 4, examine the box next to Use the next IP handle and specify it, as good as the subnet masks and default gateway. To connect the IP address of a laptop to a designated MAC address and make sure that other computer systems don't use this tackle, enable ARP Binding operate in the routers settings by way of visiting the tab IP & MAC Binding. After that, create a new entry, sort the and IP addresses, assess the field subsequent to Bind and click store. In the ARP table, you'll see all sure instruments. Now if any one else's computer (which is not on this list) sends a request to set up connection, access will be denied. Checking for strange gadgets within the record of clients related to the router. Should you notice that the quantity of your traffic has decreased greatly, otherwise you doubt that the router works safely, examine it for any odd gadgets that perhaps connected. Get protected against these threats. Learn how. Read the full article
0 notes
Link
Essential steps for tp link repeater
Are you not satisfied with the performance of your wireless router? If yes, then you should install a tp link repeater at your place. If you are not sure how to configure tp link repeater, we can help you. You can use the web address tplinkrepeater.net to configure your tp link repeater. If you looking for in-depth details, you can reach to our team.
https://tp-linkrepeatr.net/tp-link-extender-setup-instructions/
#tplinkextender.net#tplink extender setup#tplinkrepeater.net#tplinkrepeater.net not working#tplink repeater login#tplink login page#tplink setup wizard#tplink range extender setup page
0 notes