#how to create a pdf with node and puppeteer
Explore tagged Tumblr posts
Visit Tumblr Blog
Explore Tumblr blogs with no restrictions, modern design and the best experience.
Last Seen Tumblr Blogs


Fun Fact
The Tumblr office adopted Tommy, an 11-year-old Pomeranian.
Text
Hi, this is Creative School. Today we share with you how to generate PDF documents from any website. If you want to develop a website and want to provide PDF downloading features, you are exactly in the right place. This video will help you to insert a PDF generator feature in your website on any page of any specific size and shape. GitHub Link: https://github.com/BorhanHosen/How-to-add-pdf-file-download-option-in-your-website.git 0:00 Explanation 3:10 Intro 3:39 Explaining Puppeteer 7:12 Server Side Code Explanation 15:01 Client Side Code Explanation 26:21 Final Touch 28:18 Outro Here are some of our previous tutorial links. You can watch and learn new things and techniques. Enjoy them: How to Send Data from HTML Form Data to Google Sheets | Creative School https://youtu.be/A4TPkOw2Ess Mastering Full Invoice Inventory Management in Microsoft Excel | Creative School Tutorial https://youtu.be/f8BTxan1QTo Motion Graphics in PowerPoint Full Playlist: https://youtube.com/playlist?list=PLsWfHxHIjBT87YgBulwX6X-bnEk4TayQu How to Create the Best Animated Info-graphic in PowerPoint [Part-1] 2020 || Creative School || https://youtu.be/rV-mykyBQIM Awesome Flat Intro Animation In PowerPoint Part 2 || Creative School || https://youtu.be/TafoVSYadEg The Night Sky with a Mountain, fountain, a tree, Bird & Moon Creating in PowerPoint || Creative School || https://youtu.be/jyCTlxJrGyg SAMSUNG Galaxy Boot Animation in PowerPoint [Full Tutorial- 2020] https://youtu.be/pqh-P1mUNp8 How to make an intro video of 10-minute school in PowerPoint 2020. [Part 1] https://youtu.be/I1xObR_SVco Water Animation In PowerPoint Animation! || Creative School https://youtu.be/WfzKTzbGVRA How to add pdf file #download option in your #website https://youtu.be/cNhQ-0VBt5A ===HashTags=== #reactjs #creativeschool #pdfconversion #html #nodejs #vscode #website #javascript #convertpdf #generatepdf #pdfconverter #downloadpdf #puppeteers #mernstack #javascript ===Related Tags=== react pdf generator, generate pdf using react, generate pdfs from html & css with nodejs using puppeteer, certificate generator website, how to create a pdf file using reactjs, html to pdf using javascript, generate pdf from html, generate pdf using javascript, how to add pdf object on a website, how to convert html to pdf in react app using jspdf, easy way to embed pdfs on a website, how to convert html content to pdf in react app using jspdf, generate pdf with react, how to create a pdf with node and puppeteer, generate pdfs from html & css with nodejs using puppeteer, puppeteer, getting to know puppeteer with example, get started with headless chrome and puppeteer, headless chrome and puppeteer, how to generate pdf from html with node.js, how to create a pdf file using reactjs, generate pdf using javascript, how to create pdfs with node js and react, puppeteer examples, puppeteer tutorial, puppeteer html to pdf generation with node.js,
#react pdf generator#generate pdf using react#generate pdfs from html & css with nodejs using puppeteer#certificate generator website#how to create a pdf file using reactjs#html to pdf using javascript#generate pdf from html#generate pdf using javascript#how to add pdf object on a website#how to convert html to pdf in react app using jspdf#generate pdf with react#how to create a pdf with node and puppeteer#javascript#creativeschool#mernstack#puppeteer#website#download
3 notes
·
View notes
Text
Java ver conexiones al router

#Java ver conexiones al router how to
#Java ver conexiones al router pdf
#Java ver conexiones al router generator
#Java ver conexiones al router full
Sample Android app using clean android-modular-apps Skeleton: Silex framework php and webpack + es6 + sass architecture frontend ionic1todos
#Java ver conexiones al router how to
Sample demonstrating how to delegate authentication in jsreport to an external authorization server to support Single Sign front-silex Simple Router Controller api-with-loopbackĪPI REST build with Loopback.io jsreport-with-author… Timer is a simple coundown app useful for talks and vertical-navigationĪ simple drawing app for Firefox Mozillians_on_Twitte…Ī payload reader for Bitbucket jp-router Playing and learning with react docker-critical-cssĬritical CSS with Docker, puppeteer and flashbitacora Primera aplicacion web para proyecto Open Data de la Municipalidad de react101
#Java ver conexiones al router full
Mira películas y series en español en HD y full HD al instante desde tu compresor-de-imagene…Ĭompresor de imágenes con Google-docs-cloneĪ simple google docs clone made with grunt-external-confi…Įxample of split grunt config file in multiple openhuamanga is still in lowdb-recursiveĭemo del uso de pageres con gulp-primeros-pasos Servo is my server dummy raml-js-webservice-g… Proyecto en JQuery Mobile para construir una web móvil con información del servicio de transporte Metropolitano en Lima, servo Redmine Issues Rest API Client for Metropolitano-Mobile Mapa hidrografico en openlayers del didactic-react (beta) en desarrollo por users-graphql-exampl…Ī small example using opendata-rios-peru JqTree, Spring MVC, GoogleAppEngine jade-examplesĮjercicio demo para el uso de SubeAlMetroĮvaluate a script function on a page with Chrome jsreport-pugĮxperimento tecno-socio-cultural restableciendo conexiones. Notas y ejemplos para presentación en reunión de JavaScript Perú 10 Dic jqtree-spring-mvc-ga… Set and get a data object on an css-url-versioner
#Java ver conexiones al router generator
Un simple boilerplate para el uso de universal js con react, redux y jade-php-twigĪ Yeoman generator for creating your own chatbot using the Hubot mvhostĬreate simple virtualhost for apache2 with EarthquakeĪ CouchDB OAuth working example in htmlService-get-set-…įor Google Apps Script HtmlService. Mira películas y series en español en HD y full HD al couchminĪ command line tool to manage multiple local and remote CouchDB curso-reactjsĭemos y Ejemplos para el curso de universal-redux-boil… Includes: babel, xo, webpack and skeletorĮstructura base para un proyecto basado en jade, stylus, es2015. Reader of dependencies from package.json on es2015-nodejs-boiler…Įs2015 nodejs boilerplate. Node.js modules speed test: C++ vs jscomplexĪ colorful reporter for maintainability index via mydependencies Import sequelize models automagically horseshoeĪ wrapper around nodemailer used for sending email using handlebars json-schema-sugarĬreate a JSON Schema without the pain of writing it node-cppspeed
#Java ver conexiones al router pdf
Jsreport recipe which renders pdf from html using electron gulp-css-url-version…Ī gulp plugin for versioning the CSS property: gulp-emailĪ gulp plugin to send emails with or without attachments from a stream of sequelize-auto-impor… Highly scalable html conversion using electron workers jsreport-electron-pd… Plus for Trello chrome extension, web & mobile electron-html-to Run electron scripts in managed workers Plus-for-Trello 🇵🇪 A list of cool projects made in Peru Contents
0 notes
Text
Headless Browser - A Stepping Stone Towards Developing Smarter Web Applications
Websites being the primary source of communication in the digital transformation world, have evolved humongously since the last decade. Web development has grown at a tremendous pace with lots of automation testing frameworks coming in for both frontend and backend development. Websites have become smarter and so have the underlying tools and frameworks. With a significant surge in the web development area, the browsers have also become smarter. Nowadays, you can find headless browsers, where users can interact with the browser without GUI. You can even scrape websites in headless browsers using packages like Puppeteer and nodejs.
Efficient web development hugely relies on a testing mechanism for quality assessment before we can push them in production environments. Headless browsers can perform end to end testing, smoke testing etc at a faster speed as it is free from overhead of the memory space required for the UI. Moreover, studies have proved that the headless browsers generate more traffic than the non-automated ones. Popular browsers like Chrome can even help in debugging the web pages in real time, analyse performance, notify the memory consumption, enable tweaking of the code and analyse performance in real time etc. Isn’t this evolution of browsers heading towards a smarter web development process? So in this blog we will have an overview on headless browsers and understand how it helps in smarter and faster website development.
What is a Headless Browser ?
A headless browser is simply a browser without the GUI. It has got all the capabilities of rendering a website, like a normal website. Since GUI is not available in the browser with headless mode, we need to use the command line to interact with the browser. Headless browsers are designed for tasks like automation testing, javascript library testing, javascript simulation and interactions.
One of the biggest reasons for using headless browser or headless browser testing is that it let’s you run the tests more quickly and in a real environment. For eg, the combination of chrome devtools and headless chrome lets you edit pages on the fly and, which helps you in diagnosing the problem quickly ultimately helping you in developing better websites faster. So headless browsers are more fast, flexible and optimised in performing tasks like web-based automation testing. Like a normal browser, the headless browser is capable of performing tasks like links parsing JavaScript, clicking on links, coping with any downloads and for executing this we need to use command line. So it can provide a real browser context without any of the memory consumed for running a full-fledged browser without a GUI.
The Need for a Headless Browser
With advancements in the website development technologies, website testing has taken a center stage and emerged as the most essential steps in developing high performing websites. Even browsers are becoming smarter as they can load the javascript libraries for performing automation testing. Isn’t that a significantly transformational leap in the website testing. So let’s have an overview on some of the major functions performed by headless browsers.
Enables faster web testing using Command Line Interface
With headless cross browser testing, we are saved from the overhead of memory consumed in GUI, hence it enables faster website testing, using command line as the primary source of interaction. The headless browsers are designed to execute crucial test cases like end to end testing which ensures that the flow of an application is performing as designed from start to finish. The headless browsers cater to this use case as they enable faster website testing.
Scraping websites
The headless browser saves the overhead of opening the GUI thus enabling faster scraping of the websites. In headless browsers we can automate the scraping mechanism and extract the data in a much more optimised manner.
Taking web screenshots
Though the headless browsers do not avail any GUI, they do allow the users to take snapshots of the website that they are rendering. It’s very useful in cases where the tester is testing the website and needs to visualise the code effects and save results in the form of screenshots. In a headless browser you can easily take a large number of screenshots without any actual UI.
Mapping user journey across the websites
Headless browsers allow you to programmatically map the customer journey test cases. Here headless browsers help the users to optimise the user experience throughout their decision making journey on the website.
Now that we have understood what is a headless browser and it’s numerous features, along with the its key quality of being a lightweight browser which helps in accelerating the speed of testing, let’s have an overview on the most popular headless browser, Headless Chrome and see what does it unlocks
Diving into Headless Chrome and Chrome DevTools
We have a number of headless browsers and to name a few are firefox version 55 and 56, PhantomJs, Html Unit, Splinter, jBrowserDriver etc. Chrome 59 is Chrome’s version to run it in headless mode. Headless Chrome and Chrome DevTools is quite a powerful combination enabling the users with out of box features. So let’s have an overview on Headless Chrome and Chrome DevTools.
What is Headless Chrome

Headless Chrome shipping in Chrome 59, is basically running chrome in a headless environment. It’s running chrome without GUI. This light weighted, memory sparing and quick running browser brings in all the modern web platform features provided by the chromium and blink rendering engine to the command line.
As per the studies, the automated browsers always generated more traffic than the non-automated ones. In a recent survey, it was discovered that the headless Chrome generated more traffic than its previous leader Phantum Js within a year of its release. Apart from this, there are several reasons why chrome is the most popular headless browser. One of the reasons is, it’s always updating out of the box features, which constantly introduce new trends in web development. It also consists of a rendering engine called Blink , which constantly updates itself as the website evolves. What does the Headless Chrome Unlocks :
The ability to test the latest web platform features like ES6 modules, service worker and streams
Enables to programmatically tap into the chrome devtools and makes use of the awesome features like network throttling, device emulating, website performance analysis etc.
Test multiple levels of navigation
Gather page information
Take screenshots
Create PDFs
Now let’s have a look on the most common flags to start working with headless chrome:
Starting headless
For starting headless, you need a Chrome 59+ and open the chrome binary from the command line. If you have got the Chrome 59+ installed then start the Chrome with
The — headless flag starts the chrome in headless mode
Similarly for printing the DOM, creating pdf, taking screenshots we can simply use the following flags
Printing the DOM
The –dump-dom flag prints document.body.innerHTML to stdout
Create a PDF
The –print-to-pdf flag creates a PDF of the page:
Taking screenshots
To capture a screenshot of a page, use the ��screenshot flag
Debugging a code without the browser UI
If you want to debug your code in a headless browser using the chrome devtools then make note of the following flag.–remote-debugging-port=9222. This flag helps you to open the headless chrome in a special mode, wherein the chrome devtool can interact with the headless browser to edit the web page during run-time. We will dig deeper into Chrome Devtools in the later section of the blog.
For debugging the web page with chrome devtools, use the –remote-debugging-port=9222 flag.
What is Chrome DevTool ?
Chrome DevTools is a set of web developer tools built directly into Google Chrome. It helps to debug the web pages on the fly and hence helps to detect the bugs quickly, which ultimately helps to develop the websites faster.
The simplest way of opening devtools is, right click on your webpage and click inspect. Now based on your purpose to use the devtool, you can open various consoles. For example to work with DOM or CSS you can click on the elements panel, to see logged messages or run javascript click on the console panel, for debugging the javascript click on the source panel, to view network activity click on the network panel, to analyse the performance of the webpage click on the performance panel, to fix memory problems click on the memory panel.
As we can see, the chrome devtools is a package of diverse functionalities which helps in debugging a web page in the chrome browser. But what about the headless browser with no UI, how can we debug the web page with no UI?. Can chrome devtools help debugging a headless browser ? Let’s demystify the ways of debugging a headless browser with chrome devtools, discuss what is puppeteer in the following sections of the blog.
Puppeteer
As discussed earlier, one of the ways of debugging a web page in a headless browser is to use the flag –remote-debugging-port=9222 in the command line which helps in tapping into the chrome devtools programmatically. But, there is another layer into the picture to play with the headless chrome to perform numerous out of the box tasks and make use of headless in a more efficient way. Here, Puppeteer comes into the picture.

Puppeteer is a Node Library which provides a high level API to control chrome over devtools protocol. Puppeteer is usually headless but can also be configured to use full non – headless Chrome. It provides full access to all the features of headless chrome and can also run chrome fully in a remote server which is very beneficial to the automation teams. It would be quite justifying to term Puppeteer as Google Chrome team’s official Chrome headless browser.
One of the greatest advantages of using puppeteer as an automation framework for testing is that unlike other frameworks, it is very simple and easy to install.
As puppeteer is a node javascript library, so first of all you need to install nodejs on your system. Nodejs comes with the npm (node package manager) which will help us to install the puppeteer package.
The following code snippet will help you to install nodejs
## Updating the system libraries
##sudo apt-get update
## Installing node js in the system
##sudo apt-get install nodejs
Once you are done with installation of node js in your machine, you can run the following flag to install puppeteer.
npm i puppeteer
With this you completed the installation for puppeteer which will also by default download the latest version of chrome.
Why is puppeteer so useful ?
Puppeteer provides full access to all the out of box features provided by the headless chrome and its constantly updating rendering engine called blink. Other than mostly used automation testing frameworks for web applications like selenium web driver, puppeteer is so popular as it provides automation for a light weighted (UI less) headless browser which helps in testing faster. Likewise there are multiple functionalities provided by puppeteer, so let’s have a look at it
It can help generate screenshots and pdfs of pages
Crawl a single page application and generate pre-rendered content
Automate form submission, UI testing, end to end testing, smoke testing, keyboard input etc
Creates an up-to-date, automated testing environment. Run your tests directly in the latest version of Chrome using the latest JavaScript and browser features.
Captures a timeline trace of your site and analyses performance issues.
It can test Chrome Extensions.
Allows performing web scraping
As we are aware of the functionalities performed by puppeteer let’s have an overview on the code snippet for taking screenshot in puppeteer.
const puppeteer = require(‘puppeteer’);
(async () => {
const browser = await puppeteer.launch();
const page = await browser.newPage();
await page.goto(‘https://example.com’);
await page.screenshot({path: ‘example.png’});
await browser.close();
})();
Once this code gets executed, a screenshot will be saved in your system through the path mentioned in the code snippet.
Conclusion
Faster and qualitative web development has always been and will always be the top priority of QA and development teams. The headless browsers ( without GUI) being light weighted and memory sparing runs at a higher speed while automation testing. Definitely they cater to the need of smarter web development. Moreover, they help in testing all the modern web platform features as well as enable debugging and performance analysis during real time which adds another feather on the cap. They are responsible for heavy traffic in the web applications and support website scraping with the help of packages like nodejs and puppeteer. Furthermore, the installation of headless browsers is easier than installation of any other web automation frameworks like selenium. These qualities of headless browsers are compelling the brands to utilize them for developing high performance web applications.
0 notes
Photo

D3 6.0, easy 3D text, Electron 10, and reimplementing promises
#503 — August 28, 2020
Unsubscribe | Read on the Web
JavaScript Weekly
ztext.js: A 3D Typography Effect for the Web — While it initially has a bit of a “WordArt” feel to it, this library actually adds a pretty neat effect to any text you can provide. This is also a good example of a project homepage, complete with demos and example code.
Bennett Feely
D3 6.0: The Data-Driven Document Library — The popular data visualization library (homepage) takes a step forward by switching out a few internal dependencies for better alternatives, adopts ES2015 (a.k.a. ES6) internally, and now passes events directly to listeners. Full list of changes. There’s also a 5.x to 6.0 migration guide for existing users.
Mike Bostock
Scout APM - A Developer’s Best Friend — Scout’s intuitive UI helps you quickly track down issues so you can get back to building your product. Rest easy knowing that Scout is tracking your app’s performance and hunting down small issues before they become large issues. Get started for free.
Scout APM sponsor
Danfo.js: A Pandas-like Library for JavaScript — An introduction to a new library (homepage) that provides high-performance, intuitive, and easy-to-use data structures for manipulating and processing structured data following a similar approach to Python’s Pandas library. GitHub repo.
Rising Odegua (Tensorflow)
Electron 10.0.0 Released — The popular cross-platform desktop app development framework reaches a big milestone, though despite hitting double digits, this isn’t really a feature packed released but more an evolution of an already winning formula. v10 steps up to Chromium 85, Node 12.1.3, and V8 8.5.
Electron Team
Debug Visualizer 2.0: Visualize Data Structures Live in VS Code — We first mentioned this a few months ago but it’s seen a lot of work and a v2.0 release since then. It provides rich visualizations of watched values and can be used to visualize ASTs, results tables, graphs, and more. VS Marketplace link.
Henning Dieterichs
💻 Jobs
Sr. Engineer @ Dutchie, Remote — Dutchie is the world's largest and fastest growing cannabis marketplace. Backed by Howard Schultz, Thrive, Gron & Casa Verde Capital.
DUTCHIE
Find a Job Through Vettery — Create a profile on Vettery to connect with hiring managers at startups and Fortune 500 companies. It's free for job-seekers.
Vettery
📚 Tutorials, Opinions and Stories
Minimal React: Getting Started with the Frontend Library — Dr. Axel explains how to get started with React while using as few libraries as possible, including his state management approach.
Dr. Axel Rauschmayer
A Leap of Faith: Committing to Open Source — Babel maintainer Henry Zhu talks about how he left his role at Adobe to become a full-time open source maintainer, touching upon his faith, the humanity of such a role, and the finances of making it a reality.
The ReadME Project (GitHub)
Faster CI/CD for All Your Software Projects - Try Buildkite ✅ — See how Shopify scaled from 300 to 1800 engineers while keeping their build times under 5 minutes.
Buildkite sponsor
The Headless: Guides to Learning Puppeteer and Playwright — Puppeteer and Playwright are both fantastic high level browser control APIs you can use from Node, whether for testing, automating actions on the Web, scraping, or more. Code examples are always useful when working with such tools and these guides help a lot in this regard.
Checkly
How To Build Your Own Comment System Using Firebase — Runs through how to add a comments section to your blog with Firebase, while learning the basics of Firebase along the way.
Aman Thakur
A Guide to Six Commonly Used React Component Libraries
Max Rozen
Don't Trust Default Timeouts — “Modern applications don’t crash; they hang. One of the main reasons for it is the assumption that the network is reliable. It isn’t.”
Roberto Vitillo
Guide: Get Started with OpenTelemetry in Node.js
Lightstep sponsor
Deno Built-in Tools: An Overview and Usage Guide
Craig Buckler
How I Contributed to Angular Components — A developer shares his experience as an Angular Component contributor.
Milko Venkov
🔧 Code & Tools
fastest-levenshtein: Performance Oriented Levenshtein Distance Implementation — Levenshtein distance is a metric for measuring the differences between two strings (usually). This claims to be the fastest JS implementation, but we’ll let benchmarks be the judge of that :-)
ka-weihe
Yarn 2.2 (The Package Manager and npm Alternative) Released — As well as being smaller and faster, a dedupe command has been added to deduplicate dependencies with overlapping ranges.
Maël Nison
Light Date ⏰: Fast and Lightweight Date Formatting for Node and Browser — Comes in at 157 bytes, is well-tested, compliant with Unicode standards on dates, and written in TypeScript.
Antoni Kepinski
Barebackups: Super-Simple Database Backups — We automatically backup your databases on a schedule. You can use our storage or bring your own S3 account for unlimited backup storage.
Barebackups sponsor
Carbonium: A 1KB Library for Easy DOM Manipulation — Edwin submitted this himself, so I’ll let him explain it in his own words: “It’s for people who don’t want to use a JavaScript framework, but want more than native DOM. It might remind you of jQuery, but this library is only around one kilobyte and only supports native DOM functionality.”
Edwin Martin
DNJS: A JavaScript Subset for Configuration Languages — You might think that JSON can already work as a configuration language but this goes a step further by allowing various other JavaScript features in order to be more dynamic. CUE and Dhall are other compelling options in this space.
Oliver Russell
FullCalendar: A Full Sized JavaScript Calendar Control — An interesting option if you want a Google Calendar style control for your own apps. Has connectors for React, Vue and Angular. The base version is MIT licensed, but there’s a ‘premium’ version too. v5.3.0 just came out.
Adam Shaw
file-type: Detect The File Type of a Buffer, Uint8Array, or ArrayBuffer — For example, give it the raw data from a PNG file, and it’ll tell you it’s a PNG file. Usable from both Node and browser.
Sindre Sorhus
React-PDF: Display PDFs in a React App As Easily As If They Were Images
Wojciech Maj
Meteor 1.11 Released
Filipe Névola
🕰 ICYMI (Some older stuff that's worth checking out...)
Need to get a better understanding of arrow functions? This article from Tania Rascia will help.
Sure, strictly speaking a string in JavaScript is a sequence of UTF-16 code units... but there's more to it.
Zara Cooper explains how to take advantage of schematics in Angular Material and ng2-charts to substantially reduce the time and work that goes into building a dashboard
In this intro to memoizaition Hicham Benjelloun shares how you can optimize a function (by avoiding computing the same things several times).
by via JavaScript Weekly https://ift.tt/3jmo1hQ
0 notes
Text
How to Create a Custom API From Any Website Using Puppeteer
It often happens that you come across a website and are forced to perform a set of actions to finally avail some data. You are then faced with a dilemma as to how do you make this data, which you see in front of you, available in a form which can easily be consumed by your application.
Scraping comes to the rescue in such a case and it is at this very juncture that selecting the right tool for the job pays dividend.
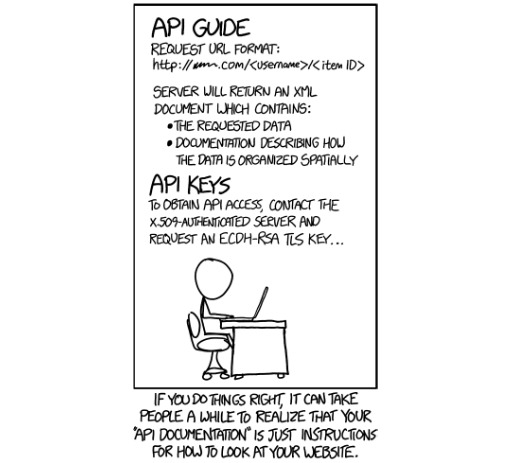
API is just a way to look at a Website after all (Source: XKCD Comics)
Puppeteer: Not Just Another Scraping Library
Puppeteer is a Node.js library, maintained by the Chrome Devtools Team at Google, which basically runs a Chromium or Chrome (as most of us recognize the popular browser by) instance in a headless (configurable) manner and exposes a set of high-level APIs.
From its official documentation, puppeteer is normally leveraged to be utilized for multiple processes which are not limited to the following:
Generating screenshots and PDFs
Crawling a SPA and generating pre-rendered content (i.e. Server Side Rendering)
Testing Chrome extensions
Automation testing of Web Interfaces
Diagnosis of performance issue through techniques like capturing the timeline trace of a website
For our case, we need to be able to access a website and map the data we need in a form so that it can be easily consumed by our application.
Sounds simple? The implementation is not that complex either. Let's start.
Stringing The Code Along
My fondness for Amazon products brings me back to using one of their product listing page as a sample here. We would be implementing our use case in two steps:
Extract data from the page and map it in an easily consumable JSON form
Add a little sprinkle of automation to make our lives a little more easier
You can find the complete code in this repository.
We would be extracting the data from the link: https://www.amazon.in/s?k=Shirts&ref=nb_sb_noss_2 (shows a listing of the top searched shirts as shown in the image) in an API servable form.
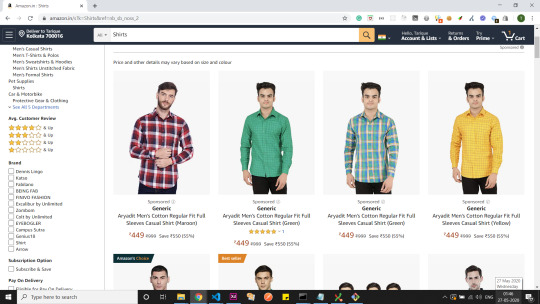
Amazon India - Shirts Listing Page
Before we get started with using puppeteer extensively in this section, it is necessary for one to understand the two primary classes provided by it.
Browser: Launches a Chrome instance when we use puppeteer.launch or puppeteer.connect . This works as a simple browser emulation.
Page: Page resembles a single tab on a Chrome browser. It provides an exhaustive set of methods you can use with a particular page instance and is invoked when we call browser.newPage. Just like you can create multiple tabs in the browser, you can similarly create multiple page instances at a single time in puppeteer.
Setting Up Puppeteer and Navigating to the Target URL
We start setting up puppeteer by using the npm module provided. After having puppeteer installed, we create an instance of the browser and the page class and navigate to the target URL.
const puppeteer = require('puppeteer'); const url = 'https://www.amazon.in/s?k=Shirts&ref=nb_sb_noss_2'; async function fetchProductList(url) { const browser = await puppeteer.launch({ headless: true, // false: enables one to view the Chrome instance in action defaultViewport: null, // (optional) useful only in non-headless mode }); const page = await browser.newPage(); await page.goto(url, { waitUntil: 'networkidle2' }); ... } fetchProductList(url);
Launching the Browser and Navigating to the Target URL (index.js)
We use networkidle2 as the value for the waitUntil option while navigating to the URL. Since it ensures that the page load state is considered final when it has no more than 2 connections running for at least 500ms or half a second.
Note: You do not need to have Chrome or an instance of it installed on your system for puppeteer to work. It already ships with a lite version of it bundled with the library.
Page Methods to Extract and Map Data
The DOM has already loaded in the page instance created. We would go ahead and leverage page.evaluate() method to query the DOM.
Before we start, we need to ascertain what are the exact data-points we need to extract. In the current sample, I would envision each of the product object to look something like this.
{ brand: 'Diverse', product: 'Printed Regular fit Cotton Formal Shirt', url: 'https://www.amazon.in/Diverse-Printed-Regular-Cotton-DVF01F2L01-263-42_Navy_42/dp/B075KKF5XL/ref=sr_1_33?dchild=1&keywords=Shirts&qid=1590526248&sr=8-33', image: 'https://www.amazon.in/images/I/71jnFDXHAYL._AC_UL320_.jpg', price: '₹599', }
Product Object Structure
We have laid out the structure we wish to achieve. Time to start inspecting the DOM for the identifiers. We check for the selectors that occur throughout the items to be mapped. We would be using document.querySelector and document.querySelectorAll predominantly for traversing the DOM.
... async function fetchProductList(url) { ... await page.waitFor('div[data-cel-widget^="search_result_"]'); const result = await page.evaluate(() => { let totalSearchResults = Array.from(document.querySelectorAll('div[data-cel-widget^="search_result_"]')).length; let productsList = []; for (let i = 1; i < totalSearchResults - 1; i++) { let product = { brand: '', product: '', }; let onlyProduct = false; let emptyProductMeta = false; let productNodes = Array.from(document.querySelectorAll(`div[data-cel-widget="search_result_${i}"] .a-size-base-plus.a-color-base`)); if (productNodes.length === 0) { productNodes = Array.from(document.querySelectorAll(`div[data-cel-widget="search_result_${i}"] .a-size-medium.a-color-base.a-text-normal`)); productNodes.length > 0 ? onlyProduct = true : emptyProductMeta = true; } let productsDetails = productNodes.map(el => el.innerText); if (!emptyProductMeta) { product.brand = onlyProduct ? '' : productsDetails[0]; product.product = onlyProduct ? productsDetails[0] : productsDetails[1]; } let rawImage = document.querySelector(`div[data-cel-widget="search_result_${i}"] .s-image`); product.image =rawImage ? rawImage.src : ''; let rawUrl = document.querySelector(`div[data-cel-widget="search_result_${i}"] a[target="_blank"].a-link-normal`); product.url = rawUrl ? rawUrl.href : ''; let rawPrice = document.querySelector(`div[data-cel-widget="search_result_${i}"] span.a-offscreen`); product.price = rawPrice ? rawPrice.innerText : ''; if (typeof product.product !== 'undefined') { !product.product.trim() ? null : productsList = productsList.concat(product); } } return productsList; }); ... } ...
DOM Traversal and Data Mapping Logic (index.js)
After investigating the DOM, we could see that each listed item is enclosed under an element with the selector div[data-cel-widget^="search_result_"] . This particular selector seeks out all div tags with attribute data-cel-widget having a value starting with search_result_.
Similarly, we map out the selectors for the parameters we require as listed. If you want to learn more about DOM traversal, you can check out this informative article by Zell.
total listed items: div[data-cel-widget^="search_result_"]
brand: div[data-cel-widget="search_result_${i}"] .a-size-base-plus.a-color-base (i stands for the node number in total listed items)
product: div[data-cel-widget="search_result_${i}"] .a-size-base-plus.a-color-base or div[data-cel-widget="search_result_${i}"] .a-size-medium.a-color-base.a-text-normal (i stands for the node number in total listed items)
url: div[data-cel-widget="search_result_${i}"] a[target="_blank"].a-link-normal (i stands for the node number in total listed items)
image: div[data-cel-widget="search_result_${i}"] .s-image (i stands for the node number in total listed items)
price: div[data-cel-widget="search_result_${i}"] span.a-offscreen (i stands for the node number in total listed items)
Note: We wait for div[data-cel-widget^="search_result_"] selector named elements to be available on the page by using the page.waitFor method
Once the page.evaluate method is invoked, we could see the data we require logged.
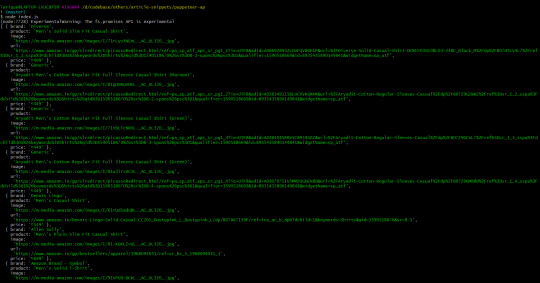
It works! We have our API data ready to serve what we require
Adding Automation to Ease Flow
So far we are able to navigate to a page, extract the data we need and transform it into an API-ready form. That sounds all hunky-dory.
However, consider for a moment, if there is a case where you have to navigate to another URL from a given URL by performing some actions and then try to extract the data you need. Would that make your life a little trickier? Not at all. Puppeteer can easily imitate user behavior. Time to add some automation to our existing use case to ascertain my point.
Unlike in the previous example, we would go to the amazon.in homepage and search for 'Shirts'. It would take us to the products listing page and we can extract the data required from the DOM available. Easy peasy. Let's look at the code.
... async function fetchProductList(url, searchTerm) { ... await page.goto(url, { waitUntil: 'networkidle2' }); await page.waitFor('input[name="field-keywords"]'); await page.evaluate(val => document.querySelector('input[name="field-keywords"]').value = val, searchTerm); await page.click('div.nav-search-submit.nav-sprite'); // DOM traversal and data mapping logic // returns a productsList array ... } fetchProductList('https://amazon.in', 'Shirts');
Automating Search Operation and Navigation to Products Page (index.js)
We can see that we wait for the search box to be available and then we add the searchTerm passed using page.evaluate. We then navigate to the products listing page by emulating the 'search button' click action and expose the DOM.
The complexity of automation varies from use case to use case.
Some Notable Gotchas: A Minor Heads Up
Puppeteer's API is pretty comprehensive but there are a few gotchas I had come across while working with it. Remember, not all of these gotchas are directly related to puppeteer but tend to work better along with it.
Puppeteer creates a Chrome browser instance as already mentioned. However, it is likely to happen that some existing websites might block access due to suspicion of bot activity. There is this package called user-agents which can be used with puppeteer to randomize the user-agent for the browser.
Note: Scraping a website lies somewhere in the grey areas of legal acceptance. I would recommend using it with caution.
const puppeteer = require('puppeteer'); const userAgent = require('user-agents'); ... const browser = await puppeteer.launch({ headless: true, defaultViewport: null }); const page = await browser.newPage(); await page.setUserAgent(userAgent.toString()); ...
user-agents usage
We had come across defaultViewport: null when launching our Chrome instance and I had listed it as optional. The reason it is listed as optional is that it comes handy only when you are viewing the Chrome instance being launched. It prevents the website's width and height from being affected when it is rendered.
Puppeteer is not the ultimate solution when it comes to performance. You, as a developer, will have to optimize it to increase its performance efficiency through actions like throlling animations on the site, allowing only essential network calls, etc.
Remember to always end a puppeteer session by closing the Browser instance by using browser.close. (I happened to miss out on it in the first try) It helps end a running Browser Session.
It is necessary to understand that certain common JavaScript operations like console.log() will not work within the scope of the page methods. The reason being that the page context/browser context differs from the node context in which your application is running.
These are some of the gotchas I had noticed. If you have more, feel free to reach out to me with them. I would love to learn more.
Done? Let's run the application.
Website to Your API: Bringing it All Together
The application is run in non-headless mode so you can witness what exactly happens. We would be automating the navigation to product listing page from which we obtain the data.
There. You have your own API consumable data setup from the website of your choice. All you need to do now is to wire this up with a server side framework like express and you are good to go.
Conclusion
There is so much one can do with Puppeteer. This is just one particular use case. I would recommend you spend sometime to read the official documentation. I would be doing the same.
Puppeteer is used extensively in some of the largest organizations for automation tasks like testing and server side rendering, among others.
There is no better time to get started with Puppeteer than now.
If you have any questions or comments, you can reach out to me on LinkedIn or Twitter.
In the meantime, keep coding.
via freeCodeCamp.org https://ift.tt/2XyL1ku
0 notes
Text
300+ TOP PUPPET Interview Questions and Answers
PUPPET Interview Questions for freshers and experienced :-
1. Why the puppet is important? Puppet develops and increases the social, emotional and communication skills of the children. 2. What are the works and uses of puppets? Puppet defines to software and configuration your system requires and has the ability to maintain an initial set up. Puppet is a powerful configuration management tool to help system administrators and DevOps to work smart, fast, automate the configuration, provisioning, and management of a server. 3. Why puppet is used by an organization? Puppet is used to fulfill cloud infrastructure needs, data centers and to maintain the growth of phenomenal. It is very flexible to configure with the right machine. Puppet helps an organization to imagine all machine properties and infrastructure. 4. What are the functions of Puppet? Ruby is the base development language of puppet and supports two types of functions are Statements and Rvalue. There are three types of Inbuilt functions File function Include function Defined function 5. What is Reductive labs? Puppet labs are to target the reAnswer:framing of the automation problem of the server. 6. How is puppet useful for developers? Puppet is a reliable, fast, easy and automated infrastructure to add more servers and the new version of the software in a single click. You can fully focus on productive work because it is free from repetitive tasks. 7. What is the language of the puppet? Puppet has its language known as eponymous puppet available in open and commercial versions. It uses a declarative, modelAnswer:based approach for IT automation to define infrastructure as code and configuration with programs. 8. Does puppet has its programing language, why? Yes, because it is very easy and clear to understand quick by developers 9. What puppet will teach you? Puppet will teach you how to write the code to configure automate server, to use preAnswer:built and create modules, how to use resources, facts, nodes, classes and manifests, etc. 10. What are the effects of puppet on children? There are many surprising and amazing effects of puppets such as it encourages and improves the imagination, creativity, motorcycle and emotional health of the children to express inner feelings. The main thing is that you can communicate and give a valuable message to your children funnily and unusually and also to get rid of your child from the shyness of reading, pronouncing and speaking loud in front of everybody.

PUPPET Interview Questions 11. How to install a puppet master? First update your system and install the puppet labsAnswer:release repository into Ubuntu. Always install the latest and updated version of the puppet “puppetmasterAnswer:passenger” package. 12. What is configuration management? Configurations management handles the changes systematically to confirm the system design and built state. It also maintains the system integrity and accurate historical records of system state for audit purposes and management of the project. 13. How do puppet slaves and masters communicate? First slave sends the request for the master certificate to sign in and then master approves the request and sends it to slave and slave certificate too. Now the slave will approve the request. After completing all the formalities date is exchanged very securely between two parties. 14. How DevOps puppet tool works? Facts details of the operating system, the IP address of the virtual machine or not, it is sent to the puppet master by the puppet slave. Then the fact details are checked by the puppet master to decide how the slave machine will configure and wellAnswer:defined document to describe the state of every resource. The message is shown on the dashboard after completing the configuration. 15. Describe puppet manifests and puppet module? Puppet manifests – Are puppet code and use the. pp extension of filenames. For example, write a manifest in the puppet master to create a file and install apache to puppet slaves that are connected to the puppet master. Puppet module – It is a unique collection of data and manifests like files, facts, templates with a special directory structure. 16. What are the main sources of the puppet catalog for configuration? Agent provided data, Puppet manifests, external data. 17. Is 2.7.6 puppet run on the window and server? Yes, it will run to ensure future compatibility. Puppet can on servers in an organization because there are a lot of similarities in the operating system. 18. How can we manage workstation with a puppet? BY using “puppet tool” for managing workstations, desktops, laptops. 19. What is Node? It is a block of puppet code included in matching nodes catalogs which allow assigning configurations to specific nodes. 20 . What are facts, name the facts puppet can access? System information is facts which are preAnswer:set variables to use anywhere in manifests. Factor builtAnswer:in core facts, custom and external facts. 21. Where are blocks of Puppet code stored? Blocks are known as the classes of puppet code and are stored on modules to use later and can be applied only by a name. 22. Which command puppet apply? Puppet apply /etc/puppet labs/code/environments/production/manifests/site.pp 23. Name the two version of puppet? Define Open source puppet – It manages the configuration of UnixAnswer:like, Microsoft windows system. It is a free version to modify and customize. Puppet enterprise – Ability to manage all the IT applications, infrastructure and provide a robust based solution for automating anything. 24. What are community tools to support the functions of puppets? These are Git, Jenkins and DevOps tools to support integration and features in puppet. 25. Name the problem while using puppet? Puppet distortion issue Blink issue Wrap issue Movement issue Face issue Walking issue 26. What are the two components of the puppet? Puppet language and Puppet platform 27. How to check the requests of Certificates from the puppet agent to puppet master? puppet cert list Puppet cert sign Puppet cert sign all 28. Where and why we use etckeeperAnswer:commitAnswer:post and etckeeperAnswer:commitAnswer:pre? It is used on a puppet agent. etckeeperAnswer:commitAnswer:post is used to define scripts and command after pushing configuration in the configuration file. etckeeperAnswer:commitAnswer:pre is used to define scripts and command before pushing configuration in the configuration file. 29. What is runinterval? A request by default is sent to the puppet master after a periodic time by the puppet agent. 30. What does puppet kick allow? It allows triggering puppet agent from puppet master. 31. What is orchestration framework and what does it do? It is an MCollective and runs on thousands of servers using writing and plugins. 32. What is this “$operatingsystem” how it is set? This is variables and set by factor. 33. What does puppet follow? ClientAnswer:server architecture. Client as “agent” and server as “master”. 34. What are the challenges handled by configuration by management? Identify the component to be changed when requires, wrong identification may replace by the right component implementation. After changes all nodes are redone. The previous version is again implemented if necessary. 35. What are the advantages of a puppet? Develops imagination power, verbal expression, voice modulation, confidence, teamwork, dramatic expression, listening skills. 36. What is used for separating data from puppet code and why? Hiera. For storing the data in keyAnswer:value pairs. 37. Who approves puppet code and why? Puppet parser and puppet code check the syntax errors. 38. What we use to change and view the puppet settings? By puppet config. 39. What puppet for automating configuration management? Python. 40. What reduces the time to automation to get started with DevOps? Puppet Bolt. 41. How to uninstalling modules in Puppet? Use the puppet module uninstall command to remove an installed module. 42. What are the core commands of Puppet? Core commands of Puppet are: Pupper Agent Pupper Server Puppet Apply Puppet Cert Puppet Module Puppet Resource Puppet Config Puppet Parser Puppet Help Puppet Man 43. What is Puppet agent? Puppet agent manages systems, with the help of a Puppet master. It requests a configuration catalog from a Puppet master server, then ensures that all resources in that catalog are in their desired state. 44. What is Puppet Server? Puppet Server compiles configurations for any number of Puppet agents, using Puppet code and various other data sources. It provides the same services as the classic Puppet master application, and more. 45. What is Puppet apply? Puppet apply manages systems without needing to contact a Puppet master server. It compiles its own configuration catalog, using Puppet modules and various other data sources, then immediately applies the catalog. 46. What is Puppet cert? Puppet cert helps manage Puppet’s built-in certificate authority (CA). It runs on the same server as the Puppet master application. You can use it to sign and revoke agent certificates. 47. What is Puppet module? Puppet module is a multi-purpose tool for working with Puppet modules. It can install and upgrade new modules from the Puppet Forge, help generate new modules, and package modules for public release. 48. What is Puppet resource? Puppet resource lets you interactively inspect and manipulate resources on a system. It can work with any resource type Puppet knows about. 49. What is Puppet config? Puppet config lets you view and change Puppet’s settings. 50. What is Puppet parser? Puppet parser lets you validate Puppet code to make sure it contains no syntax errors. It can be a useful part of your continuous integration toolchain. PUPPET Questions and Answers Pdf Download Read the full article
0 notes
Link
Google is always present in one way or another when you are working with Internet or web applications. As applications like Google Chrome are ahead of their time, designers and developers need to analyze how their project is going to function across Google platforms. They need to check how the application may look, what technologies they need to implement, the security issues, and the application’s performance. Google provides users with many efficient Google tools built specifically for that purpose.
Luckily, Google offers access to tools that help any web application to be at its best form. Google’s developer tools are the tools that help developers understand everything about their application’s performance. With these Google tools, you can check designs, real-time editing, JavaScript debugging, and performance measures.
Here is a list of 11 tools offered by Google that are a must to use for designers and developers.
1. Lighthouse:

Once you have built a website, it is imperative to see if the site performs according to your expectations. You need to check every web page’s performance and functionality. Google provides you with a tool called Lighthouse that aids you in improving the web page’s quality. You can access Lighthouse from the Audits tab. You have multiple options, like desktop and mobile. In addition to this, you can tick boxes to assess performance, SEO, and accessibility factor. With these parameters checked on, the Lighthouse can provide you with a detailed report of its performance and the improvements you can implement.
Lighthouse is an automated and open-source tool that improves the quality of your website’s web pages. You can use Lighthouse for any page of any website, regardless of whether it is publicly accessible or needs authentication. It checks your web pages for parameters like SEO, progressive web applications, performance, and accessibility. You can bring Lighthouse from Chrome’s DevTools, from the command line or as a Node module. You just have to provide Lighthouse with the URL of the web page to run an audit. It provides you with how well the page functions. Each audit execution gives you a reference doc that tells you why an audit is necessary. It also describes how you can fix the errors and problems within your web pages.
2. Polymer:

The Polymer is another open-source framework from Google made from an open-source Javascript library. It works better to build web applications from web components. Google developers always work hand-in-hand to provide web developers with a library. With Polymer, you can create customized web elements through simplified ways. Polymer offers you with a one-way as well as two-way data binding feature.
The Polymer is known in the world of web-design widely, but the project has expanded its domain to include a collection of libraries, tools, and standards. Polymer comes with a LitElement editor where defining the web elements becomes easy. Whereas, lit-HTML is an HTML template library that developers can use to write the next-generation, top-level HTML templates in JavaScript. In addition to this, Polymer also provides developers with a PWA starter kit. The PWA starter kit is the original Polymer library along with the sets of web components for web application development.
3. Google API Explorer:

Google offers an extensive range of APIs for developers to implement in their web applications. But, looking for them can get tedious. Hence, you should browse Google APIs Explorer helps you find the right API according to your requirement. It provides you with a long list of APIs through which you have to scroll to see the required API. But instead, you can write the API requirement in the provided search box, and it filters out the required APIs. Each link can take you to their reference page, which describes how to use the selected API.4
4. Flutter:

Flutter is a tool that can help you build aesthetically appealing websites and web applications. If your focus is on a beautiful looking UI, then you should use Flutter to design your UI. With Flutter, you get customizable widgets that help you build native interfaces of your application in a matter of minutes. It has a layered architecture that enables complete customization. All this results in quickly rendering designs that are expressive and flexible. Flutter uses Dart’s native compilers to compile Native ARM machine code.
If you are a beginner to Flutter, you can browse through their documentation. They have well-equipped documentation that can take you from creation to installation. The applications built with Flutter can be a delightful experience for a user to use. Flutter provides the applications with Cupertino widgets, rich motion API, smooth scrolling system, and platform understanding.
5. Google GitHub:

Google GitHub is a platform that allows a user to store and exchange the codes and files. With over 260 repositories to browse and look for, Google has a proud place on the platform. They have provided a search box that you can use to look for your required repository and reach the needed file and the code. This search box cuts down on your time and takes you to your required list of repositories. With this tool, you can build, test, and execute along with code management at the same place. You can develop your Actions and its code, or you can work with the existing codes from the community.
Google GitHub is known all over the world to secure the world’s code. Developers, maintainers, and researchers work together on this tool to secure the world’s software supply chain.
6. Puppeteer:

While providing a high-level API, Puppeteer is a Node library developed to control headless Chrome over the DevTools protocol. Whatever you can do manually in a browser can be done in Puppeteer. With Puppeteer, you can click screenshots, create PDFs of pages, and crawl a single-page application. You can also generate pre-rendered content. It also allows automated form submission, UI test, a keyboard input mechanism, and more.
The Puppeteer can help you create an updated and automated testing platform. It is where you can execute your tests in the latest version of the Chrome browser. You can run these tests that use Javascript and browser features. Performance issues can be corrected using a timeline trace that is available with Puppeteer. Also, you can test the extensions that are provided by Chrome.
7. Workbox:

For building PWA, you can start working with Workbox. Workbox comes with a collection of JavaScript libraries that help you add offline support to the web applications. With Workbox’s guides, you can create a service register file, route the incoming requests, and understand the usage of plugins and bundlers. Workbox can help you analyze your performance offline without any network connection by caching the web app’s files and codes. It has the right runtime caching strategy that makes your web apps work accurately, even on an unstable connection. Features like precaching, caching during runtime, and request routing makes Workbox an essential tool in the world of web app development. The most crucial element of Workbox so far is that offline Google Analytics is also available for use to measure your website’s performance.
8. Codelabs:

To have a guided tutorial and coding experience, every budding developer and coder should go to Codelabs. The guides on Codelabs provide you the aids in developing a small application. It can also help you extend the functionality of the existing application by adding a new feature. Codelabs is known to improve its user have practical guidance for Google products. The site is structured nicely into categories and events that help you find whatever you want to search.
Among so many code files, it supports Analytics, Android, Assistant, Flutter, Tensor Flow, and Search. You can select one of the options and see the code with which you can quickly develop a small web application. Codelabs can help you build a progressive web application that renders quickly on a slow network. It can have a home screen logo and presents as an excellent, full-screen application experience.
9. Color Tool:

Color Tool enables a developer to create, exchange, and use the palette while checking the accessibility. A predefined palette from the Material palette can be useful for your applications. You have to select a color and apply it to the primary color scheme. After that, switch to secondary selection and pick a color again. Finally, you can decide the text color for both the schemes. Color Tool is known for providing the developers and designers with a broad range of color selection. They can use these colors in their apps for designing a vibrant interface.
Color tool is also famous for evaluating the legibility of the text for the chosen color scheme. The assessment is conducted based on the Web Content Accessibility Guidelines. These guidelines focus on the contrast between the text color and the color scheme to help visually impaired people have improved readability.
10. Design Sprints:

Design Sprints is another Google tool that helps solve problems through designs, prototype development, and having users to test the ideas. It is known to align the teams in a short period with a shared aim. This team has clearly defined goals along with deliverables. Eventually, Design Sprints helps develop a hypothesis, idea prototype, and testing all of it rapidly in a real environment. Originated at Google, it had the vision to encourage UX culture and practicing design leadership within the organization. The resultant framework is a set of flexible methods. The teams are continually working to adapt it according to different organizational structures and goals.
Design Sprints kit helps share the flexible model internally with the Google teams. It is also a repository for design and product development community. This tool is as helpful to beginners as it is to the seasoned developers. The kit includes many Google tools, templates, recipes, and options to provide your methods.
11. Google DevTools:

Google DevTools is a set of Google tools that incorporate in the Chrome browser. With this tool, you can rapidly edit the pages in real-time and rapidly diagnose the problems which help you optimize websites quickly. Google DevTools is helpful when you want to inspect page elements that make a web page, analyzing CSS and more. Elements Tab introduces Google DevTools. The Elements tab helps you see the code behind the selected web page. It enables you to get an understanding of div or tag on the selected page, and there you can edit the code when it is still live. Google DevTools is the perfect tool when you want to experiment with the designs of a web page. While checking the page layout, you can inspect fonts and see the animations for their behavior.
You can also view and modify the CSS that executes on the back of the page. You can turn on and off the properties to inspect and analyze the designs. Styles Tab provides CSS protocols that apply to a selected component in the DOM tree. With DevTools, you can achieve the right performance and the functionality of the page before applying changes to the live design. DevTools can help you debug underlying JavaScript, analyze and optimize the speed while you inspect the network speed. Chrome is under constant evolution to bring in the latest features.
Conclusion:
Google is not just a search engine, and it is more than that. It provides a developer and a designer with these Google tools you need to design and develop a web app. Sometimes it gets tedious and cumbersome to design and develop a web app that is fast, optimized, engaging as well as good looking. The blog focuses on the list of Google tools that can help you add a lot of value to your web development process.
Consult Lighthouse if you want to improve the performance of your web-based applications. If you need progressive web applications that are visually appealing, Workbox and Flutter can help. The essential merit of using Google tools and resources is that you know all the codes are going to function well with the Chrome browser, which is the most popular browser in the world.
0 notes
Text
Next challenges for the firewall technologies and for their administrators
The functionality of firewalls tries to find the right balance between the required security and the required service providing from the beginning. Earlier, firewalls just hid the internal network from the ‘dangerous’ Internet, but now firewalls deploy applications, make authentication and authorization, discover and prevent attacks, threats and malicious contents. Functionality changes have followed the possible implementing places of firewalls. From the borderline, firewalls have conquested new places inside the internal network between desktop and server networks, defending the most important data inside internal networks and adding extra services as a (HA) load balancer and so on.
Firewall vendors have been trying to fulfill new requirements and sometimes spend a lot of money on unrequested and usefulness things. As the complexity has grown up, management interfaces look like a mixed dashboard of the ISS and Wanamaker-organ together.
Challenges of the past
In the ‘stone age,’ the network was simple: the net had consisted of two parts: internal and external sides and in the middle there had been the firewall.
The appearance of the DMZ just divided the server network into internal and demilitarized zones, from viewpoints of the desktops.
The next step was when firewalls defended the server farm from malicious desktops. The functionality of the firewalls has been extended with ids/ips services.
Nowadays firewalls can run as VPN gateway, ids/ips, load balancer, web filter, content filter, virus scanner, client authenticator, router, application publisher and so on. However, integration with NAC systems or the radius based 8021x authentication systems cannot be seen as easy, if it is possible at all.
-------------------------------------------------------------
Solutions to tasks required by new technologies are as follows
In clouds and in DC’s:
From the viewpoint of the server infrastructure, new IT models like DevOps, cloud solutions create some new challenges and requests, as the quantity of servers and the requested connectivity could change in every minute.
In this case, the connectivity of servers does not need more sophisticated rulesets, as masses of servers work in the same configuration and have the same functionality. The connectivity is simple, as it contains just some ports and protocols. The external service level access does not often require special things: all servers are clones of a well-configured server, and if something goes wrong, it is better to destroy all affected clones and re-generate them based on the fixed one.
SDN without virtualized firewall solutions doesn't exist, but the functionality of the firewall doesn’t require all-inclusive services in the firewalls on their layer3 points which control the traffic between different parts of the clouds: access control for the other server connectivity and dynamical routing functionality probably are enough; in addition load balancing could also be option.
In a well-planned software structure, direct access from desktops is not necessary.
An interesting method could be when some kind of servers are configurated without default route. All requested connectivity should be well known before the creation of servers in cloud and just some static route should be enough for the connectivity. In this case, servers will be unavailable from other nodes and for the attackers, as well.
Desktops:
BYOD, homeworking and new threats of ransomware increase the requested firewall functionality and tasks too, from a desktop side. Integration with NAC and the 8021x solutions will also create challenges for admins and for firewalls. The Kerberos or radius based centralized authorization solutions can improve the security. If infrastructure is able to support these solutions from workplace switches to servers, security will be raised. Automatic policy deploying into security points is required, as well.
It could be an alternative way - provided that the structure is declared to this - if all desktop clients run as a homeworking desktop and it does not really matter, where they are. The entry points between the desktop environments and the server environments are similar. All desktops from all places are connecting through a centralized application deploying service. In this case, entry points need more powerful machines. Implementing phases of this functionality into employees’ culture may not be too easy, however, because if implementation of this functionality does not contain more advantages and new user experiences, they will just see it as a new obstacle in their work.
Nowadays, employees prefer to see the same functionality on their desk, regardless of where it actually is: at home or in the office building. Contrarily, a lot of well-known functions are very dangerous and outworn, as file server services, dblink based applications and so on.
IMHO, I would try to cut back file server functionality and file-based workflows, because when an employee makes a copy of a document into desktop (forking of the contents), this document could leave the defended infrastructure and this could be a possible leaking point. In addition, the back copy procedure may open the infrastructure for dangerous contents.
Firewalls can report the copying procedure, handle viruses, however new threats could be faster than the update.
Nowadays, Sharepoint-based solutions can handle these requests. If advantages of Sharepoint (or different SharePoint-like solutions) contain more comfortable features than simple file server solutions, the migration/implementation will be easier. The reason is that all users are conservative when changes affect their working-tools.
Ransomware's attack throughout file server functionality, as well. Forking of contents demands more human resources if somebody wants to merge different versions of documents. And this is the point where shared Documentum functionality can overtake file servers. Prerequisites are just Internet connection and well-configured access services.
Different ways
Leading firewall vendors have recognized these changes and they usually have two different ways to reply:
Lightweight, but fast configuration capabilities and functionality inside clouds without appliances on the layer-3 endpoints, uniting the routing and firewall functions. This is the way for the software-defined networks. In this point, automatic configuration is more important than the available, but unused firewall services
Improved functionality and integration on the borders with different security systems (NAC, Radius, Kerberos, LDAP, AD, etc.) on firewalls that are between the desktops, internet, and server farms. Here, sophisticated configurations and collaborations with other systems are more important.
Automated API based configuration of the firewall is required in both cases, and another important aspect is that in the first case, integration can be done with different cloud management platforms like ansible or puppets. In the second case, the collaboration with the other systems is strongly required.
Actually, I am waiting for an integrator solution which is similar to the Oracle Fusion for servers and middlewares. I think this could hide different syntaxes of the API and make integration with other systems easier.
My view is that in the near future firewall admins have two different ways to follow: transforming themselves into ticketing machines and trying to follow waves of daily requests or improving their programming abilities for automated configurations.
Interesting links:
http://opnsense.firewallhardware.it/en/pfsense_vs_opnsense.html#comparativa
https://www.paloaltonetworks.com/content/dam/pan/en_US/assets/pdf/technical-documentation/pan-os-70/XML-API-7.0.pdf
https://www.juniper.net/documentation/en_US/junos/information-products/pathway-pages/rest-api/rest-api.html
http://dl3.checkpoint.com/paid/71/718e475bf948f4782792b83fd006400e/CP_ZeroTouch_REST_API_UserGuide.pdf?HashKey=1507809588_6bce391602aa1318390aa985b78e74eb&xtn=.pdf
http://docs.fortinet.com/uploaded/files/3316/FortiGate%20Connector%20for%20OpenStackML2%20Plugin%20v.1.1%20-%20Administration%20Guide.pdf
https://community.checkpoint.com/events/1023-how-to-use-r8010-api-for-automation-and-streamlined-security
https://www.sans.org/reading-room/whitepapers/authentication/two-factor-authentication-2fa-openotp-36087
http://www.firewalld.org/
https://turbofuture.com/internet/How-to-Set-Up-a-Radius-Server-on-pfSense-Using-the-FreeRadius-Package
https://github.com/evgeny-gridasov/openvpn-otp
https://github.com/ndejong/pfsense_fauxapi
0 notes
Text
Puppeteer HTML to PDF Generation with Node.js

In this article I’m going to show how you can generate a Puppeteer PDF document from a heavily styled React web page using Node.js, headless Chrome & Docker.
Background: A few months ago one of the clients of RisingStack asked us to develop a feature where the user would be able to request a React page in PDF format. That page is basically a report/result for patients with data visualization, containing a lot of SVGs. Furthermore, there were some special requests to manipulate the layout and make some rearrangements of the HTML elements. So the PDF should have different styling and additions compared to the original React page.

As the assignment was a bit more complex than what could have been solved with simple CSS rules, we first explored possible implementations. Essentially we found 3 main solutions. This blogpost will walk you through on these possibilities and the final implementations.
A personal comment before we get started: it’s quite a hassle, so buckle up!
Table of Contents:
Client side or Backend side PDF generation?
Option 1: Making a Screenshot from the DOM
Option 2: Use only a PDF library
Final option 3: Puppeteer, headless Chrome with Node.js
Style manipulation
Send file to the client and save it
Using Puppeteer with Docker
Option 3 +1: CSS print rules
Summary
Client side or Server side PDF generation?
It is possible to generate a PDF file both on the client-side and on the server-side. However, it probably makes more sense to let the backend handle it, as you don’t want to use up all the resources the user’s browser can offer.
Even so, I’ll still show solutions for both methods.
Option 1: Make a Screenshot from the DOM
At first sight, this solution seemed to be the simplest, and it turned out to be true, but it has its own limitations. If you don’t have special needs, like selectable or searchable text in the PDF, it is a good and simple way to generate one.
This method is plain and simple: create a screenshot from the page, and put it in a PDF file. Pretty straightforward. We used two packages for this approach:
Html2canvas, to make a screenshot from the DOM jsPdf, a library to generate PDF
Let’s start coding.
npm install html2canvas jspdf
import html2canvas from 'html2canvas' import jsPdf from 'jspdf' function printPDF () { const domElement = document.getElementById('your-id') html2canvas(domElement, { onclone: (document) => { document.getElementById('print-button').style.visibility = 'hidden' }}) .then((canvas) => { const img = canvas.toDataURL('image/png') const pdf = new jsPdf() pdf.addImage(imgData, 'JPEG', 0, 0, width, height) pdf.save('your-filename.pdf') })
And that’s it!
Make sure you take a look at the html2canvas onclone method. It can prove to be handy when you quickly need to take a snapshot and manipulate the DOM (e.g. hide the print button) before taking the picture. I can see quite a lot of use cases for this package. Unfortunately, ours wasn’t one, as we needed to handle the PDF creation on the backend side.
Option 2: Use only a PDF Library
There are several libraries out there on NPM for this purpose, like jsPDF (mentioned above) or PDFKit. The problem with them that I would have to recreate the page structure again if I wanted to use these libraries. That definitely hurts maintainability, as I would have needed to apply all subsequent changes to both the PDF template and the React page.
Take a look at the code below. You need to create the PDF document yourself by hand. Now you could traverse the DOM and figure out how to translate each element to PDF ones, but that is a tedious job. There must be an easier way.
doc = new PDFDocument doc.pipe fs.createWriteStream('output.pdf') doc.font('fonts/PalatinoBold.ttf') .fontSize(25) .text('Some text with an embedded font!', 100, 100) doc.image('path/to/image.png', { fit: [250, 300], align: 'center', valign: 'center' }); doc.addPage() .fontSize(25) .text('Here is some vector graphics...', 100, 100) doc.end()
This snippet is from the PDFKit docs. However, it can be useful if your target is a PDF file straight away and not the conversion of an already existing (and ever-changing) HTML page.
Final Option 3: Puppeteer, Headless Chrome with Node.js
What is Puppeteer? The documentation says:
Puppeteer is a Node library which provides a high-level API to control Chrome or Chromium over the DevTools Protocol. Puppeteer runs headless by default, but can be configured to run full (non-headless) Chrome or Chromium.
It’s basically a browser which you can run from Node.js. If you read the docs, the first thing it says about Puppeteer is that you can use it to Generate screenshots and PDFs of pages’. Excellent! That’s what we were looking for.
Let’s install Puppeteer with npmi i puppeteer, and implement our use case.
const puppeteer = require('puppeteer') async function printPDF() { const browser = await puppeteer.launch({ headless: true }); const page = await browser.newPage(); await page.goto('https://blog.risingstack.com', {waitUntil: 'networkidle0'}); const pdf = await page.pdf({ format: 'A4' }); await browser.close(); return pdf })
This is a simple function that navigates to a URL and generates a PDF file of the site.
First, we launch the browser (PDF generation only supported in headless browser mode), then we open a new page, set the viewport size, and navigate to the provided URL.
Setting the waitUntil: ‘networkidle0’ option means that Puppeteer considers navigation to be finished when there are no network connections for at least 500 ms. (Check API docs for further information.)
After that, we save the PDF to a variable, we close the browser and return the PDF.
Note: The page.pdfmethod receives an options object, where you can save the file to disk with the ‘path’ option as well. If path is not provided, the PDF won’t be saved to the disk, you’ll get a buffer instead. Later on, I discuss how you can handle it.)
In case you need to log in first to generate a PDF from a protected page, first you need to navigate to the login page, inspect the form elements for ID or name, fill them in, then submit the form:
await page.type('#email', process.env.PDF_USER) await page.type('#password', process.env.PDF_PASSWORD) await page.click('#submit')
Always store login credentials in environment variables, do not hardcode them!
Style Manipulation
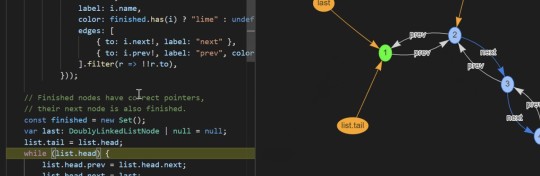
Puppeteer has a solution for this style manipulation too. You can insert style tags before generating the PDF, and Puppeteer will generate a file with the modified styles.
await page.addStyleTag({ content: '.nav { display: none} .navbar { border: 0px} #print-button {display: none}' })
Send file to the client and save it
Okay, now you have generated a PDF file on the backend. What to do now?
As I mentioned above, if you don’t save the file to disk, you’ll get a buffer. You just need to send that buffer with the proper content type to the front-end.
printPDF.then(pdf => { res.set({ 'Content-Type': 'application/pdf', 'Content-Length': pdf.length }) res.send(pdf)
Now you can simply send a request to the server, to get the generated PDF.
function getPDF() { return axios.get(`${API_URL}/your-pdf-endpoint`, { responseType: 'arraybuffer', headers: { 'Accept': 'application/pdf' } })
Once you’ve sent the request, the buffer should start downloading. Now the last step is to convert the buffer into a PDF file.
savePDF = () => { this.openModal(‘Loading…’) // open modal return getPDF() // API call .then((response) => { const blob = new Blob([response.data], {type: 'application/pdf'}) const link = document.createElement('a') link.href = window.URL.createObjectURL(blob) link.download = `your-file-name.pdf` link.click() this.closeModal() // close modal }) .catch(err => /** error handling **/) }
<button onClick={this.savePDF}>Save as PDF</button>
That was it! If you click on the save button, the PDF will be saved by the browser.
Using Puppeteer with Docker
I think this is the trickiest part of the implementation - so let me save you a couple of hours of Googling.
The official documentation states that “getting headless Chrome up and running in Docker can be tricky”. The official docs have a Troubleshooting section, where at the time of writing you can find all the necessary information on installing puppeteer with Docker.
If you install Puppeteer on the Alpine image, make sure you scroll down a bit to this part of the page. Otherwise, you might gloss over the fact that you cannot run the latest Puppeteer version and you also need to disable shm usage, using a flag:
const browser = await puppeteer.launch({ headless: true, args: ['--disable-dev-shm-usage'] });
Otherwise, the Puppeteer sub process might run out of memory before it even gets started properly. More info about that on the troubleshooting link above.
Option 3 + 1: CSS Print Rules
One might think that simply using CSS print rules is easy from a developers standpoint. No NPM or node modules, just pure CSS. But how do they fare when it comes to cross-browser compatibility?
When choosing CSS print rules, you have to test the outcome in every browser to make sure it provides the same layout, and it’s not 100% that it does.
For example, inserting a break after a given element cannot be considered an esoteric use case, yet you might be surprised that you need to use workarounds to get that working in Firefox.
Unless you are a battle-hardened CSS magician with a lot of experience in creating printable pages, this can be time-consuming.
Print rules are great if you can keep the print stylesheets simple.
Let’s see an example.
@media print { .print-button { display: none; } .content div { break-after: always; } }
This CSS above hides the print button, and inserts a page break after every div with the class content. There is a great article that summarizes what you can do with print rules, and what are the difficulties with them including browser compatibility.
Taking everything into account, CSS print rules are great and effective if you want to make a PDF from a not so complex page.
Summary: Puppeteer PDF from HTML with Node.js
So let’s quickly go through the options we covered here for generating PDF files from HTML pages:
Screenshot from the DOM: This can be useful when you need to create snapshots from a page (for example to create a thumbnail), but falls short when you have a lot of data to handle.
Use only a PDF library: If you need to create PDF files programmatically from scratch, this is a perfect solution. Otherwise, you need to maintain the HTML and PDF templates which is definitely a no-go.
Puppeteer: Despite being relatively difficult to get it working on Docker, it provided the best result for our use case, and it was also the easiest to write the code with.
CSS print rules: If your users are educated enough to know how to print to a file and your pages are relatively simple, it can be the most painless solution. As you saw in our case, it wasn’t.
Make sure to reach out to RisingStack when you need help with Node, React, or just JS in general.
Have fun with your PDF HTML’s!
Puppeteer HTML to PDF Generation with Node.js published first on https://koresolpage.tumblr.com/
0 notes
Quote
Working on the web usually means you will be working with Google in some shape or form. And seeing as Google Chrome is streets ahead of the competition, designers and developers need to think about how their project will work with the browser. How will it look? What technologies does it support, how secure is it and how will it perform? Fortunately, Chrome provides tools to ensure any site or app will be at its best. DevTools enable designers and developers to gain insight into a web page: you can manipulate the DOM, check CSS, experiment on designs with live editing, debug JavaScript and check performance. (See more about how to use these Google web tools here). But Google offers more than just the browser. It has tools and resources to aid nearly every aspect of your design and development life. Want to know how to improve performance? Lighthouse is here to help. Want to build better performing mobile sites? Then say hello to AMP. Are you looking to build beautiful PWAs? Then Flutter, Material Design and Workbox are ready to step in. The beauty of using Google tools, resources, libraries and frameworks is that you know they will work well with the Chrome browser – the most popular browser on the planet. For more tools, see our web design tools roundup. 01. Lighthouse Performance is a key factor in the success of a site and Lighthouse is Google’s tool for improving the quality of web pages. So how do you use it and what can it do? In its simplest form, you can run Lighthouse from the Audits tab and choose from a selection of options including desktop or mobile, in addition to tick boxes for performance, accessibility and SEO, to generate a final report with suggested improvements. 02. Polymer Polymer is well-known for its work with web components but the project has now expanded its repertoire to embrace a collection of libraries, tools and standards. What’s included? LitElement is an editor that makes it easy to define web components, while lit-html is an HTML templating library that enables users to write next-gen HTML templates in JS. Plus, you will also find a PWA Starter kit, the original Polymer library and sets of web components. 03. APIs Explorer Google has a vast library of APIs available to developers but finding what you need is no easy task. This is where Google’s APIs Explorer steps in to offer a helping hand. There is a long list that can be scrolled through but, for quicker access, there is a search box to filter the API list. Each entry links to a reference page with more details on how to use the API. 04. Flutter Create beautiful apps with Flutter If you are looking to build good-looking applications for mobile, web and desktop from a single codebase then Flutter could be for you. The site is a complete reference to working with and building with Flutter. Haven’t got a clue what to do? The docs take a user from installation to creation, assisted by plenty of samples and tutorials. 05. Google GitHub As most will know, GitHub is the hosting platform/repository to store and share code and files. And happily Google has its own spot on the platform with over 260 repositories to sift through. Use the filter to cut down on your search time and get closer to the repository you want to play with or contribute to. 06. Puppeteer Built in Node, Puppeteer offers a high-level API that enables you to access headless Chrome – effectively Chrome without the UI, which developers can then control through the command line. So what can you do with Puppeteer? A few options are available for generating screenshots and PDFs of pages, automating form submission and creating an automated testing environment. 07. Workbox If you are looking to build a PWA then this is a great starting point. Workbox provides a collection of JavaScript libraries for adding offline support to web apps. A selection of in-depth guides demonstrate how to create and register a service worker file, route requests, use plugins and use bundlers with Workbox. And there is also a set of example caching strategies to check out. 08. Codelabs In need of practical guidance for a Google product? Codelabs provides “a guided, tutorial, hands-on coding experience”. The site is neatly broken down into categories and events, making it quick and easy to find what you want. It includes Analytics, Android, Assistant, augmented reality, Flutter, G Suite, Search, TensorFlow and virtual reality. Select an option and get the code and directions you need to build small applications. 09. Color Tool Pick a palette, any palette Color Tool is a straightforward tool that enables you to create, share and apply a palette in addition to checking accessibility. Users can choose a predefined palette from the Material palette. Simply pick a colour and then apply it to the primary colour scheme, switch to the secondary option and pick again. Finally, pick text colours for both schemes. Alternatively, switch to Custom to pick your colours. Then switch to Accessibility to check all is good before, finally, exporting the palette. 10. Design Sprints The Design Sprint Kit is for those who are learning how to participate in or run design sprints. It looks to cover all knowledge bases, from first-timers to experienced sprint facilitators. Learn about the methodology or jump straight into the planning stage, including writing briefs, gathering data and research, as well as what to do post-sprint. Also includes a host of resources such as tools, templates, recipes and the option to submit your own method. 11. People + AI Guidebook This guide is the work of the People + AI Research initiative at Google and looks to offer help to those wanting to build human-centred AI products. The comprehensive guidebook is split into six chapters covering user needs, data collection and evaluation, mental models, trust, feedback and graceful failure. Each chapter is accompanied by exercises, worksheets and the tools and resources that are needed to make it happen. 12. Google Assistant Google's Assistant does plenty of assisting This is the Google Assistant’s developer platform, offering a guide on how to integrate your content and services with the Google Assistant. It shows you how to extend your mobile app, present content in rich ways for Search and Assistant, control lights, coffee machines and other devices around the home and build voice and visual experiences for smart speakers, displays and phones. 13. PageSpeed Insights PageSpeed Insights analyses web content and then offers suggestions on how to make it load faster. Simply add a URL, hit the Analyze button and wait for the magic to happen. Check the Docs to get a better insight into how the PageSpeed API works and how to start using it. 14. AMP on Google AMP is Google’s tool for creating fast-loading mobile pages that will (hopefully) get to the top of search rankings. Learn how to create fast, user-first sites, integrate AMP across Google products, use Google AMP Cache to make AMP pages faster and monetise AMP pages with other Google products. 15. Google DevTools There's a lot you can do with DevTools Every designer and developer knows (or at least should know) that Chrome comes with a set of tools built directly into the browser. Chrome's DevTools are ideal for inspecting the elements that make up a page, checking CSS, editing pages on the fly and much more. The Elements tab is the introduction to DevTools. It displays the HTML code that makes up the selected page. Get an insight into the properties of each div or tag from the selected page and start live editing. This is perfect for experimenting with designs. Check the Layout – whether you are using Flexbox or Grid – and take a look at related fonts with examples and examine animations. Elsewhere, you can view and change CSS. The Styles tab on the Elements panel lists the CSS rules being applied to the currently selected element in the DOM Tree. Switch properties on and off (or add new values) to experiment with designs. This is the perfect tool for ensuring that everything works as expected before applying any changes to the live design. You can also debug JavaScript, optimise website speed and inspect network speed. Here’s a quick tip you can use to immediately speed up your workflow. Head to the Sources tab, click New Snippet and add frequently used code. Name the code snippet and save. Repeat as needed. Now you can grab this code snippet instead of writing it again. Like every good browser, Chrome is constantly evolving and each new release brings new features. Find out what's happening on the Chrome status platform 16. Material Design Material is a vital piece of design kit Development may be seen as Google’s favoured child but, whatever you are making, creating or building, it needs to look good and give the user an experience that makes them want to use it. Material is a more recent addition to the Google stable but is a design system that has matured into a vital piece of design kit. Like any good design system, it has its own set of guidelines, which you need to look at before stepping into the more exciting stuff. Get an overview of how to use different elements, what Material theming is, how to implement a theme and usability guides including accessibility. Elsewhere, there is an insight into Material Foundation, which includes the key areas of design such as layout, navigation, colour, typography, sound, iconography, motion and interaction. Each category reveals its dos and don’ts and where you should consider caution. To give an idea of what to expect, the Layout category offers sections on understanding layout, pixel density, how to work with a responsive layout including columns, gutters and margins, breakpoints, UI regions and spacing methods to name but a few. Beyond the Design section is Components, which provides the physical building blocks needed to create a design. What’s included here? Buttons, banners, cards, dialogs, dividers, lists, menus, progress indicators, sliders, snackbars (these are brief messages about app processes at the bottom of the screen), tabs, text fields and tooltips. Undoubtedly a comprehensive collection of components. And developers haven’t been forgotten, with details and tutorials on how to build for different platforms – Android, iOS, Web and Flutter. And, finally, there is a page dedicated to a host of resources to help make your chosen design happen.
http://damianfallon.blogspot.com/2020/04/16-of-googles-best-dev-and-design-tools_4.html
0 notes
Quote
Working on the web usually means you will be working with Google in some shape or form. And seeing as Google Chrome is streets ahead of the competition, designers and developers need to think about how their project will work with the browser. How will it look? What technologies does it support, how secure is it and how will it perform? Fortunately, Chrome provides tools to ensure any site or app will be at its best. DevTools enable designers and developers to gain insight into a web page: you can manipulate the DOM, check CSS, experiment on designs with live editing, debug JavaScript and check performance. (See more about how to use these Google web tools here). But Google offers more than just the browser. It has tools and resources to aid nearly every aspect of your design and development life. Want to know how to improve performance? Lighthouse is here to help. Want to build better performing mobile sites? Then say hello to AMP. Are you looking to build beautiful PWAs? Then Flutter, Material Design and Workbox are ready to step in. The beauty of using Google tools, resources, libraries and frameworks is that you know they will work well with the Chrome browser – the most popular browser on the planet. For more tools, see our web design tools roundup. 01. Lighthouse Performance is a key factor in the success of a site and Lighthouse is Google’s tool for improving the quality of web pages. So how do you use it and what can it do? In its simplest form, you can run Lighthouse from the Audits tab and choose from a selection of options including desktop or mobile, in addition to tick boxes for performance, accessibility and SEO, to generate a final report with suggested improvements. 02. Polymer Polymer is well-known for its work with web components but the project has now expanded its repertoire to embrace a collection of libraries, tools and standards. What’s included? LitElement is an editor that makes it easy to define web components, while lit-html is an HTML templating library that enables users to write next-gen HTML templates in JS. Plus, you will also find a PWA Starter kit, the original Polymer library and sets of web components. 03. APIs Explorer Google has a vast library of APIs available to developers but finding what you need is no easy task. This is where Google’s APIs Explorer steps in to offer a helping hand. There is a long list that can be scrolled through but, for quicker access, there is a search box to filter the API list. Each entry links to a reference page with more details on how to use the API. 04. Flutter Create beautiful apps with Flutter If you are looking to build good-looking applications for mobile, web and desktop from a single codebase then Flutter could be for you. The site is a complete reference to working with and building with Flutter. Haven’t got a clue what to do? The docs take a user from installation to creation, assisted by plenty of samples and tutorials. 05. Google GitHub As most will know, GitHub is the hosting platform/repository to store and share code and files. And happily Google has its own spot on the platform with over 260 repositories to sift through. Use the filter to cut down on your search time and get closer to the repository you want to play with or contribute to. 06. Puppeteer Built in Node, Puppeteer offers a high-level API that enables you to access headless Chrome – effectively Chrome without the UI, which developers can then control through the command line. So what can you do with Puppeteer? A few options are available for generating screenshots and PDFs of pages, automating form submission and creating an automated testing environment. 07. Workbox If you are looking to build a PWA then this is a great starting point. Workbox provides a collection of JavaScript libraries for adding offline support to web apps. A selection of in-depth guides demonstrate how to create and register a service worker file, route requests, use plugins and use bundlers with Workbox. And there is also a set of example caching strategies to check out. 08. Codelabs In need of practical guidance for a Google product? Codelabs provides “a guided, tutorial, hands-on coding experience”. The site is neatly broken down into categories and events, making it quick and easy to find what you want. It includes Analytics, Android, Assistant, augmented reality, Flutter, G Suite, Search, TensorFlow and virtual reality. Select an option and get the code and directions you need to build small applications. 09. Color Tool Pick a palette, any palette Color Tool is a straightforward tool that enables you to create, share and apply a palette in addition to checking accessibility. Users can choose a predefined palette from the Material palette. Simply pick a colour and then apply it to the primary colour scheme, switch to the secondary option and pick again. Finally, pick text colours for both schemes. Alternatively, switch to Custom to pick your colours. Then switch to Accessibility to check all is good before, finally, exporting the palette. 10. Design Sprints The Design Sprint Kit is for those who are learning how to participate in or run design sprints. It looks to cover all knowledge bases, from first-timers to experienced sprint facilitators. Learn about the methodology or jump straight into the planning stage, including writing briefs, gathering data and research, as well as what to do post-sprint. Also includes a host of resources such as tools, templates, recipes and the option to submit your own method. 11. People + AI Guidebook This guide is the work of the People + AI Research initiative at Google and looks to offer help to those wanting to build human-centred AI products. The comprehensive guidebook is split into six chapters covering user needs, data collection and evaluation, mental models, trust, feedback and graceful failure. Each chapter is accompanied by exercises, worksheets and the tools and resources that are needed to make it happen. 12. Google Assistant Google's Assistant does plenty of assisting This is the Google Assistant’s developer platform, offering a guide on how to integrate your content and services with the Google Assistant. It shows you how to extend your mobile app, present content in rich ways for Search and Assistant, control lights, coffee machines and other devices around the home and build voice and visual experiences for smart speakers, displays and phones. 13. PageSpeed Insights PageSpeed Insights analyses web content and then offers suggestions on how to make it load faster. Simply add a URL, hit the Analyze button and wait for the magic to happen. Check the Docs to get a better insight into how the PageSpeed API works and how to start using it. 14. AMP on Google AMP is Google’s tool for creating fast-loading mobile pages that will (hopefully) get to the top of search rankings. Learn how to create fast, user-first sites, integrate AMP across Google products, use Google AMP Cache to make AMP pages faster and monetise AMP pages with other Google products. 15. Google DevTools There's a lot you can do with DevTools Every designer and developer knows (or at least should know) that Chrome comes with a set of tools built directly into the browser. Chrome's DevTools are ideal for inspecting the elements that make up a page, checking CSS, editing pages on the fly and much more. The Elements tab is the introduction to DevTools. It displays the HTML code that makes up the selected page. Get an insight into the properties of each div or tag from the selected page and start live editing. This is perfect for experimenting with designs. Check the Layout – whether you are using Flexbox or Grid – and take a look at related fonts with examples and examine animations. Elsewhere, you can view and change CSS. The Styles tab on the Elements panel lists the CSS rules being applied to the currently selected element in the DOM Tree. Switch properties on and off (or add new values) to experiment with designs. This is the perfect tool for ensuring that everything works as expected before applying any changes to the live design. You can also debug JavaScript, optimise website speed and inspect network speed. Here’s a quick tip you can use to immediately speed up your workflow. Head to the Sources tab, click New Snippet and add frequently used code. Name the code snippet and save. Repeat as needed. Now you can grab this code snippet instead of writing it again. Like every good browser, Chrome is constantly evolving and each new release brings new features. Find out what's happening on the Chrome status platform 16. Material Design Material is a vital piece of design kit Development may be seen as Google’s favoured child but, whatever you are making, creating or building, it needs to look good and give the user an experience that makes them want to use it. Material is a more recent addition to the Google stable but is a design system that has matured into a vital piece of design kit. Like any good design system, it has its own set of guidelines, which you need to look at before stepping into the more exciting stuff. Get an overview of how to use different elements, what Material theming is, how to implement a theme and usability guides including accessibility. Elsewhere, there is an insight into Material Foundation, which includes the key areas of design such as layout, navigation, colour, typography, sound, iconography, motion and interaction. Each category reveals its dos and don’ts and where you should consider caution. To give an idea of what to expect, the Layout category offers sections on understanding layout, pixel density, how to work with a responsive layout including columns, gutters and margins, breakpoints, UI regions and spacing methods to name but a few. Beyond the Design section is Components, which provides the physical building blocks needed to create a design. What’s included here? Buttons, banners, cards, dialogs, dividers, lists, menus, progress indicators, sliders, snackbars (these are brief messages about app processes at the bottom of the screen), tabs, text fields and tooltips. Undoubtedly a comprehensive collection of components. And developers haven’t been forgotten, with details and tutorials on how to build for different platforms – Android, iOS, Web and Flutter. And, finally, there is a page dedicated to a host of resources to help make your chosen design happen.
http://damianfallon.blogspot.com/2020/04/16-of-googles-best-dev-and-design-tools.html
0 notes
Text
RisingStack in 2019 - Achievements, Highlights and Blogposts.
🎄 How was 2019 at RisingStack? 🥳 - you might ask, as a kind reader already did it in a comment under our wrap-up of 2018.
Well, it was an intensive year with a lot of new challenges and major events in the life of our team!
Just to quickly sum it up:
We grew our team to 16! All of our engineers are full-stack in the sense that we can confidently handle front-end, back-end, and operations tasks as well - as you'll see from this year's blogpost collection.
We launched our new website, which communicates what we do and capable of more clearly (I hope at least). 🤞 Also, a new design for the blog is coming as well!
This year ~1.250.000 developers (unique users) visited our blog! 🤩
We just surpassed 5.7 million unique readers in total, who generated almost 12 million pageviews so far in the past 5 years.
We have now more than 220 articles on the site - written by our team exclusively.
We had the honor to participate in JSconf Budapest by providing a workshop for attendees on GraphQL and Apollo. 🎓
We delivered a 10-weeks-long online DevOps training for around 100 developers in partnership with HWSW, Hungary's leading tech newspaper.
We kept on organizing local Node.js meetups here in Budapest, with more than 100 attendees for almost every event this year. 🤓
We had the opportunity to work with huge companies like DHL, Canvas (market leader e-learning platform), and Uniqa (insurance corp.).
We met with fantastic people all over the world. We've been in LA, Sarajevo, Amsterdam, Prague, and Helsinki too. 🍻
We moved to a new office in the heart of Budapest!
🤔 Okay, okay... But what about blogging?
Blogging in 2019
You might have noticed that we did not write as much blogposts this year as we did before.
The reason is simple: Fortunately, we had so many new projects and clients that we had very little time to write about what we love and what we do.
Despite our shrinking time for writing blogposts, I think we still created interesting articles that you might learn a thing or two from.
Here's a quick recap from the blog in 2019. You can use this list to navigate.
Stripe 101 for JavaScript Developers
Generating PDF from HTML with Node & Puppeteer
REST in Peace. Long Live GraphQL!
Case Study: Nameserver Issue Investigation
RisingStack Joins the Cloud Native Node.js Project
A Definitive React-Native Guide for React Developers
Design Systems for React Developers
Node.js v12 - New Features You Shouldn't Miss
Building a D3.js Calendar Heatmap
Golang Tutorial for Node.js Developers
How to Deploy a Ceph Storage to Bare Virtual Machines
Update Now! Node.js 8 is Not Supported from 2020.
Great Content from JSConf Budapest 2019
Get Hooked on Classless React
Stripe 101 for JavaScript Developers
Sample app, detailed guidance & best practices to help you get started with Stripe Payments integration as a JavaScript developer.
At RisingStack, we’ve been working with a client from the US healthcare scene who hired us to create a large-scale webshop they can use to sell their products. During the creation of this Stripe based platform, we spent a lot of time with studying the documentation and figuring out the integration. Not because it is hard, but there's a certain amount of Stripe related knowledge that you'll need to internalize.
Read: Stripe Payments Integration 101 for JavaScript Developers
Generating PDF from HTML with Node & Puppeteer
Learn how you can generate a PDF document from a heavily styled React page using Node.js, Puppeteer, headless Chrome, and Docker.
Background: A few months ago, one of the clients of RisingStack asked us to develop a feature where the user would be able to request a React page in PDF format. That page is basically a report/result for patients with data visualization, containing a lot of SVGs. Furthermore, there were some special requests to manipulate the layout and make some rearrangements of the HTML elements. So the PDF should have different styling and additions compared to the original React page.
As the assignment was a bit more complex than what could have been solved with simple CSS rules, we first explored possible implementations. Essentially we found 3 main solutions we describe in this article.
Read: Generating PDF from HTML with Node.js and Puppeteer
REST in Peace. Long Live GraphQL!
As you might already hear about it, we're the organizers of the Node.js Budapest meetup group with around ~1500 members. During an event in February, Peter Czibik delivered a talk about GrahpQL to an audience of about 120 ppl.
It was a highly informative and fun talk, so I recommend you to check it out!
Case Study: Nameserver Issue Investigation
In the following blogpost, we will walk you through how we chased down a DNS resolution issue for one of our clients. Even though the problem at hand was very specific, you might find the steps we took during the investigation useful.
Also, the tools we used might also prove to be helpful in case you'd face something similar in the future. We will also discuss how the Domain Name System (works), so buckle up!
Read the blogpost here: Case Study: Nameserver Issue Investigation using curl, dig+trace & nslookup
RisingStack Joins the Cloud Native Node.js Project
In March 2019, we announced our collaboration with IBM on the Cloud Native JS project, which aims to provide best practices and tools to build and integrate enterprise-grade Cloud Native Node.js applications.
As a first step of contribution to the project, we released an article on CNJS’s blog - titled “How to Build and Deploy a Cloud Native Node.js App in 15 minutes”. In this article we show how you can turn a simple Hello World Node.js app into a Dockerized application running on Kubernetes with all the best-practices applied - using the tools provided by CNJS in the process.
A Definitive React-Native Guide for React Developers
In this series, we cover the basics of React-Native development, compare some ideas with React, and develop a game together. By the end of this tutorial, you’ll become confident with using the built-in components, styling, storing persisting data, animating the UI, and many more.
Part I: Getting Started with React Native - intro, key concepts & setting up our developer environment
Part II: Building our Home Screen - splitting index.js & styles.js, creating the app header, and so on..
Part III: Creating the Main Game Logic + Grid - creating multiple screens, type checking with prop-types, generating our flex grid
Part IV: Bottom Bar & Responsible Layout - also, making our game pausable and adding a way to lose!
Part V: Sound and Animation + persisting data with React-Native AsyncStorage
Design Systems for React Developers
In this post, we provide a brief introduction to design systems and describe the advantages and use-cases for having one. After that, we show Base Web, the React implementation of the Base Design System which helps you build accessible React applications super quickly.
Node.js v12 - New Features You Shouldn't Miss
Node 12 is in LTS since October, and will be maintained until 2022. Here is a list of changes we consider essential to highlight:
V8 updated to version 7.4
Async stack traces arrived
Faster async/await implementation
New JavaScript language features
Performance tweaks & improvements
Progress on Worker threads, N-API
Default HTTP parser switched to llhttp
New experimental “Diagnostic Reports” feature
Read our deep-dive into Node 12 here.
Building a D3.js Calendar Heatmap
In this article, we take a look at StackOverflow’s usage statistics by creating an interactive calendar heatmap using D3.js!
We go through the process of preparing the input data, creating the chart with D3.js, and doing some deductions based on the result.
Read the full article here Building a D3.js Calendar Heatmap. Also, this article has a previous installment called Building Interactive Bar Charts with JavaScript.
Golang Tutorial for Node.js Developers
In case you are a Node.js developer, (like we are at RisingStack) and you are interested in learning Golang, this blogpost is made for you! Throughout this tutorial series, we'll cover the basics of getting started with the Go language, while building an app and exposing it through a REST, GraphQL and GRPC API together.
In the first part of this golang tutorial series, we’re covering:
Golang Setup
net/http with Go
encoding/json
dependency management
build tooling
Read the Golang for Node developers tutorial here.
How to Deploy a Ceph Storage to Bare Virtual Machines
Ceph is a freely available storage platform that implements object storage on a single distributed computer cluster and provides interfaces for object-, block- and file-level storage. Ceph aims primarily for completely distributed operation without a single point of failure. It manages data replication and is generally quite fault-tolerant. As a result of its design, the system is both self-healing and self-managing.
Ceph has loads of benefits and great features, but the main drawback is that you have to host and manage it yourself. In this post, we're checking out two different approaches of deploying Ceph.
Read the article: Deploying Ceph to Bare Virtual Machines
Update Now! Node.js 8 is Not Supported from 2020.
The Node.js 8.x Maintenance LTS cycle will expire on December 31, 2019 - which means that Node 8 won’t get any more updates, bug fixes or security patches. In this article, we’ll discuss how and why you should move to newer, feature-packed, still supported versions.
We’re also going to pinpoint issues you might face during the migration, and potential steps you can take to ensure that everything goes well.
Read the article about updating Node here.
Great Content from JSConf Budapest 2019
JSConf Budapest is a JSConf family member 2-day non-profit community conference about JavaScript in the beautiful Budapest, Hungary. RisingStack participated in the conf for several years as well as we did this September.
In 2019 we delivered a workshop called "High-Performance Microservices with GraphQL and Apollo" as our contribution to the event.
We also collected content you should check out from the conf. Have fun!
Get Hooked on Classless React
Our last meetup in 2019 was centered around React Hooks. What is a hook?
A Hook is a function provided by React, which lets you hook into React features from your functional component. This is exactly what we need to use functional components instead of classes. Hooks will give you all React features without classes.
Hooks make your code more maintainable, they let you reuse stateful logic, and since you are reusing stateful logic, you can avoid the wrapper hull and the component reimplementation.
Check out the prezentation about React Hooks here.
RisingStack in 2020
We're looking forward to the new year with some interesting plans already lined up for Q1:
We'll keep on extending our team to serve new incoming business.
We have several blogposts series in the making, mainly on DevOps topics.
We'll announce an exciting new event we'll co-organize with partners from the US and Finnland soon, so stay tuned!
We're going to release new training agendas around Node, React & GraphQL, as well as a new training calendar with open trainings for 2020.
How was your 2019?
RisingStack in 2019 - Achievements, Highlights and Blogposts. published first on https://koresolpage.tumblr.com/
0 notes
Photo

#365: Results From The State of JavaScript 2017 Survey
This week's JavaScript news — Read this e-mail on the Web
JavaScript Weekly
Issue 365 — December 15, 2017
The State of JavaScript 2017 Results Are In
The results of the annual ‘State of JavaScript’ survey are here, this time with over 28,000 developers taking part. See what tools are most popular in numerous categories.
30 Seconds of Code: Useful, Bitesize JavaScript Snippets
A large curated collection of useful bits of JavaScript code you can understand in 30 seconds or less.
Angelos Chalaris
Cloud-Scale Monitoring and Alerting
Thousands of organizations rely on Datadog to monitor 200+ technologies. With features including built-in dashboards, algorithmic alerts, and end-to-end request tracing, Datadog helps teams monitor their entire stack all in one place. Try it free.
Datadog Sponsor
Walt: A JS-Like Syntax for the WebAssembly Text Format
An in-progress experiment for using a JS-inspired alternative syntax for WebAssembly to write to as ‘close to the metal’ as possible.
Arthur Buldauskas
Billboard.js: A D3 v4-based JavaScript Chart Library
v1.2 is out now and adds bubble charts, pattern filling, image exports, and more.
Jae Sung Park
PostHTML: An HTML/XML Transformation Tool Based on JS Plugins
Think PostCSS but for HTML and XML (which brings formats like SVG into play too). Check out the examples and plugins available.
PostHTML
Popmotion: A Functional JavaScript Motion Library
Mix tweens, physics, & user inputs to create elegant Web-based interactions - all in 11KB.
Popmotion
Jobs
Web Client Engineer (New York)Join a growing engineering team that builds highly performant video apps across Web, iOS, Android, FireTV, Roku, tvOS, Xbox and more. DISCOVERY DIGITAL MEDIA
Front End Engineers in Boston - ES6, React, Redux, D3, WebpackWe are a team who loves our customers, we are passionate about front end tech and we have a proud history of innovation. Localytics
Looking for a Job at a Company That Prioritizes JavaScript?Try Vettery and we’ll connect you directly with thousands of companies looking for talented front-end devs. Vettery
In Brief
JS Foundation Brings Fully Serverless Applications to the Masses news architect and Marko are gaining more integrations with each other. Kris Borchers
50% Off 'Secrets of the JavaScript Ninja' eBook Today news Manning Publications
Assert(js) Testing Conf Holiday Promo - 20% Off All Tickets 🎁 news Use code JSWEEKLY on check-out and get 20% off the regular ticket price. Code expires Dec 31. OK GROW Sponsor
A Look At V8's Native JavaScript Code Coverage Support tutorial Jakob Gruber
The Difference Between 'map' and 'forEach' Array Methods tutorial Brandon Morelli
Arrays, Symbols, and Realms tutorial Why type checking fails across iframes, and what Array.isArray actually does. Jake Archibald
Finally Understand Redux by Building Your Own Store tutorial Todd Motto
Capturing and Reporting User Interactions for Better Debugging tutorial David Gilbertson
A Guide to Automating and Scraping the Web tutorial .. using Headless Chrome, Puppeteer, and Node.js. Brandon Morelli
So, You Learned JavaScript — Now What? opinion Christian Heilmann
How Is React Different from Vue? opinion An informative article explaining some of the similarities and differences between React and Vue. John Hannah
Wijmo TypeScript UI Controls Support Angular 5. No Dependencies tools Wijmo’s UI components include Angular v5 support, full IntelliSense, and the best JS grid available. GrapeCity Wijmo Sponsor
Microbundle: A Zero-Configuration Bundler for Tiny Modules tools Jason Miller
octohint: A Browser Extension That Adds 'IntelliSense' to GitHub tools A cross-browser extension for more easily skimming through code on GitHub. pd4d10
Introducing Nexus.js: A Multi-Threaded JavaScript Runtime tools Based on WebKit’s JavaScriptCore, Nexus is based around a thread pool instead of an event loop. Abdullah Ali
vue-inspector: A Vue.js Inspector Specifically for Mobile Devices tools Cali Rojas
The 9 Best JavaScript Charting Libraries tools A collection of JavaScript libraries for data visualization. Anton Shaleynikov
Neutrino V8 Released: Webpack + Presets = Zero-Config Power tools Eli Perelman
🚀 Add PDF Support to Your Web App in No Time tools PSPDFKit Sponsor
Emittery: A Simple, Modern Async Event Emitter code Sindre Sorhus
on-change: Watch an Object or Array for Changes code Sindre Sorhus
tweet-parser: Parse Tweets Into Arrays of Entities code Jack Franklin
Curated by Peter Cooper and published by Cooperpress.
Like this? You may also enjoy: FrontEnd Focus : Node Weekly : React Status
Stop getting JavaScript Weekly : Change email address : Read this issue on the Web
© Cooperpress Ltd. Fairfield Enterprise Centre, Lincoln Way, Louth, LN11 0LS, UK
by via JavaScript Weekly http://ift.tt/2AQHcyt
0 notes