#how to create user account in windows 10
Explore tagged Tumblr posts
Visit Tumblr Blog
Explore Tumblr blogs with no restrictions, modern design and the best experience.
Last Seen Tumblr Blogs


Fun Fact
Tumblr was the first site to host the blog for President Barack Obama in 2011.
Text
youtube
How to Create User Account By CMD | Laptop | Desktop | Windows 10,8,7 | In Hindi | By Sachin Sharma
#change user password cmd#delete user cmd#add user to admin group#add user command prompt windows 10#computer me user account kaise banaye#windows10#windows 8#windows 7#Create a New User#Guest User Account on Windows#new user account#how to create user account in hindi#account create#how to create user account in windows 10#what is a local user account and how to create it?#create an administrator account in windows#how to set up limited user accounts in windows 10#Youtube
0 notes
Text

Andrew Blaze's Reddit Account & Its Contents


The user u/PioneersProductions was active in the subreddit r/PioneersProductions between October 21 and October 29, 2013. At some point during this period, the subreddit was set to private, which restricts the visibility of comments to third-party tools. Consequently, we are unable to ascertain the specific context of many comments, though some can be reasonably inferred.
10/21/2013, 7:42:05 PM
Nothing can replace BlogTV... YouTube's the easiest fix, but they have it set where you have to stream from your computer now. My internet isn't fast enough to stream. =(
Andrew's initial comment expresses regret over the acquisition and subsequent shutdown of the live streaming service BlogTV, suggesting that she was an active user of the platform.
10/24/2013, 1:06:41 AM
Sweet, wow dude, I can't even remember the majority of these pics. That's insane. Especially the ones from before 2011.
This comment appears to be a response to someone sharing old photographs, possibly of Blaze herself, although this cannot be confirmed.
10/24/2013, 1:12:26 AM
Alligator/Horse Head was created using Paint.NET and Windows Movie Maker. Alligator/Horse Head 2 was made with Photoshop and iMovie. I had two different versions of it: one that was used in the trailer and the one used in the final cut. That Horse Head was difficult to crop out (even with Photoshop) due to the hair on its head. The Alligator was comparatively easy because it was solid wood. Additionally, I posted a video of myself sitting on the floor in my parents' bedroom against a wall, asking for script ideas, intending to feature those whose ideas I used. Ultimately, I did not utilize any of the suggestions. Given that I only had Movie Maker, my options were limited. I would love to recut that video, but it is impossible since the Horse Head has been reduced to ashes. I also lack a clean photograph of it. I wrote Alligator/Horse Head 2 during my senior year of high school in November and did not finalize the script until the following summer. I had numerous drafts for it. James was originally intended to appear physically in the video, but time constraints prevented this, as he had to relocate.
In this comment, Blaze elaborates on the process of creating the videos Mr. Horse Head Meets Mr. Wooden Alligator 1 and 2. These videos represent a crossover between Blaze's character and one created by YouTuber makemebad35.
10/24/2013, 1:16:24 AM
I also dislike how I edited the two videos. The first one was excessively brief, while the second one was constrained by Damian's preference for a shorter duration. Nowadays, I would likely have produced a 10- to 15-minute video; however, 8 minutes seemed adequate for him. He managed to complete his portions in just 5 hours. The only inconsistency in continuity is that he wears the same black shirt at the end, where he calls me to request the Alligator back, which was meant to occur days later. It is implausible that the Alligator could have shipped from Maryland to Pennsylvania and arrived at my doorstep within the same day. I have since become a more meticulous editor compared to two to three years ago. I prefer to extend shots, making them more "film-like" (slower-paced). However, we were concerned that viewers would not watch a 10-minute video in its entirety. I would recut the entire video, but my footage was never stored; I did not acquire a terabyte drive until last year, leaving only a few videos saved on a flash drive.
Four minutes after her previous comment, Andrew provides additional insights regarding the aforementioned videos. The individual named Damian referenced in the comment is makemebad35.
10/24/2013, 1:19:03 AM
I could discuss the Alligator/Horse Head videos indefinitely, which is why I have refrained from revisiting the second one. They were foundational to my YouTube career and led to Horse Head Lives, which will soon connect to my Halloween franchise. ;D
Three minutes later, Blaze concludes her comments on the subject by mentioning the video Mr. Horse Head Lives. I am uncertain what the Halloween franchise refers to, but my best guess is that it pertains to the Finale Series, the initial videos in which Ember appears.
10/29/2013, 9:16:14 PM
You... just... wow....
This remark represents Blaze's final comment on Reddit. The specific context of her expression of shock or surprise remains unclear.
for @strvy-bvllet
#tc community#tccblr#teeceecee#tcctwt#true cringe community#tcc tumblr#tcc fandom#fawnsuga#tee cee cee#truecrimecommunity#true crume#mass shooters#andrew blaze#randy stair
180 notes
·
View notes
Text
WOWOW on Demand Sign Up Tutorial
Hello, I am back (?)

Quick tutorial in case anyone wants to sign up (and later cancel) for a WOWOW on Demand account in order to watch Justice in the Dark when it airs at midnight JST on the 7th of March (aka Thursday night going into Friday morning).
Under the cut to reduce spam!
Before you start, please know that whilst you will sign up on the website, you will only be able to watch the shows using the phone app itself, because the website blocks VPNs.
You will need:
The ability to install the WOWOW on demand apk on your android phone (for iPhone users, it's available on the Jp app store, but I can't help beyond that)
A VPN (I used surfshark)
Access to a JP phone number (I used the number given on my forwarding service)
A credit card
2530 JPY per month (JITD is expected to end sometime in June 2025)
STEP 1: Set your VPN to Japan, go to the WOWOW website as shown, and click on the blue tab circled in orange

STEP 2: This just informs you that the service costs 2530 JPY/mth. Click the blue tab again.
STEP 3: Key in your email and click the button to receive a 4-digit OTP (it will be the first and only string of 4 digits you see in the mail). Major email domains should work.
STEP 4: You should receive the OTP within 3-5mins. If you don't receive the email, check your junk folder etc I lost patience after 2 mins and clicked the button 😅
STEP 5: This is all pretty self-explanatory. Don't ask me to translate the T&C/privacy agreement because I didn't read it either 😬
Congratulations! You have successfully created a WOWOW Online account (this is the normal account which lets you watch free videos/livestreams for eg, Spirealm Ep 1 is free to watch for now).
Next, you want to create a WOWOW on Demand account, which is the service that will give you access to JITD, the rest of Spirealm episodes, and if you are in Japan with a BS Cable subscription, the ability to watch and record WOWOW shows on your TV.
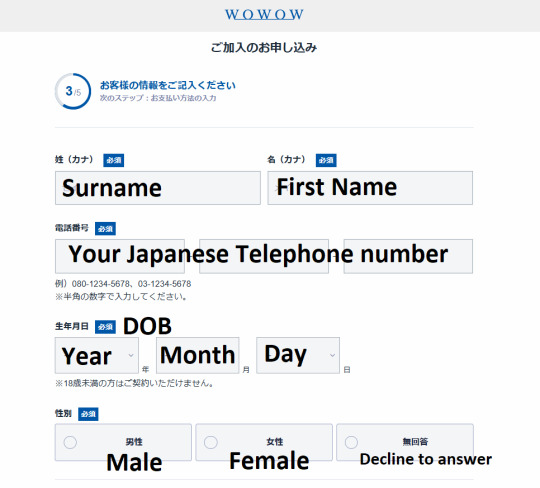
STEP 6: FINALLY we get to the most important bit, so of course I forgot to screencap it. For your Surname and First name, you will need to type it in Japanese text, so go ahead and google translate your name. For the phone number, I used the number from my Jp forwarding service (tenso), but I did try again by changing a few numbers, and it actually went through to step 4 so... if you don't have a forwarding service, you could try random numbers following the 03-1234-5678 format? Don't quote me on that.
Click the blue button at the bottom (which I accidentally cropped out) to move on.
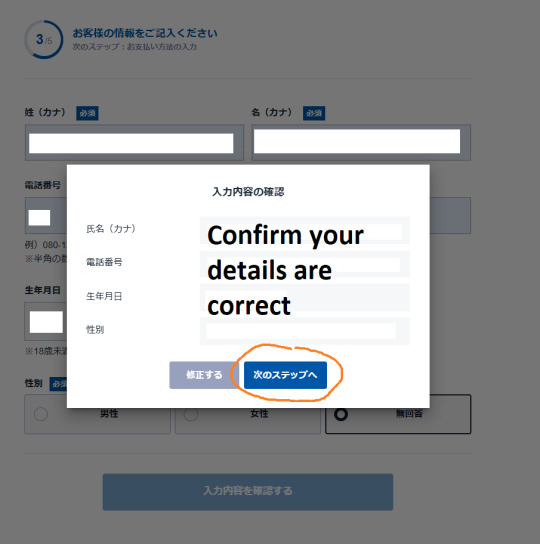
STEP 7: A confirmation window will pop up, keep clicking the blue button...
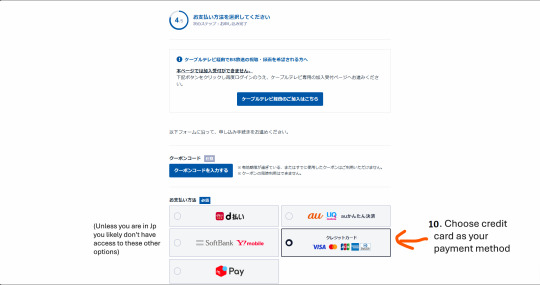
STEP 8: Almost there. Ignore all the blue buttons and choose the credit card payment option.
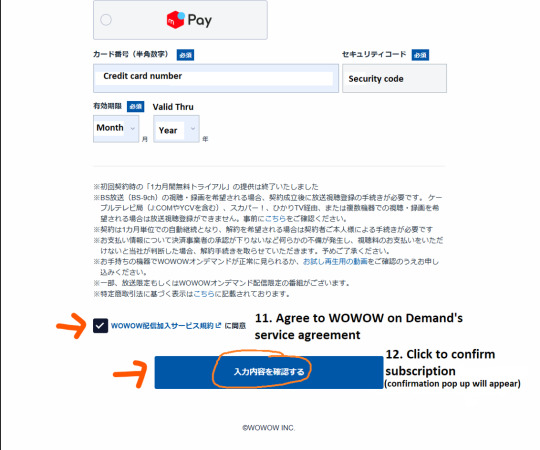
STEP 9: Scroll down and key in your credit card details (doesn't have to be Japanese), agree to the service agreement and then hit the blue button again. You will not be charged yet.
STEP 10: Confirm you really do want to spend 2530 JPY x per mth (which for JITD would be 3 months = 7590 JPY = USD$50) and click the blue button again. Your CC will be charged here.

Congrats! You're done (and broke)! Now, using your log in details, log on to the app and search 光淵 or こうえん (you will need to use your VPN on your phone too)
HOW TO CANCEL WOWOW
You will be able to watch shows for one month from that date your subscription was charged. Ie, if charged on the 3rd of July, and you cancelled on the 31st of July, you would be able to access WOWOW on demand till the 2nd of August (1 month from the 3rd of July). Hence, please remember to cancel a few days before your subscription is charged, just in case the application takes a few days to be processed.
STEP 1: Log in and go to My WOWOW
STEP 2: You'll be brought to your profile page, choose the 2nd option from the left (right next to the word TOP)
STEP 3: Look for the 解約 button
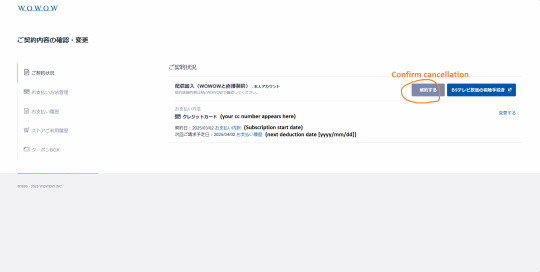
STEP 4: Look for the same word, and confirm cancellation
That's it! (When july comes, if there are extra steps required, I'll post a follow up 😅
Happy watching everyone!
#how to#jitd#wowow on demand#justice in the dark#mo du#silent reading#i'm sorry I disappeared#life got in the way as usual#thank you to everyone who sent me messages#i have not opened tumblr since MPW ended#i'm sorry if I worried anyone!!
58 notes
·
View notes
Text
The Dark Lord's birthday is not on october 2nd
so I was seeing a couple people also celebrating dark's birthday today. which makes sense, since that's the youtube upload date for ava3, and the date used in the flashback of ava uh.. 6 is it?

but this gave me pause because i did a tiny bit of research earlier on the general release timeline of ava, and i'd read on the wiki that ava3 was released on a completely different date: october 4, 2010, being first uploaded on atom.com (the site of the company that helped produce ava 2 and 3, now bought by paramount/comedy central)

now that is a drastically different date... but this is completely unsourced. do we know the actual date that ava3 was uploaded?
so i went on a web JOURNEY that i'd like to share with you all :D
tldr it's not oct 2 or oct 4. it's oct 11 2010
so the first thing i decided to check was who added that date to the wiki in the first place, and when. turns out it was an anonymous editor in 2016, not even a wiki account created... so, that's not going to get me anywhere. they didn't add a reference or any information other than just the date.
(ps you should read that 2016 version of the wiki page it's a fun janky mess lol /affectionate)
so i should just, like, check atom.com, right? well uh

yeah okay that is definitely not the same website. WAYBACK MACHINE IT IS (god bless wayback machine)
i scoured through different atom.com pages that were archived on wayback machine and found a few different tidbits:
the atom.com main page footer was updated with a link to ava3 on september 10, 2010 exactly. that seems pretty early!
the earliest capture of ava3 itself was on october 16, 2010, and the video is listed as being uploaded on october 11. interestingly, the video here was uploaded by "JO3Y", not Alan Becker... but later captures do show it as being uploaded by alan. i have no idea what is going on there
this isn't really relevant to the question at hand but you can watch ava2 on the website and it's very clearly flash-controlled, with a cool custom-made video control bar meant to look like Windows??? that's so cool????
this is also not relevant but the original description of ava2 seems to imply that this "chosen one" was originally meant to be the same stick figure as "victim". which is clearly not canon anymore but like. woag.
JO3Y's user page as of october 14, 2010 lists ava3 as being uploaded either... 6 or 7 days ago. (for some reason there are 2 uploads?? both are the same link.) that would put ava3's release on either october 7 or october 8, 2010.
guys there was an animator vs animation actual flash game. did anyone know about this wtf. the wayback machine link is busted but i managed to find a working version here and i am going to play it RIGHT as soon as i finish writing this
none of this was ultimately very helpful, though. there's multiple different dates here, none of which correspond to the elusive october 4th, and it could've even been as early as september. there's not many captures to look at, not many saved atom pages in niche places... what to even look at now?

oh.
oh i've been a FOOL.
the facebook link here is some kinda broken mess on wayback and also i don't know how to use facebook, so let's just check twitter. the given link is-

holy fucking shit did twitter look like this
right well. there's unfortunately no captures of this twitter account around the time ava3 could've released, and you can't scroll to see older tweets (those pages weren't archived), so no luck here. the account itself has also since been either deleted or renamed. a link to one of the tweets would surely also be defunct, right? but let's try it...
and oh my god. OH MY GOD. the account is STILL UP it's just under a different username oh my god. CAN WE FIND THE ORIGINAL AVA3 ANNOUNCEMENT TWEET.
lo and behold, one date-filtered twitter search later, here it is:

october 11, 2010. (and i DID confirm that was a monday)
dark's 14th birthday is coming up in a little over a week, guys...!
now, when was ava2 released? uhhhhhhhhhhhh oh hey the snipers are at my hou
#ava#animator vs animation#alan becker#the dark lord#avam#v's post#GO LOOK AT THAT AVA FLASH GAME THOUGH i've barely touched it but it seems so interesting#you can torture victim yourself lmao- sorry victim
30 notes
·
View notes
Text
How to archive a Discord channel
I'm going to say this way ahead of time: this is going to be waaaaaaay more of an annoying process than it should be. Discord should allow exporting the channel history to server owners, without the need of doing all this. I won't blame you if you give up.
Get the DiscordChatExporter application to download the chat history
This program has two versions
one that has a graphical interface, but works on Windows only
one that has a command line interface, but works on Windows, Linux and macOS
This guide covers the first. The second one maybe next time, in another post. The second version also makes it easier to download every channel on the server.
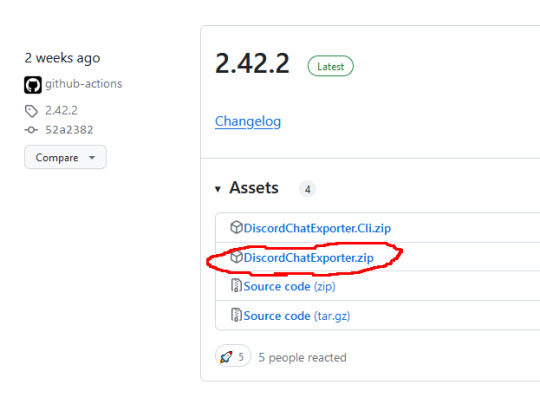
Step 1: Go to here, and download the latest version in the zip file named DiscordChatExporter.zip
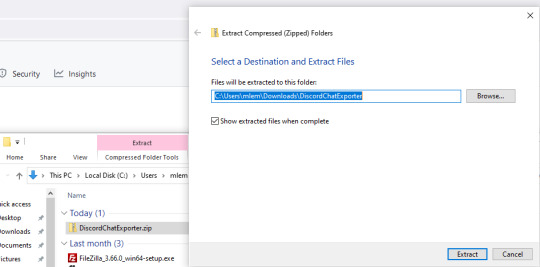
Step 2: Unpack the zip file
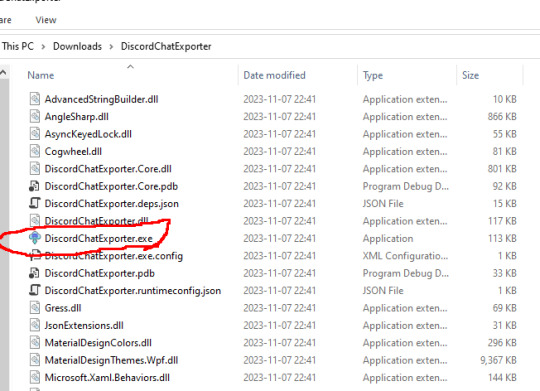
Step 3: Run DiscordChatExporter.exe
Step 4: Dismiss the scary looking warning as this will show up for any program that which developer can't afford paying $629 a year.

Step 5: Close the welcoming message and you'll see the application interface:
Prepare an access token. Do not share it to anyone else - treat it the same way as you treat your password.
There are two ways to do it:
Approach 1: use your own access token, will work with any channel you're able to access, including Direct Messages, but it is a violation of Discord Terms of Service, and therefore your Discord account could get banned for it. Use at your own risk.
Follow the instructions here, which are fairly detailed step-by-step instructions for Chrome, Firefox, and also the desktop app. I'm gonna expand more on approach 2 as I had to figure it out myself, and the current instructions for approach 2 are not really adequate enough. If you go with approach 1, skip down the entire section below, until the "Paste the token in the Token textbox and click the arrow button" section.
Approach 2: create a bot account, invite it to your server, and use its access token. This process assumes you have enough privileges to invite bots to the server ("Manage Server" permission), and therefore, but is also 100% okay as far as Discord's Terms of Service are concerned. It is also generally safer, as accidental leaking of the token will not risk you losing your user account.
Step 1: Go to the Discord developer portal.
Step 2: Create a new application by clicking the "New Application" button
Step 3: Name it however you want, I personally named it "mlemgrab". Agree to the scary sounding long ass terms of service.
Step 4: Go to the Bot section, scroll down to the "Privileged Gateway Intents"

Step 5: Enable the "Message Content Intent". We don't have to worry about the "if your bot is in more than 100 servers" part because our bot will never be in this many servers.
Step 6: Save changes by pressing the green button "Save Changes"

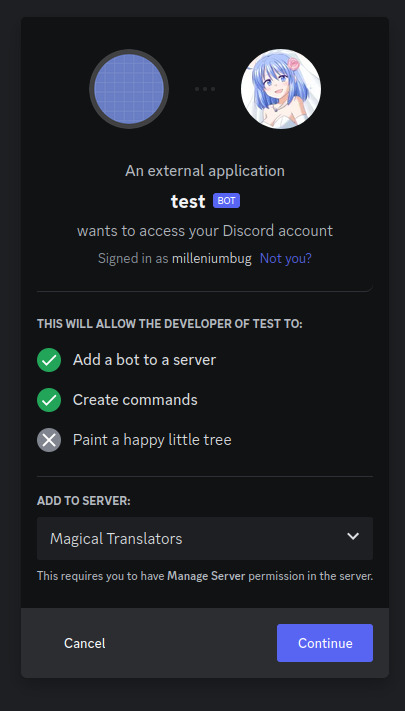
Step 7: Go to "OAuth2" followed by "URL Generator"
Step 8: Select the "bot" scope and then "Read Messages/View Channels" and "Read Message History" permissions

Step 9: Copy the link at the bottom and visit it:
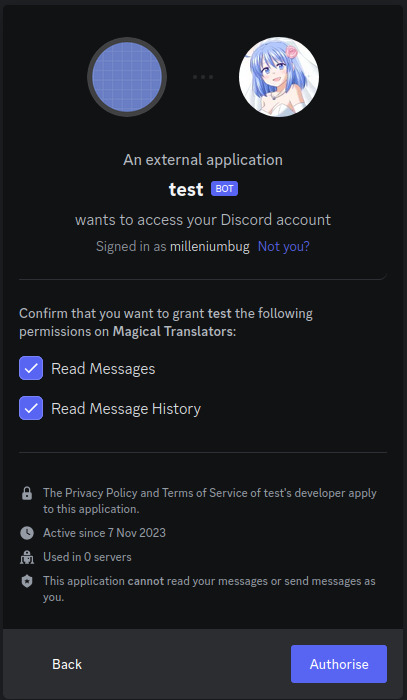
Step 10: Press "Continue", and approve the required permissions by clicking Authorize. Once you do it, the bot account is on the server.
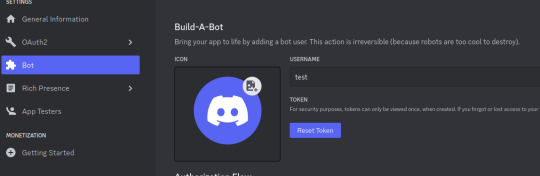
Step 11: Go to "Bot" and click the "Reset Token" button to get the token that will allow you to act (in our case, getting all the messages) using the bot user. If you lose that token, you can click reset again to get a new one.
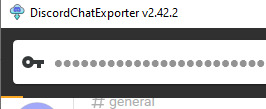
Paste the token in the Token textbox and click the arrow button

Select the server, and then the channel you want to archive

Click the download button on the bottom right

Select where you want to save it, and the format. HTML is good for easy browsing and preview in a web browser, JSON is good for further processing (let's say someone else later writes a program for importing the conversation elsewhere).
For archivization purposes I recommend saving in both HTML and JSON.
Click "More" for more options.

By default the program will not download any message attachments nor avatars or emotes. If you want that, select "Download assets" option. Preferably while also selecting the "Reuse assets" option and selecting a single directory for assets if you want to archive multiple channels.
You can also select the specific time range and using the partition limit - split the archive into several files each containing N messages.
Press Export. Wait. The progress bar will move very slowly.
Once it is done, you should be able to open the HTML file with your web browser.
Treat anything on Discord as media that will be lost
Do not use Discord to host your files. Do not rely on Discord to preserve your text. DO NOT RELY ON DISCORD FOR ANY KIND OF PRESERVATION OR HOSTING!!
It CAN be lost, it WILL be lost! You must consider Discord as a part of the Core Internet, controlled by one company that hosts the servers.
I thought it was impressive at first that it replaced IRC, but now I am horrified. If the company behind Discord went under today, how many friends would you lose?
How many relationships? How much writing?
You may think this won't happen, but I remember when AIM went down and along with it, entire novels worth of interaction with my oldest friend.
IT CAN HAPPEN TO YOU. IT WILL HAPPEN AGAIN. NO COMPANY IS INFALLIBLE.
Back up your files! Download anything you've saved to Discord NOW, before the API changes go into effect! And DO NOT RELY ON THEM FOR HOLDING IMPORTANT FILES!
52K notes
·
View notes
Text
Smart Ways to Save on Electronics Online in Bangladesh

Looking to buy a new phone, laptop, or Bluetooth speaker without burning a hole in your wallet? You’re not alone. With the rise of e-commerce in Bangladesh, online electronics shopping is more popular—and competitive—than ever. But how do you make sure you’re actually getting the best deal?
This guide breaks it down in a simple way—with smart tips, local hacks, and must-know tricks to help you save big and shop safely.
📈 Why Buy Electronics Online in Bangladesh?
Online shopping is booming in BD, especially in Dhaka, Chattogram, and other major cities. Here's why electronics buyers are going digital:
Better Prices: Online shops often offer lower rates than physical stores.
Larger Selection: Compare thousands of models across platforms.
Easy Payment Options: Choose from bKash, Nagad, Rocket, cards, or cash on delivery (COD).
Convenience: Avoid traffic, save time, and shop 24/7 from your home.
🛒 7 Smart Steps to Score the Best Online Deals
1. 🧮 Use Local Price Comparison Tools
Before clicking “Buy Now,” check multiple online shops. Use local price comparison sites to spot the best offer in seconds.
Pro Tip: Always check if the listed price includes delivery fees or VAT.
2. 📩 Sign Up for Newsletters & SMS Alerts
Want early access to flash sales or festival discounts? Subscribe to your favorite marketplaces. Benefits include:
Early sale access during Eid or Pohela Boishakh
Exclusive coupons via email or SMS
Notifications on price drops or restocks
3. 💰 Stack Coupons & Cashback Offers
Before checkout, search for active coupon codes or use browser extensions that apply them automatically.
Example: Spend BDT 5,000 on a new tablet and save BDT 500 instantly + 5% cashback via mobile wallet.
4. 📆 Shop During Major Festivals or Sale Days
Prices usually drop during: Festival/SaleTypical DiscountRamadan/Eid Sales20–50% offPohela BoishakhBundle dealsEnd-of-Year ClearanceUp to 60% off
Mark your calendar and plan big purchases during these times.
5. 🔁 Know the Return & Warranty Policies
Don't let cheap prices fool you. Check:
Return Window: Minimum 7–15 days for electronics.
Warranty Type: Manufacturer vs. seller warranty.
Refund or Replacement: Make sure damaged items are covered.
6. 🤝 Buy from Verified Sellers Only
Stick to sellers with high ratings (4.5★+), positive reviews, and verified status. Check if the product has:
Verified purchase reviews
Warranty documents included
Serial numbers (especially for phones, laptops)
7. 📱 Use App-Exclusive Offers & Mobile Wallet Discounts
Many e-commerce apps in Bangladesh offer “App-Only” deals or discounts via bKash, Nagad, or card payments.
Example: Pay with a bKash offer and get up to 10% cashback instantly.
🔓 Advanced Hacks Only Savvy Shoppers Know
🧑💻 Use Multiple Accounts Wisely
Create a second account with another email/phone number to unlock new user discounts.
💬 Negotiate Through Chat
Some sellers on marketplaces allow you to bargain via live chat. Be polite and ask for bundle or shipping discounts.
♻️ Consider Open Box or Refurbished Electronics
Open-box and refurbished items are often 30–40% cheaper and still function well. Just make sure there’s at least a 7-day return window.
🧠 Quick Recap: Your Online Electronics Savings Checklist
✅ Compare prices on multiple sites
✅ Subscribe to alerts for promo codes
✅ Buy during major sales like Eid, Boishakh, or year-end
✅ Double-check warranties and return policies
✅ Stick to verified sellers
✅ Use cashback offers and mobile discounts
✅ Bargain or bundle when possible
🤔 FAQs: Online Electronics Shopping in Bangladesh
Q1: Is it safe to buy electronics online in Bangladesh?
Yes, if you stick to verified sellers and known platforms. Always check reviews and return policies.
Q2: What’s the safest payment method?
Mobile wallets (like bKash or Nagad) offer cashback and security. COD is also safe for first-time buyers.
Q3: Can I return electronics after opening?
It depends. Many platforms allow returns if the product is faulty. Always read the return policy before purchasing.
Q4: Do I get a warranty if I buy online?
Yes, if the seller provides manufacturer or seller warranty. Keep the invoice and warranty card.
Q5: Are refurbished electronics worth it?
Yes—if you’re on a budget and the product comes with a return window and basic warranty.
📌 Next Steps
Bookmark this guide for future purchases.
Share with a friend who’s about to shop online!
Explore related tips on safe online payments and secure delivery options: 👉 DiscountBazarBD.com - Best Online Shopping Deals
🔗 External Reference Bangladesh Bureau of Statistics – ICT in Households Report (BBS)
0 notes
Text
This bundle (direct link for anyone who doesn't want to click through to Twitter: https://www.humblebundle.com/books/terry-pratchetts-discworld-harpercollins-books) is only available in the US.
So are the rest of us just out of luck? Of course not, this is the internet! And I'm not even talking about 🏴☠️! If we want to buy this bundle and gain access to this deal and buy these ebooks legitimately, we just need to make Humble think that we're in the US.
How do we do that? Well, if you already have access to a VPN service that provides location redirection you can just use that (mostly, you'll still need to read from step 11 below), but for anyone who doesn't already have one, you can use Tor as a free substitute with a little bit of work.
What is Tor, you ask? The name stands for 'The Onion Router' and it's an open-source software project designed to protect users' privacy online. It does this via a number of methods designed to make it difficult for trackers to identify a specific user (blocking tracking cookies, steps to obfuscate browser fingerprinting) and their online activity (encrypting internet traffic and relaying it through their own network to hide your identity). It's that last part that is useful for us today, because we can use that relay network to digitally project ourselves into the US of A to buy Discworld books AND donate to charity! We just need to tweak a few settings to get it to do that for us.
Step-by-step guide for how to both get and configure Tor and then use it to get this bundle under the cut.
1. First of all, you're going to need to get Tor. This is very easy, because it's distributed for free; just go to https://www.torproject.org/ and download the browser for your operating system.
2. Having downloaded it, you need to install it. Shocking, I know!
3. Once installed, you will need to run the Tor Browser and press the Connect to Tor button once.
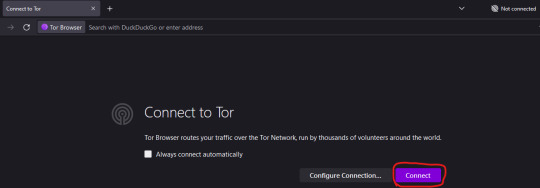
4. Once you are connected, close the browser window. Doing this creates configuration files that you will need to edit in order to have the relay go specifically via the US, instead of anywhere else in the world.
5. You need to locate the folder that Tor Browser is installed in. For Windows, by default, this will be on your Desktop (apologies to users of other OSes, I don't know the default locations for them, but you can find that info here: https://www.wikihow.com/Set-a-Specific-Country-in-a-Tor-Browser)
6. From the Tor Browser folder, you need to go to Browser > TorBrowser > Data > Tor. You should see a folder that looks like this:
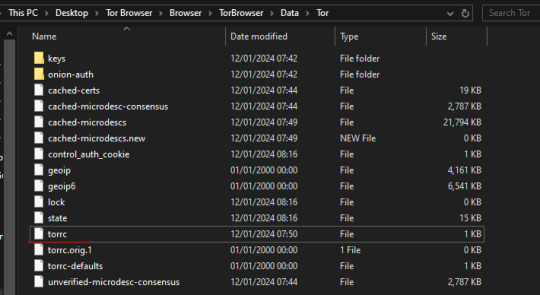
7. Right-click on the 'torrc' file and select 'Open With'. On the "How do you want to open this file?" menu that pops up, select 'Notepad'
8. Ignore the stuff that's in there already, we don't want to change any of that. What we want to do is add in two lines at the bottom, which will tell Tor to find both an entry and exit point to its network that are within the US. So we need to add in the following lines:
EntryNodes {US} StrictNodes 1 ExitNodes {US} StrictNodes 1
Add them as shown, with each one on its own line. (You might expect you only need to set the exit node to US to make this work, but when I tested this it did not work).
9. Once you've copy-and-pasted those lines in, go to File > Save (or hit Ctrl + S). Do not 'Save As', this will create a new .txt file, we need to save our changes in the original torrc file with no extension.
10. Now, re-open Tor Browser and tell it to connect. If you go over to https://www.humblebundle.com/books/terry-pratchetts-discworld-harpercollins-books you should now see the bundle, rather than be told it's not available to you... right up until you log in to your account to buy it! Oh no, we're not done yet!
11. So, if you already have a Humble account, Humble will have it location-locked to the country where you created it, and will block bundles not available in that country, even if you're currently connecting from outside that country. There are two ways around this:
11. A. Create a new Humble account using your Tor browser so that it's set to the US by default. You should be able to use your existing paypal account/other payment methods with this account even if you use them on your main account, but I haven't tested this in person.
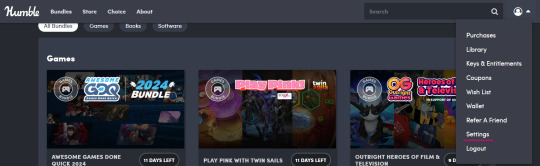
11. B. Humble lets you change the location of your existing account up to 3 times every 3 months to the location you are currently connecting from. Since you are currently connecting from the US, you can use this to change your location to the US, buy the Discworld bundle, and then from outside of Tor you can log back into your account and change it back to wherever you call home. To do that, go to Settings in the account dropdown on Humble:
That leads through to this page:

If you're currently connecting from a different location to the one in the Location box, it will allow you to select the location you are connecting from instead. It will prompt you to confirm the location change before it goes through.
12. Congratulations, you have successfully tricked Humble into thinking you are in the US and allowing you to buy the Discworld bundle. The bundle itself is redeemed through Kobo, and they don't care where in the world you are, so it doesn't matter if you change your Humble account location after you've bought the books, you'll still be able to redeem your purchase and access your ebooks.
13. Optionally, go back and edit the torrc file again and take out the lines we added to return Tor back to its default functionality.

YOOOO DISCWORLD IS ON HUMBLE BUNDLE!!!
If you've been on the fence about starting these books THIS IS YOUR SIGN
5K notes
·
View notes
Text
How to Build a Private Ethereum Blockchain for Development and Testing
Hey there! So you want to build your own private Ethereum blockchain? That's a great idea if you're looking to experiment with blockchain technology without spending real money or dealing with the constraints of public networks. Let me walk you through how to do this without getting bogged down in code.

Why Would You Want Your Own Private Blockchain?
Think of a private blockchain as your personal sandbox. You can:
Test things without spending actual money on gas fees
Control everything about your network
Get super fast transaction times (no waiting!)
Break things without consequences
Reset everything with a click when you need to
What You'll Need
Don't worry, this isn't complicated. You'll need:
A computer (Windows, Mac, or Linux)
Some basic understanding of what blockchain is
An internet connection to download the tools
A bit of patience (but not too much, I promise)
Step 1: Grab Some User-Friendly Tools
The easiest way to get started is with Ganache - it's like blockchain-in-a-box.
Head over to the Truffle Suite website and download Ganache
Install it just like any other application
Open it up and click "Quickstart"
That's it! You've got a blockchain running. See those 10 accounts loaded with 100 ETH each? That's your test money to play with.
Step 2: Set Things Up How You Want Them
Now let's make this blockchain truly yours:
Click the settings gear icon in Ganache
Give your blockchain a name that makes sense to you
If you want, change the port number (the default 7545 is fine for most people)
Pick a unique network ID (like 5777 or whatever number feels lucky)
Decide how many test accounts you want and how much fake ETH each should have
Hit "Save and Restart"
Congrats! Your blockchain is customized and running. That was pretty painless, right?
Step 3: Take a Look Around
Now that your blockchain is running, let's see what you've got:
The Ganache dashboard shows you everything happening on your private blockchain:
All your test accounts with their balances
Blocks as they're created
Transactions as they happen
Contracts once you deploy them
Click around and get familiar with it. This is your blockchain playground!
Step 4: Connect Your Blockchain to Tools You'll Actually Use
Now for the fun part - connecting tools that let you interact with your blockchain:
Setting up MetaMask:
Install MetaMask from your browser's extension store
Create a wallet (or import one)
Click the network dropdown at the top (probably says "Ethereum Mainnet")
Select "Add Network"
Fill in these details:
Network Name: Something like "My Private Blockchain"
RPC URL: http://127.0.0.1:7545 (for Ganache)
Chain ID: The number you chose earlier (like 5777)
Currency Symbol: ETH
Click "Save"
Now MetaMask is connected to your private blockchain! You can also import some of those test accounts from Ganache by copying their private keys.
Step 5: Deploy Smart Contracts Without Writing Code
Yes, you can deploy smart contracts without coding! Here's how:
Go to Remix IDE in your browser (remix.ethereum.org)
Look through the template contracts available
Find one that's close to what you need (like a simple token or auction)
Click "Compile" in the Solidity compiler tab
Go to the "Deploy & run transactions" tab
Select "Injected Web3" as your environment
Make sure MetaMask is connected to your private blockchain
Click "Deploy"
And just like that, you've deployed a smart contract!
Step 6: Play Around With Your Blockchain
Now's the time to experiment:
Send fake ETH between your test accounts
Interact with your deployed contract through Remix
Watch transactions show up in Ganache
Try breaking things to see what happens
The beauty of a private blockchain is that there are no real consequences. If something goes wrong, you can always reset and start fresh.
Step 7: Using Existing Smart Contracts
Found a smart contract online that you want to try out?
In Remix, upload the contract file or copy-paste the code
Compile it
Deploy it to your blockchain
Start interacting with it
What If Something Goes Wrong?
Here are some common issues and quick fixes:
Can't connect to your blockchain? Make sure Ganache is running and the port numbers match
Transaction failing? Check that your account has enough test ETH
MetaMask not seeing your blockchain? Double-check your network settings
Everything's a mess? Just restart Ganache with a clean slate!
Wrapping Up
Building your own private Ethereum blockchain doesn't have to be complicated. With tools like Ganache and Remix, you can have a fully functional blockchain environment up and running in minutes, without writing a single line of code.
This private playground lets you experiment, learn, and develop blockchain applications risk-free before you even think about deploying to public networks. As you get more comfortable, you can gradually dig deeper into the technology and maybe even start customizing things with a bit of configuration.
Whether you're a developer testing smart contracts, someone curious about blockchain technology, or building the next big DApp, a private blockchain is the perfect starting point.
#game#blockchain#multiplayer games#metaverse#nft#vr games#mobile game development#gaming#unity game development
0 notes
Text
How to Use www.aka.ms/linkpc to Connect Your Phone to a PC
With the increasing need for seamless connectivity between devices, Microsoft has introduced www.aka.ms/linkpc, a simple yet powerful way to link your smartphone to your Windows PC. Whether you want to sync notifications, transfer files, or even make calls from your computer, this feature enhances productivity by creating a unified experience across devices.
This article will cover the following:
What www.aka.ms/linkpc is
Benefits of linking your phone to your PC
System requirements
Step-by-step guide to setting up the connection
Common troubleshooting tips
Advanced features you can use once connected

What is www.aka.ms/linkpc?
www.aka.ms/linkpc is a short URL provided by Microsoft that redirects users to the setup page for connecting their Android phone or iPhone to a Windows PC. This connection is made possible through the Phone Link app (previously known as Your Phone Companion).
The feature enables users to:
View and reply to SMS messages
Access phone notifications
Transfer photos and files between devices
Mirror the phone screen onto the PC
Make and receive calls from the PC
Use Android apps directly from Windows (for selected Samsung and Surface devices)
This integration creates a seamless experience for users who frequently switch between their smartphones and PCs, improving efficiency and accessibility.
Benefits of Using www.aka.ms/linkpc
Connecting your smartphone to your PC via www.aka.ms/linkpc provides multiple advantages, including:
1. Seamless File Sharing
Transferring files between your phone and PC is as simple as dragging and dropping. This eliminates the need for cables, USB drives, or third-party apps.
2. Instant Notifications
Once connected, your PC will display all phone notifications, ensuring you never miss important alerts even when your phone is not nearby.
3. Messaging from Your PC
You can send and receive SMS messages directly from your computer, making typing easier with a full keyboard.
4. Screen Mirroring
For select devices, the feature allows you to mirror your phone screen onto your PC, enabling you to interact with mobile apps using a keyboard and mouse.
5. Call Management
You can make and receive phone calls directly from your PC, reducing the need to switch devices frequently.
6. Better Productivity
With your phone connected, you can work without interruptions, keeping all your necessary communications in one place.
System Requirements for www.aka.ms/linkpc
To use www.aka.ms/linkpc, ensure your devices meet the following requirements:
For Windows PC
Windows 10 (October 2018 update or later) or Windows 11
Bluetooth support (for call features)
Internet connection
For Android Phones
Android 7.0 (Nougat) or later
The Link to Windows app installed from the Google Play Store (pre-installed on some Samsung and Surface devices)
For iPhones (Limited Features Available)
iOS 14 or later
The Phone Link app installed on Windows 11 (only supports messaging and notifications)
How to Set Up www.aka.ms/linkpc
Follow these steps to successfully connect your phone to your Windows PC:
Step 1: Open the Link on Your PC
Open a web browser on your Windows PC.
Type www.aka.ms/linkpc in the address bar and press Enter.
The page will redirect you to the Phone Link app. If it’s not installed, you’ll be prompted to download it.
Step 2: Install the App on Your Phone
On your Android device, go to the Google Play Store.
Search for Link to Windows and install the app.
Open the app and sign in with your Microsoft account (use the same one as on your PC).
Step 3: Connect Your Devices
On your PC, open the Phone Link app.
Click Get Started and select Android or iPhone based on your device.
Follow the on-screen instructions to scan the QR code displayed on your PC using your phone’s Link to Windows app.
Step 4: Grant Permissions
For the connection to work properly, allow the following permissions on your phone:
Notification Access (to sync notifications)
Contacts & Messages Access (to enable calling and messaging)
Storage Access (to transfer files)
Step 5: Complete the Setup
Once permissions are granted, tap Done on your phone.
Your PC will confirm the connection, and your phone’s notifications, messages, and other features will start syncing.
Common Troubleshooting Tips
If you encounter issues while setting up www.aka.ms/linkpc, try the following fixes:
1. Ensure Both Devices Are Connected to the Internet
A stable internet connection is required for syncing. Check your Wi-Fi or mobile data.
2. Restart Both Devices
Restarting your PC and phone can resolve connectivity issues.
3. Update the Apps and System Software
Ensure your Phone Link and Link to Windows apps are updated. Also, keep your Windows and Android OS up to date.
4. Check Bluetooth and Permissions
For calling features, ensure Bluetooth is enabled and the necessary permissions are granted.
5. Reset the Connection
If issues persist, unlink your phone from the Phone Link app and restart the setup process.
Advanced Features of Phone Link
Once your phone is connected to your PC via www.aka.ms/linkpc, you can access several advanced features:
1. Access Android Apps on PC
For select Samsung and Surface devices, you can launch Android apps directly from Windows and use them as if they were installed on your PC.
2. Drag-and-Drop File Transfers
Easily move photos, documents, and other files between devices without using third-party apps.
3. Clipboard Sync
Copy text on your phone and paste it on your PC (and vice versa).
4. Personalized Notifications
Choose which notifications appear on your PC to reduce distractions.
5. Call History & Contacts Integration
View recent call logs and manage contacts directly from the Phone Link app.
0 notes
Text
Link Your Phone to Windows with www.aka.ms/linkphoneqr: A Complete Guide to Seamlessly Syncing Your Devices
In today’s digital world, staying connected across various devices is more important than ever. With the rise of mobile technology, integrating your phone with your computer has become a necessity for increased productivity and convenience. One such powerful feature that bridges the gap between your smartphone and Windows PC is the ability to link your phone to your computer using www.aka.ms/linkphoneqr. This feature allows you to synchronize your mobile device with Windows, making it easier to access notifications, messages, photos, and even control your phone from your PC.

What is www.aka.ms/linkphoneqr?
www.aka.ms/linkphoneqr is a Microsoft feature designed to help users link their smartphones, both Android and iOS, to their Windows PCs. Through this service, users can seamlessly sync their devices, enabling them to access and control important mobile features directly from their desktop or laptop. The integration allows you to read and respond to text messages, check notifications, view and transfer photos, and even mirror your phone’s screen on your PC.
For those looking to streamline their workflow or simply make their day-to-day tasks more efficient, www.aka.ms/linkphoneqr is an invaluable tool. This feature eliminates the need to constantly switch between devices, providing a unified and smooth experience across platforms. Whether you’re in a meeting, working on a project, or just trying to multitask effectively, syncing your phone to Windows can make your life a lot easier.
The Importance of Syncing Your Phone with Windows
With the advent of mobile technology, our phones have become essential for communication, entertainment, and work. But working with multiple devices simultaneously can often create friction, especially when tasks like responding to messages or managing notifications become scattered between your phone and PC. By linking your phone to your Windows computer using www.aka.ms/linkphoneqr, you consolidate your work and communication tools in one place.
Here are some of the main advantages of linking your phone to Windows:
Unified Experience: Syncing your devices provides a seamless experience where you can receive notifications and respond to messages directly from your PC without needing to pick up your phone.
Efficiency: Manage calls, messages, and app notifications from your PC, reducing the need to switch between devices.
File Sharing and Photo Transfer: Quickly move files, photos, and videos between your phone and PC without the hassle of wires or complicated procedures.
Screen Mirroring: View and interact with your mobile apps directly on your Windows PC, enabling you to use them as if they were native apps.
Time-Saving: The integration saves you time by keeping everything within one unified interface.
How to Link Your Phone Using www.aka.ms/linkphoneqr
The process of linking your phone to Windows using the www.aka.ms/linkphoneqr link is straightforward and can be completed in just a few simple steps. Below is a detailed guide on how to do it:
Step 1: Ensure Compatibility
Before you start, make sure your device meets the following requirements:
Windows PC: Running Windows 10 (or later versions).
Smartphone: The app works best with Android phones, but iOS users can also benefit from limited functionality.
Microsoft Account: You must have a Microsoft account to use the link phone feature.
Step 2: Download the "Link to Windows" App
For Android users, you need to download and install the “Link to Windows” app from the Google Play Store. This app enables your phone to connect with your PC.
For iPhone users, you can use the Your Phone Companion app, available on the App Store. The app will allow iPhone users to connect to Windows in a limited way, with access to features like notifications and text messages.
Step 3: Open www.aka.ms/linkphoneqr
Once you have downloaded the appropriate app, go to the www.aka.ms/linkphoneqr website on your Windows PC. This link will redirect you to the setup page where you'll be asked to scan a QR code with your phone.
Step 4: Scan the QR Code
Open the Link to Windows app on your smartphone and look for the option to scan a QR code. Use your phone’s camera to scan the QR code displayed on your computer screen.
Step 5: Sign In with Your Microsoft Account
Next, you’ll be prompted to sign in using your Microsoft account. This ensures that both your phone and PC are linked to the same account, allowing for seamless syncing across devices.
Step 6: Grant Permissions
Once signed in, the app will request various permissions on your phone to allow full access to notifications, messages, contacts, and photos. Ensure you grant all the necessary permissions to make the most out of the integration.
Step 7: Syncing Complete
After completing the above steps, your phone should now be linked to your PC. You can access your phone’s features directly from the Windows interface.
Features of www.aka.ms/linkphoneqr
Once the setup is complete, you can start using several features that will enhance your productivity:
Text Messages: You can send and receive text messages from your PC, even when your phone is not nearby.
Notifications: Receive app notifications from your phone directly on your PC screen, ensuring you never miss important alerts.
Photos and Files: Easily transfer photos, videos, and files from your phone to your computer and vice versa.
Phone Screen Mirroring: You can mirror your phone's screen onto your PC, enabling you to interact with apps and content as if they were running on your desktop.
Calls: Some users may also be able to make and receive calls through their Windows PC if their Android phone is connected properly.
Troubleshooting Tips for www.aka.ms/linkphoneqr
While syncing your phone to Windows is generally a smooth process, you may occasionally encounter issues. Here are a few troubleshooting tips to help resolve common problems:
Ensure Both Devices are Connected to the Same Wi-Fi Network: Both your phone and Windows PC should be on the same network for the connection to work correctly.
Check for Updates: Ensure that both your Windows and mobile apps are updated to the latest version. This can resolve any compatibility issues.
Restart Both Devices: Sometimes, a simple restart of both your phone and computer can fix connectivity issues.
Reinstall the App: If syncing fails, try uninstalling and reinstalling the Link to Windows app on your mobile device.
Disable Firewall or VPN: Occasionally, firewalls or VPNs can interfere with the connection. Temporarily disable them to see if the syncing issue is resolved.
Security Considerations for www.aka.ms/linkphoneqr
When linking your phone to your Windows computer, it’s important to consider the security of your devices and data. Always ensure the following:
Use a Strong Password: Secure your Microsoft account with a strong, unique password to prevent unauthorized access.
Enable Two-Factor Authentication: Add an extra layer of security by enabling two-factor authentication for your Microsoft account.
Use Trusted Networks: Only link your phone to your PC when both devices are connected to trusted and secure Wi-Fi networks.
Conclusion
Syncing your phone to your Windows PC using www.aka.ms/linkphoneqr provides a range of benefits that can streamline your digital life. By consolidating your communication and file management tools in one place, you’ll be able to work more efficiently and stay connected on the go. Whether you're trying to send messages from your desktop, transfer files, or mirror your phone’s screen, the www.aka.ms/linkphoneqr feature provides a smooth and intuitive experience. Follow the steps outlined above to link your devices today and take full advantage of this powerful integration.
0 notes
Text
Microsoft Office 2021 Activator Download 【Updated 2025】
I recently stumbled upon a site while trying to download activator office 2021, and it turned out to be a game-changer. The entire process was seamless, almost like following a treasure map where every step is clearly marked. What impressed me most was how user-friendly the instructions were—no tech jargon, just straightforward guidance. Within minutes, I had everything up and running without a hitch. It’s rare to find a service that combines efficiency with simplicity, but this one nailed it. If you’re looking to streamline your setup without unnecessary hassle, I highly recommend checking it out. It’s a true time-saver!
Microsoft Office 2021 is a powerful suite of productivity tools widely used by professionals, students, and businesses. To unlock its full potential, you need to activate the software. This article provides comprehensive details on downloading and using an Office 2021 activator to activate your Microsoft Office suite easily.
Why Activate Microsoft Office 2021?
Microsoft Office 2021 offers advanced features for creating, editing, and managing documents, spreadsheets, presentations, and more. However, without proper activation, many of these features remain inaccessible, and users may encounter watermarks or usage restrictions.
An Office 2021 activator ensures you can fully access all premium features of tools like Word, Excel, PowerPoint, and Outlook. Activation also ensures regular updates and compatibility, enhancing overall functionality and security.
How to Download an Office 2021 Activator
To activate your Office 2021 software, you can use a reliable Office 2021 activator. Here’s how to proceed:
Visit a Trusted SourceIt’s crucial to download activators from trustworthy websites. For the latest activator, visit https://ztadalafiluus.com, where you’ll find a secure and updated version of the tool.
Download the ActivatorLook for the section labeled Download Activator Office 2021 on the website. Follow the instructions to download the file onto your system.
Check for CompatibilityEnsure the activator is compatible with your version of Microsoft Office 2021 and your operating system (Windows 10 or 11).
Steps to Activate Office 2021
Once you’ve downloaded the activator, follow these steps:
Disable Antivirus TemporarilySome antivirus programs may flag activators as threats. Temporarily disable your antivirus to avoid interruptions during activation.
Run the ActivatorLocate the downloaded file and run it as an administrator. The activator will automatically detect your Office 2021 installation.
Activate the SoftwareClick the "Activate" button. The process should take a few seconds, after which your Office 2021 will be fully activated.
Restart and VerifyRestart your computer and open any Office application. Navigate to the "Account" section to verify activation status.
Benefits of Activating Office 2021
Activating your Microsoft Office 2021 suite provides several benefits:
Access to Premium FeaturesEnjoy unrestricted use of advanced tools across all Office applications.
Improved SecurityActivation allows you to receive regular updates, ensuring your software is secure against vulnerabilities.
Seamless IntegrationFully activated Office tools integrate effortlessly with cloud services like OneDrive, enhancing productivity.
Final ThoughtsUsing a trusted Office 2021 activator is the most efficient way to unlock the full potential of Microsoft Office 2021. Make sure to download the activator only from reliable sources like https://ztadalafiluus.com to ensure safety and effectiveness. Follow the steps mentioned above for a hassle-free activation process and start enjoying the complete suite of Office tools today.
1 note
·
View note
Text
The Ultimate Beginner's Guide to Learning Linux
Linux is an open-source operating system that powers everything from smartphones to supercomputers. Unlike proprietary operating systems like Windows and macOS, Linux is freely available to everyone. It’s known for its stability, security, and flexibility, making it an ideal choice for developers, system administrators, and tech enthusiasts.
Why Learn Linux?
1. High Demand for Linux Professionals Learning Linux opens up numerous job opportunities in fields like system administration, software development, cloud computing, and cybersecurity. Linux is the backbone of many cloud services, data centers, and tech companies.
2. Open-Source Nature Linux is open-source, meaning it is free to use, and its source code is available to modify. This is a key reason why it’s favored by tech communities worldwide.
3. Flexibility and Control Linux gives users full control over their system. It is highly customizable, allowing you to build an operating system tailored to your needs.
4. Learn Command-Line Skills The command line is a powerful tool in Linux, and mastering it will help you become more proficient in navigating and managing your system efficiently.
What You Will Learn in This Linux Course
Here’s a breakdown of the essential skills and concepts that would be covered in a comprehensive Linux course.
1. Basic Linux Commands You’ll start with basic commands like ls, cd, pwd, and mkdir. These are the building blocks that help you navigate the file system and manage files.
2. File Permissions and Ownership Learn how to manage file permissions and ownership to secure your system and ensure that users and groups have the correct access rights to files.
3. File System Structure Understand the Linux directory structure, including root directories (/, /home, /etc, etc.), and how to efficiently navigate through the filesystem.
4. User Management You’ll learn how to create, delete, and modify user accounts, as well as manage groups and user permissions.
5. Process Management Linux gives you full control over running processes. You’ll learn how to manage processes with commands like ps, top, kill, and how to use nice and renice to control process priorities.
6. Package Management Linux distributions use package managers to install, remove, and update software. Learn how to use package managers like apt (for Debian-based systems) or yum (for Red Hat-based systems).
7. Networking Basics Linux provides a variety of networking tools. You’ll learn how to configure network interfaces, troubleshoot connections, and use tools like ping, netstat, and ifconfig.
8. Shell Scripting One of the most valuable skills in Linux is shell scripting. You'll learn how to write scripts to automate tasks, save time, and enhance productivity.
9. System Logs and Monitoring Linux systems generate logs that are crucial for troubleshooting. Learn how to read and interpret system logs, and use tools like dmesg and journalctl to monitor system performance.
10. Security Practices Linux is known for its security features, and in this course, you’ll learn how to harden your system with firewalls, SELinux, and user authentication mechanisms.
How to Get Started
Step 1: Choose a Linux Distribution There are many flavors of Linux to choose from. For beginners, distributions like Ubuntu, Fedora, or Linux Mint are excellent choices. You can download and install them on a virtual machine (VM) or set up a dual boot alongside your main OS.
Step 2: Install VirtualBox or VMware If you prefer to learn without changing your current system, installing a Linux distribution on a virtual machine is a great option. VirtualBox and VMware are free tools that allow you to run Linux on top of your current OS.
Step 3: Use Linux Regularly The best way to learn Linux is by using it regularly. Install it on your computer or run it from a USB stick to get hands-on experience. The more you use it, the more comfortable you will become.
Step 4: Join Linux Communities There are active Linux communities where you can ask questions, share knowledge, and collaborate. Websites like Stack Overflow, Reddit's rlinux, and Linux forums are great resources.
0 notes
Text
Forgot Dell Laptop Password Windows 7 How to Unlock?
I forgot Windows 7 admin password for my Dell laptop and a reset disc was not created. How do I reset the password and get into my locked Dell laptop? Many people have this dilemma when using Windows 7 system. A strong and unique password is essential to protect our system, but you tend to forget Windows 7 password. What to do if we are locked out of Dell laptop Windows 7?

The following Tips will tell you how to unlock a locked Dell laptop Windows 7 without original password. All you need is to reset the forgotten admin password of Windows 7.
Tip 1: Using Windows 7 default Administrator account.
Windows 7 OS has a built-in administrator account which is created during Windows installation without password, and disable by default. You need to enable that account before losing your other admin account password. Or in this tip your built-in administrator account won’t appear in the screen.
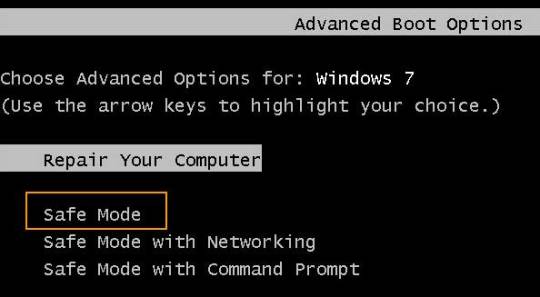
1. Start your computer and press "F8" while the computer boots up. The Advanced Boot Options screen appears.
2. Scroll down to "Safe Mode with Command Prompt" and press "Enter." Your computer starts in Safe Mode with Command Prompt.
3. Select the Administrator account that appear in the screen, then enter command prompt.
4. Type: net user your username 123456 and hit enter, it will show you a message that” the command completed successfully.
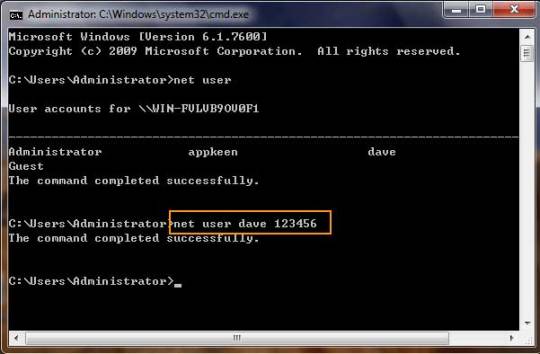
5. Restart your computer, then you can log in as dave with the password 123456. You can go to control Panel to change your account password if necessary.
Tip 2: Reset Dell Laptop Password Windows Vista Using A Free Password Reset Disk.
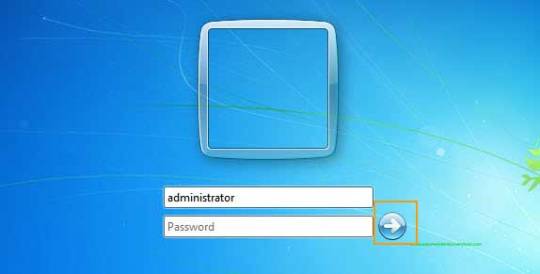
This is a free and easy way to hack Windows Vista without data lost. The problem with this option is that you have to create the reset disk before the password is lost. Thus if you don’t have a password reset disk, this option is not for you. Here are the steps if you have reset disk.
Step 1. Insert Win7 password reset disk to your computer.
Step 2. When you entering a wrong password for login, a hint will appear: The user name or password is incorrect. Click OK and back to the login Window. Click Reset password.
Step 3. Password reset wizard is running. On the Welcome screen, click Next.
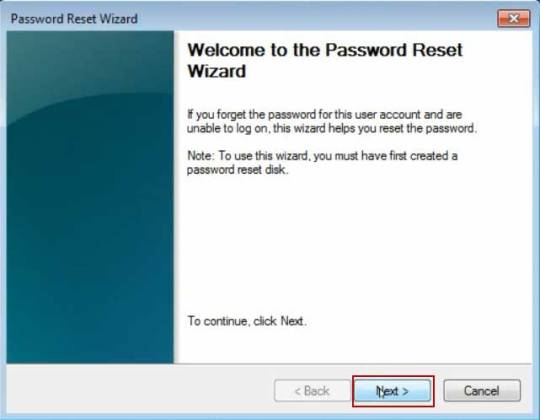
Step 4. Choose your USB flash drive in the drop-down menu and click Next.
Step 5. After the Password Reset Wizard finished reading your saved password, you need to type a new password in the Type a new password box and confirm. And then Click Next, then Finish. It is OK.
Tip 3: Use a Windows Password Recovery program to help Unlock Dell laptop Windows 7.
If you forgot an admin account password on your Dell laptop Windows 7 and there is only one admin account. It is a little troublesome.
However, we can use a handy password recovery tool, Windows Password Rescuer Advanced, to easily bypass Windows 7 admin password on your laptop without admin privileges, then you can log into your Dell laptop without password.
Here I will show you how to reset Windows 7 administrator password on a Dell laptop with USB flash drive.
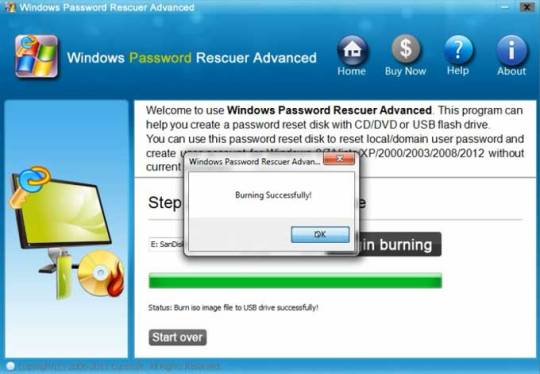
It works perfectly for all Windows versions on any laptop and desktop computers. All you need is another computer which you can login with administrator account and install Windows Password Rescuer to create a Windows password recovery disk with USB flash drive.
Step 1: Log in any available computer that you can access to and allows you download. Download and install “Wimware Windows Password Rescuer program” in that computer.
Of course, it also works for Windows 10. If you want to unlock a Dell Windows 10 laptop without password, this is one of the best workable ways.
Step 2: Run and burn the program to a blank CD/DVD or USB flash drive.
Step 3: When finish, insert the disk to your locked Computer and make your computer boot it from the disk by changing the BIOS setup, then you can follow the instruction to reset your password.
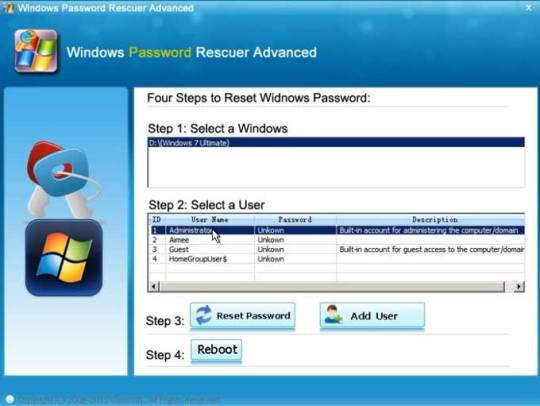
Step 4: After restart, you can log into your Dell laptop Windows 7 without password.

#Dell laptop#Windows 7#unlock dell laptop windows 7#reset password on dell laptop Windows 7#forgot dell laptop password windows 7
0 notes
Text
The Easiest Way to Start Crypto Mining
CryptoTab Lite is a browser mining solution that allows users to earn cryptocurrency while web browsing. It is a minimalist version of the full-on CryptoTab Browser, which combines traditional CPU mining techniques with some benefits for miners who rely on servers. The built-in mining algorithm provides a more cultured way of using your processor while using this, allowing you to mine more efficiently.
To start mining with CryptoTab Lite, follow these steps:
1. Install CryptoTab Browser from CryptoTab's official website.
2. Start the browser and click the CryptoTab icon in the upper right corner.
3. Log in to your social media account to keep your mined dough safe.
4. Start mining by flicking the on switch.
5. Adjust your mining speed by adding the Cloud. Boost trick to your device's settings.
6. Keep the browser open for continuous mining.
7. Mix with CT VPN for an unbroken link and finer mining.
8. Keep clicking junk from your browser every time it slows down.
9. Use the Super. Boost function in the Pro edition to give an 800% boost to your mining speed.
10. Get Cloud. Boost on board for lightning speed, 10 times faster than the default speed for $22 down three months.
12. Get a referral squad for some pocket change on the side.
13. Set the mining speed to be in harmony with the capacity of your system.
CryptoTab Browser's affiliate program is what truly excites me about it. You can solo mine and earn a decent income, but when you create a mining network, the sky's the limit. These networks rake in serious money, paying via stacked commission tiers every month.
To get funds out, identify yourself through a social network login, put in your wallet details, and boom, pay-out request. If you want to learn how to create a Bitcoin wallet to withdraw the balance, tell me in the comments.
CryptoTab Lite is a great starting point for anyone new to cryptocurrency mining without having to fiddle with technical code. It is not going to take over old-school mining setups for hardcore miners, but its no-sweat method and the real-deal prospect of making some coin make it a cool pick for not-so-serious users wanting to bag their first Bitcoin.
Whether you're using it on CryptoTab PC, Windows, or as part of the broader CryptoTab ecosystem, it's a solid entry point into the world of browser mining and the CryptoTab income potential.

#mix#mixinfo#mixinformation#CryptoTabLite#Bitcoin#BTC#CryptoMining#BitcoinMining CryptoApp#CryptoBrowser#CryptoNews#CryptoInvesting
0 notes
Text
Price: [price_with_discount] (as of [price_update_date] - Details) [ad_1] Power up your Windows security skills with expert guidance, in-depth technical insights, and dozens of real-world vulnerability examples from Google Project Zero’s most renowned researcher! Learn core components of the system in greater depth than ever before, and gain hands-on experience probing advanced Microsoft security systems with the added benefit of PowerShell scripts. Windows Security Internals is a must-have for anyone needing to understand the Windows operating system’s low-level implementations, whether to discover new vulnerabilities or protect against known ones. Developers, devops, and security researchers will all find unparalleled insight into the operating system’s key elements and weaknesses, surpassing even Microsoft’s official documentation. Author James Forshaw teaches through meticulously crafted PowerShell examples that can be experimented with and modified, covering everything from basic resource security analysis to advanced techniques like using network authentication. The examples will help you actively test and manipulate system behaviors, learn how Windows secures files and the registry, re-create from scratch how the system grants access to a resource, learn how Windows implements authentication both locally and over a network, and much more. You’ll also explore a wide range of topics, such as: Windows security architecture, including both the kernel and user-mode applications The Windows Security Reference Monitor (SRM), including access tokens, querying and setting a resource’s security descriptor, and access checking and auditing Interactive Windows authentication and credential storage in the Security Account Manager (SAM) and Active Directory Mechanisms of network authentication protocols, including NTLM and Kerberos In an era of sophisticated cyberattacks on Windows networks, mastering the operating system’s complex security mechanisms is more crucial than ever. Whether you’re defending against the latest cyber threats or delving into the intricacies of Windows security architecture, you’ll find Windows Security Internals indispensable in your efforts to navigate the complexities of today’s cybersecurity landscape. Publisher : No Starch Pr (30 April 2024) Language : English Paperback : 572 pages ISBN-10 : 1718501986 ISBN-13 : 978-1718501980 Item Weight : 1 kg 90 g Dimensions : 17.93 x 3.51 x 23.34 cm [ad_2]
0 notes
Text
Looking for an effective way to manage computer usage at home or in the office?
Here’s a step-by-step guide on how to set up and use SentryPC effectively:

>>>>>>Click here to get access
Step 1: Sign Up for SentryPC
Visit the SentryPC website and choose a subscription plan that best fits your needs. They offer various options depending on the number of devices and features you require.
Create an account by entering your email and setting up a password.
Step 2: Download and Install SentryPC
After signing up, download the SentryPC software to the devices you want to monitor. SentryPC supports Windows and Mac operating systems.
Follow the installation prompts to complete the setup on each device.
Step 3: Configure User Accounts
Once installed, log in to your SentryPC dashboard using your account credentials.
Create user accounts for each individual you want to monitor. You can set different permissions and restrictions for each user based on their needs.
Step 4: Set Monitoring Parameters
Go to the settings for each user account to configure what activities you want to monitor. This includes:
Tracking website visits
Monitoring application usage
Setting time limits for computer usage
Blocking specific websites or applications
Step 5: Customize Reporting Options
Select how often you want to receive reports and what details you want included. SentryPC allows you to choose between real-time monitoring or scheduled reports.
Set alerts for specific activities, such as attempts to access restricted content.
Step 6: Use Remote Access Features
Familiarize yourself with the remote access functionality. This allows you to make adjustments to settings or view reports from any device, ensuring you can manage activities on the go.
Step 7: Monitor Activity and Generate Reports
Regularly check the SentryPC dashboard to monitor user activity. The reports provide valuable insights into how each user interacts with the computer.
Use this data to address any concerns or to have discussions with users about their online behavior.
Step 8: Adjust Settings as Needed
Based on the monitoring reports, adjust restrictions, time limits, or permissions as necessary. You can easily update settings in the dashboard to reflect any changes in your requirements.
Step 9: Review and Analyze
Periodically review the overall activity reports to assess productivity and ensure that users are adhering to set guidelines.
Use the insights gained to foster a better environment, whether for family, students, or employees.
Step 10: Stay Informed
Keep an eye on SentryPC updates and new features. Regularly check their website or subscribe to newsletters to learn about improvements and tips for using the software effectively.
By following these steps, you can effectively set up and utilize SentryPC to monitor and manage computer usage, ensuring a safe and productive environment.
0 notes