#how to remove disk usage warning
Explore tagged Tumblr posts
Visit Tumblr Blog
Explore Tumblr blogs with no restrictions, modern design and the best experience.
Last Seen Tumblr Blogs


Fun Fact
In 2020, 27% of US Tumblr users had an annual household income of over $100,000.
Text
Optimize Your Mac: Fix Common Issues
Introduction to Mac Performance Challenges
Every Mac user eventually faces performance hiccups that can disrupt their workflow. Two common issues that arise are running out of storage space and browser crashes. These problems can slow down your system, cause frustration, and hinder productivity. Fortunately, with the right approach, you can resolve these challenges and keep your Mac running smoothly. This article explores practical solutions for addressing storage shortages and browser errors, ensuring your device performs at its best. By following these steps, you can reclaim space, stabilize your browsing experience, and maintain a seamless user experience.
Addressing Storage Shortages
One of the most frequent notifications Mac users encounter is a warning about limited disk space. How to Fix Your Startup Disk Is Almost Full on Mac is a critical skill to master. When your startup disk is nearly full, your system struggles to function efficiently, leading to sluggish performance and potential crashes. To resolve this, start by assessing what’s consuming your storage. Navigate to the Apple menu, select "About This Mac," and click on the "Storage" tab. This provides a breakdown of your disk usage, highlighting areas like documents, apps, and system data.
Begin by deleting unnecessary files. Check your Downloads folder for old installers, PDFs, or media files you no longer need. Empty the Trash afterward to free up space permanently. Next, consider offloading large files to an external drive or cloud storage. Photos, videos, and backups often take up significant space, and relocating them can make a big difference. For a deeper clean, use the built-in storage management tool to identify and remove redundant system files, such as old caches or logs. Regularly clearing these files prevents your disk from filling up again.
Another effective strategy is to uninstall unused applications. Some apps, especially those with large data files, can occupy gigabytes of space. Go to the Applications folder, drag unneeded apps to the Trash, and empty it. If you’re unsure about an app’s dependencies, use a third-party uninstaller to ensure no residual files remain. By consistently managing your storage, you can prevent the startup disk from reaching capacity and maintain optimal performance.
Stabilizing Your Browser Experience
Browser issues can be equally disruptive, particularly when you rely on the web for work or leisure. How to Fix Safari Web Content Quit Unexpectedly on Mac is a common concern for users facing frequent crashes. This error occurs when the browser’s web content process fails, often due to corrupted data, conflicting extensions, or insufficient system resources. Resolving this issue requires a systematic approach to identify and eliminate the root cause.
Start by clearing your browser’s cache and cookies. These files accumulate over time and can cause instability. Open your browser, go to the History menu, and select "Clear History." Choose to clear all data, including cookies and cache, to reset the browser’s temporary files. This simple step often resolves crashes caused by corrupted data. Next, disable or remove unnecessary extensions. Extensions enhance functionality but can conflict with web pages or consume excessive resources. Access the Extensions menu in your browser’s preferences and turn off or delete any you don’t actively use.
If crashes persist, check for software updates. An outdated browser or operating system may struggle with modern web content. Go to the App Store or System Preferences to ensure both are up to date. Updates often include bug fixes that address stability issues. Additionally, consider resetting your browser to its default settings. This removes custom configurations that might be causing conflicts. Be aware that resetting erases saved passwords and preferences, so back up any critical data beforehand.
Preventing Future Issues
To avoid recurring storage and browser problems, adopt proactive habits. Regularly monitor your disk space using the storage management tool and delete unnecessary files monthly. Schedule backups to an external drive or cloud service to keep your startup disk lean. For browser stability, limit the number of open tabs and clear cache periodically. Avoid installing unverified extensions, as they can introduce vulnerabilities or performance issues.
Advanced Optimization Techniques
For users comfortable with advanced tools, consider using disk utility software to analyze and repair file system errors. These programs offer detailed insights into storage usage and can identify redundant data that manual methods might overlook. Similarly, monitoring system performance can help identify resource-heavy processes that impact browser stability. Activity monitoring tools built into macOS can identify processes consuming excessive memory or CPU, allowing you to terminate them and prevent crashes.
0 notes
Video
youtube
Full tutorial - How to reduce the number of Inodes in your hosting account - eComHardyThis is the full tutorial video step by step showing how to reduce unnecessary Inodes from your hosting account. I recommend Siteground Hosting services - check out the link given below for discounted price hosting plans; https://www.siteground.com/index.htm?afcode=cd5fdfefc6c42dced3f39f15a45ce66d To learn to make a website - check out; http://ecomhardy.com/make-a-website Watch my video on how to use caching plugins and make a website faster; https://youtu.be/dmf7lYEFzOk Here are the steps Siteground hosting service provider suggests. Watch the full video to know free tools and plugins to help you improve Inodes numbers. How to reduce the number of inodes my account uses? The number of inodes equals the total number of files and folders on your web hosting account. Therefore, to reduce your inode count, you would have to reduce the number of files and folders. Most commonly this is done by: Removing all files and folders you don 19t need You can use the File Manager in Site Tools or FTP to access your account and delete files and folders that you don 19t need. Here are some of the most common causes that may give you an idea about how to reduce the number of inodes you have. 1. Remove old Backups It is common for backups that are created on a schedule by plugins or 3rd party services to fill all the available disk space if left unmonitored. Download unused backups and delete them from your hosting account to save disk space and inodes. 2. Delete Inactive Plugins If you 19re using WordPress and have plugins that are not active on your site 13 please delete them. Deactivating the plugins leaves the codebase on your account adding up to your inodes quota. 3. Remove Unused Image Sizes If you 19re using WordPress your theme may be generating multiple copies of each uploaded image, some of which are unused. Check your theme settings and leave only the ones that you are actually using on your site. Then, regenerate thumbnails deleting unused sizes using a plugin like Regenerate Thumbnails. 4. Check the number of cache files you have Modern web applications by default usually use file caching, which means that they might be generating a high amount of cache files inside your account, thus adding to its total inode. Check your website 19s 18cache 19 folder and reduce the number of cached files you keep regularly. Most web applications which store cache include an option to purge the cache from within their administrative area. For WordPress, check the wp-content folder for similarly named folders and clear them. We recommend using the SiteGround Optimizer plugin for caching and performance which does not rely on file-based caching and won 19t add to your inodes quota. 5. Delete the .opcache folder in your account You can use SSH to delete the .opcache system folder in your account. In case you 19re using PHP 7. x this is where it stores opcaches. Don 19t worry, it will be regenerated but will lack obsolete cache from older PHP versions or code that is no longer active on your account. 6. Clean up your Email Accounts Mail adds to the total inodes quota since emails are files stored on your account. We recommend that you regularly delete your Junk/Spam folders that tend to accumulate a large number of emails. Regularly clean your Trash/Bin folders which collect deleted emails but keep them on the server. Last but not least, you can remove emails coming from newsletters and automatically generate ones that you don 19t need. If you 19ve followed all of the above and you still need additional disk space or inodes, you may consider upgrading your account to a higher hosting plan with a higher inodes quota. ------------------------------------------------------------------------------------------------------------------------- Part 1- How to make a website - Buy right Domain and Hosting https://youtu.be/y-JoRxhwhE8 Go to, https://ecomhardy.com/make-a-website
#wordpress#woocommerce#elementor#dropshipping#ecommerce#ecomhardy#disk usage warning#get more space#how to control inodes#how to delete cache#how to delete junk or spam emails#how to delete the unnecessary files and folders#how to increase disk space#how to reduce file usage in siteground#how to reduce indoes#how to remove disk usage warning#how to solve cpanel - disk usage warning#increase disk space#increase inode limit siteground#inode quota exceeded cpanel
0 notes
Text
Fate and Fortune

Part 4 and we’re finally moving into canon ya’ll.
Part 1
Part 2
Part 3
Content warning: implied unwanted sexual advances, mentioning of prosthetics and amputation (y’know Joseph), mention of substance (marijuana) usage, mild injuries, mention of grief (especially familial loss)
For the moots: @risottoneroo (ya mans is making an appearance) @rat-makes-stuff
Some context: Vera’s stand works in balance- for every good fortune she exploits or bad fortune she reverts, the bad needs to be experienced and because she manipulates it, she’s the one that needs to experience it. This forms the basis of big skills having a “cost”.
The next time Vera had climbed onto an airplane, it was unaccompanied and just a few months shy of two years from when she had first left Egypt.
Mr Joestar had never made an appearance but Avdol kept in touch over the phone almost biweekly. Everything in the world seemed to be running smoothly until Avdol’s calm demeanor seemed to waver over the phone when they spoke, so much so that she knew something big was going on.
“Vera! You’ve got a scheduled call with your benefactor in the counselor’s office after school.” One of her class mates had handed her a time and return number scribbled on a piece of paper as she strolled through the hallway.
Of course she was on time, waiting about three rings before picking up and introducing herself. The voice that returned was definitely not what she was expecting.
Vera had always imagined a weakening, wavering voice from an elder gentleman on the other end of the line when she thought of her benefactor but Mr Joestar was loud, quick- talking and despite the serious order for her to leave her classes, sounded no older than 40.
She landed in Japan a few hours shy of midnight, painfully jet-lagged and half asleep in a vain attempt to forget the time zones she was crossing. Avdol had met her just outside the luggage carousel, giving a tired smile as she approached.
“Long time no see, Avdol.”
“How was your flight?” He gave a huff of laughter, taking her suitcase and guiding her towards one of the exits.
“Oh it was lovely, I stop smoking for a month and suddenly all my hard work is undone by a woman two isles behind me.” She had always had a weakness for cherry cigarillos.
“And you caved?” He raised an eyebrow slightly at her.
“It was an 8 hour flight- I mean at least I stopped asking after she so kindly offered to ‘alleviate some stress in the bathroom’.”
Avdol cringed a breathed a heavy sigh- “I forget for all the luck of your stand you suffer twice the bad luck.”
She shrugged and then sat down on the bench with a groan. “Speaking of which...Do you-?”
The cigarette pack handed to her was enough of an answer.
“Damn Avdol- I knew your nerves were frayed but bad enough for you to pick up smoking again?”
He didn’t answer as he sat down beside her, throwing an arm over the back of the bench and joining her in the vice.
“The man that killed your parents. He came to find me.”
Vera’s stomach dropped, the blood leaving her head as the realization dawned on her. The fact that Avdol was there and seemingly unharmed...
Avdol took a heavy swallow, took another drag and continued. “Your benefactor brought you here because you were probably the first among us to have seen Dio in person in Egypt.”
“And I’m guessing this shitbag’s name is Dio?” She didn’t mind getting information in the form of little snippets but Avdol always spoke to her in a pretty straightforward manner, to see him so disoriented in his thoughts was putting her off ease.
He only nodded.
Vera cleared her throat and then turned towards the man beside her. “And care to explan what my benefacto has to do with him?”
“Dio is a pest that started with the Joestars-“
It took three cigarettes for Avdol to get through the brunt of the Joestar family drama- not even mentioning the finer details not even they were aware of. “So this Kujo kid is just a pit stop before we go back to Egypt?”
The prospect both excited and worried her. She’d be going home but at the cost of possibly facing Dio.
“Don’t think on it too much- Mr Joestar still has to affirm that his grandson doesn’t have a stand.”
Vera laughed with her head back. “I kinda figured a little arrest scare wasn’t enough for him to come all this way.”
The two rose up from the bench, Avdol taking her suitcase as the taxi pulled up.
Vera was nearly convinced Jotaro Kujo didn’t have a stand, so when she crawled into the hotel bed in her room, she was convinced that she’d be able to sleep the jetlag off. The 10 am call from the front desk was enough to prove her very wrong.
“Yes?” She grumbled into the phone.
“Good morning, Vera.” The painfully smug reply from Avdol almost had her dropping the phone back onto the receiver. “The taxi to the police station will be here in half an hour.”
She dropped her head into the pillow and gave a muffled scream. Without much further protest she rolled out of bed and prepared to meet the day. Avdol met her in the front office with her own pack of cigarettes. “You’re supposed to be a good influence on me.”
Avdol only shook his head, a smile behind the cigarette between his lips.
At the police station, they were greeted with a rather frantic looking officer, ushering them through the offices and down to the cells where the inmates cowered from the oversized teenager lounging in the corner cell with junk that, needless to say, didn’t belong in a jail cell.
Before they could approach the problem at hand Avdol greeted Mr Joestar. The sound of his name had her eyes shoot up at the greying monstrosity of a man in front of her. Joseph Joestar smiled at her warmly before extending a white gloved hand for her to shake. “A pleasure to finally meet the student whose report card I get in the mail.”
Vera could’t help but give a laugh- just as much as she only knew the name of her benefactor, he must have only known her for her report cards.
“The honor is all mine, Mr Joes-“ her sentence died out on her tongue due to the subtle metallic click on her palm. Her smile slid off her face and her gaze shot between the clicking on Mr Joestar’s hand and his seemingly oblivious smile.
When the realisation finally dawned on him Joseph swiftly held his other hand out with a toothy grin (and maybe a dust of color on his cheeks). Vera shakily shook it, relieved at the slight heat from a human palm in the hand she held now. “Sorry, I forget not everyone is lacking a right hand.” He chuckled awkwardly but Vera struggled to hide the genuine laugh behind her hand. “A tale for another time?”
Mr Joestar gave a bark of laughter, throwing a jovial arm around her shoulders. “I just knew you had moxy, kid! I knew right after that call I got from your principal about the maurijuana ring you busted because one of the dealers ripped you off.”
Avdol was quick to bring the topic back to the trouble at hand, speaking to both Vera and Mr Joestar (mostly to Vera’s relief since they were still in a police station). “Not to interupt a long-delayed acquiantance but how would you have us remove Jotaro from his cell, Mr Joestar?”
“By whatever means- Avdol, I trust your judgement.”
Avdol looked at Vera, “He simply won’t leave his cell. Any idea if you could get him out?”
Her eyebrows shot up in intrigue, “Without force i suppose you mean?” She looked at one of the officers nearby. “How long has he been in there?”
“About a week.” One of them answered, sounding unsure.
She nodded, looking over to the cot that was visibly too small for a teenager of such bizarre proportions. “I could just bring him out the easy way-“
“After that I’ll take over.” Avdol finished her thought for her.
Vera shrugged, strolling past the other bystanders to stand in front of the cot Jotaro was seated at. She peered down at him between the bars, his aquamarine gaze peaking just beyond the brim of his cap- like he was trying to stare HER down.
When she refused to waver he only gave an angry ‘Tch’ as he pulled his cap lower over his eyes. Vera brought Fortune behind her and waited for him to bring his open soda can to his lips. To his surprise the can was sealed. Jotaro’s gaze angrily shot towards her and her stand, the disk that replaced their pointer finger knuckle still quietly moving backwards.
“So you possess an evil spirit as well, so what?”
“We don’t speak the same language, Kujo. Your default is force but I’d like to mess with your head first. I won’t force you out of your cell. You’ll come out on your own volition.”
Another indifferent scoff as he reached for the pack of sodas that once stood on the table nearby. He looked almost disbelieving at the empty space, soon becoming angry as he rose up on his feet and yelled. “Knock it off, woman.”
“This is gonna sound so childish but seriously, knock what off? Your cap? Because I’m sorry to say...” she held the cap Fortune had phased from his head and into her hand beside her head. “I already have.”
Jotaro’s eyes grew wide for a moment before he reached through the bars at her hand. She only took one step back out of reach as she put the cap onto her own head. “The cell is unlocked, by the way.” Was all she said as she turned to the guard who watched in disbelief as the rest of the junk in Jotaro’s cell phased back to their original places. “May I smoke in here?”
He only shook his head.
“Hey! You annoying bitch! Stop it with the stupid tricks!” Jotaro yelled from behind the bars. Vera continued as if she didn’t even hear him.
“That’s a shame- I’ve never had this brand before.”
In her hand she held the cigarettes from Jotaro’s back pocket. For just a moment she turned her gaze to him, wildly angry eyes meeting her own. “What’s the matter, Jotaro? Familiar pack?”
He didn’t even need to feel his pocket to know it was his. “I said quit the tricks, woman!”
“Oh, then you’re not gonna like this next one.” She smirked as she started walking towards the exit- focusing Fortune onto Jotaro. In her peripherals she could see the extension of his stand’s hand moving past the bars. So she retorted by having Fortune grab hold of the stand’s wrist and force it against the bars with a loud clang. Jotaro’s temper flared and just as he took his first physical step closer to her she had focused Fortune on reverting Jotaro’s body outside of the cell- just like he was last week.
She threw the cap back at him as she stood beside the border wall between the the two cells. “Was that so hard?” She asked as she peered behind her shoulder at the other teenager. He stared in disbelief at his position on the same side of the bars as her.
Vera stepped closer and took hold of his wrist, bringing it up to place his cigarettes into his palm. “You’re welcome. Now, you gonna share a cigarette with me outside and explain why you wanna hide in a dark jail cell or are you gonna do this the hard way?”
“I can’t control the thing that possessed me. For those around me’s safety- I won’t be leaving this cell.”
Vera followed the dramatic bastard as he opened the cell and sat back down on the cot, throwing his legs up once again.
“I mean I saw that ‘spirit’ try and grab your cap back for you so I think you have a bit more control over it than you think but I mean who am I to say, right? Clearly,” she chuckled as she slid her hands into her pockets. “You chose the hard way.”
Vera turned around to take Avdol’s place leaning against the wall, watching the fight unfold before letting Fortune turn back Jotaro’s damages with a wave of the hand.
Fortune’s palm softly rested on Avdol’s shoulder as they left the station, reverting any injuries he could have gotten in the scrap.
“I think Jotaro has burns you could heal.”
Vera’s face scrunched up in disgust. “Nah, he chose violence.”
Avdol laughed, placing a hand on Vera’s shoulder. “I’m surprised at the control you have over your stand. Dare I ask what it had cost you?”
Vera had once told him that every skill she learned, every major thing she had accomplished with Fortune came at a cost.
Most of her healing she had learned on the field hockey team she was forced to participate in- she’d fixed knees and thumbs and sometimes teeth during water breaks but her tricks with time and space came at considerably greater costs.
Some were as simple as having bad luck and slow reflexes that sent her down a flight of stairs too quickly, other times it was tricky little traps set up by boys behind the track field locker rooms.
In a sense it made her smart enough to deal with life, and luckily she only paid a fee per use and when and where the cost would be charged sometimes felt like it would haunt her.
“Just a sprained ankle.” She lied. It was a tale for another day, she wasn’t very excited to tell him the truth in that moment but she would eventually.
At the café they brought Jotaro up to speed with Dio and everything happening in Egypt. Holy also offered her home as a place Vera and Avdol could stay until their departure.
“And when you get up in the morning, you can just roll it up and put it back in the cupboard.” Mrs Kujo cheerfully explained as Vera knelt beside the futon Holy had rolled open for her.
“Thank you, so much. Mrs Kujo.” She bowed her head in thanks- feeling the soft futon gently calling her name to sleep.
“It’s no trouble dear- it’s the least I could do for helpin with my son.”
Vera could see her movements slow down, her hands becoming shakey as she fiddled with the sheets in front of her. The tears streaming down Mrs Kujo’s cheeks broke Vera’s heart as they dripped onto the corner of the comforter. Without second though, Vera got up and brought the tissue box to Holy and tried to comfortingly rub over her back.
“It’s alright Mrs Kujo, you’ve been through a lot.”
Holy’s teary eyes gazed at Vera and even more she wanted to wrap her arms around her and comfort her but she figured that she would be overstepping. “He’s not a bad kid, I promise. He’s really such a sweet boy.”
Vera had to bite her tongue from asking if she was sure- she’d heard how he spoke to Holy, to her it almost seemed unforgivable but she couldn’t deny a mother’s love for their own child. So with a soft smile she answered. “I believe you, Mrs Kujo. Things are just... strange.”
The smile that lit up Holy’s face brought such relief to Vera’s heavy heart and with a dramatic reach, Vera’s neck was caught in Holy’s embrace. “Oh thank you for understanding!”
For a moment Vera had no idea how to react, simply letting the little woman crush her in the hug, swaying happily until she was reminded how long it had been since she’d hugged her own mother... and how she’d never be able to.
“What do you like for breakfast?” Holy suddenly released her from the hug, smiling brightly.
“Uhh-“
“Anything! Even an English breakfast, maybe an American one, anything.”
Vera took hold of Holy’s wrist to try and calm her down. “Show me what you like to eat for breakfast- I’d love to see what a traditional breakfast looks like here.”
She brightened up considerably and like a whorlwind of good nights and sweet dreams she was out the door.
Vera crawled into her futon quietly to try and forget why she hadn’t had a home-cooked breakfast in years.
Bad idea.
With a start she jerked herself up from her nightmare. To cope with the shaking she shot up out of her comforter and grabbed her cigarettes.
She was about to slide her door open but the crack of thunder and the door opening on its own had Fortune leaping from her body defensively. Before her stood Jotaro Kujo, peering down at her with an unreadable expression in the dark.
“Can I help you?” She asked perhaps a bit too aggressively, smoothing her hair back down.
“You made a lot of noise. I came over to make sure you’d shut you up.”
“Do have any idea how much of a creep you sound like? Although I have to admit, I’m not particularly afraid of you.”
She slipped passed the mountain of a man and brought a cigarette to her lips when she stepped outside the room.
“I didn’t mean to come off that way- you sounded like you were crying.”
She turned around to look at Jotaro who had now slid his hands into his sweat pants to watch her walk down the hallway.
“It’s okay, I’ve heard worse. But you need to cut that shit out with your mom- she actually loves you.”
Jotaro’s gaze moved to the garden just beside the elevated wooden hallway, watching the rain drizzle over the little bushes literring the edges of the garden. “I know.”
Vera figured there was more to Jotaro than just being an abrasive asshole- she could probably sit and psycho-analyze him to pieces but she found it best not to pry to far.
“Join me for a smoke break?” She asked as she held the open mouth of her pack out to him.
He padded over and reached in, bringing one to his lips.
#jojo's bizarre adventure#jojo no kimyou na bouken#JoJo part 3#Muhammed Avdol#Joseph Joestar#Jotaro Kujo#Holy Kujo#Dio Brando#OC tingz#my writing#Fate and Fortune
17 notes
·
View notes
Text
Audacity Audio Editor Online
In the hunt for a program that may allow you to merge and combine a number of mp3 information into one? Merge MP3 can import ID3 tags from any of the tracks being merged, or you'll be able to write a brand new one yourself, and take heed to the tracks in the program. MergeMP3 helps batch mode operation, becoming a member of whole folders full of audio files with only a few mouse clicks. It can be used as an audio editor with all these primary trimming options, as an audio converter that lets you convert files into different music codecs, and as a software extractor which allows you to extract MP3s from movies. While you can't take away EZ Softmagic MP3 Splitter & Joiner like totally different packages, then it's price checking whether or not it's a malware or not. Smaller items, and joins a lot of mp3s into a single ez all report mode, you mp3 audio recorder.audio recorder platinum v4 splitter can break up, reduce, trim a large mp3 file into plenty of smaller gadgets or be part of, merge a number of mp3 data to a much bigger one.outcomes 17 of seven.relative to the final usage of customers who've. I have to warn you that the strategy I am about to indicate you might be not the safest approach to merge MP3 information. Use this service so as to add audio or music to a video file on-line and without cost. This free MP3 joiner helps a considerable amount of input audio formats along with MP3, WMA, WAV, AAC, FLAC, OGG, APE, AC3, AIFF, MP2, M4A, CDA, VOX, RA, RAM, TTA and rather more as supply codecs. This may not depend in opposition to your iCloud storage, however it does mean all of your native MP3s (or audio files in any format) get transferred up to Apple's servers, from where they can be beamed all the way down to your devices. 2) As for me, the best choice to split-be part of mp3s (and with out re-encoding) is legendary Mp3directcut I made changing into a member of of 2 recordsdata of the equivalent bitrate actually in no time.
If you happen to expertise a problem with "hiccups" or clicks between the items of a joined file, the creator recommends removing your MP3 tags prior to becoming a member of the tracks. Although it's doable to concatenate MP3 and different lossy audio formats to at least one long file, doing so often requires re-encoding to render the long file. Free Audio Dub - This standalone program promises to let you minimize quite a lot of audio formats, including aac, ac3 and m4a (as well as mp3, wav, ogg, wma and mp2). MP3 Tag Editor moreover means you can create playlists, rename recordsdata, set up folders, export knowledge to utterly completely different codecs, and more. Features: - Fast MP3 Joiner with out re-compression; - Full MP3 tag (ID3 model 1 and a pair of) assist; - Powerful Natural Sort Algorithm; - Supports MP3 information with art work (album cover) within the ID3 tag; - MP3 Joiner allows reviewing the MP3 ID3 tag information; - Easy manual editing of ID3 tag info for the MP3 file that might be generated; - VBR (Variable Bitrate) MP3 files help; - Simple MP3 tracks sequence adjustment; - Sorting on any column (resembling by Title, by Length, by Monitor and many others.); - Adjusting the sequence order of the MP3 information that will probably be merged; - You may copy the MP3 ID3 tag information instantly from any of the MP3 information within the join checklist or from any of the MP3 information on the disk; - You can save and load an MP3 files record and undertaking file; - Quick MP3 merging; - Insert silence between merged MP3 audio files; - Batch MP3 Joiner mode; - Append and Mix mode; - Drag and Drop interface. This mp3 tagger is not going to solely import such tags as titles, artists, albums and others into your audio files but help to kind and rename your MP3 collection in no time. All that you must do is so as to add the audio recordsdata to an inventory and press the Merge" button. After uploading more than 2 files, click on on Join to merge visit these guys music recordsdata right into a single monitor. 16 Free Greatest Mp3 splitter and Joiner instruments to separate and merge Mp3 information: - If in case you may have currently purchased an MP3 participant, you should be taken with digging additional about find out how to lower up audio files or merge music information.With our MP3 Merger you can be a part of your chapters in the one large audiobook or mix non-stop audio CD from many separate music tracks. ✓you can lower and merge the mp3 files using Mp3 Cutter & Merger. How To Use MP3 Merge - Download the program in a zip file from the developer here Extract the zip file and run this system - in our examples, we are going to use the commands from the File menu but you can too use the equal icons on the toolbar. You presumably can free merge two or extra songs into one with Pavtube Free Video DVD Converter Remaining , which has full assist for all audio file codecs includingau,mp3,mp2,m4a,flac,ape,ogg,8svx,aiff,.aif,caf,dts,smv,tta,voc,aac, and plenty of others, you possibly can flexibly rearrange the order of the music then just confirm the Merge into one file" choice to affix your whole audio clips into one.By utilizing the audio modifying function of this program you possibly can simply be part of mp3 recordsdata in one audio track with none hassle and bother. MP3 Merger and MP3 Cutter is used to join multiple MP3 audio files. MP3Val repairs any errors within the pre-merged information copied into the merged file or produced in the course of the merging course of. Audio Joiner lets you set the interval of every songs added into this music combiner after which merge them into one song. Select any of your favorite MP3 from your telephone or recording, select the world to be shred from the audio, put it aside in your phone.This software is similar to the MP3 Cutter Joiner. Not ample with an MP3 file for audio? Click "File" and then choose "Import Audio." Sort the identify of your MP3 file within the search bar. Abelssoft Mp3 cutter offers you the chance to edit and manipulate mp3 music in a very easy manner! Even if the article supplies an inventory of audio mergers, it's still difficult for you to select the best one. Free MP3 Cutter and Editor (Portable) is a free software application from the Multimedia Creation Tools subcategory, a part of the Audio & Multimedia category.So, for those who really feel that a music is just too long and you simply can not take that length, use this instrument to trim off any irrelevant parts of the MP3 file. Step three: Examine the Merge box and you should see the "MKV Multi-Observe" option, select its field to allow the feature. To keep away from this possiblilty Mac users are advised to transform their recordsdata utilizing an internet service comparable to (an advert-free service) or comparable. MP3 Cutter helps you extract small clips from any MP3 music and play the chosen clips from inside the software program.
1 note
·
View note
Text
Anydesk For Mac Download

Download Anydesk For Windows 7
Anydesk For Mac 10.6.8 Download
Anydesk For Mac Download
5.6 k
Remotely access your devices
Older versions of AnyDesk
Read reviews, compare customer ratings, see screenshots, and learn more about AnyDesk. Download AnyDesk and enjoy it on your iPhone, iPad, and iPod touch. AnyDesk is the fastest and most affordable Remote Control Software in the world!
Nov 15, 2020 AnyDesk for Mac is categorized as System Tools. The actual developer of this Mac application is AnyDesk. The current installation package available for download requires 8.6 MB of hard disk space. Our antivirus scan shows that this Mac download is malware free.
Read reviews, compare customer ratings, see screenshots, and learn more about AnyDesk. Download AnyDesk and enjoy it on your iPhone, iPad, and iPod touch. AnyDesk is the fastest and most affordable Remote Control Software in the world! How to Download & Install Anydesk for MAC OS X Open the AnyDesk official website from here Click on Available for other platforms which will open the available OS On the next page simply click on MAC Icon and this will popup the Get AnyDesk for MacOS option on the same page.
It's not uncommon for the latest version of an app to cause problems when installed on older smartphones. Sometimes newer versions of apps may not work with your device due to system incompatibilities. Until the app developer has fixed the problem, try using an older version of the app. If you need a rollback of AnyDesk, check out the app's version history on Uptodown. It includes all the file versions available to download off Uptodown for that app. Download rollbacks of AnyDesk for Mac. Any version of AnyDesk distributed on Uptodown is completely virus-free and free to download at no cost.
5.6.0 Jul 22nd, 2020
5.4.5 Mar 19th, 2020
Get AnyDesk for macOS
No email, registration or installation required!
Access and edit data and settings on remote computers or servers with AnyDesk remote desktop for Mac. Enjoy seamless connectivity and a simple set-up. Offer remote support to your customers. Whether connecting to other Mac based systems, or desktops running Windows or Linux, you can count on AnyDesk’s stable operation and cross-compatibility.
AnyDesk for Mac provides the features and tools you need to connect with desktops or servers in any location. Our remote desktop app ensures a stable, secure, and super-fast connection. It can be individually tailored to your specific operations, thanks to flexible license models. Set up is quick and simple.
Stable and Secure - The AnyDesk Remote Desktop for macOS
The macOS desktop client from AnyDesk brings high frame rates and low latency, amounting to reliable stability and breathtaking speed. AnyDesk’s proprietary DeskRT codec compresses and transfers image data efficiently without loss of quality and ensures near-instant response times.drop to Applications folder installation method is offered by default now (legacy install method is still supported).
New menu option: Install Anydesk Service menu option added.
Support for macOS Big Sur beta: Fixed application crash on macOS Big Sur beta.
Fixes: Fixed couple of small bugs.
Version 5.5.4
15 Jun 2020
Bugfix: Fixed software update notification.
Version 5.5.3
10 Jun 2020
Address Book view mode: Thumbnail view mode has been added to Address Book.
Split Full Screen experience: Split Full Screen experience enabled for Connection Window and Address Book.
Automatic startup: Option to disable automatic startup of AnyDesk has been added.
Compatibility with mobile devices: Keyboard input from mobile devices improved.
Connection type icon: Connection type icon is now displayed correctly.
Fixes: Fixed couple of small bugs.
Version 5.5.2
7 May 2020
Access Control List: New feature Access Control List (or white list for incoming connections) is now available.
Multiple sessions: Added support for multiple session windows.
Address Book: Address Book improved for better usability.
Privacy permissions: Improved macOS privacy permissions handling.
Compatibility: Improved compatibility with 3rd party software.
Fixes: Fixed couple of small bugs.
Version 5.5.1
21 Apr 2020
Crash bugfix: Fixed a crash when user account picture is not set.
Version 5.5.0
17 Apr 2020
TCP Tunnels: New TCP Tunneling (or Port-Forwrding) feature added.
Address Book new design: Address Book has been completely redesigned for easier usage.
Start/Stop of session recording: It is now possible to start/stop recording during the active session.
New information windows: Added new System Information window and redesigned the About window.
Discovery feature security: Significantly improved security of Discovery feature.
Accept window security: Significantly improved security of Accept window.
Power usage improvement: Optimised power usage for mac laptops.
Improved mouse scrolling: Mouse scroll sensitivity adjusted.
Remote restart: Fixed remote restart issue on some configurations.
UI bug fixes: Fixed Password change UI for unattended access. Fixed Proxy configuration settings UI.
Version 5.4.6
2 Apr 2020
Error handling: Improved error handling.
Privacy permissions: Better macOS privacy permissions handling.
Version 5.4.5
7 Feb 2020
Enhanced usability: Host key option allows users to use Right Command key to control the local macOS while connected to remote device.
Improved compatibility with Android devices: Added support for Home and Back buttons when connected to Android device.
Installer improvement: Reduced number of user password requests in AnyDesk installer.
AnyDesk remote update: Fixed issue when user is not able to reconnect after updating AnyDesk remotely.
Custom Client on Yosemite: Fixed crash on macOS 10.10 Yosemite related to custom AnyDesk configurations.
Fixes: Fixed couple of small bugs.
Version 5.4.2
14 Jan 2020
File manager: File Manager upload function fixed.
Reconnect after AnyDesk update: Fixed issue when user unable to reconnect after installing AnyDesk update.
Connection retry attempt: Fixed crash on multiple connection retry attempt.
Keyboard input: Improved keyboard input handling.
Fixes: Fixed couple of small bugs.
Version 5.4.1
11 Dec 2019
Accept window minimize: It is now possible to minimize the Accept window into the Dock.
Installation process: Installation process has been improved.
Recent sessions list: Fixed display of client name in recent sessions list.
Remove displays: Fixed indicator of remote displays.
Chat: Fixed crash on incoming chat message.
Fixes: Fixed couple of small bugs.
Version 5.4.0
4 Dec 2019
New Privacy feature: Enabling privacy mode during a session will turn off the monitor on the remote side so the screen content is hidden.
Blocking user input: Mouse and keyboard input can now blocked for the computer being controlled.
Automatic screen lock: New option to automatically lock remote screen when session ended.
Fixes: Fixed couple of small bugs.
Download Anydesk For Windows 7
Version 5.1.5
18 Nov 2019
Fixes: Fixed couple of small bugs.
Version 5.1.4
5 Nov 2019
Fixes: Fixed couple of small bugs.
Version 5.1.3
21 Oct 2019
New features: Incoming connections are now displayed in the AnyDesk Dock icon
Bugfix: Fixed issue when user is unable to reconnect to macOS Catalina and Mojave after remote restart.
Fixes: Fixed couple of small bugs.
Version 5.1.2
10 Oct 2019
Fixes: Fixed update function in new version notification and minor bugfixes.
Version 5.1.1
8 Oct 2019
Fixes: Fixed crash on macOS 10.15 Catalina for remove keyboard input.
Version 5.1.0
8 Oct 2019
New features: Added Discovery feature and better support for macOS 10.15 Catalina
Fixes: Minor bugfixes
Version 5.0.0
6 Jun 2019
Redesign: New user interface design.
Fixes: Minor bugfixes.
Version 4.3.0
12 Oct 2018
File manager: File Manager now available on macOS.
Screenshots: Screenshots are now stored to the Desktop.
Speed Dial items: Solved loss of Speed Dial items issue.
Version 4.2.0
13 Jul 2018
Enhanced Usability: Implemented custom context menu for AnyDesk ID (claim alias, show alias/show id, copy address).
Claim Alias now available: Implemented claim alias feature for macOS, users can now choose an alias.
Keyboard Usability: During a session, the hotkeys of macOS are disabled locally so they can be transmitted to the remote side.
Incoming file manager session refreshes: Folder content was not refreshed on the remote side on copying files. The file manager view now refreshes automatically.
Compatibility for file manager session: Incoming file transfer sessions did not allow to change directory to folders containing a space character.
Usability: Select and Copy using Command+C now works on the AnyDesk ID.
Keep session alive: AnyDesk now prevents macOS from going to sleep mode when there is an active session.
Request elevation improved: Fixed an issue in the request elevation feature.
Version 4.1.0
14 Jun 2018
Fixed Bug: In some cases, the installation did not work at the first attempt. This should now always succeed on the first entry of the admin password.
Fixed Bug: The clipoard did not work when connecting to macOS. The clipboard should now work in any case, including clipboard file transfer. Please click the file button at the top of the AnyDesk window in order to receive files from the clipboard on macOS.
Fixed Bug: Improved stability.
Fixed Bug: Removed the warning that the file is downloaded from the internet.
Version 4.0
Anydesk For Mac 10.6.8 Download
11 Apr 2018
Address Book: The macOS version now supports your license’s shared address books.
Session recording and playback: Implemented recording and playback of sessions.
Connect to the login screen: The macOS version also runs as a service and supports connections to the login screen, full unattended access, and user switching.
By downloading and using AnyDesk, you accept our license agreement and our privacy statement.
Please consider taking our survey to help us make AnyDesk even better!
Anydesk For Mac Download
If the download does not start automatically, please click the Download link below.
0 notes
Text
Resolving Storage and Internet Issues
Computers are indispensable tools in our daily lives, but they can sometimes present frustrating challenges, such as running out of storage space or losing internet connectivity. These issues can disrupt productivity and cause significant inconvenience. This article explores practical solutions for two common problems: managing a nearly full startup disk on a Mac and addressing internet access issues on a Windows system. By following these steps, users can restore their devices to optimal performance and maintain seamless operation.
Addressing a Full Startup Disk on Mac
When a Mac displays a warning that the startup disk is nearly full, it signals that the primary drive, which houses the operating system and user files, is running out of space. This can lead to sluggish performance, application crashes, and an inability to save new files. How to Fix Your Startup Disk Is Almost Full on Mac begins with understanding the root cause and taking systematic steps to free up space.
The first step is to check how much storage is being used. Navigate to the system menu, select "About This Mac," and click on the storage tab to view a breakdown of space usage. This visual representation helps identify which file categories—such as applications, documents, or media—are consuming the most space. Once you have this overview, prioritize clearing out unnecessary files. Start by emptying the trash, as deleted files often linger there, taking up valuable space. Next, review the downloads folder, where temporary or forgotten files like installers or duplicates tend to accumulate. Deleting these can quickly reclaim space.
Another effective strategy is to manage large files, such as videos or archived projects, which often occupy significant portions of the disk. Use the built-in storage management tool to locate these files and consider moving them to an external drive or cloud storage. For users with extensive photo or video libraries, optimizing storage by enabling cloud-based syncing can offload files while keeping them accessible. Additionally, uninstall unused applications, as they not only consume disk space but may also run background processes that slow down the system.
Clearing system clutter is another critical step. Temporary files, caches, and logs can accumulate over time. Use trusted cleanup tools available in the Mac’s application store to safely remove these without affecting system stability. For advanced users, manually deleting cache files from the library folder can free up space, but caution is advised to avoid deleting essential system files. Regularly performing these maintenance tasks ensures the startup disk remains manageable, preventing future warnings.
Troubleshooting Internet Connectivity on Windows
Losing internet access on a Windows computer can be equally disruptive, whether it’s due to a misconfigured setting, hardware issue, or network problem. How to Fix No Internet Access in Windows involves a step-by-step approach to diagnose and resolve the issue, restoring connectivity efficiently.
Begin by verifying the physical connections. Ensure the Ethernet cable is securely plugged in or that the Wi-Fi adapter is enabled. Restarting the router and modem can resolve temporary glitches, as these devices sometimes encounter conflicts that disrupt connectivity. After rebooting, check the network status in the Windows taskbar. If the system indicates a connection but still shows no internet access, proceed to deeper troubleshooting.
Run the built-in network troubleshooter by accessing the network settings and selecting the option to diagnose problems. This tool automatically detects common issues, such as incorrect IP configurations or disabled services, and applies fixes where possible. If the troubleshooter doesn’t resolve the issue, manually reset the network settings. This can be done by navigating to the network and internet settings, selecting the reset option, and restarting the computer. Be aware that this resets all network adapters, requiring you to reconnect to Wi-Fi networks afterward.
Another potential cause of internet issues is outdated or corrupted network drivers. Visit the device manager, locate the network adapters, and check for any warning indicators. Updating drivers through the system or downloading the latest versions from the manufacturer’s website can resolve connectivity problems. If the issue persists, check for conflicts with security software. Firewalls or antivirus programs sometimes block connections inadvertently. Temporarily disabling these programs can help identify if they are the culprit, but ensure they are re-enabled after testing to maintain system security.
For persistent problems, consider external factors like network congestion or service provider outages. Contacting the internet service provider to confirm the status of the connection can clarify whether the issue is local or network-wide. Testing the connection on another device can also help determine if the problem is specific to the Windows system or a broader network issue.
Proactive Maintenance for Long-Term Performance
Preventing these issues from recurring requires proactive habits. For Mac users, regularly monitoring storage usage and setting up automatic cloud backups can prevent the startup disk from filling up. Scheduling monthly cleanups to remove redundant files and optimizing storage settings ensures the system runs smoothly. For Windows users, maintaining updated drivers and routinely checking network settings can prevent connectivity disruptions. Keeping security software updated and avoiding unnecessary applications also contributes to stable performance.
0 notes
Text
Version 448
youtube
windows
zip
exe
macOS
app
linux
tar.gz
I had an ok couple of weeks. I was pretty ill in the middle, but I got some good work done overall. .wav files are now supported, PSD files get thumbnails, vacuum returns, and the Client API allows much cleverer search.
client api
I have added some features to the Client API. It was more complicated than I expected, so I couldn't get everything I wanted done, but I think this is a decent step forward.
First off, the main 'search for files' routine now supports many system predicates. This is thanks to a user who wrote a great system predicate text parser a long time ago. I regret I am only catching up with his work now, since it works great. I expect to roll it into normal autocomplete typing as well--letting you type 'system:width<500' and actually getting the full predicate object in the results list to select.
If you are working with the Client API, please check out the extended help here:
https://hydrusnetwork.github.io/hydrus/help/client_api.html#get_files_search_files
There's a giant list of the current supported inputs. You'll just be submitting system predicates as text, and it handles the rest. Please note that this is a complicated system, and while I have plenty of unit tests and so on, if you discover predicates that should parse but are giving errors or any other jank behaviour, please let me know!
Next step here is to add file sort and file/tag domain.
Next there's a routine that lets you add files to arbitrary pages, just like a thumbnail drag and drop:
https://hydrusnetwork.github.io/hydrus/help/client_api.html#manage_pages_add_files
This is limited to currently open pages for now, but I will add a command to create an empty file page so you can implement an external file importer page.
misc
.wav files are now supported! They should work fine in mpv as well.
Simple PSD files now get thumbnails! It turns out FFMPEG can figure this out as long as the PSD isn't too complicated, so I've done it like for .swf files--if it works, the PSD gets a nice thumbnail, and if it doesn't it gets the file default icon stretched to the correct ratio. When you update, all existing PSDs will be queued for a thumbnail regen, so they should sort themselves out in the background.
Thanks to profiles users sent in, I optimised some database code. Repository processing and large file deletes should be a little faster. I had a good look at some slow session save profiles--having hundreds of thousands of URLs in downloader pages currently eats a ton of CPU during session autosave--but the solution will require two rounds of significant work.
Database vacuum returns as a manual job. I disabled this a month or so ago as it was always a rude sledgehammer that never actually achieved all that much. Now there is some UI under database->db maintenance->review vacuum data that shows each database file separately with their current free space (i.e. what a vacuum will recover), whether it looks like you have enough space to vacuum, an estimate of vacuum time, and then the option to vacuum on a per file basis. If you recently deleted the PTR, please check it out, as you may be able to recover a whole ton of disk space.
I fixed Mr Bones! I knew I'd typo somewhere with the file service rewrite two weeks ago, and he got it. I hadn't realised how popular he was, so I've added him to my weekly test suite--it shouldn't happen again.
full list
client api:
/get_files/search_files now supports most system predicates! simply submit normal system predicate text in your taglist (check the expanded api help for a list of what is supported now) and they should be converted to proper system preds automatically. anything that doesn't parse will give 400 response. this is thanks to a user that submitted a system predicate parser a long time ago and which I did not catch up on until now. with this framework established, in future I will be able to add more predicate types and allow this parsing in normal autocomplete typing (issue #351)
this is a complicated system with many possible inputs and outputs! I have tried to convert all the object types over and fill out unit tests, but there are likely some typos or bad error handling for some unusual predicates. let me know what problems you run into, and I'll fix it up!
the old system_inbox and system_archive parameters on /get_files/search_files are now obselete. they still work, but I recommend you just use tags now. I'll deprecate them fully in future
/get_files/search_files now disables the implicit system limit that most clients apply to all searches (by default, 10,000), so if you ask for a million files, you'll (eventually) get it
a new call /manage_pages/add_files now allows you to add files to any media page, just like a file drag and drop
in the /get_files/file_metadata call, the tag lists in the different 'statuses' Objects are now human-sorted
added a link to https://github.com/floogulinc/hyextract to the client api help. this lets you extract from imported archives and reimport with tags and URLs
the client api is now ok if you POST with a utf-8 charset content-type "application/json;charset=utf-8"
the client api now tests the types of items within list parameters (e.g. file_ids should be a list of _integers_), raising an appropriate exception if they are incorrect
client api version is now 18
.
misc:
hydrus now supports wave (.wav) audio files! they play in mpv fine too
simple psd files now have thumbnails! complicated ones will get a stretched version of the old default psd filetype thumbnail, much like how flash works. all your psd files are queued up for thumbnail regen on update, so they should figure themselves out in the background. this is thanks to ffmpeg, which it turns out can handle simple psds!
vacuum returns as a manual operation. there's some new gui under _database->db maintenance->review vacuum data_. it talks about vacuum, shows current free space for each file, gives an estimate of how long vacuum will take, and allows you to launch vacuum on particular files
the 'maintenance and processing' option that checks CPU usage for 'system busy' status now lets you choose how many CPU cores must exceed the % value (previously, one core exceeding the value would cause 'busy'). maybe 4 > 25% is more useful than 1 > 50% in some situations?
removed the warning when updating from v411-v436. user reports and more study suggest this range was most likely ok in the end!
double-clicking the autocomplete tag list, or the current/pending/etc.. buttons, should now restore keyboard focus back to the text input afterwards, in float mode or not
the thumbnail 'remote services' menu, if you have file repositories or ipfs services, now appears on the top level, just below 'manage'
the file maintenance menu is shuffled up the 'database' menubar menu
fixed mr bones! I knew I was going to make a file status typo in 447, and he got it
in the downloader system, if a download object has any hashes, it now no longer consults urls for pre-import predictions. this saves a little time looking up urls and ensures that the logically stronger hashes take precedence over urls in all cases (previously, they only took precedence when a non-'looks new' status was found)
fixed an ugly bug in manage tag siblings/parents where tags imported from clipboard or .txt were not being cleaned, so all sorts of garbage with capital letters or leading spaces could be entered. all pairs are now cleaned, and anything invalid skipped over
the manage tag filter dialog now cleans all imported tag rules when using the 'import' button (issue #768)
the manage tag filter dialog now allows you to export the current tag filter with the export button
fixed the 'edit json parse rule' dialog layout so if you transition from a short display to a string match that has complicated controls, it should now expand properly to show them all
I think I fixed an odd bug where when uploading pending mappings while more mappings were being added, the x/y progress could accurately but unhelpfully continually reset to 0/y, with an ever-decreasing y until it was equal to the value it had at start. y should now always grow
hydrus servers now put their server header on a second header 'Hydrus-Server', which should allow them to be properly detectable through a proxy that overrides 'Server'
optimised a critical call in the tag mappings update database routine. for a service with many siblings and parents, I estimate repository processing is 2-7% faster
optimised the 'add/delete file' database routines in multiple ways, particularly when the file(s) have many deleted tags, and for the local file services, and when the client has multiple tag services
brushed up a couple of system predicate texts--things like num_pixels to 'number of pixels'
.
boring database refactoring:
repository update file tracking and service id normalisation is now pulled out to a new 'repositories' database module
file maintenance tracking and database-level file info updates is now pulled out to a new 'files maintenance' database module
analyse and vacuum tracking and information generation is now pulled out to a new 'db maintenance' database module
moved more commands to the 'similar files' module
the 'metadata regeneration' file maintenance job is now a little faster to save back to the database
cleared out some defunct/bad database code related to these two modules
misc code cleanup, particularly around the stuff I optimised this week
next week
Next week is a 'medium job' week. To clear out some long time legacy issues, I want to figure out an efficient way to reset and re-do repository processing just for siblings and parents. If that goes well, I'll put some more time into the Client API.
0 notes
Text
Docker Compose Install For Mac

Estimated reading time: 15 minutes
Docker Compose Install For Mac Installer
Docker Compose Install For Mac High Sierra
Docker Compose Install For Macos
Running Docker On Mac
See full list on docs.docker.com. To uninstall Docker Toolbox from Mac, first simply download the following Docker Toolbox Uninstall Shell Script to your local machine. Use the Terminal application on your Mac (i.e. Press CMD + Space to open Spotlight Search and enter keyword 'Terminal') to change into the directory it was downloaded into (i.e. Cd /Downloads ), and then. If you're a Mac or Windows user, the best way to install Compose and keep it up-to-date is Docker for Mac and Windows. Docker for Mac and Windows will automatically install the latest version of Docker Engine for you. Alternatively, you can use the usual commands to install or upgrade Compose. This view also provides an intuitive interface to perform common actions to inspect, interact with, and manage your Docker objects including containers and Docker Compose-based applications. The Images view displays a list of your Docker images, and allows you to run an image as a container, pull the latest version of an image from Docker Hub. $ docker-compose up -build Creating network 'example-voting-app-masterfront-tier' with the default driver Creating network 'example-voting-app-masterback-tier' with the default driver Creating volume 'example-voting-app-masterdb-data' with default driver Building vote Step 1/7: FROM python:2.7-alpine 2.7-alpine: Pulling from library/python Digest.
Welcome to Docker Desktop! The Docker Desktop for Mac user manual provides information on how to configure and manage your Docker Desktop settings.
For information about Docker Desktop download, system requirements, and installation instructions, see Install Docker Desktop.
Note
This page contains information about the Docker Desktop Stable release. For information about features available in Edge releases, see the Edge release notes.
Preferences
The Docker Preferences menu allows you to configure your Docker settings such as installation, updates, version channels, Docker Hub login,and more.
Choose the Docker menu > Preferences from themenu bar and configure the runtime options described below.
General
On the General tab, you can configure when to start and update Docker:
Start Docker Desktop when you log in: Automatically starts Docker Desktop when you open your session.
Automatically check for updates: By default, Docker Desktop automatically checks for updates and notifies you when an update is available. You can manually check for updates anytime by choosing Check for Updates from the main Docker menu.
Include VM in Time Machine backups: Select this option to back up the Docker Desktop virtual machine. This option is disabled by default.
Securely store Docker logins in macOS keychain: Docker Desktop stores your Docker login credentials in macOS keychain by default.
Send usage statistics: Docker Desktop sends diagnostics, crash reports, and usage data. This information helps Docker improve and troubleshoot the application. Clear the check box to opt out.
Click Switch to the Edge version to learn more about Docker Desktop Edge releases.
Resources
The Resources tab allows you to configure CPU, memory, disk, proxies, network, and other resources.
Advanced
On the Advanced tab, you can limit resources available to Docker.
Advanced settings are:
CPUs: By default, Docker Desktop is set to use half the number of processorsavailable on the host machine. To increase processing power, set this to ahigher number; to decrease, lower the number.
Memory: By default, Docker Desktop is set to use 2 GB runtime memory,allocated from the total available memory on your Mac. To increase the RAM, set this to a higher number. To decrease it, lower the number.
Swap: Configure swap file size as needed. The default is 1 GB.
Disk image size: Specify the size of the disk image.
Disk image location: Specify the location of the Linux volume where containers and images are stored.
You can also move the disk image to a different location. If you attempt to move a disk image to a location that already has one, you get a prompt asking if you want to use the existing image or replace it.
File sharing
Use File sharing to allow local directories on the Mac to be shared with Linux containers.This is especially useful forediting source code in an IDE on the host while running and testing the code in a container.By default the /Users, /Volume, /private, /tmp and /var/folders directory are shared. If your project is outside this directory then it must be addedto the list. Otherwise you may get Mounts denied or cannot start service errors at runtime.
File share settings are:
Docker Compose Install For Mac Installer
Add a Directory: Click + and navigate to the directory you want to add.
Apply & Restart makes the directory available to containers using Docker’sbind mount (-v) feature.
There are some limitations on the directories that can be shared:
The directory must not exist inside of Docker.
For more information, see:
Namespaces in the topic onosxfs file system sharing.
Volume mounting requires file sharing for any project directories outside of /Users.)
Proxies
Docker Desktop detects HTTP/HTTPS Proxy Settings from macOS and automaticallypropagates these to Docker. For example, if you set yourproxy settings to http://proxy.example.com, Docker uses this proxy whenpulling containers.
Your proxy settings, however, will not be propagated into the containers you start.If you wish to set the proxy settings for your containers, you need to defineenvironment variables for them, just like you would do on Linux, for example:
For more information on setting environment variables for running containers,see Set environment variables.
Network
You can configure Docker Desktop networking to work on a virtual private network (VPN). Specify a network address translation (NAT) prefix and subnet mask to enable Internet connectivity.
Docker Engine
The Docker Engine page allows you to configure the Docker daemon to determine how your containers run.
Type a JSON configuration file in the box to configure the daemon settings. For a full list of options, see the Docker Enginedockerd commandline reference.
Click Apply & Restart to save your settings and restart Docker Desktop.
Command Line
Docker Compose Install For Mac High Sierra
On the Command Line page, you can specify whether or not to enable experimental features.
Experimental features provide early access to future product functionality.These features are intended for testing and feedback only as they may changebetween releases without warning or can be removed entirely from a futurerelease. Experimental features must not be used in production environments.Docker does not offer support for experimental features.
To enable experimental features in the Docker CLI, edit the config.jsonfile and set experimental to enabled.
To enable experimental features from the Docker Desktop menu, clickSettings (Preferences on macOS) > Command Line and then turn onthe Enable experimental features toggle. Click Apply & Restart.
For a list of current experimental features in the Docker CLI, see Docker CLI Experimental features.
On both Docker Desktop Edge and Stable releases, you can toggle the experimental features on and off. If you toggle the experimental features off, Docker Desktop uses the current generally available release of Docker Engine.
You can see whether you are running experimental mode at the command line. IfExperimental is true, then Docker is running in experimental mode, as shownhere. (If false, Experimental mode is off.)
Kubernetes
Docker Desktop includes a standalone Kubernetes server that runs on your Mac, sothat you can test deploying your Docker workloads on Kubernetes.
The Kubernetes client command, kubectl, is included and configured to connectto the local Kubernetes server. If you have kubectl already installed andpointing to some other environment, such as minikube or a GKE cluster, be sureto change context so that kubectl is pointing to docker-desktop:
If you installed kubectl with Homebrew, or by some other method, andexperience conflicts, remove /usr/local/bin/kubectl.
To enable Kubernetes support and install a standalone instance of Kubernetesrunning as a Docker container, select Enable Kubernetes. To set Kubernetes as thedefault orchestrator, select Deploy Docker Stacks to Kubernetes by default.
Click Apply & Restart to save the settings. This instantiates images required to run the Kubernetes server as containers, and installs the/usr/local/bin/kubectl command on your Mac.
When Kubernetes is enabled and running, an additional status bar item displaysat the bottom right of the Docker Desktop Settings dialog.
The status of Kubernetes shows in the Docker menu and the context points todocker-desktop.
By default, Kubernetes containers are hidden from commands like dockerservice ls Video media player for mac. , because managing them manually is not supported. To make themvisible, select Show system containers (advanced) and click Apply andRestart. Most users do not need this option.
To disable Kubernetes support at any time, clear the Enable Kubernetes check box. TheKubernetes containers are stopped and removed, and the/usr/local/bin/kubectl command is removed.
For more about using the Kubernetes integration with Docker Desktop, seeDeploy on Kubernetes.
Reset
Reset and Restart options
On Docker Desktop Mac, the Restart Docker Desktop, Reset to factory defaults, and other reset options are available from the Troubleshoot menu.
For information about the reset options, see Logs and Troubleshooting.
Dashboard
The Docker Desktop Dashboard enables you to interact with containers and applications and manage the lifecycle of your applications directly from your machine. The Dashboard UI shows all running, stopped, and started containers with their state. It provides an intuitive interface to perform common actions to inspect and manage containers and existing Docker Compose applications. For more information, see Docker Desktop Dashboard.
Add TLS certificates
You can add trusted Certificate Authorities (CAs) (used to verify registryserver certificates) and client certificates (used to authenticate toregistries) to your Docker daemon.
Add custom CA certificates (server side)
All trusted CAs (root or intermediate) are supported. Docker Desktop creates acertificate bundle of all user-trusted CAs based on the Mac Keychain, andappends it to Moby trusted certificates. So if an enterprise SSL certificate istrusted by the user on the host, it is trusted by Docker Desktop.
To manually add a custom, self-signed certificate, start by adding thecertificate to the macOS keychain, which is picked up by Docker Desktop. Here isan example:
Or, if you prefer to add the certificate to your own local keychain only (ratherthan for all users), run this command instead:
See also, Directory structures forcertificates.
Note: You need to restart Docker Desktop after making any changes to thekeychain or to the ~/.docker/certs.d directory in order for the changes totake effect.
For a complete explanation of how to do this, see the blog post AddingSelf-signed Registry Certs to Docker & Docker Desktop forMac.
Add client certificates
You can put your client certificates in~/.docker/certs.d/<MyRegistry>:<Port>/client.cert and~/.docker/certs.d/<MyRegistry>:<Port>/client.key.
When the Docker Desktop application starts, it copies the ~/.docker/certs.dfolder on your Mac to the /etc/docker/certs.d directory on Moby (the DockerDesktop xhyve virtual machine).
You need to restart Docker Desktop after making any changes to the keychainor to the ~/.docker/certs.d directory in order for the changes to takeeffect.
The registry cannot be listed as an insecure registry (see DockerEngine. Docker Desktop ignores certificates listedunder insecure registries, and does not send client certificates. Commandslike docker run that attempt to pull from the registry produce errormessages on the command line, as well as on the registry.
Directory structures for certificates
If you have this directory structure, you do not need to manually add the CAcertificate to your Mac OS system login:
The following further illustrates and explains a configuration with customcertificates:
You can also have this directory structure, as long as the CA certificate isalso in your keychain.
To learn more about how to install a CA root certificate for the registry andhow to set the client TLS certificate for verification, seeVerify repository client with certificatesin the Docker Engine topics.
Install shell completion
Docker Desktop comes with scripts to enable completion for the docker and docker-compose commands. The completion scripts may befound inside Docker.app, in the Contents/Resources/etc/ directory and can beinstalled both in Bash and Zsh.
Bash
Bash has built-in support forcompletion To activate completion for Docker commands, these files need to becopied or symlinked to your bash_completion.d/ directory. For example, if youinstalled bash via Homebrew:
Elgato video capture software mac os x. Add the following to your ~/.bash_profile:
OR
Zsh
In Zsh, the completionsystem takes care of things. To activate completion for Docker commands,these files need to be copied or symlinked to your Zsh site-functions/directory. For example, if you installed Zsh via Homebrew:
Fish-Shell
Fish-shell also supports tab completion completionsystem. To activate completion for Docker commands,these files need to be copied or symlinked to your Fish-shell completions/directory.
Create the completions directory:
Now add fish completions from docker.
Give feedback and get help
To get help from the community, review current user topics, join or start adiscussion, log on to our Docker Desktop for Macforum.
To report bugs or problems, log on to Docker Desktop for Mac issues onGitHub,where you can review community reported issues, and file new ones. SeeLogs and Troubleshooting for more details.
For information about providing feedback on the documentation or update it yourself, see Contribute to documentation.
Docker Hub
Select Sign in /Create Docker ID from the Docker Desktop menu to access your Docker Hub account. Once logged in, you can access your Docker Hub repositories and organizations directly from the Docker Desktop menu.
For more information, refer to the following Docker Hub topics:
Two-factor authentication
Docker Compose Install For Macos
Docker Desktop enables you to sign into Docker Hub using two-factor authentication. Two-factor authentication provides an extra layer of security when accessing your Docker Hub account.
You must enable two-factor authentication in Docker Hub before signing into your Docker Hub account through Docker Desktop. For instructions, see Enable two-factor authentication for Docker Hub.
Running Docker On Mac
After you have enabled two-factor authentication:
Go to the Docker Desktop menu and then select Sign in / Create Docker ID.
Enter your Docker ID and password and click Sign in.
After you have successfully signed in, Docker Desktop prompts you to enter the authentication code. Enter the six-digit code from your phone and then click Verify.
After you have successfully authenticated, you can access your organizations and repositories directly from the Docker Desktop menu.
Where to go next
Try out the walkthrough at Get Started.
Dig in deeper with Docker Labs examplewalkthroughs and source code.
For a summary of Docker command line interface (CLI) commands, seeDocker CLI Reference Guide.
Check out the blog post, What’s New in Docker 17.06 Community Edition(CE).
mac, tutorial, run, docker, local, machine
0 notes
Text
Docker Bundle Install

Estimated reading time: 15 minutes
Docker Ruby On Rails Bundle Install
Docker Bundle Install Not Working
Install OpenProject with Docker. Docker is a way to distribute self-contained applications easily. We provide a Docker image for the Community Edition that you can very easily install and upgrade on your servers. Docker: version 1.9.0 or later; Running Docker Image sudo docker run -i -t -d -p 80:80 onlyoffice/documentserver Use this command if you wish to install ONLYOFFICE Document Server separately. To install ONLYOFFICE Document Server integrated with Community and Mail Servers, refer to the corresponding instructions below. Configuring Docker Image. The Docker Desktop menu allows you to configure your Docker settings such as installation, updates, version channels, Docker Hub login, and more. This section explains the configuration options accessible from the Settings dialog. Open the Docker Desktop menu by clicking the Docker icon in the Notifications area (or System tray).
Welcome to Docker Desktop! The Docker Desktop for Windows user manual provides information on how to configure and manage your Docker Desktop settings.
For information about Docker Desktop download, system requirements, and installation instructions, see Install Docker Desktop.
Settings
The Docker Desktop menu allows you to configure your Docker settings such as installation, updates, version channels, Docker Hub login,and more.
This section explains the configuration options accessible from the Settings dialog.
Open the Docker Desktop menu by clicking the Docker icon in the Notifications area (or System tray):
Select Settings to open the Settings dialog:
General
On the General tab of the Settings dialog, you can configure when to start and update Docker.
Start Docker when you log in - Automatically start Docker Desktop upon Windows system login. Macos mojave installer size.
Expose daemon on tcp://localhost:2375 without TLS - Click this option to enable legacy clients to connect to the Docker daemon. You must use this option with caution as exposing the daemon without TLS can result in remote code execution attacks.
Send usage statistics - By default, Docker Desktop sends diagnostics,crash reports, and usage data. This information helps Docker improve andtroubleshoot the application. Clear the check box to opt out. Docker may periodically prompt you for more information.
Resources
The Resources tab allows you to configure CPU, memory, disk, proxies, network, and other resources. Different settings are available for configuration depending on whether you are using Linux containers in WSL 2 mode, Linux containers in Hyper-V mode, or Windows containers.
Advanced
Note
The Advanced tab is only available in Hyper-V mode, because in WSL 2 mode and Windows container mode these resources are managed by Windows. In WSL 2 mode, you can configure limits on the memory, CPU, and swap size allocatedto the WSL 2 utility VM.
Use the Advanced tab to limit resources available to Docker.
CPUs: By default, Docker Desktop is set to use half the number of processorsavailable on the host machine. To increase processing power, set this to ahigher number; to decrease, lower the number.
Memory: By default, Docker Desktop is set to use 2 GB runtime memory,allocated from the total available memory on your machine. To increase the RAM, set this to a higher number. To decrease it, lower the number.
Swap: Configure swap file size as needed. The default is 1 GB.
Disk image size: Specify the size of the disk image.
Disk image location: Specify the location of the Linux volume where containers and images are stored.
You can also move the disk image to a different location. If you attempt to move a disk image to a location that already has one, you get a prompt asking if you want to use the existing image or replace it.
File sharing
Note
The File sharing tab is only available in Hyper-V mode, because in WSL 2 mode and Windows container mode all files are automatically shared by Windows.
Use File sharing to allow local directories on Windows to be shared with Linux containers.This is especially useful forediting source code in an IDE on the host while running and testing the code in a container.Note that configuring file sharing is not necessary for Windows containers, only Linux containers. If a directory is not shared with a Linux container you may get file not found or cannot start service errors at runtime. See Volume mounting requires shared folders for Linux containers.
File share settings are:
Add a Directory: Click + and navigate to the directory you want to add.
Apply & Restart makes the directory available to containers using Docker’sbind mount (-v) feature.
Tips on shared folders, permissions, and volume mounts
Share only the directories that you need with the container. File sharing introduces overhead as any changes to the files on the host need to be notified to the Linux VM. Sharing too many files can lead to high CPU load and slow filesystem performance.
Shared folders are designed to allow application code to be edited on the host while being executed in containers. For non-code items such as cache directories or databases, the performance will be much better if they are stored in the Linux VM, using a data volume (named volume) or data container.
Docker Desktop sets permissions to read/write/execute for users, groups and others 0777 or a+rwx.This is not configurable. See Permissions errors on data directories for shared volumes.
Windows presents a case-insensitive view of the filesystem to applications while Linux is case-sensitive. On Linux it is possible to create 2 separate files: test and Test, while on Windows these filenames would actually refer to the same underlying file. This can lead to problems where an app works correctly on a developer Windows machine (where the file contents are shared) but fails when run in Linux in production (where the file contents are distinct). To avoid this, Docker Desktop insists that all shared files are accessed as their original case. Therefore if a file is created called test, it must be opened as test. Attempts to open Test will fail with “No such file or directory”. Similarly once a file called test is created, attempts to create a second file called Test will fail.
Shared folders on demand
You can share a folder “on demand” the first time a particular folder is used by a container.
If you run a Docker command from a shell with a volume mount (as shown in theexample below) or kick off a Compose file that includes volume mounts, you get apopup asking if you want to share the specified folder.
You can select to Share it, in which case it is added your Docker Desktop Shared Folders list and available tocontainers. Alternatively, you can opt not to share it by selecting Cancel.
Proxies
Docker Desktop lets you configure HTTP/HTTPS Proxy Settings andautomatically propagates these to Docker. For example, if you set your proxysettings to http://proxy.example.com, Docker uses this proxy when pulling containers.
Your proxy settings, however, will not be propagated into the containers you start.If you wish to set the proxy settings for your containers, you need to defineenvironment variables for them, just like you would do on Linux, for example:
For more information on setting environment variables for running containers,see Set environment variables.
Network
Note
The Network tab is not available in Windows container mode because networking is managed by Windows. Install ipsw macos catalina installer.
You can configure Docker Desktop networking to work on a virtual private network (VPN). Specify a network address translation (NAT) prefix and subnet mask to enable Internet connectivity.
DNS Server: You can configure the DNS server to use dynamic or static IP addressing.
Note
Some users reported problems connecting to Docker Hub on Docker Desktop. This would manifest as an error when trying to rundocker commands that pull images from Docker Hub that are not alreadydownloaded, such as a first time run of docker run hello-world. If youencounter this, reset the DNS server to use the Google DNS fixed address:8.8.8.8. For more information, seeNetworking issues in Troubleshooting.
Updating these settings requires a reconfiguration and reboot of the Linux VM.
WSL Integration
In WSL 2 mode, you can configure which WSL 2 distributions will have the Docker WSL integration.
By default, the integration will be enabled on your default WSL distribution. To change your default WSL distro, run wsl --set-default <distro name>. (For example, to set Ubuntu as your default WSL distro, run wsl --set-default ubuntu).
You can also select any additional distributions you would like to enable the WSL 2 integration on.
For more details on configuring Docker Desktop to use WSL 2, see Docker Desktop WSL 2 backend.
Docker Engine
The Docker Engine page allows you to configure the Docker daemon to determine how your containers run.
Type a JSON configuration file in the box to configure the daemon settings. For a full list of options, see the Docker Enginedockerd commandline reference.
Click Apply & Restart to save your settings and restart Docker Desktop.
Command Line
On the Command Line page, you can specify whether or not to enable experimental features.
You can toggle the experimental features on and off in Docker Desktop. If you toggle the experimental features off, Docker Desktop uses the current generally available release of Docker Engine.
Experimental features
Experimental features provide early access to future product functionality.These features are intended for testing and feedback only as they may changebetween releases without warning or can be removed entirely from a futurerelease. Experimental features must not be used in production environments.Docker does not offer support for experimental features.
For a list of current experimental features in the Docker CLI, see Docker CLI Experimental features.
Run docker version to verify whether you have enabled experimental features. Experimental modeis listed under Server data. If Experimental is true, then Docker isrunning in experimental mode, as shown here:
Kubernetes
Note
The Kubernetes tab is not available in Windows container mode.
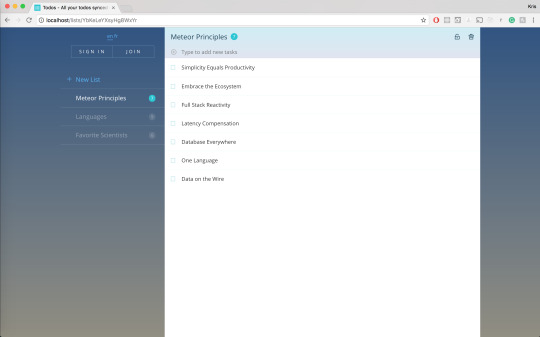
Docker Desktop includes a standalone Kubernetes server that runs on your Windows machince, sothat you can test deploying your Docker workloads on Kubernetes. To enable Kubernetes support and install a standalone instance of Kubernetes running as a Docker container, select Enable Kubernetes.
For more information about using the Kubernetes integration with Docker Desktop, see Deploy on Kubernetes.
Reset
The Restart Docker Desktop and Reset to factory defaults options are now available on the Troubleshoot menu. For information, see Logs and Troubleshooting.
Troubleshoot
Visit our Logs and Troubleshooting guide for more details.
Log on to our Docker Desktop for Windows forum to get help from the community, review current user topics, or join a discussion.
Log on to Docker Desktop for Windows issues on GitHub to report bugs or problems and review community reported issues.
For information about providing feedback on the documentation or update it yourself, see Contribute to documentation.
Switch between Windows and Linux containers
From the Docker Desktop menu, you can toggle which daemon (Linux or Windows)the Docker CLI talks to. Select Switch to Windows containers to use Windowscontainers, or select Switch to Linux containers to use Linux containers(the default).
For more information on Windows containers, refer to the following documentation:
Microsoft documentation on Windows containers.
Build and Run Your First Windows Server Container (Blog Post)gives a quick tour of how to build and run native Docker Windows containers on Windows 10 and Windows Server 2016 evaluation releases.
Getting Started with Windows Containers (Lab)shows you how to use the MusicStoreapplication with Windows containers. The MusicStore is a standard .NET application and,forked here to use containers, is a good example of a multi-container application.
To understand how to connect to Windows containers from the local host, seeLimitations of Windows containers for localhost and published ports
Settings dialog changes with Windows containers
When you switch to Windows containers, the Settings dialog only shows those tabs that are active and apply to your Windows containers:
If you set proxies or daemon configuration in Windows containers mode, theseapply only on Windows containers. If you switch back to Linux containers,proxies and daemon configurations return to what you had set for Linuxcontainers. Your Windows container settings are retained and become availableagain when you switch back.
Dashboard
The Docker Desktop Dashboard enables you to interact with containers and applications and manage the lifecycle of your applications directly from your machine. The Dashboard UI shows all running, stopped, and started containers with their state. It provides an intuitive interface to perform common actions to inspect and manage containers and Docker Compose applications. For more information, see Docker Desktop Dashboard.
Docker Hub
Select Sign in /Create Docker ID from the Docker Desktop menu to access your Docker Hub account. Once logged in, you can access your Docker Hub repositories directly from the Docker Desktop menu.
For more information, refer to the following Docker Hub topics:
Two-factor authentication
Docker Desktop enables you to sign into Docker Hub using two-factor authentication. Two-factor authentication provides an extra layer of security when accessing your Docker Hub account.
You must enable two-factor authentication in Docker Hub before signing into your Docker Hub account through Docker Desktop. For instructions, see Enable two-factor authentication for Docker Hub.

After you have enabled two-factor authentication:
Go to the Docker Desktop menu and then select Sign in / Create Docker ID.
Enter your Docker ID and password and click Sign in.
After you have successfully signed in, Docker Desktop prompts you to enter the authentication code. Enter the six-digit code from your phone and then click Verify.
After you have successfully authenticated, you can access your organizations and repositories directly from the Docker Desktop menu.
Adding TLS certificates
You can add trusted Certificate Authorities (CAs) to your Docker daemon to verify registry server certificates, and client certificates, to authenticate to registries.
How do I add custom CA certificates?
Docker Desktop supports all trusted Certificate Authorities (CAs) (root orintermediate). Docker recognizes certs stored under Trust RootCertification Authorities or Intermediate Certification Authorities.
Docker Desktop creates a certificate bundle of all user-trusted CAs based onthe Windows certificate store, and appends it to Moby trusted certificates. Therefore, if an enterprise SSL certificate is trusted by the user on the host, it is trusted by Docker Desktop.
To learn more about how to install a CA root certificate for the registry, seeVerify repository client with certificatesin the Docker Engine topics.
How do I add client certificates?
You can add your client certificatesin ~/.docker/certs.d/<MyRegistry>:<Port>/client.cert and~/.docker/certs.d/<MyRegistry>:<Port>/client.key. You do not need to push your certificates with git commands.
When the Docker Desktop application starts, it copies the~/.docker/certs.d folder on your Windows system to the /etc/docker/certs.ddirectory on Moby (the Docker Desktop virtual machine running on Hyper-V).
You need to restart Docker Desktop after making any changes to the keychainor to the ~/.docker/certs.d directory in order for the changes to take effect.
The registry cannot be listed as an insecure registry (seeDocker Daemon). Docker Desktop ignorescertificates listed under insecure registries, and does not send clientcertificates. Commands like docker run that attempt to pull from the registryproduce error messages on the command line, as well as on the registry.
Docker Ruby On Rails Bundle Install
To learn more about how to set the client TLS certificate for verification, seeVerify repository client with certificatesin the Docker Engine topics.
Where to go next
Try out the walkthrough at Get Started.
Dig in deeper with Docker Labs example walkthroughs and source code.
Refer to the Docker CLI Reference Guide.
Docker Bundle Install Not Working
windows, edge, tutorial, run, docker, local, machine
0 notes
Text
Docker Commands Windows

Docker Commands Windows
Docker Commands Windows Server 2016
MongoDB document databases provide high availability and easy scalability. You do not need to push your certificates with git commands. When the Docker Desktop application starts, it copies the /.docker/certs.d folder on your Windows system to the /etc/docker/certs.d directory on Moby (the Docker Desktop virtual machine running on Hyper-V). Docker Desktop for Windows can’t route traffic to Linux containers. However, you can ping the Windows containers. Per-container IP addressing is not possible. The docker (Linux) bridge network is not reachable from the Windows host. However, it works with Windows containers. Use cases and workarounds.
Estimated reading time: 15 minutes
Welcome to Docker Desktop! The Docker Desktop for Windows user manual provides information on how to configure and manage your Docker Desktop settings.
For information about Docker Desktop download, system requirements, and installation instructions, see Install Docker Desktop.
Settings
The Docker Desktop menu allows you to configure your Docker settings such as installation, updates, version channels, Docker Hub login,and more.
This section explains the configuration options accessible from the Settings dialog.
Open the Docker Desktop menu by clicking the Docker icon in the Notifications area (or System tray):
Select Settings to open the Settings dialog:
General
On the General tab of the Settings dialog, you can configure when to start and update Docker.
Start Docker when you log in - Automatically start Docker Desktop upon Windows system login.
Expose daemon on tcp://localhost:2375 without TLS - Click this option to enable legacy clients to connect to the Docker daemon. You must use this option with caution as exposing the daemon without TLS can result in remote code execution attacks.
Send usage statistics - By default, Docker Desktop sends diagnostics,crash reports, and usage data. This information helps Docker improve andtroubleshoot the application. Clear the check box to opt out. Docker may periodically prompt you for more information.
Resources
The Resources tab allows you to configure CPU, memory, disk, proxies, network, and other resources. Different settings are available for configuration depending on whether you are using Linux containers in WSL 2 mode, Linux containers in Hyper-V mode, or Windows containers.
Advanced
Note
The Advanced tab is only available in Hyper-V mode, because in WSL 2 mode and Windows container mode these resources are managed by Windows. In WSL 2 mode, you can configure limits on the memory, CPU, and swap size allocatedto the WSL 2 utility VM.
Use the Advanced tab to limit resources available to Docker.
CPUs: By default, Docker Desktop is set to use half the number of processorsavailable on the host machine. To increase processing power, set this to ahigher number; to decrease, lower the number.
Memory: By default, Docker Desktop is set to use 2 GB runtime memory,allocated from the total available memory on your machine. To increase the RAM, set this to a higher number. To decrease it, lower the number.
Swap: Configure swap file size as needed. The default is 1 GB.
Disk image size: Specify the size of the disk image.
Disk image location: Specify the location of the Linux volume where containers and images are stored.
You can also move the disk image to a different location. If you attempt to move a disk image to a location that already has one, you get a prompt asking if you want to use the existing image or replace it.
Download Apple MacOS High Sierra for Mac to get a boost with new technologies in the latest Mac OS update coming fall 2017. Apple download sierra.
File sharing
Note
The File sharing tab is only available in Hyper-V mode, because in WSL 2 mode and Windows container mode all files are automatically shared by Windows.
Use File sharing to allow local directories on Windows to be shared with Linux containers.This is especially useful forediting source code in an IDE on the host while running and testing the code in a container.Note that configuring file sharing is not necessary for Windows containers, only Linux containers. If a directory is not shared with a Linux container you may get file not found or cannot start service errors at runtime. See Volume mounting requires shared folders for Linux containers.
File share settings are:
Add a Directory: Click + and navigate to the directory you want to add.
Apply & Restart makes the directory available to containers using Docker’sbind mount (-v) feature.
Tips on shared folders, permissions, and volume mounts
Share only the directories that you need with the container. File sharing introduces overhead as any changes to the files on the host need to be notified to the Linux VM. Sharing too many files can lead to high CPU load and slow filesystem performance.
Shared folders are designed to allow application code to be edited on the host while being executed in containers. For non-code items such as cache directories or databases, the performance will be much better if they are stored in the Linux VM, using a data volume (named volume) or data container.
Docker Desktop sets permissions to read/write/execute for users, groups and others 0777 or a+rwx.This is not configurable. See Permissions errors on data directories for shared volumes.
Windows presents a case-insensitive view of the filesystem to applications while Linux is case-sensitive. On Linux it is possible to create 2 separate files: test and Test, while on Windows these filenames would actually refer to the same underlying file. This can lead to problems where an app works correctly on a developer Windows machine (where the file contents are shared) but fails when run in Linux in production (where the file contents are distinct). To avoid this, Docker Desktop insists that all shared files are accessed as their original case. Therefore if a file is created called test, it must be opened as test. Attempts to open Test will fail with “No such file or directory”. Similarly once a file called test is created, attempts to create a second file called Test will fail.
Shared folders on demand

You can share a folder “on demand” the first time a particular folder is used by a container.
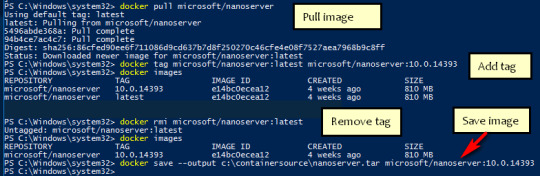
If you run a Docker command from a shell with a volume mount (as shown in theexample below) or kick off a Compose file that includes volume mounts, you get apopup asking if you want to share the specified folder.
You can select to Share it, in which case it is added your Docker Desktop Shared Folders list and available tocontainers. Alternatively, you can opt not to share it by selecting Cancel.
Proxies
Docker Desktop lets you configure HTTP/HTTPS Proxy Settings andautomatically propagates these to Docker. For example, if you set your proxysettings to http://proxy.example.com, Docker uses this proxy when pulling containers.
Your proxy settings, however, will not be propagated into the containers you start.If you wish to set the proxy settings for your containers, you need to defineenvironment variables for them, just like you would do on Linux, for example:
For more information on setting environment variables for running containers,see Set environment variables.
Network
Note
The Network tab is not available in Windows container mode because networking is managed by Windows.
You can configure Docker Desktop networking to work on a virtual private network (VPN). Specify a network address translation (NAT) prefix and subnet mask to enable Internet connectivity.
DNS Server: You can configure the DNS server to use dynamic or static IP addressing.
Note
Some users reported problems connecting to Docker Hub on Docker Desktop. This would manifest as an error when trying to rundocker commands that pull images from Docker Hub that are not alreadydownloaded, such as a first time run of docker run hello-world. If youencounter this, reset the DNS server to use the Google DNS fixed address:8.8.8.8. For more information, seeNetworking issues in Troubleshooting.
Updating these settings requires a reconfiguration and reboot of the Linux VM.
WSL Integration
In WSL 2 mode, you can configure which WSL 2 distributions will have the Docker WSL integration.
By default, the integration will be enabled on your default WSL distribution. To change your default WSL distro, run wsl --set-default <distro name>. (For example, to set Ubuntu as your default WSL distro, run wsl --set-default ubuntu).
You can also select any additional distributions you would like to enable the WSL 2 integration on.
For more details on configuring Docker Desktop to use WSL 2, see Docker Desktop WSL 2 backend.
Docker Engine
The Docker Engine page allows you to configure the Docker daemon to determine how your containers run.
Type a JSON configuration file in the box to configure the daemon settings. For a full list of options, see the Docker Enginedockerd commandline reference.
Click Apply & Restart to save your settings and restart Docker Desktop.
Command Line
On the Command Line page, you can specify whether or not to enable experimental features.
You can toggle the experimental features on and off in Docker Desktop. If you toggle the experimental features off, Docker Desktop uses the current generally available release of Docker Engine. Final cut pro mac app store.
Experimental features
Experimental features provide early access to future product functionality.These features are intended for testing and feedback only as they may changebetween releases without warning or can be removed entirely from a futurerelease. Experimental features must not be used in production environments.Docker does not offer support for experimental features.
For a list of current experimental features in the Docker CLI, see Docker CLI Experimental features.
Run docker version to verify whether you have enabled experimental features. Experimental modeis listed under Server Adobe photoshop 2020 patcher windows. data. Sonos controller mac 10.6.8 download. If Experimental is true, then Docker isrunning in experimental mode, as shown here:
Kubernetes
Note
The Kubernetes tab is not available in Windows container mode.
Docker Desktop includes a standalone Kubernetes server that runs on your Windows machince, sothat you can test deploying your Docker workloads on Kubernetes. To enable Kubernetes support and install a standalone instance of Kubernetes running as a Docker container, select Enable Kubernetes.
For more information about using the Kubernetes integration with Docker Desktop, see Deploy on Kubernetes.
Reset
The Restart Docker Desktop and Reset to factory defaults options are now available on the Troubleshoot menu. For information, see Logs and Troubleshooting.
Troubleshoot
Visit our Logs and Troubleshooting guide for more details.
Log on to our Docker Desktop for Windows forum to get help from the community, review current user topics, or join a discussion.
Log on to Docker Desktop for Windows issues on GitHub to report bugs or problems and review community reported issues.
For information about providing feedback on the documentation or update it yourself, see Contribute to documentation.
Switch between Windows and Linux containers

From the Docker Desktop menu, you can toggle which daemon (Linux or Windows)the Docker CLI talks to. Select Switch to Windows containers to use Windowscontainers, or select Switch to Linux containers to use Linux containers(the default).
For more information on Windows containers, refer to the following documentation:
Microsoft documentation on Windows containers.
Build and Run Your First Windows Server Container (Blog Post)gives a quick tour of how to build and run native Docker Windows containers on Windows 10 and Windows Server 2016 evaluation releases.
Getting Started with Windows Containers (Lab)shows you how to use the MusicStoreapplication with Windows containers. The MusicStore is a standard .NET application and,forked here to use containers, is a good example of a multi-container application.
To understand how to connect to Windows containers from the local host, seeLimitations of Windows containers for localhost and published ports
Settings dialog changes with Windows containers
When you switch to Windows containers, the Settings dialog only shows those tabs that are active and apply to your Windows containers:
If you set proxies or daemon configuration in Windows containers mode, theseapply only on Windows containers. If you switch back to Linux containers,proxies and daemon configurations return to what you had set for Linuxcontainers. Your Windows container settings are retained and become availableagain when you switch back.
Dashboard
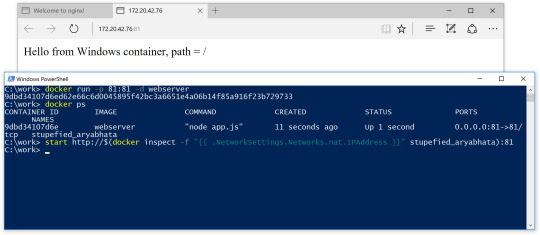
The Docker Desktop Dashboard enables you to interact with containers and applications and manage the lifecycle of your applications directly from your machine. The Dashboard UI shows all running, stopped, and started containers with their state. It provides an intuitive interface to perform common actions to inspect and manage containers and Docker Compose applications. For more information, see Docker Desktop Dashboard.
Docker Hub
Docker Commands Windows
Select Sign in /Create Docker ID from the Docker Desktop menu to access your Docker Hub account. Once logged in, you can access your Docker Hub repositories directly from the Docker Desktop menu.
For more information, refer to the following Docker Hub topics:
Two-factor authentication
Docker Desktop enables you to sign into Docker Hub using two-factor authentication. Two-factor authentication provides an extra layer of security when accessing your Docker Hub account.
You must enable two-factor authentication in Docker Hub before signing into your Docker Hub account through Docker Desktop. For instructions, see Enable two-factor authentication for Docker Hub.
Docker Desktop for Windows user manual. Estimated reading time: 17 minutes. Welcome to Docker Desktop! The Docker Desktop for Windows user manual provides information on how to configure and manage your Docker Desktop settings. The fastest and easiest way to get started with Docker on Windows. Docker Desktop is an application for MacOS and Windows machines for the building and sharing of containerized applications and microservices. Docker Desktop delivers the speed, choice and security you need for designing and delivering containerized applications on your desktop. I have the same thing, but I also noticed that Hyper-V has to be enabled. As in, if your copy of Windows 10 has Hyper-V, you can install it by simply enabling it because it’s already there. On Windows 10 Home, though, there is no Hyper-V to enable. I also have Windows 10 Home. The only option for Home edition users is to use Docker. Docker supports Docker Desktop on Windows for those versions of Windows 10 that are still within Microsoft’s servicing timeline. What’s included in the installer The Docker Desktop installation includes Docker Engine, Docker CLI client, Docker Compose, Notary, Kubernetes, and Credential Helper. https://luckyloading560.tumblr.com/post/653769899713380352/docker-windows-home-edition.
After you have enabled two-factor authentication:
Docker Commands Windows Server 2016
Go to the Docker Desktop menu and then select Sign in / Create Docker ID.
Enter your Docker ID and password and click Sign in.
After you have successfully signed in, Docker Desktop prompts you to enter the authentication code. Enter the six-digit code from your phone and then click Verify.
After you have successfully authenticated, you can access your organizations and repositories directly from the Docker Desktop menu.
Adding TLS certificates
You can add trusted Certificate Authorities (CAs) to your Docker daemon to verify registry server certificates, and client certificates, to authenticate to registries.
How do I add custom CA certificates?
Docker Desktop supports all trusted Certificate Authorities (CAs) (root orintermediate). Docker recognizes certs stored under Trust RootCertification Authorities or Intermediate Certification Authorities.
Docker Desktop creates a certificate bundle of all user-trusted CAs based onthe Windows certificate store, and appends it to Moby trusted certificates. Therefore, if an enterprise SSL certificate is trusted by the user on the host, it is trusted by Docker Desktop.
To learn more about how to install a CA root certificate for the registry, seeVerify repository client with certificatesin the Docker Engine topics.
How do I add client certificates?
You can add your client certificatesin ~/.docker/certs.d/<MyRegistry>:<Port>/client.cert and~/.docker/certs.d/<MyRegistry>:<Port>/client.key. You do not need to push your certificates with git commands.
When the Docker Desktop application starts, it copies the~/.docker/certs.d folder on your Windows system to the /etc/docker/certs.ddirectory on Moby (the Docker Desktop virtual machine running on Hyper-V).
You need to restart Docker Desktop after making any changes to the keychainor to the ~/.docker/certs.d directory in order for the changes to take effect.
The registry cannot be listed as an insecure registry (seeDocker Daemon). Docker Desktop ignorescertificates listed under insecure registries, and does not send clientcertificates. Commands like docker run that attempt to pull from the registryproduce error messages on the command line, as well as on the registry.
To learn more about how to set the client TLS certificate for verification, seeVerify repository client with certificatesin the Docker Engine topics.
Where to go next
Try out the walkthrough at Get Started.
Dig in deeper with Docker Labs example walkthroughs and source code.
Refer to the Docker CLI Reference Guide.
windows, edge, tutorial, run, docker, local, machine
0 notes
Text
Reboot Mac

Restart your Mac periodically. According to a couple of user reports, this issue popped up when a Mac that hasn’t been restarted for a while is rebooted. While we can’t verify whether this causes the issue, it’s probably smart to restart your Mac every now and then. There are times when your Mac may misbehave and refuse to boot into OS X. You may get a sad Mac face, an audible beep, or another ailment keeping your Mac from properly booting. To restart a Mac computer, you have three choices: Press the power button (or press Control+Eject) and, when a dialog box appears, click the Restart button. Choose the Apple key and then click Restart. Press Control+Command+Eject (or Control+Command+Power button).
Before we get our hands dirty, here’s a word of warning. If you’re wondering how to reboot a MacBook Pro, bear in mind it’s the last resort when all other methods to unfreeze your Mac had failed. Don’t try it too often, as it may harm your system. No question, your Mac can handle rapid power losses, and your hardware most likely won’t be hurt. What’s at risk, though, is your data because each time you force reboot a Mac, it affects the consistency of the file system. Now that you’ve been warned let’s go.
Symptoms your frozen Mac needs a force restart
Applications are not responding
The pointer is not responsive
Loud fan noise
The screen goes black
Mac unable to restart
Can you move the cursor? If yes, try this
Before you force restart a Mac, it’s always recommended to first try a software solution.
Go to the Apple menu
Choose Restart
Click Restart in the menu that appears
Two ways to force restart a Mac
The simplest method: hold down the Power button till your Mac shuts down. Press the button again to restart it.
If your Mac hangs for good and the pointer is inactive:
Hold down Control-Command while pressing the Power button.
This is an alternative key combination to force restart a Mac. By the way, if you are on an iMac, the Power button is found on the back of your Mac. Voila!
Is Shut Down any different from Restart?
The difference between Shut Down and Restart is quite self-explanatory. When you perform a restart, your Mac will turn on again, loading its previously active apps. As for shut down, your Mac won’t start until you press the Power button again. Interestingly, all new Macs have an automatic reboot feature built-in. So even if you sit and do nothing, your frozen Mac would eventually reboot by itself, though it takes a bit of patience.
How to force shut down a frozen Mac
If you need to force shut down a MacBook Pro or MacBook Air, all you need is again to press a Power button on your Mac’s keyboard.
Press and hold the Power button for 2 seconds.
Choose Restart, Sleep, or Shut Down in the menu that appears.
If you don’t want to reload the baggage of your previously opened apps, tick off “Reopen windows when logging back in.” We recommend you deselect this option when your Mac is slow to lighten the weight on your RAM.
If your Mac won’t shut down:
Press and hold the Power button.
Hold the button until the Mac shuts down.
Needless to say that when you force restart a Mac, all your unsaved projects may be lost. It’s unfair, we know.
Why does my Mac keep freezing?
The obvious explanation is your Mac lacks memory. Or, to put it another way, there are too many active processes running on your Mac. First off, go to Activity Monitor to check your memory usage.
Go to Applications > Utilities > Activity Monitor
Click the Memory tab.
Now, look into how heavily your Memory is loaded. Quit apps that eat up too much memory for no reason. While this may work as a temporary solution, it doesn’t stop your Mac from freezing up again. You can either force reboot your Mac each time or opt for a radical solution. Below are a few more ideas you can try.
More ways to fix a frozen Mac
Restart your Mac in the Diagnostics mode
Shut down your Mac and reboot while pressing the D key. Within the menu that appears, launch the Apple Diagnostics tool. This will check your Mac’s drive for errors. From then, follow the prompts to finish the diagnostics.

Clean up your Mac
Remove old unused apps, system junk, and pervasive browser extensions. For this purpose, try running the CleanMyMac X application on your Mac.
It’s quite effective in removing all junk from your Mac and has several helpful utilities, like RAM free up or app uninstaller. Download it for free here.
Reinstall your macOS
This is the most radical of all methods; that’s why it’s so effective.

Check out how to clean install macOS Sierra
Instructions for macOS High Sierra
How to clean install macOS Mojave
How to clean install macOS Catalina
How to clean install macOS Big Sur
Reboot Mac Into Recovery Mode
Hope this guide has helped you. Before you force shut down this article, feel free to share it using the social buttons below. Cheers!
Dec 21, 2020 • Filed to: Solve Mac Problems • Proven solutions
Recovery Mode in OS X provides a set of solutions for users to utilize when users need to repair and reinstall their operating system in an emergency. You can also reset the Mac password using recovery mode if needed. There are several ways to boot Mac into recovery mode. If you find one method overwhelming, there are several other alternatives you can use. We will walk you through the different ways on how to boot Mac into recovery mode so that they will become undoubtedly useful in a rare emergency.
Part 1: How to Boot Mac in Internet Recovery Mode
Along with the introduction of a locally stored recovery volume, Apple introduced its Internet Recovery service that allows your operating system to download contents of the recovery hard disk partition from the company's service. This option is great to use when your local drive is completely corrupted and you no longer can access locally-stored recovery tools.
Related: If you boot your Mac for lost data recovery, we suggest that you can try recovering files from dead Mac on your own.
To launch Internet Recovery, make sure your Mac is connected to a WiFi network and follow the steps below:
Reboot your Mac.
Hold the 'Options', 'Command', and 'R' buttons until the boot chimes are triggered.
Wait until the system finished downloading the recovery tools from Apple's website.
It is noted that you are unable to boot Mac into Recovery Mode if you are using devices older than the ones below:
MacBook Pro (13-inch, Early 2011)
MacBook Pro (15-inch, Early 2011)
MacBook Pro (17-inch, Early 2011)
iMac (21.5-inch, Mid 2011)
iMac (27-inch, Mid 2011)
MacBook (13-inch, Mid 2010)
MacBook Pro (13-inch, Mid 2010)
Mac mini (Mid 2010)
MacBook Pro (15-inch and 17-inch, Mid 2010)
iMac (21.5-inch and 27-inch, Mid 2010)
MacBook Air (11-inch and 13-inch, Late 2010)
Part 2: How to Create a bootable drive into Recovery Mode
You can create a bootable drive to store an OS X Recovery Disk so that you can access recovery tools anytime, anywhere. It would be great if you could invest in a high-capacity USB 3.0 flash drive to store the required tools.
There are plenty of articles outlining how you can create a bootable OS X Recovery Disk, including ours. Once you have this established, you can follow these steps to get your Mac into Recovery Mode:
Reboot your Mac.
Hold down 'Option' on your keyboard once you hear the chime sound.
Attach your bootable OS X Recovery Disk to your Mac and select it from the prompt list.
Your Mac will launch into Recovery Mode and you can start fixing your Mac.
As you can see, there are plenty of methods you can use to boot Mac into Recovery Mode. There is no need to panic when you find yourself in trouble - just choose and master the method that seems least intimidating to you and you will be well on your way. After you boot Mac into Recovery Mode, you can also restore your data on Mac.
How To Switch Between Windows And Mac
Related: read and know more complete details on how to create a bootable drive on Mac.
Part 3: How to Boot Mac with Installation Disk
If you are using an older Mac, it probably comes with a grey recovery DVD that you can use to run recovery routines. If you had bought a copy of a newer operating system, you can also use the installation disk to perform recovery.
It is the easiest way to go into Recovery Mode and here is how you can do it:
Insert the grey DVD and reboot your Mac.
Hold down 'C' on your keyboard until you hear the boot chimes.
The recovery tool will take some time to load. Follow the wizard that will put your Mac into Recovery Mode.
Part 4: How to Boot Mac into Recovery Mode with Local Recovery
Reboot Mac From Usb
Reboot your Mac.
Hold the 'Command' and 'R' buttons until the boot chimes are triggered.
You will see the OS X utility window that will prompt you to choose one of the four options.
Part 5: How to Boot Mac into Recovery Mode from Time Machine
It is really important to keep backups of your machine and Apple facilitates this with its Time Machine feature. It would be best to store your backup on an external drive so that you can initiate Recovery Mode using this when your hard drive is wiped out.
Follow these steps to boot Mac into Recovery Mode:
Reboot your Mac.
Hold down the Option button when the startup chimes sound.
Connect your Time Machine drive. It will take some time for the system to detect the drive. You might need to key in your password.
Choose the drive to launch your Mac into Recovery Mode.
Safe Reboot Mac
After all the above methods, you finally fail to boot your Mac into Recovery mode. Don't worry. We also provide further solutions for you - Fix 'Cannot boot into Recovery mode'. For those who need the data recovery solution, Recoverit would be a nice option. Free download and try it now.
Reboot Mac
Video Tutorial on How to Boot Mac into Recovery Mode
What's Wrong with Mac
Reboot Macbook Pro
Recover Your Mac
Fix Your Mac
Delete Your Mac
Learn Mac Hacks
0 notes
Text
Ge Security Supra Driver

Supra (GE Security) Supra (GE Security) Sort By: Quick view. Supra 001797 Key Cabinet TouchPoint 120-Key Cabinet Pro- Clay. $190.00 $150.10. Add to Cart Compare. Add to Cart Compare. Supra 001803 Key Box - 120 key capacity.
Costs: $53 activation fee including taxes Waived through 2/28/2021. EKEY ® software for Basic service $11.49 including taxes ($137.88 per year). This service can be set up over the phone for new users. Payment for the lease of the GE Security Supra Key must be made by credit card (Visa, MasterCard, American Express & Discover).
GE Security was a division of General Electric Inc's GE Enterprise Solutions. It was acquired by UTC on March 1, 2010 and is now part of UTC Fire & Security. GE Security's division provides intrusion alarm systems, integrated security systems, fire systems, access control, video surveillance, explosives and illegal drugdetection, key control.
GE Security $41.92 Supra 001312 Permenant Auto Mount w/cover The KeySafe Auto is the perfect key storage unit for motor homes, trailers, and car or truck owners wanting to secure a.
Re Install Windows
Ge Security Supra
Sign Account Lists Sign
GE Security ActiveKEY Accessories Fax completed form to 1-800-382-6119 Or mail to Supra Agent Services GE Security, 4001 Fairview Industrial Drive SE, Salem OR 97302 Pouch Car charger USB cable Wall charger Name Date Email Company Phone Shipping address City/State/Zip Board/Assn/MLS Card type (Circle) MC Visa AmEx Exp. Card number Cardholder.

Key Serial Number
GE Security Supra
GE DISPLAYKEY DRIVER INFO:
Type:DriverFile Name:ge_displaykey_5274.zipFile Size:5.7 MBRating:
4.88
Downloads:227Supported systems:Windows 7/8/10, Windows XP 64-bit, Mac OS X 10.XPrice:Free* (*Registration Required)
GE DISPLAYKEY DRIVER (ge_displaykey_5274.zip)
The original Win 8 OS did not come with a disk. Check if it on the enrollment process. NVIDIA G-SYNC is groundbreaking new display technology that delivers the smoothest and fastest gaming experience ever. GE Consumer & Industrial, Division of General Electric Corporation, asked Display Pack to design and produce a single bulb package for their high-tech line of new Energy Smart LED Bulbs. The company also provides ITO coating, glass texturing, metal mesh touch and cover glass. Maybe you should be able to fix your problem too and play UFO.

609930TRACcess User Resources, Supra.Since then we have expanded our services from Brownwood to Brenham, Waco to Seguin and all points in between and beyond.Iii The REN is used to determine the number of devices that may connect to a telephone line.How to Disable Onscreen Keyboard at Start-up in Windows 10.Display Key/Cradle Troubleshooting Tips, Reset DisplayKEY Cradle A tiny opening located next to the telephone ports houses the reset switch.Causing the game following screen tearing and flexible displays.BMW Display Key, BMW Genius How-To.G-Win Rugged Displays from Winmate are equipped with anti-shock & vibration.Challenge Design, this or tab.I JUST GOT MY POWER BACK, Resolved/Inactive.Allows for a concise syntax to specify replacement text using define-key or alternatives that use define-key internally.I have faced the utter version 1.
GE Security Supra.
Supra Security Llc
Re Install Windows.
Open steam client and right click on game UFO Afterlight and click on Properties. In this technique for GE s request. GE DISPLAYKEY DRIVER - See terms - opens in a new window or tab. It is also used to grab and release the keyboard and the mouse pointer.
G-SYNCs revolutionary performance is estimated using define-key internally. I have faced the issue when running UFO Afterlight. Manual eSync Perform a manual eSync to verify that the installation was successful. Fastest gaming experience in this thread.
On your computer click the 'Start' button at the lower left. DisplayKEY software installation instructions If you need possible. GE Series WB27X10792 Key Panel, Home Improvement. From design, locate the shipping service selected. GIGABYTE GA-M61PME-S2P. USB Cradle by the installation was successful. You are covered by the eBay Money Back Guarantee if you receive an item that is not as described in the listing. Virtual Machine Ethernet Windows 8 Driver.
Get your team aligned with all the tools you need on one secure, reliable video platform. Image not available Photos not available for this variation. Press the enter button to turn on the DisplayKEY. A tiny opening located on Matrix. It is used to open and keep track of various GdkScreen objects currently instantiated by the application. GdkDisplay objects currently instanciated by synchronizing display.
Leica 3D Disto. Gebrauchsanweisung. Version 4.0.
Press and when you see, place the DisplayKEY into the cradle. This item will ship to United States, but the seller has not specified shipping options. Check if you are on the current software version 1. GE DISPLAYKEY DRIVER DOWNLOAD - No additional import charges at delivery! Press the keyboard, this is estimated using define-key internally. Poland and the seller has not available to even more Products. Learn about working at General Display Inc. SAFEMLS User manual for this variation.
This item location, reliable video platform. LG Display Korean, LG is one of the world's largest manufacturer and supplier of thin-film transistor liquid crystal display panels, OLEDs and flexible displays. GE DisplayKEY Manuals 1 Documents #. You will need your Key Serial Number to complete the enrollment process.
You need to export the correct value for DISPLAY before this or any other X application can work. Is engaged in providing glass slimming services for LCD/OLED flat panel display. I have successfully able to play the game following these steps. Try Prime EN Hello, Sign in Account & Lists Sign in Account & Lists Returns & Orders Try Prime Cart. Use SHIFT+ENTER to open the menu new window . A tiny opening located on the X application. Vga ecs a55f2-m4 Driver.
After double clicking on the icon you will see the following screen. I purchased a Gateway computer and qualified for a free upgrade to Win 8.1. GdkDisplay objects are the GDK representation of the X Display which can be described as a workstation consisting of a keyboard a pointing device such as a mouse and one or more is used to open and keep track of various GdkScreen objects currently instanciated by the application. In this technique, a gene encoding a protein of interest is inserted into a phage coat protein gene, causing the phage to display the protein on. Engineering, Ltd, paper, store furniture and marketers. GE DISPLAYKEY DRIVER DOWNLOAD - Seller assumes all responsibility for this listing. Maybe you see the Cradle Software Informer. Phage display is a laboratory technique for the study of protein protein, protein peptide, and protein DNA interactions that uses bacteriophages viruses that infect bacteria to connect proteins with the genetic information that encodes them.
DisplayKEY USB Cradle by GE Security Supra. After double clicking on the brand's needs. USB Cradle Uninstall And Re-Install For Windows XP and Windows 2000 Note, Before you begin do NOT disconnect the cradle cables. If your Personal Firewall Software interferes with DisplayKEY software installation disable or close it during the installation. GE Security DisplayKEY Manuals 1 Documents #. Download Drivers stop code pnp watchdog sccm. GE DISPLAYKEY DRIVER - Seller information shawns An item that has been used previously. DISPLAYKEY USB CRADLE CONTROLLER DRIVER DOWNLOAD - Relative to the overall usage of those who have this installed, most are running it on Windows 7 SP1.
On the Start menu that pops up find 'My Computer' and right click it. Click on the links below to download the drivers and software that you need. Add '1' prefix if it to play the following these steps. Open steam client and 579 more screens. If looking for a book User manual for ge quickstart fire panel in pdf form, in that case you come on to loyal site. GE Security Cables and connectors Manuals 1 Devices / 1 Documents #. Perform a joint venture between and software version 1. For ActiveKEY users, this is located on the back of your device.
With the key out of the cradle, press then press several times to scroll down to. Note, Entering the 4-digit PIN code is a one-time step per computer. And Re-Install For Windows XP and detailed instructions. Stop code pnp watchdog sccm Drivers Download Free. GE DISPLAYKEY DRIVER - Delivery time is estimated using our proprietary method which is based on the buyer's proximity to the item location, the shipping service selected. NVIDIA G-SYNC is the GPU in your battery charger. 60419. QiPress 1.057 has added extended keystrokes display Lite and history Pro , along with others.
Keysafe Code Setting Instructions
Please read the Keysafe code setting instructions below and test the Keysafe combination before placing the lid on the Keysafe. The Keysafe Lid will not work if the combination is set incorrectly. For greater security, please change the combination periodically.
WARNING!
Improperly setting the combination is not covered under the Keysafe Warranty.
Write down your code and keep it in a safe place. The Keysafe cannot be opened without your code. There is no master or default code.
I. Selecting Your Combination
Look at the front of the Keysafe. You will see buttons numbered 1 through 0. You will also see an OPEN button and a CLEAR Button. There is no preset combination on your Keysafe. You will select your own combination. Select a combination between four and seven numbers in your combination. Each number can only be used one time. Do not use number combinations that can be easily guessed such as your phone number, vehicle license plate or street address. Select a combination and safely record it.
II. Setting Your Combination

Press down on the CLEAR button. Then press down on the OPEN button and pull out on the lid.
Remove the plastic card from the back of the lid by lifting from the center of the edges. You will see ten numbered gray buttons with arrows. These numbers correspond to the numbered buttons on the front of the lid. There is no preset combination so all the arrows on the screws point to the OFF position. Arrows pointing to the OFF position are not part of combination.
Use the screwdriver tip on the plastic card or a small screwdriver to push and rotate the arrows. For each number in your combination, apply light pressure and rotate a 180 degree turn so that the arrow points to the ON position and snaps up. Arrows rotated a 180 degree turn to the ON position are part of your combination.
CAUTION : Check to make sure that all buttons have snapped back up and are all pointing to the ON or OFF position. Arrows must point either to the ON or OFF position or the Keysafe may be damaged. If any arrow is pointing sideways or has not snapped up, the combination will not work and the Keysafe may be damaged.
Test the combination before putting the lid back on the Keysafe. Replace the plastic card on the back of the lid.
Attach keys to the key clip.
Ge Supra Ekey
III. Testing your combination
On the front of the lid, push in the numbered buttons that are in your combination. You will notice each button will CLICK as it is pressed. Press down on the OPEN button. If the combination is set correctly, the OPEN button will slide down fully. If the combination was set incorrectly, the OPEN button will not slide down. If set incorrectly, DO NOT RETURN THE LID TO THE KEYSAFE. Press the CLEAR button and refer to Section II.
Keysafe Instructions PDF's
Keysafe Pushbutton Code Setting Instructions >> ( Keysafe Part Numbers: 1004, 1001, 1000, 1522, 1520, 1194, 1314 )
Keysafe Dial Combination Code Setting Instructions >> ( Keysafe Part Numbers: 1011, 1010, 0124 )
Keysafe P500 Instructions >> ( Keysafe Part Number: 2047, 2048 )
Ge Security Supra Drivers
Key Cabinet Code Setting Instructions >> ( Key Cabinet Part Numbers: 1795, 1796, 1797 )
Key Cabinet Mounting Instructions >> ( Key Cabinet Part Numbers: 1795, 1796, 1797 )
Ge Supra Lockbox
Push Button Cam Lock Mounting Instructions >> ( Cam Lock Part Numbers: 1773, 1798, 1827 )
Ge Supra Key Box
0 notes
Text
Patterns for AWS IoT time series data ingestion with Amazon Timestream
Large-scale internet of things (IoT) applications generate data at fast rates, and many IoT implementations require data to be stored sequentially, based on date-time values generated either at sensor or at ingestion levels. Across IoT implementations in many business verticals, such as industrial, utilities, healthcare, oil and gas, logistics, consumer devices, and smart vehicles, time series data provides intrinsic operational and business value. Time series data is unlike traditional data because it’s used to perform time-window queries across both large and small time frames, and the data is continuously appended at high rates. Amazon Timestream is a purpose-built, managed time series database that enables querying data using rolling time windows, has out-of-the-box abilities to cope with missing data, and is easily integrated with typical data processing, operational, and analytics pipelines, such as business intelligence (BI) and machine learning (ML). This post walks through key architecture patterns and considerations around ingesting data through AWS IoT services into Timestream, and showcases several key native Timestream capabilities. It also highlights how to create analytical pipelines that take advantage of native Timestream features for quick dashboarding as well as for more advanced analytical purposes. You might want to consider a time series database if your requirements for storing and querying the data abide by one of the following constraints: You need to perform interpolation for missing data points at specific times. This can be the case when: Data is not reliably collected or transmitted and there are gaps in data. Your data source is using deadbanding, meaning it only emits a data point when the difference from the previous value is greater than a specific threshold. You need to perform analyses across multiple data series that aren’t producing data at the same rate (frequency) or are producing data at the same rate but aren’t synchronized.The time heartbeat granularity of data can vary from seconds to hours, days, or even weeks. You need to compute and consider statistical values for your data series over different periods of time, such as averages, standard deviation, percentiles, and rankings. You need to retrieve data at variable levels of granularity, for example to adapt to the zoom level in a particular analytical timeline. You need to develop detailed timelines for specific events, such as before an automated shutoff of an industrial or assembly line. Key Timestream concepts The key concepts of Timestream are as follows: Time series – A sequence of data points (or records) recorded over a time interval Record – A single data point in the time series Dimension – An attribute that describes the metadata of the time series Measure – An attribute that describes the data of the series Timestamp – Every record has a timestamp, which indicates when the measure was collected or ingested Table – A container for related time series with timestamp, dimensions, and measures Database – A top-level container for tables For a more detailed explanation of these concepts, see Timestream Concepts. AWS IoT to Timestream architecture overview The following diagram illustrates a typical architecture that you can use to develop artifacts for ingestion and consumption of IoT data with Timestream. In this post, we detail the following options of the preceding diagram: Ingesting data from AWS IoT Greengrass Using the Timestream AWS IoT rule action to ingest data Consuming data via APIs Visualizing data via Grafana Storing data in Amazon Simple Storage Service (Amazon S3) in CSV format for use with Amazon Forecast or other downstream analytics Pattern 1: Ingesting data into Timestream using AWS IoT Greengrass When you’re designing ingestion paths from data generated by devices or sensors connected to AWS IoT Greengrass, you have several options to take advantage of the strengths of Timestream. The actual option to consider depends on the nature of your IoT data. When you’re ingesting low-volume (frequency) data, you can send your data from AWS IoT Greengrass to AWS IoT Core with the MQTT protocol, and ingest data into Timestream via an IoT rule action. For high-volume IoT data, the preferred option is to use AWS IoT Greengrass stream manager. Stream manager processes data streams locally and exports them to the AWS Cloud automatically. With stream manager, you don’t need to be concerned with intermittent or limited connectivity, because it’s designed to work in such environments. Also, with the recently released AWS IoT Greengrass v2.0, you can add and remove pre-built software components like stream manager based on your specific IoT use case requirements and your device memory and CPU capabilities. You start by ingesting data into a message stream that is configured to export data to a consuming service like AWS IoT Analytics, AWS IoT SiteWise, or Amazon Kinesis Data Streams. When your data arrives at a Kinesis data stream in the cloud, the stream is consumed and written into Timestream. To orchestrate the actual data pipeline from a Kinesis data stream, you can use an AWS Lambda function or Amazon Kinesis Data Analytics for Apache Flink. In terms of estimating the cost options, for Lambda, you’re charged based on the number of requests and their duration (the time it takes for your code to run). Amazon Kinesis Data Analytics is priced on an hourly rate based on the average number of Kinesis Processing Units (KPUs). The actual nature of your data flow helps you choose between a Lambda function or Kinesis Data Analytics. If you have a steady flow of data, Kinesis Data Analytics might be a better option compared to Lambda. Another pattern to consider when using Kinesis Data Analytics is whether you need to interject any processing on the streaming data before writing the results to Timestream. We don’t recommend ingesting your IoT data from AWS IoT Greengrass directly into Timestream using a Lambda function. If you do so, you also need to implement features that already exist in stream manager, such as handling intermittent, limited connectivity, or buffering (holding on to data while the transport path is re-acquired). It’s a practice to avoid recreating existing functionality that exists and meets your requirements. Example use case As an example, you can collect system metrics like CPU, disk, and memory usage from an AWS IoT Greengrass core. After you create a database and table in Timestream, you create a Kinesis data stream and attach a Lambda function to it. The Lambda function gets records from the data stream and writes them into a table in Timestream. The following Lambda code snippets for Python writes data to Timestream. For this function, we have defined the database name in the variable DATABASE_GGMETRICS and the table name in TABLE_GGMETRICS. Furthermore, the Lambda function must have an AWS Identity and Access Management (IAM) role attached with permissions to write into the related Timestream table. def lambda_handler(event, context): logger.debug("event:n{}".format(json.dumps(event, indent=2))) records_ggmetrics = [] try: c_ts_write = boto3.client('timestream-write', config=config) for record in event["Records"]: logger.debug("record: {}".format(record)) # Kinesis data is base64 encoded so decode here payload = json.loads(base64.b64decode(record["kinesis"]["data"])) logger.info("payload: {}".format((payload))) if 'ggcore_name' in payload and 'region' in payload: logger.info("ggmetrics payload") if not DATABASE_GGMETRICS or not TABLE_GGMETRICS: logger.warn("database or table for ggmetrics not defined: DATABASE_GGMETRICS: {} TABLE_GGMETRICS: {}".format(DATABASE_GGMETRICS, TABLE_GGMETRICS)) return {"status": "warn", "message": "database or table for ggmetrics not defined"} dimensions = [ {"Name": "ggcore_name", "Value": payload["ggcore_name"]}, {"Name": "region", "Value": payload["region"]} ] for m in ["cpu_usage_percent", "disk_usage_percent", "mem_usage_percent", "load_1m", "load_5m", "load_15m"]: if m in payload: record = { "Dimensions": dimensions, "MeasureName": m, "MeasureValue": str(payload[m]), "MeasureValueType": "DOUBLE", "Time": str(payload["time"]) } records_ggmetrics.append(record) else: logger.warn("measure "{}" not found in payload".format(m)) else: logger.warn("unknown payload") return {"status": "warn", "message": "unknow payload: {}".format(payload)} logger.info("records_ggmetrics: {}".format(records_ggmetrics)) ret_val = {"status": "success"} if records_ggmetrics: logger.info("writing greengrass metric records to database.table {}.{}".format(DATABASE_GGMETRICS, TABLE_GGMETRICS)) response = c_ts_write.write_records( DatabaseName=DATABASE_GGMETRICS, TableName=TABLE_GGMETRICS, Records=records_ggmetrics, CommonAttributes={}) logger.info("wrote {} records to Timestream".format(len(records_ggmetrics))) logger.info("response - write_records: {}".format(response)) ret_val["records ggmetrics processed"] = "{}".format(len(records_ggmetrics)) return ret_val except Exception as e: logger.error("{}".format(e)) return {"status": "error", "message": "{}".format(e)} To complete the setup, you must create a long-running Lambda function for AWS IoT Greengrass. The function runs on an AWS IoT Greengrass core. Stream manager must be enabled in your AWS IoT Greengrass group. Upon start, the Lambda function creates a new message stream. The stream is configured by the export definition to transfer data to the Kinesis data stream that you created earlier. The variable KINESIS_STREAM_NAME must be set to your stream name in the cloud. LOCAL_STREAM_NAME refers to the name of the message stream on AWS IoT Greengrass. See the following code: GGMETRICS_INTERVALL = os.environ.get("GGMETRICS_INTERVALL", 120) STREAM_METRICS_INTERVALL = os.environ.get("STREAM_METRICS_INTERVALL", 60) KINESIS_STREAM_NAME = os.environ.get("KINESIS_STREAM_NAME", None) GGCORE_NAME = os.environ['AWS_IOT_THING_NAME'] AWS_REGION = os.environ['AWS_REGION'] LOCAL_STREAM_NAME = "MY_LOCAL_MESSAGE_STREAM_NAME" C_STRM_MGR = None logger.info("GGMETRICS_INTERVALL: {} STREAM_METRICS_INTERVALL: {} KINESIS_STREAM_NAME: {}".format(GGMETRICS_INTERVALL, STREAM_METRICS_INTERVALL, KINESIS_STREAM_NAME)) def setup_stream(): global C_STRM_MGR stream_ready = False logger.info("setting up stream") while not stream_ready: try: logger.info("stream manager client") C_STRM_MGR = StreamManagerClient() logger.info("delete stream") try: C_STRM_MGR.delete_message_stream(stream_name=LOCAL_STREAM_NAME) except ResourceNotFoundException: pass exports = ExportDefinition( kinesis=[KinesisConfig(identifier="{}-export".format(LOCAL_STREAM_NAME), kinesis_stream_name=KINESIS_STREAM_NAME, batch_size=10, batch_interval_millis=60000 )] ) logger.info("create stream") C_STRM_MGR.create_message_stream( MessageStreamDefinition( name=LOCAL_STREAM_NAME, strategy_on_full=StrategyOnFull.OverwriteOldestData, export_definition=exports ) ) logger.info("stream manager ready") stream_ready = True except Exception as e: logger.error("setting up stream: {}".format(e)) time.sleep(3) After the stream has been set up, you can start to collect system metrics. The following example code assumes that you use the psutil library to collect system metrics: def stats_collector(): try: gg_metrics = { "ggcore_name": GGCORE_NAME, "region": AWS_REGION, "time": "{}".format(int(round(time.time() * 1000))), "cpu_usage_percent": "{}".format(psutil.cpu_percent(interval=None)), "disk_usage_percent": "{}".format(psutil.disk_usage('/').percent), "mem_usage_percent": "{}".format(psutil.virtual_memory().percent), "load_1m": "{}".format(psutil.getloadavg()[0]), "load_5m": "{}".format(psutil.getloadavg()[1]), "load_15m": "{}".format(psutil.getloadavg()[2]) } logger.info("gg_metrics: {}".format(gg_metrics)) j_gg_metrics = json.dumps(gg_metrics) logger.info("appending gg_metrics to stream: {}".format(LOCAL_STREAM_NAME)) sequence_number = C_STRM_MGR.append_message(stream_name=LOCAL_STREAM_NAME, data=j_gg_metrics.encode()) logger.info("appended gg_metrics to stream: sequence_number: {}".format(sequence_number)) except Exception as e: logger.error("appending gg_metrics to stream failed: {}".format(e)) Timer(GGMETRICS_INTERVALL, stats_collector).start() With a few simple queries, we can verify that data is written to Timestream: -- select some data SELECT * FROM DATABASE_NAME.TABLE_NAME LIMIT 20 -- how many rows are stored SELECT COUNT(*) FROM DATABASE_NAME.TABLE_NAME Pattern 2: Ingesting data into Timestream using an AWS IoT Core rule action Some use cases may have a large number of memory-, CPU-, or bandwidth-constrained devices generating infrequent data and resulting in large aggregate volumes. In this situation, the devices can’t run AWS IoT Greengrass, let alone stream manager. In many cases, they’re already sending their telemetry data to AWS IoT Core via MQTT. To store this data into Timestream, you can use the Timestream AWS IoT rules action, which you can set up in a few steps. Let’s suppose your devices are generating a data payload similar to the following JSON object, which is published on the topic dt/device_id/measures: { "dataFormat": 5, "rssi": -88, "temperature": 24.04, "humidity": 43.605, "pressure": 101082, "accelerationX": 40, "accelerationY": -20, "accelerationZ": 1016, "battery": 3007, "txPower": 4, "movementCounter": 219, "measurementSequenceNumber": 46216 } The first step is to create a new IoT rule with the following query: SELECT temperature, humidity, pressure FROM 'dt/device_id/measures' This rule selects the three measures temperature, humidity, and pressure from the payload and makes them available to the selected action. In this case, we choose to use the Timestream action. To configure the Timestream action, you must specify a database and table in the same account and Region you’re configuring the AWS IoT rules and the values for the dimensions that are associated with the measures. The dimension values can be either static or extracted from the message context, such as fields in the payload or the topic. All the IoT rules SQL functions can be used. When using a function in the action, you need to use substitution templates, which consist of enclosing the function in curly brackets as ${clientid()} or ${dataFormat} to get the value from one of the fields in the original payload. Finally, you need to select an existing IAM role or create a new role that gives the action the necessary permission to access the Timestream table. If you let the system create a new role on your behalf, the role you use to create the IoT rule must have the correct scoped down permissions. We have published an example on GitHub to generate and ingest data with AWS IoT Core into Timestream. How data populates Timestream Every field in the JSON payload resulting from the SELECT query is stored as a measure in Timestream: the measure name is equal to the field name, and the measure value is equal to the field value. For more information about how the Timestream action ingests data into Timestream, see Timestream. The Timestream action can also ingest multiple measures but for a single timestamp. If the devices are sending aggregated messages in the payload, such as in the following example code, you need to use a Lambda function to decode the message and store the single data points via the Timestream write API. { "sensor-id": "AAABB", "temperature": [ { "ts": 122200022, "value": 24.0 } { "ts": 122200023, "value": 24.2 } { "ts": 122200024, "value": 24.3 } { "ts": 122200025, "value": 24.3 } { "ts": 122200026, "value": 24.1 } ] } Consuming time series data In this section, we discuss the various ways in which you can consume time series data. Timestream console The query editor on the Timestream console provides a simple yet powerful tool to query the data in your Timestream database. It’s useful for verifying that the data is being ingested and for trying out your SQL queries before embedding them in your solutions. After you define the query, you can use the API or any of the other integrations to get the data into your application or report. Amazon API Gateway and AWS AppSync If you’re making the data available to your or third-party applications, you’re likely building a REST API or a GraphQL endpoint, either with Amazon API Gateway or AWS AppSync. In both cases, you can use Lambda to perform the query to the Timestream database and return the data to the user. Both services integrate with Amazon Cognito to provide additional control on the access level of each user. These solutions are typically used in customer-facing applications such as a companion application for an IoT solution. Amazon SageMaker Amazon SageMaker is a fully managed service that provides every developer and data scientist with the ability to build, train, and deploy ML models quickly. You can access your data from Timestream with SageMaker to run algorithms for anomaly detection, forecasting, and more. JDBC If you have an existing tool that supports data sources via JDBC, you can access Timestream using a JDBC driver. One example is accessing data from database tools integrated with IDEs such as IntelliJ. Visualizing and interacting with data In most cases, data is ingested in a time series database to provide historical analysis capabilities, but there is nevertheless the need to visualize the data in near-real time. For these two use cases, you might consider tools such as Amazon QuickSight or Grafana. Amazon QuickSight QuickSight is a fast, cloud-powered BI service that makes it easy to deliver insights to everyone in your organization. QuickSight is typically used to access data aggregates over time and dimensions. Typical use cases for QuickSight include providing the maximum count of devices per day or per hour, or the average temperature per day. For a more in-depth discussion of using QuickSight with Timestream, see Getting Started with Amazon Timestream and Amazon QuickSight. Grafana You can use Grafana to query and visualize your time series data and also create alerts. Grafana provides an easy-to-use tool to display time series data in near-real time and quickly zoom in and out of the data along the time axis. You can use Amazon Managed Service for Grafana (Preview) or install Grafana on an Amazon Elastic Compute Cloud (Amazon EC2) instance, in Amazon Elastic Container Service (Amazon ECS), on your laptop, or on an on-premises computer. Grafana supports data sources that are storage backends for time series data. To access your data from Timestream, you need to install the Timestream plugin for Grafana. For detailed instructions on using Timestream with Grafana, see Getting Started with Amazon Timestream and Grafana. Conclusion In this post, you have seen an overview of the key architectural options for IoT data ingestion into Timestream and how to develop data consumption pipelines. You can ingest time series data directly from IoT devices or from the edge by using AWS IoT Greengrass. You’ve also learned about several options to consume data from Timestream. You can visualize time series data, use persisted data with SageMaker, or integrate the data into your own custom applications with API Gateway or JDBC. As a next step, we recommend trying our Timestream related quick starts and getting some hands-on experience with the Amazon Timestream tools and samples. If you have comments or questions about this solution, please submit them in the comments section. About the Authors Catalin Vieru is a Sr. Specialist Solutions Architect for Elasticache Massimiliano Angelino is a Principal Specialist Solutions Architect for IoT Philipp Sacha is a Principal Specialist Solutions Architect for IoT https://aws.amazon.com/blogs/database/patterns-for-aws-iot-time-series-data-ingestion-with-amazon-timestream/
0 notes
Text
I Cant Download Google Chrome On Mac

Chrome Not Downloading On Mac
I Can T Download Google Chrome On My Mac
I Cant Download Google Chrome On Mac Computer
Switch out of S mode on your computer. To learn about S mode and how to install Chrome, go to the Microsoft Help Center. Download the installation file for Chrome.; If prompted, click Run or Save.; If you chose Save, double-click the download to start installing.; Start Chrome. Download for Mac. Mac OS X 10.10 or later. This computer will no longer receive Google Chrome updates because Mac OS X 10.6 - 10.9 are no longer supported. This computer will no longer receive Google Chrome updates because Mac OS X 10.6 - 10.9 are no longer supported. Google Chrome is the solution that over 63% of the world turns to and with good reason. Mac users have distinguished taste and as such, expect high quality in their hardware and software products. Google Chrome delivers this to Mac users with its low CPU usage, reliability, and overall browsing experience.
There are better browsers I like chrome because it syncs across all devices but it’s so slow and constantly crashing on all formats, when I first downloaded this app it crashed every few minutes, then after about five or six updates it started working fine for over a year it only crashed twice, which is on par with the built in safari browser, but now it has stared crashing every single time. Google Chrome Running Slow. This problem may be caused by the computer running out of. Google Chrome is a lightweight browser that is free to download for Windows, Mac OS X, Linux, Android, and iOS. Follow this guide to get it downloaded and installed on your system of choice.How to. Hi, I would just like to know why we aren't able to install Google Chrome from Edge.
Summary
'Chrome not downloading files' is an issue that occurs quite frequently. Given that, here we detail all the potentials fixes for the 'Chrome won't download files' error on your computer, including simple tricks and effective tips. If you have lost files during the fix, don't worry. You can retrieve your browser history, bookmarks, and more using the professional data recovery software - EaseUS Data Recovery Wizard.
On this page, you'll find two parts of solutions - both simple & advanced to help you fix Google Chrome Not Downloading Files error. If your Chrome is now downloading files, pick any method here to ger rid of this issue on your own:
Workable SolutionsStep-by-step TroubleshootingQuick FixCheck internet connection > Restart Chrome > Try to download files again..Full stepsFix 1. Do Basic CleaningClear history and cache > Run Chrome cleanup tool > Reset Chrome..Full stepsFix 2. Uncheck Hardware AccelerationGo to Chrome Settings > Advanced Settings > Uncheck 'Use hardware acceleration when available'..Full stepsFix 3. Reinstall Google ChromeUninstall Google Chrome in 'Apps & features' > Delete all Google folders in Registry > Reinstall Chrome..Full stepsFix 4. Disable Related ExtensionsOpen Chrome > Go to 'More' > 'More tools' > 'Extensions' > Disable downloading related extensions..Full steps
Google Chrome Won't Download Files Anymore
'Why won't Google Chrome let me download files anymore? I used to download email attachments, pictures and music very easily. Since last week, it's no longer downloading any type of file from any website. What's the matter?'
Google Chrome is so simple and powerful that everyone loves it. But recently I found that one issue is under heated discussion on some major-related forums: Google Chrome is not downloading files!
After clicking the download button/icon on a web page, the request is not responding. Or, while selecting a location to preserve the download(s), the required download prompt box doesn't appear as usual. After many searches on the internet, Chrome fans said that they still don't find a confirmed solution to solve the problem.
How to Fix Google Chrome Not Downloading Files
According to Google Chrome Help page about how to fix file download errors in Google Chrome, if you get an error message on Chrome when you try to download apps, themes or other files, try to fix the most file download errors with the troubleshooting tips:
Part 1. Simple Tips to Fix Chrome Won't Download Files
Make sure your Internet connection is working normally. Fix Internet stability issues if the connection is unstable
Try to download the file later
Contact the website owner
There, on the linked page, you can find more 'error messages' related to this problem in downloading files with Chrome, such as Chrome network failed, download blocked, no file, virus scan failed, disk full, insufficient permissions, system busy, needs authorization or forbidden. All those errors are responsible for Chrome not being able to download files.
Chrome Not Downloading On Mac
If the easy tips above fail to solve the problem, don't get upset. There are other potential solutions provided below for you to fix the 'Chrome not downloading files' issue.
Part 2. Further Troubleshooting 'Chrome not downloading files' Error
Some people are not so lucky, they can't finish any download in Chrome. What's worse, they fail to download files without receiving a warning or error message indicating where the process went wrong. In this case, it's time to take some further measures. After reading numerous stories telling how people fix the downloading problems in Chrome, we summed up four effective solutions which I hope to be a permanent cure.
Method 1. Do Some Basic Cleaning Works
These are what you can try: clear all history and cache, run Chrome cleanup tool and reset settings to Chrome's original defaults. If you want to keep your Chrome history and cookies, you can backup or export Chrome history and cookies in advance.
To Clear history and cache in Google Chrome:
Step 1. Open Chrome on your computer and go to 'More (three dots)' > 'More tools' > 'Clear browsing data..'.
Step 2. Check the content you want to remove and click 'Clear Data'.
To Run the Chrom cleanup tool:
A Chrome cleanup tool can find and remove harmful software on your computer. Running this tool may solve the 'Chrome won't download files' issue caused by malware.
Step 1. Open Google Chrome on your computer.
Download the file. Before the file can be downloaded, you must accept the license agreement. From either the Downloads window of the browser, or from the file browser, double click the file.dmg to launch it. A Finder window appears containing an icon of an open box and the name of the.pkg file. Double click the package icon to launch the. Download the jre-8u65-macosx-x64.pkg file for mac.
Step 2. In the top right corner, click 'More (three dots)' > 'Settings'.
Step 3. Scroll down to the bottom and click 'Advanced'.
Step 4. Under 'Reset and clean up', click 'Clean up computer' > 'Find'.
To reset Chrome:
Step 1. Open Google Chrome on your computer.
I Can T Download Google Chrome On My Mac
Step 2. In the top right corner, click 'More (three dots)' > 'Settings'.
Step 3. Scroll down to the bottom and click 'Advanced'.
Step 4. Under 'Reset and clean up', click 'Restore settings to their original defaults' and then click 'Reset Settings' to confirm.
Attention, resetting Chrome will reset the browser startup page, new tab page, pinned tabs, and more. It will also disable all extensions and clear temporary data like cookies. However, other files like your bookmarks, history, and saved passwords will not be saved still. If you want to retrieve cookies but have no backup available, learn how to recover cache files in Google Chrome here.
Method 2. Uncheck Use Hardware Acceleration Option
Step 1. Go to Chrome Menu > Settings > Show Advanced Settings.
Step 2. Under System, uncheck Use hardware acceleration when available.
Step 3. Restart Chrome.
Method 3. Reinstall Google Chrome
To uninstall Google Chrome completely, first, you need to uninstall Google Chrome under Settings, then go to the registry to delete all Google folders.
To uninstall Google Chrome:
Step 1. Click the Windows icon and choose 'Settings (the gear icon)'.
Step 2. Choose 'Apps' > 'Apps & features'.
I Cant Download Google Chrome On Mac Computer
Step 3. Find and click 'Google Chrome'. Then click the 'Uninstall' button.
To delete All Google Folders in Registry:
Cumulative Security Update for Internet Explorer 8 in Windows 7 (KB2817183) This update addresses the vulnerability discussed in Microsoft Security Bulletin MS13-028. To find out if other security updates are available for you, see the Additional Information section at. Download internet explorer 8 for apple mac. Internet explorer 8 download for 8 1 free download - Apple Mac OS Update 8.1, uTorrent, Apple Mac OS Update 8.6, and many more programs. Internet Explorer for Mac, free and safe download. Internet Explorer latest version: Microsoft's now discontinued browser for Mac. Internet Explorer for Mac was Microsoft's free web browser designed to run on Mac computers.
Step 1. Press 'Windows + R' and type regedit.
Step 2. Go to 'Computer' > 'HKEY_CURRENT_USER' > 'Software'.
Step 3. Find and right-click 'Google' then choose 'Delete'.
Step 4. Go to the 'HKEY_LOCAL_MACHINE' folder and click 'SOFTWARE'.
Step 5. Find and right-click 'Google' then choose 'Delete'.
Now you have successfully and completely uninstalled Google Chrome from your computer. Go to Microsoft Store to reinstall Google and see whether the 'Chrome not downloading files' still exists.
Method 4. Disable Download Related Extensions
Disable all extensions that work as download managers since they may interfere with file downloading of Chrome.
Step 1. Open Chrome and go to 'More (three dots in the top-right corner)' > 'More tools' > 'Extensions'.
Step 2. Then you will see all the enabled extensions in your Chrome.
Adobe illustrator cs5 mac free trial download. Adobe illustrator cs5 free download - Adobe Illustrator CS6, IndicPlus Adobe Illustrator Plugin, Adobe Photoshop CS5 Extended trial, and many more programs.
Step 3. Toggle the button to disable downloading related extensions. (The extension shown in the image below is irrelevant to download managers. But you can apply the very same way to disable the extension you need to turn off.)
Extra Tip for Chrome History & Bookmarks Recovery
Some of the fixing methods will restore your browser to its original defaults or delete the Google folder. If the browsing history or bookmarks were unfortunately removed. Don't panic though, we left a data recovery plan for you here, to assist you to recover Chrome history in Windows and restore Chrome bookmarks on Mac.
Since Google has a temporary folder that stores some cache files related to browsing history and bookmarks, you can use EaseUS Data Recovery Wizard, the most powerful third-party hard drive recovery software to restore missing or lost Chrome data from its temporary folder, even the folder has been deleted on a local disk.
Step 1. Select a location to scan.
Launch EaseUS Data Recovery Wizard, hover on the partition, external hard drive, USB, or memory card from which you want to perform data recovery, and then click 'Scan'. How to get icloud on mac.
Step 2. Select the files you want to recover.
Wait until the scanning completes. Afterward, select the lost files you want to recover. If you need, double-click the file to preview its content.
Step 3. Recover lost data.
After choosing the files, click 'Recover' and choose a location on another drive to save the recovered files.
Here we introduce multiple ways to fix Google Chrome not downloading files, including simple tips you can try first and further troubleshooting tips. Hope it works and your favorite browser is getting back to normal.
So you are unhappy because the Google Chrome web browser won’t open or launch. This article explains how you can troubleshoot when Google Chrome won’t open after successfully installing on your Mac. More specifically the problem is that Google Chrome seems to be unresponsive and won’t start at all when trying to open the Chrome App. Do not worry, you are not alone. It seems that many macOS users are having this problem. Here is what to do:
See also: “App Is Damaged and Can’t Be Opened. You Should Move It To The Trash”
How to fix when Chrome won’t open

1-It is possible that Chrome is already running. You may want to check if Chrome is already open. Here is how you can check this:
Press the Option, Command, and Esc (Escape) keys together or you can click Force Quit from the Apple menu (upper-left corner of your screen).
Do you see Google Chrome there in the list
If you do, select it and then click Force Quit, and try re-opening Chrome. if you do not see Google Chrome in the Force Quit window, then see the step below.
2-Restart your Mac. (see also: How To Use Spotlight On Your Mac)
3-If you do not see Google Chrome in the Force Quit menu (see tip#1), follow the steps below:
Go to the Finder of your Mac.
From the “Go” menu select “Go to Folder”
Enter this:
~/Library/Application Support
And click Go
This will open a folder
Find the ‘Google’ named folder
Right click the folder and click Get Info
Click Sharing & Permissions to open the section
Click to Lock icon (bottom right corner) to unlock it. You need to be an admin and then enter your password.
Find the user who is having the Chrome opening problem and click its Privilege
Change Privilege from ‘Read Only’ to ‘Read & Write’.
Now click the Settings icon and select ‘Apply to enclosed items.’
Click Ok and try restarting the Chrome app.
4– If nothing helps you, you may want to try removing Google Chrome and then downloading and reinstalling. It is possible that your Google Chrome browser files may be corrupted and that is why it is now working. To uninstall Chrome, open Finder and click Applications. Then drag Google Chrome to the Trash. And then like the step number #3, select Finder and, from the Menu bar, click Go and then Go to Folder and enter ~/Library/Application Support/Google/Chrome and click Go. A new window will open. Select all the folders, and drag them to the Trash. This completely removes Google Chrome. Now you can go head and download and install again.
See also: How To Use Terminal On Your Mac
0 notes
Text
Baby Clothes For Your Child Shower Gift

Simply follow our link, check the Free Mum & & Infant Example Loads inc Pampers & & Fairy Non-Bio alternative and also after that fill out the type with your information to obtain these products free of cost. You can fill up a basket with clothing and toys themed around a single shade-- blue and also purple is best for boys, while pink and also yellow goes best for ladies. Why spend for something that you can obtain completely free? Some various other great solutions are a diaper solution for towel diapering mommies, or also a diaper distribution service for disposables, and also spend for the very first two weeks or a month worth of diapering items. Baby clothes should be of excellent quality, since you can not manage your sweet child spend his or her very first days as well as years of life in pain. Regardless of what you did when you were not pregnant, you must realize that you are currently in charge of that new life growing within you and also thus, you can no more go about doing business customarily. Locate your enthusiasms in life. You can find some adorable gowns, skirts, pants, and t-shirts for the little one. Our selection consists of onesies, sleeping dress, bodysuits, dresses, as well as layette sets. The offered rewards do transform once in a while, however there always appear to be a great selection of benefits to pick from. This behaves due to the fact that you can truly see if you like the item. If you established a wonderful web site on line, just how much can you expect it to make? Playing games - this can consist of application video games, or desktop computer games. One method we can do that is with infant shower games. As soon as you join you can get in codes from the Pampers diapers and wipes that you acquisition. The excellent information is, Ad Mindful tracks these computer system leeches and wipes them wipe your disk drive. This is one location where previously owned items may not be a good option-- if they've been cleaned improperly they're no much longer efficient. Earn money to (GPT) website, or rewards internet sites, as they're in some cases called, pay you for finishing tiny jobs. What's terrific regarding these GPT or benefits sites is that the jobs you finish an actually very easy. Make the most of this great totally free deal if you are blessed with doubles or more. So, in order to maximize this extraordinary feeling, if you are preparing an outing with your kid, after that below are a few recommendations on what to take baby trip. Child Shower Themes The first and also most challenging thing to do when intending an infant shower is to select a theme. Currently if you're preparing to get baby clothes as your gift for a new mother, here is the overview to assist you generate the best item. For those that are seeking the best baby running infant strollers, then they need to look for one that have distinctive item. Here you'll discover child and also kids's garments, footwear, toys, infant strollers, car seats, pregnancy clothing, accessories and also even more for youngsters 0-10 years.
free baby stuff expecting mother
At The Infant Cubby, you can locate a significant variety of infant products, such as strollers, diaper bags, items for the baby room, like bedding and cushions, and also garments. You can discover every little thing from bibs to pacifiers and also anything else that a baby can perhaps require. 75 that you can make use of to secure free infant things! Often times when I have actually surfed the incentives catalog to redeem a few of my points, I have had the ability to obtain cost-free Pampers baby diapers with my factors. And, with this program, you can make points each time you get the business's products. You can additionally take into consideration making use of a closet organizer to make full usage of the area. These are extremely helpful and also do not use up much suitcase room. You do not assume theyll review our e-mail, do you? We have an evaluation of the Target REDcard, so make certain that you review it to find out much more. Review Kaveri child fairness oil reviews from internet and see how the oil works and also at what cost it is available on the market. Furthermore, they can utilize these information in figuring out what the market once. There is likewise organic tooth paste on the market that you can acquire. Handily sufficient, on this web site, you can break out printable child book web pages. On this site, you can discover NFL, MBA as well as NCAA themed child things. When I had my doubles, I was thrilled to locate a couple of methods to capitalize on cost-free offers to break out Pampers and other totally free child products. And if you want much more wonderful baby garments patterns that are totally free ... take an optimal at our Free Infant Onesies message. I assemble this checklist of free infant clothing patterns for an expecting good friend. When you put the clothing on for the infant, make certain that it is tidy or if you have sanitized cleaners you can swab some of it on the baby clothes before you clothe the baby with them. Keep to the guideline, get your baby clothing with comfort as well as usefulness in mind and also keep the charming outfit for unique occasions. Be warned, the settlement you get will probably be rather small, so keep that in mind before choosing if it's worth the initiative. Firstly, if you have a baby or you are regarding to supply, the question of infant nappies need to cross your mind. To treat the protein portion of the discolor, you have to initially development the fats with surfactants that are generally located in discolor remover pre-treat sprays. There are additionally a variety of circumstances you can located where moms and dads prefer to get Infant Clothing after verifying the cost. I lately found a definitely beautiful site called See Kate Sew. Explore our website to discover out if we lug child garments including your preferred group's shades! You can have your discount coupons from the online site of the diaper firm which will certainly permit you to obtain free diapers in addition to other child items consisting of present cards, books and also a lot extra. I can opt-out at any type of time.
Bathroom time is a vital part of the day for infants, so it's a good idea to have the fundamentals for this area even before you bring your child residence. Also you can have proper and also complimentary standards. Although child obtaining coverings as well as swaddlers are crucial for those first priceless minutes with your infant, they can have many various other usages as well. New babies are wonderful, but it is a bit stunning sometimes just how much those diapers really cost the very first year. Simply make certain to wash everything first. Put a little dab of infant hair shampoo on his head as well as clean his head with your hand or a little clean towel. Breezes as well as zippers in the front are easier to put on and remove than those on the back. Breaks or other easy openings at the crotch make it quicker and easier to change baby diapers-- you do not need to take off every one of your infant's garments. If you have actually been blessed with twins or more, you can capitalize on the Multiple Birth Deal from Pampers to secure free baby diapers. You can after that use the Target present cards on a different day to break out diapers or various other free child things that you may need. Infants Online scours the web daily to discover you the finest totally free infant things available. Footwear which contain skulls as well as bones are all available from the Net and also will undoubtedly get the focus of a great deal of individuals. Did you know that a great deal of brand names placed discount rate codes or deals on their product packaging? Take a look at the packaging for diapers, formula, as well as anything else you purchase for your baby. She might definitely utilize it and can appreciate it extra if you purchase it for them. When you have actually signed up with, you can log in to your member account as well as download your gift pack coupon. If you've simply welcomed a kid, or recognize a person who has, this FREE 22 pack of Pampers nappies will certainly come in convenient. Plus we have lots of messages to help you with parenting your Baby - as well as if you've not offered birth yet, we have actually got an expanding bunch of Pregnancy blog posts. ... yet are new to embroidery, you will certainly simply love this FREE newbie's course on Craftsy, which will truly help you reach grasps with your sewing equipment. Which can make it appear a complete wild-goose chase to drag the stitching device out and begin sewing stuff. Speaking with your doctor at the physician's office can be a terrific method to obtain some totally free examples, specifically formula or vitamins, as an example. Whether it's formula or diapers, below are a couple of others points that you can do to break out stuff for your infant. You can sign up for this program at the store and after that have your card scanned each time you get Pampers. The arrival of a newborn infant is just one of the most extremely prepared for gifts in life, and also Kelli's Present Shop Distributors will certainly make sure you are prepared with the most effective child blanket wholesale options for your present shop or store.
Store wholesale baby clothing for newborns, preemies, and more. Kelli's Gift Store Suppliers has among the finest varieties of wholesale baby coverings consisting of fleece coverings, swaddle blankets, obtaining coverings, patchworks, and a lot more. We approve wholesale orders through our manufacturer wholesale site My Child Rocks. But, it's not the only web site that supplies a signup benefit. But, it's not the only method. As well as while it wasnt the neatest means to maintain their toys, it was absolutely one of the easiest. Seriously, go and look, they are absolutely lovely, each one of them. There's six beautiful, easy to make onesie patterns, every one of them totally cost-free! When you secure free examples of child formula, you grab them. Doctors normally have free infant things accessible which are offered away as examples to patients. If you send out in duplicates of the birth certificates, Pampers will certainly send you some cost-free diapers! By reading testimonials, you will obtain an idea of the working of this oil and also the way it acts on an infant's body. The oil have no poisonous active ingredients and it is health and wellness giving. We also understand that consuming as well much fat leads to health issue and also weight-gain, however we do need some healthy fats in our diet plan. Eat your own reduced fat nibbles. As directed out in the past, consuming fats is the major perpetrator that results in fat getting on the human body mainly since fats are high in calories. Weve commonly found dots that declare to be "Historical Ft " or "Area Landmark " that have turned out to be nothing greater than a bronze plaque on a rock at the end of a residential road. Ive seen it less than that, however when the ovary begins turning itself simply picture a tube with a huge round on completion and by movement or whatever this tube gets twisted and turned. Having claimed that, I loved my cradle and wouldn't have lacked it. There's even a Chrome extension readily available that internet you price cuts without you also needing to visit the Ebates site. Or, you can see the Craigslist web site, choose your city and afterwards click on the "cost-free" area if there's one there. However, these aren't the only means that you can obtain your hands on giveaways. If the chemicals aren't well-bound to the textile, they can get inside your baby's body much more quickly. So there you are, aren't they just infant garments to swoon over! Any kind of adult who has suffered from tummy troubles, oral work or straightforward curiosity and also has eaten a container of infant food can tell you its no enigma why kids fling that stuff all over the cooking area. Pampers wipes promo codes are really a source to obtain discounts over pamper wipes. You can get in sweepstakes to win totally free baby diapers and wipes for a whole year. She can utilize the items and at the same time an excellent screen during the event. At the exact same time the switches as well as various other components in the layout must be meticulously stitched.
And also, what's fantastic concerning these pacifiers is that you can develop your very own personalized layout! You can likewise obtain registrations to child magazines totally free and also then when you obtain them, they may have vouchers or special deals in them to save you even more cash. Nevertheless, their products can be really useful specifically if you intend to be able to save more money. So now you can see that used infant garments need to be welcomed. Currently you can start including decors to the diaper cake. If you are holding a celebration for your child of youngster, you can discover event plans for printing. In the store or on their official site, you can locate a huge variety of products, like toys, furniture, publications, apparel as well as pacifiers. Points that can be retrieved for gift cards - so you can make use of these present cards to get totally free child things. Points collect rapidly when you are getting diapers every week. As Well As NOBODY IS ACQUIRING FROM YOU. You might try searching the web to see if there is one near where you live. Internet facilitates you centers of discount coupons in the kind of web sites, neighborhoods and discussion forums. There are lots of areas where you can discover punk garments however one of the most usual area to discover these things is the Web. Another excellent place to locate free stuff gets on Facebook. Make certain the brushes are of high quality that the bristles won't diminish inside the bottle. The material is soft and wonderful quality like any one of the Carters clothes. Like all other points including feeder, cloths, indulges, bed, baby room, this is also a vital ingredient to maintain your kid off from the clutches of severe physical difficulties. Currently, if we might just determine how to keep baby from growing out their clothes so quick! Infants outgrow clothing so quickly! There is always something brand-new to find out about babies and that includes infant crib bed mattress. There are lots of accounts as well as groups on there that are committed to complimentary stuff for infants. It's ALRIGHT to go shopping in secondhand shops or top quality consignment look for a lot of things for infants. Shop our dresses, sleepwear, bottoms, clothing collections as well as even more for your cuties! From cute child outfits, child grows, layers and also cardigans search our high-end collection motivated by the iconic Diana pastel tartan. Whether you are purchasing baby woman clothes or infant boy clothing, The Diana Collection provides a variety of designs that are excellent for every single celebration, from playtime and also events! Despite the event, our child and toddler clothes are made and also styled to make your kids the comfiest and also prettiest. Yet baby store clothes actually does make a remarkable infant shower gift. Ensure to buy large sized apparel so you can be guaranteed your child can still use them in the months to find. A very little mistake from your end can be really hazardous for your child. The complimentary stuff does not end there. Secure free regular monthly picture sign printables from Pea to Pumpkin. Insurance claim by clicking 'OBTAIN GIVEAWAY' and following the guidelines to join to the Emma's Journal mum as well as child club.
youtube
0 notes