#i did not draw any of those patterns. they are free brushes on clip studio
Text
they took your honour and they took my trust, but our love remains ours. ❤
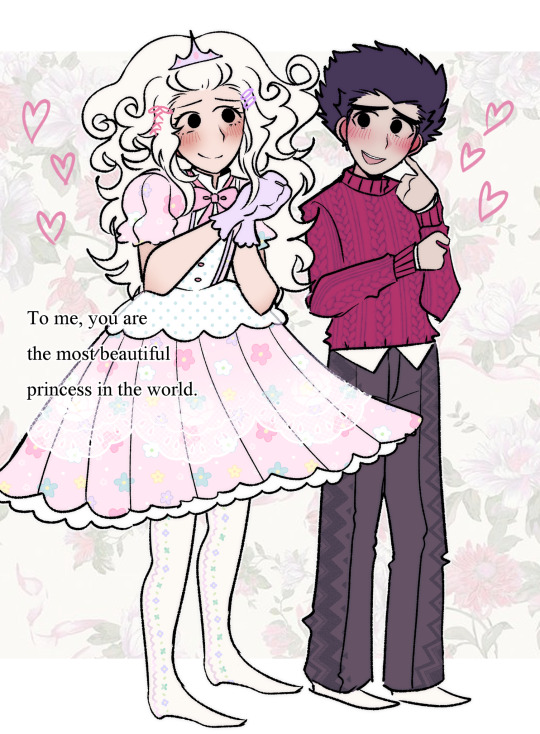
#i did not draw any of those patterns. they are free brushes on clip studio#i dont dont have the energy for detailed pieces anymore#ill do my best for my birthday piece but after that im going back to simple doodles#my goal isnt to improve professionally. improvement sounds nice but its not my priority. i just want to draw#but i still feel guilty when i post mediocre art because i have this irrational fear that my friends wont like me anymore#because my art looks meh😐😐😐#but its very dumb . look at princess frog she is very very sweet#and her loving boyfriend is there to support her#ishigeru#danganronpa self ship
15 notes
·
View notes
Note
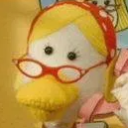
Sorry if this has been asked before - do you have any tips on how you create those lovely stained-glass-like patterns for the round backgrounds for patreon pieces?
Sure! Although this will be entirely about Clip Studio Paint because it's what I use :>
CSP has a fantastic symmetry tool that lets you draw multiple sections at the same time, a bit like a kaleidoscope. You can increase the number of symmetry lines and use it to make really intricate patterns quickly.

Here's a few I've made in the past using this method:
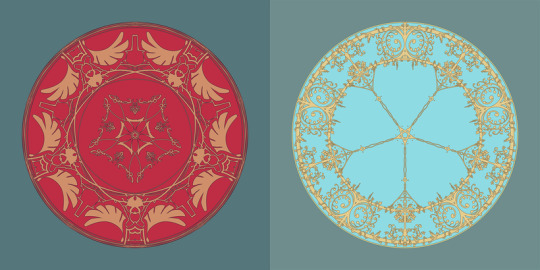

Or!
you could do what I did for the NN portrait borders and download free-to-use assets from the vast realms of the community hub :D
Such as these pretty brushes I used: [1] [2]
Then click the spanner symbol to open your circle tool settings (or using whatever line or shape tool you want!) you need to head into the Brush Tip sub-menu, the Material tab, and import your new downloaded brush.
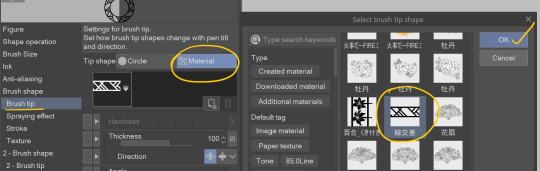
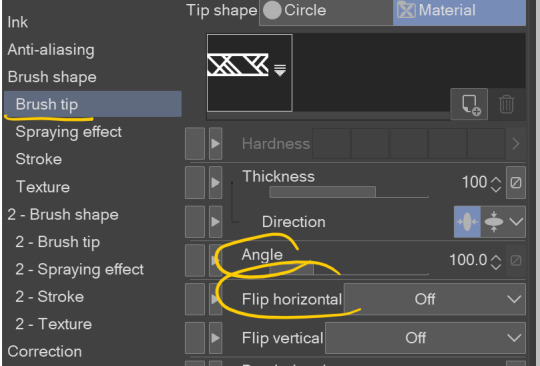
Have a look at your brush tip settings too, some brushes need a different angle or need to be flipped horizontally for them them to look right. Fiddle with this section if your result looks funky!
Pop into the Stroke sub-menu and make sure ribbon is ticked also.

Then it's just a case of adjusting the Brush Size afterwards, and off you go :D
I hope that helped, have fun making your own funky borders!!
psst I have a handful of tutorials and full video timelapses on my patreon if making art is your jam <3
★ patreon || website || twitter ★
#if you're reading this and wanna know anything super specific about CSP shoot me an ask btw!#muffin tips#reply
320 notes
·
View notes
Text
Aaa finally got around to ask replies, all under the cut!

Thank you!!! All things considered it went even smoother than I could have hoped and I’m quite happy with my new room :D

Thanks!! Sadly the backgrounds are one of the things that tends to get skimped on when I’m in a time crunch, so I do intend to go back once chapter two is done and add more details to some and redo parts of others. But they are honestly fun to do and I’m glad to hear you like them!

Ahh so, I do use discord actually! I’m mostly active in my school’s servers, but a few folks have contacted me on Tumblr/Amino and we’ve connected on discord. I don’t mind if people ask!
Thing is,,, I’m very bad at 1-1 casual conversation and keeping chats “alive” so I’m concerned that an actual server would be pointless or awkward? Like, if you really wanted to join a Terraria server as far as I know there’s an official Discord for it. Any announcements I’d make there, like skipping pages, would be put on Tumblr too anyways, and I already take art/writing/headcanon requests and stuff over on my main account. I also don’t want to make anyone feel like they have to dox themselves or something to message me, hence why I’ve been sure to keep anonymous asks open here on tumblr!
That’s not to say there’s nothing that could be done with a Discord (especially if it was a more casual/fun general Terraria/fanfic/art/whatever community thing), since there are some fun features that Discord provides to play around with like streaming and just being able to chat and hang with folks, but I’d feel silly starting something like that if there’s no need or even just general interest in it, y’know?

Yeah sure! Here’s an image of the “steps” with an explanation for each one below. You can take it as a tutorial if you’d like, but since I use a downloaded brush to make the clouds and just add colors and lighting based off of the whims of my soul, I’m afraid the real answer to “how do I draw clouds” is either to look up an actual tutorial for drawing clouds, or to just get a brush for it like I did.

Here’s the base background with the grass/characters blacked out so we can focus better on just the clouds. You can see I’m doing the clouds on a blue/gray base.
The first cloud layer is just a gray-ish smatter a little lighter than the base. I’m using a cloud texture brush for this -- if you’re a Clip Studio Paint user, you can download it for free by going to File >> Open Clip Studio and in Clip Studio going to Service >> Clip Studio Assets on the left sidebar. Then, just type 1784043 into the search bar and download/install like any other asset!
Next, I throw another layer of cloud patterns down. These clouds are colored completely white and are set to a glow dodge layer at 50% opacity.
Now I do some color correction, achieved by a light yellow multiply layer at 85% opacity and a dark maroon linear light layer at 15% opacity.
Then I use some light yellow with the soft airbrush on some glow dodge and soft light layers with varying levels of opacity to give the clouds more glowy-softness. Keep in mind that these layers and the color correction ones are sort of “whatever” -- the exact combinations of colors and layer types for color correction and lighting vary from scene to scene. I just do it based off of looks until I’m happy with what comes out.
And finally the raindrops! To be particular, these were done by using the default raindrop generator in Clip Studio, which I then applied a motion blur to in the angle that the drops were falling, and then set this layer to glow dodge. The smaller sparkles were done with a droplet airbrush and given a light gaussian blur, then also set to be a glow dodge layer.
Keep in mind that this cloud brush also doesn’t account for flat-bottomed clouds -- it’s just one general cloud texture -- so you’ll have to add those in yourself if you’re going from that angle! And while these steps are good for showing the different layers I’ve used, the actual process is far less clean -- I’ll decide I need more light and throw another glow dodge layer on, I’ll decide it isn’t the color I want so I’ll try some various colors with soft light, linear light, linear burn, multiply, etc. layer types...and so on, until I’m happy with how it looks!
13 notes
·
View notes
Note
Hello, yes, hi, I recently found your art and account and I love what you do. I'm turning 14 in April and I've asked for a drawing pad, but I have no idea how to use one as of yet. Have you got any tips or anything? Because I've wanted to try digital art for a while and your art makes me want to even more lmao. Thanks! - B.A.
BOI OH BOI DO I GOT SOME TIPS FOR U
(I’m not sure what kind of comp you’re going to be using, so I’ll list for both.)
FIRST: Drawing Programs; the free and the great.
-Firealpaca: Lightweight drawing program. I draw Recovery using this! It’s easy on the RAM if you have a weak comp/are paranoid about yours like I am, it is mainly for basic comic making, and has all the basic brushes you need (pen/pencil/airbrush/symmetry/etc). You can add your own brushes as well but they’re p basic settings. Has basic Animation/Gif making as well using Onion Mode! Layout is a piece of cake. Please note that If you leave it open for a week it’ll crash on you, even if you haven’t anything on it at the moment, and sometimes the brush sensitivity just stops working so you just have to close and then open it again. (Also I have no idea how to update it aside from deleting it completely and just downloading the new version from scratch, so thats a thing.) Mac/Windows
-MedibangPaint: This is basically FireAlpaca But Better. Has tons of screen tones, brush patterns, and tools. I don’t use it much because I’m used to FA’s layout and get confused with the the placement of tools in here, so if you can I highly suggest just going with this first. Also has basic animation/gif making! Has storage for the website as well, and you can upload more preset brushes. It’s v anime. This program has waaay more in terms of basically everything, so it just takes more RAM. NBD, you don’t have to have every brush downloaded from the storage ^u^. Mac/Windows
-Clip Studio Paint: Okay this one isn’t free, it’s a pricey one, HOWEVER once a year they take the price way fuckin down by at least 75%. Sign up for the email list and it’ll let you know when that precious day comes. It’s how I got it @u@, around christmastime? This program is basically MedibangPaint On Steroids. I do all of my digital-yet-tradition-style-painting on here! The brushes all have some neat af settings to play with, you can make your own brushes, has tons of screen tones, pre-made panels, and settings. You can save projects as basically anything you need, is a hardy program that almost never crashes, and It’ll take a nice chunk of space on your comp depending on how much memory you have but hey, its worth it. It’s much more complex layout-wise than the other two here, but you get used to it after playing around and watching tutorials haha.
-Mischief: It’s a 25$ app, has like four brushes and five layers only but is vector-based with an endless canvas. Not really worth having unless you like the vector thing. UP TO YOU. I spent forever with this one doing all that homestuck stuff, so it’s not really bad so much as it is a basic bitch. Mac
-MyPaint: I used this a bunch when I still did digital art on my windows laptop before I upgraded to a Mac. It’s easy on the comp and has plenty of brushes and settings. You can also get brush packages if you don’t feel like you have enough that comes with the program! Also has endless canvas; pretty sure you can just select an area and then export as is. I barely remember the rest but It’s pretty great. Windows/MacPorts(which I hate)
-GIMP: I hate this thing. I cannot figure it out for the life of me. It’s got loads of shit though, can handle layers, has plenty of brushes, and can do basic animation/gifs if you ever figure it out. Windows/mac
I’ve heard good things from paint tool SAI and Krita as well, but have never used them myself.
***You can always pay through the nose/use a student discount for the photoshop series and pay that shit monthly, those fuckers have literally everything, but I am a cheap college kid making minimum wage with a car payment; I’d rather just pay once/not at all.
TABLETS: treat that shit like a newborn babe 24/7
-I have literally only ever owned a Wacom Intuos4. It has lasted me six years, and at least five moves across many miles. I broke one of the cord ports the day I opened it by holding it wrong, have one left, and now treat it like it’s going to die if the cord moves badly. Please be aware that if you break both ports, you better either sodder it back together yourself or upgrade to smth else because it costs about as much as the tablet itself was bought at to be fixed. Good news, though, it comes with at least six extra pen nibs, has programable buttons on the side (that I have never bothered to use) and a scroll bar in case you’re too lazy to use the keyboard (…I don’t really use that either unless I’m just scrolling through tumblr LMFAO).
-I would die for a Cintiq.
HOT TIPS: its useful.
-most of the programs listed use the same keyboard shortcuts. MEMORIZE THEM. It’s pretty easy, since you’ll use em a lot. [cntrl/cmmd+T] lets you resize what you just drew on that layer, and [cntrl/cmmd+z] is undo. I use those the most, for obvious reasons.
-vector-based programs are pretty great because when you resize an image it looks prefect. You can’t do that with a program that isn’t, so I just resize the base roughdraft and draw the lineart again on the layer above so I don’t get weird JPEG quality lines.
-You can use a ruler with your tablet, just slap it on and go, but honestly most programs have settings for that. just use those.
-You can also trace stuff on your tablet, so long as the paper isn’t too thick. I just scan/take a photo and then open it up in the program, though. much easier.
-SAVE CONSTANTLY. Art programs like to crash on you, even when they’re hardy and you have a good comp. make it a habit to quick save your work.
-Use a desk and have good posture. You’ll be able to draw a hell of a lot longer if you do. I personally keep fucking up my knees by sitting on my legs as I work out of habit, and don’t actually have a desk chair. Keep your screen at eye level and at a fair distance to prevent eyestrain and also neck-strain haha
-Chances are you won’t be used to the tablet right away. Most places you buy from say it’ll take a couple of months to get used to how weird it is to draw while not looking at your own hand, so don’t be frustrated If your drawings look a bit off at first.
-if you draw at least one thing every day, by the end of the year you’ll have improved exponentially. I literally made this blog to make myself draw once a day.
-don’t be afraid to check out speedpaints and tutorials. It’s always good to get more familiar with the program you’re using and new techniques previously unconsidered.
-get familiar with clipping layers. They are insanely useful; you clip one layer to the one below and then when you draw it only shows up on the drawing of that layer below. Shit is a godsend if you’re bad at coloring in the lines/lazy. The bucket tool is also really useful, and you can adjust the expansion by pixel so you don’t miss anything between the lines.
-experiment with your brushes, shit be fun af
-warmup your wrists before and after drawing. prevent swollen veins and such. dont want hand pain/numbness, its reaaaaally bad.
—basically if your hands hurt stop for the day.
-PNGS are for internet, JPEGS are for printing/fucking with quality (cough hack homestuck)
-resolution doesn’t have to be much more than 350 dpi if its just going to be on a webpage. Maximize that shit if you’re going to be printing, though. Especially if you put stuff on redbubble.
-DeviantArt has this thing called Sta.sh where you can dump art, keep it in perfect quality and just share it with certain people with a link instead of all of the website. Great for storing commission pieces, its the only reason I have DA in the first place.
-you get a different audience depending on what site you use for posting art, so keep that in mind for the kind of feedback you want.
-after awhile of drawing using a tablet, you may lose patience/forget that in traditional art there isn’t an undo button lmfao It’s cool; you don’t have to choose one over the other or anything.
-Honestly you can work around almost anything. You just invent new ways and techniques for yourself and you’ll do just fine.
Aaaaand that’s all I got for today! Thanks for sticking around
277 notes
·
View notes
Last Seen Blogs

nineonine1
Bass Man
hannashjalplinje
Hannas Hjälplinje

instagrambutikleri-blog
Instagram Butikleri

80-hd
i Made You A Cookie, But...

goldenreveries
GOLDEN REVERIES!