#i dont know how other people got hd clips of this drama
Text

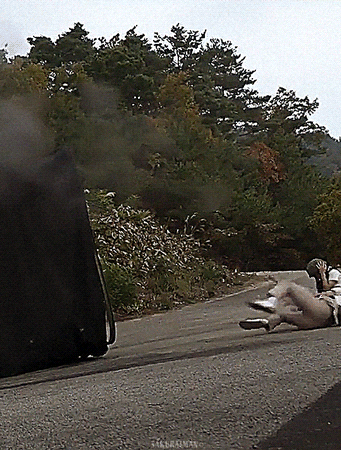


"Now that I think about it, I'm so grateful and proud of you. Thanks to you, this endless war didn't feel so frightening."
DUTY AFTER SCHOOL (2023)
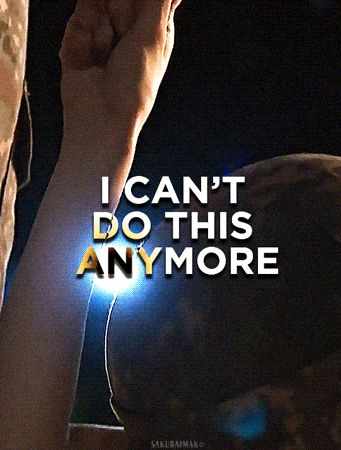
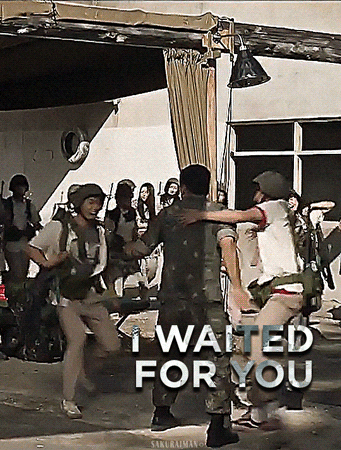
#consider this is the “fine imma do it myself post” haha#i love them and this drama so soo much#i dont know how other people got hd clips of this drama#so please just bear with my gif quality#duty after school#방과 후 전쟁활동#korean drama#kdrama#kdramaedit#mygifs
253 notes
·
View notes
Text
Anisah tries to make a tutorial :)
There is probably a list of people who should never make tutorials, and i’m on it... but here we are anyways ~
(this is a very detailed tutorial from start to finish, so please bear with me lols. also, its super long, so under a cut it goes )
The first step of course is getting the right videos. I would highly reccomend downloading torrents, as opposed to video clips off of youtube/daily motion because they will always be better quality !
In the case that you can’t find a torrent/the torrent you found has barely any seeders and is basically dead, then i’d reccomend downloading clips from the official drama channels, since they will always upload in HD and have the widest variety of drama clips.
KBS SBS TvN JTBC MBC
Once you have your episode/clips downloaded, I would recommend using a video editor to cut out the scenes that you want. This is because, if you try and make a gif on photoshop from a full episode, its will end up being like 500 frames and your death :)
Also, if you want to make a multi scene set, if you cut them clips out before hand and compile them into a new video - it will be easier to find the exact clips you want, without having to go back and forth between different clips

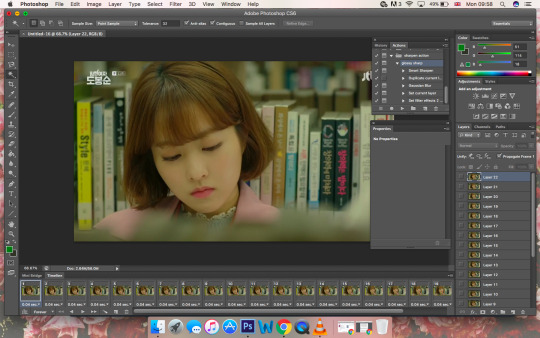
So you have HD clips, and they’ve been cut into the individual scenes for giffing, so now to actual gif making.
I know a lot of people do the whole ‘screenshot and then convert layers to frames’ but I have no idea what that is or how to do that, so here is an alternative? (Which I think is a lot easier than screenshotting)

On photoshop you can import a video and convert it into a frame animation
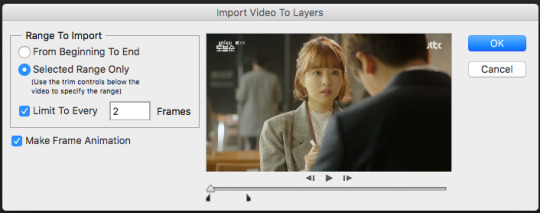
^ make sure you tick ‘limit to every __ frames’ + since you don’t want to have too many frames in your gif, i’d recommend going for every 2 or every 3 frames.
then hit okay, and you’ve technically just made a gif and could very well just save it (it would probably be huge though like 13mb so i would 500% not reccomend this)
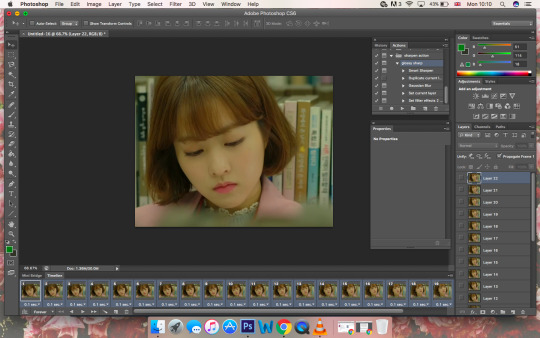
So your gif probably looks like this, the timing will probably be something like 0.04 sec which is wayyy too fast - so the first thing you’ll want to do is select all the frames (click the first frame, then press shift, and click the last frame) and change the timing - i usually use 0.1 seconds, but people prefer different timings so its really up to you~
The next step is to crop your gif, for the first gif click the crop tool, and select “unconstrained” - this will allow you to crop your gif into any shape you like

once you’ve decided on a shape you like, click “save preset” - what this does is save your crop shape, so next time you don’t have to use “unconstrained” you can just use the crop preset that you’ve saved - aka all your gifs will be the same size/shape
as you get into making different styles of gifsets, you’ll start using different shaped gifs and your list of presets will grow

^^^ this is what my one currently looks like, gibberish titles i know, but i understand what they mean and what shapes they are, and thats all that matters really! (although...i should probably delete some, since i dont even use half of them lmao)
For the sake of this tutorial, lets say you saved your crop preset as “gifset 1” - so the next gif you make, instead of clicking “unconstrained” you just click “gifset 1” and you’ll get the same crop proportions :)
also important: i’d 500% reccomend cropping out logos! logos honestly ruin gifs and will put your hard work to waste
if your gif shape doesn’t allow you to crop out the logo without cropping out key details from the gif, i’d reccomend colouring over the gif
Okay, so your gif now looks like this
but its still very big (like probs 900px) and tumblr’s dimensions for gifs are 268px for small gifs and 540px for big gifs
for this tutorial i’m going to make a small gif, so to resize the gif, just press cmd+shift+i or click on the image drop down menu and then click “image size”
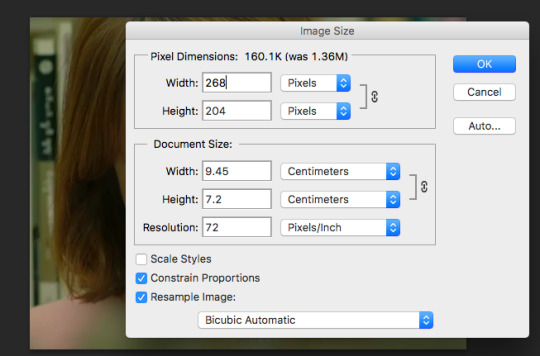
and resize your gif to 268px. make sure “constrain proportions” is ticked!!! or else your gif will end up being stretched and it will look awful!!!
also, click cmd+1 or go to the “view” drop down menu and click on “actual size” so the gif it the exact size you want it to be, and not zoomed in or zoomed out (doesn’t change anything on the actual gif, its just easier to work with)
And your gif is almost done :) all thats left is colouring and sharpening !!
When you import your gif, on the right hand column will be your gif layers, photoshop will select the first layer by default, but to make sure the colouring is on all the frames make your you have the last layer selected!
Everyone colours differently, but here are my basic steps - and from there you can just mess around with the colouring etc
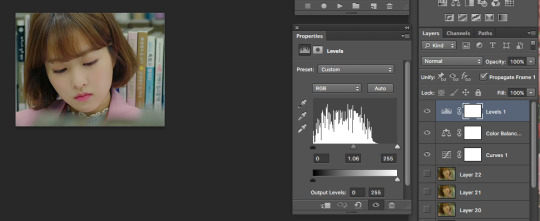
The first thing I do is increase the “curves” - there isn’t an exact number or curve you want to go for, it literally depends on how dark the scene is and how bright you want it. however, do not brighten it too much at this point, because as you add layers it will get brighter and you dont want to whitewash!

The next thing I do is balance out the colours using “colour balance”, to reduce the yellow tint and make the scene look more natural

I then increase the levels a little bit, to make the scene lighter
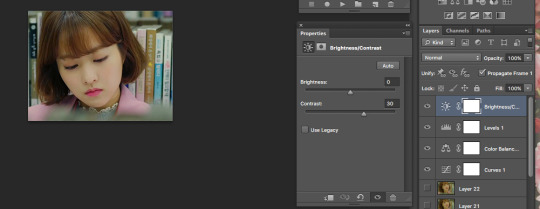
It looks fine, but the colours seem a little flat, and the scene hasn’t got a lot of depth, so I do a “brightness/contrast” layer and increase the contrast (i dont increase the brightness, since the “curves” and ”levels” have already done this part, but i do sometimes lower the brightness if the contrast overexposes the scene)
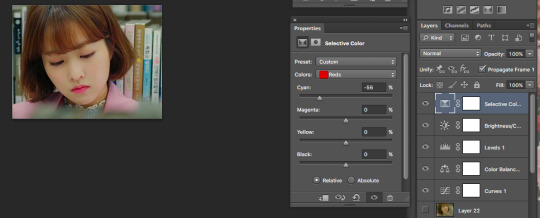
^ This looks fine, and I could finish here, but I want the colours to be a bit more vibrant. So, I open a “selective colour” layer, and on the “red” I reduce the “cyans”
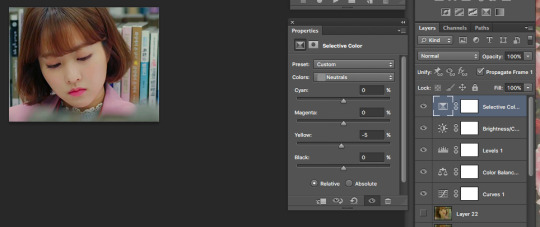
Then reduce the “yellows” on “neutrals”
And finally, increase “black” on “blacks”

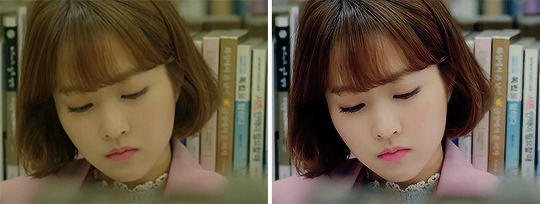
and badabing badaboom, you’ve now coloured your gif!
The only thing left to do now is sharpen~

At the bottom left hand corner of your timeline there is a small button next to where it says “forever”, click that to convert your frames into a video timeline
making your timeline look like this:

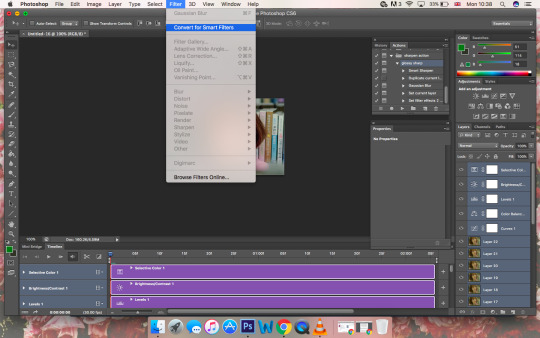
Then click cmd+alt+A or the “select” drop down menu, and click “all layers”

and then click on the “filter” drop down menu, and click “convert to smart filters”
So your timeline should now look like this:

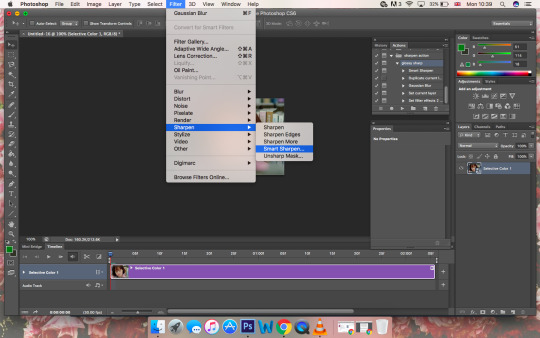
To sharpen your gif, click “filter” and then go to the sharpen sub-menu and click on “smart sharpen”
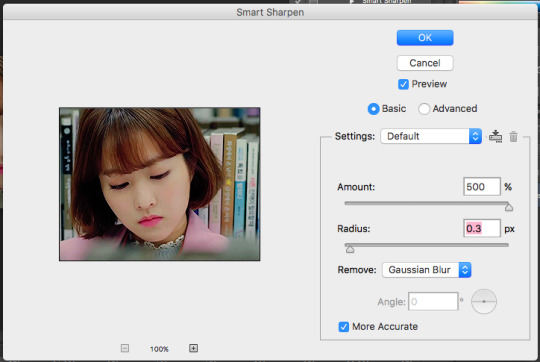
How much you sharpen your gif is up to you, some people do more than one layer of sharpening others only sharpen a little
I’d say to start off between 0.2px and 0.3px and mess around with the settings from there
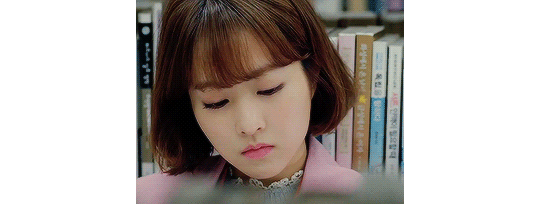
And you’re done!!!
All you have to do now is save your gif - so go to the “file” drop down menu and click “save for web”
Important things to note when saving your gif though:
Make sure the loop is on “forever” - photoshop will put it at “once” so you have to change is manually when you save
make sure your gif is under 3mb or it wont move on tumblr
make sure you save it under “pattern” and not “diffusion” (which is the default) or else it will look fuzzy/low quality

CLICK SAVE AND HALLELUJAH YOU JUST MADE A GIF!!! WOO HOO !!!
please please please let me know if this tutorial helped you, you don’t need to reblog or even like it... just a reply would do (just so i know this wasn't a waste of time and it actually helped someone lmao)
90 notes
·
View notes
Last Seen Blogs

tarihkultursanat-blog
Tarih Kültür Sanat

moriyataito
*WORLD OF GIRLS*

sohmaluver
bel!
superrpowerlesshuman
call me irresponsible

dramadaisies
k-drama gifs & gabble