#i know you make beaufitul gifs but i included the gif tutorials in case achalk needs them!
Note
omg I need a full tutorial on how you do your edits on powerpoint because sis my edits trying to have even a little hint of *amazingness*
Hi! First of all your edits are beautiful and I am queuing them up 💛 and again, I'll never be as adept as the Photoshop gods, but since both you and @achalk asked, Powerpoint is surprisingly easy to use after some practice and is adequate to make edits, especially if you’re a beginner like me. I’m also still learning about color and fonts and other aesthetics.
A lot of it is trial and error, which is why I never look at my older edits cause they were definitely more on the error side, but I can break down some of my newer edits so you know what went on in there.
What usually takes a long time in edit making (especially graphics) is finding the right movie frames/pictures. The pictures I use are frames from movie files that are larger than 3gb. A truly marvellous place to find those files are in this post by @in-a-cave-with
Figuring out how to arrange things is a balance between what picture you want to make and what the edit is about. for my last edit all the circular shapes was supposed to be like the arc reactor’s circle but that point might have been missed.
Anyway, I have no idea about your skills but under the cut we start with the very rudimentary basics and then I’ll dissect some of my edits for you. please excuse the messiness of my Powerpoints windows
The Basics
First of all, it depends on what version of Powerpoint you have. My university gives us free access to the Office 365, so that’s the version I’m working with.
I’m pretty sure a lot of the features I use most often (shapes, arranging, and animations) are available on all versions, though.
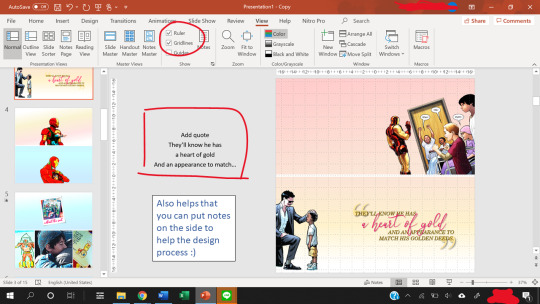
The gridlines are really helpful with positioning, and you can use the space beside the slides to add notes.
Also, to change the slide size, go to the Design -> Slide Size -> Custom Slide Size.
Usually, I use a width of 33.867 cm, which is the default for my Powerpoints and that translates nicely to 1280 pixels when you save as a PNG file.
The 1280 pixels is a multiple of 540 pixels, which is the width that tumblr rescales your images to, so it balances the quality of the image with tumblr’s determination to ruin that quality.
What I usually modify is the height of the slide, and that’s a balancing act. You want enough space to fit what you want, but not too much to crowd the dash. Nobody knows anymore what the maximum height limit is for tumblr but I try to keep the height below 60 cm for proportionality.
Note: each Powerpoint file can only have one slide size. So if you want to make one graphic but using two different slide sizes, you need two Powerpoint files.
Usually, I stick to one slide size per graphic so that it doesn’t confuse people.
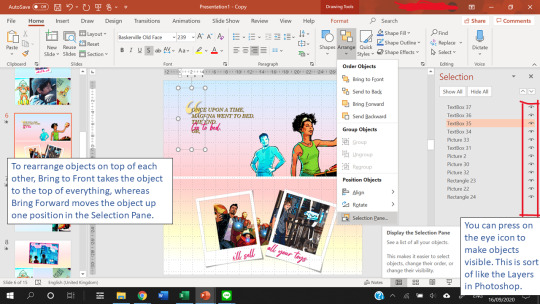
Finally, Arranging things is really useful. This allows you to have multiple “Layers” in your slide.
Creating Templates
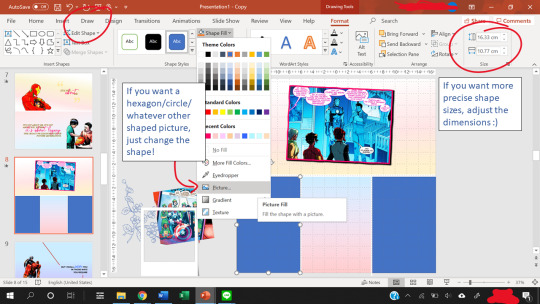
Shapes in powerpoint are a beautiful thing. And the most useful thing is that you can fill a shape with a picture or with a gradient.
After you fill a shape with a picture, you can go to Format -> Crop. Then, you can resize that picture.
If you have the Draw tab in your Powerpoint, that’s also great for you to draw your own lines and shapes to give things a more authentic feel. You can find the Draw tab here if you have the right version of Powerpoint.
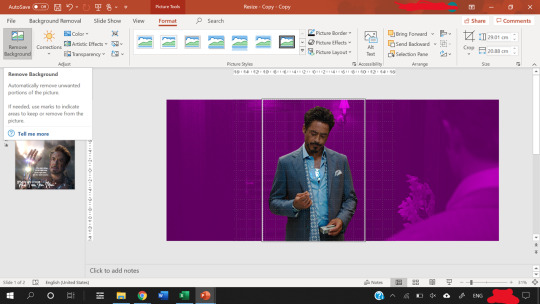
The Corrections option (see picture below, it’s the one with the sun icon) under the Format tab is great for quick adjustments to the brightness and contrast of a picture, and for saturation or grayscale adjustments you go to Color right next to it.
Artistic effects are useful to blur a picture, and if you want to adjust even further, you can go to Options at the very bottom of the pop-up which brings up a side panel for you to fine tune everything.
Notice that on the left of Corrections there is Remove Background. This is very useful as long as your picture has a clear background and foreground.

Shapes can also create a “template” for when you have more than ten images (which is the tumblr limit). You can put two images into one slide easily using the shape as a template so that the images are of the same size.
Gradients are nice to add some vibrance to your edits, and Powerpoint lets you adjust the angle of the gradients for variation.
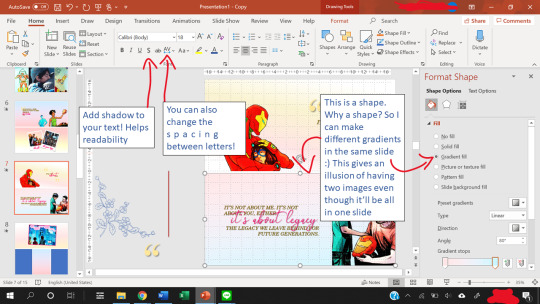
Other useful features include the text shadow effect and the spacing of letters.
To see how you can use shapes as templates, let’s look at some of my edits.
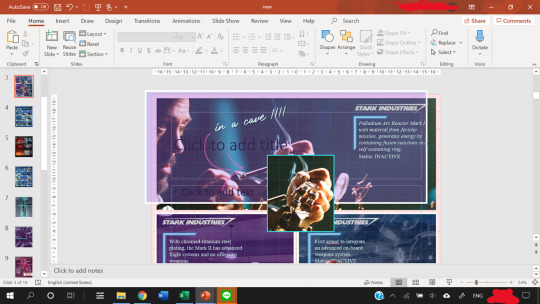
Anatomy of a Slide I
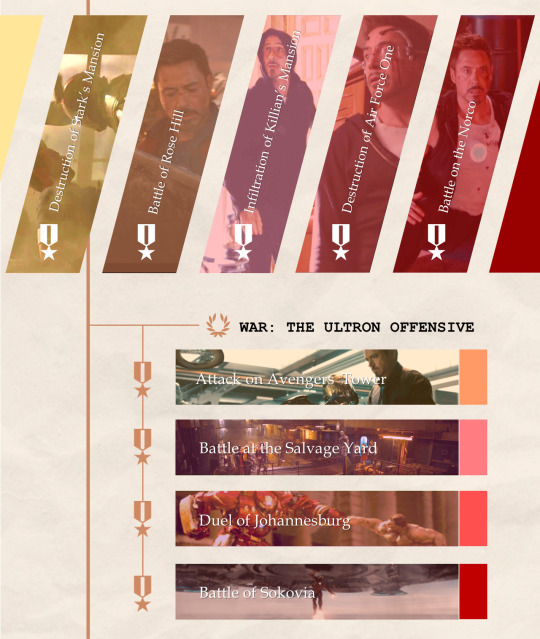
Let’s break this graphic edit down from my Tony Stark + Combat History edit. It has 12 parallelograms, 12 rectangles, 10 icons, 10 textboxes, 3 lines, and a texture background.
This is what the slide looks like as I put the first picture in.
In the end result, the slide consists of:
5 parallelograms filled with a picture.
2 parallelograms at the sides are just filled with color.
5 more parallelograms are arranged on top of the 5 earlier parallelograms, and filled with a color. The transparency of the shape is adjusted so that it creates a sort of color filter for the pictures.
4 of the rectangles are filled with a picture.
4 rectangles are put on top of them, filled with color, transparency adjusted to again create a color filter.
Then, the 4 smaller rectangles at the end of the large rectangles are just filled with color. They are there simply for aesthetics :)
The 10 icons are the medals and the wreath. To find icons in Powerpoint, you can go to Insert -> Icons. Icons is right next to Shapes for me. You can change the color and transparency of Icons too!
The three lines are just to make everything look a tiny bit more cohesive and linked.
The texture background is a paper texture. To find texture backgrounds, there’s this really amazing resource post!
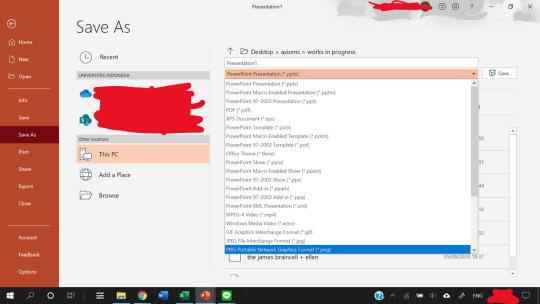
After the slide is done, you can save your slide as a PNG image (save as PNG and not as JPEG because JPEG is lossy and tumblr destroys it) by going to Save As -> PNG. You can choose to save one slide only or all the slides.
That’s it. You’re done making a graphic edit :)
Notice that one of the save options is save as a GIF. That does not work unless you have the newest version of Powerpoint. I don’t have it, so in order to create GIFs, we need to find a workaround, which I explain next.
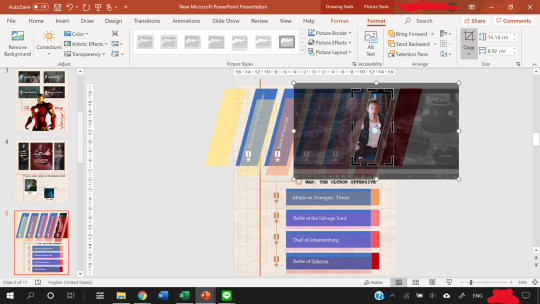
Anatomy of a Slide II

This GIF from my Tony + Ethics edit has 8 components/objects in it.
A black and white picture (a screenshot of Tony, cropped in Powerpoint and also turned black and white by adjusting the Color and Saturation in Powerpoint)
The color cutout of Tony.
Two lines (called Straight Connectors in the animation pane)
Four textboxes.
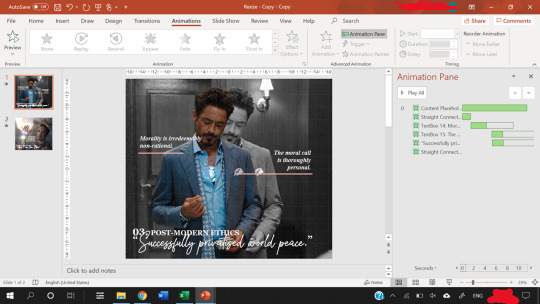
In order to make them appear one by one, animations are used. Here, all of them are animated using the Fade animation.
When you animate, make sure that the first object on the animation pane starts With Previous.
In the picture above, you can see that beside the first object in my Animation pane (the object called Content Placeholder) there’s a number 0. That means the animation starts With Previous.
Never set an animation to start On Click because then the animation won’t show up when you convert the Powerpoint to a video.
You can start an animation After Previous as long as the first animation is starts With Previous. Just never use On Click
To figure out what I mean by On Click, With Previous, and After Previous, you can check this link.
The objects with animations are the color cutout, the two lines, and three textboxes.
The color cutout is actually part of the original screenshot of Tony. I copied the screenshot, changed the saturation and brightness of it, and then removed the background using the Background Removal tool in Powerpoint.
For how to use the Background Removal tool, check this link.
Then, the color cutout is arranged to be in front of the black and white picture, and a Fade animation is put in place so that it looks as if only Tony is coming into color.
Similar animations are used for the textboxes and the straight lines. In order to animate by letter, follow this tutorial.
P.S. you can use emphasis animations to animate the color of a text.
Adjust the animation pane for the timing of the appearances, and present the slide to see if you’re satisfied with the final result.
The next step is how to convert the animated slide into an actual gif.
First, go again to Save As, but this time choose MPEG-4 Video (*.mp4).
Then, you extract each frame of the resulting video and then use photoshop to turn the frames into a GIF.
For a tutorial on how to make gifs in photoshop, check out this really amazing and blessed tutorial by @robertdowneys
Anatomy of a Slide III
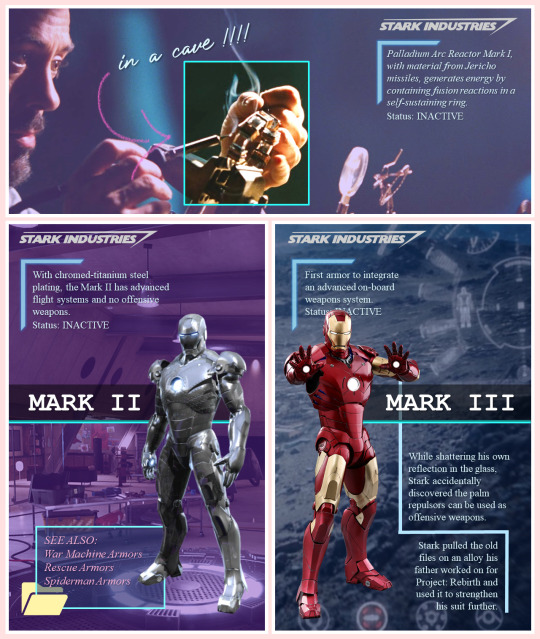
The top part of this slide has 8 components/objects to it:
3 rectangles
1 hooked shape
2 textboxes
The Stark Industries logo
The arrow
The hooked shape has a small glow effect added to the shape. Here’s a tutorial on shape effects. On that note, you can also make transparent text using various shape functions, and a tutorial for that is here.
The logo is a transparent logo downloaded from the internet, and the arrow is hand-drawn by me using the Draw tool in Powerpoint.
2 of the rectangles are filled in with the same picture and stacked on top of each other.
Then, the top rectangle is cropped to only Tony’s hand, and a border is added.
After that, another rectangle is arranged between the top and bottom rectangles. This third rectangle is filled in with a purplish color and transparency adjusted.
That creates a “highlight” effect for the part of the picture where Tony is working on the arc reactor. This same trick is what I used to make several parts of my ethics edits, like this GIF which I like.

Except, this time I make a circle shape first, fill that circle with the same image as the background, and adjust the size of the image to be the same as the background using the Crop tool on the circle.
Then, I make the background darker and the circle brighter using the Corrections tool. This increases the contrast between the two to create a highlighting effect.
Add a border to the circle, and add a Fade in animation.
Save the Powerpoint as a video, and turn video into GIF in photoshop.
Anatomy of a Slide IV - Inserting GIFs
Finally, you can put gifs into a slide! This GIF is from my Tony + his heart of gold edit. Make the GIF in photoshop, then just copy and paste the GIF into the slide like any other picture.
You can rotate, crop and adjust the size of a GIF in powerpoint.
You can’t make any other adjustments (e.g. you cannot change the brightness of a GIFor the color. If you try to do that, the GIF will freeze and become a still image.)
The GIF will not play unless you present the slide.
Don’t steal GIFs :) Again go back to that blessed tutorial on how to make your own GIFs, or ask permission from GIF creators.
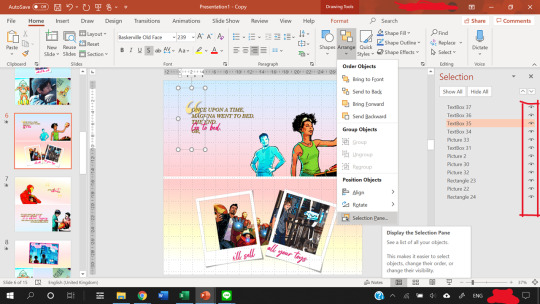
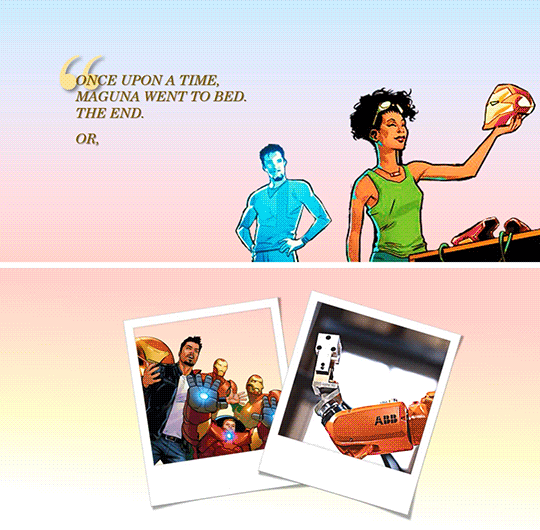
As you can see from the selection pane, this slide has 12 components.
The quotation mark is in a textbox of its own
3 textboxes with pink text (animated using a Fade in animation by letter), and 1 with the all caps text
2 polaroid frames arranged on top of a comic book panel (with background removed) and a GIF of Harley.
Plus, a comic book panel of Riri with background removed
Then there are two rectangles filled with a gradient color to serve as the “background” of the slide.
I made the bottom background rectangle a gradient that fades into white to make a more seamless transition to the next image.
You can see the GIF of Harley does not move in this view. However, when you present the slide, it will move. To check if you accidentally froze the GIF while editing, present the slide.
When you are satisfied with how the slide looks, again save it as an MPEG-4 Video (*.mp4). Then, you extract each frame of the resulting video and then use photoshop to turn the frames into a GIF.
That’s it!
Powerpoint has all those tools, and you shouldn’t be afraid to experiment :)
My foray into making edits was literally me, bored in class, with a presentation about data when I went... hey... that’d be nice if I put Tony’s face in it because isn’t everything better with Tony in it?
There’re even more useful features in Powerpoint but this tutorial’s gotten really long already, so I’ll leave it at that. Hope it helped!
You can send me another ask or message me if you’re confused :)
#asks#vormirjumper#resources#tutorials#i know you make beaufitul gifs but i included the gif tutorials in case achalk needs them!#this got WAY longer than expected#but i hope it's useful#forgive my ramblings#and i hope to see more of your edits because all that coloring!#and those captions of yours?? iconic
30 notes
·
View notes
Last Seen Blogs

f-lavie
How was Japan?

zaghetti
may.

33winme
Nhà cái 33WIN

rainbowradio-moved
you did the hokey pokey and it went like this

hustlinyoman
not an exo blog i swear