#i much prefer treadles to handles
Text
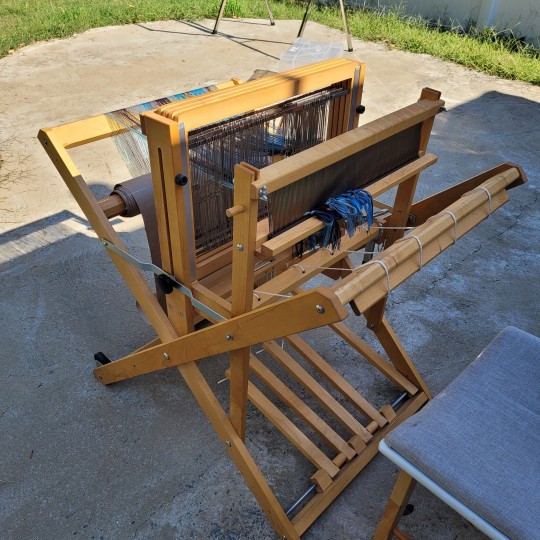
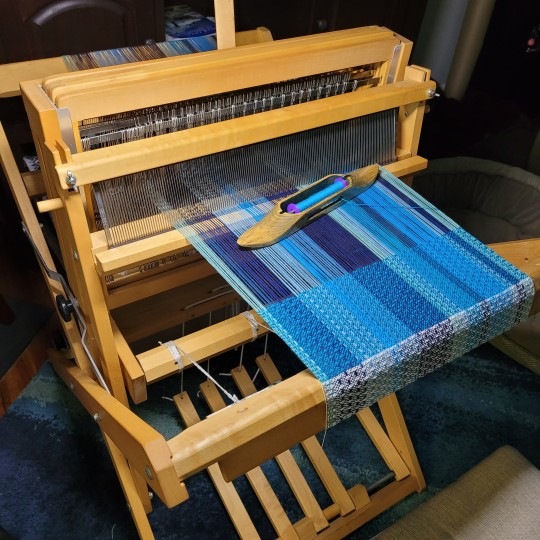
New loom new loom!!!! I got myself a lil Wolf Pup loom that I can more easily move for transport when I do craft fairs! It's so much fun to play with its so lil!!!
#i traded my table loom with a nice lady who also just moved to the area#im enjoying this loom more than the table loom for sure#i much prefer treadles to handles#weaving loom#fibercraft#weaving#handcraft#loom weaving#floor loom
279 notes
·
View notes
Text
Best Sewing Machine Reviews and Comparisons
If the machine makes it too heavy, you might find yourself paying some huge cash. Different equipment are also provided, including the buttonhole foot, monogramming foot, zipper foot, zigzag foot, blind stitch, button fitting foot, seam ripper and much more. A high quality heavy responsibility sewing machine must be in a position to provide several a whole bunch of stitches per minute (SPM) and a heavy duty sewing machine has extra SPM than the common family sewing machine. This mannequin has an LCD screen, so you can simply monitor which program you are at the moment utilizing while sewing. As a computerized sewing machine, it gives you customizable sewing pace with the maximum velocity of 850 stitches per minute, making it perfect for professional sewers who're pressed for time. There is also a numbered diagram and adjustable sewing button which enables you to easily thread and control speed based on your requirement. SINGER is among the oldest sewing machine maker having headquarter in La Vergne, Tennessee, United States.
Choosing an appropriate sewing machine for quilting might be tough even if you’re more advanced however in here you could find probably the most cost-effective products. The Brother CS6000i looks as if a fantastic sewing machine. The Brother SE400 is designed for embroidery. The Brother SE400 Combination Computerized Sewing and four x four Embroidery Machine With 67 Built-in Stitches, 70 Constructed-in Designs, 5 Lettering Fonts comes with a wealth of built-in embroidery designs, together with five different lettering fonts. I don't make it a habit to sew a number of layers of heavy material incessantly, however when the occasion calls for it, the Brother machine seems fairly able to handling it. Nowadays, the automated sewing machine has taken place of guide stitching machine. An everyday sewing machine can not handle heavy fabrics. At prime of B measure and permit 28" inches for the handle in a loop. Proceed to pin the strap in place. Whenever you arrive back at the highest of A, enable one other 28" inches for the opposing handle. Another vital characteristic that helps qualify these models as leather-based sewing machines is their capability to handle thick material.
Tooling means impressing a pattern into the leather. Thus, the person only has to decide on the required sample and the rest of the job is done by the machine itself. Lightweight and simple to use, this is the perfect machine for a newbie and the worth is just right! Therefore, it becomes essential that rookies take proper care whereas buying for a sewing machine, and select your suitable product on the premise of worth and features. It's full of 27 Stitches for numerous kinds of sewing wants. As talked about earlier there are a number of retailers who promote software program for stitching varied kinds of patterns. These kind of industrial sewing machines are typically used for advanced stitching and the place entry to the area is troublesome, reminiscent of manufacture of boots, work gloves and the like as well as affixing emblems to clothes or other objects. I'd prefer to take you through some of these sewing feet and what they will do.
Adding a bias binding or facing does take longer, however it can look so significantly better. If you'll be carrying it while hiking, for instance, you might want backpack model straps, which may affect the overall design you choose for your digital camera bag. Nation Brook Design | Polypropylene Webbing (1 Inch) (Black, 50 Yards)This is the exact polypropolene webbing I take advantage of to make the vests. Pfaff have a good system whereby you'll be able to choose to only purchase one design or a complete ebook. It is one of the vital handy sewing machines to have. Analysis the Varieties of Machines - There are different types of sewing machines out there today. The rationale of having opinions is that it helps you in sorting out features and specs of merchandise and their fashions. Please be happy to go to and join in. Hence my go to to your most fantastic site. It comes with an embroidery foot for free motion quilting and embroidery.
The Singer 9960 best sewing machine reviews Sewing Machine also comes with thirteen step-1 buttonholes. There are a lot of retailers online the place you can buy your sewing machine. With a worldwide fame for excellence and slicing-edge technology, the corporate is predicated in Sweden, where it has been offered sewing machines since 1872. With none doubt, this firm is a leader within the sewing machine business! This machine does have some limitations that might have an effect on extra superior sewers. Making a banner or flag generally is a fun undertaking for both adults and kids. To make it work, you want to be able to stretch your banner background tight in order that the surface becomes easier to paint. The Juki HZL-F600 has all the things you must work on robust fabric. The antique treadle machines often work great however you need to focus on learning to sew, not on working the treadle. No questions however I want to let you recognize that I might love to stitch up a quilt.
The Best Sewing Machine - How To Get Started Finding Your Perfect Machine
It seems there has been a revival in home sewing. Maybe for the reason that from the craft craze that's quite popular and possibly it is because there exists a greater interest in producing your own garments for reasons unknown. So we decided to obtain a new sewing machine. Where will we start? What is the best machine to purchase?
Singer 66 was the best machine that this world had seen in 1908. Those who have used this machine describe becoming a beautiful and stylish piece of furniture in addition to a highly functional one. This heavy duty machine is a straightforward and easy to make use of, which has a drop-in bobbin, adjustable presser foot pressure, and adjustable stitch measurements. When in proper condition, Singer 66 can sew delicate fabrics to denim. It will also handle any of your household sewing without difficulty.
One of the machines that's been getting some of the most useful user reviews on the web is the Brother PC-420. This machine costs about $390 (should you look around for that lowest price) and customers are actually passing on rave reviews. It has 294 built-in stitches this also packed with user-friendly features. Even though it is filled with features a lot of people still think you can easily use. People are also commenting that this machine is fast and quiet. With over 180 reviews online this machine received a really impressive average user rating of 4.7 stars. If you are looking to get a good machine it's hard to argue with that sort of customer opinions.
Singer - the singer grand continues to be operating in the business for the very long time and tastes their very best machine are the older black version. The Singer 16U288 and Singer 210B are specially designed for sewing heavy materials for example upholstery, canvas, and leather. There are lots of newest models from singer that could handle heavier projects. Singer as well as other brands in sewing instrument are creating top quality of machine because they know the requirement for top end sewing device across the world.
Professional sewing machines may offer more than 100 different stitch settings, while simple machines may have under 10 for newbies. Play around with all the settings and use using them on several types of fabric to determine what sort of finish changes in one instance to a different. It will also give you a pretty good possibility to master how each stitch setting looks on the number of different fabrics, which will help you polish you own sewing style.
0 notes
Text
Adjusting the Jacques Board Shear
by Bill Minter
Over the years, I have had an opportunity to test the cutting action of many board shears. While some are OK, others have a major problem. Not only are they difficult to use, they could be causing serious damage to the components. And in some cases, there is a possible danger to the user. In 2000, the Guild of Book Workers produced a video on maintaining the Jacques Board Shear. That video is still available through the Guild Library. (Note: Be sure to look under the year 2000 – Salt Lake City, Utah for the “Examination of the Jacques Board Shear”.) The following information will supplement that video.
As stated in the video, an immediate safety concern is a pin or bolt to prevent the counter-weight from dropping off. While the weight is known to have dropped a few times, fortunately, there have been no serious injuries. To prevent the weight from dropping, there should be the hole at the end of the counter-balance bar with a pin or bolt as a safety; if not, one should be added immediately. Another recent safety concern is the clearance under the clamp bar. This topic will be covered in a future article.
BACKGROUND
The Jacques Board Shear is available in two models: My preference is the “Iron-Top” that is described by Jacques as a “Bookbinders’ Shear.” Note that the cutting blade support of the Bookbinders’ Shear is a heavy, angular casting that is less prone to flexing during a cut. The second and very common model is the “Fine Paper Box Makers’ Shear” or the “Strawboard Shear” with a wooden top. In this model the upper blade is supported by a flat, rectangular casting that may flex during a cut.
In either model, the cutting blade should ideally move freely along the bed blade without pinching or binding. In fact the blade should ‘sing’ sweetly, smoothly and uniformly during the movement when not cutting any material. If everything is adjusted properly, a sheet of tissue paper or thin Japanese paper should cut cleanly. Occasionally, people may think that the blades need to be sharpened, but the upper blade may simply need an adjustment. Furthermore, one blade sharpening company has even suggested that the blades on our shears should only need to be sharpened every twenty years — see more information about sharpening at the end of this article.
Following is a diagram of the components for adjusting a Jacques Board Shear. Note that the cutting blade is supported on a Hub that pivots between the two Axle Bolts. These Axle Bolts push against one-another thus supporting the Hub. These bolts are adjusted to provide the proper clearance between the cutting blade and the fixed bed blade. Also note that these two axle bolts must be locked or secured by the adjacent Jam Nut, otherwise these bolts will loosen when the shear is used. Another nice feature in the Jacques design is the yoke that can be rotated or pivoted by two adjusting bolts, after loosening two other bolts. By adjusting these bolts, the cutting blade is made perfectly parallel to the fixed bed blade, even after decades of use.
Additional Notes before making any adjustments:
Note that the thickness of some blades may have been overly ground and that the blades may not be flat. In other words, the blades could be warped. Since the blades will never lay flat, this may create a problem with the adjustments. See the additional notes at the end of this article about sharpening.
Both the bed blade and the cutting blade should have been attached to a clean and uniform surface. All old shims should have been removed and the mounting surfaces should be clean of anything that could interfere with a uniform surface.
The pivot points of the Axle Bolts and the Hub should be cleaned and lubricated with heavy-duty grease, such as automotive wheel bearing grease.
Special tools are needed: Two large adjustable wrenches are needed for the Axle Bolt and Jam Nut, one of which must be capable of fitting the large jam nut that is 1-7/16″; other smaller wrenches will also be needed.
Adjustment of the Cutting Blade — Patience is required:
1) Before making any adjustments, lower the cutting blade SLOWLY AND CAREFULLY and observe the contact point of the two blades. Ideally, the cutting blade should lightly contact the bed blade during the entire cutting motion — there should be no need to pull on the cutting blade handle. Note that the bed blade has a slight inward grind, thus there will be clearance between the blades after the upper cutting blade has passed the cutting point. If the cutting blade pinches at any point, or if there is excessive clearance in an area, an adjustment should be made.
A.1) Blades pinching in one area: If the upper blade is pinching, then the axle bolts need to be adjusted. First loosen the jam nut for bolt A and then loosen A a small amount, perhaps about 15 degrees (less than 1/16th of a full rotation) —note: a tiny adjustment may have a huge affect on the alignment of the blade, so one must be very patient. After adjusting, re-secure the jam nut. Then loosen jam nut B, and adjust bolt B, though not too tight. While holding B in place, re-secure the jam nut. Slowly lower the cutting blade for a test. Adjust more as needed.
A.2) Excessive clearance all-along: If there is excessive clearance or if the blade is not making contact, then the axle bolts may need to be adjusted. First loosen the jam nut for bolt B and then loosen B a small amount, perhaps about 15 degrees (less than 1/16th of a full rotation). —note: a tiny adjustment may have a huge affect on the alignment of the blade, so one must be patient. After adjusting, re-secure the jam nut. Then loosen jam nut A, and adjust bolt A, though not too tight. While holding A in place, re-secure the jam nut. Slowly lower the cutting blade for a test. Adjust as needed.
A.3) Other: If the blade is making light contact in the middle of the length of the blade, but not at the ends, the upper blade is probably already parallel to the bed blade. In this case, the blade may need to be shimmed at the ends — see # 3 below.
B) Cutting at one end: If the upper blade is contacting the bed blade at only one end, it may be necessary to adjust the yoke — see step 2. The upper blade must first be parallel to the bed blade before making the final adjustments.
2) Adjusting the Yoke: Note that the Yoke is secured by two bolts (2b) under the Hub. If you need to adjust the yoke, loosen these bolts slightly. Then loosen one of the bolts at 2c and then tighten the other (both bolts should be snug afterwards) — this will rotate the yoke. Note that small adjustments can make a huge change, so be patient. After adjusting, re-tighten the bolts 2b. Lower the blade slowly and carefully to test the cutting. Readjust as needed until the upper blade is perfectly parallel to the bed blade. Then adjust the clearance following section A.2.
3) Shimming the Cutting Blade: Thin sheets of Mylar (polyester film), such as 2, 3 or 4-mil, seem to be the best material for shimming. The pieces of film should be cut to fit between the bolts that secure the cutting blade to the support handle; the pieces should also be long enough to reach the top of the blade and also extend beyond the bottom. The pieces of film can be folded/creased so that they will stay in place when the bolts are loose. With the shims long enough during the adjusting process, a record can be made of what has been inserted and where; these extensions will be trimmed off when the adjustments are complete. Add shims as needed and tighten the bolts securely before each test. Add (or remove) shims as needed for a perfect cut, and then trim off the excess shims.
Continue adjusting until the cutting blade sings and will cut a thin piece of paper easily. Be patient, as it will take time for a proper adjustment.
* Sharpening the Blades — The blades should be ground to the same angle as the original. In some cases, the grinder may want to remove stock from both the height and the width (thickness) of the blade. If the blades are in good condition, there should be little or no stock removal from the width/thickness of the blade to insure a solid, stable blade. Excessive grinding of the thickness will make the blade too thin and then difficult to adjust. Therefore, most sharpening should be done by only removing metal, for example from the top, from the height of the blade. In other words, for the bed blade, the sharpening would be to take a little off the top. If the blades are too thin from over-grinding, they will not lay flat and could pose a problem.
— Note that both blades are composed of two different hardnesses of metal: The main portion of the blade is a standard steel, but the actual cutting edges are a much harder metal that has been inlaid. Scratching the side and the top of the blade with a needle can show this hardness.
— Also note that most upper cutting blades are flat and wider along the bottom edge, thus providing extra strength for cutting binder board. Some other shear blades may have been sharpened like a guillotine blade with a point. Since the angle is acute, this style of blade is better suited for cutting only paper.
One final note: It would be a good idea to schedule an annual test of all bolts to be sure they are snug and tight. This is especially true for the foot-treadle bolts, as they seem to loosen first. ALSO, be sure that the bolts for the counter-weight are still tight.
The board shear is an important and essential tool in our bindery. It is the focal-point. It should always be in good condition for safe operation. Good Luck.
If there is a need for any further clarification, please let us know.
Sincere Thanks to Richard Baker for his assistance.
0 notes
Text
During the year 1817 – Baron Karl Drais Von Sauerbronn patented what we know know as “The Bicycle”. He named it the “DRAISINE”.
The Draisine (or Draisienne) had two wheels and a wooden frame with a rotating handlebar attached, which permitted the front wheel to be turned.
Unlike todays bicycles, the Draisine was powered by pushing with your feet along the ground. Much like the wooden balance bikes used by aspiring cyclists under the age of 5.
Back then bicycled were known by many names; Hobby Horse or Dandy Horse. Pedals came about in 1839 when Kirkpatric Macmillan invented the “Velocipede” – otherwise known as a Foot Treadle.
As time went on, a small invention became something massive, taking the world by storm. Very few children today have ever ridden a bicycle, or know someone that has. One things for certain – We’ve all seen one.
Today there are many varieties of bikes to choose from including; Road bikes, Cyclocross, touring, triathlon, Flat bar road, track, fixed gear, Mountain, Hybrid, Performance hybrid, Cruiser, flat foot cruiser, City, BMX, Folding, recumbent, Tanden, adult tricycles, hard tail, soft tail and the list goes on.
Making a decision on best suits your style and needs can be as confusing as trying to find a running shoe for every day use. I’ve tried and its not easy. For example, a hybrid won’t handle down hill terrain tracks with jumps, and a mountain bike wouldn’t be much use on the road in speed events. What a marketing dream this is !!!
I remember when BMX first came out. Finally a bike you ride off the kerb, over rocks and gravel without fearing the tyre coming off the rim. You could even do tricks like wheelies on them. I thought I was so cool, until BMX stunt riding took off. Like “Break Dancing” I quickly realised how untalented I actually was. My 2 second wheelie couldn’t match the skills of those guys/girls.
Before we knew it, Bikes had 3 speed’s, then 10 speed’s then 12 and 14 and 18 speeds, all make possible by a complex wheel of gears perched on the rear wheel, and usually 3 on the front cog. So with a push of a lever or twist of a handle it was now easier to go up hills. No longer would you see a cue of school boys/girls pushing their bikes to the top of the hill just so they could ride down it again.
bicycle gears mechanism on the rear wheel
It’s best to find a style you enjoy and stick to it, or buy several bikes, one for each discipline. This isn’t a cheap exercise mind you. Especially with some bikes costing upwards of a thousand dollars (at least).
I’ve had my fair share of bikes. I remember a Scott Triathlon Bike I had for a year. I sold it when I discovered I wasn’t getting much use out of it, so bought a mountain bike, more suited to what I was doing at the time. I’d have kept both but aero bars and a smaller front wheel wasn’t an everyday cycling type setup.
With mountain bikes, theres also many options, features and accessories. The main decision you’ll find is whether to choose a “Hard tail” or a “Soft tail” bike. A hard tail has rear suspension to absorb the momentum when traversing undulating terrain or coming off jumps, and a hard tail is a great cross country bike when you need torque to the back wheel while peddling. An in between bike is a hard tail soft front bike. A bike that has suspension on the front and not on the back. This feature absorbs impacts through the handlebars but nothing through the rear, allowing for easier hill climbs and flat surface riding. confused ?? But wait, theres more. You also have an option on some bikes to lock the front suspension. This makes flat surface riding easier as you don’t have the front ducking and bobbing up and down when your trying to pedal while standing up off the seat.
Oh and bikes nowadays have hydraulic disc brakes, not the little rubber pads operated by a lever and cable causing friction against the rim. The good old days had many many a rider going through a puddle and unable to stop as the rubber brakes were wet. Fun time I tell you.
Just when you thought mountain bikes couldn’t get any better the 29’er came along and the way we rolled over obstacles became easier. The 29’er because the wheels are a larger diameter. Usually mountain bikes have a wheel size of either 26″ or 27.5″ (also known as the 650B). the 29’er is arguably better amongst many cyclists as it’s perceived that it has increased ability to handle obstacles (as the height of the bottom bracket is raised) and larger wheels roll over terrain more efficiently. I’ve had both 26″ and 29″ and I think the 29’er rolls better into and out of obstacles, and the increased sized wheels change the gear ratio’s slightly. I guess its personal preference though.
Heres a comparison between a 29’er and a 26″ bikes wheel.
Things have gone a little further now with “Fat Bikes” becoming the trend. Extremely easy to ride on loose surfaces such as sand, mud or gravel, these massive wheels and tyres give the rider the confidence to tackle almost anything. I’d kill myself on one I reckon.
There is a new kid on the block though. Battery powered bikes have revolutionised the way we enjoy the trails. Faster, more enjoyable (for the lazier of us), and becoming more affordable is the bike that has a battery and motor. It’s still small enough not be known as a motorcycle, but the technology is the same as battery powered motorcycles, just on a smaller scale. Again, there are a variety of types. The extreme battery motorised mountain bike;
Or the commuter bike (seen cruising around your local neighbourhood delivering mail).
How can we stand in the way of technology ? People may ask “Yeah but at what cost”?? We’re becoming a society of convenience, and an an electric commuter bike costs very little to charge, takes next to no effort to ride, and because its a bike, you can ride it to the office and keep it in a store room. With benefits of no fuel costs, registration, car parking fee’s, Tolls, traffic or road raging drivers….. No wonder they’re becoming popular for people living close to work.
Maybe its just be me ?! but I actually enjoy a little exertion, the exercise I’m getting when I’m riding. I reach my destination, and think to myself “I’ve actually achieved something”. It makes me feel good to know I can pedal my bike up a hill, and each time I do it, it becomes easier. Yes, I’ve been told on occasion that I over think things !! ha haFor the Hipster type parents. Those parents that enjoy riding, the outdoors and pedal power, there’s an alternative to the old fashioned kids seat perched on the rear cargo carrier of the old type parents bike.
Now theres a bike that looks like a pedal powered wheel barrow. It has a large cargo area between the peddler and the front wheel. Here you can fill it with blankets, pillows and yes, your children.
Alternatively, you can purchase a bike trailer that looks like a tent on wheels, inside your children sit patiently while being dragged through traffic or along the bike paths. I always wonder though, what happens to the loose stones that are usually thrown out from the rear wheel, or the rooster tail of water that we’ve all had soak the rear of our trousers, making them look like you’ve followed through while expelling flatulence.
The rear, side mounted briefcase or carry bag has given way to an office deliver bike. This bike has a sealed container of which documents of the highest importance are kept safe between city blocks.
The Bicycle courier wouldn’t have a job had it not been for the invention of, the bicycle. Neither would the newly created roles of Deliveroo (Pizza and fast food delivery) where college student make extra money delivery food to those too time poor to go get it themselves.
ET wouldn’t have been able to sit in a basket of a bicycle with his finger glowing saying “ET Phone home”, had it not been for a Frenchman in 1869.
So, some of life’s greatest experiences have happened (or been made easier) because of the humble Bicycle. Grazed knees/elbows/faces, gravel rash, runnings with branches, gates and electric fences, having your favourite pair of white trousers eaten by the chain, fingers caught in spokes and “Doubling accidents gone wrong” wouldn’t have been part of the “Highlight Reel” had it not been for bicycles. New and improved bicycles have changed the face of cycling as have the different varieties of cycles but one thing remains a constant. It’ll never change (well not in foreseeable future anyway), and that is the required skill everyone must have. Balance. Without this simple yet easily disrupted skill, the art of riding would be impossible.
Learning to ride a bicycle is a right of passage. A simple transition from infant to childhood. A test for parents to see how they’re going, whether they’re children will listen to them, trust them, and of course be comforted by them. It’s a child’s first real test, it gives them experience in failure (everyone falls off when learning), it teaches them to persist, and ultimately succeed, with practice and determination. Ask yourself one thing. Without the bicycle, what could replace this valuable experience in a child life ?? xBox or Playstation ??!!
And this has been my blog on Bicycles.
Bicycles – A revolution During the year 1817 - Baron Karl Drais Von Sauerbronn patented what we know know as "The Bicycle".
0 notes
Text
Adjusting the Jacques Board Shear
by Bill Minter
Over the years, I have had an opportunity to test the cutting action of many board shears. While some are OK, others have a major problem. Not only are they difficult to use, they could be causing serious damage to the components. And in some cases, there is a possible danger to the user. In 2000, the Guild of Book Workers produced a video on maintaining the Jacques Board Shear. That video is still available through the Guild Library. (Note: Be sure to look under the year 2000 – Salt Lake City, Utah for the “Examination of the Jacques Board Shear”.) The following information will supplement that video.
As stated in the video, an immediate safety concern is a pin or bolt to prevent the counter-weight from dropping off. While the weight is known to have dropped a few times, fortunately, there have been no serious injuries. To prevent the weight from dropping, there should be the hole at the end of the counter-balance bar with a pin or bolt as a safety; if not, one should be added immediately. Another recent safety concern is the clearance under the clamp bar. This topic will be covered in a future article.
BACKGROUND
The Jacques Board Shear is available in two models: My preference is the “Iron-Top” that is described by Jacques as a “Bookbinders’ Shear.” Note that the cutting blade support of the Bookbinders’ Shear is a heavy, angular casting that is less prone to flexing during a cut. The second and very common model is the “Fine Paper Box Makers’ Shear” or the “Strawboard Shear” with a wooden top. In this model the upper blade is supported by a flat, rectangular casting that may flex during a cut.
In either model, the cutting blade should ideally move freely along the bed blade without pinching or binding. In fact the blade should ‘sing’ sweetly, smoothly and uniformly during the movement when not cutting any material. If everything is adjusted properly, a sheet of tissue paper or thin Japanese paper should cut cleanly. Occasionally, people may think that the blades need to be sharpened, but the upper blade may simply need an adjustment. Furthermore, one blade sharpening company has even suggested that the blades on our shears should only need to be sharpened every twenty years — see more information about sharpening at the end of this article.
Following is a diagram of the components for adjusting a Jacques Board Shear. Note that the cutting blade is supported on a Hub that pivots between the two Axle Bolts. These Axle Bolts push against one-another thus supporting the Hub. These bolts are adjusted to provide the proper clearance between the cutting blade and the fixed bed blade. Also note that these two axle bolts must be locked or secured by the adjacent Jam Nut, otherwise these bolts will loosen when the shear is used. Another nice feature in the Jacques design is the yoke that can be rotated or pivoted by two adjusting bolts, after loosening two other bolts. By adjusting these bolts, the cutting blade is made perfectly parallel to the fixed bed blade, even after decades of use.
Additional Notes before making any adjustments:
Note that the thickness of some blades may have been overly ground and that the blades may not be flat. In other words, the blades could be warped. Since the blades will never lay flat, this may create a problem with the adjustments. See the additional notes at the end of this article about sharpening.
Both the bed blade and the cutting blade should have been attached to a clean and uniform surface. All old shims should have been removed and the mounting surfaces should be clean of anything that could interfere with a uniform surface.
The pivot points of the Axle Bolts and the Hub should be cleaned and lubricated with heavy-duty grease, such as automotive wheel bearing grease.
Special tools are needed: Two large adjustable wrenches are needed for the Axle Bolt and Jam Nut, one of which must be capable of fitting the large jam nut that is 1-7/16″; other smaller wrenches will also be needed.
Adjustment of the Cutting Blade — Patience is required:
1) Before making any adjustments, lower the cutting blade SLOWLY AND CAREFULLY and observe the contact point of the two blades. Ideally, the cutting blade should lightly contact the bed blade during the entire cutting motion — there should be no need to pull on the cutting blade handle. Note that the bed blade has a slight inward grind, thus there will be clearance between the blades after the upper cutting blade has passed the cutting point. If the cutting blade pinches at any point, or if there is excessive clearance in an area, an adjustment should be made.
A.1) Blades pinching in one area: If the upper blade is pinching, then the axle bolts need to be adjusted. First loosen the jam nut for bolt A and then loosen A a small amount, perhaps about 15 degrees (less than 1/16th of a full rotation) —note: a tiny adjustment may have a huge affect on the alignment of the blade, so one must be very patient. After adjusting, re-secure the jam nut. Then loosen jam nut B, and adjust bolt B, though not too tight. While holding B in place, re-secure the jam nut. Slowly lower the cutting blade for a test. Adjust more as needed.
A.2) Excessive clearance all-along: If there is excessive clearance or if the blade is not making contact, then the axle bolts may need to be adjusted. First loosen the jam nut for bolt B and then loosen B a small amount, perhaps about 15 degrees (less than 1/16th of a full rotation). —note: a tiny adjustment may have a huge affect on the alignment of the blade, so one must be patient. After adjusting, re-secure the jam nut. Then loosen jam nut A, and adjust bolt A, though not too tight. While holding A in place, re-secure the jam nut. Slowly lower the cutting blade for a test. Adjust as needed.
A.3) Other: If the blade is making light contact in the middle of the length of the blade, but not at the ends, the upper blade is probably already parallel to the bed blade. In this case, the blade may need to be shimmed at the ends — see # 3 below.
B) Cutting at one end: If the upper blade is contacting the bed blade at only one end, it may be necessary to adjust the yoke — see step 2. The upper blade must first be parallel to the bed blade before making the final adjustments.
2) Adjusting the Yoke: Note that the Yoke is secured by two bolts (2b) under the Hub. If you need to adjust the yoke, loosen these bolts slightly. Then loosen one of the bolts at 2c and then tighten the other (both bolts should be snug afterwards) — this will rotate the yoke. Note that small adjustments can make a huge change, so be patient. After adjusting, re-tighten the bolts 2b. Lower the blade slowly and carefully to test the cutting. Readjust as needed until the upper blade is perfectly parallel to the bed blade. Then adjust the clearance following section A.2.
3) Shimming the Cutting Blade: Thin sheets of Mylar (polyester film), such as 2, 3 or 4-mil, seem to be the best material for shimming. The pieces of film should be cut to fit between the bolts that secure the cutting blade to the support handle; the pieces should also be long enough to reach the top of the blade and also extend beyond the bottom. The pieces of film can be folded/creased so that they will stay in place when the bolts are loose. With the shims long enough during the adjusting process, a record can be made of what has been inserted and where; these extensions will be trimmed off when the adjustments are complete. Add shims as needed and tighten the bolts securely before each test. Add (or remove) shims as needed for a perfect cut, and then trim off the excess shims.
Continue adjusting until the cutting blade sings and will cut a thin piece of paper easily. Be patient, as it will take time for a proper adjustment.
* Sharpening the Blades — The blades should be ground to the same angle as the original. In some cases, the grinder may want to remove stock from both the height and the width (thickness) of the blade. If the blades are in good condition, there should be little or no stock removal from the width/thickness of the blade to insure a solid, stable blade. Excessive grinding of the thickness will make the blade too thin and then difficult to adjust. Therefore, most sharpening should be done by only removing metal, for example from the top, from the height of the blade. In other words, for the bed blade, the sharpening would be to take a little off the top. If the blades are too thin from over-grinding, they will not lay flat and could pose a problem.
— Note that both blades are composed of two different hardnesses of metal: The main portion of the blade is a standard steel, but the actual cutting edges are a much harder metal that has been inlaid. Scratching the side and the top of the blade with a needle can show this hardness.
— Also note that most upper cutting blades are flat and wider along the bottom edge, thus providing extra strength for cutting binder board. Some other shear blades may have been sharpened like a guillotine blade with a point. Since the angle is acute, this style of blade is better suited for cutting only paper.
One final note: It would be a good idea to schedule an annual test of all bolts to be sure they are snug and tight. This is especially true for the foot-treadle bolts, as they seem to loosen first. ALSO, be sure that the bolts for the counter-weight are still tight.
The board shear is an important and essential tool in our bindery. It is the focal-point. It should always be in good condition for safe operation. Good Luck.
If there is a need for any further clarification, please let us know.
Sincere Thanks to Richard Baker for his assistance.
0 notes
Last Seen Blogs

eemodgy
emodgy

tuiccim
This way...

alexchavot
Ad Libitum —

fernandofanado-blog
Fernando Fanado
fernandofanado-blog
Fernando Fanado