#i need wheat flour to add to my bread to give it a nutty and warm flavor
Text
Haters want to know why I have so many types of the same grain in my pantry. To which I say, mind your business
#i need wheat flour to add to my bread to give it a nutty and warm flavor#and bread flour to make pizza dough#also medium grain long grain brown wild and arborio rice are all a must!!!!#you wish you had my grain game#food#tw food
3 notes
·
View notes
Link
Nutty Whole Wheat Bread.
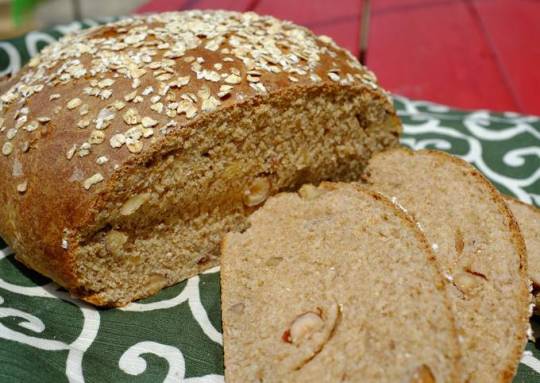
Hello everybody, it is Jim, welcome to our recipe site. Today, I'm gonna show you how to prepare a distinctive dish, nutty whole wheat bread. One of my favorites. For mine, I will make it a bit tasty. This is gonna smell and look delicious.
Nutty Whole Wheat Bread is one of the most well liked of recent trending meals in the world. It is appreciated by millions every day. It is simple, it is quick, it tastes yummy. Nutty Whole Wheat Bread is something that I have loved my whole life. They're fine and they look wonderful.
To get started with this particular recipe, we must prepare a few ingredients. You can cook nutty whole wheat bread using 11 ingredients and 17 steps. Here is how you can achieve it.
The ingredients needed to make Nutty Whole Wheat Bread:
{Make ready 125 ml of Warm water (1/2 US cup).
{Prepare 125 ml of Warm milk (1/2 US cup).
{Make ready 50 ml of Olive oil or melted butter (about 3 Tbsp).
{Make ready 7 g of active dry yeast (2 tsp).
{Take 10 g of brown sugar or honey (2 tsp).
{Take 300 g of Whole wheat flour (2 heaping cups).
{Prepare 200 g of All-purpose flour (1 2/3 cups).
{Make ready 10 g of Salt (2 tsp).
{Get 1/2 cup of Chopped nuts (walnuts, hazelnuts are nice).
{Get 1 of beaten egg for brushing top (not necessary but gives bread extra color).
{Get of Optional toppings: rolled oats, sesame seeds, etc..
Instructions to make Nutty Whole Wheat Bread:
If not chopped already, chop up your nuts into smaller pieces. Walnuts are nice, or use a mix of your favorites :).
In a small pot, mix milk, water and olive oil/butter. Heat until warm (but not hot!) on low heat. Take of heat and mix in honey/sugar and yeast until dissolved. Warm water is important to activate the yeast so don't use cold!.
Let the liquid sit for 5-10 minutes. You should get little bubbles or foam from the yeast starting to be active..
In a large mixing bowl, mix together wheat flour and regular flour..
Pour in the liquid mixture, then add the salt last. Start mixing and folding with a spatula to bring the dough together..
You want the dough to be moist but not sticky. If the dough is too dry or powdery, add add just a little more milk or water (try a Tablespoon or two at a time). Once the dough comes together, it's ready to knead!.
Dust your kneading surface with plenty of flour and place the ball of dough onto it. Also, dust your hands with plenty of flour to prevent the dough from sticking..
First, flatten out the dough a little bit and gently press in the nuts..
To knead, fold in the outer edges of the dough toward the center and press down with the palm of your hand each time. Repeat....
Keep folding over and pressing, while rotating the dough around so you can form a big ball..
Knead this way for 10 minutes or so until the dough is fairly smooth..
Once finished, you'll have a ball of dough which should be smooth on top and have creases from folding on the bottom..
Grease the mixing bowl with just a little oil and put in the ball of dough, crease-side down. Brush the top with a little oil too to help prevent drying..
Cover with wrap and set in a warm spot or warm oven for about 1 hour - 1.5 hours. The dough should rise to about double..
Squish out the air and shape into the shape you want (e.g. a round or oval loaf). Place on the baking sheet..
Beat an egg with a Tablespoon of water and brush top of dough with it. If adding toppings like rolled oats, sesame seeds, etc., sprinkle on desired amount. The egg will give the bread a nice brown color and hold on any toppings while baking but isn't necessary..
Let dough rise for another 30 minutes. Preheat oven to 375°F/190°C. Bake for 30-40 minutes (mine only took 30 minutes). Let cool on a rack for a few minutes before digging in!.
So that is going to wrap it up with this special food nutty whole wheat bread recipe. Thanks so much for your time. I am confident that you will make this at home. There's gonna be more interesting food in home recipes coming up. Don't forget to bookmark this page on your browser, and share it to your family, colleague and friends. Thank you for reading. Go on get cooking!
0 notes
Text
Milling Your Own Grain For Residence Baked Bread
I was talking to my neighbor last springtime when he informed me that he was expanding hard, solid, bread wheat under agreement for a significant bakeshop firm. I was able to view it grow over the following months and also was pleased to see it do so well as well as ripen well throughout the late summertime.
I headed out to enjoy it being collected, as well as was once again talking to my pleasant farmer, when he asked me," Was I was aware of a mill ideal to produce bread flour for their farm website coffee shop utilizing their own grain"?
I agreed to check out it for him and said I would not mind trying my self, proceed aid your self to some grain from the trailer in the area he claimed, so up I climbed up and collected a sack of grain to attempt grating some myself.
Canadian Bread Flour
When I obtained residence all set plaything to begin the job, I distributed concerning 1.5 lb of grain right into a screen, then I continued to cleanse the seed and eliminate as many of the small weed seeds as I might by trembling and touching the screen to permit the seed to function their way to the base of the filter as well as fall out. There were additionally several grains with husks still attached due to a little percent of grains not being whipped enough in the old faithful incorporate harvester to get rid of all the persistent husks.
When I was satisfied that the grain was clean adequate as well as devoid of weed seeds, I positioned a few ounces into the coffee grinder, which was on the wall and also continued to mill the flour in the mill.
I need to make it clear that this is a mill has a hand operated turning mill, which squashes the coffee beans and grinds them to the desired fineness by means of a modification screw to manage the clearance in between the rotating strong grinding shaft and also the wall surface of the mill.
So, I was able to create a pretty fine wholemeal flour making use of the coffee grinder, please note it was not one of the rotating blade kind of mills for spices and so on, yet a correct milling action.
This machine was made by Spong and also is bolted to the wall in our utility room, and I was able to mill 1.5 pound in concerning 7 minutes of constant grinding, which was not too much of a work as long as you had a reasonably strong arm.
yeast For Baking
When I baked the bread I discovered that the moisture level in the fresh grain meant that I had to lower the amount of warm water contributed to the dough mix to end up with a loaf, which climbed to the required degree of domed top in the cooking tin, a littl3 trial and error was OK because although they were not all ideal to consider the were scrumptious to eat, with a very nutty flavour
I eventually took place the internet to Scotts of Stow, that had a hand mill with a comparable action as the coffee mill however with even more capacity as well as a longer take care of which provided a better control of the grading of the flour. I had actually taken a look at some extremely swank ones on the net however made a decision for the trial the Scott's one would fit the bill.
If you called for a less "wholemeal" loaf you could pass the completed flour with a filter to get rid of as much of the fibre part as you desired, and also to end up with a white flour with it all eliminated.
I use a pretty common dish for the bread as supplied with my bread Panasonic Bread manufacturer, which I have actually had for over ten years utilizing purchased flour from the supermarkets I have actually tried all sorts of bread mixes and also flours primarily the organic wholemeal, but I have actually checked out that there is absolutely nothing like freshly grated flour baked quickly, I does seem to have a really nutty flavour yet I may be biased by my own satisfaction in my residence baked loaves, evidently the natural oils in the grain evaporate a particular amount after milling and also throughout storage, so fresh milled has a USB well worth the initiative.
One thing I nearly constantly do is to add a number of tablespoonfuls of mixed seeds such as sunflower, sesame, pumpkin, poppy seed and also a few ache nuts for added passion and also structure, occasionally I include some linseed or hemp seed for an additional bite and problem, which all amounts to an extremely healthy alternative with all the nutrients you require for a healthy and balanced and also delicious slice of salute.
I have lately in the last week approximately began to cook some pitta Bread which is very quick and also really rewarding and although I ate them for lunch on the day they were baked I did not obtain any poor digestive results due to the quality of the bread, I usually have actually left bread over evening to consume following day to avoid any episodes triggered by very fresh baked bread, but this fresh machine made fresh baked pitta bread was superb; and ready in no time at all in all it is baked in 8/9 minutes, which is terrific if you are right out of bread.
So if you get the chance try; bread wheat is readily available by mail order from numerous areas with a big choice of grains to select from.
My history and also credentials for giving this Info are: In 2002, after taking early retirement with virtually twenty years as advertising and marketing exec with the Miele UK Carbon monoxide Ltd based in Oxfordshire.
During that time I was the Location Manager for South Wales, the West Midlands and also the West Country from Cornwall, to Bournemouth, as well as much as Staffordshire, as well as across to Tenby in West Wales, actually the whole of the South West, West Midlands, and also South Wales quarter of the UK.
I have actually aided lots of people set up an entire variety of ware washing as well as cleaning tasks, including, Nursing Homes, Hospitals, Hotels, and also Industrial circumstances such as the laundry for Fire Service Uniforms, for Bristol Uniforms UK.
During all those years participating in Hotel Olympia, Friendliness, as well as many local food catering events I have gained a great deal of experience in cooking as well as picking food and tools to provide great wholesome dishes, I will certainly stay clear of words "food" yet you know what I suggest.
0 notes
Text
Gradz - puts the Artizan in Artizan Bread
One of the things I really love as a food writer is the opportunity I have to try new things. Its a perk that I never get tired of. I was recently contacted and asked if I would like to try out some bread from GRADZ Bakery, finely crafted artisanal breads, crafted in London by Master Bakers.
Master bakers Agnes Gabriel and Romuald Damaz have always been passionate about making healthy, delicious bread. When they discovered a treasure of family recipes hand-written by Agnes’s Great Grandfather, they were inspired to establish the GRADZ (Gabriel Romuald Agnes DamaZ) bakery and share their tradition of continental-style baking with Britain.
By adding their knowledge, skill and expertise, the GRADZ master bakers have developed traditional bread with today’s tastes and health benefits.
Their wish is for you to enjoy their family heritage of continental-style baking when you take time to savour their authentic bakery products.
I love bread so they didn't have to ask me twice. I love bread and I was really keen to try these breads.
A week or so later a large box filled with all sorts of fabulous breads came to our door. I wish there was such a thing as Smellivision because you can't imagine how very good it all smelled when I opened the box! They had sent me one of each of their loaves. I was in bread heaven!
This bakery specialises in Artisanal Sour Dough breads, Wheat and Rye breads as well as a Gluten Free range of breads.
I had tried Gluten Free breads in the past. There was a time early last year when I thought I might have to go gluten free and I have to say at the outset, gluten free bread does not excite me. The ones I bought at the shop were lacklustre and left a really odd texture/feeling in my mouth that I did not enjoy in the least.
These were the first breads I tried. On the left, Gluten Free Sour Dough White, and on the right, Gluten Free Sour Dough Dark Bread with Seeds.
They each had a very nice texture and appearance, both with a nice chewy crust. Here is what I thought.
GF Sour Dough White - crusty, nice flavour somewhat of a gummy texture in the mouth, but not unpleasant.
GF Sour Dough Dark with Seeds- crusty, nice flavour, seeded, not as much of a gummy texture. I I could happily eat this and enjoy!
GF Dark with Sunflower Seeds - This was my favourite of the GF breads. It had a beautiful texture and flavour, with lots of lovely sunflower seeds. I loved the taste.
Overall I was quite impressed with their Gluten Free Range of Breads. I could quite happily enjoy these if I had a problem with wheat. I highly recommend.
Recipe # 12 Sour Dough Chia Seed Bread.
A flavoursome white sourdough bread with a dark crust and a generous peppering of chia seeds throughout the loaf. The natural sourdough bread is easier on your digestive system and gut than other loaves, and the chia seeds add extra benefits because they are rich in fibre, omega-3 fats, protein, vitamins and minerals and so can be a powerhouse for your body. This loaf has very quickly established itself in our range as a firm favourite.
Recipe #21 Sour Dough Chia Seed - chewy with nice flavour and texture. Liked the seeds on the crust. I can easily see why this is a favourite from their range of breads. I enjoyed this very much. It was great on its own, but really came alive toasted. I had two slices of this every night in the evening, simply toasted and spread with some butter. YUMMY!
Recipe #12, Spirulina & Pumpkin Seed Bread
Our Spirulina and Pumpkin Seed Loaf has a delicious nutty flavour from the generous coating of pumpkin seeds on the outside of the loaf which toast as the loaf bakes. Pumpkin seeds are known to be a source of minerals including magnesium, zinc and manganese and a good source of antioxidants. Spirulina, often referred to as a superfood because of the high levels of nutrients it contains, is of huge benefit to the body as both a protein source, it contains all the essential amino acids as well as B Vitamins, iron and copper. Most of all though people love the wonderful texture and flavour of this loaf and that's what makes it so easy to eat
Recipe #12, Spirulina & Pumpkin Seed Bread - This had a slight green tinge, with a nice texture and a lovely coating of pumpkin seeds on the surface and then scattered throughout the dough. I found it to be somewhat earthy in flavour, chewy, nutty. Not at all unpleasant, although the "green" earthy flavour was a bit of a surprise.
Recipe #19 Rye 100% with Honey
If you like rye breads this will be the loaf for you. Our 100% rye sourdough is a far cry from the solid texture that we often associate with rye breads. Using our sourdough starter which has matured over several years helps give us a lighter less dense texture whilst not compromising on the delicious rye flavour and high fibre content. This bread has no wheat added to it so is suitable for those avoiding wheat in their diets. The addition of honey gives it a natural sweetness. This bread also
has excellent keeping qualities.
Rye 100% and Honey - I LOVE LOVED THIS, slightly tangy, chewy, robust. Lovely rye flavour. This was an excellent rye bread.
Recipe #14 Oat and Flax
We love our Oat and Flax bread served with soup or sliced more thinly it makes a a great sandwich too and is the perfect partner to smoked meat and fish, cheeses or even honey and banana. The oats lend a great texture to the crust and through the bread as do the flax seeds. Flax seeds are rich in omega 3 fats, the healthy fats we need to keep skin and hair healthy and are also a source of plantestrogen which are believed to naturally help balance and stabilise female hormones.
Recipe #14 Oats and Flax - I loved the nubbly bits of oats on the crust. It had a wonderfully chew texture and a lovely nutty flavour.
Yeast Free White Sour Dough.
This is their basic white sour dough. Using natural ingredients is not enough; GRADZ master bakers are also patient. Agnes’s treasured family recipes require a slow fermentation process in which the dough rises gradually for up to 24 hours. During this time, flour and other ingredients are broken down, eventually making the bread gentler to the digestive system.
Yeast Free Sour Dough - This was chewy, and had a lovely light texture, with a beautiful flavour and slight tang that was not at all unpleasant. I thoroughly enjoyed this.
Overall, I was really pleased and impressed with the Gradz range of breads. Their attention to detail was evident and the quality was excellent. It was lovely just as it and delicious toasted. I made some very tasty sandwiches with the white loaf. I have to say in all honesty if I was a Coeliac I would definitely buy their Gluten Free Range as it was clearly the best I have ever eaten.
You can read more about their process and range on their website, here. They are available to purchase online via Ocado.
e-mail: [email protected]
Thanks very much to Gradz for sending me these tasty breads to try.
Note - Although I was sent a selection of breads to try for free, I was not required to do a positive review in exchange.

Source: https://theenglishkitchen.blogspot.com/2019/03/gradz-puts-artizan-in-artizan-bread.html
0 notes
Text
cookies and christmas pjs
Hi! In less than three days, we’re jumping on (or, more accurately, “squeezing a toddler and many bags and a stroller and a car seat onto”) a plane and heading to Hawaii for the first time since our two-bowl household became a three-bowl one. There are aunties and uncles and cousins for Luke to meet for the first time, beaches to explore, galbi to chew on, and to say we–and even more, his grandparents–are excited would be an understatement. Our fellow passengers are probably less excited, though they don’t know it yet. (If you have any tips for entertaining a 14-month old in an enclosed space for five hours, I welcome them and our seatmates will thank you.)
But first, cookies! I had to restore some kind of holiday order to this place, lest we go the entire month of December without a post that is at least somewhat cookie-related. So here’s a little round-up of some favorite holiday cookie recipes, some old and much-loved and some I’ve been meaning to try, plus an update on that classic to rule all classics, the chocolate chip cookie. (Also, some gratuitous Christmas pajama photos, which have nothing to do with cookies.)
I had no intention of sharing another chocolate chip cookie recipe here, because no one needs me to tell them how to make chocolate chip cookies when there are so many impeccable versions out there already (most recently, this ripply, thin-and-crispy beauty from Sarah Kieffer that has been taking the world by storm!) But then I realized that the only CCC recipe here to date is the infamous David Leite New York Times recipe, which I continue to love but to which I’ve rarely adhered in the last five (!) years since I posted it, and it didn’t seem quite right to leave out the recipe that I actually make every time I crave this classic cookie.
So, here it is! This one hews most closely to Tara O’Brady’s recipe from her cookbook Seven Spoons, and it stole my heart because it uses melted butter, meaning no waiting for the butter to come to room temperature or creaming it with the sugars (my two least favorite cookie tasks) and, therefore, cookies even faster; the cookies it makes are thick and hefty, with crisp tops and edges but velvety, fudgy innards, puddles of chocolate on top and striated ripples within, and, if you can bear to let the dough rest a few days, warm, round notes of butterscotch and toffee underneath. There are a few quirks from David’s recipe that still make their way into my kitchen when I make these: It has more chocolate, and even though many have rightly pointed out that a mix of bread flour and cake flour should average out to the protein content of all-purpose, there’s something about the mix that I find adds a little extra depth to the flavor. But while I like to use chocolate chip cookies as a repository for as many flours as possible, you shouldn’t need to, so the recipe below is written with all-purpose.
As an alternative, for a little holiday version, I like replacing a third or so of the flour with a whole grain flour like sprouted wheat, white whole wheat, rye, or spelt, to add extra nuttiness, and a touch of rosemary to lend a little savoriness, akin to the sea salt on top, which makes the sweet sweeter and the dough deeper and richer. This makes for the extra craggy cookies pictured up top and at the end, while all-purpose flour will give you the softer, more tender cookies directly below. But rest assured, I love these pretty much any way they turn out.
Happiest holidays, friends! I hope it’s filled with coziness and all the cookies you could want.
a whole lot of cookies
rosemary caramel linzer cookies • macau-style almond cookies • classic gingersnaps
fig jam & goat cheese thumbprints • cranberry orange shortbread • coconut oil gingerbread folk
pan-banging ginger molasses cookies • chewy chai snickerdoodles • matcha shortbread
oatmeal raisin cookies • black and white cookies • dark & stormy sugar cookies
and
my go-to chocolate chip cookie + some variations
This is very lightly adapted from Tara O'Brady's recipe in her fantastic cookbook, Seven Spoons, and it is my go-to recipe: an easy, streamlined process that makes cookies that are thick and hefty, with a crisp edge and a fudgy, velvety center, chocolate puddled on top and rippled throughout, and a butterscotch note underneath. My only variations were to suit my personal preference--a bit more chocolate, a tad less salt and baking powder, and some notes on what flours I like to use.
1 cup (2 sticks, or 8 ounces) butter
3 ¼ cups (406 grams) all-purpose flour (though I prefer a combination of flours in the Notes)
1 teaspoon baking powder
1 teaspoon baking soda
1 teaspoon salt
1 ½ cup brown sugar
½ cup granulated sugar
2 eggs
2 teaspoons vanilla extract
16 ounces chopped dark chocolate, or a mix of chopped and chocolate chips
flaky sea salt, for topping
Melt the butter in a heavy bottomed saucepan over very low heat, or in the microwave in 15-second increments. Take care that the butter does not sizzle. (See Notes.)
In a bowl, whisk together the flour, baking powder, baking soda, and salt. Set aside. Pour the melted butter into a large bowl and whisk in the sugars until smooth. Add the eggs, one at a time, whisking until just combined. Stir in the vanilla. Use a wooden spoon or silicone spatula to stir in the dry ingredients until barely blended. When things are still looking a bit floury, stir in the chocolate until all of the ingredients are just combined. Use a large cookie scoop or your hands to shape the dough into large 2-ounce (or even 3-ounce) balls, then place in an airtight container and chill in the refrigerator for at least 30 minutes and ideally 24-36 hours. They can also be frozen at this point, which I love doing.
After the dough has rested, preheat the oven to 360 degrees. Line a large baking sheet with parchment paper or a Silpat baking mat. Space 8-9 of the dough balls on the baking sheet, or as many as will comfortably fit several inches apart, and sprinkle with flaky salt. Bake until the tops are cracked and lightly golden, 15-18 minutes, rotating the pan halfway through. They may take less time, depending on the size of your cookies, or more. Cool on the pan for 2 minutes, the move to a wire rack to cool completely.
I like to use chocolate chip cookies as a repository for all the random flours I have in my pantry, but I know that recommending two or three flours for an everyday recipe is a little fussy. Still, if you're curious, my favorite mix is about half and half bread and cake flour by weight (200 grams each), or, in the case of the craggy cookies pictured above, a mix of bread flour, cake flour, and a whole grain flour like white whole wheat, sprouted wheat, rye, spelt, etc. I find that a mix of flours adds a nice depth and nuttiness that I love. As long as it adds up to around 400-410 grams, I've found that all sorts of experiments will work and are delicious.
For a rosemary-walnut twist, add 1 teaspoon finely chopped rosemary to the melted butter before whisking with the sugars, and ½ to 1 cup chopped walnuts to the dough with the chocolate chips.
3.1
http://tworedbowls.com/2017/12/20/cookies-christmas-pjs/
a
you may also like

Source: http://tworedbowls.com/2017/12/20/cookies-christmas-pjs/
0 notes
Text
Brown Butter Banana Nut Bread
A classic banana nut bread scented with brown butter complete with a domed, cracked top and lots of toasty walnuts.
The internet probably doesn’t need another banana nut bread recipe but I’m throwing this one out there because it’s my dream banana bread! I have a few versions on the site already but not my perfect version with a domed, cracked top, dense but not-too-heavy crumb, and lots of toasty walnuts. It may seem basic but I leveled it up just a little with the addition of deeply browned butter (and I mean, VERY BROWN almost black butter) which gives this loaf extra flavor and will make your kitchen smell amazing while it bakes.
This recipe actually started off with Oh, Ladycakes One Bowl Banana Nut Bread, which is vegan and delicious. Hers is made with coconut oil, no eggs or dairy, and white whole wheat flour, if that’s more your style I urge you to give her version a try! I made a loaf for my family and it was devoured within 48 hours (and there are only 3 of us!). I wanted my recipe to include brown butter because I love it when paired with bananas (or basically anything) and also keep to ingredients I typically have on hand in my pantry (like all-purpose flour, dairy, butter, and eggs), so I translated Ashlae’s version into one that fit my baking style and it worked out great.
Notes:
Brown it like you mean it! When browning butter don’t be afraid to push it to the limit. You want it to be deeply browned, just on the verge of being burnt. The flavor will be much better and it won’t get lost among the other ingredients.
Be patient. Banana bread takes about an hour to bake. All those bananas make the bread super moist but also makes for a bread that takes a bit of time to bake through.
Don’t ditch the buttermilk. The acid in buttermilk is 100% necessary to activate the baking soda and give this bread it’s rise. Since we aren’t using baking powder in this recipe (which has an added acid in it, giving it rising power) you need to the combination of buttermilk and soda to give this loaf lift. If you don’t have buttermilk, mix 1 1/2 teaspoons of white vinegar with 1/2 cup of milk to mimic the buttermilk.
Brown Butter Banana Nut Bread
Total time
1 hour 15 mins
A classic banana bread scented with brown butter complete with a domed, cracked top and lots of toasty walnuts.
Author: Cindy
Serves: 10-12 servings
Ingredients
¾ cup unsalted butter, browned and cooled (6oz/170g)
4 very ripe bananas (about 1½ cups)
1 cup granulated sugar (7oz/200g)
2 large eggs
½ cup buttermilk (4oz/115g)
1 tablespoon pure vanilla extract
3 cups all-purpose flour (13.2oz/375g)
1 teaspoon cinnamon (optional)
1 teaspoon kosher salt
1 teaspoon baking soda
1 cup toasted walnuts, roughly chopped (3oz/90g)
Instructions
Preheat the oven to 350°F and grease a 6-cup loaf pan well.
Begin by browning the butter. Add the butter to a saucepan and heat over medium-high to melt, stirring occasionally. Once the butter is melted and begins to foam, turn the heat down to medium and stir constantly until the solid bits (we call these “milk solids”) turn deep brown, almost black, and smell like rich, nutty toffee. Remove from the heat and pour into a bowl to cool--it can be slightly warm but should not be hot when you mix it into the batter.
In a large measuring cup, puree the bananas using a stick blender (or mash them well with a fork) and whisk in the sugar, eggs, buttermilk, and vanilla. Set to the side.
In a mixing bowl whisk the flour, cinnamon, salt, and soda to combine. Fold in the banana mixture and the browned butter until you get a smooth batter. Fold ¾ of the walnuts, reserving ¼ for the top, and spread the batter into the prepared pan. Sprinkle the remaining walnuts over the top of the batter and bake in the center of the oven for 1 hour, or until a toothpick inserted into the center of the bread comes out clean or with very few moist crumbs attached. Remove from the oven and cool on a wire rack. This bread keeps well for a few days wrapped in plastic at room temperature.
3.5.3208

Source: http://www.hungrygirlporvida.com/blog/2018/05/21/brown-butter-banana-nut-bread/
0 notes
Text
Brown Butter Banana Nut Bread
A classic banana nut bread scented with brown butter complete with a domed, cracked top and lots of toasty walnuts.
The internet probably doesn’t need another banana nut bread recipe but I’m throwing this one out there because it’s my dream banana bread! I have a few versions on the site already but not my perfect version with a domed, cracked top, dense but not-too-heavy crumb, and lots of toasty walnuts. It may seem basic but I leveled it up just a little with the addition of deeply browned butter (and I mean, VERY BROWN almost black butter) which gives this loaf extra flavor and will make your kitchen smell amazing while it bakes.
This recipe actually started off with Oh, Ladycakes One Bowl Banana Nut Bread, which is vegan and delicious. Hers is made with coconut oil, no eggs or dairy, and white whole wheat flour, if that’s more your style I urge you to give her version a try! I made a loaf for my family and it was devoured within 48 hours (and there are only 3 of us!). I wanted my recipe to include brown butter because I love it when paired with bananas (or basically anything) and also keep to ingredients I typically have on hand in my pantry (like all-purpose flour, dairy, butter, and eggs), so I translated Ashlae’s version into one that fit my baking style and it worked out great.
Notes:
Brown it like you mean it! When browning butter don’t be afraid to push it to the limit. You want it to be deeply browned, just on the verge of being burnt. The flavor will be much better and it won’t get lost among the other ingredients.
Be patient. Banana bread takes about an hour to bake. All those bananas make the bread super moist but also makes for a bread that takes a bit of time to bake through.
Don’t ditch the buttermilk. The acid in buttermilk is 100% necessary to activate the baking soda and give this bread it’s rise. Since we aren’t using baking powder in this recipe (which has an added acid in it, giving it rising power) you need to the combination of buttermilk and soda to give this loaf lift. If you don’t have buttermilk, mix 1 1/2 teaspoons of white vinegar with 1/2 cup of milk to mimic the buttermilk.
Brown Butter Banana Nut Bread
Total time
1 hour 15 mins
A classic banana bread scented with brown butter complete with a domed, cracked top and lots of toasty walnuts.
Author: Cindy
Serves: 10-12 servings
Ingredients
¾ cup unsalted butter, browned and cooled (6oz/170g)
4 very ripe bananas (about 1½ cups)
1 cup granulated sugar (7oz/200g)
2 large eggs
½ cup buttermilk (4oz/115g)
1 tablespoon pure vanilla extract
3 cups all-purpose flour (13.2oz/375g)
1 teaspoon cinnamon (optional)
1 teaspoon kosher salt
1 teaspoon baking soda
1 cup toasted walnuts, roughly chopped (3oz/90g)
Instructions
Preheat the oven to 350°F and grease a 6-cup loaf pan well.
Begin by browning the butter. Add the butter to a saucepan and heat over medium-high to melt, stirring occasionally. Once the butter is melted and begins to foam, turn the heat down to medium and stir constantly until the solid bits (we call these “milk solids”) turn deep brown, almost black, and smell like rich, nutty toffee. Remove from the heat and pour into a bowl to cool--it can be slightly warm but should not be hot when you mix it into the batter.
In a large measuring cup, puree the bananas using a stick blender (or mash them well with a fork) and whisk in the sugar, eggs, buttermilk, and vanilla. Set to the side.
In a mixing bowl whisk the flour, cinnamon, salt, and soda to combine. Fold in the banana mixture and the browned butter until you get a smooth batter. Fold ¾ of the walnuts, reserving ¼ for the top, and spread the batter into the prepared pan. Sprinkle the remaining walnuts over the top of the batter and bake in the center of the oven for 1 hour, or until a toothpick inserted into the center of the bread comes out clean or with very few moist crumbs attached. Remove from the oven and cool on a wire rack. This bread keeps well for a few days wrapped in plastic at room temperature.
3.5.3208
Source: http://www.hungrygirlporvida.com/blog/2018/05/21/brown-butter-banana-nut-bread/

0 notes
Text
cookies and christmas pjs
Hi! In less than three days, we’re jumping on (or, more accurately, “squeezing a toddler and many bags and a stroller and a car seat onto”) a plane and heading to Hawaii for the first time since our two-bowl household became a three-bowl one. There are aunties and uncles and cousins for Luke to meet for the first time, beaches to explore, galbi to chew on, and to say we–and even more, his grandparents–are excited would be an understatement. Our fellow passengers are probably less excited, though they don’t know it yet. (If you have any tips for entertaining a 14-month old in an enclosed space for five hours, I welcome them and our seatmates will thank you.)
But first, cookies! I had to restore some kind of holiday order to this place, lest we go the entire month of December without a post that is at least somewhat cookie-related. So here’s a little round-up of some favorite holiday cookie recipes, some old and much-loved and some I’ve been meaning to try, plus an update on that classic to rule all classics, the chocolate chip cookie. (Also, some gratuitous Christmas pajama photos, which have nothing to do with cookies.)
I had no intention of sharing another chocolate chip cookie recipe here, because no one needs me to tell them how to make chocolate chip cookies when there are so many impeccable versions out there already (most recently, this ripply, thin-and-crispy beauty from Sarah Kieffer that has been taking the world by storm!) But then I realized that the only CCC recipe here to date is the infamous David Leite New York Times recipe, which I continue to love but to which I’ve rarely adhered in the last five (!) years since I posted it, and it didn’t seem quite right to leave out the recipe that I actually make every time I crave this classic cookie.
So, here it is! This one hews most closely to Tara O’Brady’s recipe from her cookbook Seven Spoons, and it stole my heart because it uses melted butter, meaning no waiting for the butter to come to room temperature or creaming it with the sugars (my two least favorite cookie tasks) and, therefore, cookies even faster; the cookies it makes are thick and hefty, with crisp tops and edges but velvety, fudgy innards, puddles of chocolate on top and striated ripples within, and, if you can bear to let the dough rest a few days, warm, round notes of butterscotch and toffee underneath. There are a few quirks from David’s recipe that still make their way into my kitchen when I make these: It has more chocolate, and even though many have rightly pointed out that a mix of bread flour and cake flour should average out to the protein content of all-purpose, there’s something about the mix that I find adds a little extra depth to the flavor. But while I like to use chocolate chip cookies as a repository for as many flours as possible, you shouldn’t need to, so the recipe below is written with all-purpose.
As an alternative, for a little holiday version, I like replacing a third or so of the flour with a whole grain flour like sprouted wheat, white whole wheat, rye, or spelt, to add extra nuttiness, and a touch of rosemary to lend a little savoriness, akin to the sea salt on top, which makes the sweet sweeter and the dough deeper and richer. This makes for the extra craggy cookies pictured up top and at the end, while all-purpose flour will give you the softer, more tender cookies directly below. But rest assured, I love these pretty much any way they turn out.
Happiest holidays, friends! I hope it’s filled with coziness and all the cookies you could want.
a whole lot of cookies
rosemary caramel linzer cookies • macau-style almond cookies • classic gingersnaps
fig jam & goat cheese thumbprints • cranberry orange shortbread • coconut oil gingerbread folk
pan-banging ginger molasses cookies • chewy chai snickerdoodles • matcha shortbread
oatmeal raisin cookies • black and white cookies • dark & stormy sugar cookies
and
my go-to chocolate chip cookie + some variations
This is very lightly adapted from Tara O'Brady's recipe in her fantastic cookbook, Seven Spoons, and it is my go-to recipe: an easy, streamlined process that makes cookies that are thick and hefty, with a crisp edge and a fudgy, velvety center, chocolate puddled on top and rippled throughout, and a butterscotch note underneath. My only variations were to suit my personal preference--a bit more chocolate, a tad less salt and baking powder, and some notes on what flours I like to use.
1 cup (2 sticks, or 8 ounces) butter
3 ¼ cups (406 grams) all-purpose flour (though I prefer a combination of flours in the Notes)
1 teaspoon baking powder
1 teaspoon baking soda
1 teaspoon salt
1 ½ cup brown sugar
½ cup granulated sugar
2 eggs
2 teaspoons vanilla extract
16 ounces chopped dark chocolate, or a mix of chopped and chocolate chips
flaky sea salt, for topping
Melt the butter in a heavy bottomed saucepan over very low heat, or in the microwave in 15-second increments. Take care that the butter does not sizzle. (See Notes.)
In a bowl, whisk together the flour, baking powder, baking soda, and salt. Set aside. Pour the melted butter into a large bowl and whisk in the sugars until smooth. Add the eggs, one at a time, whisking until just combined. Stir in the vanilla. Use a wooden spoon or silicone spatula to stir in the dry ingredients until barely blended. When things are still looking a bit floury, stir in the chocolate until all of the ingredients are just combined. Use a large cookie scoop or your hands to shape the dough into large 2-ounce (or even 3-ounce) balls, then place in an airtight container and chill in the refrigerator for at least 30 minutes and ideally 24-36 hours. They can also be frozen at this point, which I love doing.
After the dough has rested, preheat the oven to 360 degrees. Line a large baking sheet with parchment paper or a Silpat baking mat. Space 8-9 of the dough balls on the baking sheet, or as many as will comfortably fit several inches apart, and sprinkle with flaky salt. Bake until the tops are cracked and lightly golden, 15-18 minutes, rotating the pan halfway through. They may take less time, depending on the size of your cookies, or more. Cool on the pan for 2 minutes, the move to a wire rack to cool completely.
I like to use chocolate chip cookies as a repository for all the random flours I have in my pantry, but I know that recommending two or three flours for an everyday recipe is a little fussy. Still, if you're curious, my favorite mix is about half and half bread and cake flour by weight (200 grams each), or, in the case of the craggy cookies pictured above, a mix of bread flour, cake flour, and a whole grain flour like white whole wheat, sprouted wheat, rye, spelt, etc. I find that a mix of flours adds a nice depth and nuttiness that I love. As long as it adds up to around 400-410 grams, I've found that all sorts of experiments will work and are delicious.
For a rosemary-walnut twist, add 1 teaspoon finely chopped rosemary to the melted butter before whisking with the sugars, and ½ to 1 cup chopped walnuts to the dough with the chocolate chips.
3.1
http://tworedbowls.com/2017/12/20/cookies-christmas-pjs/
a
you may also like
Source: http://tworedbowls.com/2017/12/20/cookies-christmas-pjs/
0 notes
Text
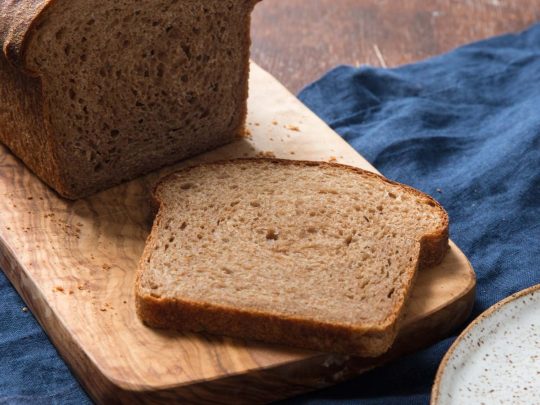
How to Make 100% Whole Wheat Bread
[Photographs: Vicky Wasik]
More
Tips and tricks for making the best sandwiches at home.
I adore everything about whole wheat bread, from its hearty texture and graham-like flavor to the general aura of virtue that comes with making anything from whole grains.
When ordering out, it's my favorite side for sopping up runny yolks on a breakfast plate, my ultimate sandwich bread. And assuming there's plenty of butter and jam, the perfect accompaniment to a simple mug of coffee.
Whole wheat bread has an unfortunate reputation for turning out heavy and dense at home. It can have a texture that's prone to tearing or crumbling apart, especially when sliced thin for sandwiches.
These attributes are often identified as an inescapable reality of 100 percent whole wheat formulas, as the inclusion of wheat bran and germ can interfere with proper gluten development, resulting in a poorly risen, too-tender loaf that lacks the structure and chewiness of a classic white bread.
As a result, an overwhelming number of recipes for "whole wheat" bread will actually include a good deal of white bread flour, often 50 percent. This improves a standard loaf's chewiness and rise, but it also dilutes the characteristic flavor and nutrition of whole wheat.
That doesn't mean it's impossible to make a fluffy, well-structured whole wheat loaf that's high-rising and chewy. It just means you'll need a slightly different approach than the one you see in run-of-the-mill recipes—one that involves a bit more time, power, and water.
Step 1: Start With an Autolyse
The first key step for my whole wheat bread is to start with an autolyse. With this technique, bakers combine the flour and water up front and then allow the mixture to rest for some length of time before kneading.
This waiting period kicks off the enzymatic breakdown of starch, while giving the gliadin and glutenin proteins in the flour time to hydrate and mingle, forming gluten.
It's not an exciting process to behold, but it does some amazing things for the dough by fostering gluten formation prior to the gluten development achieved through kneading.
An autolyse can be helpful for many types of bread, especially in a commercial setting, but it's particularly useful at home for doughs that struggle to achieve sufficient gluten development in the first place, like whole wheat bread.
What's more, this hydration period softens the bran and germ in the dough, leading to a lighter, softer loaf.
The timing of an autolyse will vary from recipe to recipe, with some as short as a few minutes and others lasting overnight, but after testing a dozen or more intervals for this loaf, I was happiest with a two-and-a-half-hour autolyse (you can see some of my testing shots on Instagram). There's definitely some wiggle room if you need a buy a bit of time or move things along, but substantial deviations can lead to suboptimal results.
Step 2: Intensive Gluten Development
Even with an autolyse, gluten development can be difficult in a 100 percent whole wheat dough. Whenever I'm faced with a challenging dough that needs a lot of structure (like superchewy bagels, for example), I break out my food processor.
When it comes to intensive gluten development, food processors can do near miraculous work. After adding some brown sugar, salt, and yeast, the food processor is able to take my 100 percent whole wheat dough from a gnarly blob to a strong and satiny dough in just 75 seconds, without any risk of oxidation or overheating of the dough and with little risk of overheating or burning out the machine’s motor (which is more common with certain brands of small but colorful stand mixers with plastic gears).
After processing, the dough will have enough gluten development to pull a small piece into a translucent sheet or, in baker-speak, a windowpane. With a 100 percent whole wheat dough, this level of gluten development can be very difficult to achieve by hand or even in a stand mixer.
Which is to say the food processor isn't an optional shortcut for this dough but a vital tool. For this recipe, I used both the 14-cup Cuisinart at our test kitchen and my 16-cup Breville Sous Chef without incident, but for smaller machines, it will be necessary to process the dough in stages (see our food processor equipment review for more info on our recommended models).
Step 3: Divide and Conquer
Whole wheat dough typically requires more hydration than white bread due to the wheat bran's absorbency. But when I gave the dough all the water it needed up-front with the autolyse, it was too sticky and wet for my food processor.
I was able to sidestep the problem by reserving a small portion of water to incorporate after developing the gluten. Adding the water in two stages allowed for ample hydration during the autolyse, producing a dough with enough structure for the food processor to handle, while creating a soft and elastic dough that bakes up chewy, moist, and light.
Along with this second addition of water, I also add a splash of oil. This likewise keeps the dough from turning sticky early on, but its inclusion improves the flavor, texture, and shelf life of the finished loaf. Clear, neutral oils like safflower work well, or you can add another layer of nutty flavor with options like toasted pumpkin seed oil or toasted pecan oil.
After adding the water and oil, the dough is processed until smooth and then transferred to a lightly greased bowl for the first rise. At this stage, it should feel sticky, wet, and elastic, very unlike a typical whole wheat dough.
As with any bread, timing the first rise will depend on the dough and environment, as "room temperature" can range from well below 65°F (18°C) to above 85°F (29°C), depending on the season. But in an approximately 70°F (21°C) environment, expect things to take about two hours. Or, if desired, the dough can be refrigerated to substantially slow things down.
However the timing works out, when the dough has roughly doubled in volume, turn it out onto a clean surface that's been lightly dusted with whole wheat flour.
I form the loaf by folding the dough in thirds, using the heel of my hand to seal the dough against itself to form a tight roll. From there, I transfer it to a well-greased one-pound loaf pan (this tapered style will measure nine-by-five inches at the top and eight-by-four inches at the bottom).
I loosely cover the dough with plastic and proof until it's well risen and light but resilient, able to slowly spring back from a gentle poke. If the dough feels dense and firm and resists taking an impression when poked with a finger, I let it continue to rise.
As with the first rise, this process will move faster or slower depending on environmental conditions, but expect about 75 minutes at 70°F. Keep a close eye on the dough at this stage, checking it frequently to avoid overproofing (letting it puff up so much that it starts to lose structure).
After the second rise, bake the loaf until it's well risen and golden brown, giving up a hollow sound when thumped. This should take about 45 minutes at 350°F (177°C) or until the loaf reaches an internal temperature just over 200°F (93°C).
Immediately de-pan the loaf, and let it cool completely on a wire rack. While warm, the loaf will be fragile and easily compressed, with a gummy texture.
Once cool, however, it will be sturdy and light, chewy and soft, crisp around the edges and moist in middle. Because it's so well structured, it can be thinly sliced for sandwiches so long as you have a thin, serrated knife with sharp teeth (a thick, dull blade will only smoosh the loaf).
Daniel has done an extensive review of the best serrated knives in the past; his favorite (and mine!) is the 10-inch Tojiro Bread Slicer, which makes beautiful slices of any loaf.
Thanks to an autolyse, a food processor, and a two-pronged approach for adding the water and oil, this 100 percent whole wheat bread bakes up chewy, moist, and light, with a soft crumb and marvelous staying power (it'll keep for a week at room temperature in a paper bag or bread box).
It may not be the fastest recipe around, but it's one that can still be knocked out in less than eight hours, with very little hands-on attention—the perfect loaf for puttering around the kitchen on a lazy Sunday.
This post may contain links to Amazon or other partners; your purchases via these links can benefit Serious Eats. Read more about our affiliate linking policy.
0 notes
Text
These are the healthiest whole grain foods you should eat
Whole grains are a pretty misunderstood food group, especially considering how carb-phobic we all are right now! So, to help clear the confusion, I wanted to share the actually healthy whole grain foods you should eat on a daily basis. Plus, I’ve got some fun recipe ideas that will help you elevate whole grains beyond a basic boiled side dish.
We’ve heard the term ‘whole grain’ so often that it can feel like nothing more than a marketing term…and it’s absolutely true that not all whole grain foods are that healthy. But that doesn’t mean we should banish these fibre, protein and mineral rich foods from our plates!
What are whole grains?
A whole grain food is one that has all three original parts of the grain, the endosperm (inner part), the germ and the bran. So, flours can be 100% whole grain, as long as nothing has been removed. I will often talk about ‘intact’ whole grains, which means that they have not be milled, rolled, steamed or otherwise transformed from the original grain as it grows. So an intact form of grain would be wheat berries (also called wheat kernels) or steel cut oats while quick oats or whole wheat flour can be considered 100% whole grain.
Whole Wheat vs Whole Grain
While all whole grain wheat flour will be 100% whole wheat, not all whole wheat flour is 100% whole grain. In Canada, up to 5% of the kernel can be removed from milled whole wheat flour and still be called whole wheat, so whole wheat is not always 100% whole grain. It’s pretty close though!
Is whole grain flour healthy?
While I absolutely think that whole grain flours have a place in a healthy diet, I think that we tend to consume WAY more flours than intact whole grains in our food culture so I tend to focus on encouraging people to eat more intact whole grains.
What’s more, we tend to be overly focused on eating wheat. Many of us eat wheat 3-6 times a day and few of us eat alternative grains such barley, rye or millet. As long as you tolerate wheat, eating it can be very healthy; however, eating only wheat means we are missing out on the nutrition that is found in eating a variety of grains.
How you cook or process that grain flour also matters. Many whole grain breads are so fluffy and soft that they have a very high glycemic impact on your blood sugars, which isn’t a great idea on an anti-inflammatory diet. Instead, I tend to recommend my clients look for heavy, 100% whole grain sourdoughs or sprouted grain breads for more fibre, more protein and a lower glycemic index.
While we’re on the topic, I should also mention that whole grain pastas, cooked al dente, are also a great choice on an anti-inflammatory diet as they also have a moderate glycemic index when compared to most other flour-based foods.
Whole Grains List
Gluten-containing whole grain foods you should eat more of
Wheat Berries
Wheat berries look similar to brown rice, and have a dense, chewy texture and slightly nutty flavour that is super satisfying. Wheat berries also contain more protein and fibre, cup for cup, than quinoa…making it an excellent locally grown grain choice on a plant-based diet.
Farro, Spelt and Kamut Berries
Farro, Spelt and Kamut are ancient cousins of modern wheat; each has a slightly different flavour profile and texture but they are similar to wheat berries. They may be a bit easier to digest for those that are wheat or FODMAP intolerant – but they contain gluten so they are not suitable for those with celiac disease.
Bulgur (Cracked) Wheat
Whole grain bulgur is wheat berries that have been cut, or ‘cracked’ into smaller pieces and steamed. A great whole grain substitute for couscous (which is essentially a pasta and not a whole grain) in salads like tabbouleh.
Whole Oats (Groats)
Whole oat groats also look similar to wheat berries, and you can use them in a similar way. When they are cut, they become steel cut oats. When they rolled, they become rolled or old fashioned oats, and if rolled finely and steamed, quick or instant oats. Oats are fantastic because of their soluble fibre content, which is very soothing to the gut and helps promote the growth of beneficial bacteria in the gut. Conventional oats do not contain gluten per se, they are however cross-contaminated with gluten. You can now also find 100% gluten free oats. Just check on the label.
Barley
Barley comes in two forms, pot or pearl. Pot is whole grain and has most of its bran intact, while pearl has been polished (pearled) for longer and lacks the bran. However, barley is also very high in soluble fibre, so even pearl barley is a great fibre pick for gut health. Barley has a lighter, milder taste than wheat.
Rye
Rye groats are harder to find, but 100% rye flour is one of my favourite flours. It has a dark, earthy flavour and a light gluten structure – meaning it’s not a straight 1:1 swap for wheat flour in all recipes. It works well in cookies and muffins and quick breads blended with another stronger flour, such as spelt.
Gluten free whole grain foods you should eat more of
NERDY FYI: Most gluten free grains such as buckwheat, quinoa and millet are not true grains, they are actually seeds that we cook like grains.
Quinoa
Quinoa is probably the most popular gluten free grain after rice, well known for its ‘complete’ amino acid profile. However, people often mistake quinoa for being high in protein. In fact, one cup of cooked quinoa only has 8.5g of protein – excellent as a grain, but not enough to carry an entire meal…you still need to add another concentrated plant protein source to get enough protein. Quinoa flour is quite bitter, not an easy one to bake with.
Black, Brown, and Red Rice
Rice is a staple the world over; however, you might be surprised to learn that brown rice isn’t really that high in fibre. One cup of cooked brown rice has just 3 grams of fibre. For more stable blood sugars, look for long grain basmati or jasmine rice. I also really like black and red rice for their chewy textures and flavour.
Millet
Millet is probably my favourite gluten free grain these days. It has a milder, wheat-ier flavour than quinoa and a fluffier texture that works well in a variety of dishes. It’s slightly lower in protein than quinoa, at 6.5g per cooked cup but boasts a variety of minerals such as iron, zinc and potassium.
Buckwheat Groats
The confusingly named buckwheat has nothing to do with actual wheat; it is the seed of a plant related to rhubarb! Buckwheat flour is dark in colour and richly flavoured and is a common ingredient in pancake and crepe recipes. You can also toast buckwheat groats for a crunchy addition to salads, or cook it as a grain.
Sorghum
A true gluten free cereal grain, sorghum can be found in groats but is most commonly used as a flour. It has a lovely texture that approximates wheat flour in baking, and is great when blended with millet or rice flour. Sorghum is similar in protein content to quinoa and boasts more minerals than millet.
12 Yummy Whole Grain Recipes to Make Now
Whole grains have such an incredible variety of textures and flavours, they are worth making them the star of your meal!
Wheat Berry Salad
Wheat berries make for a hearty and filling salad, this recipe from Ellie Krieger adds celery and walnuts for crunch, and dried cherries for a hint of sweet.
Asparagus Barley Risotto
Once you try barley risotto, you may never go back to rice! This recipe from The Full Helping contains nutritional yeast for that cheesy flavour.
Bulgur Salad with Apricots, Radicchio, Herbs, and Walnuts
This Mediterranean-inspired recipe uses one of my favourite bitter veggies, radicchio, for a filling and flavourful salad that is great as a side or as the star of the show, with some extra protein added!
Chickpea Coconut Curry with Millet
Okay, so SOMETIMES it’s just easy to boil up some millet as a side dish. This curry is a family fave and the millet soaks up all that yummy broth so well.
Roasted Garlic, Mushroom and Barley Stew
This flavourful stew from Rabbit and Wolves is just the thing to fight off the cold. And all that garlic will make your immune system happy too!
Roasted Sweet Potato, Kale and Farro Salad
So many of my favourite tastes and textures in one dish! If you double the chickpeas, this is a complete meal.
Snap Pea Salad with Crunchy Buckwheat and Creamy Cashew Ginger Dressing
This salad is one of my absolute favourite things, and it gives you a fun way of using buckwheat that you may not have tried before: roasting it in the oven until crispy!
Chili Lime Popped Sorghum
Popping sorghum for the first time feels like the most delightful food surprise! It’s like tiny popcorn, and this chili-lime version is a tasty treat.
Vegetarian Baked Beans with Barley
This grainful take on a nostalgic recipe will have you feeling like a (very full and satisfied) kid again!
Black Bean Quinoa Chili
Never too many variations on chili, this one pairs classic black beans with quinoa and smoky adobo sauce.
Easy Vegan Fried Rice
I would add some extra greens like bok choy or collards to this yummy tofu + veggie recipe from Minimalist Baker to make it even healthier!
Tomato Chickpea Farro Soup
Farro helps make a delicious soup even higher in fibre and more filling!
The post These are the healthiest whole grain foods you should eat appeared first on Desiree Nielsen, Dietitian.
0 notes
Text
20 Alternative Flours You Should Know
If you are still baking primarily with whole wheat flour because you believe it is better for your health, you may not be aware of the many alternative flours that exist. While some are worth checking out, there are others that are best avoided altogether, such as corn flour and soy flour, which did not make the list as they are often produced from genetically engineered crops.
Many of the 20 alternative flours highlighted below are gluten-free. If you have celiac disease, a gluten intolerance or have chosen to go gluten-free for other reasons, you are very likely familiar with some of them. Gluten, by the way, is a protein made of glutenin and gliadin molecules that forms an elastic bond in the presence of water, thereby holding bread and cakes together and giving them a spongier texture.
Gluten is a concern because it interferes with your body’s ability to break down and absorb nutrients from food. Gluten contributes to the formation of a glue-like, constipating lump in your gut that can interfere with proper digestion.
Undigested gluten prompts your immune system to attack your villi, the fingerlike projections lining your small intestine, resulting in side effects such as abdominal pain, diarrhea, constipation or nausea. Gluten consumption can also predispose you to increased inflammation, nutrient malabsorption and deficiencies and other health problems.
Eight Healthy Alternative Flours
The eight flours shown directly below are, in my opinion, the healthiest of the 20 alternative flours addressed in this article. Each is gluten- and wheat-free. Two of my personal favorites are almond and coconut flour. Again, you will need to experiment a bit to figure out which types of flours work best with your recipes. When in doubt, start with smaller amounts of each type of flour and adjust from there.
Almond1— Almond is produced by grinding and sifting blanched almonds into a fine powder. (The terms almond flour and almond meal are often used interchangeably, but they are not the same. Almond meal is made by grinding almonds with their skins intact, a process that produces a coarser end product.) Because almonds are a tree nut, almond flour is naturally gluten- and wheat-free.
Almond flour is sweeter than other flours, low in carbohydrates and packed with protein and fiber. It is a good source of copper, magnesium, manganese, phosphorus and vitamin E. While almond flour can be used as a 1-to-1 replacement for wheat flour, it will have the effect of making baked goods denser and flatter than usual.
Amaranth2,3— Amaranth flour is a gluten-free, wheat-free flour produced by grinding the seeds of the amaranth plant into a fine powder. Not only does amaranth flour contain all nine essential amino acids, but it is also a good source of calcium, iron, magnesium and phosphorus. While technically not a grain, amaranth flour is grain-like and is described as having an earthy, nutty taste.
Because it is a dense flour, you will achieve better results when blending amaranth with other flours. Start with 25 percent amaranth and adjust from there. It does best in pancakes and quick breads and can also be used to thicken roux, soups, stews and white sauces.
Arrowroot4,5— Derived from the root of the plant of the same name, arrowroot flour (also known as arrowroot starch) is a tasteless, odorless powder useful as a thickening agent.
It is far superior to cornstarch, which is often genetically engineered. It also can be used as a breading for fish and meats or blended with other gluten-free/wheat-free flours to make baked goods.
Arrowroot contains a good amount of B vitamins, iron and potassium, but no protein, which gives it superior thickening power. As such, it is often used in confections because it creates a perfectly clear gel that can stand up to acidic ingredients and freezing. Accordingly, it is often used to thicken fruit gels and fruit sauces, including cranberry sauce and sweet and sour sauce.
Coconut6,7— Coconut flour consists of the dried meat of fresh coconuts after they’ve been pressed to make coconut milk and most of the oil has been extracted. When used as a replacement for conventional flour, it adds a mild coconut flavor while imparting a rich texture and natural sweetness.
Coconut flour is nutritious, in part, because it boasts the highest percentage (48 percent) of dietary fiber of any flour. It’s also a good source of protein, while being very low in carbohydrates. And, it’s naturally gluten- and wheat-free.
You can turn standard baked goods into delicious gluten-free, low-carb paleo treats by replacing the wheat flour with coconut flour and adding eggs. On average, add one egg for every ounce of coconut flour used — this will help the ingredients hold together when baked. Also, because it is very dense, you will need to slightly increase the liquids in recipes involving coconut flour.
As a general rule of thumb, you can replace one-fifth of the flour in a recipe with coconut flour without compromising the taste or texture of the finished product. For a delicious breakfast treat, check out my recipe for coconut flour almond meal pancakes.
Hemp8— Hemp flour (also known as hemp powder) is produced by milling and sifting hemp seeds after they are crushed to extract the oil. Hemp flour is gluten- and wheat-free and adds a mild, nutty flavor to baked goods. It is about 33 percent protein, making it a great source of amino acids. It is high in fiber, iron, magnesium and zinc.
This dense flour does best when combined with other alternative flours for baking. Limiting hemp powder to 25 percent of your flour blend will ensure a lighter texture, especially when baking bread. Due to its oily nature, hemp powder will go rancid unless it is refrigerated.
Millet9,10,11— Millet is an ancient, drought-resistant grain — part of the grass family — grown widely in China, India and countries surrounding the Sahara Desert in western Africa. It has a protein structure similar to wheat, but is gluten- and wheat-free. It boasts a sweet, buttery, cornmeal-like flavor.
Millet is a good source of B vitamins and offers a decent amount of copper, manganese, magnesium, potassium and zinc. That said, millet also contains goitrogens, dietary substances known to impair your thyroid and iodine metabolism.
In countries in which millet is consumed as a staple, the development of goiter is common.12,13 As such, you’ll want to moderate your intake.
Sorghum14,15— Sorghum flour, which is both gluten- and wheat-free, is ground from the grain of the same name. It is an important dietary staple for some 9 million people worldwide, and is used often in Africa and India to make porridge and flat, unleavened breads. The Ethiopian flatbread called injera and a particular type of Indian roti are both made with sorghum.
Sorghum flour is a good source of antioxidants, B vitamins, fiber, iron phosphorus and protein. It has a mild, slightly sweet taste, which makes it a good addition to flour blends. It does not work well in cup-for-cup substitutions with regular flour.
Tapioca (cassava)16,17— Tapioca flour is derived from the root of the cassava plant, producing a fine white flour useful as a thickener for gravies, sauces, soups and stir-fries. Tapioca adds chewiness to gluten-free and wheat-free baked items, and can be stored at room temperature for long periods of time.
Due to its bland taste, blending tapioca with other flours is best when using it for baking. Start by using 25 percent tapioca in your gluten-free blends and adjust according to your preference. When using sorghum flour for baking, you may want to increase your liquids slightly or add an extra egg to increase moisture content. If you are a diabetic or prediabetic, tapioca, as a digestive-resistant starch, is one of the recommended superfoods for diabetics.
Two additional “flours” I want to bring to your attention are those derived from cauliflower and macadamia nuts. To me, “cauli-flour” is simply riced cauliflower that can be spiced up to make a tasty flatbread or pizza crust. You can rice cauliflower by placing pieces of raw, washed cauliflower in your food processor and blending it until it is reduced to tiny, rice-sized pieces.
If you like cauliflower, check out these delicious recipes for nutritious golden cauliflower flatbread and cauliflower pizza crust. By using cauliflower instead of grain flours in these recipes, you replace starchy carbohydrates with whole-food nutrition and cut calories, while satisfying your craving for bread.
Similar to almond flour, macadamia flour is produced by using your food processor to transform whole, raw macadamia nuts into a fine powder. Macadamia flour has a sweet, nutty taste and is a healthy gluten-free, low-carb option. Macadamia flour is lower in both carbs and protein than almond flour. For a new taste twist, you can substitute macadamia flour into recipes calling for almond flour, including the coconut-almond pancake recipe mentioned above.
12 Flours to Avoid if You Want to Minimize Harmful Lectins
The 12 flours highlighted below are often touted as healthy alternatives to wheat, especially when it comes to gluten-free diets, whether it be celiac disease or simply a matter of personal preference. While some of these alternative flours are considered nutritious solely based on the amount of fiber, protein, vitamins and minerals they contain, their health benefits may be overshadowed by the presence of harmful plant lectins.
Lectins are sugar-binding plant proteins that attach to your cell membranes and can be a hidden source of weight gain and ill health, even if you eat an otherwise healthy diet. Many lectins are proinflammatory, immunotoxic, neurotoxic and cytotoxic.
Certain lectins may also increase blood viscosity, interfere with gene expression and disrupt endocrine function. Because the following flours are high in lectins, I recommend you use them sparingly or avoid them entirely, especially if you have an autoimmune disease.
Barley18— Barley flour is made from milled whole grain barley that’s had its outer husk removed. This wheat-free flour contains some gluten and has a slightly sweet, nutty flavor. Barley flour is rich in fiber. Similar to oat flour (discussed later), it contains high amounts of soluble fiber composed of indigestible sugars called beta-glucans, which have been shown to lower your blood pressure.
For best results, use barley flour in a blend with other flours, and limit it to about 25 percent of the overall mix. It can also be used to thicken or flavor soups or stews.
Buckwheat19,20— Despite its name, buckwheat (also known as kasha when its toasted) flour is not a form of wheat, but actually a relative of rhubarb. Because it is ground from seeds, buckwheat flour is both gluten- and grain-free. Due to its strong nutty taste, which can be overpowering and somewhat bitter, buckwheat flour should not stand alone in a recipe.
Buckwheat, which is a good source of calcium, fiber and protein, is a very fine flour and can be used as a substitute for cornstarch in gluten-free bread recipes. Buckwheat is a low-glycemic carbohydrate offering better satiety than wheat bread, so you’ll feel fuller longer. You can replace regular flour with buckwheat flour cup-for-cup. It is said to make excellent waffles and pancakes, including Russian blinis, as well as French buckwheat crepes.
Chia21,22— Chia flour is produced from ground chia seeds and is touted as a superfood because it is a source of concentrated energy and nutrition. Chia flour boasts a high calcium, fiber, omega-3 and protein content. When baking with chia flour, you will need to increase the amount if liquids and cooking time to achieve the best results. Chia flour is gluten- and wheat-free.
Chickpea23,24— Also known as garbanzo bean flour, chickpea flour possesses a distinctive, slightly nutty taste that does not do well on its own. When substituting it for conventional flours, use very small amounts in combination with other gluten- and wheat-free flours, otherwise its distinctive taste may dominate. Chickpea flour is high in fiber, folate, manganese and protein.
Lupin25,26— Lupin flour is derived from the “sweet lupin” legume that is in the same family as peanuts and soybeans. As such, this gluten- and wheat-free flour is high in fiber and protein and low in fat. The major caution about lupin flour is the possibility it may be life-threatening if you have a peanut or soybean allergy. Similar to other gluten-free grains, lupin does best when included in a flour blend.
Oat27,28— Oat flour is made from ground oats, which can be concerning if you have celiac disease since oats are often contaminated with wheat. Even if you avoid wheat, you still need to contend with avenin, a protein in oats that is similar to gluten and therefore can have negative effects on celiac sufferers.
Oat flour is often thought to be a healthy choice because it contains high amounts of soluble fiber comprised of indigestible sugars called beta-glucans, shown to lower your blood pressure. Oat flour is well suited for baking, but absorbs liquids, so plan to increase liquid ingredients when using it. Oat flour goes rancid quickly, so store it in your refrigerator or freezer, or make small batches using a food processor.
Potato29— Potato flour and potato starch, both of which are gluten- and wheat-free, are often confused. Potato flour possesses a very strong potato flavor, as well as the heaviness of potato. For these reasons, a little goes a long way in a recipe. It also has a short shelf life, so buy it only when you plan to use it.
Potato starch, on the other hand, has a light potato flavor and a consistency similar to cornstarch or tapioca. It has a longer shelf life, is a good thickener and has a taste virtually undetectable in recipes. If you are a diabetic or prediabetic, potato starch is one of the digestive-resistant starches recommended for diabetics. Both the flour and the starch cannot stand alone in recipes, and will do better when blended with other gluten-free flours.
Quinoa30,31— Quinoa flour is produced from milled quinoa seeds. This ancient grain with a nutty flavor is both gluten- and wheat-free. It is recognized for its high amounts of lysine and isoleucine that enable it to be a complete protein source. It is one of the few plant foods containing all nine essential amino acids.
As a whole grain or flour, quinoa is particularly rich in two flavonoids, kaempferol and quercetin, which have antioxidant properties. Quinoa flour tends to dry out baked goods when used in large amounts. For that reason, it is best to use only small amounts of this flour in sweets such as muffins and quick breads.
Rice32,33— Both brown and white rice flour are gluten- and wheat-free. Brown rice flour is the heavier, grainer of the two. While it has a higher nutritional content than its white cousin, brown rice flour can be a bit grainy and heavy in some recipes. Similar to potato and tapioca, brown rice flour is one of the digestive-resistant starches recommended if you are a diabetic or prediabetic.
Brown rice flour has a slightly nutty flavor, whereas white rich flour is quite bland. Given that white rice flour is milled from polished white rice, it has very little nutritional value. Its strength is in the light texture it imparts, making it ideal in recipes such as dumplings and pizza crust.
Keep in mind that rice contains chitin-binding lectins, which are similar to wheat lectin. Because chitins are long polymers of n-acetyl-glucosamine, the primary binding target of wheat lectin, wheat lectin and chitin-binding lectin are functionally identical. Given this reality, in my opinion, a grain-free diet often yields far superior health benefits as compared to a diet focused solely on eliminating wheat- and gluten-containing grains.
Rye34,35— Rye flour is a dark flour that possesses a distinctive flavor. It is wheat-free and has a low gluten content. Breads made with rye flour tend to be denser than those made with wheat. When milled, rye flour retains the germ, endosperm and bran, making it more nutritious than refined wheat flour. Rye flour is a good source of B vitamins, iron, magnesium, phosphorus and zinc, as well as fiber and protein.
When used in baking, rye flour, due to its lower gluten content than wheat flour, is less elastic and therefore produces bread that is less airy. Rye dough also contains more free sugars than wheat, so it ferments faster.36
Spelt37,38— Spelt flour results from the milling of an ancient grain of the same name. Spelt flour contains a low amount of gluten, but is not entirely gluten-free. It is a good source of B vitamins, manganese, magnesium, phosphorus and zinc, and rich in fiber and protein. Spelt tends to absorb more moisture than wheat flour, so you will want to reduce liquids by 25 percent when substituting it.
When using spelt flour to make bread, take care to knead it lightly otherwise it will become dense. Spelt flour produces a bread similar in color to light rye, with a slightly sweet and nutty flavor. Some varieties of crackers and pretzels are made with spelt flour.
Teff39,40— Teff flour is made from milled teff, a tiny cereal grain originating from northern Africa. Teff flour is a primary ingredient in the spongy, slightly-sour flatbread called injera that is eaten daily in countries such as Eritrea and Ethiopia.
It is both gluten- and wheat-free, with a mild, nutty flavor. Teff is an excellent source of amino acids, and is high in calcium, iron and protein. Much of its fiber is a type known as resistant starch, which has been linked to health benefits such as improved blood sugar and weight management.
Final Thoughts About Alternative Flours
Using alternative flours will require patience and can be quite a challenge. If you are living a gluten-free lifestyle — either due to celiac disease, a gluten or wheat intolerance or simply as a matter of personal preference — you will need to do some experimenting to achieve your desired outcomes. The struggles and rewards of gluten-free baking come in blending several flours, adding eggs and adjusting liquids.
The biggest adjustment, however, will be in your expectations for the finished product. No matter how many techniques and tricks you use, it is virtually impossible to replicate the elasticity of gluten in most baked goods, particularly in yeast breads. In time, however, you’ll acquire a taste for denser, flatter treats made with one or more of the healthy alternative flours.
As you make a conscious choice to eat less wheat-containing foods, or perhaps to avoid wheat altogether, mainly because it is an inflammatory food, you’ll be happier and healthier. I would say the same for the alternative flours containing lectins — it’s better to avoid them or moderate your use. If you are looking for new ideas for gluten-free cooking and baking, check out my Healthy Gluten-Free Recipes.
from Articles http://articles.mercola.com/sites/articles/archive/2019/04/22/flour-alternatives.aspx
source https://niapurenaturecom.tumblr.com/post/184358683141
0 notes
Text
20 Alternative Flours You Should Know
If you are still baking primarily with whole wheat flour because you believe it is better for your health, you may not be aware of the many alternative flours that exist. While some are worth checking out, there are others that are best avoided altogether, such as corn flour and soy flour, which did not make the list as they are often produced from genetically engineered crops.
Many of the 20 alternative flours highlighted below are gluten-free. If you have celiac disease, a gluten intolerance or have chosen to go gluten-free for other reasons, you are very likely familiar with some of them. Gluten, by the way, is a protein made of glutenin and gliadin molecules that forms an elastic bond in the presence of water, thereby holding bread and cakes together and giving them a spongier texture.
Gluten is a concern because it interferes with your body's ability to break down and absorb nutrients from food. Gluten contributes to the formation of a glue-like, constipating lump in your gut that can interfere with proper digestion.
Undigested gluten prompts your immune system to attack your villi, the fingerlike projections lining your small intestine, resulting in side effects such as abdominal pain, diarrhea, constipation or nausea. Gluten consumption can also predispose you to increased inflammation, nutrient malabsorption and deficiencies and other health problems.
Eight Healthy Alternative Flours
The eight flours shown directly below are, in my opinion, the healthiest of the 20 alternative flours addressed in this article. Each is gluten- and wheat-free. Two of my personal favorites are almond and coconut flour. Again, you will need to experiment a bit to figure out which types of flours work best with your recipes. When in doubt, start with smaller amounts of each type of flour and adjust from there.
Almond1 — Almond is produced by grinding and sifting blanched almonds into a fine powder. (The terms almond flour and almond meal are often used interchangeably, but they are not the same. Almond meal is made by grinding almonds with their skins intact, a process that produces a coarser end product.) Because almonds are a tree nut, almond flour is naturally gluten- and wheat-free.
Almond flour is sweeter than other flours, low in carbohydrates and packed with protein and fiber. It is a good source of copper, magnesium, manganese, phosphorus and vitamin E. While almond flour can be used as a 1-to-1 replacement for wheat flour, it will have the effect of making baked goods denser and flatter than usual.
Amaranth2,3 — Amaranth flour is a gluten-free, wheat-free flour produced by grinding the seeds of the amaranth plant into a fine powder. Not only does amaranth flour contain all nine essential amino acids, but it is also a good source of calcium, iron, magnesium and phosphorus. While technically not a grain, amaranth flour is grain-like and is described as having an earthy, nutty taste.
Because it is a dense flour, you will achieve better results when blending amaranth with other flours. Start with 25 percent amaranth and adjust from there. It does best in pancakes and quick breads and can also be used to thicken roux, soups, stews and white sauces.
Arrowroot4,5 — Derived from the root of the plant of the same name, arrowroot flour (also known as arrowroot starch) is a tasteless, odorless powder useful as a thickening agent.
It is far superior to cornstarch, which is often genetically engineered. It also can be used as a breading for fish and meats or blended with other gluten-free/wheat-free flours to make baked goods.
Arrowroot contains a good amount of B vitamins, iron and potassium, but no protein, which gives it superior thickening power. As such, it is often used in confections because it creates a perfectly clear gel that can stand up to acidic ingredients and freezing. Accordingly, it is often used to thicken fruit gels and fruit sauces, including cranberry sauce and sweet and sour sauce.
Coconut6,7 — Coconut flour consists of the dried meat of fresh coconuts after they've been pressed to make coconut milk and most of the oil has been extracted. When used as a replacement for conventional flour, it adds a mild coconut flavor while imparting a rich texture and natural sweetness.
Coconut flour is nutritious, in part, because it boasts the highest percentage (48 percent) of dietary fiber of any flour. It's also a good source of protein, while being very low in carbohydrates. And, it's naturally gluten- and wheat-free.
You can turn standard baked goods into delicious gluten-free, low-carb paleo treats by replacing the wheat flour with coconut flour and adding eggs. On average, add one egg for every ounce of coconut flour used — this will help the ingredients hold together when baked. Also, because it is very dense, you will need to slightly increase the liquids in recipes involving coconut flour.
As a general rule of thumb, you can replace one-fifth of the flour in a recipe with coconut flour without compromising the taste or texture of the finished product. For a delicious breakfast treat, check out my recipe for coconut flour almond meal pancakes.
Hemp8 — Hemp flour (also known as hemp powder) is produced by milling and sifting hemp seeds after they are crushed to extract the oil. Hemp flour is gluten- and wheat-free and adds a mild, nutty flavor to baked goods. It is about 33 percent protein, making it a great source of amino acids. It is high in fiber, iron, magnesium and zinc.
This dense flour does best when combined with other alternative flours for baking. Limiting hemp powder to 25 percent of your flour blend will ensure a lighter texture, especially when baking bread. Due to its oily nature, hemp powder will go rancid unless it is refrigerated.
Millet9,10,11 — Millet is an ancient, drought-resistant grain — part of the grass family — grown widely in China, India and countries surrounding the Sahara Desert in western Africa. It has a protein structure similar to wheat, but is gluten- and wheat-free. It boasts a sweet, buttery, cornmeal-like flavor.
Millet is a good source of B vitamins and offers a decent amount of copper, manganese, magnesium, potassium and zinc. That said, millet also contains goitrogens, dietary substances known to impair your thyroid and iodine metabolism.
In countries in which millet is consumed as a staple, the development of goiter is common.12,13 As such, you'll want to moderate your intake.
Sorghum14,15 — Sorghum flour, which is both gluten- and wheat-free, is ground from the grain of the same name. It is an important dietary staple for some 9 million people worldwide, and is used often in Africa and India to make porridge and flat, unleavened breads. The Ethiopian flatbread called injera and a particular type of Indian roti are both made with sorghum.
Sorghum flour is a good source of antioxidants, B vitamins, fiber, iron phosphorus and protein. It has a mild, slightly sweet taste, which makes it a good addition to flour blends. It does not work well in cup-for-cup substitutions with regular flour.
Tapioca (cassava)16,17 — Tapioca flour is derived from the root of the cassava plant, producing a fine white flour useful as a thickener for gravies, sauces, soups and stir-fries. Tapioca adds chewiness to gluten-free and wheat-free baked items, and can be stored at room temperature for long periods of time.
Due to its bland taste, blending tapioca with other flours is best when using it for baking. Start by using 25 percent tapioca in your gluten-free blends and adjust according to your preference. When using sorghum flour for baking, you may want to increase your liquids slightly or add an extra egg to increase moisture content. If you are a diabetic or prediabetic, tapioca, as a digestive-resistant starch, is one of the recommended superfoods for diabetics.
Two additional "flours" I want to bring to your attention are those derived from cauliflower and macadamia nuts. To me, "cauli-flour" is simply riced cauliflower that can be spiced up to make a tasty flatbread or pizza crust. You can rice cauliflower by placing pieces of raw, washed cauliflower in your food processor and blending it until it is reduced to tiny, rice-sized pieces.
If you like cauliflower, check out these delicious recipes for nutritious golden cauliflower flatbread and cauliflower pizza crust. By using cauliflower instead of grain flours in these recipes, you replace starchy carbohydrates with whole-food nutrition and cut calories, while satisfying your craving for bread.
Similar to almond flour, macadamia flour is produced by using your food processor to transform whole, raw macadamia nuts into a fine powder. Macadamia flour has a sweet, nutty taste and is a healthy gluten-free, low-carb option. Macadamia flour is lower in both carbs and protein than almond flour. For a new taste twist, you can substitute macadamia flour into recipes calling for almond flour, including the coconut-almond pancake recipe mentioned above.
12 Flours to Avoid if You Want to Minimize Harmful Lectins
The 12 flours highlighted below are often touted as healthy alternatives to wheat, especially when it comes to gluten-free diets, whether it be celiac disease or simply a matter of personal preference. While some of these alternative flours are considered nutritious solely based on the amount of fiber, protein, vitamins and minerals they contain, their health benefits may be overshadowed by the presence of harmful plant lectins.
Lectins are sugar-binding plant proteins that attach to your cell membranes and can be a hidden source of weight gain and ill health, even if you eat an otherwise healthy diet. Many lectins are proinflammatory, immunotoxic, neurotoxic and cytotoxic.
Certain lectins may also increase blood viscosity, interfere with gene expression and disrupt endocrine function. Because the following flours are high in lectins, I recommend you use them sparingly or avoid them entirely, especially if you have an autoimmune disease.
Barley18 — Barley flour is made from milled whole grain barley that's had its outer husk removed. This wheat-free flour contains some gluten and has a slightly sweet, nutty flavor. Barley flour is rich in fiber. Similar to oat flour (discussed later), it contains high amounts of soluble fiber composed of indigestible sugars called beta-glucans, which have been shown to lower your blood pressure.
For best results, use barley flour in a blend with other flours, and limit it to about 25 percent of the overall mix. It can also be used to thicken or flavor soups or stews.
Buckwheat19,20 — Despite its name, buckwheat (also known as kasha when its toasted) flour is not a form of wheat, but actually a relative of rhubarb. Because it is ground from seeds, buckwheat flour is both gluten- and grain-free. Due to its strong nutty taste, which can be overpowering and somewhat bitter, buckwheat flour should not stand alone in a recipe.
Buckwheat, which is a good source of calcium, fiber and protein, is a very fine flour and can be used as a substitute for cornstarch in gluten-free bread recipes. Buckwheat is a low-glycemic carbohydrate offering better satiety than wheat bread, so you'll feel fuller longer. You can replace regular flour with buckwheat flour cup-for-cup. It is said to make excellent waffles and pancakes, including Russian blinis, as well as French buckwheat crepes.
Chia21,22 — Chia flour is produced from ground chia seeds and is touted as a superfood because it is a source of concentrated energy and nutrition. Chia flour boasts a high calcium, fiber, omega-3 and protein content. When baking with chia flour, you will need to increase the amount if liquids and cooking time to achieve the best results. Chia flour is gluten- and wheat-free.
Chickpea23,24 — Also known as garbanzo bean flour, chickpea flour possesses a distinctive, slightly nutty taste that does not do well on its own. When substituting it for conventional flours, use very small amounts in combination with other gluten- and wheat-free flours, otherwise its distinctive taste may dominate. Chickpea flour is high in fiber, folate, manganese and protein.
Lupin25,26 — Lupin flour is derived from the "sweet lupin" legume that is in the same family as peanuts and soybeans. As such, this gluten- and wheat-free flour is high in fiber and protein and low in fat. The major caution about lupin flour is the possibility it may be life-threatening if you have a peanut or soybean allergy. Similar to other gluten-free grains, lupin does best when included in a flour blend.
Oat27,28 — Oat flour is made from ground oats, which can be concerning if you have celiac disease since oats are often contaminated with wheat. Even if you avoid wheat, you still need to contend with avenin, a protein in oats that is similar to gluten and therefore can have negative effects on celiac sufferers.
Oat flour is often thought to be a healthy choice because it contains high amounts of soluble fiber comprised of indigestible sugars called beta-glucans, shown to lower your blood pressure. Oat flour is well suited for baking, but absorbs liquids, so plan to increase liquid ingredients when using it. Oat flour goes rancid quickly, so store it in your refrigerator or freezer, or make small batches using a food processor.
Potato29 — Potato flour and potato starch, both of which are gluten- and wheat-free, are often confused. Potato flour possesses a very strong potato flavor, as well as the heaviness of potato. For these reasons, a little goes a long way in a recipe. It also has a short shelf life, so buy it only when you plan to use it.
Potato starch, on the other hand, has a light potato flavor and a consistency similar to cornstarch or tapioca. It has a longer shelf life, is a good thickener and has a taste virtually undetectable in recipes. If you are a diabetic or prediabetic, potato starch is one of the digestive-resistant starches recommended for diabetics. Both the flour and the starch cannot stand alone in recipes, and will do better when blended with other gluten-free flours.
Quinoa30,31 — Quinoa flour is produced from milled quinoa seeds. This ancient grain with a nutty flavor is both gluten- and wheat-free. It is recognized for its high amounts of lysine and isoleucine that enable it to be a complete protein source. It is one of the few plant foods containing all nine essential amino acids.
As a whole grain or flour, quinoa is particularly rich in two flavonoids, kaempferol and quercetin, which have antioxidant properties. Quinoa flour tends to dry out baked goods when used in large amounts. For that reason, it is best to use only small amounts of this flour in sweets such as muffins and quick breads.
Rice32,33 — Both brown and white rice flour are gluten- and wheat-free. Brown rice flour is the heavier, grainer of the two. While it has a higher nutritional content than its white cousin, brown rice flour can be a bit grainy and heavy in some recipes. Similar to potato and tapioca, brown rice flour is one of the digestive-resistant starches recommended if you are a diabetic or prediabetic.
Brown rice flour has a slightly nutty flavor, whereas white rich flour is quite bland. Given that white rice flour is milled from polished white rice, it has very little nutritional value. Its strength is in the light texture it imparts, making it ideal in recipes such as dumplings and pizza crust.
Keep in mind that rice contains chitin-binding lectins, which are similar to wheat lectin. Because chitins are long polymers of n-acetyl-glucosamine, the primary binding target of wheat lectin, wheat lectin and chitin-binding lectin are functionally identical. Given this reality, in my opinion, a grain-free diet often yields far superior health benefits as compared to a diet focused solely on eliminating wheat- and gluten-containing grains.
Rye34,35 — Rye flour is a dark flour that possesses a distinctive flavor. It is wheat-free and has a low gluten content. Breads made with rye flour tend to be denser than those made with wheat. When milled, rye flour retains the germ, endosperm and bran, making it more nutritious than refined wheat flour. Rye flour is a good source of B vitamins, iron, magnesium, phosphorus and zinc, as well as fiber and protein.
When used in baking, rye flour, due to its lower gluten content than wheat flour, is less elastic and therefore produces bread that is less airy. Rye dough also contains more free sugars than wheat, so it ferments faster.36
Spelt37,38 — Spelt flour results from the milling of an ancient grain of the same name. Spelt flour contains a low amount of gluten, but is not entirely gluten-free. It is a good source of B vitamins, manganese, magnesium, phosphorus and zinc, and rich in fiber and protein. Spelt tends to absorb more moisture than wheat flour, so you will want to reduce liquids by 25 percent when substituting it.
When using spelt flour to make bread, take care to knead it lightly otherwise it will become dense. Spelt flour produces a bread similar in color to light rye, with a slightly sweet and nutty flavor. Some varieties of crackers and pretzels are made with spelt flour.
Teff39,40 — Teff flour is made from milled teff, a tiny cereal grain originating from northern Africa. Teff flour is a primary ingredient in the spongy, slightly-sour flatbread called injera that is eaten daily in countries such as Eritrea and Ethiopia.
It is both gluten- and wheat-free, with a mild, nutty flavor. Teff is an excellent source of amino acids, and is high in calcium, iron and protein. Much of its fiber is a type known as resistant starch, which has been linked to health benefits such as improved blood sugar and weight management.
Final Thoughts About Alternative Flours
Using alternative flours will require patience and can be quite a challenge. If you are living a gluten-free lifestyle — either due to celiac disease, a gluten or wheat intolerance or simply as a matter of personal preference — you will need to do some experimenting to achieve your desired outcomes. The struggles and rewards of gluten-free baking come in blending several flours, adding eggs and adjusting liquids.
The biggest adjustment, however, will be in your expectations for the finished product. No matter how many techniques and tricks you use, it is virtually impossible to replicate the elasticity of gluten in most baked goods, particularly in yeast breads. In time, however, you'll acquire a taste for denser, flatter treats made with one or more of the healthy alternative flours.
As you make a conscious choice to eat less wheat-containing foods, or perhaps to avoid wheat altogether, mainly because it is an inflammatory food, you'll be happier and healthier. I would say the same for the alternative flours containing lectins — it's better to avoid them or moderate your use. If you are looking for new ideas for gluten-free cooking and baking, check out my Healthy Gluten-Free Recipes.
from
http://articles.mercola.com/sites/articles/archive/2019/04/22/flour-alternatives.aspx
source http://niapurenaturecom.weebly.com/blog/20-alternative-flours-you-should-know
0 notes
Text
How to Get an Open Crumb with Whole Grain Sourdoug...
New Post has been published on https://makesomethingtasty.com/how-to-get-an-open-crumb-with-whole-grain-sourdoug/
How to Get an Open Crumb with Whole Grain Sourdoug...
amzn_assoc_placement = "adunit0"; amzn_assoc_tracking_id = "pramedgro-20"; amzn_assoc_ad_mode = "search"; amzn_assoc_ad_type = "smart"; amzn_assoc_marketplace = "amazon"; amzn_assoc_region = "US"; amzn_assoc_title = "Shop Related Products"; amzn_assoc_default_search_phrase = "cooking"; amzn_assoc_default_category = "Kitchen"; amzn_assoc_linkid = "51fe4d035c7af8dc5928e6f5e5b79c4e"; amzn_assoc_default_browse_node = "284507"; amzn_assoc_rows = "4"; amzn_assoc_design = "text_links";
Several months ago, I began a quest to make whole wheat sourdough artisan bread with an open crumb. As we bakers know, refined flour tends to produce a more open, airy bread, whereas whole grain flour usually makes a denser bread. Now, a tight-crumb bread can be fantastic (pumpernickel, rye, vollkornbrot), but the pursuit of an open crumb is enticing and challenging.
My goal was to find the conditions and techniques that might coax an open crumb out of whole grain bread, but at the same time not be overly burdensome to the baker. For example, I don’t enjoy the process or clean-up of sifting out bran, so I avoided the technique where you remove the bran, boil it, and then reintroduce it into the dough.
So why bake with whole grain flour?
Nutrition and flavor.
On the nutrition front, there are significantly more nutrients in the bran and germ of wheat, which are removed in refined (roller milled, white) flour. You can see how much more vitamins, minerals, fiber, and protein are in whole wheat flour vs. refined and even enriched flour in the chart in this article from the Whole Grains Council. The importance of fiber specifically caught my attention earlier this year when I learned about numerous studies connecting high dietary fiber with a lower incidence of heart disease, cancer, diabetes and arthritis.
In terms of flavor, whole grain flour adds complexity to bread: different kinds of nuttiness, sometimes sweetness, sometime bitterness — always more character. The wheat is not only a medium for other foods (butter, jam, meat, cheese, tomatoes), but also brings its own flavor into play.
Note: This post contains bread baking concepts and terminology that may be unfamiliar to beginning bakers — particularly after the recipe, where I summarize the testing I did to arrive at the final version. Moreover, the recipe itself may be challenging because shaping a high hydration dough is difficult, especially the first few times you do it. The instructions and photo gallery should help with this, but you can always use slightly less water or more flour in your dough. Most importantly, please feel free to ask questions in the comments section of the blog/forum. The Breadtopia community is a welcoming place for bakers of all experience levels.
During this quest (which will actually never truly be over) I baked sixteen loaves of bread during nine rounds of baking. I looked at many variables: mixing to windowpane, stretching and folding, and cold vs room temperature bulk fermenting and final proofing, length of these stages and more.
I kept the wheat varieties and their ratio relatively constant but I did some loaves with home-milled wheat and others with Breadtopia-milled wheat, and once available, I used Breadtopia’s whole grain bread flour, which has a higher protein content. I used hard red and hard white wheat berries, turkey red wheat flour, hard white wheat flour, and hard red wheat bread flour.
I found the main contributors to crumb openness to be high hydration, spot-on fermentation, and high protein content of the wheat.
More water tended to mean a more open crumb, but often difficult handling and weaker bloom and score, except in the higher protein flour.
Too little fermentation meant a tight crumb and flat loaf, and too much fermentation resulted in a honeycomb-open crumb and flat loaf.
The protein content of the wheat (red wheat varieties and bread flour being the highest) impacted the dough’s ability to be cohesive rather than batter-like at a high hydration.
Doing some or all of the final proof at room temperature seemed to improve the crumb openness in the center of the loaf, whereas all-cold final proofs tended to have open edges and a tighter center of the loaf.
Gluten development through mixing to windowpane and stretching and folding did not contribute to crumb openness in my experiments, but these techniques often made for easier dough handling during shaping, and better bloom of the score during the bake.
In the recipe below, I give the ingredients and instructions for my most successful whole grain sourdough bread – a recipe I repeated to ensure that it wasn’t a fluke.
Then, below the recipe and the gallery, I outline some of my other test bakes with their formulas, photos, and my takeaway from each experience.
How to Get an Open Crumb with Whole Grain Sourdough Bread
Whole grain sourdough bread has phenomenal flavor and nutrition. The character of the wheat comes through with a full range of vitamins, minerals, fiber and protein. The ingredients and instructions in this recipe can help you achieve a tender and relatively open crumb in a beautiful artisan style, naturally leavened whole wheat bread.
Ingredients
400g Breadtopia whole grain bread flour (3 1/3 cups)
150g Breadtopia hard white wheat flour (1 1/3 cups)
510g water* (2 1/6 cups)
75g sourdough starter (1/4 cup)
10g salt (2 tsp)
2-3 Tbsp of rice flour or bran flakes for the proofing basket
*This amount of water, or even more, works well for home-milled wheat (more absorption) and whole grain bread flour (higher protein results in more ability to hold its shape). If you are using other whole grain flours, you might consider less water 20-40g, as your dough will be difficult to handle, though worth the effort if you are willing to wrangle batter. In the instructions below, I will go over strategies for shaping and preventing sticking.
Instructions
Mix all of the ingredients together for about 10 minutes. I suggest a 5 minute rest in between two rounds of approximately 2.5 minutes of active mixing. This can be done in a stand mixer first on low speed and then on medium (dough hook, scrape down sides a few times), or you can use a dough whisk for round one, and a method like the Rubaud method for round two. (See the video below this recipe for a demonstration.)
I did not see a benefit to the crumb in autolysing the flour and water, but you may choose to do this if it’s your preference.
Perform three rounds of stretching and folding at approximately 30 minutes, 1.5 hours and 2.5 hours after mixing. If your room temperature is mid-70sF or higher, do the stretching and folding closer together. And if you are using a lower protein flour, you may want to skip the stretching and folding, based on my findings explained below this recipe.
Retard the dough to the refrigerator for about 8-12 hours, but pay more attention to the dough than the clock. Stop the bulk fermentation when the dough looks puffy and has grown by about 50%.
Scrape the dough onto a dampened countertop, using wet fingertips or a wet dough scraper.
Gently shape the dough into a round and cover it with an inverted bowl for 15-45 minutes (more time if the dough felt tight and/or underdeveloped as you preshaped it, less if it was loose and/or proofy).
Uncover the dough and flour the top of it, smoothing the flour evenly on the dough surface with your palm. Then using a bench scraper, lift half the dough and slip your hand under it. Use the bench scraper on the other side to flip the dough over to its floured side.
Gently stretch the dough into a square.
See the gallery below to visualize the following shaping instructions. This is for an oval-shaped bread, but you can make a round bread instead by stitching from all sides, flipping and further rounding with your palms.
Fold up the bottom third of the dough. Fold inward the left and right sides. Then fold the top side of the dough down the to the bottom edge.
If the dough is stretchable / extensible, stitch the sides inward to make a tighter tube.
Roll the lower part of the dough upward and press it into the middle of the tube, Continue rolling and cinching the dough until it is flipped over.
Give the sides of the dough a few pinches to close the seams of the roll. Use your bench scraper to tighten the tube further if needed.
Let the dough sit for a minute or so to seal the bottom seam.
Line your proofing basket with bran flakes or rice flour. Then lift and flip the dough into the proofing basket. Stitch the dough more in the basket if it seems loose.
Cover and let proof 1-1.75 hours at room temperature. Many combinations of final proofing temperature and time will work e.g. 15 minutes at room temperature and 12 hours in the refrigerator, or 8 hours in the refrigerator and 1 hour at room temperature. Remember that the proofing will be much faster at room temperature, and that gases are compressed at cold temperatures, so the appearance of a cold dough can be flatter despite advanced proofing.
Preheat your oven to 475F for 30 minutes with your baking vessel inside.
Cover your basket with parchment paper and a cutting board, flip the entire contraption, and remove the basket.
Lift the parchment paper and dough into your hot baking vessel and score. I suggest scoring after lifting because the dough may spread as soon as it is cut, and I find it easier to transfer a taut dough.
Bake until the internal temperature is over 205F.
475F for 30 minutes, lid on
450F for 10 minutes, lid off
Let cool for several hours before cutting.
4.26
https://breadtopia.com/how-to-get-an-open-crumb-with-whole-grain-sourdough-bread/
My variation on the Rubaud method of hand-mixing dough from Breadtopia’s Whole Grain Spelt Ciabatta Recipe.
Examples of dough growth during bulk fermentation and final proofing
Start of bulk fermentation
A shaping technique (other methods also work well)
Descriptions and Photos from my Experimental Bakes
Disclaimer: I undertook these experiments with the intention of testing and observing the effects of different techniques and conditions. These results represent the experience of one baker however, and should not be taken as definitive conclusions on any of the subjects. Many variables impact the outcome of a loaf of bread, and I encourage you to engage in, and report on your own testing to add to the body of knowledge that is always evolving in the baking world.
If you’re not familiar with Baker’s Percentages, which I use in the explanations below, you can learn about them here.
Round 1 of experimentation used whole grain turkey red wheat flour and was 90% hydration. This bake involved a flour and water autolyse, and Rubaud hand mixing until both doughs passed the windowpane test. Then, the dough on the right had four rounds of stretching and folding at roughly 30-minute intervals. I believe I fermented this dough too little, and the stretching and folding was done too closely together for a slowly developing dough. As you can see from the photo, the dough (left) that wasn’t touched after mixing is a bit taller and more open than the dough on the right that was stretched and folded.
In Round 2 I used my Mockmill to mill hard white wheat and I used Breadtopia’s turkey red wheat flour at close to a 50:50 ratio, 85% hydration. These doughs had Rubaud style hand mixing, and then spent about 24 hours in the refrigerator, followed by one stretch and fold and 11 hours at room temperature. The final proof was at room temperature for 1.5 hours and in the refrigerator for about 9 hours. This bread turned out quite well, I believe in part because of the extended fermentation.
Round 3 was designed to learn the differences between Mockmilled flour and Breadtopia-milled flour. I used 60:40 red to white wheat, 85% hydration, Rubaud hand mixing, and one stretch and fold when transferring each dough to a clean bowl. The bulk fermentation was both room temperature and cold, and I believe spot on. However, I pushed the final proof very far in hopes of seeing a more open crumb. The loaves were flattish, and the crumb okay but not open. In addition to finding the too-far point of the final proof, I learned that the home-milled flour needs more water to feel the same hydration as the Breadtopia-milled flour, and that the home-milled is sweeter, all other factors being equal.
Homemilled left; Breadtopia milled right
Homemilled left; Breadtopia milled right
Round 4 again involved a Breadtopia-milled flour (turkey red and hard white) and a home-milled flour from hard red wheat berries and hard white wheat berries. This time 70:30 red to white wheat, 85% hydration for the Breadtopia dough, and 87% for the Mockmilled dough. For the homemilled flour, which came out of the mill at 90F, I used colder water to even the dough temperatures. These doughs were hand mixed Rubaud style and had one round of stretching and folding. They bulked 9.5 hours, final proofed for 15 minutes at room temperature and 12 hours in the refrigerator. They came out attractive on the outside and adequate on the inside. This is about when I started to think I needed to increase the hydration of the dough.
Homemilled on left; Breadtopia mill on right
For Round 5, before upping the hydration, I wanted to again test one more time the gluten building techniques of aggressive hand mixing, and stretching and folding, vs. leaving the dough alone. Using Breadtopia’s flour, I gave two doughs an autolyse of flour and water, followed by Rubaud hand-mixing the dough while adding the starter and salt. At this point in time, I also mixed a third dough, all ingredients in at once, just until the ingredients were incorporated. All three doughs were 60:40 turkey red to hard white wheat, 85% hydration.
The bread on the right had the autolyse, Rubaud, and four rounds of stretching and folding. It had the best oven spring and bloom to the crust.
The bread in the middle only had autolyse and Rubaud, and it spread more in the baking vessel, but had a similar crumb to the bread on the right.
The bread on the left was all-in and leave alone, and it had the most open crumb. It was also baked in a different shaped baker, so the experiment was flawed, but I still took away from this experiment the possibility that handling whole grain dough during fermentation is not helpful to open the crumb.
By Round 6, I was ready to push hydration in pursuit of an open crumb. Doing this with whole grain flour is more challenging than refined flour because the dough tends to spread and stick rather than hold its shape. This test bake was 70:30 hard red to hard white wheat and 93% hydration. I used a stand mixer with the dough hook on low speed for 2-3 minutes with 2 pauses to scrape down the sides of the bowl. I let the dough rest about 5 minutes, and then mixed on medium speed for another 2-3 minutes with 2 pauses to scrape. The bulk fermentation was about 8 hours. The final proof was 70 minutes at room temperature. The crumb was indeed more open, but the exterior of the bread suffered from a lack of tension (minimal bloom).
Challenging to shape, rice flour in banneton crucial
During Rounds 7 & 8 I applied what I learned about hydration to a mix of Breadtopia’s new whole grain bread flour (hard red wheat) and hard white wheat at a 73:27 ratio. This bake became the final recipe that is at the beginning of this blog post. The 93% hydration of the recipe is a splitting of the difference in the hydration levels I used in these two bakes. I mixed by hand as described in the recipe above, and then noting the good gluten development in this higher protein dough, I did three rounds of stretching and folding, but fairly spread apart. Both doughs had some refrigeration during the bulk fermentation, and none during the final proof. I used rice flour in the banneton in the oval loaf, and bran flakes in the round loaf. Although both doughs were relatively strong, Round 7 spread on the parchment when I scored, so for Round 8, I scored after lifting the dough into the hot baking vessel.
BONUS BAKE “microlevain”
70% home milled hard red wheat
30% home milled hard white wheat
95% water
1% starter (5g)
2% salt (10g)
Mixed all at once, bulked for 20 hours at room temperature. I didn’t track the final proof time (room temperature). See this thread in the forums for more information on this technique.
About the author
Melissa Johnson: Devoted bread baker, inspired by the science and art of sourdough.
(function(d, s, id) var js, fjs = d.getElementsByTagName(s)[0]; if (d.getElementById(id)) return; js = d.createElement(s); js.id = id; js.src = "http://connect.facebook.net/en_US/all.js#xfbml=1&appId="; fjs.parentNode.insertBefore(js, fjs); (document, 'script', 'facebook-jssdk'));
amzn_assoc_placement = "adunit0"; amzn_assoc_search_bar = "true"; amzn_assoc_search_bar_position = "bottom"; amzn_assoc_tracking_id = "pramedgro3-20"; amzn_assoc_ad_mode = "search"; amzn_assoc_ad_type = "smart"; amzn_assoc_marketplace = "amazon"; amzn_assoc_region = "US"; amzn_assoc_title = "Shop Related Products"; amzn_assoc_default_search_phrase = "cookware"; amzn_assoc_default_category = "All"; amzn_assoc_linkid = "b45319dac495d29e17b5eff312392025";
Source link
0 notes
Text
Why Bother With Breakfast?
Why Bother With Breakfast?
They say numbness is ecstasy however there are times when obliviousness of individuals makes me pitiful. One such example is when individuals don't think breakfast is essential and picked not to incorporate it in their schedule. It is said that one ought to eat like a lord for breakfast, ruler for lunch and popper for supper.weight loss diet plan in tamil Shockingly for some individuals, for reasons of their own, supper happens to be the greatest dinner and breakfast is the first to be skipped. I have dependably trusted that to an expansive degree, the type of food you eat will affect you general health so I think sustenance has an imperative influence in one's life, particularly the personal satisfaction. That is one reason why I require some serious energy and push to get ready great sustenance as well as to compose a considerable measure about it so I spread some mindfulness in what small amount way I can. Reason I say it makes me miserable is on account of the impacts of skipping breakfast may not be seen promptly. Be that as it may, after some time one should confront the outcomes. At the point when some of my companions say they don't eat I feel awful on the grounds that they are not doing any useful for their body. In this article I would like to outline what I have perused and comprehended about the significance of breakfast and furthermore some basic yet fast breakfast thoughts to make it simpler for youweight loss diet plan in tamil .
Give us a chance to take a gander at the effect of having or not eating to better comprehend why waste time with breakfast
1. Weight administration - many trust that skipping breakfast so they decrease calories would enable them to shed pounds. It can't be more distant from reality. When we rest amid the night, our body backs off, so digestion backs off. When we have a remark in the morning, we are adequately giving the flag to the body that the day has started and digestion should increment. In any case, individuals who skip breakfast preclude their body from securing this flag so they feel drowsy as they proceed until lunch with moderate digestion. When one feels languid and drained, one tends to work less, physically and thusly consumes less calories. Additionally, when the body is denied of nourishment for quite a while, longings start, particularly sugar yearnings. This is the point at which we have a craving for nibbling on a chocolate bar or a huge biscuit or cakes and so on. This successfully builds the calorie utilization. In outline, a moderate digestion, tired body consuming lesser calories and unhealthy/fat tidbits viably add to weight put on and not weight reduction. We as a whole continue finding out about the various medical issues that can accompany being overweight, particularly danger of heart maladies and skipping breakfast can conceivably prompt being overweight.
2. Brought down comprehension - thinks about have said to have demonstrated that youngsters who eat admission preferable in critical thinking over kids who skip breakfast.
Keep in mind that it isn't only whatever is left of the body that gets vitality from processed nourishment yet in addition the cerebrum. At the point when the mind is low on vitality, one can't anticipate that it will work adequately. A few examinations additionally demonstrate that kids who skip breakfast will probably have issues concentrating and furthermore have issues with memory when contrasted and kids who eat.
3. Sort 2 diabetes - skipping breakfast is said to expand the danger of creating sort 2 diabetes. On the off chance that one is as of now diabetic, it is all the more critical to keep sugar variances low which implies the body must be nourished at customary interims. Diabetes is a condition of the body that isn't especially simple to oversee as the intricacies of diabetes can be intense from losing visual perception, heart assaults, being cut off. On the off chance that one is now overweight, the entanglements deteriorate. The impact of diabetes may not be known instantly but rather the body will weaken continuously. Monitoring the glucose is completely critical while living with diabetes and skipping suppers, that too breakfast will be exceedingly counter-gainful for diabetes administration.
4. Menstrual abnormalities - a few examinations are said to have demonstrated that young ladies/ladies who skip breakfast are probably going to have unpredictable periods.
5. Poor disposition - low glucose is said to be in charge of fractiousness weakness and tiredness. A few investigations demonstrate that individuals who skip breakfast snap at others all the more effortlessly.
To me the danger of weight pick up (and all related wellbeing dangers due to being overweight) and danger of diabetes alone are sufficient to influence me to keep running for my breakfast. With regards to kids, it is imperative to set up adhering to a good diet propensity at a beginning period and for that, eating is vital. With kids getting less and less recess and exercise nowadays it is all the more critical for them to practice good eating habits. There is no reason for sending them to class to learn stuff in the event that they can't think and as guardians, we have to give them sufficient help to empower them to learn. Ideally, at this point you are in any event considering eating.
I originate from a tamil Brahmin family and Brahmin supper design is very notable in light of the fact that the vast majority of them have a major mid morning feast, later toward the evening a tiffin or lighter dinner is expended while supper at times is fluid admission or organic products or a few oats, if not curd rice. Reason I specify that will be that albeit a few people condemn them for having a substantial dinner that early, what current dieticians are exhorting is essentially comparable - have a major breakfast. The feast would regularly comprise of rice (starches), dal (protein), vegetables (vitamins and minerals) and ghee (fat) and unless I failed to understand the situation, this is the thing that constitutes an adjusted supper. At this day and age, we scarcely have room schedule-wise to make all these before we leave the ways to work and neither would our working hours permit such a timetable. Along these lines, what are some snappy breakfast arrangements you could attempt.
1. Oats porridge - heat up a few tablespoon of oats in water until the point when it is done (normal oats is superior to anything speedy cooking and genuinely does not set aside much opportunity to cook in any case). In the event that you like it sweet, include some drain, sugar or nectar or some other sensible sweetener of decision. On the off chance that you like appetizing, at that point include some buttermilk and minimal salt and expend. In any case, have a banana or some other product of decision.
2. Breakfast shake - drain shake or smoothies influence awesome to breakfast. Mix a banana sweetened with date syrup or some other characteristic sweetener (keep away from engineered sweetners or refined sugar) alongside some drain. Top with squashed nuts and drink. Including oat drain rather than bovine's drain can help diminish calories and fat and furthermore loan to fiber admission. You could attempt the same with apple as well. You could likewise utilize a spoon of wheat germ as fixing.
3. Biscuit - having a low sugar, wheat stacked biscuit is an incredible approach to top you off for the morning. Top a solid biscuit with berries and eat alongside a glass of juice. A lot of solid biscuit formulas are accessible, take a stab at making enough finished the end of the week itself. I would say it most likely takes in regards to 10 minutes to influence the biscuit to hitter and around 20 minutes heating time and that would be your breakfast arranged for seven days!
4. Breakfast sandwich - you could make these with scraps as well. You could utilize chapattis or pita breads or wholemeal breads and stuff them with left finished sabjis or any vegetable of decision. Throughout the ends of the week I tend to rapidly sauté ground courgette, flavor it with cumin, crisp and coriander powder and make a flame broiled wholemeal sandwich. This causes me get one of my five daily vegetables also. You can attempt the same with paneer or ground cauliflower, cabbage and so on. Nutty spread sandwich is a decent choice also.
5. Toast and beans - beans likewise add to one of five daily. This alternative is alright on the off chance that you have sufficient energy to take a seat and have your breakfast.
6. Low fat pancakes - I make my own particular hotcake which is more chewy than normal ones. I utilize next to no darker sugar however include dry products of the soil syrup to sweeten. Trust it or not little bits of these oats rich no additional fat hotcakes are an awesome begin to the day.
7. Multi grain porridge - back home it is regular practice for mothers to make a multi grain powder. It generally comprises or wheat, grain, finger millet, sago, almonds and cardamom for enhancing. One can include couple of stacked spoons of this to water, convey to bubble while mixing, include jaggery or sugar and drain.
8. Solid flapjacks - influence your own hotcake to blend by including either the previously mentioned porridge powder or wholewheat powder alongside some millet powder. Include squashed banana or pureed apple or blueberries, on the off chance that you need it sweeter, add syrup like dates syrup to make a player. I tend to avoid the heating powder or pop bicarb as it represses sustenance retention weight loss diet plan in tamil. You could add minimal universally handy flour to ease flipping the flapjack. Pour the player on hot tava and shower oil/margarine/ghee. Cook the two sides, eat.
9. Bread omelet - beat an egg and include salt and required vegetables like tomato, onion, mushroom and so on and make an omelet. Snatch couple of toasts and a glass of juice. Having protein prior in the day is said to be superior to later.
10. Museli - consolidate wheat chips, oat drops, rye pieces, grain chips with some dry natural products like raisins, currants, seeds like pumpkin seed. Present with regular foods grown from the ground.
11. Speedy French toast - cut couple of bread cuts into four triangles each. Plunge them in beaten egg (season it as required) and cook on hot tava. Shower some oil or spread while cooking. Cook the two sides and that is a decent breakfast in a hurry.
12. Millet gruel - Millet is typically viewed as poor man's nourishment however truth is many individuals who buckle down physically have ragi gruel regularly for breakfast. It keeps them full for long in spite of the fact that they are associated with exceptional work. One method for getting ready is like multi grain porridge specified already. Another technique is to blend it with some buttermilk and let it sit overnight. Next morning include little water if necessary and cook while blending, until the point when it is sparkling. Season with salt and drink. Millets are low fat protein sources.
I trust no less than maybe a couple of the above choices suit your
Why Bother With Breakfast?
weight lose, weight loss, weight loss diet plan in tamil
via usefullovely http://ift.tt/2As5QW2
0 notes
Last Seen Blogs

amanda-boston-blog
You Never Knew Me

meikerio
meiker.io

ahkeembrown
Untitled

nekoma-2-0
Nekoma 2.0

artursadlos
Artur Sadlos