#i whipped put my calculator and did a little hypothetical equation for myself
Text
7,876... idk what to say. I wrote and wrote until the creativity voice went quiet for the day. Let's hope I'm this productive tomorrow!
#writing#smut#coriolanus snow smut#tbosas movie#the ballad of songbirds and snakes#coriolanus snow#coriolanus snow x reader#tbosas#you know what I realized?#i whipped put my calculator and did a little hypothetical equation for myself#i put what if for every section of this fic I wanna writing#I wrote 7000 words#then I multiplied it ×4 because that how many sections I plan to have and you guys...#2800 WORDS! that like a fairly small novella but a novella#notheless#I'm-#I'm trying I'm hope I get this done and if I don't I forget about the other parts and just release what already have written#but that's a last result for me because i really want it to be formatted as one thing#also how are we feeling about slightly dom!reader?#because that's the vibes the reader gives off to me in this one#don't blame me blame my imagination that came up with her#anyways slay lol#but honestly this is probably the most driven I've felt to finish something in months#but I don't want to jinx myself#knock on wood#coffee (my silly little (rabbit) caramel frappe I make at home) is helping me get through#i hopped on caffeine and the ideas start spewing out on me sometimes or I just get tachycardia#winning
13 notes
·
View notes
Text
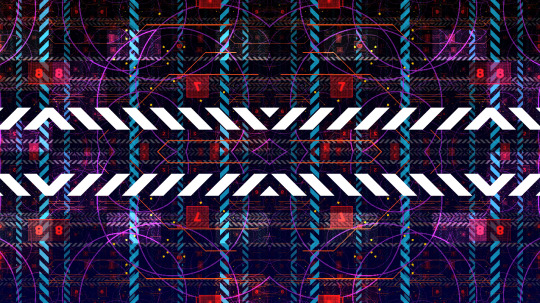
A breakdown of the Revision 2020 Threeway Battle shader
Those of you who have been following this year's edition of Revision probably remember the unexpected twist in Sunday's timeline, where I was pitted in a coding "battle" against two of the best shader-coders in the world to fend for myself. Admittedly the buzz it caused caught me by surprise, but not as much as the feedback on the final shader I produced, so I hope to shed some light on how the shader works, in a way that's hopefully understandable to beginners and at least entertaining to experts, as well as providing some glimpses into my thought process along the way.
youtube
Recorded video of the event
But before we dive into the math and code, however, I think it's important to get some context by recounting the story of how we got here.
A brief history of demoscene live-coding
Visual coding has been massively opened up when graphics APIs began to introduce programmable fragment rendering, perhaps best known to most people as "pixel shaders"; this allowed programmers to run entire programmable functions on each pixel of a triangle, and none was more adamant to do that than a fellow named Iñigo Quilez (IQ), an understated genius who early on recognized the opportunity in covering the entire screen with a single polygon, and just doing the heavy lifting of creating geometry in the shader itself. His vision eventually spiraled into not only the modern 4k scene, but also the website ShaderToy, which almost every graphics programmer uses to test prototypes or just play around with algorithms. IQ, an old friend of mine since the mid-00s, eventually moved to the US, worked at Pixar and Oculus, and became something of a world-revered guru of computer graphics, but that (and life) has unfortunately caused him to shift away from the scene.
His vision of single-shader-single-quad-single-pass shader coding, in the meantime, created a very spectacular kind of live coding competition in the scene where two coders get only 25 minutes and the attention of an entire party hall, and they have to improvise their way out of the duel - this has been wildly successful at parties for the sheer showmanship and spectacle akin to rap battles, and none emerged from this little sport more remarkably than Flopine, a bubbly French girl who routinely shuffled up on stage wearing round spectacles and cat ears (actually they might be pony ears on second thought), and mopped the floor up with the competition. Her and a handful of other live-coders regularly stream on Twitch as practice, and have honed their live-coding craft for a few years at this point, garnering a considerable following.
youtube
Just a sample of insanity these people can do.
My contribution to this little sub-scene was coming up with a fancy name for it ("Shader Showdown"), as well as providing a little tool I called Bonzomatic (named after Bonzaj / Plastic, a mutual friend of IQ and myself, and the first person to create a live coding environment for demoparties) that I still maintain, but even though I feel a degree of involvement through the architectural side, I myself haven't been interested in participating: I know I can do okay under time pressure, but I don't really enjoy it, and while there's a certain overlap in what they do and what I do, I was always more interested in things like visual detail and representative geometry aided by editing and direction rather than looping abstract, fractal-like things. It just wasn't my thing.
Mistakes were made
But if I'm not attracted to this type of competition, how did I end up in the crossfire anyway? What I can't say is that it wasn't, to a considerable degree, my fault: as Revision 2020 was entirely online, most of the scene took it to themselves to sit in the demoscene Discord to get an experience closest to on-site socializing, given the somber circumstances of physical distancing. This also allowed a number of people who hasn't been around for a while to pop in to chat - like IQ, who, given his past, was mostly interested in the showdowns (during which Flopine crushed the competition) and the 4k compo.
As I haven't seen him around for a while, and as my mind is always looking for an angle, I somehow put two and two together, and asked him if he would consider taking part in a showdown at some point; he replied that he was up for it - this was around Saturday 10PM. I quickly pinged the rest of the showdown participants and organizers, as I spotted that Bullet was doing a DJ set the next day (which would've been in a relatively convenient timezone for IQ in California as well), and assumed that he didn't really have visuals for it - as there was already a "coding jam" over Ronny's set the day before, I figured there's a chance for squeezing an "extra round" of coding. Flopine was, of course, beyond excited by just the prospect of going against IQ, and by midnight we essentially got everything planned out (Bullet's consent notwithstanding, as he was completely out of the loop on this), and I was excited to watch...
...that is, until Havoc, the head honcho for the showdowns, off-handedly asked me about an at that point entirely hypothetical scenario: what would happen if IQ would, for some reason, challenge me instead of Flopine? Now, as said, I wasn't really into this, but being one to not let a good plan go to waste (especially if it was mine), I told Havoc I'd take one for the team and do it, although it probably wouldn't be very fun to watch. I then proceeded to quickly brief IQ in private and run him through the technicalities of the setup, the tool, the traditions and so on, and all is swell...
...that is, until IQ (this is at around 2AM) offhandedly mentions that "Havoc suggested we do a three-way with me, Flopine... and you." I quickly try to backpedal, but IQ seems to be into the idea, and worst of all, I've already essentially agreed to it, and to me, the only thing worse than being whipped in front of a few thousand people would be going back on your word. The only way out was through.
Weeks of coding can spare you hours of thinking
So now that I've got myself into this jar of pickles, I needed some ideas, and quick. (I didn't sleep much that night.) First off, I didn't want to do anything obviously 3D - both IQ and Flopine are masters of this, and I find it exhausting and frustrating, and it would've failed on every level possible. Fractals I'm awful at and while they do provide a decent amount of visual detail, they need a lot of practice and routine to get right. I also didn't want something very basic 2D, like a byte-beat, because those have a very limited degree of variation available, and the end result always looks a bit crude.
Luckily a few months ago an article I saw do rounds was a write-up by Sasha Martinsen on how to do "FUI"-s, or Fictional User Interfaces; overly complicated and abstract user interfaces that are prominent in sci-fi, with Gmunk being the Michael Jordan of the genre.
Image courtesy of Sasha Martinsen.
Sasha's idea is simple: make a few basic decent looking elements, and then just pile them on top of each other until it looks nice, maybe choose some careful colors, move them around a bit, place them around tastefully in 3D, et voilà, you're hacking the Gibson. It's something I attempted before, if somewhat unsuccessfully, in "Reboot", but I came back to it a few more times in my little private motion graphics experiments with much better results, and my prediction was that it would be doable in the given timeframe - or at least I hoped that my hazy 3AM brain was on the right track.
A bit of math
How to make this whole thing work? First, let's think about our rendering: We have a single rectangle and a single-pass shader that runs on it: this means no meshes, no geometry, no custom textures, no postprocessing, no particle systems and no fonts, which isn't a good place to start from. However, looking at some of Sasha's 3D GIFs, some of them look like they're variations of the same render put on planes one after the other - and as long as we can do one, we can do multiple of that.
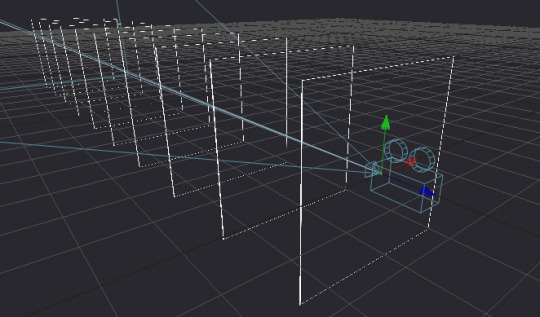
Rough sketch of what we want to do; the planes would obviously be infinite in size but this representation is good enough for now.
Can we render multiple planes via a single shader? Sure, but we want them to look nice, and that requires a bit of thinking: The most common technique to render a "2D" shader and get a "3D" look is raymarching, specifically with signed distance fields - starting on a ray, and continually testing distances until a hit is found. This is a good method for "solid-ish" looking objects and scenes, but the idea for us is to have many infinite planes that also have some sort of alpha channel, so we'd have a big problem with 1) inaccuracy, as we'd never find a hit, just something "reasonably close", and even that would take us a few dozen steps, which is costly even for a single plane and 2) the handling of an alpha map can be really annoying, since we'd only find out our alpha value after our initial march, after which if our alpha is transparent we'd need to march again.
But wait - it's just infinite planes and a ray, right? So why don't we just assume that our ray is always hitting the plane (which it is, since we're looking at it), and just calculate an intersection the analytical way?
Note: I would normally refer to this method as "raytracing", but after some consultation with people smarter than I am, we concluded that the terms are used somewhat ambiguously, so let's just stick to "analytical ray solving" or something equally pedantic.
We know the mathematical equation for a ray is position = origin + direction * t (where t is a scalar that represents the distance/progress from the ray origin), and we know that the formula for a plane is A * x + B * y + C * z + D = 0, where (A, B, C) is the normal vector of the plane, and D is the distance from the origin. First, since the intersection will be the point in space that satisfies both equations, we substitute the ray (the above o + d * t for each axis) into the plane:
A * (ox + dx * t) + B * (oy + dy * t) + C * (oz + dz * t) + D = 0
To find out where this point is in space, we need to solve this for t, but it's currently mighty complicated. Luckily, since we assume that our planes are parallel to the X-Y plane, we know our (A, B, C) normal is (0, 0, 1), so we can simplify it down to:
oz + dz * t + D = 0
Which we can easily solve to t:
t = (D - oz) / dz
That's right: analytically finding a ray hit of a plane is literally a single subtraction and a division! Our frame rate (on this part) should be safe, and we're always guaranteed a hit as long as we're not looking completely perpendicular to the planes; we should have everything to start setting up our code.
Full disclosure: Given my (and in a way IQ's) lack of "live coding" experience, we agreed that there would be no voting for the round, and it'd be for glory only, but also that I'd be allowed to use a small cheat sheet of math like the equations for 2D rotation or e.g. the above final equation since I don't do this often enough to remember these things by heart, and I only had a few hours notice before the whole thing.
Setting up the rendering
Time to start coding then. First, let's calculate our texture coordinates in the 0..1 domain using the screen coordinates and the known backbuffer resolution (which is provided to us in Bonzomatic):
vec2 uv = vec2(gl_FragCoord.x / v2Resolution.x, gl_FragCoord.y / v2Resolution.y);
Then, let's create a ray from that:
vec3 rayDir = vec3( uv * 2 - 1, -1.0 ); rayDir.x *= v2Resolution.x / v2Resolution.y; // adjust for aspect ratio vec3 rayOrigin = vec3( 0, 0, 0 );
This creates a 3D vector for our direction that is -1,-1,-1 in the top left corner and 1,1,-1 in the bottom right (i.e. we're looking so that Z is decreasing into the screen), then we adjust the X coordinate since our screen isn't square, but our coordinates currently are - no need to even bother with normalizing, it'll be fine. Our origin is currently just sitting in the center.
Then, let's define (loosely) our plane, which is parallel to the XY plane:
float planeDist = 1.0f; // distance between each plane float planeZ = -5.0f; // Z position of the first plane
And solve our equation to t, as math'd out above:
float t = (planeZ - rayOrigin.z) / rayDir.z;
Then, calculate WHERE the hit is by taking that t by inserting it back to the original ray equation using our current direction and origin:
vec3 hitPos = rayOrigin + t * rayDir;
And now we have our intersection; since we already know the Z value, we can texture our plane by using the X and Y components to get a color value:
vec4 color = fui( hitPos.xy ); // XY plane our_color = color;
Of course we're gonna need the actual FUI function, which will be our procedural animated FUI texture, but let's just put something dummy there now, like a simple circle:
vec4 fui ( vec2 uv ) { return length(uv - 0.5) < 0.5 ? vec4(1) : vec(0); }
And here we go:
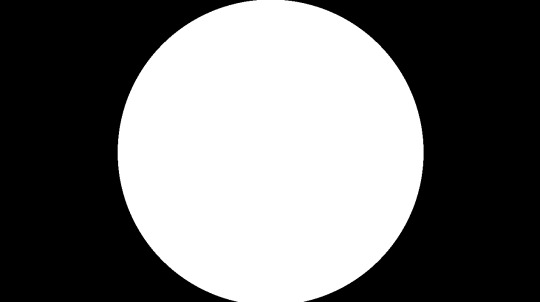
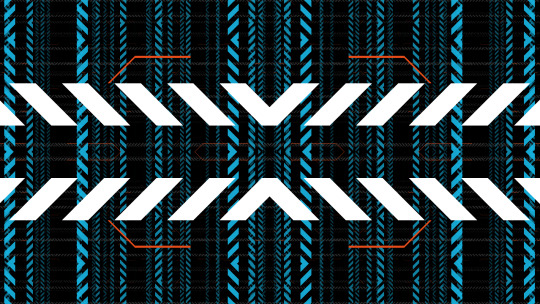
Very good, we have a single circle and if we animate the camera we can indeed tell that it is on a plane.
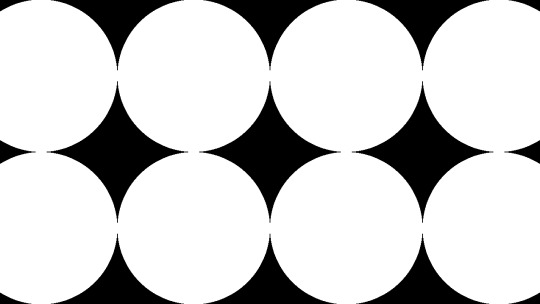
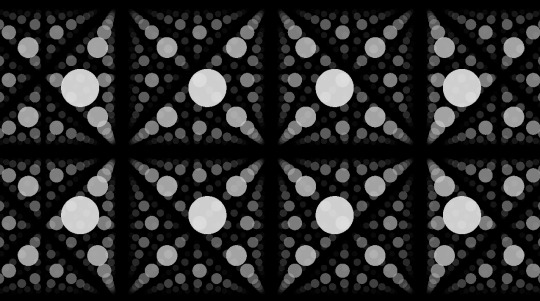
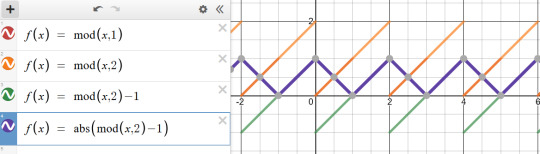
So first, let's tile it by using a modulo function; the modulo (or modulus) function simply wraps a number around another number (kinda like the remainder after a division, but for floating point numbers) and thus becomes extremely useful for tiling or repeating things:

We'll be using the modulo function rather extensively in this little exercise, so strap in. (Illustration via the Desmos calculator.)
vec4 layer = fui( mod( hitPos.xy, 1.0 ) );
This will wrap the texture coordinates of -inf..inf between 0..1:
We also need multiple planes, but how do we combine them? We could just blend them additively, but with the amount of content we have, we'd just burn them in to white and it'd look like a mess (and not the good kind of mess). We could instead just use normal "crossfade" / "lerp" blending based on the alpha value; the only trick here is to make sure we're rendering them from back to front since the front renders will blend over the back renders:
int steps = 10; float planeDist = 1.0f; for (int i=steps; i>=0; i--) { float planeZ = -1.0f * i * planeDist; float t = (planeZ - rayOrigin.z) / rayDir.z; if (t > 0.0f) // check if "t" is in front of us { vec3 hitPos = rayOrigin + t * rayDir; vec4 layer = fui( hitPos.xy, 2.0 ); // blend layers based on alpha output colour = mix( colour, layer, layer.a ); } }
And here we go:

We decreased the circles a bit in size to see the effect more.
Not bad! First thing we can do is just fade off the back layers, as if they were in a fog:
layer *= (steps - i) / float(steps);
We have a problem though: we should probably increase the sci-fi effect by moving the camera continually forward, but if we do, we're gonna run into a problem: Currently, since our planeZ is fixed to the 0.0 origin, they won't move with the camera. We could just add our camera Z to them, but then they would be fixed with the camera and wouldn't appear moving. What we instead want is to just render them AS IF they would be the closest 10 planes in front of the camera; the way we could do that is that if e.g. our planes' distance from each other is 5, then round the camera Z down to the nearest multiple of 5 (e.g. if the Z is at 13, we round down to 10), and start drawing from there; rounding up would be more accurate, but rounding down is easier, since we can just subtract the division remainder from Z like so:
float planeZ = (rayOrigin.z - mod(rayOrigin.z, planeDist)) - i * planeDist;
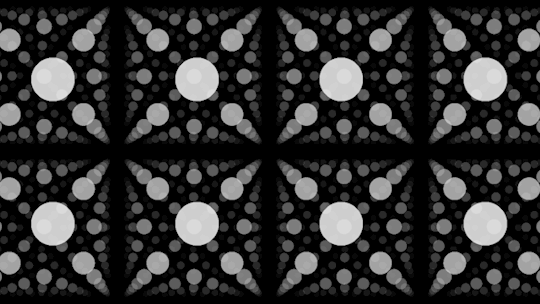
And now we have movement! Our basic rendering path is done.
Our little fictional UI
So now that we have the basic pipeline in place, let's see which elements can we adapt from Sasha's design pieces.
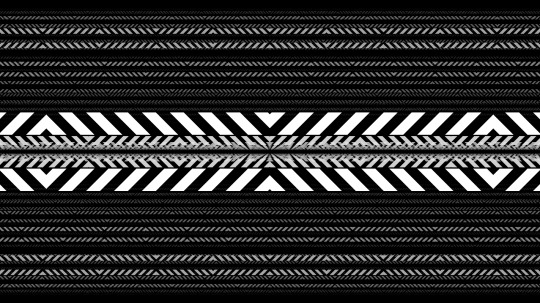
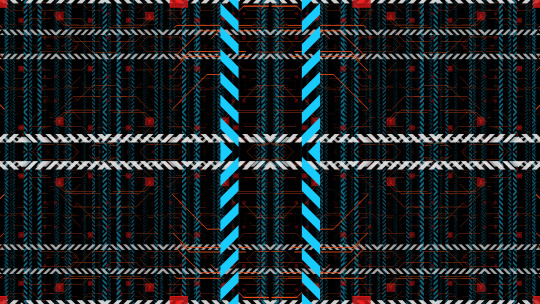
The first one I decided to go with wasn't strictly speaking in the set, but it was something that I saw used as design elements over the last two decades, and that's a thick hatch pattern element; I think it's often used because it has a nice industrial feel with it. Doing it in 2D is easy: We just add X and Y together, which will result in a diagonal gradient, and then we just turn that into an alternating pattern using, again, the modulo. All we need to do is limit it between two strips, and we have a perfectly functional "Police Line Do Not Cross" simulation.
return mod( uv.x + uv.y, 1 ) < 0.5 ? vec4(1) : vec4(0);

So let's stop here for a few moments; this isn't bad, but we're gonna need a few things. First, the repetition doesn't give us the nice symmetric look that Sasha recommends us to do, and secondly, we want them to look alive, to animate a bit.
Solving symmetry can be done just by modifying our repetition code a bit: instead of a straight up modulo with 1.0 that gives us a 0..1 range, let's use 2.0 to get a 0..2 range, then subtract 1.0 to get a -1..1 range, and then take the absolute value.
vec4 layer = fui( abs( mod( hitPos.xy, 2.0 ) - 1 ) );
This will give us a triangle-wave-like function, that goes from 0 to 1, then back to 0, then back to 1; in terms of texture coordinates, it will go back and forth between mirroring the texture in both directions, which, let's face it, looks Totally Sweet.
For animation, first I needed some sort of random value, but one that stayed deterministic based on a seed - in other words, I needed a function that took in a value, and returned a mangled version of it, but in a way that if I sent that value in twice, it would return the same mangled value twice. The most common way of doing it is taking the incoming "seed" value, and then driving it into some sort of function with a very large value that causes the function to alias, and then just returning the fraction portion of the number:
float rand(float x) { return fract(sin(x) * 430147.8193); }
Does it make any sense? No. Is it secure? No. Will it serve our purpose perfectly? Oh yes.
So how do we animate our layers? The obvious choice is animating both the hatch "gradient" value to make it crawl, and the start and end of our hatch pattern which causes the hatched strip to move up and down: simply take a random - seeded by our time value - of somewhere sensible (like between 0.2 and 0.8 so that it doesn't touch the edges) and add another random to it, seasoned to taste - we can even take a binary random to pick between horizontal and vertical strips:
The problems here are, of course, that currently they're moving 1) way too fast and 2) in unison. The fast motion obviously happens because the time value changes every frame, so it seeds our random differently every frame - this is easy to solve by just rounding our time value down to the nearest integer: this will result in some lovely jittery "digital" motion. The unison is also easy to solve: simply take the number of the layer, and add it to our time, thus shifting the time value for each layer; I also chose to multiply the layer ID with a random-ish number so that the layers actually animate independently, and the stutter doesn't happen in unison either:
vec4 fui( vec2 uv, float t ) { t = int(t); float start = rand(t) * 0.8 + 0.1; float end = start + 0.1; [...] } vec4 layer = fui( abs(mod(hitPos.xy, 2.0)-1), fGlobalTime + i * 4.7 );

Lovely!
Note: In hindsight using the Z coordinate of the plane would've given a more consistent result, but the way it animates, it doesn't really matter.
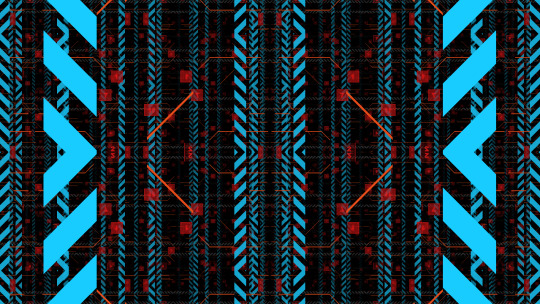
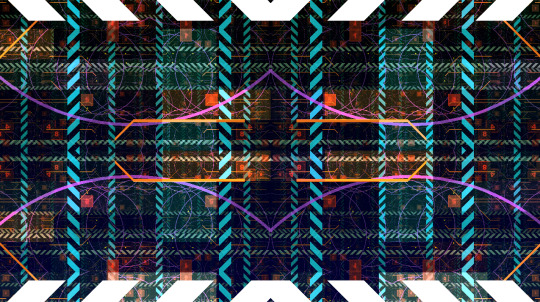
So let's think of more elements: the best looking one that seems to get the best mileage out in Sasha's blog is what I can best describe as the "slant" or "hockey stick" - a simple line, with a 45-degree turn in it. What I love about it is that the symmetry allows it to create little tunnels, gates, corridors, which will work great for our motion.
Creating it is easy: We just take a thin horizontal rectangle, and attach another rectangle to the end, but shift the coordinate of the second rectangle vertically, so that it gives us the 45-degree angle:
float p1 = 0.2; float p2 = 0.5; float p3 = 0.7; float y = 0.5; float thicc = 0.0025; if (p1 < uv.x && uv.x < p2 && y - thicc < uv.y && uv.y < y + thicc ) { return vec4(1); } if (p2 < uv.x && uv.x < p3 && y - thicc < uv.y - (uv.x - p2) && uv.y - (uv.x - p2) < y + thicc ) { return vec4(1); }
Note: In the final code, I had a rect() call which I originally intended to use as baking glow around my rectangle using a little routine I prototyped out earlier that morning, but I was ultimately too stressed to properly pull that off. Also, it's amazing how juvenile your variable names turn when people are watching.
Looks nice, but since this is such a thin sparse element, let's just... add more of it!
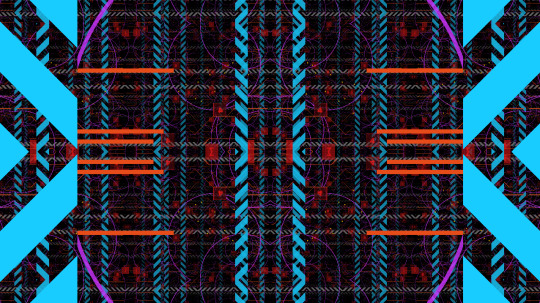
So what more can we add? Well, no sci-fi FUI is complete without random text and numbers, but we don't really have a font at hand. Or do we? For years, Bonzomatic has been "shipping" with this really gross checkerboard texture ostensibly for UV map testing:

What if we just desaturate and invert it?
We can then "slice" it up and render little sprites all over our texture: we already know how to draw a rectangle, so all we need is just 1) calculate which sprite we want to show 2) calculate the texture coordinate WITHIN that sprite and 3) sample the texture:
float sx = 0.3; float sy = 0.3; float size = 0.1; if (sx < uv.x && uv.x < sx + size && sy < uv.y &&uv.y < sy + size) { float spx = 2.0 / 8.0; // we have 8 tiles in the texture float spy = 3.0 / 8.0; vec2 spriteUV = (uv - vec2(sx,sy)) / size; vec4 sam = texture( texChecker, vec2(spx,spy) + spriteUV / 8.0 ); return dot( sam.rgb, vec3(0.33) ); }
Note: In the final code, I was only using the red component instead of desaturation because I forgot the texture doesn't always have red content - I stared at it for waaaay too long during the round trying to figure out why some sprites weren't working.
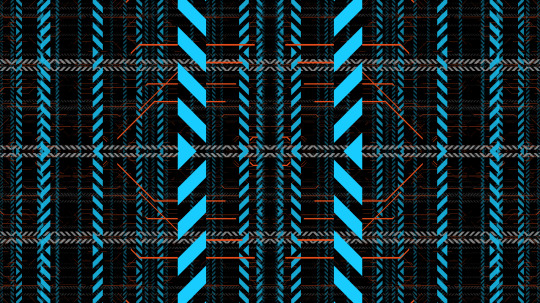
And again, let's just have more of it:
Getting there!
At this point the last thing I added was just circles and dots, because I was running out of ideas; but I also felt my visual content amount was getting to where I wanted them to be; it was also time to make it look a bit prettier.
Post-production / compositing
So we have our layers, they move, they might even have colors, but I'm still not happy with the visual result, since they are too single-colored, there's not enough tone in the picture.
The first thing I try nowadays when I'm on a black background is to just add either a single color, or a gradient:
vec4 colour = renderPlanes(uv); vec4 gradient = mix( vec4(0,0,0.2,1), vec4(0,0,0,1), uv.y); vec4 finalRender = mix( gradient, vec4(colour.xyz,1), colour.a);

This added a good chunk of depth considerably to the image, but I was still not happy with the too much separation between colors.
A very common method used in compositing in digital graphics is to just add bloom / glow; when used right, this helps us add us more luminance content to areas that would otherwise be solid color, and it helps the colors to blend a bit by providing some middle ground; unfortunately if we only have a single pass, the only way to get blur (and by extension, bloom) is repeatedly rendering the picture, and that'd tank our frame rate quickly.
Instead, I went back to one of the classics: the Variform "pixelize" overlay:
This is almost the same as a bloom effect, except instead of blurring the image, all you do is turn it into a lower resolution nearest point sampled version of itself, and blend that over the original image - since this doesn't need more than one sample per pixel (as we can reproduce pixelation by just messing with the texture coordinates), we can get away by rendering the scene only twice:
vec4 colour = renderPlanes(uv); colour += renderPlanes(uv - mod( uv, 0.1 ) ) * 0.4;
Much better tonal content!
So what else can we do? Well, most of the colors I chose are in the blue/orange/red range, and we don't get a lot of the green content; one of the things that I learned that it can look quite pretty if one takes a two-tone picture, and uses color-grading to push the midrange of a third tone - that way, the dominant colors will stay in the highlights, and the third tone will cover the mid-tones. (Naturally you have to be careful with this.)
"Boosting" a color in the mids is easy: lucky for us, if we consider the 0..1 range, exponential functions suit our purpose perfectly, because they start at 0, end at 1, but we can change how they get here:
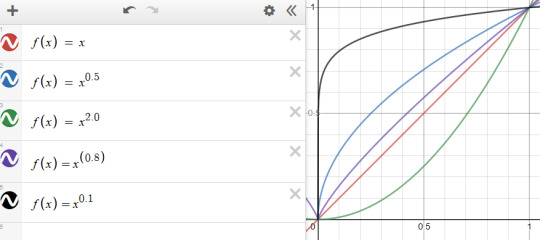
So let's just push the green channel a tiny bit:
finalRender.g = pow(finalRender.g, 0.7);
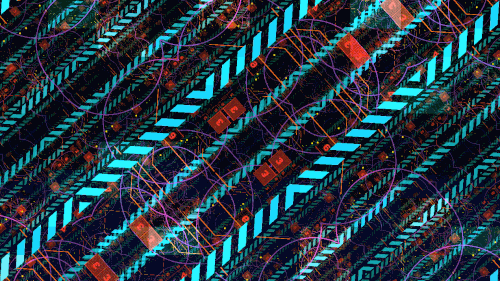
Now all we need is to roll our camera for maximum cyberspace effect and we're done!
Best laid plans of OBS
As you can see from the code I posted the above, I wrote the final shader in GLSL; those who know me know that I'm a lot more comfortable with DirectX / HLSL, and may wonder why I switched, but of course there's another story here:
Given the remote nature of the event, all of the shader coding competition was performed online as well: since transmitting video from the coder's computer to a mixer, and then to another mixer, and then to a streaming provider, and then to the end user would've probably turned the image to mush, Alkama and Nusan came up with the idea of skipping a step and rigging up a version of Bonzo that ran on the coder's computer, but instead of streaming video, it sent the shader down to another instance of Bonzo, running on Diffty's computer, who then captured that instance and streamed it to the main Revision streaming hub. This, of course, meant that in a three-way, Diffty had to run three separate instances of Bonzo - but it worked fine with GLSL earlier, so why worry?
What we didn't necessarily realize at the time, is that the DirectX 11 shader compiler takes no hostages, and as soon as the shader reached un-unrollable level of complexity, it thoroughly locked down Diffty's machine, to the point that even the video of the DJ set he was playing started to drop out. I, on the other hand, didn't notice any of this, since my single local instance was doing fine, so I spent the first 15 minutes casually nuking Diffty's PC to shreds remotely, until I noticed Diffty and Havoc pleading on Discord to switch to GLSL because I'm setting things on fire unknowingly.
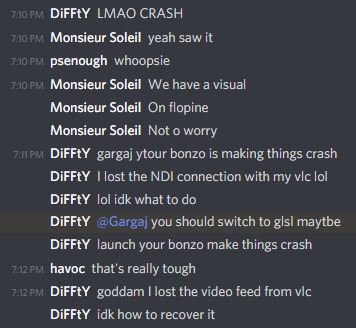
This is fine.
I was reluctant to do so, simply because of the muscle memory, but I was also aware that I should keep the show going if I can because if I bow out without a result, that would be a colossal embarrassment to everyone involved, and I only can take one of those once every week, and I was already above my quota - so, I quickly closed the DX11 version of Bonzo, loaded the shader up in a text editor, replaced "floatX" with "vecX" (fun drinking game: take a shot every time I messed it up during the live event), commented the whole thing out, loaded it into a GLSL bonzo, and quickly fixed all the other syntax differences (of which there were luckily not many, stuff like "mix" instead of "lerp", constructors, etc.), and within a few minutes I was back up and running.
This, weirdly, helped my morale a bit, because it was the kind of clutch move that for some reason appealed to me, and made me quite happy - although at that point I locked in so bad that not only did I pay absolutely not attention to the stream to see what the other two are doing, but that the drinks and snacks I prepared for the hour of battling went completely untouched.
In the end, when the hour clocked off, the shader itself turned out more or less how I wanted it, it worked really well with Bullet's techno-/psy-/hardtrance mix (not necessarily my jam, as everyone knows I'm more a broken beat guy, but pounding monotony can go well with coding focus), and I came away satisfied, although the perhaps saddest point of the adventure was yet to come: the lack of cathartic real-life ending that was taken from us due to the physical distance, when after all the excitement, all the cheers and hugs were merely lines of text on a screen - but you gotta deal with what you gotta deal with.
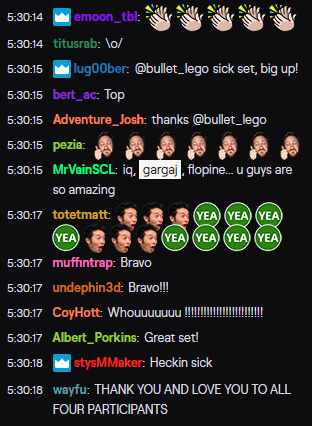
A small sampling of the Twitch reaction.
Conclusion
In the end, what was my takeaway from the experience?
First off, scoping is everything: Always aim to get an idea where you can maximize the outcome of the time invested with the highest amount of confidence of pulling it off. In this case, even though I was on short notice and in an environment I was unfamiliar with, I relied on something I knew, something I've done before, but no one else really has.
Secondly, broaden your influence: You never know when you can take something that seems initially unrelated, and bend it into something that you're doing with good results.
Thirdly, and perhaps most importantly, step out of your comfort zone every so often; you'll never know what you'll find.
(And don't agree to everything willy-nilly, you absolute moron.)
10 notes
·
View notes
Last Seen Blogs

jdebbiel
Deb JJ Lee
48classesand48aspects
48 Classes and 48 Aspects

talonmom
any pronouns, asexual lesbian

tu-omnia
thinking about julia ortega 😵💫😵💫😵💫

themperor-rome
Tired Enby