#i've been doing some beginner tutorials on html and just started one on css
Explore tagged Tumblr posts
Visit Tumblr Blog
Explore Tumblr blogs with no restrictions, modern design and the best experience.
Last Seen Tumblr Blogs


Fun Fact
Mobile Tumblr US users spend an average of 4.04 minutes per session on the app.
Text
The struggle that is me wanting to work on several longfics and just not having time for them all.
The big problem right now is that I'm getting really excited about the Time Travel fic again but I have two (2) multichapter fics partially published right now and I don't want to abandon them to get that one out. I definitely want to finish "Within a forest dark" before I get to TT, but I'm not sure about whether I'll stick with Inheritance Found before doing some of TT. Idk. It's hard to say. IF is an interesting concept to me, but not nearly as much as TT. I've been in love with Time Travel concepts since I was around 10 or 11, so it has a bigger grip on me than the kidnapping premise of IF. That and TT is currently sitting at over 100k words while IF is only the 5k I've published.
I guess one of my big decisions here is how in depth I want to go with IF. The more in-depth I go, the longer it will take me to get to the stuff I'm currently excited about writing. But if I rush IF, I might end up disappointed by the result. So it's hard to say.
...also there's the Nidstinien fic sitting at 45k in my drafts that I really want to fix up, but I have a feeling it won't be done in less than 60k so. That's also going to be time consuming. Ahhh! So many fics to write, so little time. Spending my evenings playing FFXIV 4 days a week really sucks up a lot of my free time... I'm looking forward to when we clear so I only have to raid 2 or 3 days a week for reclears instead. (Currently I have 3 days for Savage Raiding and 1 day for Extreme Mount Farm. Though....my FRU group wants to do more reclears too which will take up extra days so ahhhh my free tiiiiime I want you baaaaack).
#there's also me wanting to learn to code to make a neocities#i've been doing some beginner tutorials on html and just started one on css#but then i ALSO want to get back to doing my Latin lessons.#AND i want to read more#and also i want to do cosmic exploration in ffxiv#when was the last time i had so many things i wanted to do in life...?#it's been a long time#it's almost weird to have so much#it's a good kind of weird though#i just need to take a deep breath so i don't get stressed/upset by not being able to do it all as fast as i'd like#erurandomness
1 note
·
View note
Note
do you happen to know any site building tutorials to follow and learn from? been having a hard time finding a place to start with my own neocity but the free reign and customization of them interests me a lot :0c
ABSOLUTELY! I do want to stress one thing if HTML/CSS is something you're not familiar with: It's okay if your website doesn't look like the most creative, eye-popping thing in the world! I've seen sooooooo many people get so discouraged because their beginner websites don't look like the flashier websites you see on Neocities' front page (by people who've been coding for a Long Time, mind you!) and like!!! That's fine!!! The code of my own site was quite possibly the worst thing you've ever seen thrown together into one big CSS soup before I Literally Just Rewrote It Today, After A Year Of Having A Neocities. And so, with that being said:
As anyone on the internet might do, w3schools is the absolute first place I'd recommend to beginners! There are videos, it's mostly a text-based learning site with lots of exercises to test your knowledge. If you'd prefer videos:
My personal favorite guy on Youtube to learn coding things from is Giraffe Academy: Here's his full course on HTML! The video itself is about two hours—I skimmed through it and everything seems to be perfectly oriented towards beginners (I haven't watched it in its entirety, but I have seen his videos on C# and Python [programming languages, don't worry about it] and they did a lot to help explain certain things to me that I didn't know previously!).
BroCode's HTML in 1 hour and CSS in 1 hour are pretty good! His videos do include a little bit on how to implement some JavaScript here and there, but nothing major or terrifying.
Here's a playlist of HTML/CSS tutorials in bite-sized videos, too! Think about 10-25 minutes per video.
I will say that searching for YouTube videos on HTML/CSS will always sort of gear more towards what people in the professional sphere are looking for rather than what you'd see on Neocities.
As for Neocities-specific things (which may be the actual point of your ask! Might've misinterpreted the hell out of it oops):
sadgrl.online is perhaps the most known website on Neocities, largely because the website itself not only has a layout maker you're free to use if you want to make a website now but the thought of writing HTML/CSS from scratch terrifies you, but also HTML/CSS guides themselves! There's also a bunch of links you can use to help fluff up your site a bit, generate HTML code for you, or just fluff up your site in general.
The Melonland Project is also dedicated to providing website development tools and tutorials for beginners: here is its guide to making a website on Neocities! It also provides a link to learnlayout.com, which I'll link here as well—a website for helping you learn CSS layouts!
And, once you've got the hang of how CSS works but are still feeling unable to code it yourself (no ideas? just not feeling up to it? FUCK MAN DO I UNDERSTAND THAT) Eggramen has free CSS pages you can use, and all you have to do is write the HTML for it!
But I would always focus more on learning HTML first before any CSS—and then learning how to integrate CSS into HTML via inline styling (which those video tutorials do!) before worrying about any external stylesheets or whatever. HTML is the actual building block—CSS just makes it look pretty.
#'site-building' tutorials will almost always lead you to like. coding bootcamps and stuff for companies#the nc-specific links should be more help in just building a site on nc!#anyway. hope to god i didn't misinterpret this question HAHA#asks
12 notes
·
View notes
Text
yes!!
i've been putting a lot of free time lately just finding more stuff (and also because it's fun for me) so here's another list of some tools.
here are some guides! they do go through a lot so i recommend reading at your own pace, and you can even start projects on the side based on what you know rather than trying to read and absorb them all at once. i usually like using guides as references more than a how-to manual before starting anything, but for the very basics it's usually a good place to start.
Interneting Is Hard (but it doesn't have to be), a guide on the raw basics of what a website is and how to make one, written casually and friendly for beginners
Marksheet, a thorough and introductory website on how to make a website, from starting with the basic stuff to introducing more complex techniques
The Quick ‘n’ Dirty Guide to Making a Website, a guide for how and why you should make a website, geared primarily towards artists/creatives
sadgrl online's webmastery resources, particularly: the what you see is what you get layout maker (no coding required), and html & css snippets, which i have heard great things about
petrapixel's layout generator, which also allows you to customize and generate your own layout with no coding required
web design in 4 minutes by jeremy thomas, an introductory tutorial on thinking about webdesign/website structure
tutorials at htmldog, which was my primary place in learning how to make a website in like... 2008. and yet they're still so relevant today
make your own website, a beginner's guide to making one's own website. it was written for the writer's 12 year old child if that may be less intimidating than the rest of these guides
other sitely resources!
easily download your ao3 fics for archival purposes and if you want to reupload them
owls' guide to webshrines, if you're ever interested in or have considered making in the shrine in the form of a website for something you really like and are a fan of! from a fannish perspective this has always been common among fan-inclined indie website makers - people just want to make websites dedicated to things they love, because hey, that's what the rest of us are doing in fandom anyway. this guide goes into detail how, why, and some suggestions for how to make a fan shrine!
how to make your first randomizer at lions-garb.net. you can make a randomizer through just inputting the stuff, sure, but this is a small guide on how to do it on the backend so you can also make your own randomizers while also making them look pretty on the internet.
resources list for the personal web, a very extensive list of a variety of webweaving resources, from tutorials to code snippets to tips to ideas! it may seem very daunting so i recommend just skimming it and seeing what catches your eye first, there's no chronological way to learn things once you have the very basics down
kalechips's layout thrift store, which has a bunch of free codes already created as basic web templates that anyone can feel free to take and adjust and edit and learn from to their liking! there's a lot of different already preset layouts so you don't have to worry about that part, and learn and modify them (if you want) instead
petrapixel's coding self-study checklist, a thorough list of some webdev coding necessities that hobbyists may have i missed (i know have!)
and if you get to the point where you want your website to feel like part of a community as much as you are, you can join a web ring!
the fic ring for self-hosted fanfic sites
the fandom webring, a webring for any webmasters in fandom
here's a consistently updated list of current indie web-rings!
In the wake of the TikTok ban and revival as a mouthpiece for fascist propaganda, as well as the downfall of Twitter and Facebook/Facebook-owned platforms to the same evils, I think now is a better time than ever to say LEARN HTML!!! FREE YOURSELVES FROM THE SHACKLES OF MAJOR SOCIAL MEDIA PLATFORMS AND EMBRACE THE INDIE WEB!!!
You can host a website on Neocities for free as long as it's under 1GB (which is a LOT more than it sounds like let me tell you) but if that's not enough you can get 50GB of space (and a variety of other perks) for only $5 a month.
And if you can't/don't want to pay for the extra space, sites like File Garden and Catbox let you host files for free that you can easily link into NeoCities pages (I do this to host videos on mine!) (It also lets you share files NeoCities wouldn't let you upload for free anyways, this is how I upload the .zip files for my 3DS themes on my site.)
Don't know how to write HTML/CSS? No problem. W3schools is an invaluable resource with free lessons on HTML, CSS, JavaScript, PHP, and a whole slew of other programming languages, both for web development and otherwise.
Want a more traditional social media experience? SpaceHey is a platform that mimics the experience of 2000s MySpace
Struggling to find independent web pages that cater to your interests via major search engines? I've got you covered. Marginalia and Wiby are search engines that specifically prioritize non-commercial content. Marginalia also has filters that let you search for more specific categories of website, like wikis, blogs, academia, forums, and vintage sites.
Maybe you wanna log off the modern internet landscape altogether and step back into the pre-social media web altogether, well, Protoweb lets you do just that. It's a proxy service for older browsers (or really just any browser that supports HTTP, but that's mostly old browsers now anyways) that lets you visit restored snapshots of vintage websites.
Protoweb has a lot of Geocities content archived, but if you're interested in that you can find even more old Geocities sites over on the Geocities Gallery
And really this is just general tip-of-the-iceberg stuff. If you dig a little deeper you can find loads more interesting stuff out there. The internet doesn't have to be a miserable place full of nothing but doomposting and targeted ads. The first step to making it less miserable is for YOU, yes YOU, to quit spending all your time on it looking at the handful of miserable websites big tech wants you to spend all your time on.
#i got so distracted while compiling this list lOL#but i think this is quite thorough and a good length#hope it helps someone!!
11K notes
·
View notes
Text
A not-so-quick how-to for Ao3 work skins
Ao3 has some pretty powerful customization tools at your disposal - if you know how to use them. Did you know this entire time you could change your text colors, size, background colors, outlines, underlines, overlines, and even fonts of your works? It's fairly easy to do - you only need a little knowledge about markup languages to get started. The way this is done is through classes and the clever application of some simple CSS. Though I've written this guide around using my Obey Me coloring and work skin, the principles are applicable across anything you may want to do with your Ao3 styling.
I've done all the heavy lifting this time around, and have actually created a very, very simple skin that you may want for the purposes of your Obey Me fic including:
Unique colors for each character (sticking to WCAG 1:3 minimum contrast ratio for accessibility)
Heading font and size styling (separate from character colors)
Styled 'pullquotes' for written letters/passages/quotes (at 75% size)
Make sure to keep checking back for updates - I'll put word out here on my tumblr whenever I update, but I've also created a codepen (work skin CSS found in the CSS tab) with the latest version of the skin that you can use to play around in.
Just a heads up before you start: there is a bit of a learning curve, but I have tried to make the explanation as simple as possible, and hopefully provide enough tools and knowledge that you can run with what I've given you and start creating your own styles.
1. Markup: The Basics
I'm sorry - no matter how simple I try to make this work skin, you're going to need at least a little understanding of what markup languages are and how they work. But don't fret: I've had a few years experience now teaching this to absolute beginners so hopefully by the end of this tutorial you'll be feeling like a real Hackerman.
So what is Markup? A tl;dr
Markup is a set of instructions used to tell a program (in this case your internet browser) how something should behave. HTML stands for Hypertext Markup Language and is likely the markup language you'll encounter most often. Ordinary text like you would type in a word document is meaningless to a computer browser - it doesn't know how to read. You need to talk to it in a language it understands so that it can translate your wonderful words into something that appears in your browser. This is done through the use of 'elements'.
Like how you know "words captured in these quotation marks" are quotes (or text written in parentheses is related to but non-essential to the main body), elements are essentially markers that indicate how a thing should be read. In HTML, these elements are denoted through angular brackets <> containing the necessary info that your browser understands. These often consist of an opening tag <[element type]>with content within, followed by a closing tag</[element type> denoted through the use of the "/" slash. Every element that has been opened must always be closed. Common tags include:
<p></p> for paragraphs
<em></em> for emphasis (typically displayed as italic)
<strong></strong> for strong (typically displayed as bold)
<h1></h1> for your highest headline (and subsequent-level headings use 2-6)
<div></div> for generic sections or blocks
<span></span> for specific selections of text.
<a></a> for anchors (links)
<img> containing images <- this one doesn't have closing tags because it's special
and more!
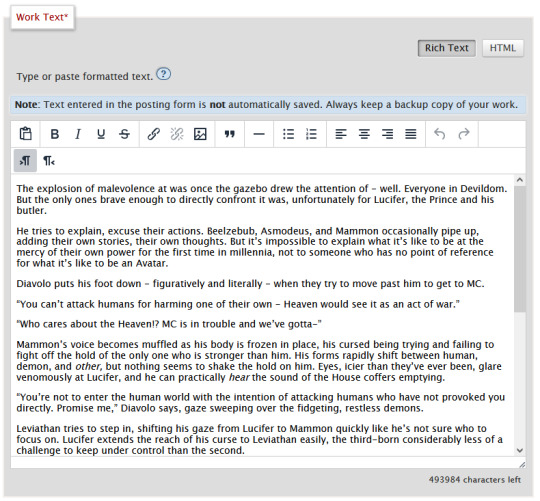
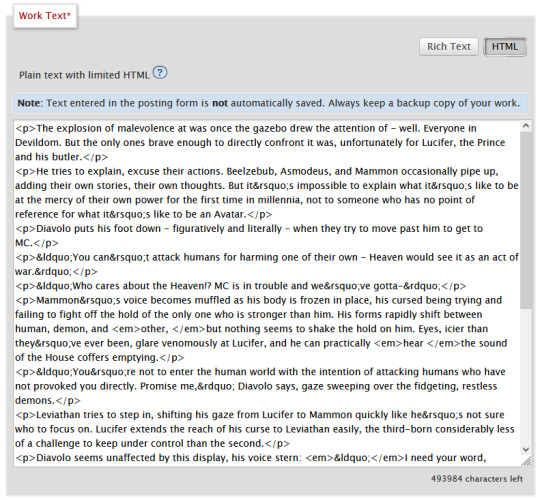
Everything you see on the internet rests within tags like these. You don't see them because they're only for your browser's eyes. Even your fics are formatted with this - though Ao3 does it automatically. You can freely switch between Markup (HTML) and Rich Text Formatting up in the top right corner.
Attributes
Attributes are additional information you can add to an element. Some attributes are essential, like a href (hyperlink reference) for anchor elements. Some are additional information used to differentiate between different identical elements like a class or id. It's this latter, non-essential attribute we're going to be utilizing for our work skins.
Once you have your fic in Ao3, make sure to switch over to the html editor. From there, you are going to find the element that you want to change the look of, and we're going to add a class.
We do this by finding the open tag of an element. That will probably be a <p>. Inside those angular brackets, after the name of the element, we are going to type class=""
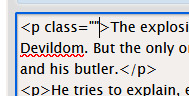
What we've done there is create a field for the class, but we haven't actually given the element a class yet.
It's always a good idea to name classes that describe the content, not what you want it to look like. You could change your mind down the line, but then you're stuck with a class called red that's really changing the color to blue. So rather than calling a class "gold", you might instead give it the name "Mammon" as it indicates when Mammon is speaking. This is known as Semantic markup.
Here's a few things you need to know about classes:
Class names cannot contain spaces. We use spaces to delineate new classes in the same element (like commas to separate tags on tumblr).
You can use as many classes as you want, as many times as you want.
They are case-sensitive.
You can add classes to all most html elements. That means that you don't have to just make entire paragraphs a particular style.
I have already specified several classes in my existing work skin. These are [Luci Mammon Levi Satan Asmo Beel Belphie Dia Barb Luke Sol Sim Heading pullQuote] - remember that these are case-sensitive. Feel free to use any one of these, or use your own! Put your chosen class name between those quotation marks I had you make earlier like so!

These don't actually do anything just yet. For that, we need to now head on over into our work skin.
2. Introducing the work skin: CSS
Now that we hopefully have our heads wrapped around the basics of elements and classes, we can start using that to make things look interesting. CSS stands for Cascading Style Sheet. HTML gives the browser structure, CSS gives the browser style.
But first, we have to create a new work skin.
Go to your Ao3 Dashboard and up in the top left underneath "Profile" and "Preferences" you should see an option for Skins. It'll land land you in "site skins" by default, so make sure to click on My Work Skins. From here you can click on Create Work Skin in the top right corner.
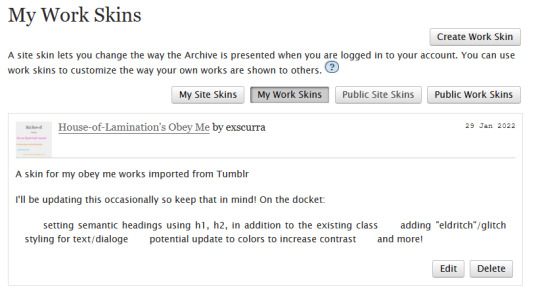
In the "About" section, make sure Work Skin is selected, and give your new skin a title!
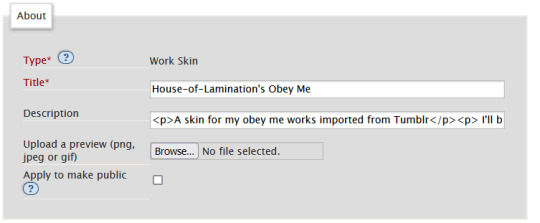
Feel free to also include a description for your own sake. Now. Onto the fun part!
Below the "About" section, you should see a box labelled CSS. In that box, feel free to copy+paste the styles below into that box:
#workskin .Luci { color: #0071ed;}
#workskin .Mammon { color: #e5a71c;}
#workskin .Levi { color: #e26600;}
#workskin .Satan { color: #00c117;}
#workskin .Asmo { color: #ff00bd;}
#workskin .Beel { color: #e80b00;}
#workskin .Belphie { color: #4f08b5;}
#workskin .Luke { color: #00c0ed;}
#workskin .Dia { color: #9b0000;}
#workskin .Barb { color: #007215;}
#workskin .Sim { color: #c1ac44;}
#workskin .Sol { color: #757575;}
#workskin .Heading { font-size: 1.25em;}
#workskin .pullQuote { text-align: center; font-size: 0.75em; display: block;}
This can also be found in the CSS section in this codepen. (disclaimer: tumblr may or may not mess with the line spacing when you copy things over. After you've copied, save your work skin and then reopen it in "edit" - Ao3 will automatically format your work so that it's nice and clean).
So what's actually happening here?
Let's read from left-to-right, top-to-bottom - because that's precisely what CSS does. Feel free to skip this part if you're not interested in creating your own styles and you're happy to just copy and paste existing work skins :)
#workskin .Luci { color: #0071ed; }
This first part here is what is called a "selector". Here, we're specifying what exactly we want to target in order to change its looks. Every character, including the spaces, symbols, and capitals matter.
#workskin .Luci { color: #0071ed; }
#workskin is specifying a unique ID within the HTML - one that encapsulates everything that you want to apply the work skin to - so basically your entire work. This is absolutely necessary in order for the work skin to actually function. We didn't create this ID in our HTML because Ao3 (will) create it for us automatically down the line.
#workskin .Luci { color: #0071ed; }
Following the work skin id, we have a space, a period, and then - hey! That's a class name! The space between the ID selector and the next part indicates we're looking for things inside this particular ID. Periods are used to indicate classes. When targeting a class, you use the period, followed by the class name. So if you're targeting your Levi class, you would write #workskin .Levi . If you were targeting a class that you created in your html, you would write #workskin .[classname] (removing the square brackets, of course).
#workskin .Luci { color: #0071ed; }
Now it's time for the fun stuff - the rules. Once we've targeted what we want to style with our selector, we use curly brackets to contain all the "rules" that we're using to make the browser appear a certain way.
#workskin .Luci { color: #0071ed; }
We start with our property - or what we want to change. In this case it's the text colour, denoted through 'color'. Yes. It's American spelling. I have no control over this. Find a simple list of css properties here! There's loads, but the ones that are probably of most use to you at this point are color, font-size, font-weight, text-align, text-decoration, and display. Make sure to put a colon after the property - that links us into the next step.
#workskin .Luci { color: #0071ed; }
Finally, we have our value - or what we're asking the property to do. In this case, we're changing the color, so the value is a hex color value. Color can also be denoted through rgb [written as rgb(0,0,0)]. Different properties will have different values. For example, text-align can have a value of left, right, or center (note the Americanized spelling again). If you click on the property in this list, it will tell you what values you can use!
You can have as many rules as you want in your selectors, as long as you end each of them with a semicolon. I cannot stress the semicolon enough. If your CSS isn't working - it's probably a missing semicolon. An example of multiple rules being used within one selector is in the pullquote styling:
#workskin .pullQuote { text-align: center; font-size: 0.75em; display: block; }
You can even write rules that override each other, though we try and avoid doing that. When this happens, your CSS will read from top-to-bottom, prioritizing the latest thing it has read (typically your bottom-most). There are exceptions to this, but that's not necessary for this guide.
So by this point you should have copied over the CSS I've written into your work skin, or perhaps tried your hand at making your own. This would be a good point to save.
3. With our Powers Combined
Right! So we have our work skin. We have our work formatted properly, resplendent with classes. Here's how we get these things talking to each other:
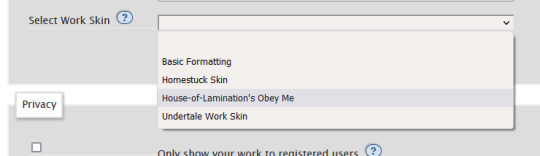
Once you've saved and closed your new work skin, open up or post the work you would like to apply the styling to. Down the bottom of the Associations section, there is an option to Select Work Skin. Ao3 already provides some work skins by default - Homestuck and Undertale - but you should be able to select your new work skin from this dropdown.
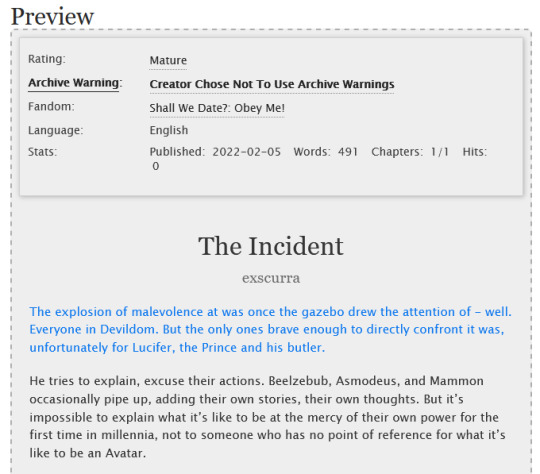
Now here's the magic. Time to check if this worked. Go through and make sure you've applied your classes to each of the elements you want to change the look of. These can be <p> elements, <em> elements, <strong> elements, or you can even make new, unique sections using <span>. Save your work as a draft and preview it - if you've done everything right, you should see the sections of text you've added classes to have changed in appearance!
A reminder that you can add multiple classes to one element: say for example you want to create section headings unique to each 'character', you can name both classes in the class field, separated by a space. See the example below:
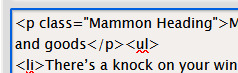

And that's about it! You can use the same work skin for multiple works - just remember that you should be using the same class names if that's the case. If you create a new class in your html, make sure to go back to your work skin and make some rules for that class!
I've created this codepen that you can play in that is using all the same classes - it also has the work skin in the CSS which you're also very welcome to mess around with.
Ao3 itself has a great guide to using work skins, explaining things just like I did here. The Modzilla Developer Network is a great resource for learning more in-depth about html and css if you want to do weirder and wonderful-er things!
I hope this has been informative and useful! Best of luck using skins in your own fics! 💛
#obey me#ao3#tutorial#omswd#writing reference#long post#cs people dont come @ me about my oversimplifications. this is for beginners! i am not here for definitional semantics!!!!#literally only one person asked for this and YET. i really enjoy writing tutorials
237 notes
·
View notes
Note
Hi there. I was wondering how I could create a website for my random creative musings, similar to your own. My attempts in the past have been unfruitful because web design is an utterly inhospitable place if you don't know where to start. Is there any advice you could give?
Hi!
This, uh, went on for a bit, so full suggestions under the cut:
how to do a website, kind of?
Web design can definitely be a bear if you're not familiar with it—although I do think it's fun and worthwhile to learn if you are interested! You don't necessarily need to engage with actual HTML and CSS if you don't want to, of course.
That would be the first thing to decide: are you interested in learning to create websites from scratch or having total control over their design and layout? Or do you just want to focus on your content and not worry too much about site maintenance or a custom design?
website builders/software
If you'd rather keep things as simple as possible, then you'll probably want to sign up for a service that lets you build a website using visual site-building tools. Most free hosts/site builders are going to display ads of some sort on your site, though, so you'll need to be comfortable with that. WordPress.com may work for you if you're okay with ads on a free site, although I feel like WordPress's page creation interface can be a bit hit or miss with new users. Worth a try to see if you like it, since it's reliable software if it does click with you. A while back I feel like I remembered a lot of people using Weebly for free sites but I can't really speak to how good it is myself.
In general I don't have a ton of great suggestions in this area, unfortunately, because it's just not something I have a ton of recent hobbyist experience with. But if you're okay with the limitations these come with and the ease-of-use (assuming you can find an option that clicks with you) is important, then they're a perfectly reasonable choice! There are a lot of options, so shop around a bit, sign up for free accounts and mess around to see how comfortable you are with each one.
do it yourself
If you are interested in doing things the old-fashioned way, then you'll want to learn at least a little bit of HTML and CSS. There are a million resources out there on the internet, of varying degrees of quality, accuracy, or actual beginner-friendliness. Here are some guides and resources that I'm familiar with and/or generally trust:
freecodecamp
These days, if you want to learn to code, you'll probably end up funneled toward online courses of one kind or another. Some of them are probably pretty good! Many of the good ones are probably also not free, and I assume you're not looking to spend money on a course like that if you aren't yet comfortable with HTML/certain you want to use it for your site.
FreeCodeCamp is one I've actually used a bit before, back when I was a bit rusty and wanted to brush up on some things before moving on to more advanced stuff. It's intended for people who want to get into web design and related fields as a career, but you don't need to go that far with it: the first group of HTML tutorials does a great job covering all the basics you'll need, and each step of the course builds comfortably on the previous steps. It comes with built-in HTML editors/previewers pre-filled with its examples so you can complete the exercises and check your work without needing other software. The intro course is geared toward the design of a "Cat Photo App" (not actually a functional app, just what the design of the page would look like; no need to worry about any weird software coding) rather than a personal website, but it'll give you a great grounding in HTML and CSS themselves.
Specifically, you'll want the "Responsive Web Design" course, and to follow it up through the section "Applied Visual Design" (though you likely don't need all of the lessons in there, as many are features you probably won't use on a personal site). The basics of the section after that, "Applied Accessibility", are also important if you want to make your website accessible to the visually impaired and other disabled folks! Everything beyond that you can ignore, unless you decide you're interested in trying that stuff out on your own. :)
mozilla developer network/mdn
MDN is primarily a developer resource (hence the name), meant as a huge reference document for web development standards rather than helping with personal sites and such, but this is basically the place you go when you need to look up details on how a given HTML element or CSS selector works. If you're ever not sure how an element mentioned in a tutorial works, or if you think you need an selector that you haven't seen explained before, this is where you go to look it up. (You'll also commonly see a site called "W3Schools" recommended for this, and it's an okay reference as well, but most folks tend to prefer MDN since it's not commercially-motivated.)
MDN does offer a "Getting started with the web" tutorial that covers the basics of HTML, CSS, what to do with all the files, and things like that. I actually only just learned about this while working on this post so I'm not sure how good it is as a beginner's reference, but it looks decent, and I trust it'll all be accurate information. I do like that it suggests taking the time to make a sketch of what you imagine the site looking like first—it's a good reminder to have a goal to work toward rather than trying to decide what you want at the same time you're trying to learn how it works.
So, that's general HTML stuff. What about tools meant more for actually creating personal sites?
bogleech's website ingredients - a good simple starting point
Bogleech has a fantastic "website ingredients" post with all the basic files you need for a website along with helpful instructions:
The files in that download will let you produce a (very simple) HTML website, and explain how basic HTML works, how to add images, how to keep files together, and things like that. You'll want to find other resources to learn how to put together a more complex layout, but this is a great tool for just playing around and learning how all this stuff works.
the cave of dragonflies' webmaster guides - more in-depth html tutorials and content advice
Also consider checking out @antialiasis's webmaster guides, which are all geared toward creating your own personal website from scratch. (And, if you're not already familiar with it, her site The Cave of Dragonflies in general is itself a big personal/creative Pokémon fansite, and a great example of what you can put together if you really get going!)
There are also free layouts available as a more structured starting point than Bogleech's simple page, so if you want a template to customize after learning the basics, this is an option for that.
html editors
If you're going to write your own code, you'll want software to write it in (please do not use word processing software like Microsoft Word or Google Docs, it really isn't meant for this and will cause headaches down the line). Many basic tutorials (including Bogleech's) will recommend Notepad to view the page's code—if you're on a Mac, TextEdit would be the closest equivalent—and that will work for the bare basics and doesn't require you to install or download anything new or complicated. But if you think you're likely to want to work with HTML, I would strongly suggest getting a text editor with syntax highlighting capabilities; it makes telling the various bits of your code apart much, much, easier. For Windows Notepad++ is a good suggestion, while for Mac you'll probably want to look at TextMate; I haven't used it in a while but I used to use Brackets (cross-platform) a lot and found it generally good at getting out of my way when I needed it to. I personally use Visual Studio Code (also cross-platform) at the moment. There are tons of other options out there and I won't muddle things by listing them all here, but just know that if none of those options click with you, you'll be able to find another one that suits your needs.)
hosting
However you put your site together (with the exception of the site builders mentioned earlier, which generally also host your site for you), you'll need a place to put it online. Nowadays it's not common to find reputable HTML file hosts for free; you'll usually end up paying at least a small amount per month/year for hosting, it'll include other features you probably don't actually need for a simple personal site, and that's not counting the cost of the domain name (though those are usually just one low price once per year for a common extension like .com, .net, etc.). But there is at least one great free option: Neocities. Neocities is totally dedicated to bringing back the days of small, personal websites that you can design yourself, and while I haven't used it myself it's been really great to see the kinds of fun sites and projects people have been able to create with it. Would definitely recommend checking this out as a first stop for hosting! This looks like a good absolute-basics starting guide for Neocities (and includes a link to a "layout builder" if you want a more structured starting layout than Bogleech's ingredients, with a few more options to choose from than having to manually edit TCoD's): https://learn.sadgrl.online/absolute-beginners-guide-to-neocities/
(Neocities appears to have an online file editor with syntax highlighting, so in theory you don't need one of the editors mentioned above. However, I would still recommend writing your code as local files in your computer, and then just uploading the files to Neocities. That way you have a bit more protection from things like browser crashes if something happens to go wrong, and you'll have a local copy of all your stuff just in case.)
are there any other options?
There is the third option of purchasing hosting, and then installing software on that hosting to run your website (for example, you can also install WordPress on your own site rather than using WordPress.com; Altered Origin is currently running on a PHP CMS called Grav). Depending on the software you choose you can get an experience more or less like using a site builder, but with more control over your content, the design, etc.. The tradeoff is that you'll likely end up managing all the more technical aspects of software like that yourself, which can be more work than either having a company take care of it for you or using something that's a little harder to break outside of code typos, like a static HTML site.
The amount of coding you need to worry about can also vary with this; my current Grav site provides a simple way to manage adding new content, but the design/layout of the site around that content was still written entirely by hand with HTML and CSS. With self-hosted WordPress you can just use and customize themes without (necessarily) needing to touch the code, and can have more flexibility about which themes and other elements you can install than WordPress.com's free hosting allows.
But either way, I'd recommend trying one or both of the other options before bothering with this. Buying more advanced hosting and maintaining the software on your own website is something you probably don't want to worry about unless you already know you require it or will enjoy it!
okay i'll shut up now
I always love hearing that someone's looking into creating their own space on the internet; it's really a shame that so much of that creative spirit has disappeared over the years. I wish you the best of luck with your site; I'd love to see a link to it whenever you've got it up and running! (And if there was anything specific you were wondering about that I didn't cover here, or if this wasn't the sort of help you were asking for at all and I totally rambled on past your actual question, feel free to send another ask and let me know!)
If any of my other webmaster friends want to chime in with further advice or suggestions, feel free!
#personal website#it has been years since i last wrote a long post on tumblr and somehow the experience has gotten worse?#impressive
12 notes
·
View notes
Note
HALLOOOOO! first of all, let me just say what amazing work you mods are doing! this blog has been a huge help so kudos to all of you! thank you for your hard work!!! 😁😁😁😁
on to my question...what would you, since some of you write IFs as well, suggest to those who wants to start writing one? i really, really want to write one, but i guess i'm really intimidated by the thought of coding. also, how did you choose your medium? what made you choose ChoiceScript or Twine?
sorry for the long ask. 🙏
i hope you all have a good day!
Thank you!!

I'll start us off by saying that yes, coding isn't easy, but don't be daunted! Take it one step at a time, use your resources, ask for help, and you'll learn how to do it to a point where it comes a lot easier to you while you're writing!
I started Smoke & Velvet (now When it Hungers) in Cscript without knowing anything about coding in that language and I've learned a ton since then! I'm now transferring over to twine, facing the same daunting, overwhelmed, feeling I had when I first opened up the cscript tutorial :'D
W3schools is a great resource, so is freecodecamp and mimo, if you want to start diving in to html, css, and javascript (start with html, then work your way up, start small, read code line by line instead of looking at it as a whole lest you become overwhelmed).
I chose Cscript at first because that was my only interaction with the IF community at the time. I didn't even know that twine existed, and had been lowkey wanting to write a game for years before taking the dive.
Going into twine now is challenging but I've been having a lot of fun with creating a unique format that has more accessibility options and features, like save slots, back buttons, sound, music, and other things that amplify gameplay.
There's still a long way left to go for me, but it's been a journey worth having and the community has been pretty wonderful for the most part. Be patient with yourself, with your writing, with your learning, and surround yourself with fellow writers and readers who support you and encourage you but also remind you to take breaks and drink plenty of water :D
- Roast

Alright, I’m not even going to sugarcoat this since I’ve been really open about this on all of my blogs, but I am writing all of my future games on Twine and translating my ChoiceScript WIP (Greater than Gods) to Twine as well. This is merely because I genuinely disagree with Choice of Games as a company, and as someone who does want to monetize my games I didn’t want it to go through them.
Now, maybe you don’t have that much of an issue w CoG or you don’t want to monetize your games, so my justification won’t mean much to you. Coding-language wise ChoiceScript is kind of friendlier since it’s less overwhelming than Twine when you first take a peek, but as long as you’ve got someone to ask (which you can find plenty in our Discord servers!) I believe that starting off with Twine and getting the hand of it can be good! The hardest part is adjusting to different languages so changing halfway (and translating one to the other) makes it overall trickier.
Also, personally, I didn’t even begin to code until I had a good chuck of the story written since I couldn’t get the ChoiceScript extras running on the computer I used to have. My vote is that if code overwhelms you, then postpone it as much as you can and let the story take you at first, just focus on the parts you love.
Yet, to be fair, after reading what Dani said.... all advice is subjective LOL so what might be the answer for me might just be problems for you and viceversa, the best advice will always be fuck around and find out
- Cruz

Currently I’m using CS, though there will be Twine in the future as well!
Initially, I didn’t really even know about the other side of IF (itch.io/Twine), so I went with what I’d heard of (CS). Ultimately, CScript is beginner friendly due to the fact that you’re not adding on the additional challenges of UI (user interface)/styling, etc, and it lets you get acquainted with algorithmic thinking, which I think is probably what people struggle with the most when getting started—cold, hard computer logic. Building that foundation is very useful if you don’t have previous coding experience.
As for tips for those getting started, these are mine (as someone from the CS background). Take these with a grain of salt; not everyone works the same way, but this is what works for me and what I find valuable, but I know that some of the other mods work in opposite ways, for example, LOL.
If you know nothing else, know the key middle point/event of your story AND how your story ends. This is super important, not only for your story, but also for coding. Because IF is about branching and converging, all those branches have to go somewhere, and at some point you’re going to have to pull them back together a bit before you send them branching back out again. Knowing these two points will save you a LOT of pain with coding and planning your branches AND with managing the feasibility of your project. Ironically, many people tend to start with the beginning of their story. But knowing where you’re going will really save your bacon.
Map your code for your chapter before you write the chapter. Yep. I said it. I’m in the minority here, I know that most folks don’t do this. But if you can do this, it means (A.) you’ve got a really clear plot map of your chapter, so writing it will be a piece of cake and (B.) you’ve really fleshed out exactly what’s happening/the various causal relationships, which means your code is probably going to be neat and concise. Plus, coding first is a whole heck of a lot easier than adding the code in afterward, when you have to hunt through walls of text to find where the various code lines should be added. I know it sounds bonkers. I know. Really. But if you can manage the planning well enough to pull it off, it’s well worth it. (It’s also worth noting that doing this lets you test your code a lot faster/first, which can also be useful when you’re first getting started. But might not be everyone’s cup of tea, heh.)
For CS, if you know of a WIP that has a feature you’d like to use in your game, code dive and see how that author did it. For example, if a game has a function to randomize the shirt color of a certain character every time you meet them and you’d like to do something similar, take a look at that person’s code! Odds are you can learn more than that. Look at different authors’ coding styles and see what neat tricks you can learn. And if you don’t know how to code dive come DM me LOL.
Lastly, on a more general note, the two big WIP killers are the fraternal twins Scope and Planning; that is to say, when the scope gets out of hand and there isn’t enough planning, that tends to be when WIPs die because the author starts to feel overwhelmed and/or demoralized. So, from the very start be intentional about planning. I know plenty of authors say they don’t plan but. I’m telling you now. PLAN. LOL.
Oh, also, if you do use CS, CSIDE is a program that’s dedicated to editing Choicescript and great for light testing and the like.
I need to shut up now because I’ve typed too much but if I’ve left you with more questions than answers you’re welcome to come hunt me down on my personal blog!
- Dani

I don't have much experience with Twine yet (but heavily considering switching) aside from fiddling around, and the other mods have given their two cents on CS that I already think so I'll mostly just stick to giving advice on writing an IF as a fellow beginner!
From what the other lovely mods have said, planning is your bestfriend! It's very easy to get swept up in the idea of making your own IF project but it does tend to be more overwhelming down the line without proper planning.
You can use mind-mapping tools, or draw one! I'm partial to bullet point outlining but it can be a little tedious as the chapters become more complex with branching.
So, sit yourself down and do some outlining. This is a general advice a creative writing teacher of mine has given me: ignore the beginning, skip to the ending. And it makes a lot of sense. Because as a writer, you'll get hung up on how you want your story to start. We are, to some extent, perfectionists with what we write.
So ignore the beginning, and instead think of how you want your story to end. Trust me, while you're at it, you'll get so many ideas/prompts of what you want to put in the middle. The beginning is easy pickings once you have the foundation of an ending laid out. Writing is a separate matter entirely, but y'all already know that.
Now let's talk about organizing! If you feel like you'll remember an idea later on, trust me, you won't. Write it down, write it all down. OneNote is my go-to with organizing my thoughts/prompts/ideas with my current project.
It's uploaded on a cloud and you'll also be able to access it on your phone! The sticky notes feature come in handy as well. Also, it's a good place to back up your code-formatted chapters/assets!
Lastly, please be kind and patient with yourself! There will be learning and writing frustrations, but it's normal. It happens. Don't beat yourself up too hard over it. Writing is a complex process, but also very worth it.
I mean, I get it. I constantly fall down the rabbit hole of, "If this rough draft isn't perfect then that means I am a horrible writer," which is absolutely not true!
Remember to take care of yourself in the process of writing. Figure out your limits because burning out and losing passion for a project can happen. Above all else, writing shouldn't feel like a chore, it should be fun!
- Nines
Goodluck, and have fun!!
Ko-fi link | Discord | Reddit | Featured Authors Interest Form
85 notes
·
View notes