#inputTypes
Explore tagged Tumblr posts
Visit Tumblr Blog
Explore Tumblr blogs with no restrictions, modern design and the best experience.
Last Seen Tumblr Blogs


Fun Fact
Tumblr has 16.74 million mobile monthly users in the US.
Text
made a little house of leaves text replacement script for Firefox with the FoxReplace extension ! instructions under the cut
basically replaces house with
<span style ="color:#6570ae">house</span>
and minotaur with
<span style ="color:red"><s>minotaur</s></span>
firefox installation method:
get the FoxReplace extension: https://addons.mozilla.org/en-US/firefox/addon/foxreplace/
Script: save the following as a .json file, and import it into FoxReplace:
{ "version": "2.6", "groups": [ { "name": "House of leaves", "urls": [], "substitutions": [ { "input": "house", "inputType": "text", "outputType": "text", "output": "<span style =\"color:#6570ae\">house</span>", "caseSensitive": true }, { "input": "minotaur", "inputType": "text", "outputType": "text", "output": "<span style =\"color:red\"><s>minotaur</s></span>", "caseSensitive": true }, { "input": "House", "inputType": "text", "outputType": "text", "output": "<span style =\"color:#6570ae\">House</span>", "caseSensitive": true }, { "input": "Minotaur", "inputType": "text", "outputType": "text", "output": "<span style =\"color:red\"><s>Minotaur</s></span>", "caseSensitive": true } ], "html": "output", "enabled": true, "mode": "auto&manual" } ] }
notes:
I haven't finished House of Leaves yet so it currently only substitutes house and Minotaur.
Recommended to turn on Automatic substitution On page load
Not recommended to Apply automatic substitutions every few seconds, it moves your cursor in an opened text editor. sadly cant see the house in blue while im typing this post
-> edit: it only affects the tumblr post editor??
Not recommended to change the HTML to input&output (currently output only) because it would fuck up URLs and tags
4 notes
·
View notes
Text
We all see Anna as a child for tell she sounds like a child still playing house for thinks Jensen is her beloved husband.
Speaking of nut jobs fans! Hey, @Odayssincejensenwasobjectified do you notice that these fans are posting screenshots of the Tesco store website selling the "Dean Winchester" life-size cardboard cutout? Tesco is like the UK version of Target. I think how ridiculous for see unhealthy fans are excited to post about on their social media... Guess they want to date with a cardboard cutout boyfriend because of how desperate they want to be with Jensen for cardboard. Guess see my eyes How ridiculous people are for putting their disgusting dirty Dildo on cardboard cut-outs of Jensen to think they’re having sex with real Jensen. How sad and ridiculous that losers are living!
https://www.tesco.com/groceries/en-GB/search?query=dean+winchester+&inputType=free+text
🤦🏼♀️


Sigh. God. You're such a child.
4 notes
·
View notes
Text
History of Roblox, 2003-2006
This post will be updated over time as more information is found.
2003

Roblox, Dynablox, and Goblox domains are registered by Jim Stevens.
2004
Up to July

Erik Cassel, Keith, and David Baszucki are Roblox’s primary developers.
Builds of roblox from this time were most likely attached* to the browser. The 3D view would show some general information, but build tools were contained in an html panel on the website.
*full ability to use the program required input from buttons on the roblox website, rather than in a UI hardcoded into the exe. Think of how the oldschool Toolbox worked: it was a webpage rendered inside the game window that could send special function calls to the program to insert content, use certain building tools, manipulate bricks, etc. This technique was abandoned by 2006 at the latest.
Surfaces and Joints existed. “Bumps”, a surface type resembling studs but later superseded by Glue, would create raised square bumps on the entire face of any surface it was applied to. To this day, trying to set a part’s surface to “Bumps” will instead turn it into a Glue surface.
Cards - A section of properties for parts and models. Would display in the upper right-hand corner of the screen whenever a part or model with set cards was selected. The text could be set by the user. The properties were Title, Description, Color, Image, Row0, Row1, Row2, Row3, and Row4.
Early evidence of planning for humanoids and multiplayer - Humanoids in the form of ‘PhysicalCharacter’, a subInstance of Models intended for models such as the red/blue figures, with support for Posing (sit, stand, and climb) and Control.
Roblox Website and forums are created. Client could be installed from the website.
In-game camera controlled by arrow keys, right mouse button, and scroll wheel.
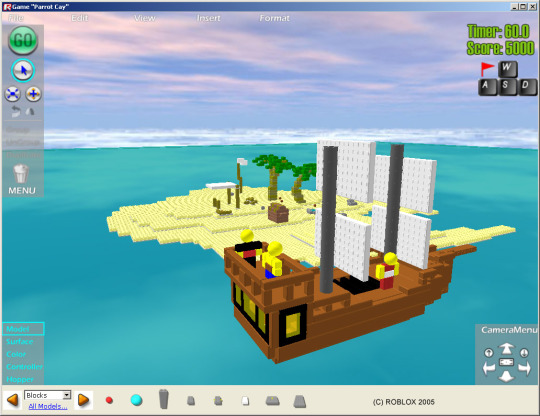
2005
Up to the patent build (May)

Builds at this time, while not known if standalone or still required use of the browser, did not rely as much on build tools in an html side panel. All tools used for manipulating the level were contained within the 3D view, as well as a toolbox on the bottom of the screen for inserting parts and models, changing part colors, adding hopperbins, applying ControllerSchemes, and changing surface types. On the top of the screen were six drop-down menus: File, Edit, View, Insert, Format, and Run. A panel on the Left-hand side of the screen Contained basic build tools, from top to bottom: Go, Drag, Axis Drag, Resize, Rotate, Tilt, Group, Ungroup, Duplicate, and Delete. A Camera control cluster in the Lower right-hand corner of the screen could be used to tilt, zoom, pan, and focus the camera.
The property “className” was instead called “Keywords”.
Surfaces worked differently - each face of a part had 5 sub-properties: Type - the type of surface that face would use (Smooth or Bumps), Constraint - the type of rotating joint that would be used if any (Hinge, Motor, None, or SteppingMotor), SurfaceInput - the InputType for any rotating joints (LeftTread, RightTread, Steer, Throtle, Updown, Action1-5, Sin, and Constant), ParamA -the first parameter for any rotating joints, and ParamB - the second input for any rotating joints.
A mysterious surface called “Spawn” existed until early 06, used in models such as “Electron Gun” and “Figure with spawn gun.” Presumably, it would regularly respawn any object attached to it at intervals set by ParamA/ParamB. The cursor used when applying the ‘Spawn’ surface to a part is still in content/Textures up through at least 2008.
Motors were applied in a different way - one could choose from “LeftHandMotors” or “RightHandMotors” which would automatically set the surface’s input parameters to “LeftTread” or “RightTread” respectively. Another option, “OscillateMotor”, would set the input parameter to “sin”, allowing the motor to oscillate back and forth rather than constantly rotating. The tools for applying these motor types are, apparently, still in modern builds of studio.
Another, now long gone, service named “Level” with the following properties: SplashHTML - an unknown feature, though likely a window or text that would appear when a level was loaded to provide instructions, DragExtents - a constraint on where parts could be placed in the level, Messages - WinMessage and LoseMessage respectively, which would be displayed when the game reached either a win state or an end state, HighScoreIsGood - presumably to determine whether it’s better to have a low or high score (think golf), RunOnOpen - determined whether the game would being immediately upon being opened, InitialTimerValue - the amount of time the user would have to complete the level, InitialScore - the score the user would start with, TimerUpAction - what would happen if the timer ran out (Draw, Lose, Nothing, Pause, or Win), and TimerAffectsScore - how the timer would change the score (Decrease, Increase, or NoChange).
Parts had some more properties, too: HasOnTouch - a boolean to set whether the part would perform some action when touched, Color - still exists though hidden in the properties menu up until modern builds of Roblox - contains the Color3 value of the part’s BrickColor, Offset/RotVel - older names for “Position” and “RotVelocity” respectively, CanSelect - older name for “locked”, CanUngroup - sets whether the part/model can be ungrouped, NameShown - sets whether the name of the part/model would be displayed above it in the 3D space (code likely later reused for humanoids), Action - the action to be done when touched if HasOnTouch is set to true (Draw, Lose, Nothing, Pause, or Win), Sound - the sound to be played when touched if HasOnTouch is set to true (Boing, Bomb, Break, Click, Clock, NoSound, Page, Ping, Slingshot, Snap, Splat, Step, StepOn, Swoosh, or Victory), ChangeScore - the amount to be added to/subtracted from the score if touched when HasOnTouch is set to true, ChangeTimer - the amount to be added to/subtracted from the timer if touched when HasOnTouch is set to true, SingleShot - a boolean to set whether the OnTouch events can be triggered more than once, KeywordFilter - sets whether the part should look for all parts with a certain Keyword or without a certain Keyword (Exclude, Include) and Keyword - the Keyword to look for, TouchesToTrigger - the amount of times the part has to be touched to trigger the OnTouched actions, and UniqueObjects - How many unique objects have to touch the part to trigger the OnTouched actions.
Hopperbins were contained in the Hopper service and were not scriptable. Instead, users could select from the following “commands”: Clone, Grab, and Hammer. Grab could drag entire models or single ungrouped parts, and instead of displaying the chassis/yellow brick it does now, it simple displayed the click cursor with the blue text “grab”. Artifacting from this text is still slightly visible in current versions of the icon. Hopperbins could be added to a Level if building was required in order to complete it. HopperBins also had two other properties: “Cost” - the score the play would have to achieve before being granted the ability to use that HopperBin, and “Quantity” - unknown.
Chase and Follow ControllerSchemes.
Camera control keys possibly changed from Arrow cluster to UHJK, as the two known ControllerFlag schemes from this time were WASD and the Arrow cluster. Plausible that the behavior of Format>Camera View at the time was such that using WASD when the camera was focused on a model would not break that focus, thus allowing KeyboardLeft to be used without interfering with the camera.
Addition of the ability to view Properties of instances - a Properties window could either be shown by selecting it from the drop-down “View” menu or would appear whenever a part of model was double-clicked.
Undo function added.
Cards deprecated(?)
Up to the Morgan McGuire builds (October)
“Run” menu removed.
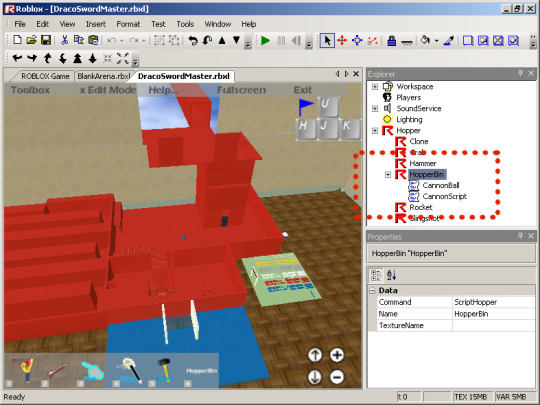
2006
Up to march

The 3D view for edit mode was placed into a Visual-Studio styled IDE initially referred to as the “roblox developer’s environment.” Build tools were removed from the in-game UI and relocated to the topbar, as well as the 5 dropdown menus. An explorer window was added to view the child hierarchy of the entire Level (now referred to as “game”) and the Property of any instance currently selected would display below that.
Humanoids are added, allowing for models (specifically player models with a certain structure) to be controlled by ControllerFlags without the use of motors. In conjunction with this, the “Player” ControllerScheme is added, as well as the Players service, and the Player instance. This occurred during Fall 2005. Mike Rayhawk was commissioned to make designs for characters that were ultimately never used, though he did design the bulk of Roblox’s classic badge Icons.
A Lua virtual machine was incorporated with its own API specifically for interacting with roblox, resulting in the addition of scripts and scriptable hopperbins. An output and command bar were added for better interaction with the Lua VM. This occurred during Fall 2005.
Explosions are added, and display as big red orbs. The hopperbin gets another four pre-scripted options: Rocket, Slingshot, Laser, and GameTool.
The UHJK ControllerScheme is added, and the studio camera is again controlled via the arrowkeys. It is unknown when WASD becomes an option for controlling the camera.
When the surface tools were added to the topbar, the motor tool was taken from the old “Right-Hand Motor tool”, resulting in all motors being automatically given the “RightHandTread” surface input.
At this time the lighting service is now visible (might always have been, unknown), and has the following properties: TopAmbient2 - how the areas of parts facing toward the sun will be shaded, BottomAmbient2 - how the areas of parts facing away from the sun will be shaded, Spotlight2 - the color of sunlight, and ClearColor - the color to be displayed in lieu of the skybox if the quality level is too low to render it.
Up to June

All or most 04/05-era properties of parts and other instances, such as the “Level” service, are removed or renamed, leaving them more or less as they are until 08.
Multiplayer was added, bringing with it the NetworkServer and NetworkClient services, as well as the chat bar and chatlog. Early multiplayer games were hosted on dedicated roblox servers and user-made games were restricted to singleplayer.
Telamon joins the roblox team, becoming their fourth engineer. He gives humanoids the ability to jump and begins working on AI.
Up to October
User-made games, now called “places”, may be played in multiplayer.
Beyond
In January of 2007, ‘Hopper’ is renamed to ‘StarterPack’ to better reflect its intended purpose, and a dummy ‘Hopper’ class is added purely to ensure that, when loading older levels with HopperBins stored under ‘Hopper’, they would all be dumped into the StarterPack. The dummy class would then delete itself.
In May of 2009, Controllers were rewritten - the ‘Player’ ControllerType was hard-coded into whatever model was set as the Player’s character, and all the Controller functionality involving motors was reworked into VehicleSeats, resulting in some loss of functionality, as individual Hinges/Motors could no longer be set to rotate with specific inputs.
-DirtPiper
9 notes
·
View notes
Text
Android - Login Screen
10 December 2020
A login application is the screen asking your credentials to login to some particular application. You might have seen it when logging into facebook,twitter e.t.c
This chapter explains, how to create a login screen and how to manage security when false attempts are made.
First you have to define two TextView asking username and password of the user. The password TextView must have inputType set to password. Its syntax is given below −
<EditText android:id = "@+id/editText2" android:layout_width = "wrap_content" android:layout_height = "wrap_content" android:inputType = "textPassword" /> <EditText android:id = "@+id/editText1" android:layout_width = "wrap_content" android:layout_height = "wrap_content" />
0 notes
Photo

Simplify Android App Development With Anko
Designed by JetBrains, the organization behind Kotlin, Anko is an open-source library that can radically change the way you create Android apps. It leverages Kotlin's syntax to offer a large collection of helper functions that help you reduce the verbosity of your code while also improving its performance.
Anko doubles as a DSL, short for domain-specific language, for creating Android layouts. In other words, it can act as a type-safe, dynamic, and more reusable alternative to layout XML files, which, as you might already know, tend to get unwieldy for large apps.
In this tutorial, I'll help you get started with Anko by showing you how to use some of its most popular features.
1. Project Setup
To be able to use the core features of Anko in your Android Studio project, all you need to do is add the following implementation dependency in the app module's build.gradle file:
implementation 'org.jetbrains.anko:anko:0.10.1'
If you want Anko to work with widgets from Android's support libraries, however, you'll need the following additional dependencies:
implementation 'org.jetbrains.anko:anko-appcompat-v7:0.10.1' implementation 'org.jetbrains.anko:anko-design:0.10.1' implementation 'org.jetbrains.anko:anko-recyclerview-v7:0.10.1' implementation 'org.jetbrains.anko:anko-cardview-v7:0.10.1'
2. Creating Layouts
The Anko DSL has helper functions for almost every widget that's offered by the Android SDK and the Android support libraries. Using them, you can create your layouts programmatically. The names of the functions match the names of the widgets, but they start with a lowercase letter. For example, to create a TextView widget, you use Anko's textView() function. Similarly, to create a FloatingActionButton widget, you can use the floatingActionButton() function.
Inside the functions, you'll have access to all the properties and event listeners of the associated widgets. For instance, you can change the text size of a TextView widget by updating the value of the textSize property inside the textView() function. Similarly, you can add an on-click event listener to it using the onClick method.
To help you better understand how to use the DSL, here's a sample layout for a browser app, containing an EditText widget and a WebView widget placed inside a LinearLayout widget whose orientation is VERTICAL:
linearLayout { orientation = LinearLayout.VERTICAL var myWebView:WebView? = null editText { inputType = InputType.TYPE_TEXT_VARIATION_URI imeOptions = EditorInfo.IME_ACTION_GO onEditorAction { _, _, _ -> myWebView?.loadUrl(text.toString()) } } myWebView = webView { webViewClient = WebViewClient() } }
Code written in the Anko DSL is very readable and intuitive, but it does take some getting used to, especially if you are already an experienced Android developer. You no longer have to assign identifiers to your widgets—or use the findViewById() method to reference them—because unlike XML-based layouts, Anko's DSL-based layouts can encapsulate your app's business logic. For instance, you can see that the EditText widget defined above has an OnEditorAction event listener that directly calls the loadUrl() method of the WebView widget to load the URL the user typed in.
Furthermore, you don't have to call the setContentView() method anymore because Anko calls it automatically inside your Activity class's onCreate() method.
The DSL includes several shortcuts you can use to make your layouts more concise. For example, you can directly pass strings to its functions to assign labels to widgets. Often, you can also avoid explicitly setting layout parameters such as widths and heights because it handles them automatically. The following sample code shows you how to create a layout containing two TextView widgets in a highly concise manner:
verticalLayout { textView("One") textView("Two") }
For comparison, here's what the above layout would look like if it were created conventionally:
<?xml version="1.0" encoding="utf-8"?> <LinearLayout xmlns:android="http://ift.tt/nIICcg" android:layout_width="match_parent" android:layout_height="match_parent" android:orientation="vertical"> <TextView android:layout_width="wrap_content" android:layout_height="wrap_content" android:text="One"/> <TextView android:layout_width="wrap_content" android:layout_height="wrap_content" android:text="Two"/> </LinearLayout>
Lastly, it's worth mentioning that layouts created using the Anko DSL tend to load faster than regular layouts because there's no XML parsing required.
3. Creating Dialogs
If you think using the AlertDialog.Builder class to create dialogs is a lot of work, you're definitely not alone. For example, here's how you would normally create a simple dialog that displays a title, a message, and an "OK" button:
AlertDialog.Builder(this@MyActivity) .setTitle("My Dialog") .setMessage("This is a test message") .setPositiveButton("OK", null) .create() .show()
With Anko, however, creating the above dialog simply involves a call to the alert() function, which accepts the dialog's title and message as its arguments.
alert("This is a test message", "My Dialog") { yesButton { } }.show()
Note that you don't have to pass a context to the alert() function. It infers the context automatically.
Anko has similar intuitively named functions to help you quickly create toasts and snackbars too. The following code shows you how to create both short and long duration toasts:
toast("This is a short toast") longToast("And this is a long toast")
4. Creating Intents
Whenever you need to start a new activity in your app, you must create an intent. Additionally, if you want to send data to the activity, you must include it in the intent as one or more extras.
With Anko's startActivity() function, you can usually perform both tasks in just one line of code. For example, the following code shows you how to launch an activity named MyActivity and pass two extras, a string extra named "PERSON" and an integer extra named "AGE", to it:
startActivity<MyActivity>("PERSON" to "Bob", "AGE" to 25)
Anko also has helper functions for several common intent-based tasks. For instance, you can use its browse() function to open a URL in the device's default browser app. Similarly, you can use the email() function to open the default email app and compose an email.
// Open browser browse("https://tutsplus.com") // Open default E-mail app email("[email protected]", "Hello", "This is a test email")
5. Using SQLite Databases
Even though every Android app can create and use SQLite databases with no additional dependencies, many developers choose third-party databases like Realm. Why? Well, maybe it's because Android's SQLite API is extremely verbose, low-level, and requires a good understanding of SQL. Fortunately, Anko has SQLite helper functions to address all those problems.
Let's say we have a simple SQLite database created using the following code:
val myDB = openOrCreateDatabase("test.db", Context.MODE_PRIVATE, null)
With Anko, you can now add a table to the above database simply by using the createTable() function, which expects the name of the table along with one more or tuples specifying the names and data types of its columns. The following sample code creates a table named PERSON having four columns, one of which serves as a primary key:
myDB.createTable("PERSON", true, "NAME" to TEXT, "AGE" to INTEGER, "NET_WORTH" to REAL, "ID" to INTEGER + PRIMARY_KEY)
What's more, to insert rows into the table, you no longer have to depend on the ContentValues() class. You can directly call the insert() function on the database, specify the name of the table you want to add the row to, and then pass the column values to it in the form of tuples.
// Add a row myDB.insert("PERSON", "NAME" to "Bob Martin", "AGE" to 25, "NET_WORTH" to 2500.50, "ID" to 100) // Add another row myDB.insert("PERSON", "NAME" to "Jane Flores", "AGE" to 32, "NET_WORTH" to 21500.80, "ID" to 101)
Lastly, to query the database, you can use the select() function, optionally followed by a chain of intuitively named functions such as whereSimple(), orderBy(), and groupBy(). For example, to list the names and ages of all persons in the above table whose net worth is greater than 10000, you can use the following code:
myDB.select("PERSON", "NAME", "AGE") .whereSimple("NET_WORTH > ?", "10000.0").exec { // More code here }
The result of the above query will be, as you might expect, a Cursor object. Converting it into a List containing actual column values of all the rows is slightly more complicated because it involves creating an object that implements the RowParser interface and passing it to the parseList() function.
The RowParser interface has just one method, the parseRow() method, inside which you'll have access to the column values of a row. How you use the values is of course up to you. For now, let's just concatenate them and print them. The following code shows you how to do so:
parseList(object: RowParser<String>{ override fun parseRow(columns: Array<Any?>): String { // Concatenate the values of the first and second columns, // which happen to be NAME and AGE return "${columns[0]} (${columns[1]} years old)" } }).forEach { println(it) // print the concatenated values } // Result is: // Jane Flores (32 years old)
Note that you don't always have to create a RowParser object manually. If the results of your query contain just one column, you are free to use one of Anko's many built-in parsers.
The names of the built-in parsers are based on the data types of the columns. For example, if the data type is TEXT, you can use a StringParser. Or if the data type is INTEGER, you can use an IntParser. The following code shows you how to use a StringParser to simply list the names of all persons in our database:
myDB.select("PERSON", "NAME").exec { parseList(StringParser).forEach { println(it) } } // Result is: // Bob Martin // Jane Flores
Conclusion
In this tutorial, you learned how to use Anko's DSL and helper functions to simplify Android application development. You also saw how Anko simplifies SQLite-related operations. I hope you now realize how well-thought-out and useful the library is.
In my opinion, if you are competent in Kotlin already, there's really no reason why you shouldn't use Anko to further improve your efficiency and development experience. To learn more about it, do refer to its official wiki.
And while you're here, check out some of our other posts about Kotlin and Android app development!
Android SDK
Java vs. Kotlin: Should You Be Using Kotlin for Android Development?
Jessica Thornsby
Android SDK
Introduction to Android Architecture Components
Tin Megali
Android SDK
Get Started With RxJava 2 for Android
Jessica Thornsby
Kotlin
Kotlin From Scratch: More Fun With Functions
Chike Mgbemena
by Ashraff Hathibelagal via Envato Tuts+ Code http://ift.tt/2jL70UU
1 note
·
View note
Video
youtube
Nguyễn Công Trình - xử lý trang đăng nhập - lập trình androi -login android studio
++facebook của tôi : http://bit.ly/2gbTWGk
+++blog : http://bit.ly/2iEwW3Y
++ pinterest của tôi : http://bit.ly/2yXVriG
+++kênh học tập : http://bit.ly/2zM0S1v
++ instagram của tôi : http://bit.ly/2CVFDzR
+++ Tumblr : http://bit.ly/2zUrIp3
++ reddit : http://bit.ly/2zKuA7h
+++ google+ : http://bit.ly/2iCRIkz Hãy sub(đăng ký ) kênh để ủng hộ tác giả nhé ! vấn đề liên quan :login android studio,tạo màn hình đăng nhập android studio,tao man hinh dang nhap cho android,dang nhap android studio,dialog login android,inputtype trong android,anh xa android studio,tạo màn hình đăng nhập android
0 notes
Link
One of the most important things which is also often neglected by developers - the performance. One of the key focus area for the 1.0 release was making it blazingly fast ⚡
TypeGraphQL is basically an abstraction layer built on top of the reference GraphQL implementation for JavaScript - graphql-js. To measure the overhead of the abstraction, a few demo examples were made to compare it against the "bare metal" - using raw graphql-js library.
It turned out that in the most demanding cases like returning an array of 25 000 nested objects, the old version 0.17 was even about 5 times slower!
library execution time TypeGraphQL v0.17 1253.28 ms graphql-js 265.52 ms
After profiling the code and finding all the root causes (like always using async execution path), the overhead was reduced from 500% to just 17% in v1.0.0! By using simpleResolvers it can be reduced even further, up to 13%:
execution time graphql-js 265.52 ms TypeGraphQL v1.0 310.36 ms with "simpleResolvers" 299.61 ms with a global middleware 1267.82 ms
Such small overhead is much easier to accept than the initial 500%! More info about how to enable the performance optimizations in the more complex cases can be found in the docs 📖.
Schema isolation
This is another feature that is not visible from the first sight but gives new possibilities like splitting the schema to public and private ones 👀
In 0.17.x and before, the schema was built from all the metadata collected by evaluating the TypeGraphQL decorators. The drawback of this approach was the schema leaks - every subsequent calls of buildSchema was returning the same schema which was combined from all the types and resolvers that could be find in the metadata storage.
In TypeGraphQL 1.0 it's no longer true! The schemas are now isolated which means that the buildSchema call takes theresolvers array from options and emit only the queries, mutation and types that are related to those resolvers.
const firstSchema = await buildSchema({ resolvers: [FirstResolver], }); const secondSchema = await buildSchema({ resolvers: [SecondResolver], });
So just by modifying the resolvers option we can have different sets of operations exposed in the GraphQL schemas! Proper isolation also makes serverless development easier as it allows to get rid of the "Schema must contain uniquely named types" errors and others.
Directives and extensions
This two new features are two complementary ways to put some metadata about the schema items.
GraphQL directives though the syntax might remind the TS decorators, as "a directive is an identifier preceded by a @ character", but in fact, they are a purely Schema Definition Language feature. Apart from the metadata capabilities, they can also modify the schema and e.g. generate the connection type for pagination purposes. Basically, the looks like this:
type Query { foobar: String! @auth(requires: USER) }
To apply them, we just need to put the @Directive decorator above and supply the string argument, e.g.:
@Resolver() class FooBarResolver { @Directive("@auth(requires: USER)") @Query() foobar(): string { return "foobar"; } }
However, on the other side we have the GraphQL extensions which are the JS way to achieve the same goal. It's the recommended way of putting the metadata about the types when applying some custom logic.
To declare the extensions for type or selected field, we need to use @Extensionsdecorator, e.g.:
@ObjectType() class Foo { @Extensions({ roles: [Role.User] }) @Field() bar: string; }
We can then read that metadata in the resolvers or middlewares, just by exploring the GraphQLResolveInfo object, e.g.:
export const ExtensionsMiddleware: MiddlewareFn = async ({ info }, next) => { const { extensions } = info.parentType.getFields()[info.fieldName]; console.log(extensions?.roles); // log the metadata return next(); };
More info about directives and extensions features can be found in docs 📖
Resolvers and arguments for interface fields
The last thing that was preventing TypeGraphQL from being fully GraphQL compliant thus blocking the 1.0 release - an ability to provide interface fields resolvers implementations and declare its arguments.
Basically, we can define resolvers for the interface fields using the same syntax we would use in case of the @ObjectType, e.g.:
@InterfaceType() abstract class IPerson { @Field() avatar(@Arg("size") size: number): string { return `http://i.pravatar.cc/${size}`; } }
...with only a few exceptions for cases like abstract methods and inheritance, which you can read about in the docs.
More descriptive errors messages
One of the most irritating issues for newcomers were the laconic error messages that haven't provided enough info to easily find the mistakes in the code.
Messages like "Cannot determine GraphQL input type for users" or even the a generic "Generating schema error" were clearly not helpful enough while searching for the place where the flaws were located.
Now, when the error occurs, it is broadly explained, why it happened and what could we do to fix that, e.g.:
Unable to infer GraphQL type from TypeScript reflection system. You need to provide explicit type for argument named 'filter' of 'getUsers' of 'UserResolver' class.
or:
Some errors occurred while generating GraphQL schema: Interface field 'IUser.accountBalance' expects type 'String!' but 'Student.accountBalance' is of type 'Float'
That should allow developers to safe tons of time and really speed up the development 🏎
Transforming nested inputs and arrays
In the previous releases, an instance of the input type class was created only on the first level of inputs nesting. So, in cases like this:
@InputType() class SampleInput { @Field() sampleStringField: string; @Field() nestedField: SomeNestedInput; } @Resolver() class SampleResolver { @Query() sampleQuery(@Arg("input") input: SampleInput): boolean { return input.nestedField instanceof SomeNestedInput; } }
the nestedField property of input was just a plain Object, not an instance of the SomeNestedInput class. That behavior was producing some unwanted issues, including limited support for inputs and args validation.
Since 1.0 release, it's no longer an issue and all the nested args and inputs are properly transformed to the corresponding input type classes instances, even including deeply nested arrays
0 notes
Link
EditText editable is deprecated How to use inputType in Android
If you are working in non editable EditText, then you may notice that now its showing warning in xml layout file, Because android:editable is now deprecated in Android. And it will be removed in upcoming version of android. And if you navigate to official website then they will suggest you to use android:inputType instead of android:editable. But they haven’t explained that how to use android:inputType to disable input in EditText.
So here is solution:
Make EditText non editable in Android
First method:
first method is using android:inputType which is suggested by official android team. To use this just set android:inputType="none" and it will become non editable.
Second method:
In you xml code set focusable="false", android:clickable="false" and android:cursorVisible="false" and this will make your EditText treat like non editable.
for example
in XML
<EditText android:id="@+id/myEditText" android:layout_width="match_parent" android:layout_height="wrap_content" android:hint="Hint" android:focusable="false" android:clickable="false" android:cursorVisible="false" />
Third method:
If you still want to use editable property then you can set this from Java or Kotlin code.
for example
In Java
EditText et = findViewById(R.id.myEditText); et.setEnabled(false);
In Kotlin
myEditText.isEnabled = false
It depends on you that which method will you preffer. Write in comments which method you like and why so other users can take benefit of this.
via Learn Pain Less's RSS Feed
0 notes
Text
SWAT Tactical Pen Review
The tough reality is that a tactical pen is only as great as the person using it. This is a self-defense tool that can be lethal in the right-hand men … and give you a combating possibility even if you’re not trained in any kind of self-defense.
You may be questioning, “Can’t I just use a regular pen or pencil?”
The response is no … you can’t. Regular pens will break and they’re not hard enough to do much damage. When it pertains to tactical pens, among the finest is the SWAT Tactical Pen.
With numerous mostly favorable evaluations from pleased clients and a high ranking on Amazon, this is social evidence that the item works. It’s important to know the specs of the pen and why it’s developed the way it is. The very best function of the pen is the effect tip. This tip is built with an armor-piercing product that’s called tungsten carbide. What do you need an effect tip for?
If you’re in a self-defense scenario and someone is assaulting you, holding the pen in a reverse grip and backhanding the tip against their temple or face can do enormous damage and bring the attack to an immediate stop. Very often, you may have to use the window.
If it’s locked, you can smash the whole window just by striking the effect tip of the pen against it.The same uses if you’re in a cars and truck that lands into a river with you caught inside it. One smash with the pen and your window or windshield will break. It’s that effective. The SWAT pen is the number # 1 ranked tactical pen by close-quarter battle fitness instructors. Naturally, if you have an excellent empty hand system, the pen will be a lot more reliable for you. The thumb grip of the pen is steady which permits a strong grip and optimum force. The aluminum shaft is anti-rust and will last a long period of time.
Here’s a point to keep in mind– do not get a tactical pen for it’s additional functions and composing abilities. A tactical pen is for self-defense.
That’s what you should use it for. There are many elegant tactical pens out there with a wide variety of functions that sidetrack from the most important function of the pen– to conserve your life and do optimal damage. Very often, the expensive pens fall brief in this location. The SWAT pen is relatively light-weight in spite of it’s stiff building. Another intriguing indicate note is that the cap doesn’t need to be unscrewed if you need to use it to compose. You can just remove the cap and pop it on the other side. As far as composing goes, this pen is as great as any and composes efficiently in dark black ink. The pen will not leakage, and you can always get refills from the producer. The look of the pen betrays its nature. This pen looks badass, and not like your normal pen. If you’re not pleased with it, you can always get your money back … but we’re wagering that once you see how cool it is, you’ll probably buy another to keep in your bug-out bag too.
if you kind of skipped the SWAT tactical Pen review above and want to get the gist of the product in video, I hear you. So do I often. Or at least a combination of words and videos. Coach Helder shot a video review, i found usefull. Enjoy
youtube
Aaaand cut! I hope you liked it.

I am the man behind Prepper Stepper, James Bisshop, and the reason this resource exists is for you to be able to access hundreds of incredible Urban, Outdoor, and Survival Skills videos. That’s it! That’s all.
Alright, so here goes the big ol’ “but”…
Okay, to start on the right foot, a confession is in order. The truth is, my own selfish needs are really what led to the creation of this site. You see, I deeply enjoy videos on the subject of SENSIBLE(!) prepping, survivalism and homesteading (like the **VIDEO TITLE OR MAIN KEYWORD** presentation you just finished viewing), and a cool site on which I could re-watch my favorite videos is really what I was after.
Of course, I do see this as something of an opportunity, as well. Not gonna lie.
I enjoy earning a bit of sponsorship revenues on the side, as I share awesome SENSIBLE(!) prepping, survivalism and homesteading videos with you. Hopefully, you’re cool with that.
I just wanted to disclose the fact that yes, I do make money from this site. However… any possible monetary benefit is incidental, and I’m not here to sell you anything. If something being offered on my site appeals to you, perfect! But if you’re just not interested, no problem. I’m just glad that you’re here.
I just want you and I to be able to “crack out” on some cool survivalist videos and tips, new and sensible prepping tips and outdoor gear videos together!

And that’s what Prepper Stepper is. It’s basically just a place for people who care about emergency meals, survival tools and emergency gear to get together and watch some cool videos. It’d be great to see you here again, if that sounds good.
So keep on comin’ back! I’m gonna be ceaselessly sharing top-notch videos which cover EDC (Everyday Carry), prepping and homesteading, and survival skills… and so on and so forth.
Please subscribe using the form below if you’d like to be updated about new videos as they become available. Email notifications of newly added videos are all you’ll ever receive from me. No promos.
If you’d like to be kept in the know, please join for free here…
#mc_embed_signupbackground:#fff; clear:left; font:14px Helvetica,Arial,sans-serif; /* Add your own Mailchimp form style overrides in your site stylesheet or in this style block. We recommend moving this block and the preceding CSS link to the HEAD of your HTML file. */ #mc-embedded-subscribe-form inputtype=checkboxdisplay: inline; width: auto;margin-right: 10px; #mergeRow-gdpr margin-top: 20px; #mergeRow-gdpr fieldset label font-weight: normal; #mc-embedded-subscribe-form .mc_fieldsetborder:none;min-height: 0px;padding-bottom:0px;
Subscribe to our mailing list
* indicates required
Email Address *
First Name
Marketing PermissionsPlease select all the ways you would like to hear from Prepper Stepper:
Email Direct Mail Customized Online Advertising
You can unsubscribe at any time by clicking the link in the footer of our emails. For information about our privacy practices, please visit our website.
We use Mailchimp as our marketing platform. By clicking below to subscribe, you acknowledge that your information will be transferred to Mailchimp for processing. Learn more about Mailchimp’s privacy practices here.
(function($) window.fnames = new Array(); window.ftypes = new Array();fnames0='EMAIL';ftypes0='email';fnames1='FNAME';ftypes1='text';(jQuery));var $mcj = jQuery.noConflict(true);
And please do use the comments section below to let me know what you thought of the SWAT Tactical Pen Review! Upon signing up, you will also receive a very special “secret gift” from me. It will arrive in your inbox within just minutes from right now.
In any case, I’d still be very grateful if you’d click the FB “Like” button on the right-hand side of this page. Or at a minimum, please share this post via one of the social share buttons below.
And of course, it means a lot to me to hear what my visitors think of the content I share. You’ll find the comments section below. Please use it, okay?
To you,
James Bisshop
The post SWAT Tactical Pen Review appeared first on Prepper Stepper.
0 notes
Text
角度の相互変換
[vb title=”VBA”] ‘角度の相互変換 ‘esriDirectionType ‘ esriDTNorthAzimuth :北方位角(北から時計回りの角度) ‘ esriDTSouthAzimuth :南方位角(南から時計回りの角度) ‘ esriDTPolar :極座標角(東から反時計回りの角度) ‘ esriDTQuadrantBearing :四分円方位角(指定した四方位から指定方位に向いた角度[eg,S 45 E]) Private Function GetAzimuthalToGeneral(ByVal Value As Variant, _ Optional ByVal InputType As…
View On WordPress
0 notes
Link
Envato Tuts+ Code http://j.mp/2kBuNFI
Designed by JetBrains, the organization behind Kotlin, Anko is an open-source library that can radically change the way you create Android apps. It leverages Kotlin's syntax to offer a large collection of helper functions that help you reduce the verbosity of your code while also improving its performance.
Anko doubles as a DSL, short for domain-specific language, for creating Android layouts. In other words, it can act as a type-safe, dynamic, and more reusable alternative to layout XML files, which, as you might already know, tend to get unwieldy for large apps.
In this tutorial, I'll help you get started with Anko by showing you how to use some of its most popular features.
1. Project Setup
To be able to use the core features of Anko in your Android Studio project, all you need to do is add the following implementation dependency in the app module's build.gradle file:
implementation 'org.jetbrains.anko:anko:0.10.1'
If you want Anko to work with widgets from Android's support libraries, however, you'll need the following additional dependencies:
implementation 'org.jetbrains.anko:anko-appcompat-v7:0.10.1' implementation 'org.jetbrains.anko:anko-design:0.10.1' implementation 'org.jetbrains.anko:anko-recyclerview-v7:0.10.1' implementation 'org.jetbrains.anko:anko-cardview-v7:0.10.1'
2. Creating Layouts
The Anko DSL has helper functions for almost every widget that's offered by the Android SDK and the Android support libraries. Using them, you can create your layouts programmatically. The names of the functions match the names of the widgets, but they start with a lowercase letter. For example, to create a TextView widget, you use Anko's textView() function. Similarly, to create a FloatingActionButton widget, you can use the floatingActionButton() function.
Inside the functions, you'll have access to all the properties and event listeners of the associated widgets. For instance, you can change the text size of a TextView widget by updating the value of the textSize property inside the textView() function. Similarly, you can add an on-click event listener to it using the onClick method.
To help you better understand how to use the DSL, here's a sample layout for a browser app, containing an EditText widget and a WebView widget placed inside a LinearLayout widget whose orientation is VERTICAL:
linearLayout { orientation = LinearLayout.VERTICAL var myWebView:WebView? = null editText { inputType = InputType.TYPE_TEXT_VARIATION_URI imeOptions = EditorInfo.IME_ACTION_GO onEditorAction { _, _, _ -> myWebView?.loadUrl(text.toString()) } } myWebView = webView { webViewClient = WebViewClient() } }
Code written in the Anko DSL is very readable and intuitive, but it does take some getting used to, especially if you are already an experienced Android developer. You no longer have to assign identifiers to your widgets—or use the findViewById() method to reference them—because unlike XML-based layouts, Anko's DSL-based layouts can encapsulate your app's business logic. For instance, you can see that the EditText widget defined above has an OnEditorAction event listener that directly calls the loadUrl() method of the WebView widget to load the URL the user typed in.
Furthermore, you don't have to call the setContentView() method anymore because Anko calls it automatically inside your Activity class's onCreate() method.
The DSL includes several shortcuts you can use to make your layouts more concise. For example, you can directly pass strings to its functions to assign labels to widgets. Often, you can also avoid explicitly setting layout parameters such as widths and heights because it handles them automatically. The following sample code shows you how to create a layout containing two TextView widgets in a highly concise manner:
verticalLayout { textView("One") textView("Two") }
For comparison, here's what the above layout would look like if it were created conventionally:
<?xml version="1.0" encoding="utf-8"?> <LinearLayout xmlns:android="http://j.mp/2B8wijc" android:layout_width="match_parent" android:layout_height="match_parent" android:orientation="vertical"> <TextView android:layout_width="wrap_content" android:layout_height="wrap_content" android:text="One"/> <TextView android:layout_width="wrap_content" android:layout_height="wrap_content" android:text="Two"/> </LinearLayout>
Lastly, it's worth mentioning that layouts created using the Anko DSL tend to load faster than regular layouts because there's no XML parsing required.
3. Creating Dialogs
If you think using the AlertDialog.Builder class to create dialogs is a lot of work, you're definitely not alone. For example, here's how you would normally create a simple dialog that displays a title, a message, and an "OK" button:
AlertDialog.Builder(this@MyActivity) .setTitle("My Dialog") .setMessage("This is a test message") .setPositiveButton("OK", null) .create() .show()
With Anko, however, creating the above dialog simply involves a call to the alert() function, which accepts the dialog's title and message as its arguments.
alert("This is a test message", "My Dialog") { yesButton { } }.show()
Note that you don't have to pass a context to the alert() function. It infers the context automatically.
Anko has similar intuitively named functions to help you quickly create toasts and snackbars too. The following code shows you how to create both short and long duration toasts:
toast("This is a short toast") longToast("And this is a long toast")
4. Creating Intents
Whenever you need to start a new activity in your app, you must create an intent. Additionally, if you want to send data to the activity, you must include it in the intent as one or more extras.
With Anko's startActivity() function, you can usually perform both tasks in just one line of code. For example, the following code shows you how to launch an activity named MyActivity and pass two extras, a string extra named "PERSON" and an integer extra named "AGE", to it:
startActivity<MyActivity>("PERSON" to "Bob", "AGE" to 25)
Anko also has helper functions for several common intent-based tasks. For instance, you can use its browse() function to open a URL in the device's default browser app. Similarly, you can use the email() function to open the default email app and compose an email.
// Open browser browse("https://tutsplus.com") // Open default E-mail app email("[email protected]", "Hello", "This is a test email")
5. Using SQLite Databases
Even though every Android app can create and use SQLite databases with no additional dependencies, many developers choose third-party databases like Realm. Why? Well, maybe it's because Android's SQLite API is extremely verbose, low-level, and requires a good understanding of SQL. Fortunately, Anko has SQLite helper functions to address all those problems.
Let's say we have a simple SQLite database created using the following code:
val myDB = openOrCreateDatabase("test.db", Context.MODE_PRIVATE, null)
With Anko, you can now add a table to the above database simply by using the createTable() function, which expects the name of the table along with one more or tuples specifying the names and data types of its columns. The following sample code creates a table named PERSON having four columns, one of which serves as a primary key:
myDB.createTable("PERSON", true, "NAME" to TEXT, "AGE" to INTEGER, "NET_WORTH" to REAL, "ID" to INTEGER + PRIMARY_KEY)
What's more, to insert rows into the table, you no longer have to depend on the ContentValues() class. You can directly call the insert() function on the database, specify the name of the table you want to add the row to, and then pass the column values to it in the form of tuples.
// Add a row myDB.insert("PERSON", "NAME" to "Bob Martin", "AGE" to 25, "NET_WORTH" to 2500.50, "ID" to 100) // Add another row myDB.insert("PERSON", "NAME" to "Jane Flores", "AGE" to 32, "NET_WORTH" to 21500.80, "ID" to 101)
Lastly, to query the database, you can use the select() function, optionally followed by a chain of intuitively named functions such as whereSimple(), orderBy(), and groupBy(). For example, to list the names and ages of all persons in the above table whose net worth is greater than 10000, you can use the following code:
myDB.select("PERSON", "NAME", "AGE") .whereSimple("NET_WORTH > ?", "10000.0").exec { // More code here }
The result of the above query will be, as you might expect, a Cursor object. Converting it into a List containing actual column values of all the rows is slightly more complicated because it involves creating an object that implements the RowParser interface and passing it to the parseList() function.
The RowParser interface has just one method, the parseRow() method, inside which you'll have access to the column values of a row. How you use the values is of course up to you. For now, let's just concatenate them and print them. The following code shows you how to do so:
parseList(object: RowParser<String>{ override fun parseRow(columns: Array<Any?>): String { // Concatenate the values of the first and second columns, // which happen to be NAME and AGE return "${columns[0]} (${columns[1]} years old)" } }).forEach { println(it) // print the concatenated values } // Result is: // Jane Flores (32 years old)
Note that you don't always have to create a RowParser object manually. If the results of your query contain just one column, you are free to use one of Anko's many built-in parsers.
The names of the built-in parsers are based on the data types of the columns. For example, if the data type is TEXT, you can use a StringParser. Or if the data type is INTEGER, you can use an IntParser. The following code shows you how to use a StringParser to simply list the names of all persons in our database:
myDB.select("PERSON", "NAME").exec { parseList(StringParser).forEach { println(it) } } // Result is: // Bob Martin // Jane Flores
Conclusion
In this tutorial, you learned how to use Anko's DSL and helper functions to simplify Android application development. You also saw how Anko simplifies SQLite-related operations. I hope you now realize how well-thought-out and useful the library is.
In my opinion, if you are competent in Kotlin already, there's really no reason why you shouldn't use Anko to further improve your efficiency and development experience. To learn more about it, do refer to its official wiki.
And while you're here, check out some of our other posts about Kotlin and Android app development!
http://j.mp/2B7uI1l via Envato Tuts+ Code URL : http://j.mp/2etecmc
0 notes
Photo

OLALA Quick Charge 3.0 10000mAh Portable Charger with Dual Input(Type C and Micro USB) Faster Recharge Ultra Slim External Battery for Sony, Samsung, iPhone, iPad - Dark Green (USB-C Cable Included)
https://topcellulardeals.com/product/olala-quick-charge-3-0-10000mah-portable-charger-with-dual-inputtype-c-and-micro-usb-faster-recharge-ultra-slim-external-battery-for-sony-samsung-iphone-ipad-dark-green-usb-c-cable-included/
[Quick Charge 3.0 Technology] Compared to QC 2.0, QC 3.0 has 15% greater charging efficiency, charges up to 27% faster, and reduces power consumption by up to 45%. QC 3.0 is also compatible with Normal USB Charge, QC 2.0 & 1.0. [Two Way Rapid Recharge] One input is just never enough! It equipped with 2 input interfaces (USB Type-C and Micro USB) to meet different needs. Featuring Quick Charge USB-C to USB 3.0 cable included for Type-C port, can fully recharge this portable battery in just 3.5 hrs. [10000mAh High Capacity] This portable charger has powerful capacity up to 10000mAh, it can fully charge your iPhone 8 3.6 times, an iPhone X or iPhone 8 Plus 2.4 times, a Galaxy S8 2.2 times, or an iPad Mini 4 more than 1 time.
0 notes
Link
Some of the input types attribute. 1) Value. 2) readonly. 3) Disabled. 4) Size 5) Maxlength.
0 notes