#it's a great way to get started and learn the basics of EQ and compression and other ways to manipulate waveforms
Explore tagged Tumblr posts
Visit Tumblr Blog
Explore Tumblr blogs with no restrictions, modern design and the best experience.
Last Seen Tumblr Blogs


Fun Fact
Tumblr posted its first advertisements in May 2012 and subsequently earned $13M in revenue.
Text
you CAN use audacity as a DAW
don't let the haters tell you otherwise
#music#music production#music producer#music production advice#music advice#audacity#bad music production advice#but also kinda good advice#it's a great way to get started and learn the basics of EQ and compression and other ways to manipulate waveforms#I recommend everyone try to produce at least one song with Audacity#if for no other reason than limitations can produce great art#I've tried this before and had a lot of fun
6 notes
·
View notes
Note
where should i look to learn the basic of ableton? it overwhelms me so much but there's nothing more i want to do than making music or at least trying to and I'm terrible depressed bc of that
Hi anon. I’ve been in the same position as you and I know what it feels like to have all this creative energy and emotions pent up that you can’t express in the way you’d like to. This is a long one but I’m really passionate about this so here:
Basically I learnt the basics of logic at my uni and I got lessons/mentoring from my bandmate who encouraged me to switch over to ableton (I much prefer it now).
I know it looks overwhelming at first but I promise with some practice it’s really not too bad (it’s def easier than pro tools lol) Music production is one skill that is really easy to self teach because there’s just so many free resources online. I’d really recommend finding an in depth introduction to ableton video on YouTube and kind of just following along. Start trying to learn the keyboard commands early on if you can because they’ll make your workflow so much faster in the long run.
Izotope has some really great articles that go into the basics of production techniques in really easy to understand terms. Sound on sound has some great articles too. Making a big google doc with every you learn can be a great resource to have so you can go back and reference it.
Alongside that I’d recommend trying to learn some basic music theory because I honestly think it essential to know for production (many people would disagree lol). If you haven’t already, try to get your head around the circle of fifths and the harmonic series.
As well as this, I think it’s important to understand the basics of synthesis because that terminology will keep coming up in VSTs and it’ll help to have some context of where these terms came from. Look into the basics anatomy of a subtractive synthesiser to start. From there id recommend looking into FM, additive and wavetable synthesis. This book was written in the 80s but I found it really helpful for grasping these concepts: https://archive.org/details/SynthesizerBasicsDeanFriedman600dpi_201608/page/n70/mode/1up
I’d also recommend grasping the basics of EQ and compression because it’s something you’ll probably use on every single track you ever make. Also learn what phase cancellation is because that’s an issue that come up a lot when you’re a beginner.
If you’re able to, I’d recommend making it a goal to try to a learn new thing about music or production every day. Even if that’s just something as simple as what synth was used on a song you like or what a particular mic is good for or a neat trick you do with a stock plugin, all that knowledge adds up and complements each other.
I’ve found that trying to listen to your favourite music with an analytical frame of mind and even trying to get a hold of the multitracks can be a great learning tool. Find out what kind of hardware they used, what plugins they used, what mics etc. There’s no shame in copying your favourite producers until you find your own voice.
In terms of gear, I’d recommend picking up a midi keyboard and an interface if you don’t have one already. If you’re finding you keep running into CPU issues with your computer (ableton isn’t great for this) you can try resampling your midi track and turning off the plugins then freezing the track (I wish I started doing this sooner). Otherwise you’ll just get frustrated and stuck and not want to keep working on your tracks.
If money is an issue, ableton comes with a lot of great stock instruments and effects + samples and drum racks but expensive plugins are always going on sale so maybe have a look on plugin boutique and see if anything that looks cool is within your budget.
Keep in mind that I’m saying this as someone who still considers themself a beginner/intermediate in this area and I still have a heap to learn too. Good luck and make cool stuff.
18 notes
·
View notes
Text
7 Do’s & Don’ts of Music Production
Music production is an art form that combines creativity, technical skill, and a keen understanding of sound. Whether you’re a seasoned producer or a novice, there are fundamental principles that can help guide your work towards a professional finish. In this article, we will explore seven do’s and don’ts of music production that will enhance your skills and help you avoid common pitfalls. Additionally, we will highlight the importance of working with professional services like 432Hz Studio, a premier dubbing studio in Bangalore, to achieve top-notch results.
Do’s of Music Production
1. Do Plan Your Production
One of the most critical steps in music production is planning. Before diving into recording and mixing, take the time to conceptualize your project. Outline your goals, choose your instruments, and decide on the overall vibe you want to achieve.
Tip: Create a timeline and a checklist to keep your project organized and on track.
2. Do Invest in Quality Equipment
High-quality equipment can significantly impact the outcome of your music production. Invest in a reliable computer, audio interface, microphones, monitors, and headphones. Quality gear ensures better sound capture and more accurate monitoring.
Tip: Start with the essentials and gradually expand your setup as you become more experienced.
3. Do Learn the Basics of Sound Engineering
Understanding the fundamentals of sound engineering is crucial for any music producer. Learn about recording techniques, microphone placement, EQ, compression, and other essential aspects of sound engineering. This knowledge will empower you to make informed decisions during the production process.
Tip: There are numerous online courses and tutorials available that can help you get started.
4. Do Focus on the Arrangement
A well-structured arrangement can make a significant difference in how your music production is perceived. Pay attention to the flow of your track, including the introduction, verses, choruses, and bridges. Ensure that each section transitions smoothly and that there is a dynamic range throughout the piece.
Tip: Experiment with different arrangements and seek feedback from others to refine your work.
5. Do Use Reference Tracks
Using reference tracks is a great way to gauge the quality of your production. Choose tracks that you admire and compare them to your work. Listen for differences in mix balance, tonal quality, and overall impact.
Tip: Reference tracks can help you identify areas for improvement and ensure your mix is up to industry standards.
6. Do Pay Attention to Details
Details matter in music production. From the choice of sounds and samples to the subtle effects and automation, every element contributes to the final product. Take the time to refine each aspect of your track.
Tip: Regularly review your work with fresh ears to catch any details you might have missed.
7. Do Get Professional Help
Even the most talented producers can benefit from professional assistance. Consider working with a professional mixing and mastering engineer to polish your tracks. They can provide an objective perspective and ensure your music production meets commercial standards.
Tip: A professional studio like 432Hz Studio offers expert services in mixing, mastering, and dubbing, helping you achieve a polished final product.
Don’ts of Music Production
1. Don’t Rush the Process
Patience is key in music production. Rushing through recording, editing, and mixing can lead to mistakes and a subpar final product. Take your time to ensure each step is done correctly.
Tip: Set realistic deadlines and give yourself enough time to perfect your work.
2. Don’t Overuse Effects
While effects like reverb, delay, and compression can enhance your music, overusing them can clutter your mix and detract from the overall sound. Use effects sparingly and with intention.
Tip: Focus on achieving a clean, balanced mix before adding effects.
3. Don’t Neglect Room Acoustics
The acoustics of your recording environment play a crucial role in the quality of your recordings. Poor acoustics can lead to unwanted reflections, echoes, and a muddy sound. Invest in acoustic treatment for your studio.
Tip: Simple solutions like bass traps, diffusers, and acoustic panels can make a significant difference.
4. Don’t Ignore Feedback
Feedback is invaluable in music production. Share your work with trusted friends, colleagues, or mentors and be open to constructive criticism. Fresh perspectives can help you identify issues you might have overlooked.
Tip: Regularly seek feedback during different stages of your production process.
5. Don’t Rely Solely on Software
While digital audio workstations (DAWs) and plugins are powerful tools, relying solely on software can limit your creativity. Incorporate hardware instruments, synthesizers, and other analog gear into your setup for a more diverse sound palette.
Tip: Experiment with different combinations of software and hardware to find your unique sound.
6. Don’t Forget to Back Up Your Work
Losing your project files can be devastating. Regularly back up your work to multiple locations, such as external hard drives and cloud storage. This ensures that you can recover your files in case of a technical failure.
Tip: Set up an automatic backup system to save time and reduce the risk of data loss.
432Hz Studio, a premier dubbing studio in Bangalore, is committed to fostering a culture of continuous learning and innovation. They offer regular training sessions and encourage their team to stay at the forefront of music production trends.
7. Don’t Skimp on Mastering
Mastering is the final step in music production, and it’s crucial for ensuring your track sounds its best on all playback systems. Don’t skimp on this process. If possible, hire a professional mastering engineer to give your music the final polish.
Tip: Professional mastering can enhance the clarity, volume, and overall impact of your track.
Conclusion
Music production is a multifaceted process that requires a balance of creativity and technical skill. By following these seven do’s and don’ts, you can enhance your production quality and avoid common mistakes. Planning, investing in quality equipment, learning sound engineering basics, focusing on arrangement, using reference tracks, paying attention to details, and seeking professional help are all essential steps to success.
Conversely, avoid rushing the process, overusing effects, neglecting room acoustics, ignoring feedback, relying solely on software, forgetting to back up your work, and skimping on mastering. These pitfalls can hinder your progress and affect the final outcome of your music.
For those serious about music production, partnering with a professional dubbing studio in Bangalore like 432Hz Studio can make a significant difference. With their expertise and state-of-the-art facilities, you can achieve a polished, professional sound that stands out in the industry.
By adhering to these guidelines and leveraging professional resources, you can take your music production to new heights, creating tracks that captivate and inspire listeners
0 notes
Text
7 Do’s & Don’ts of Music Production
Music production is an art form that combines creativity, technical skill, and a keen understanding of sound. Whether you’re a seasoned producer or a novice, there are fundamental principles that can help guide your work towards a professional finish. In this article, we will explore seven do’s and don’ts of music production that will enhance your skills and help you avoid common pitfalls. Additionally, we will highlight the importance of working with professional services like 432Hz Studio, a premier dubbing studio in Bangalore, to achieve top-notch results.
Do’s of Music Production
1. Do Plan Your Production
One of the most critical steps in music production is planning. Before diving into recording and mixing, take the time to conceptualize your project. Outline your goals, choose your instruments, and decide on the overall vibe you want to achieve.
Tip: Create a timeline and a checklist to keep your project organized and on track.
2. Do Invest in Quality Equipment
High-quality equipment can significantly impact the outcome of your music production. Invest in a reliable computer, audio interface, microphones, monitors, and headphones. Quality gear ensures better sound capture and more accurate monitoring.
Tip: Start with the essentials and gradually expand your setup as you become more experienced.
3. Do Learn the Basics of Sound Engineering
Understanding the fundamentals of sound engineering is crucial for any music producer. Learn about recording techniques, microphone placement, EQ, compression, and other essential aspects of sound engineering. This knowledge will empower you to make informed decisions during the production process.
Tip: There are numerous online courses and tutorials available that can help you get started.
4. Do Focus on the Arrangement
A well-structured arrangement can make a significant difference in how your music production is perceived. Pay attention to the flow of your track, including the introduction, verses, choruses, and bridges. Ensure that each section transitions smoothly and that there is a dynamic range throughout the piece.
Tip: Experiment with different arrangements and seek feedback from others to refine your work.
5. Do Use Reference Tracks
Using reference tracks is a great way to gauge the quality of your production. Choose tracks that you admire and compare them to your work. Listen for differences in mix balance, tonal quality, and overall impact.
Tip: Reference tracks can help you identify areas for improvement and ensure your mix is up to industry standards.
6. Do Pay Attention to Details
Details matter in music production. From the choice of sounds and samples to the subtle effects and automation, every element contributes to the final product. Take the time to refine each aspect of your track.
Tip: Regularly review your work with fresh ears to catch any details you might have missed.
7. Do Get Professional Help
Even the most talented producers can benefit from professional assistance. Consider working with a professional mixing and mastering engineer to polish your tracks. They can provide an objective perspective and ensure your music production meets commercial standards.
Tip: A professional studio like 432Hz Studio offers expert services in mixing, mastering, and dubbing, helping you achieve a polished final product.
Don’ts of Music Production
1. Don’t Rush the Process
Patience is key in music production. Rushing through recording, editing, and mixing can lead to mistakes and a subpar final product. Take your time to ensure each step is done correctly.
Tip: Set realistic deadlines and give yourself enough time to perfect your work.
2. Don’t Overuse Effects
While effects like reverb, delay, and compression can enhance your music, overusing them can clutter your mix and detract from the overall sound. Use effects sparingly and with intention.
Tip: Focus on achieving a clean, balanced mix before adding effects.
3. Don’t Neglect Room Acoustics
The acoustics of your recording environment play a crucial role in the quality of your recordings. Poor acoustics can lead to unwanted reflections, echoes, and a muddy sound. Invest in acoustic treatment for your studio.
Tip: Simple solutions like bass traps, diffusers, and acoustic panels can make a significant difference.
4. Don’t Ignore Feedback
Feedback is invaluable in music production. Share your work with trusted friends, colleagues, or mentors and be open to constructive criticism. Fresh perspectives can help you identify issues you might have overlooked.
Tip: Regularly seek feedback during different stages of your production process.
5. Don’t Rely Solely on Software
While digital audio workstations (DAWs) and plugins are powerful tools, relying solely on software can limit your creativity. Incorporate hardware instruments, synthesizers, and other analog gear into your setup for a more diverse sound palette.
Tip: Experiment with different combinations of software and hardware to find your unique sound.
6. Don’t Forget to Back Up Your Work
Losing your project files can be devastating. Regularly back up your work to multiple locations, such as external hard drives and cloud storage. This ensures that you can recover your files in case of a technical failure.
Tip: Set up an automatic backup system to save time and reduce the risk of data loss.
432Hz Studio, a premier dubbing studio in Bangalore, is committed to fostering a culture of continuous learning and innovation. They offer regular training sessions and encourage their team to stay at the forefront of music production trends.
7. Don’t Skimp on Mastering
Mastering is the final step in music production, and it’s crucial for ensuring your track sounds its best on all playback systems. Don’t skimp on this process. If possible, hire a professional mastering engineer to give your music the final polish.
Tip: Professional mastering can enhance the clarity, volume, and overall impact of your track.
Conclusion
Music production is a multifaceted process that requires a balance of creativity and technical skill. By following these seven do’s and don’ts, you can enhance your production quality and avoid common mistakes. Planning, investing in quality equipment, learning sound engineering basics, focusing on arrangement, using reference tracks, paying attention to details, and seeking professional help are all essential steps to success.
Conversely, avoid rushing the process, overusing effects, neglecting room acoustics, ignoring feedback, relying solely on software, forgetting to back up your work, and skimping on mastering. These pitfalls can hinder your progress and affect the final outcome of your music.
For those serious about music production, partnering with a professional dubbing studio in Bangalore like 432Hz Studio can make a significant difference. With their expertise and state-of-the-art facilities, you can achieve a polished, professional sound that stands out in the industry.
By adhering to these guidelines and leveraging professional resources, you can take your music production to new heights, creating tracks that captivate and inspire listeners
1 note
·
View note
Text
Fabfilter Pro Q 3 License Key Free

Fabfilter Pro Q 3 License Key Free Code
Fabfilter Pro Q 3 License Key Free
FabFilter Pro Q-3.17 Crack & License Key Download (2021) Fabfilter VST free download. Multimedia tools downloads - FabFilter Pro-Q by FabFilter Software Instruments and many more programs are available for instant and free download. Fabfilter pro q VST free download.
FaBFilter Pro Q is probably the device you use the most when mixing and working, so you need a top-notch add-on. With FabFilter Pro-Q 3, you get the best possible sound quality, a broad overview of features, and a clean, creative interface for easy use. It is a VST engine sound module with unusual sound mixing techniques.
FabFilter Total Bundle License Key consists of all crucial keygen units which contact for to get the free get right of access to this software program. Moreover, Fabfilter pro q 3 split free download newest sound manufacturing program is usually consists of 14 plugins that could work on Microsoft Home windows and macOS products.
Fabfilter Total Bundle VST Crack (Win) Download. FabFilter Total Bundle Crack is intended to become your sound shaping tool. This 24-band dynamic equalizer allows subtle optimizations and extreme frequency sculptures, both with an analog natural phase and with a precise digital linear phase.
FabFilter Pro Q-3.17 Crack & License Key Download (2021)
Fabfilter VST free download. Multimedia tools downloads - FabFilter Pro-Q by FabFilter Software Instruments and many more programs are available for instant and free download.
Fabfilter pro q VST free download. Most people looking for Fabfilter pro q VST free downloaded: FabFilter Pro-Q. FabFilter Pro-Q is designed to create sound bands, select and edit multiple bands at once. FabFilter Pro-L.
Dec 9, 2018 - FabFilter recently released the Pro-Q 3 — an update to their flagship equalizer plugin. Its predecessor, the Pro-Q 2, was already an incredible. Videos about FabFilter Pro-Q Learn more about FabFilter Pro-Q's features and functions.
FabFilter Pro-Q 3 Crack (VST) License Key Free Download (2021) FabFilter License Key offers everything that the demanding engineer can do: FabFilter Total Bundle 2020 is here, complete set of all FabFilter plug-ins excellent sound quality audio processing and music production. May also like Idoo FabFilter Pro-Q 3 Crack from here.
FabFilter Pro-Q 3 Crack the best method for sound creation. This 24-band dynamic equalizer allows subtle tweaks as well as intense frequency sculpting in both analog and digital phase modes. Let snare drums break, let vocals louder, or even fit one of the tracks to another with the EQ curve. You also get an infinite variety of philter types, center- and left-right processing modes, and support for Dolby Atmos. Pro-Q 3 could be the last EQ plugin you ever need to complete with the Auto Gain feature. Thanks to its versatile new features, it’s easy to create a top drawer mix with Pro-Q 3. Take advantage of support from Dolby Atmos, smart per band speakers. FabFilter Pro License Key removes inappropriate frequencies using an LP / HP brick wall philter pitch.
One compressor plug-in that has received rave reviews for its sound character and delicious versatility is FabFilter Pro-C 2. Pro-C 2 offers an innovative user interface, flexible side training and routing options, and offers you high quality compression and useful presets depending on the program.
There’s also a philter type of Flat Tilt. The creation of sonic space is a piece of cake with Pro-Q 3 — its modernized spectrum analyzer gives an indication of collision frequency, while the over-the-top Spectrum Grab feature provides labels for critical peaks. Improved EQ Match lets you match another Pro-Q 3 instance’s post spectrum in your session. Moreover, automatic gain now involves the weighting of the channels and an assessed correction of dynamic gain, leading to a better overall gain.
FabFilter Pro Q 3 Crack & Torrent + License Time Download
In the FabFilter Pro-Q 3 Crackplug-in, there is a Natural Phase mode with a distinctly analog atmosphere, in addition to a very clear-cut mode for the linear phase. The natural phase mode corresponds to an analog equalizer’s magnitude response and phase response without unwanted audible stimuli. When you start boosting strongly, digital EQs begin to display their true colors, and Pro-Q 3 is the most striking.
Fabfilter Free Download
FabFilter Pro Crack is famous for an audio plugin VST application. It has special and useful mastering tricks and techniques to mix an audio sound. The quality of music production is boosted but after the complete implementation of VST, VST3, AU, AAX, and other AudtioSuites reliably. It is an option to customize the platform for your consequences. So, you can equalize the sound and audio voice. Hence, it is removing these types of tactical terms using the professional suite. This is a complete suite within a transparency control and goes to peak performance due to a true limiter.
FabFilter Pro Q 3 Crack & Keygen Download (Mac + Windows)
Fabfilter Pro Q 2 Download
Sweetwater mixing engineers know that your EQ frequencies have a big effect on your combination. You will note a decrease in energy and enthusiasm and may not know why, if you cut the frequency that falls in line with the key to the song which you mix. With Pro-Q 3, the Piano Roll view shows you at once the variety of notes you work in, making it possible to make more musical choices and sound mixes.
You alter the overall volume level of this track if you make substantial boosts or cut to an EQ. In the FabFilter Pro Keygen-Q 3 plug-in, the Auto Gain mode compensates the key performance by how you boost or cut. You can do this without disrupting the overall balance of the mix if an EQ adjustment is required after setting the basic mix levels. Auto Gain mode Pro-Q 3 involves channel weighting and the expected dynamic gain correction, which increases overall gain adjustment.
FabFilter Pro Bold Features:
Complete EQ and plug-in philter
Smart pro-band speaker selection support for Dolby Atmos
LP / HP philter pitch brick wall removes unwanted frequencies actively
The indication of frequency collision makes sonic space brisk
Overhauled spectrum seizure functionality includes labels to identify important peaks
Auto gain consists of channel weighing and a complex adjustment.
Bell, Notch, High / Low Shelf, High / Low Cut, Tilt Shelf, and Flat Tilt are the most common forms of philter.
EQ Match helps you to balance another Pro-Q 3 in your session with a post spectrum
Mid- and left-right per-band modes allow you to more accurately EQ your mix
Improved EQ band menu with Dynamic Creation, Inverting Gain, etc.
Pick from Linear Phase transparent operation or Natural Phase analog sound mode.
The Zero Latency mode makes it perfect for monitoring or live use
Unbelievably sensitive audio monitoring with up to 24 EQ bands
Pick frequencies with Piano Roll View based on musical note values
The maximum depth is 96dB per octave for all types of philters
Technical Specification:
Software Type: EQ and Filters
Platform: Mac & PC
Upgrade/Full: Full
Download/Boxed: Download
Bit Depth: 64-bit
Format: AAX Native, VST, VST3, AU, AudioSuite
Requirements – Mac: Intel Core 2 Duo or higher, 4GB RAM minimum, OS X 10.9 or later
Requirements – PC: Intel Core 2 Duo / AMD Athlon 64 X2 or higher, 4GB RAM minimum, Windows 7 SP1 or later
How to install FabFilter Pro-Q 3 Cracked Edition?
First of all, download the latest version from our link.
Now, extract the setup using a new edition WinRAR.
So, run the setup and wait for full installation.
No, do the button and enjoy it for a lifetime.
FabFilter Pro Crack + Keygen 2021 Download
FabFilter Pro Crack is a plugin that will interact with its incomparable sounds and user interface. Voice and VST32 sound quality is now available. It is the advancement of a new generation to perfectly organize music content. However, you can engage in EQ plugins and play professional functions
To create Bass Gorilla keyword and critical planning as you wish. It is the perfect data arrangement and sound mix for music lovers. So how difficult is it here? Nothing special. First, it interacts with your equation and the best evaluation technique. Also, there is a great and impressive interface to share your ideas with your latest music. This is fast and efficient. Because it revealed the tools of the master.
FabFilter Pro keygen offers everything the discerning engineer can do iT Total Bundle is here, a complete set of all it plug-ins, excellent sound quality, audio processing, and music production. You may also like Idoo Video Editor Crack Version from here. It Pro Download is a powerful audio editing tool that will allow you to shape your audio files and comes with the highest quality end product possible.
The quality of the audio files depends on many factors. Quality can be influenced by many plugins. The equalizer is by far the most popular way to improve sound quality. It is an equalizer that comes as an audio plug-in and is very easy to use.
Fabfilter Pro Q 3 License Key Free Code
FabFilter Pro Serial Key is designed to help you achieve your sound in the fastest possible way. Via the large interactive EQ display, you can create bands where you need them and select and edit multiple bands at once. Unique features like Spectrum Grab, Full Screen Mode, and EQ Match will speed up your workflow even more.
It is designed to help you achieve your sound in the fastest possible way. Via the large interactive EQ display, you can create bands where you need them and select and edit multiple bands at once. Unique features like Spectrum Grab, Full-Screen Mode, and EQ Match will speed up your workflow even more.
FabFilter Pro Crack
It quickly became my first-choice EQ plug-in, and I’ve spent much of the last four years happily putting Pro-Q in the insert slots. If I’m honest, in fact, it hadn’t actually occurred to me that there might be ways to make it even better. Then themselves, however, have not been so accommodating, and Pro-Q version 2 offers a positive deluge of new features.
FabFilter Pro License Key is a plug-in that interacts with you to match its unmatched sounds and user interface. It is now available for VST and VST32 to create quality sounds. It’s about the advancement of a new generation to perfect the organization of music content. However, you can participate in the EQ plugin and play its Pro features to send your sounds and critical planning of Bass Gorilla stuff as you like.
FabFilter Pro Keygen is a very useful tool, but it also has its serious side. The linear phase mode makes it suitable for the master bus, and it also has left-right and middle side modes. The EQ range extends down to 10 Hz and up to 30 kHz, and together with the crisp EQ curves, this makes it ideal for cutting inaudible frequencies that take up headroom.
In use, it feels precise and clear, with frequencies cut when desired, and with boosted frequencies clearly audible with very tight Q settings. Raising the high-end adds what it should rather than an undue edge. All of this results in clear, defined mixes when used on each channel, for which the low CPU load makes it suitable. It’s not as comprehensive as, say, DMG’s Equilibrium, which offers a wide range of EQ characters, among other things. But Pro-Q 2 has no glaring omissions, although it is not so specified as to detract from its immediacy.
FabFilter Pro Crack Key Features
Fully support VST, VST3 with Full HD video/audio units.
Here is full support for native AAX formats.
Known for the MAC / Windows operating system.
This is the final synthesizer that works basically through the app stores.
This plugin has a flexible drag and drops modulations.
There is such a nice oscillator for tuning the multi-interactive displays.
FabFilter Crack perfectly controls your sounds, including the power of tools.
However, it includes advanced sidechain options as well as accurate measurement.
High-quality audio with nice plug-in and synthesis effects.
Fabfilter Pro Q 3 License Key Free
System Requirement
For Windows Vista, XP, 7,8.1,8 and Windows 10 too, both (32/64 bit)
Nothing special more than that.
How to install FabFilter Pro Crack?
First of all, download FabFilter Crack.
Then run Crack and generate the license key.
Now it’s done.
Complete installation procedure.
Then enjoy
You may also like Adobe After Effects Crack Full Version Download (2021)
1 note
·
View note
Text
Soundrs: DJ CYBERDAD
My name is John Verchot, I’ve released music under several names: J-chot as well as DJ CYBERDAD. Locally, I’m usually just billed as DJ Verchot. I feel like the first thing I should tell you about myself is that I have severe ADHD, which seems to be the single most consistent force guiding my art and existence. I often get distracted and always get ahead of myself when I try to explain things. DJ CYBERDAD started out as a funny pseudonym to release more profane songs that I didn’t want my son to hear, but changed into an outlet for my smoother dance jams as well as more introspective music.

What are your inspiration sources?
It varies from project to project. Often times with tracks, the inspiration to work on them comes in two or three different phases. Inspiration to create sounds is one thing, as inspiration to finish and structure tracks, create moods/themes, or even package them into a finished project, all feel like different driving forces/processes that need to happen in order for me to get anything done. However, whichever one of those forces I am able to utilize when I sit down at my laptop often seems to be beyond my control.
Most times I’ll hear a sound, loop or phrase, I’ll start to wonder what I can do with it, or how I can change and manipulate it. It might be the timbre of an old instructional video’s narrator, or an odd metallic sound I’ve managed to coax out of some equipment. Occasionally I’ll think of a concept, either of overall sound or thematic content and before I know it, I’ve got half a track planned out in my head. Many times I’ll hear other tracks or songs, and want to use just one part/concept/sound or re-do the whole track differently. With “Emotional in Destin”, I was trying to convey moods or feelings I felt during an unexpected trip to Florida in the middle of a crushing depression. It sounds bizarre, but I've never channeled personal experiences into my music before.
Overall what inspires me to create different sounds is the novelty of technology and bits and other people’s music.
What makes me want to sit down and make music is personal or professional success.
What inspires me to finish tracks and projects is the distant white noise of overwhelming anxiety and dread setting in as the ennui of the imminent collapse of western society fades giving way to the dark, almost imperceivable thrumming of the void drawing nearer, and is definitely getting louder. Your “time” is almost up John. Did you even do anything, or are you too skiddish and feeble of heart and head to make any clear decisions, impulsively flitting from one animal urge to another bad habit, clogging the chemical receptors of your brain for simple stupid pleasure. It’s night now and your eyes and fingers grow weary…
What was the question again?
Tell us something about your workflow.
Most times, it starts with just noodling around. Sometimes, it’s with synths and sequencers, either recording sounds or looping notes and tweaking/loading patches (virtual or real synths), sometimes I’m browsing potential sample material, but what happens next is the same regardless of how I’m making sounds or what I’m doing:
…I think hear something.
…And I STOP noodling. Basically, I either hear something I like, or I hit a riff or whatever and it’s like a tiny, tiny light bulb that blinks barely. Occasionally it’s like a hundred watt, and other ideas quickly fall into place. Most times, it’s a process of trial and error, but I’m making sure to document or isolate the little pieces that click and then attempt to refine or improve on those ideas. Ideas can quickly diverge, multiple sets with different names get saved, and I often jump around and get lost. I use color coding on clips and pieces in Ableton to help me sort those ideas. Some ideas form by running one sequence I’ve had already through a whole different synth/patch.
Very rarely, I’ll get a concrete idea while I’m driving, maybe I’ll make some notes on my phone (text to speech notes, voice recording).
When I get a spark that makes me imagine a full concept (“Charles Nelson Riley”, or that “My P**sy tastes like Pepsi Cola” remix for example), the track is formed VERY quickly (four to eight hours working time) and I finish the mix, structure, everything. This is rare, but these tracks are almost always my better material.
The next step is always the same: Let the track “cool-off”. Leave it alone. Do something else for a few days, or weeks… or in some cases, years… Then I’ll fuck around with it even more, or move on to:
STRUCTURE & MIXING:
I look for/experiment with arrangements that compliment my DJ style, or allow someone to do a rough edit if they want, (breakdowns at the end), or I’ll load a track that I like to DJ that’s similar enough and I will STRAIGHT UP copy the song structure in terms of intro, (drums or keys?) repeating bits, breakdowns, outros… Most times I fuck with it until it sounds okay, which is kinda bad because I end up drastically overscrutinizing it.
When it comes to mixing, something that I should do more often but don’t is load a reference track (someone else’s track) and try to get my mix to sound like theirs… This technique REALLY helps stop “nasty surprises” when you listen to it on a big system, or in the car.
Most of the time, I’ve been tweaking the mix the entire time I’ve been working on the project.
TL;DR
The “Emotional in Destin” EP is almost entirely soft synths, but lately my flow is:
1. dick around on hardware
2. “oh that sounds good, let me make another sound to go with it” (see step 1)
3. record a few pieces to an Ableton project.
4. “I don't know what to do now.” …maybe mixing or structure…
…almost ALL THE TIME, however I jump around and do everything very non-linearly. Hardware helps me not spend so much time tweaking patches or EQ-ing a snare drum for an hour. Texture is SUPER important to me, so I’ll often get hung up on EQ and compression before I even start on structure or mixing.
How would creative rituals benefit your workflow?
The hardest part for me is ALWAYS ALWAYS ALWAYS getting started, or shifting gears from other activities (resting after work, reading tumblr, goofing off…) and going to sit down at my desk and start music stuff. I’m certain it’s an executive dysfunction thing. The less I think about doing it before I do it, the better.
Animal sacrifice SIGNIFICANTLY speeds things up. Try not to get blood on the gear/laptop, and make sure never to clean, but regularly sharpen the ceremonial dagger (VERY important).

How do you get in the zone?
I don’t really try…
As soon as I start to approach a task as “a thing” I get nervous and anxious. If I go “okay, I’ve got this task to complete…” my subconscious hijacks my higher functions to make me look at memes or tumblr for three hours instead of do what I “should” or “want”… The problem with me in the past has been how do I get OUT of the zone?
How do you start a track?
Oh jeez, I really jumped the shark with that question earlier, didn’t I? A technique I’ll sometimes employ is load up an old track, keep the drum sounds/patches but delete all the data, and make an entirely different genre of track… or one that's very similar… That’s kind of a fun exercise if nothing else. Also it often winds up getting tweaked and adjusted to hell and back.
Do you have a special template?
Nope. I make TONS of drum, EQ, and effects presets though. And they all have terrible names like “gooddrums”, “$GOODrums” and such.
Even though I’ve started with carbon copies, they ALWAYS end up sounding completely different by the time I’m finished with the track, because I can’t leave em well enough alone.
What do you put on the master channel?
Sometimes EQ, but always a phat ass compressor (limiting). I’ve been thinking about investing in a nice non-free one lately, but for some reason I am not comfortable with purchasing software plugins… I also have learned recently, that I’ve been using compression on the individual tracks way too much… which makes final-mixing a pain in the ass.
How do you arrange and finish a track?
DAMN IT. I really did go too hard with the first couple questions. The “finishing” of a track for me (arrangement, mixing) is usually done much later than the rest of the process. I try not to force stuff, but lately I’m realizing more and more that I need to not do this as much.
I can’t stress enough how using a reference track for structure or mixing can very often break up stagnation on a project.
How do you deal with unfinished projects?
Several ways. The first step is to judge an old file and see if it's worth finishing. If there is ANYTHING of creative/sonic merit, I put it in a folder with the other “sketches and ideas” (project graveyard). Otherwise, I have been trying to delete the “junk” projects… this can make it easier to focus. Another thing I often do is to make presets/patches/Ableton instruments from the parts I like, then drop it in a folder called “meh”. Or I drop them into several categorical folders, i.e.: “uncircumcised electro bangers”, “abrasive techno”.
How do you store and organize your projects?
Aw jeez. Oh gosh-oh darn. (See above answer.)
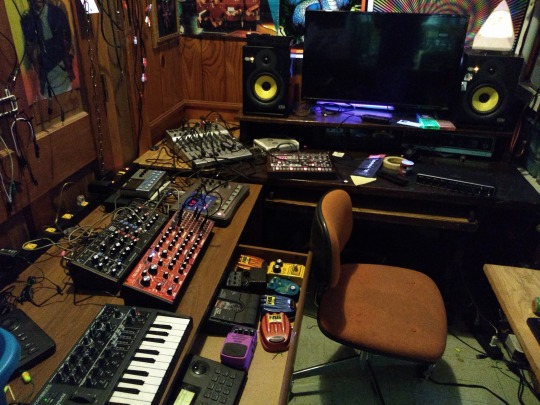
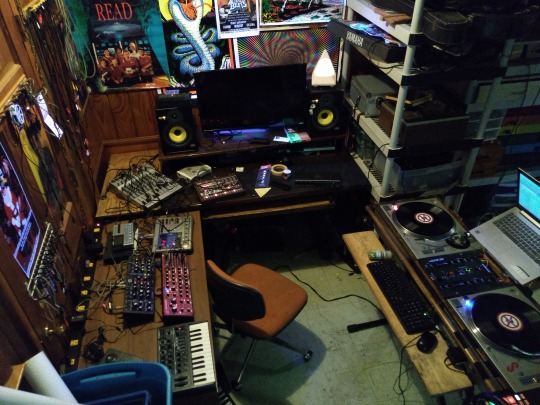
How do you take care of studio ergonomics?
Trial and error, trial and error, trial and error. This year alone my studio has been restructured and moved about my downstairs room at least five times. I’ve finally settled on something that feels very useful and productive. I am also this way with my work station at my job. CHANGE IT UNTIL IT WORKS GREAT. This can also help with creative stagnation, or can trigger it, so be careful. I keep my “electronics laboratory” close at hand so that more of that tinkering can find it’s way into my music… no such luck, YET.
I’ve currently decorated my space with all the crap I’ve saved up over the years, that for some reason, I’ve looked at this and thought: “This makes me happy” …SUUURE, my studio now looks like a fourteen year old decorated it, but I gotta say, I feel pretty phenomenal. Soon I’m gonna try to put this “stars and space” wall paper on my ceiling… I’ll update with a photo when that’s done.
Also I would like to say:
Minimalist spaces and studios are bullshit, y’all look like sick baby birds in empty shoe-boxes.
I mean, NOBODY LIVES THAT WAY, right? Maybe some boring rich people do, but damn… I mean, I try to clean and stay organized… and it helps, but I also try not to get to hung up on it.
Tell us something about your daily routine, how is your day structured, how do you make room for creativity?
**LOUD SUCKING SOUND THROUGH TEETH** I don't… at least, not very well at all… but I’m working on that.
I am not the person you should ask this question, because THIS RIGHT HERE is the BANE of my existence…
Share a quick producing tip.
MAN, I’ve already dropped like… seven, but okay, here goes:
BY ANY MEANS NECESSARY, FINISH THE TRACK. For me, this means ghetto-rigging, DIY, using the same goddamn audio interface from 2002 for f****ng fifteen YEARS… (recently fixed) don’t get hung up on “proper” ways, or ways that are outside your current means. Also, get a set of decent monitors… or use several pairs of headphones/speakers to double check mixes.
Recently, I’ve had less time, but a little bit of money, which is the opposite of how I’ve ALWAYS operated… it’s been difficult to unlearn “time consuming but cheap”. Also difficult not to impulse buy synths.
Making music with just a mouse and keyboard may be the least sexy thing ever… it works tho… cheap MIDI controllers CAN work faster however.

Share a link to an interesting website (doesn’t have to be music related).
My son just showed me this ➜ https://dddance.party/ and I have to say, this is an outstanding achievement of mankind.
List ten sounds you are hearing right this moment : )
Traffic outside my window, gentle hum of laptop cooling fan, dog snoring, fingers typing, birds chirping… that’s it.
John has a lo-fi house EP out on UltraBold Records as DJ CYBERDAD. It’s called ‘Emotional in Destin’. Stream it ➜ here, audio cassettes are available ➜ here.
Thanks John! If you want to get featured next, send a message here on tumblr or email [email protected].
#soundrs#soundrooms#interview#inspiration#workflow#workspace#creativity#electronic music#House Music#lofi#producers#producer#audio production#music producers#music producer#Music Production#audio producer#audio producers#dj cyberdad#ultrabold#ultrabold records
40 notes
·
View notes
Text
And I Get Up Again I Get Up Again I - (how I fell in love with producing again/the making of ‘overdue conversations’ pt. 3)
When I got home, the morning I decided to start my project, after going and getting my morning coffee I found that I had turned some internal dialogue into the intro of a song. The lines “where have you been? You’ve been lost inside you head” sung by my computer/the creative parts of myself to me seemed like an interesting place to start a song. I quickly recorded a voice memo.
found_sound.mp3
·
overdue conversation - voice memo
Even on that memo I sensed that this track was going to be a lot of different things because even in the two sections I had vaguely worked out in my head, the feeling was very different. The ever-changing feeling of this song has become what makes it stand out as unique to me when I look at what I have made so far. The reason it moves from section to section, constantly introducing new musical ideas rather than establishing one that we keep coming back to is this song was composed as it took shape.
What I mean is I made one of the synths in the intro using the mac start up noise (a little nod to the idea that my muse from within my computer is talking to me) and added a second subtle synth part and recorded scratch vocal for that part there. Then I laid down the 808 layer and some basic drums for the first section and recorded that section. And so, I progressed through the entire song. This meant that I was writing melodies and lyrics based on what I felt in the moment of creating the track. Initially I thought the song was going to take a more negative slant, the initial working title being ‘l0ser’ but the remember line turned it for me. I have been doing a lot of introspection recently and trying to document the things I think while I am at various points of mental health. This helps me put my thoughts into perspective and offers insights into triggers and, when used in moderation can be a place to draw ideas for lyrics from. When the line “remember, remember what you said when you were all alone” while it came from somewhere in my brain took me to nights where I felt like the world was falling down but I got back up. I got up because I have gotten up before and I have made promises to myself to keep getting up. The vocal performance on the bridge was completely improvised in a scratch take and the version that I use on the track was the second one I performed, it came from inside of me and that kind of reflected the point that I have landed on with this track.
For such a long time I have felt frozen by the pressure I put on myself to make things that blow people away. Ironically, I was taking what drew me to hyperpop initially, the raw, emotional, hyper nature of it and I was trying to make it fit in what I thought a perfect hyperpop song could be, and that wasn’t a fun way to make stuff. Eventually, through reflection, making stuff and just committing to what I wanted to achieve which was no longer a perfect song but being happy as a creator and artist with what I have made. I am reminded by some funny but poignant comments made by 100 gecs in an interview with pitchfork. Dyllan Brady said that his barometer for if a song was good was, he framed it in the context of his friend coming up to him and showing him the track. (2020) Most stuff, if you said your friend made it you would think was great and encourage their career. That is the new energy I am trying to manifest for my critique of my own work. The tempo change is a primary example of this kind of thinking. Tempo changes in my head are often corny and there are rules (in western music theory tradition) as to how you do them. Even in contemporary music there are rules about changing the tempos of songs in clubs for transitions. I wrote off drastic and sudden tempo changes as poor writing and bad technique. But as I was working on this song, I realised that the two sections I had in my head didn’t fit together if I tried to have them be at all the same speed, so I decided to have a set tempo for the intro and outro and bump up the tempo for the body of the piece. Once I had all the parts together, I went through a process of simplifying some parts, reducing them to what it needs to be added to the song. I have been trying to do this kind of minimalization in parts of songs because I tend to try and be impressive and show how much music I can do, which in some cases is the perfect thing to do but you shouldn’t have all parts of your song doing it at the same time. My initial kick and 808 pattern were quite busy and produced an off kilter, swinging style rhythm that was interesting to listen to, but in the context of this track I didn’t need a rhythm section that was super interesting and academically put together, I needed drums that were big and loud and fun and bass to go alongside.
Once all the parts were simplified to what they needed to be, I started to mix and process all of the signals. This is often where I find my experience block come in. While I have been working in the software for 10 years, only the past 5 have been focused years and even then, only in the past 2 have I begun to experiment with anything beyond recording acoustic music. I have been trying to listen to other songs in the genre to go to as reference tracks, for example I really like the way aldn treats their vocals. [a particular favourite of mine are the two different vocal treatments in: what was the last thing you said]. And the big, distorted section at the end of underscores spoiled little brat acted as a big inspiration for the breakdown section at the end of my track. Using these reference points, I took what I understand about audio editing (which to be fair is a solid amount and I try and learn more every time I do it) and tried to make the sounds I had “fit”. The most important part for me was not necessarily that the track sounded exactly like another song but more that all the parts of the song fit sonically together and, to draw from Dyllan, if my friend came up to me and said that they did this would I think it was sick and encourage them to do more? It was at this point I had two primary problems that took me some time and multiple attempts to figure out. The first was the vocal mix. Like I have mentioned before, auto-tune is not the magic bullet that a lot of critics seem to paint it as, I view it as another instrument that I have had to learn how to play, and the way I play it is through a combination of my voice and my computer. One thing I really like about vocals in hyperpop tunes is that they are very clean. They are obviously manipulated and modulated in various ways, but they are always clean, and clear. I struggled to get this sound until I was watching a video from Red Bull Music Lab where producer Kenny Beats and T-Pain make a song together - Kenny Beats and T-Pain Cook Up an Instant R&B Classic | Red Bull Remix Lab
It’s a video I have watched before but it’s funny and fun and inspiring to see two great artists work together and I just happened to notice that in the effects chain for T-Pain’s vocals, before anything else there was a gate, set very low with a low return. I saw it and instantly understood why it was there, the job of the auto-tune the way I use it is it essentially processes the entire voice, synthesising what was once an analogue recording. However, without the gate, not only was it having that effect on the lyrics being sung but also on the various ambient noise picked up from recording in my bedroom. This along with some creative EQ work and compression got the vocals to a place I was finally happy with.
The second issue was the bass part. After working on my All Eyes on Me Cover for a morning I returned to ‘overdue conversations’ and found that the bass part was sticking out in an obnoxious way, downing out the mix and not feeling settled. I then spent a couple of hours trying different sounds, moving the octave of the part, changing the part, changing other parts. I worked for a few hours before I gave up, and then worked on it a bit, and then gave up, and then worked on it a bit, and then gave up. Even that night as I was eating dinner, I had 808 patterns in my head. The next morning, I loaded up the session and had a listen. Aside from re-recording the pattern in some of the sections to give what was already there some space and let most of the drive and momentum come from the kick pattern and some mix/processing adjustments, what I had wasn’t that bad at all. Reflecting on this, I think it was a combination of mental and physical (ear) fatigue, that day being full of making stuff and listening and trying things and having ideas, as well as instantly comparing what I had at that point to the finished cover that I had just posted to social media and was already getting some love for. After taking a night to sleep on my ideas and coming back with fresh ears the next day I realised that what I thought was going to have to be a full re-record of everything late in the game turned into some subtle tweaks.
So, with all of that said, here is a finalised version of ‘overdue conversations’ which is pretty much ready for commercial/official release but I want to have a few songs put together before I release anything on public channels.
found_sound.mp3
·
'overdue conversations'
References: Patel, P. (Interviewer). (2020, November). Pitchfork Review: 100 Gecs and the Mystery of Hyperpop. [Audio Podcast]. Get Wired. https://open.spotify.com/episode/1UnB4gNxTsInfjur0iVXEP?si=NXGfknGtTqSId4z-XhKNeg&dl_branch=1
#CIM 401.2#found_sound.mp3#hyperpop#original song#new music#process#musician#music#work in progress#canberra#australia#hyperpop journey#autoethnograophy
0 notes
Photo

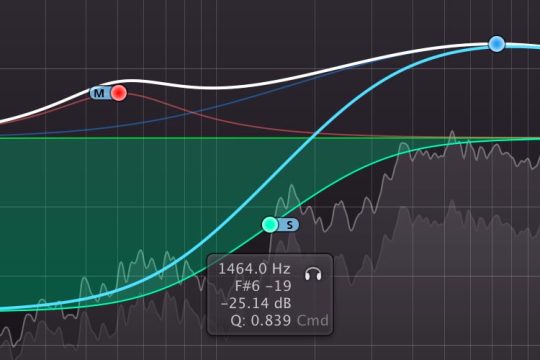
ILL COMMUNICATION: “ Compressor Families and their Digital Counterparts” - BY ILL POETIC
It took me a long time to wrap my head around what I should be hearing a compressor do. Even now, I’m still learning, both intellectually and aurally, how to hear compression as well as how to more effectively utilize it. This piece below offers a brief summary into my understanding of analog compressors and their digital counterparts with additional resources available for further learning.
Four years ago I officially made the plunge back into the world of higher education. I’d been majoring in Digital Music Technology, which covered everything from sound-designing synths to recording and mixing in a large-scale studio setting. I’ve been inside a lot of larger studios but never had a full grasp on what all the hardware was really doing. Finally, I’d been given that opportunity.
During a summer break, I came across a podcast that sent me into a small wormhole on compressors. This podcast led me to an additional article (info below) that gave me a deeper insight on how to ultimately view analog compressors as well as how to translate that understanding into digital compressor emulators (plug-ins).
Sine Language Podcast
Before I dive into the specifics of compressors, I’d like to highlight the podcast that brought me here. The Sine Language Podcast dives deep into numerous aspects of audio engineering. From gain staging and EQs to recording wind ensembles, stereo miking and compressors, this is a great podcast to ride around listening to (it’s only available on iTunes as of now).
Compressor Functions
Before receiving a more formal education in audio engineering, I’d always struggled to grasp the true process of compression and how to truly use it effectively. I’d like to give a brief summary as to the basic functions you will see in most compressors, as it will give more meaning to the upcoming analysis of compressor families and their digital counterparts. By no means am I an expert at this. If you’re a novice to compressors as well, this may be to your benefit, as I’m not that much further beyond your scope of knowledge and in many ways may be less so.
I’ve heard compression explained a million different ways, which would always just confuse me more. Not to mention, every compressor seems to look different. It initially feels very overwhelming. And though some compressors may offer different layouts (all of which serve important purposes), understanding basic functions will make these different layouts far less intimidating.
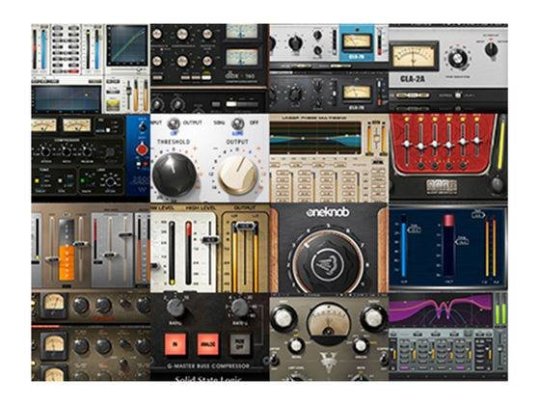
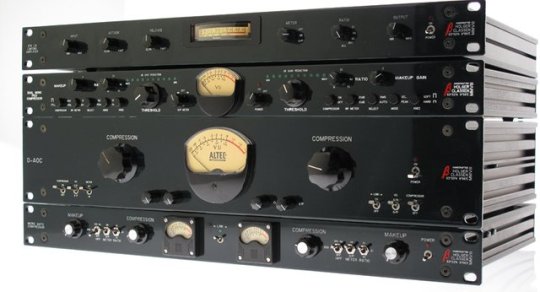
Above is a picture of 5 compressors (all from the Waves Plug-in collection). Each looks radically different but perform the same function: reducing the dynamics of an audio recording. Here’s why: if a vocalist started singing in a whisper and ended scream-singing into the mic, you as the listener would have to turn the music down to save your hearing. Compression boosts that whisper up and squashes that scream-singing down to a much slimmer dynamic range. You as the listener still hear the whisper and the scream-singing and recognize the shift in dynamics but you don’t have to physically turn the volume up and down each time the singer shifts intensity.
So let’s single out one of these compressors and offer a quick definition as to what’s doing that:
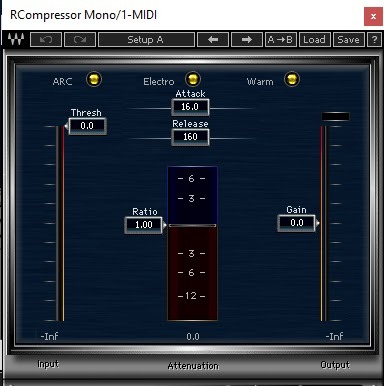
Above is an image of the RCompressor from Waves-Plugins and here’s a quick rundown on what’s happening:
Gain - Think of gain as your final volume control. Once you’ve made all your adjustments in ratio, threshold, etc., you will boost or lower your gain to finalize your final level for audio output. Again, I’d think of this primarily as a final volume control, accompanied by a meter that will let you know when you are peaking.
Threshold - Think of threshold as the ceiling for your audio. If a singer is belting out a loud note, lowering that threshold will lower the ceiling on just how loud that note will sound. For example, if you lower a threshold to -5db, you’re telling the compressor that every part of an audio clip that exceeds this level will be squashed down to -5db. Nothing can move past that ceiling. I recommend applying this to an audio file you know well and bringing the threshold as far down as you can to get an exaggerated understanding of what’s happening. Before you do though, you’ll want to understand ratio.
Ratio - Ratio accompanies threshold. Ratio will often be shown as 2:1 or 6:1 or 24:1, etc., though in the example above you can pull the ratio down to any exact number you’d like. Ratio says that for every 2 (or 6 or 24, etc) decibels that you lower the threshold, only 1 decibel will be allowed out. So if you choose a ratio of 6:1 for a vocalist singing a loud run, the compressor will squash 6 decibels of vocal dynamics into 1 decibel. If you were to choose 24:1, you’d be squashing nearly the entire dynamic range of the vocalist into 1 single decibel. I recommend trying this just to get an idea of what’s actually happening.
Attack - Once the compressor detects a sudden rise in audio, you can determine just how quickly it will react (or attack) to that shift in dynamics. For instance, you may want an extremely fast attack if you’re compressing drums since they are primarily sharp transients (the sudden impact of a kick or snare hit). If you set the attack to slow, you’ll miss the initial impact of the kick or snare that you may be trying to compress. Conversely, you may want a slower attack for vocalists and softer instruments to keep a smooth flow of sound.
Release - If the attack focuses on how the compressor starts to compress, the release focuses on how it lets go of what it’s compressing. A longer release means the compressor won’t just stop suddenly once a piece of audio (vocalist, drums, etc) falls back below the threshold, rather it will smoothly release until it’s activated again.
There are plenty of other functions in compressors but I feel these are the 5 base functions to get a true understanding and application of before moving on.
Compressor Families
The Sine Language Podcast has a great 2-part spread on compression. Both are definitely worth listening to, but it was their episode titled “Compressor Design Topologies” that really stuck with me. In this episode, they interview Christopher Dion of Quantum Music Mastering who breaks down his process for grouping compressors into families. Understanding what’s happening inside of each family of compressor really helped me begin choosing which compressors to use for which instruments or vocals and how they were truly functioning behind the knobs. Compressors can be broken down into four families: VCA, Opto, Variable Mu (Veri-Mu) and FET.

VCA
VCA stands for “Voltage Controlled Amplifier” and they are the most common compressors used as they are electrically stable and relatively cheap to replicate. Most plug-ins are based on VCA compressors. Two key features of a VCA compressor include:
Transparency - There is no limit to attack time in a VCA compressor which means you can compress the quickest dynamic shift (such as transients from a kick or snare drum) instantly. This can work fantastic when it’s your sole purpose for compressing, but can feel sterile and lack character for other compression needs, such as long-term
PEAK hard knee - VCA Compressors attend to the PEAK of an audio as opposed to RMS (root mean square). This means they hone in on the highest peak of audio file’s amplitude (say, an abnormally loud snare drum in an audio take) rather than RMS, which takes a more averaged out level of the entire audio clip. Hard knee refers the response curve. Hard knee would be linear, therefore more abrasive in it’s compression vs. soft-knee which has slight curve and softness to the compression.
When to use: For transients notably out of the dynamic range of the rest of the song.
When not to use: Attempt to adjust the overall volume and compression of a song or audio file.
Advantages: Gives a punch and aggressiveness
Disadvantages: Sounds thin and sterile.
Physical Examples: SSL, Neve and API mix bus compressors, Focusrite RED, DBX 160, Alan Smart C1.
Digital (Plug-In) Equivalents:
SSL 4000 Bus Compressor- SSL Duende Native SSL Bus Compressor, Waves SSL 4000 SSL G-Master Buss Compressor, Native Instruments Solid Bus Comp, T-RackS CS Bus Compressor, FXpansion "DCAM Dynamics" BusComp, URS 1980, Sonalksis SV-315, Cytomic The Glue (SSL XLogic G-Series), Stillwell Audio Bombardier
SSL 4000 E/G Channel Compressor: Waves SSL 4000 SSL E/G Channel, SSL Duende Native SSL Channel, T-RackS CS British/White Channel, Eareckon ANALOG87 series, Native Instruments Solid Dynamics, OverTone DSP DYN4000
Neve 2254 - Waves V-Comp, Lindell Audio (Plugin Alliance) Lindell 254E, URS 1970 Classic Console Compressor, Nomad Factory MCL-2269, McDSP CompressorBank
Neve 33609: IK Multimedia T-RackS CS Precision Comp/Limiter, McDSP 6030 Ultimate Compressor
Neve 8014 console (-esque): Sonimus Britson, Slate Digital “Virtual Buss Compressors” FG-8014 (see also Focusrite RED)
Neve VXS Console Comp: Brainworx bx_console
Rupert Neve Design Portico 5043 Compressor: Steinberg Rupert Neve Design Portico Compressor
Rupert Neve Design Portico 5015 Compressor (-esque): Slate Digital “Virtual Buss Compressors” FG-4014
API 2500: Waves API 2500
API 525: LSR audio VLB525, URS CCS Pro 1967
Focusrite Red - Focusrite Red Plug-In Suite, Slate Digital “Virtual Buss Compressors” FG-8014 (see also Neve 8014 console)
DBX160 - Native Instruments VC160, Waves dbx-160, Sknote C165a, Yamaha Vintage Channel Strip "Compressor 260", URS 1975, URS VCA60 (CCS Pro), Slate Digital Virtual Mix Rack, Stillwell Audio Major Tom, McDSP 6030 Ultimate Compressor, McDSP CompressorBank

Opto
In explaining what an Opto compressor does, I’m going to pull a quote directly from the Quantum Music Mastering article that gives a thorough explanation:
“Opto (compressor) uses photocells as a detector and a light bulb to determine the gain reduction. As the signal passes through the light bulb, it will make the light bulb glow more or less depending on the intensity of the signal. Since the intensity of the light is function of the temperature of the filament, the light intensity will vary as a smoother version of the signal. In other words, if the detector in the VCA design sees the exact signal, the opto one will see an averaged over time version of it.This makes the opto compression much less sensitive to transients, peaks and sudden spikes. For this reason, much higher ratios can be used.”
If a VCA focuses on PEAK compression (the loudest moments in an audio clip), Opto focuses on RMS, the overall amplitude of an audio file. The Opto moves slower than a VCA which makes it less ideal for transients (percussion) but more ideal for an overall smooth compression with noticeable character. Because of this, there’s not real need for an attack or release time.
When to use: Opto will even out the overall dynamics of a song. If a song has peaks and valleys, Opto does a good job of leveling them out as much as you’d like. It’s fantastic for tightening a final mix without destroying the integrity and punch of the transients.
When not to use: Again, not to be used with sudden transients, of which it will pass right over.
Advantages: extremely transparent. Tightens up a mix without flattening transients.
Disadvantages: Not built for fast transients. Also, due to to how frequencies of bass vs higher end frequencies work, opto’s traditionally do not work well with low-end frequency content. This causes a pumping effect in low-end frequencies, which can be solved by side-chaining a high pass filter to the compressor (around the 150-250hz range). This side-chain filter can actually be fantastic in a mastering chain.
Physical Examples: LA-3A, JLM Mac Opto Comp, LA-2A, TubeTech CL1B.
Digital (Plug-In) Equivalents:
LA-2A/3A - Waves CLA-2A/3A, IK Multimedia T-RackS CS White 2A, URS Opto2a/3a (CCS Pro), Cakewalk CA-2A, Native Instruments VC2A, Black Rooster Audio VLA-3, Bomb Factory BF2A/3A, U-he Presswerk, PSP Audioware oldTimer, PSP Audioware MixPressor2, McDSP 6030 Ultimate Compressor, McDSP CompressorBank, Antress Modern The Lost Angel
TubeTech CL1B - Softube Tube-Tech CL-1B, URS Tube T (CCS Pro)
Variable Mu (Tube Compressor) (aka Vari Mu)
One of the earliest compressor designs, the Vari Mu is still very popular for high-end audio, specifically in the field of mastering. What makes the Vari Mu special is in it’s relationship between gain and ratio. Vari Mu compressors increase the ratio as the gain reduces. At a technical level this results in a non-linear transfer curve. What this creates for our ears is a smooth compression in which the louder transients are automatically compressed at a higher ratio.
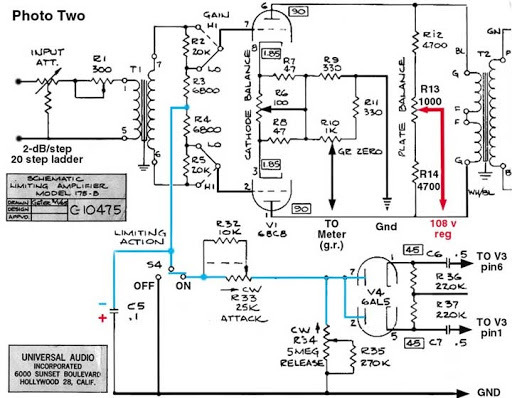
The Vari Mu also does not respond as reflexively as the VCA or FET compressor. Because it’s a tube compressor, it takes more time which means it will never overreact to a transient. This is why it’s often used at the mastering stage, as it really helps glue a mix together. Below is an example of the inner-workings of a Vari Mu compressor, if you want to get deeper into the mechanics of how these compressors and side-chain filters work, I recommend reading this article on compressor topologies:
When to use: When you’ve leveled the dynamics of a song, running the song through this tube compressor will tighten it up and smooth it out. It will glue the elements of the song together.
When not to use: For punch, aggressiveness or solving compression issues within the mix.
Advantages: Warmth, richness, texture and definition that cannot be replicated by plug-ins.
Disadvantages: Not punchy, operating with no side chain filter can be an issue for bass.
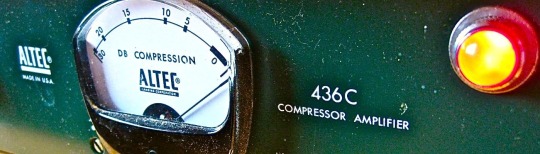
Physical Examples: Fairchild 670, Altec 436C, Manley Variable Mu, HLC Varis
Digital (Plug-In) Equivalents:
Fairchild 660/670 - IK Multimedia T-RackS CS Vintage Compressor Model 670, Slate Digital “Virtual Buss Compressors” FG-MU, Waves JJP PuigChild 660/670, Overtone FC70, U-he Presswerk, Nomad Factory LM-662, Nomad Factory FA770, Bomb Factory Fairchild 660/670, McDSP 6030 Ultimate Compressor, McDSP CompressorBank, URS Child (CCS Pro), Antress Modern The Fire Chainer
Manley Variable Mu - Native Instruments Vari Comp, McDSP 6030 Ultimate Compressor
FET (Field Effect Transistor)
A FET Compressor combines the best of the compressors listed above. It provides the smoothness and warmth of Vari Mu and Opto Compressors with the quick attack time and punchiness of the VCA compressor. This is an extremely popular compressor, primarily the 1176 and is noted for its versatility on every type of track: percussion, instruments and vocals.
When to use: for bite, aggressiveness and punchiness on drums, bass, or vocals. Great for warm and rich distortion as well. Also great for use in a mix bus or mastering chain with the compression turned off, just to add color and warmth to the final track.
When not to use: On a master or mix bus with the compressor on
Advantages: adds a punch that cannot be replicated by plug-ins, as with the Vari Mu.
Disadvantages: Most don’t have options for side-chain filtering.
Physical Examples: 1176
Digital (Plug-In) Equivalents:
Urei 1176LN - Softube FET Compressor, Waves CLA-76, Bomb Factory BF76, IK Multimedia T-RackS CS Black 76, Native Instruments VC76, U-he Presswerk, FXpansion "DCAM Dynamics" ChanComp, Slate Digital Virtual Mix Rack, Lindell Audio 7X-500, McDSP 6030 Ultimate Compressor, McDSP CompressorBank, URS Fet (CCS Pro), Yamaha Vintage Channel Strip "Compressor 276", Stillwell Audio The Rocket, Antress Modern The Seventh Sign
Final Notes
A couple final thoughts to include with the information above:
I’d recommend keeping this link of digital plug-in emulators in your bookmarks. Though I pulled some compressors off of here to group them in their proper families, there are a TON of other digital emulators on this link that can help with EQs, reverbs, synthesizers and much more.
None of these compressors are stand-alone. I’m currently getting deeper into applying various compressors to certain tracks in a mix at incremental levels to help shape the specifics of that sound. I have a long way to go still, but the more I understand these compressor families and apply the knowledge, the more I see compressors as just another set of paint brushes to color and shape sound with.
For more information on me, you can visit my portfolio at www.soundrzn.com
Sources: Sine Language Podcast, Christopher Dion of Quantum Music Mastering, Joe Kucera - San Diego City College
0 notes
Text
Transform Your Song - Mixing and Mastering - The Basics to an Awesome track - 5 minute read
The Challenges of Mixing and Mastering and How To Get Started
Let's say you recorded a song and you need a way to make it sound better. That's where mixing and mastering comes in, but what is mixing and mastering? Sometimes a song you've made can sound muddy or under the weather. A studio engineer can improve this with mixing and mastering your track, but if you want to make music in a bedroom studio setting, achieving this part of music can benefit you in the long run. Mixing and mastering can be a challenge to tell apart, but they are quite different, and here's why: Mixing always comes before mastering Mixing is the process you start focusing on what tools you can use to remedy your song. Mastering focuses more on how to get any last adjustments in the track to cover anything an audience may hear at the last stage to make it sound better right there at the end. Well, you still need to know what tools to start with. I have been mixing and mastering for about two years, and it has been a learning experience. Learning to mix and master can be challenging, but fun if you keep your patience. I'll get started with the basics and then move onto the lesson.

Mixing Basics This is where you get the levels of your recording set. A simple definition of mixing is the time in recording a process that is used to adjust elements in a song. Mixing is not something professional engineers use to make songs sound "different" or to change their original performance. The mix is a cleaning stage. The song is passed down to mixing engineers to adjust the elements of individual tracks with EQs, compression, faders, and panning to fit into a genre. Grasping your tools in your mix is important because you cannot move forward into mastering if the mix is incomplete. Mastering Basics This is the process of finishing your song to be released and audible on all mediums, it will make it so your song can be played in the studio, clubs, headphones and the car, always sounding good! Not all songs are mastered, but you really should, especially if your goals are to get plays on the radio. The best way is to have your songs mastered by an experienced engineer. Mastering involves one file of the song being updated into a better version of the mix. Basically what mastering is, is the fine-tuned adjustments that are made like loudness, eq, and "tone" or "place" of the track. You don't want to master ever in your mix, using the Master channel and that's where a lot of learners kind of go south. Ideally, you would not Master your own track, as to get the best results it is good to have a fresh set of ears. Mastering can be a tricky thing to wrap your head around, but I am going to share a little insight later in the article.
Breaking Down Mixing Elements
There are certain ideas you need to keep in mind before you start a mixing process. Try to imagine the track as an orchestra performance, and each instrument has an assigned seat. That's also how mixing works. You don't want certain elements in the back, and you don't want certain elements too far in the front in your mixing process. If you are just getting started with mixing, allow yourself room for growth, and the mindset that each sound and section of your song can get pulled under, and it's your job to bring out elements using your daw's mixing studio. A lot of mixing can be generated for you or you can mix freely manually in your bedroom. The elucidation of each sound you hear in a track is crucial. Not everything you make will be the same, and it is required that you win a clear playback each time. It is not impossible to get the correct mix in your bedroom, but there will be techniques that you must apply for clarity.

Mixing 101 Mixing can be a challenging task at first, but that doesn't mean it can't be overcome. I want to simplify some tools that every DAW has. There are a lot of ways you can get a mix to do exactly what you need. If you need something in the background, try reverb and if you want something brought to the front, you can add an eq and less reverb. Realize that you can use panning or mono tracks to pull in a sound or a stereo track to expand your sound. Also, reverb and delay are some special effects that you can add to your tracks to keep it interesting, but weren't there initially. Keep in mind that a mix is the ONLY time you get to perfect any mistakes in a song. EQ EQ is a good tool that can fix a lot of mistakes in a recording. A big difference EQs can bring is eliminating the low end. Low end is a rumble of heavy bass that can easily way down any mix. Low end is extremely difficult to hear unless you know how to use an EQ. For example, the picture below demonstrates how an EQ looks when you cut out the low end in a guitar channel. Notice how on the left end, the frequency visualizer is brought down either manually or robotically to attach closer to the sound wave in the middle.

Volume and Panning Now, you want to focus on the volume. Every section needs its volume level. Keep in mind, when mixing, you can adjust volume levels on separate tracks. Lead synthesizers and vocals tend to be brought out and emphasized in front while drums can blend into your back. Be careful with drums, because you don't want to exclude them completely. I commonly use automation within the daw to lure loudness and volume along with panning to bring out each snare and hi-hat. One thing that I would point out is a lot of songs tend to sound bad because the low end wasn't helping in with drums and bass, so it's okay to add some breathing room for a drum track, in my opinion. Mastering 101 Mastering is the 1 percent left before your release. A good example of mastering is the overall hearing of an album. How will the song sound by all of the other songs on the album? Are the volumes levels the same? Does a couple of songs render any stereo issues? You want to make sure your panning and tracks are set to your liking in a mix. In mastering, the goal is to mix your songs in one setting to get a finished product. You are allowed to work with any mix, and it is better to work with all mixes in one mastering session. By that, each track should a single track and ready to be passed through for a final master. There are a lot of great mastering tools out there for anyone ready to learn! Ozone has a great selection of mastering tools for free and for sale. Every link I reference in this article uses Ozone to cut out any confusion of what to use! Limiting Limiting is a way you can adjust the volume to the overall track. If you have noticed that your track is soft or too quiet, limiting can help there. But you don't want to go heavy on it because it will distort any kicks or snares you've previously cared for in your mix. I want to share with you someone I found on YouTube that shares a lot of mastering software and tips to help you get started even more! Here is a link to a video that will help you with limiting. I will post another link for the entire lesson on mastering here. Here's what he posted about volumes peaks: Ceiling - Set at least -1.0dB True Peak. Potentially up to -2dB True Peak Ensure you select "True Peak" - This is essential. Average LUFS - Hit at least -14 to avoid Spotify limiting and then push it louder to your own preferences.In The Mix from YouTube Multiband Compression If you have never used a multiband compressor before, it looks very strange when you open one up for the first time. A Multiband compressor is known for a 4-split screen to independently edit transients and achieve adequate hi-end and low end. Multiband compression can be a daunting subject even for me! There are several tricks you can apply in your master that cut out any unwanted noises in your track with multiband compressors and EQs. EQs do not always get the job done, and that's where a multiband compressor can save the day. Check out this great multiband video here.
Conclusion
Hopefully, you have learned something about mixing and mastering today and what they are. Mixing and mastering can be a fun experience if you need to take your music needs to the next level. Most songs you hear on the radio or watch on TV have had professionals help with the Mixing and Mastering process. If you need help, be sure to check out our Mixing and Mastering service providers. For Mixing engineers click here For Mastering engineers click here Read the full article
0 notes
Text
Finding the Best Compressor Eq
Compressors arrive in various diverse flavors. This compressor adds plenty of coloring to sound. This compressor isn’t for beginners. Today’s compressors are souped-up and customisable workstations that offer you a large quantity of control over every facet of the way that they’re processing sound. No quantity of low-frequency EQ after the compressor can accomplish this. A superb compressor ought to be felt and not heard! It’s an ultra clean compressor suited to delicate material.

The 30-Second Trick for Compressor Eq
The EQ lets you choose which frequencies you wish to get compressed harder based on their various gain setting. The EQ, nevertheless, is a modern design with advantages provided by techniques that weren’t possible 35 years back along with improvements in electronic components currently available, and ought not to be thought of as a clone. If you prefer, you can imagine it as eq, and the majority of the exact philosophy still applies.
The Ultimate Compressor Eq Trick
The Bloom circuit is among the most exciting regions of the Bloom! A portion of the audio signal is rectified and smoothed to make the right control voltage for the V.C.A. which needs to respond promptly and have low distortion. Learning how to cut frequencies is equally as critical as boosting frequencies. There are a couple of frequency ranges you can work on in case you locate your bass taking up too much sonic area in your mix. You’d be astonished how cutting certain frequencies can bring up the general volume.
Vital Pieces of Compressor Eq
Undeniably, drums are generally the major part of a mix. Be mindful not to boost too much unless you would like your bass to come right to the front part of the mix. The bass guitar is a significant element of every contemporary mix though it rarely plays a prominent function.
It is possible to think of them as a means to sculpt” the sounds so that they blend well together. There are lots of things to take into account when it regards the sound you receive from your microphone, not just in terms of price and quality, but also where you really place the mic in connection with your amplifier. The sounds via an inexpensive card might not be wonderful and you will most likely need a better one. You’re able to get a cleaner, modern-day sound boosting around the 50-60Hz location. There isn’t any reason to settle for lackluster kick drum sounds on your house recording. Basically, Front End Audio is composed of individuals who love great audio.
Try to remember, at you first need to get familiar with your tools. For this reason, you only really require the most simple of tools to have you started. It’s true, you want some fundamental decent tools, but only you are able to bring to life the electricity and value of your work. You have to acquire knowledgeable about your preferred tool or package.
Our principal objective is to help our clients find the gear necessary to be prosperous in their recording projects. Whenever there’s a kick or snare hit the remaining portion of the mix needs to be pulled down in volume to provide room to them, and because of this movement and interest is going to be added, along with the remainder of the elements being glued together more coherently. Due to how compressor work by lowering the loudest peaks in the audio, it will naturally decrease the general degree of the audio coming from the unit.
youtube
from Sacramento Heating And Air Conditioning Repairs https://ift.tt/2s9Rg2o
0 notes
Text
Hard Truths: Mixing is Making Small Changes
Hard Truths: Mixing is Making Small Changes: via LANDR Blog
It’s easy to think of mixing as a magic process that turns raw tracks into slick productions.
Complicated tutorials and racks of rare gear in pro studios can make it seem like mixing tools completely transform the sound of the basic tracks in a session.
It is possible to totally reshape a sound with audio effects, but most changes you’ll make during your mix are much more subtle.
Here’s my hard truth for today: mixing is about making small changes.
That’s not meant to be discouraging. In this article, I’ll explain why tuning your ear into the smallest possible differences in your sounds will make you a better mixer.
Let’s get started.
Listen like a mix engineer
Pull up a mix you’re working on right now. Pick a channel and insert your favourite EQ plugin.
You need to train your ear to recognize what’s happening whenever you take an action in your mix.
Add the gentlest boost you can—let’s say, ~2 dB at 800 Hz with a Q of 1 or less.
Can you hear the difference? How about solo’d or in the mix?
Now try adjusting the fader ever so slightly. Maybe reduce the track’s overall volume by 1.5 dB.
Did it affect your mix?
If you can’t tell, it may be time to go back to the drawing board with ear training. Or take a hard look at the gear you’re using to mix. I’m talking about listening chain essentials like your headphones, audio interface or studio monitors.
Believe it or not, these minute differences can mean the difference between a vocal that sits musically on top of a mix and a completely buried singer that doesn’t pop.
To fix it you need to train your ear to recognize what’s happening whenever you take an action in your mix.
That means learning how to zoom in on the smallest details of your mix. They all matter!
Start with a solid foundation
If you know you’ll mainly be making subtle changes, you need to set yourself up for a successful mix.
That means you need to start with raw material that’s as close to a finished sound as you can make it.
Pay attention as you record your sounds and try to imagine them in the mix from the start.
Pay attention as you record your sounds and try to imagine them in the mix from the start.
Try to catch any issues as early in the chain as you possibly can. If an instrument has too much flabby low end or the singer’s mic is harsh and sibilant you need to deal with it right away.
These problems will only compound and get worse as you get to the mix stage. And the worst part? In many cases, plugins won’t fix it. Don’t miss your chance to get it right at the source.
That’s not to say that you can’t use exaggerated effects like pumping compression or ambient reverb when you’re getting your basic tones.
Just consider them “tracking” elements and apply the same approach to make them sound as finished as possible.
What’s easier? Fixing a sound that doesn’t work, or just recording it again? I choose the second option every time.
Modern mixing tools can do a lot. In some cases, they truly can save something that seems unfixable.
But the results will always be better if you start close to the target and get the rest of the way with tasteful, informed choices.
Everything adds up
Mixing is a series of decisions that starts the second you hit record and doesn’t end until the mastering process is complete.
Every call you make in the beginning affects other choices that happen later in the process.
Here’s what I mean.
Mixing is a series of decisions that starts the second you hit record and doesn’t end until the mastering process is complete.
Let’s go back to the sibilant vocalist example.
If you notice the harsh “S” sounds sticking out while tracking vocals, you’ll have a few options.
The best is to change the microphone for one with less sensitivity in the upper mids.
But if you’re short for time and want to press on with the session you may consider trying to tame it with a de-esser during the mix instead.
Unfortunately, the effect of sibilance gets even more distracting once you add compression and EQ.
It’s particularly bad considering most pop vocal processing includes boosting the high end for extra air and compressing aggressively with multiple stages of compression.
It might have seemed OK at the time, but that sibilance is going to get much worse.
Your de-esser will help, but now you’ll have to use it far more intensively—and that comes with consequences.
You can only limit the S’s so hard before the de-esser turns them into unnatural bursts of sound. And there’s no going back!
Developing the instincts for what will work and what won’t takes practice, but it’s one of the best habits you can get into as an engineer.
Incremental changes
Every great mix starts with great sounds and ends with strict attention to detail.
To get there you’ll have to develop a sense for how powerful the smallest adjustments in a mix really are.
Whether that means working on your ear training, upgrading your listening chain or simply changing your approach, you need to start paying attention to the little things.
The post Hard Truths: Mixing is Making Small Changes appeared first on LANDR Blog.
from LANDR Blog https://blog.landr.com/hard-truths-mixing-small-changes/ via https://www.youtube.com/user/corporatethief/playlists from Steve Hart https://stevehartcom.tumblr.com/post/624175059948503040
0 notes
Text
Best Vocal Effects Processor For Live Performances
As humans, we constantly want to do better (or at least I hope we do).
But these quiddities about us are what make us unique, what make us different from other humans, helping us build our individualities.
Anything that we perceive will help us do better, that will somehow cover up out inherent flaws is always something that we most welcome.
And in this case, we are talking about our vocals, well, for those who use them for other purposes than talking alone. In this article, we will be talking about vocal effects processors; and we will be talking about the ones that just about anyone who is interested in it would be able to afford, not costing you an arm and a leg. We will be talking about vocal effects processors that are great for both live performances and recording.
Let us give you a quick rundown of the products that are featured in this article:
Behringer Virtualizer 3D FX2000
It has a powerful processing capability
It is durable, as it is made with high quality
It has 200 presets that you can edit to your own taste.
TC Helicon VoiceTone Harmony-G XT Vocal Effects Processor
This is an intelligent and versatile effects processor
You can plug in both your guitar and your microphone
It has pitch correction, voice doubling, compression, EQ, and de-essing.
Roland VT-3 Voice Transformer
It has a sturdy build
It is a great vocal effects processor for your money
It comes with options for auto pitch
Boss VE-20 Vocal Performer Multi-Effects Pedal
It is quite easy to use even if you are a beginner
You can tweak your voice in many ways you choose
It comes with onboarding editing tools for the experienced users.
TC-Helicon VoiceLive 3
It can store up to 500 harmony presets
It has an adjustable pitch correction.
You can plug in both your guitar and your microphone.
What Does a Vocal Effects Processor Do?
A vocal effects processor is a digital device that creates effects like echo, voice doubling, and, also reverb to help improve your vocals when you sing.
It allows you change the character of your vocals on the go, with just the touch of a button. It even allows you manipulate the sound of your voice, making it sound like that of a child or a male or female.
The vocal effects processor corrects the pitch of your voice automatically. Most of them come with a harmonizer feature that adds pre-recorded, multiple-part harmonies, and loops to give depth and bulk to your voice.
The thing is, all these happen in real time as you perform.
There is so much that you can do with this processor.
It sits between your microphone using the XLR input and, through its own input and another XLR cable, it sends signals to the mixing board or the PA system.
The sent voice signal is then processed before it is sent to the PA system. The device enables you get that refined vocal quality you would get only in a studio recording environment.
One of its greatest boons is that it allows you to kind of perfect your vocals in real time as you are performing.
If you happen to be a solo performer, the vocal effects processor is a blessing. It acts like a backup singer and, also a sound engineer.
The only problem you might have with this tool is that it can make people who are already bad at singing start believing that they somehow have a shot at music.
Who Needs a Vocal Effects Processor?
Anyone who happens to be a live performer can find the vocal effects processor very useful.
Purists may cringe at anything that would digitally alter a singer’s voice. Many even feel like it is cheating, although, singers like Cher and T-Pain might have different opinions.
You can use the vocal effects processor without you having to sound like a robot or making your vocals sound too digital.
Unless you intend for your performance to be 100 percent acoustic, almost every live performance now utilize some degree of vocal effects processing.
With the use of vocal effects processor, you are basically admitting that your voice could sound much better.
It could be that you struggle to control your pitch, or that your voice is flat and is lacking that ‘ingredient’ that would make it really pop.
It is apparent that some voices sound better than others, some are just naturally gifted, but the human voice is innately imprecise.
Although, our vocals can be fine tuned for perfect pitches, perfect harmonies, and smooth note transitions; you know that you cannot rely on your voice to sound the same all the time.
Vocal Effects Processors and their Usefulness on the Stage
Voice processing is known by a lot of terms like double tracking, voice doubling, the autotune effect, and so forth.
The usage of the vocal effects processor is, of course, not a new thing; even though singer, Cher, with her wildly acclaimed 1998 hit song, Believe, has been credited to bring the trend to life, other singers like Teddy Riley, Roger Troutman, Madonna, Daft Punk, and many others all had certain amount of successes with vocal effects.
But many of these artistes have used vocal effects processing in the studio, which is way easier as producers have all the time to clean and tweak the vocals.
When a singer is on stage, there isn’t enough time, and this is where the vocal effects processor comes in.
How Do You Prefer Your Vocal Effects Processor? Tabletop, Mountable, or Pedal?
These three vocal effects types – the tabletop, stand mountable, and the pedal controlled – are the three basic modes vocal effects processors come in.
The one you choose to go with depends on your live rig setup as well as if you sing vocals and simultaneously play an instrument.
Tabletop vocal effects processors are probably preferred by DJ’s and EDM performers because they can easily throw them onto their decks where they can reach them with ease as they perform.
For those who are specialist vocal performers, a vocal effects processor can be mounted in your mic stand and operated with your hands from a standing position.
The pedal ones are known as stompboxes, and they are a favorite for singers that play guitars. They are very convenient as they let you multitask seamlessly, by singing and playing the guitar, while you operate the effects processor with your foot.
But you would need to be very nimble with your feet if the stompbox has multiple footswitches.
The Top 5 Vocal Effects Processors
1. Behringer Virtualizer 3D FX2000
2. TC Helicon VoiceTone Harmony-G XT
3. Roland VT-3 Voice Transformer
4. Boss VE-20 Vocal Performer
5. TC-Helicon VoiceLive 3
There are products that are great options that you will find through the price scale. Their features and build quality get better as you move up the scale. You should remember that all effects processors that we will be reviewing have way more features and effects combinations that we can run through here.
So as to take into consideration those with a tight budget, we will be starting with the low-end models
1. Behringer Virtualizer 3D FX2000
For a product in its price range, this model has an incredible value.
It just two effects – reverb and delay, although, its delay feature is only for guitars. But these features can be programmed with a wider range of FX combinations so they can produce hundreds of unique sounds.
In the end, you will get effects that are editable like reverb flanger, reverb echo, reverb chorus, pitch delay, tremolo delay, vocoder, resonator, and so forth. You can also preset these for storage and easier access.
The Behringer 3D FX2000 has many complex effects combinations that people who are less technically inclined can find the learning curve to get quite steep.
Extra Features and Benefits
- It has a remarkably strong processing capacity for a value item
- It is well built and will last you for years
- 200 presets that you can edit as you like.
- It comes at a great price for everything that it offers
- It has no-frills, easy to use interface that is also appealing.
- Its knobs are made of rubber and are easy to grip, with solid-feel switches that makes it easy to use.
Cons
- It is quite limited on effects
- Its instruction manual is not very comprehensive and would need you to go online for more info.
2. TC Helicon VoiceTone Harmony-G XT Vocal Effects Processor
This product from TC Electronics, which is one of the biggest names in the vocal effects processors world, is a vocal effects pedal that you can easily control with your feet.
This product is an intelligent and a very versatile effects processor that will give your performances the effect of a full-sized band of guitarists.
It allows you to plug in both your guitar and your vocal microphone, giving you one of its greatest attributes which is the automatic harmony generation.
This processor recognizes guitar chords and automatically generates and plays realistic sounding harmonies that follow whatever it is you are playing on your guitar.
You can both record and program your harmonies manually if you do not play the guitar. But your guitar chords need to be very clean, if not, you will end up having unintended harmonies that will mess up your performance.
Among its many other features are pitch correction, voice doubling, compression, EQ, and de-essing.
Extra Features and Benefits
- 10 effects presets that each have several individual variations.
- Its smart harmonizer gives you an option between both male and female sounding harmonies.
- It can work as the effects processor for your voice and guitar, your guitar tuner, and, also as your mic preamp.
- It comes with a bypass footswitch that turns off all the effects and the ability to process just your voice and switch off the harmonies.
Cons
- It would be better if the pitch correction could be adjusted.
3. Roland VT-3 Voice Transformer
The Roland VT-3 Voice Transformer is a great vocal effects processor for your money.
This device does exactly as it promises, and its build quality is very robust.
Just as the name says, this VT-3 transforms your voice into many cool and fun sounds. It comes with options for auto pitch as well as different effects like scatter, reverb, robot, and megaphone.
You can also use it to change male voices to a female tone and vice versa.
This device is a very versatile device since it serves as a vocal effects processor, a vocoder, and a synthesizer all together.
Extra Features and Benefits
- It has rubber feet grip on the surface so that the device does not slide around you as you perform.
- It has sturdy sliders that you can easily move up and down to control the different effects.
- It comes with a built-in auto tuner as well as both mono and stereo outs.
- There is a USB out that you can use to connect to a computer for recording purposes.
- Phantom power enabled, and this means that you can sue it with an XLR condenser mic without having to bother about where you will get power for the mic
Cons
- It does not have a mounting bracket that will enable you to attach it to your mic stand.
- It is difficult to remove the other effects if what you want is pitch correction
4. Boss VE-20 Vocal Performer Multi-Effects Pedal
With the TC Helicon, BOSS has set the standard in the vocal effects processor business. BOSS is a subsidiary of Roland, which is a brand that is known for making high quality music instruments.
As long as you are familiar with what it is you want and you know how to do it, there is no limit to what it is that you can do with the Boss VE-20.
It has options that let you tweak your voice in numerous interesting ways and is quite easy to use even for starters. There are onboard editing tools available for the experienced users.
This device is marketed as a stompbox that was made with vocalists in mind, this vocal effects processor auto corrects the pitch of your voice and it also automatically adds body and a ton of other cool features to completely transform your vocals.
With this device, you will get the standard reverb, double track, chorus, and delay effects and a whole lot of other not-so-popular ones like strobe, radio, chorus, and distortion.
Extra Features and Benefits
- It has an onboard Phrase Looper that enables you to layer sounds and helps you produce studio quality tracks on a live stage.
- It comes with phantom power functionality that you can use with your condenser mic right out of the box.
- It has both the AC and battery power options which are very convenient for when you have to perform in remote places.
- It comes with a smart harmonizer that allows you to make multi-part stacks and save them for instant playback.
- Instead of small footswitches, this model has fuller rubber pedals that are easy to maneuver.
- It is made with high quality – a strong all-metal construction – that makes it great for heavy users.
Cons
- Its display is small and quite difficult to see, especially when you perform in a standing position.
5. TC-Helicon VoiceLive 3
Anything that is priced above $500 should be considered high-end for any vocal effects processor.
And so that you can avoid any buyer regret, if you will be spending such an amount of money on a vocal effects processor, you should ensure that it is a trusted brand that you will be getting. And you cannot do any better than the TC Helicon.
This model – the TC Helicon VoiceLive 3 – can store up to 500 harmony presets, and this is way more that the average musician can go through.
With that, it has an adjustable pitch correction and all the effects like reverb, echo, delay, and other features that you can find on the other TC-Helicon models and two new ones on vocoder and synth.
The vocal effects processor, just like the others in the VoiceLive series, has inputs for both your guitar and your vocal microphone. You can even program it to render multiple effects for both voice and guitar simultaneously.
Extra Features and Benefits
- It is well built, and it has an expression pedal jack if you think that the footswitches are too difficult to maneuver.
- It enables you to import backing tracks from your PC.
- It has a guitar in and a guitar “through” that enables you to run your guitar through the VoiceLive 3 while bypassing the guitar effects.
- You can turn the lead vocals to zero so that you can output only the harmonies.
- It comes with a multi-looper that has a learning curve but it is much fun once you have it all figured out.
Cons
- It does not have battery power functionality. What this means is that you cannot use it when there is no AC power.
6. Tascam TA1VP Vocal Producer
If you are in search of a device that can give you some great autotune and you stumbled upon this article, then you have come to the right place. Tascam TA1VP Vocal Producer is the vocal processor for you.
Its Quality
This is probably one vocal processor that feels the most luxurious of all the ones listed in this article, and we are confident that there is absolutely nothing wrong with the quality of this product.
Its Sound Quality
This vocal processor is a tricky one. It is great for autotune, and you can also choose whether you want autotune for all the notes, or for just a particular one, maybe that high note that you seem to always have an issue hitting. You can also choose what scale you will be singing in, making it easier for it to know which note you are aiming for.
Pros
Great autotune
High quality
Selects specific notes and scales
Cons
It is expensive.
7. TC Electronics Singles VoiceTone E1
Some artists might go through this list and give a sigh. If you are a good singer and you do not feel like you have to use any special effects, is there any processor out there for you? The answer is yes.
The Quality
This vocal processor is a sturdy little foot pedal that seems to be of high quality. It has a cool design and it is easy to use since it does not come with too many weird effects that you might not end up using.
The Sound
This is also a tricky one that does different kinds of echoes and it also lets you change your tone and make it either dry or wet. It is good to have it if you are performing in a place that has poor acoustics and you want it to sound as if you are in a church singing.
Pros
It is affordable
It has echo
It is easy to use.
Cons
It is not especially versatile.
8. TC Helicon Harmony Singer 2
If you sing and play the guitar, then you would love the TC Helicon Harmony Singer 2.
The Quality
There have been a few faulty ones, and a few users have said that they needed to get one a year or so after. But what stands out about this product is that those people chose to get a new one of the same kind. Another thing is that it comes with a 3-year warranty, meaning that if anything happens to it that is by no way your fault, you will probably be able to get it fixed for free. So you do not need to worry if you decide to give it a look.
Its Sound
What is this device good for? This device will tune in to your guitar chords and when you sing, it will provide harmonies that match the chords. It can add one voice or two voices if you want a full sound. You can also choose to add some reverb from three different styles.
Pros
It comes with a 3-year warranty
It can be sued with your guitar
It is a stompbox
Cons
It is not sturdy.
9. Boss VE-5
This is an amazing tool for vocalists that want a vocal processing device that they can easily have with them while they are on the stage. You can easily attach it to the mic stand, making it easy to use it without distracting the audience much.
Quality
There really hasn’t been any bad reviews of this product, meaning that it is a high-quality product.
Sound
This vocal effects processor gives a lot of opportunities to help change your tone by helping you add some reverb, delay, harmony, dynamics, pitch correction; and it also comes with a loop station. You can also get radio voice, robot voice, and a scary sort of distorted hard rock voice. It makes your voice sound a bit unnatural, though, so it is best for music genres like pop, rock, disco, and other styles and it is less suited for jazz and musicals.
Pros
It comes with a loop feature
It can be attached to your mic stand
It has many options you can use to alter your tone
Cons
It makes your voice sound unnatural.
10. TC Helicon VoiceSolo FX150
If you are wondering why anyone would want their voice to sound like that of a robot, or you just can’t fathom why you would want automatic harmonies added to your singing when you could easily have someone do it for you, then you just might want this vocal processor.
The Quality
It has a decent quality, meaning that it does not break down easily, but there is a common theme among the users who gave their reviews, and that is that the volume is unusually low, and this can be very bad if you are playing in a band and you are trying to make yourself heard over electric guitars and drums. But if you plan on singing with acoustic guitars that are not so loud, then this should be great for you.
Another great thing about this is that you can attach it to a mic stand.
Its Sound
As mentioned above, this product does not give any fun guitar effects, but it includes an equalizer and reverb and volume control.
Pros
It is easy to use
It has an equalizer and a reverb.
Cons
It is simplistic.
In Conclusion
Our Pick
The TC Helicon VoiceTone Harmony-G XT
The Behringer Virtualizer 3D FX2000 is a good one for everything that it does. It is not a bad place to start of you are new to the vocal effects processing world.
The Roland and Boss VE-20, as is expected of all Roland products, are very well-made pieces of equipment. You won’t find many flaws in them.
But the model that will give you greater value for your dollar, according to many users who have used and reviewed it very favorably, is the TC Helicon VoiceTone Harmony-G XT.
Its build quality is very solid. And the voice/guitar functionality, range of effects, and the manual and guitar generated effects options make the price look like the product is too good to be true.
There are quite a lot of worthy upgrades in between, and this includes the Boss VE-20.
But if you want a true upgrade, you would need to spend some extra dollars and get the TC-Helicon VoiceLive 3.
0 notes
Video
Your Beats Are Uninteresting as well as Below's Why Your beats may have the most crazy drum pattern the globe has ever heard, however it's boring after 15 seconds. Is it the audio typefaces? Is it the lack of adjustments in the chord progression and also arrangement? There are a great deal of factors your beats are burning out that you can deal with quickly and also take your game to the next level ... Not a day passes where I do not listen to some non-hip-hop listener claim something stupid like, "Pay attention to this crap. I can make this beat! There's absolutely nothing to it. I should certainly be a millionaire." If you dig into the on-line beat making community for even ten mins you'll realize that a lot of these haters in fact try to come to be manufacturers, together with various other aiming musicians that are followers of the category. Not a lot of them are millionaires or are landing their beats on significant tag records, as well as it's except an absence of attempting. They are shopping their beats almost everywhere in hopes that a person will hear their unassailable ability and "placed them on." The problem is that most of these people simply aren't talented. Their beats downright draw. The exact same factor that made you believe you might replicate and copycat the greats is the same reason you can't. You do not have the ear. You do not discover the nuances. You haven't researched a lick of music theory. And also believe me, everyone can listen to that you're using (a bootleg duplicate of) Fruity Loops. Allow me place it to you candidly: Your Beats Are All Out Boring (Yet We Can Repair That). Remember back when you initially started and also thought "Guy, the pro's beats are so simple. I can do that in a heartbeat." And also you've been pumping out easy beats considering that, since you misinterpreted their easy orchestration for a basic setup. They are doing things with 3 audios that you could not perform with 15, which's why they are selling exclusives for $100,000 a pop as well as you're leasing your tracks off of Soundclick for $1.00 per download. update your game at journal note. Here's just how we're going to fix your trouble throughout this short article, by discussing:. Audio Font styles. Music Concept. Combining & Learning. Orchestration. Plan. Add all of these with each other and also you have an equation that will certainly take you up a level, regardless of where you're currently at. As you check out along, really consider you're very own scenario and think of how to use these tips. They aren't really optional if you want to make significant scrape, so focus. Sound Font styles. Probably, you resemble me when I started. You're young as well as ballin' on a budget plan. And also as all of us know, attempting to buy a piece of software application and afterwards updating the sound font styles can cost a limb. That's why a lot of people are still shaking the exact same versions of Fruity Loops and Cool Edit Pro 2 from the mid-90's that was drifting around. But I'm going to inform you now, that's not going to cut it. Your choices are to either discover just how to use a synthesizer or plugin to create the noises you want (you'll be really limited), or you'll require to start buying as well as collecting sound font styles and examples. If you can play the tricks in any way, any old keyboard is mosting likely to have a midi input/output on it that you can regulate your noises from. This means you might conserve loan as well as score an outboard sound financial institution from one of the killer key-boards around. Have a look at the Yamaha Concept (pictured above), Korg Triton, or Roland Fantom, every one of which were big victors back in my day. Sound Font Styles as well as Test CD's. Every piece of common software program is conveniently differentiated by it's default audio font styles. They are never ever good until you struck the Reasoning Pro or Pro Equipment level. This means you're going to have to purchase some additionals. Depending upon your style, you can get real-deal samples of online instruments, or you can get classic packs like the 808 set, etc. The choices are virtually limitless. My pointer is not to obtain a load. Figure out your design and also go from there, based upon the customers your focusing on. Tightening your emphasis to South, West, East, MidWest, or Dubstep, equally as instances, can considerably increase your opportunity of success. But it likewise keeps you from having 100,000 sound typefaces you can not perhaps arrange through and select from. Get a core collection of sounds you can come to be acquainted with and also go from there. Music Concept. Often individuals break the mold. You have guys like Mr. Sche in Memphis banging out heating systems all the time while sequencing on Fruity Loops as well as still utilizing some default appears, touchdown beats for individuals like 8 Sphere and also Al Kapone. You know why his beats still bang? Because he understands music theory. If anything is mosting likely to set you apart, it's this. Yes, it sucks at first. You'll essentially need to bust out a text publication or read online and also treat it like school. You'll have to examine as well as do homework. However it's an investment right into your organisation so obtain it done. songs concept for beat manufacturers. The important things lacking in every amateur beat manufacturer's tracks is a lack of chord adjustments and song areas. Discuss boring. Changing secrets inadvertently (and half the moment not also having a trick), having tools not balance each other, over-producing in an effort to offset various other lacking areas, and lots of other troubles can all be resolved with a primary understanding of music theory. I'm talking Music Theory 101 levels (terrific book there) that can up your video game in just a week with some quick examining. Read the other Ledger Note write-up I just connected to and you'll observe a prompt change in the quality of your instrumentals. Combining & Learning. Mixing and also mastering are items you'll want to leave to the experts eventually, but recognizing the least amount regarding it can help improve the chances of your beats getting got by artists. Blending. Amateur beats normally sound like a muddy, slurred mess because of the total lack of any blending. They'll have kick drums and also bass lines bleeding right into each other, and also various other instruments clashing right into disaster. The tiniest bit of blending with EQ's, compression, and some panning can repair the majority of these problems, relocating your tracks from insane cacophony to a polished shiny turd. But if you're track is in fact great, some mixing can reveal its real possibility as a work of art. It's not tough and also we've currently put together some blending ideas for you here. Don't neglect this component, its a true make-it-or-break-it aspect, due to the fact that impressions count the most. Mastering. One more concern is understanding. Folks will certainly put a mastering plugin with some default setup on their master out and stop, and after that be confused when somebody hears the track and comments on all the clipping as well as distortion. Don't also attempt to understand your tracks. Simply add compression where required on specific noises as well as enjoy the needles to see if you're peaking anywhere. If you are, simply secure every one of the tracks with each other as well as transform them down with each other to preserve your blending equilibrium. Orchestration. These following two parts, orchestration and also setup, are technically parts of music concept but deserve their very own attention in this article. Both can finish your beat making skills to the following level if done right. orchestration. When you consider the word orchestration, consider a literal orchestra as well as the genius waving his stick around. He's informing particular individuals to play their instruments at specific times based on their seating placement (blending as well as panning). He informs certain ones to stop while others begin, as well as when he actually wishes to blow your mind, he'll bring them all right into the mix simultaneously, but they appear terrific with each other since they are making use of harmony and also off-setting each other's rhythms. You need to be doing the exact same thing with your beats. Your goal is to try and make use of the whole variety of human hearing, from the bass frequencies as much as the sparkly highs. To pull this off, you require to be familiar with the major frequency series of different tools as well as audios. You have actually listened to adequate music to understand exactly how to do this without having the specific Hertz regularities memorized. Use your ears! Primarily, this suggests that you do not want 5 instruments all wrecking along in the bass range. Have a bass, a kick drum a little bit higher in frequency, a snare greater, then human vocals, and after that a number of others a bit higher and also panned around supporting the lead melody. The distinction in top quality and also satisfaction is very obvious once acknowledged. Beginning with a proper selection in instrumentation makes the remainder of your task much easier. Syncopation. We are speaking about rap or R&B generally here, I'm thinking. That means there's a huge emphasis on the drums as well as the pattern in which they thump out their rhythm. The most uninteresting thing you can do is make use of all down defeats. It's the top factor your beats are boring. When you examine songs concept, you'll find out about something you can currently feel, which is solid beats and weak beats. In common time, which is four over 4 or four beats per step, you'll with ease count the vanquish like ... ONE, two, THREE, 4, ONE, two, 3, 4 ... You'll observe, and I have actually laid it out visually above, that the 1 beat is the toughest, followed by the 3 beat. 2 and also four are heard as weak beats. Yet if you move into 8th notes as well as 16th notes, two and also 4 are really felt even stronger. Syncopation can be taken having your drums appealed the weak beats instead of the strong. This makes the audience really feel the weak beats while anticipating the strong, which creates a feeling of driving onward with the track (also known as not being uninteresting). To obtain a sense of this, lay out a loophole where you drop the kick on the 1st beat and after that hit the entrapment on the 2 and also 4 beats. Currently return in, extend your view to 8th or 16th notes, and actively go down kicks anywhere yet the solid beats (1, 2, 3, as well as 4). Currently you're producing hip-hop rather than thumping club-techno, hefty steel, or 80's rock. Sparse or Full. Notice as you listen to different tracks that they generally comply with one of two paths: they are either really sporadic in their instrumentation or they are really full sounding. Something like "Drop It Like It's Warm" by Pharell was thin, where as something like Dr. Dre's "Kush" is very full. Make this decision from the start so that you don't have orchestration concerns. Notification exactly how Dre's option of tool audios don't clash with each other, as a result of them each having actually an assigned frequency variety that don't butt heads. A lot more instances of complete beats were Kanye's very early Midwest style beats. If you choose to go thin, you have to maintain points fascinating by using special audios. Pharell chose to make use of ridiculous mouth sounds mixed with synths to an unusual association. But it functioned. Another technique is to keep your beat and also rhythm the very same, yet change instruments, such as switching out entrapments throughout the carolers or changing kicks midway via a verse. The major trick to making full or sparse beats work involves the complying with area on plan. Setup. By the time you consider setup, you've selected your instrumentation already. So the concern comes to be not which tools to use, yet when to utilize them. You can not simply begin smashing them all at the exact same time or you'll simply have a mess. If they all play, in unison, the same lead melody the vocalist is singing, after that you do not have a song. You require to select what function each tool offers, such as harmonizing the lead tune, sustaining it's rhythm, or generating the hype just in the chorus, etc . Songs is as much concerning space and emptiness as it is loading that space. The ears as well as mind need a chance to "take a breath" as well as refine what it's hearing. That's why much less is extra a lot of the times, and songs that attain a volume are doing it with reverbs and hold-ups extra so than added instruments. Over-flooding a person's senses won't get their interest, it'll just have them transform your tune off, similar to we always mute the TELEVISION throughout loud commercials. Personalized Fills up. Two of the funnest parts of making beats is creating custom fills for completions of sections and after you obtain the vocals back from the rapper or vocalist. In relation to custom loads pre-vocals, proceed as well as loophole your song out with regular rhythms that are foreseeable as well as recurring. This provides the user something to lock into so they can concentrate on the vocals and also verses. With experience you run the risk of being dull for being remarkable, however fortunately it opens up a chance to develop much more intriguing "ear candy" with fills. personalized drum fills. Now that you have your fundamental format expanded with duplicating rhythms that your audience will become acquainted with, you can pick particular minutes in the song (generally transitional minutes) to accentuate with custom loads. The traditional minute is when you're vacating completion of a verse and also right into the chorus. You can decrease in a wonderful entrapment fill that liven up the ears of the listener. It obtains them paying closer attention again as well as signals them that something will take place (in this instance, moving right into the chorus). Now you have passion and experience with each other while keeping shifts from being disconcerting, sudden, and distressing. When you get vocals back, an enjoyable trick is to listen along for any type of unique words, parts of the lyrical message, or off-setting rhythmic parts. You can aid these parts radiate much more by creating custom drum fills beneath them as well as also bringing in (or securing) other instruments to draw more focus to it. Do not exaggerate it or it'll lose it's power and also distress the experience you have actually developed. Dynamic Breathing. Remember earlier when I claimed you have to let a track breathe? Along with tune areas transforming feeling and also tunes switching around, you require to also differ the level of intensity throughout a track. By being a bit creative, you can attain this in lots of different methods. Among my faves is to drop into half-time or dual time drums. It's hardly ever seen in hip-hop but you can even change tempo or time signatures. One of the most helpful for this sort of songs is dropping out and also bringing back different instruments. It can be as easy as quiting high-hats for a section, leaving the bass for an action, or quiting the snare. By going down instruments out, you can preserve familiarity, and afterwards when you reintroduce it the stamina of the initial impact makes it seem new and enhanced. You'll have managed to breathe some fresh air right into a track all by tricking the brain of the audience right into playing catch-up and after that forgeting an instrument. You can do this with any kind of tool during any type of section of the song, yet choose carefully and don't just go willy-nilly erasing portions of tracks. Final thought. Right here's what I suggest. Pick any type of instrumental of yours. Possibly your preferred one, or your weakest one. After that reread this article and also use among the suggestions over to it. Then an additional. Function your method through all of them as well as ultimately make an additional full-bounce of the track, then forget about it. Wait a week and then pay attention to the original variation a few times. Ultimately, pay attention to your brand-new and also boosted version as well as prepare yourself to be blown away at the advancements you'll have made. When you feel you've internalized these new concepts, you'll start applying them to every one of your brand-new beats as well as suddenly discover that you're being gotten in touch with by a growing number of new clients. Your track record will certainly begin climbing up, however do not quit here. This is just a starting factor for every one of the methods you can discover. Keep studying more songs theory and applying your brand-new expertise. If you aren't researching, your competition will be, as well as it's a no amount video game. Either your beats obtain put on the album, or another person's does. Get to function as well as maintain grinding!
0 notes
Text
What’s your biggest challenge in making music?
We presented a challenging question on our Facebook page on Aug 14 that seemed to spark interest and a very broad spectrum of answers. We found them so interesting that we decided to try and answer the majority of them according to our own experience and give insight how we have tackled them and found our unique ways to get over these common roadblocks. You can find below the majority of the answers from Facebook and our take on them below.
Question: What’s your biggest challenge in making music?
1. Wasting money on promoters and losing hope
• CloudBounce: We’d say both “wasting money” and “losing hope” are never an option. Good old DIY mentality goes pretty far; using social media and various digital music platforms, connecting with people by email, going to places where like-minded people hang, promoting using every possible channel, and playing “live” will pay off over time. Think all possible ways you can promote your work and let everybody hear your latest and greatest work.
• Fanu: Not sure what this means exactly. Are you paying for promoters to book you or to promote your work? Maybe this refers to a publicist? Anyways, in a way I feel that these days everyone can do a lot about his own exposure on his own by putting out his best work online (even Bandcamp is a super legit platform these days). It does take time, however, and there are no shortcuts. A musical career is like a plant…it won’t pop up overnight. It takes a lot of time to become something.
2. Proliferation
• CloudBounce: This is a tough one, and one we certainly know a lot about. If this relates to having a family, and therefore time management challenges, we understand you. It’s a tremendous challenge but if you are passionate enough you can still find time to do some music. You will have to plan well ahead, be super efficient when on it and focus on the core things (start with the song). See point 17. for additional tips.
• Fanu: Does this mean making too much music? If it does, I feel you on this one, bro! Making too much is the opposite of not being able to finish enough, and can actually be a bit of a burden at times…you want to make more, but you’re already sitting on a ton of unreleased (and/or unfinished) material. One just has to plan decent releases for the music to get it out…which can be a bit annoying sometimes, and that’s often the number one reason many producers would love to get on a label to do the work. Starting your own outlet and putting the eggs in that basket might make sense. If this means having kids, however…can’t help you with that one, sorry! :D
3. Finding the time to finish the hundreds of riffs/loops in the laptop into complete songs
• Fanu: A logical answer would be “Put your energy into finishing songs instead of starting new ones, but we all know that starting new ones is super addictive. Total crack! Still, a key factor distinguishing a more professional producer from a less experienced one (totally not making this personal or offending anyone here!) is actually finishing songs. It IS work and does take a work ethic approach. Starting news songs is always fun, but finishing them always isn’t, so put your work mode on. A prerequisite to becoming a pro requires working like one. Everyone can start five songs a day, but only one with a more professional work ethic can finish them and show something to others.
4. Learning how to make music
• CloudBounce: Although not required in this day and age, it’s really a great idea to learn to play an instrument such as guitar or keys. That really helps with composing and arranging side of things, and let’s you try out different ideas instantly (and record them, too). A massive recommendation!
• Fanu: Gasp! LOL. Listen, listen. Listen a lot. To be able to make music takes understanding music and the tools for making it. There are tons of free tutorials on the net. It just takes time. Being able to understand music and its “contents” and then reproducing that on your own is a very complex skillset, and refining it does take a lot of dedication. But if you love listening to music and find that you enjoy it, that’s a great step number one. Learning how to use a DAW would be the logical next step. Then, learn how to put your ideas into music. I know, I make it sound like it’s a walk in the park while it’s not!
5. Finishing your mix
• CloudBounce: mixing is a true balancing act, and there’s many dimensions to it. Once again, a structured approach is of tremendous help. There’s the obvious tasks of: EQ’ing, panning, adding processing / effects and automation. Build it up like a layer cake, start with the most important like EQ, and once done, proceed to the next phase. You can always come back to tweak but try to complete these required elements of the whole process first, and you’ll end up with a finished song (if you remain persistent).
• Fanu: Ah, the never-ending task of finishing something in the endless world of digital tools. What applies to a song probably applies to a mix: when you feel there’s nothing you want to add or take away, that’s it. Also, realizing that often “good enough” is better in terms of productivity than “perfect”. Does it stand up to work you admire? If not, learn what it’s lacking and how to tackle that.
6. Save enough money with music to build a studio someday to produce good music
• CloudBounce: It’s always worth it to take a long hard look into how you use your money. Learn to give away certain habits that might affect to your music production life more you want to admit. There’s probably a way to cut your monthly costs (Netflix, coffee shops, gym, monthly subscriptions - you know the drill), there’s usually an almost free alternative to all of these money pits. Spending small sums here and there accumulates fast! Learn to do small sacrifices and save money, invest it and maybe even find some additional income (passive income is the holy grail).
• Fanu: I’d say if this means that the money for the decent studio has to come from the music you make, you may be looking at it from the wrong angle. Many things in life take investments at first. I’d say fund your studio with money from something else (your job?) and then watch the money from music come back slowly but surely at a later stage. It’s like if you wish to become a pro translator, you first need to fund some translation lessons, because sure enough that money can’t come from translations at first!
7. Finding the right balance - kick, bass and leads
• Fanu: Kick and bass: a quick tip is to have your kick peak roughly an octave above your sub bass. E.g., if your sub peaks at 50 Hz, have your kick peak at 100 Hz, roughly, for really good separation. So, basically, wherever your sub peaks, multiply that by two, and that’s where your kick should peak, roughly (sure there are other parts to the kick, too, way above that, but getting the low end right is very crucial for clarity).
8. Discipline
• CloudBounce: Certainly one of the most important things to learn in order to get anything done. Focus with persistence, and single-mindedly work on the task at hand until it’s done. Set priorities on a list (pen and paper) and work from the top down. There’s no easy answer to this other than setting clear goals, planning and hard work.
• Fanu: I sort of of touched on this on point 3: willing to become a pro takes working like one. Professional work ethic is one key to professional results. And pros – in any field – have discipline, make no mistake on that. Ask yourself, “Is what I’m doing right now taking me closer to my goal?” and adjust accordingly.
9. Learning the program
• CloudBounce: Learning and sticking to a one DAW is super important for developing the core skillset. There’s so many aspects to music production anyway, so it’s better to focus on the key elements. Choose your DAW wisely, learn it, and maybe even choose just a couple of basic tools (EQ, compressor etc.) that you can truly decode and understand, and use to their full potential. Big tip; apply kind of an analog desk mindset, and you’ll never have to spend time thinking what tool to use.
• Fanu: Second this! Major key. Do not drown under all the different possible DAWs etc. You only need to one to make great music. Learn it well, inside out, and it’ll be a major asset. I know from experience there are people switching DAWs just because this and that producer endorses it…but the fact is, it won’t make you sound like him. Switching DAWs will only slow you down. It can be great for inspiration, as humans tend to become inspired from change quite often, but best to know your main tool, still.
10. Being too productive! Making more music more than I have time to arrange decent release plans for
• CloudBounce: See point 2.
11. Separation in the lows and mids
• Fanu: The only brief answer I can give to this one is decent monitoring play a massive role here. Even decoupling your monitors from your desk is known to decrease the amount of low-mid vibration, which can make mixing low-mids very challenging. Also, needless to say, the more you invest in your monitors, headphones, and room treatment in general, the better tools you will have for hearing the separation in the first place.
12. Finishing
• CloudBounce: See point 3 and 8 above.
• Fanu: Just do it!
13. Recording vocals and mixing them. I don't use autotune and when I sing off-key I have to re-record again. And then which FX add to the vocals
• CloudBounce: We definitely respect the dedication to good old real life performance, it’s the way it really should be. It’s a pain in the ass to get the perfect take sometimes. Pressing the “record button” somehow makes things harder. But the effort is well worth it! What comes to effects after doing some EQ, compression and de-essing, we’d say that in most cases just a quality reverb and delay goes a long way.
• Fanu: Personally I’d have nothing against someone using a little “helper” to tune the vox a little. I’ve definitely done that to a few producers in their mixing project (using the free Vielklang plugin you can get for free with Computer Music, for example). Even professional photographers use image editing software to bring out the best qualities and hide the less-than-good ones. IMHO the tools are there to help us – think about EQ, for example!
14. The limited gear I have without any budget to upgrade
• CloudBounce: Depends what gear you are talking about. If you mean just creating music digitally a DAW from any major manufacturer will be enough. In many cases you get a limited version of a commercial DAW for free when you buy a sound card package or similar. And there are great totally free options as well. If you mean real instruments, there’s hundreds of decent quality options on the market for almost anything (a mint condition used one is usually the best option with a budget). For hardware, their digital counterparts within any DAW is close enough to produce professional results. Also, see point 6 for money saving tips.
• Fanu: Limitations can spark creativity if you look at it from the right angle. Honestly, all one really needs today is a DAW. If you mean your audio system, use a few trusted reference songs and learn how they sound in your workspace. Learn them well. Then, try to get your songs as close to them as possible. Think of how limited many producers were in the 90s and what classics they created!
15. Space on my computer not being infinite
• CloudBounce: There’s probably a couple of alternatives: either clear your computer frequently off the junk you don’t need, as that just eats space. Invest in additional hard-drives, as those should be fairly inexpensive. Also, if you can use free cloud storages to store some of the stuff, that’s always a cost-effective solution.
• Fanu: These days it’s so easy to buy and download tons and tons of VSTs and instruments, which will need endless space. Try a more minimal approach! You’ll find you honestly don’t need that many instruments or samples etc. to make great music. I know you probably know this, and we all know how inspirational it is to get a new synth and even go thru its presets. But make more with what you have. Also, trying to make music with a more limited hardware device may make you understand a more limited approach. Samplers such as Octatrack, Digitakt or an MPC (or an SP 1200 with 10 seconds of sampling time!) can offer a great lesson in doing more with less.
16. Over-perfectionism and inability to just get it done!
• CloudBounce: This is a big one for many producers. You start to work on your new idea (riff, loop, melody etc.), sugarcoating it with too much stuff, and ending up with a good sounding 1-minute long jingle. Tackling this goes back to the focus, work ethic and ability finish. One way to start is to create a full structured song from start to finish before recording anything and adding additional processing. Once you have a song (that feels good), now you can start to work on it and see what comes out.
• Fanu: It’s good to understand that it’s better to finish 6 songs in 3 months than 3 in 6. The former will teach you more. You’ll never be a master when working with one song, if you know what I mean: the more songs you make, the more scenarios you’ll tackle in terms of everything. This will also contribute to forming your own style, which can only happen through making a lot of music, as you’ll “find yourself” in the process. Also, somehow the one song you spend months on will seldom be worth all the time spent on it. I know this from experience and also remember an old DBridge interview where he said the same thing: the tunes you work on the longest are never received as well as those you write quicker.
17. Time
• CloudBounce: We all have only a certain number of hours available, unless you’re stealing from sleeping hours (not the best choice). Even if your schedule is hectic, you can find enough time by being extremely focused and structured. Create realistic goals, write them down, and then think of all possible ways to find the time to execute those goals. Wake up earlier, work later, create structured routines, remove distractions (social media, TV, etc. – you don’t need them). Learn to be more efficient in solving problems and making decisions. Trust your intuition.
• Fanu: Many modern life conveniences often get in the way of what matters. Sell your TV. Do less of the stuff that doesn’t matter. Think about the non-mattering things you do: social media, browsing the internet…and you may realize you spend quite a lot of time on them just because they’re always within arm’s reach. When you think of how it all adds up, it’s a lot. If you sleep for 8 hours, work for 8, you probably have at least two–three solid hours of being able to do what matters every day. That makes roughly 20 hours a week at least…that’s one song at least!
18. Arranging a track
• Fanu: It always baffles me how common this topic is. I’m going to put my granpa mode on and say when I started making music around 1992 or so, we had no song structure templates or tips on arrangement. We didn’t even see waveforms on arrangement or the arrangement in general (tracker style ahoy!). Yet we made it work! A ton of amazing music was made in the 90s. I remember no-one asking for arrangement tips. How did we manage? By just listening to music. See (or hear) how different sections work in different songs and how they make you feel. There are gazillions of zigabytes of music out there online that you can listen to. And I mean literally listening with attention; not while browsing Facebook, because then your focus will be elsewhere. Learn from them! If nothing else helps, listen with attention and write down what happens in the different sections in your favorite songs, for example: be your own teacher in that respect.
Summary: this was fun, and we think we should do this again. What would you guys like to discuss next time? Till the next time!
Team CloudBounce
0 notes
Text
In 2017, what is the best video editing program?
I have been editing video since I can remember, starting in middle school on tape decks, moving to a black MacBook and iMovie circa 2005. As what I wanted to do with video grew, so did my needs in a video editing program.
When I started film school 8 years ago, Final Cut Pro 7 was in vogue and I learned it. It had its quirks, but at the time it was the best editing software by far.
That was until apple released Final Cut X in 2011 to a rabid user base that basically wanted to crucify them for messing with their precious Final Cut. Most of these users just wanted updated features, pretty much just A Final Cut 8. Apple decided to gut the program and rewrite every line of code, to better prepare it for the future of editing.
In use, it was buggy and was missing many key features that editors needed. Features like XML import and export, server support, multicam editing, chapter markers, and broadcast monitor support. Final Cut X was branded iMovie pro and most Final Cut 7 users left to other video editing software.
At the time there were only 2 viable alternatives to Final Cut, Avid Media Composer and Adobe Premiere Pro. Avid was poised to take over Film and Television editing and Premiere pretty much took everyone else.
I made the choice to become a Premiere user. Premiere has great after effects integration, and was able to edit any type of footage from its native file type. At the time, most video editing software needed to be transcoded/converted to its preferred video file type to be edited. Final Cut had Prores and Avid had DNXHD. With premiere you didn’t have to waste time converting anything, you could edit right away, saving hours or days of post production time.
I still never liked premiere. It always ran like crap on every Mac I installed it on, no matter how powerful the machine. Premiere was originally a PC program, and was never truly optimized to run on Macs. This led many editors to switch to PC’s to recapture some of the speed and reliability they longed for.
My original professional background was in IT and data recovery, basically I fixed PC’s. PC’s are cheap garbage, no matter what brand you buy. There just isn’t a PC brand that can match the build quality that Apple has, I really wish their was. Even if there was, Windows is just crap. I have never had a PC running windows last more than 3 months of my use without crashing, but every Mac I have owned has lasted and lasted. My mother still uses my 2005 black MacBook to this day, good luck using a 12 year old PC.
I won’t go back to PC, I know the flaws in their software and hardware and just won’t put myself through hours of waiting on geek squad service.
So for the last 5 years, I have been running premiere. Dealing with crashes, corrupted project files, green frames in my footage, and general sluggishness on my Mac.
I tried Avid, but my opinion is that Avid is for video editors that only edit video. What I mean is that Avid is for editors who work as part of a larger team with someone to do the sound, someone to do the color and someone to do the titles. Basically you need another program/person to do anything else besides edit video. This is fine is some work environments, and can be the optimized way of working for many editors. I know Avid has built in tools, but for the most part they are not very good or they are dated.
I personally usually work alone because of tight budgets. I cannot afford to hire anyone else, and I need to efficiently do all the work required of me. If premiere wasn’t such a badly coded piece of software, it would be perfect for this. Adobe comes with sound, graphics, and color software allowing you to do everything you need.
Once Davinci Resolve’s editing panel because more fleshed out, I tried that out. It was okay, and will probably work great for many editors. I ultimately didn’t use it because it’s audio editing options were very limited. I need to use EQ, compression, low and high cut filters, and noise reduction to provide clean professional audio for my clients. Resolve just didn’t cut it.
Then late last year, I had a client who needed their projects edited in Final Cut X. I decided to give it a whirl and began my journey to relearn Final Cut. I had kept in touch with final cut since I left it, always checking in to see how it was doing but never staying.
I was pleasantly surprised! All the features that were missing, were now back. They had also added countless other amazing features that can save you hours as an editor.
Then Apple shocked the editing community by releasing 10.3. I feel this made Final Cut X the best editing software available to date, on any platform.
It is fast, blazingly fast on any modern Mac. You don’t need anything beefed up, apple has programmed the shit out of this and Final Cut X as a software is leaps and bounds more advanced than anything else available. This means native editing of video at any resolution, and instead of having to step down your resolution to ¼ or 1/16 for Red video like Premiere, Final Cut X will automatically adjust video quality to optimize your computers performance. This means more focusing on editing and less on your machine. Basically more time to be creative.
Roles are better than tracks! Tracks now feel like stepping back into 1983 for me, they are extremely outdated at this point. Roles are the future and move with you, allowing you to have greater control of your media and timeline. Roles also optimize the space on your screen, giving you more room, while also allowing you to see what’s in your timeline more easily.
I love how Final Cut X switches between the timeline and viewer automatically, allowing me to have more room on my screen to see my media, instead of sharing the screen space with a two up display like the traditional editing interface. You can choose to have the traditional editing layout, but why would you when Final Cut works to great.
Proxies made easy. Premiere pro sucks for proxies, even when using their built in proxy tools. Thinks get unlinked and you need to spend valuable time troubleshooting link problems.
Try making proxies for Red on premiere and then going back to the original r3d, good luck. They might have added a new feature recently, but it’s probably buggy anyway. Premiere focuses too much on new features to satisfy their user base paying high monthly fees for their software. Apple always focuses on reliability before anything.
Need proxies with Final cut X? You just check a box and bam you have optimized proxies for your machine. Need to go back to the original footage for your final render? Just check another back, super easy and reliable.
Final Cut X has great audio tools, many of them are straight out of Apple’s professional sound editing and mixing software Logic. You can even save presets in Logic to use in Apple, making Final Cut’s build in audio editing and mixing tools very powerful. I personally find these tools to be leaps and bounds better technically and creatively then anything found in other editing software.
Final Cut X has amazing Motion graphic tools, and integrate with Apple Motion to provide even greater control of graphics. You can even install plugin’s that allow you to have easily customizable motion titles, something much more difficult to with with After Effects. These motion titles update in real time, allowing you to make better creative decisions.
Because of the nature of my work, I often still need to edit in Resolve, Premiere or Avid. Every time it feels like I’m stepping back to the past. Final Cut had to take a major step back then re-coded everything from the ground up. Just like the first iPhone, it was embarrassing and did not have many needed features. Apple is the best at not giving up and following through with their vision, and that has really paid off with Final Cut 10.3. Not just that, it’s always the cheapest available professional editing solution by far because Apple makes their money from hardware and can subsidize the software.
If you have a Mac and are editing your video on something else, it’s time for you to take another look at Final Cut before you are left behind. The future of editing is happening right now.
0 notes
Text
Transform Your Song - Mixing and Mastering - The Basics to an Awesome track - 5 minute read

The Challenges of Mixing and Mastering and How To Get Started
Let's say you recorded a song and you need a way to make it sound better. That's where mixing and mastering comes in, but what is mixing and mastering? Sometimes a song you've made can sound muddy or under the weather. A studio engineer can improve this with mixing and mastering your track, but if you want to make music in a bedroom studio setting, achieving this part of music can benefit you in the long run. Mixing and mastering can be a challenge to tell apart, but they are quite different, and here's why: Mixing always comes before mastering Mixing is the process you start focusing on what tools you can use to remedy your song. Mastering focuses more on how to get any last adjustments in the track to cover anything an audience may hear at the last stage to make it sound better right there at the end. Well, you still need to know what tools to start with. I have been mixing and mastering for about two years, and it has been a learning experience. Learning to mix and master can be challenging, but fun if you keep your patience. I'll get started with the basics and then move onto the lesson.
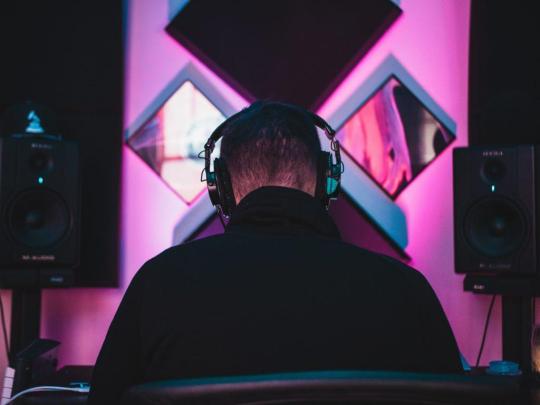
Mixing Basics This is where you get the levels of your recording set. A simple definition of mixing is the time in recording a process that is used to adjust elements in a song. Mixing is not something professional engineers use to make songs sound "different" or to change their original performance. The mix is a cleaning stage. The song is passed down to mixing engineers to adjust the elements of individual tracks with EQs, compression, faders, and panning to fit into a genre. Grasping your tools in your mix is important because you cannot move forward into mastering if the mix is incomplete. Mastering Basics This is the process of finishing your song to be released and audible on all mediums, it will make it so your song can be played in the studio, clubs, headphones and the car, always sounding good! Not all songs are mastered, but you really should, especially if your goals are to get plays on the radio. The best way is to have your songs mastered by an experienced engineer. Mastering involves one file of the song being updated into a better version of the mix. Basically what mastering is, is the fine-tuned adjustments that are made like loudness, eq, and "tone" or "place" of the track. You don't want to master ever in your mix, using the Master channel and that's where a lot of learners kind of go south. Ideally, you would not Master your own track, as to get the best results it is good to have a fresh set of ears. Mastering can be a tricky thing to wrap your head around, but I am going to share a little insight later in the article.
Breaking Down Mixing Elements
There are certain ideas you need to keep in mind before you start a mixing process. Try to imagine the track as an orchestra performance, and each instrument has an assigned seat. That's also how mixing works. You don't want certain elements in the back, and you don't want certain elements too far in the front in your mixing process. If you are just getting started with mixing, allow yourself room for growth, and the mindset that each sound and section of your song can get pulled under, and it's your job to bring out elements using your daw's mixing studio. A lot of mixing can be generated for you or you can mix freely manually in your bedroom. The elucidation of each sound you hear in a track is crucial. Not everything you make will be the same, and it is required that you win a clear playback each time. It is not impossible to get the correct mix in your bedroom, but there will be techniques that you must apply for clarity.
Mixing 101 Mixing can be a challenging task at first, but that doesn't mean it can't be overcome. I want to simplify some tools that every DAW has. There are a lot of ways you can get a mix to do exactly what you need. If you need something in the background, try reverb and if you want something brought to the front, you can add an eq and less reverb. Realize that you can use panning or mono tracks to pull in a sound or a stereo track to expand your sound. Also, reverb and delay are some special effects that you can add to your tracks to keep it interesting, but weren't there initially. Keep in mind that a mix is the ONLY time you get to perfect any mistakes in a song. EQ EQ is a good tool that can fix a lot of mistakes in a recording. A big difference EQs can bring is eliminating the low end. Low end is a rumble of heavy bass that can easily way down any mix. Low end is extremely difficult to hear unless you know how to use an EQ. For example, the picture below demonstrates how an EQ looks when you cut out the low end in a guitar channel. Notice how on the left end, the frequency visualizer is brought down either manually or robotically to attach closer to the sound wave in the middle.
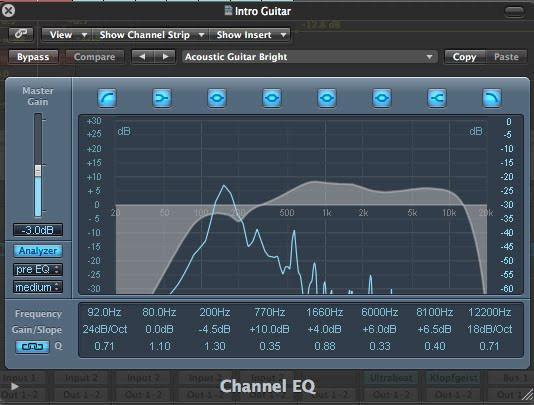
Volume and Panning Now, you want to focus on the volume. Every section needs its volume level. Keep in mind, when mixing, you can adjust volume levels on separate tracks. Lead synthesizers and vocals tend to be brought out and emphasized in front while drums can blend into your back. Be careful with drums, because you don't want to exclude them completely. I commonly use automation within the daw to lure loudness and volume along with panning to bring out each snare and hi-hat. One thing that I would point out is a lot of songs tend to sound bad because the low end wasn't helping in with drums and bass, so it's okay to add some breathing room for a drum track, in my opinion. Mastering 101 Mastering is the 1 percent left before your release. A good example of mastering is the overall hearing of an album. How will the song sound by all of the other songs on the album? Are the volumes levels the same? Does a couple of songs render any stereo issues? You want to make sure your panning and tracks are set to your liking in a mix. In mastering, the goal is to mix your songs in one setting to get a finished product. You are allowed to work with any mix, and it is better to work with all mixes in one mastering session. By that, each track should a single track and ready to be passed through for a final master. There are a lot of great mastering tools out there for anyone ready to learn! Ozone has a great selection of mastering tools for free and for sale. Every link I reference in this article uses Ozone to cut out any confusion of what to use! Limiting Limiting is a way you can adjust the volume to the overall track. If you have noticed that your track is soft or too quiet, limiting can help there. But you don't want to go heavy on it because it will distort any kicks or snares you've previously cared for in your mix. I want to share with you someone I found on YouTube that shares a lot of mastering software and tips to help you get started even more! Here is a link to a video that will help you with limiting. I will post another link for the entire lesson on mastering here. Here's what he posted about volumes peaks: Ceiling - Set at least -1.0dB True Peak. Potentially up to -2dB True Peak Ensure you select "True Peak" - This is essential. Average LUFS - Hit at least -14 to avoid Spotify limiting and then push it louder to your own preferences.In The Mix from YouTube Multiband Compression If you have never used a multiband compressor before, it looks very strange when you open one up for the first time. A Multiband compressor is known for a 4-split screen to independently edit transients and achieve adequate hi-end and low end. Multiband compression can be a daunting subject even for me! There are several tricks you can apply in your master that cut out any unwanted noises in your track with multiband compressors and EQs. EQs do not always get the job done, and that's where a multiband compressor can save the day. Check out this great multiband video here.
Conclusion
Hopefully, you have learned something about mixing and mastering today and what they are. Mixing and mastering can be a fun experience if you need to take your music needs to the next level. Most songs you hear on the radio or watch on TV have had professionals help with the Mixing and Mastering process. If you need help, be sure to check out our Mixing and Mastering service providers. For Mixing engineers click here For Mastering engineers click here Read the full article
0 notes