#it's like how gear 5 is more visually striking and dynamic than in black and white line form (illustrative art)
Text
sometimes I forget the anime exaggerated Hancock's love-fantasies
#one piece musings#boa hancock#for example: the whole wedding scenario doesn't exist; the whole bit about nami and robin doesn't exist#in fact i don't think there's every any visual cue for what hancock is imagining but i'm not 100% sure#a lot of the visual fantasy was much more elaborate in the anime. which makes sense since it is visual#it's like how gear 5 is more visually striking and dynamic than in black and white line form (illustrative art)#rambling tags#one piece#she does think luffy hugging her is a sign of marriage or engagement. i can't remember which. don't feel like getting up to check right now
4 notes
·
View notes
Text
Review: Furutech DSS-4.1 Speaker Cable & DPS-4.1 Power Cord

Furutech DSS-4.1 Speaker Cable & DPS-4.1 Power Cord
The Audiophile Weekend Warrior (TAWW)
TAWW Rating: 5 / 5
Attainable ultra-high-end performance.
PROS: Incredibly quiet, transparent and open-sounding; powerful and resolving frequency extremes; pure and organic midrange; fast and unfettered dynamics; remarkable sense of space.
CONS: Only sold in parts form, so you'll need to figure out termination; power cord can put some strain on jacks.
My first couple decades as an audiophile were relatively frugal. I bought a pair of used Merlin TSM speakers out of college that I used for 16 years. I rolled my own DIY speaker wire and bought $400 Sony and Onkyo CD players that I modified. My amplifier was a defective review sample that I repaired and got for pennies on the dollar. But after years of self-restraint, I started to slide down the slippery slopes of system upgrades. It started innocently enough with some used pieces... an Ayre integrated here, a Cambridge Audio streamer there... then came DAC upgrades, followed by nicer amplifiers, which naturally necessitated a better preamp. But things really took a turn for the crazy last year (I blame pandemic cabin fever) when speakers were upgraded to Audiovector SR 6 Avantgarde Arreté, which then led to the Gryphon Essence preamp and amp. Along the way I picked up the excellent Audience Au24 SX cables which, combined with Audience powerChord SEi's and a hodgepodge of other wire from Cardas, DH Labs and Mogami, have held me over. But with the system now scaling new heights of resolution and realism, the cable upgrade itch needed scratching... which leads us to the Furutech DSS-4.1 speaker cables ($395/m bulk; $3,138 as tested) and DPS-4.1 power cord ($480/m bulk; $1,458 as tested). While that might seem pricey for wire, they’re positioned to deliver the kind of ultra high-end performance associated with far more extravagant products. Could they deliver on that promise in the new TAWW reference rig?
DIY Ultra High-end??
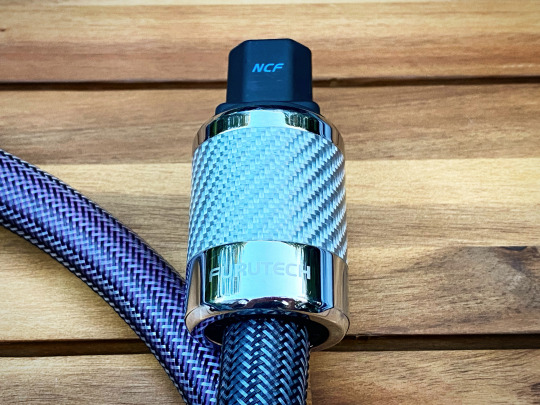
Furutech is a Japanese cable and accessory manufacturer known for their fanatical attention to material and construction quality. Their AC power components are particularly acclaimed, and the distinctive NCF-series AC plugs and outlets can be found on the finished products of many other high-end marques. Similar to how manufacturers like Dynaudio used to sell raw drivers to other manufacturers while also building complete loudspeakers, Furutech seems perfectly content with anyone in the industry using their parts while they also sell finished products. The enterprising audiophile looking to construct or upgrade their own gear can find Furutech components readily available for purchase, though be warned - there are apparently a large number of knock-offs being peddled as genuine Furutech on eBay and other online marketplaces, so you'll want to stick to an authorized distributor. Fortunately for us in the States, we can turn to reputable online stores such as Music Direct, The Cable Company, Douglas Connection or any number of authorized dealers. The very friendly Scot Markwell of Elite A/V Distribution, Furutech's US distributor, provided the units under review here.
The DSS-4.1 speaker and DPS-4.1 and power cable represent the very highest-end Furutech wire you can buy in bulk - anything fancier requires factory termination. The two are effectively the same cable design, with the DPS version adding the requisite third conductor for grounding. I got a heads up to the remarkable properties of the power cord from my late friend Marty DeWulf a couple years back. Marty had been quietly consulting with an electrical engineer specializing in high-voltage power line transmission to construct his own power cords from scratch, and had reached a point where he felt his DIY concoctions outperformed the dozens of pricey high-end cords he had tried over the years. Marty sent me a number of development prototypes and I can attest that the cord was indeed superb and elevated the performance of most every amp I had at my disposal. Marty was feeling pretty happy with his effort until Scot @ Elite AV sent him some Furutech samples to try out, including the DPS-4.1. Sure enough, the DPS-4.1 performed at a different level from anything else Marty had tried before, including his own creations, and recalibrated his expectations for power cords - it was that good.
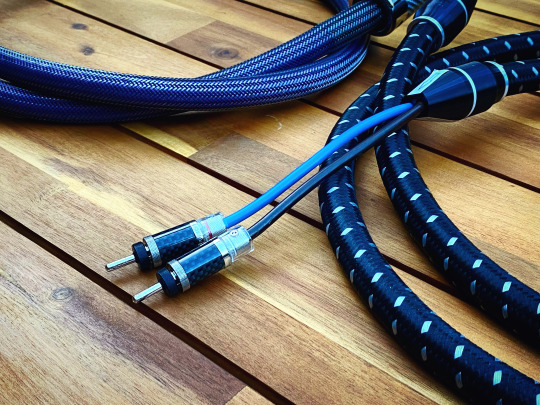
I later picked up the DPS-4.1 cable myself, along with the Furutech e-TP80 power distributor he praised, and confirmed their high level of performance. My appetite was whetted and I got in touch with Scot about kitting out the new reference rig with Furutech speaker and power wire throughout. This includes DPS-4.1 power cords on everything save the DAC, a GTO-D2R power distributor (review forthcoming) and DSS-4.1 speaker cables. All my samples were terminated with Furutech’s top-shelf rhodium-plated connectors - NCF plugs on the power cords, locking bananas and spades on the speaker cable. For the Gryphon Essence power amp, I had a 1.5m DPS-4.1 power cable made with 20A connectors. Since the Audiovector SR 6 speakers have tri-wire terminals, Scot also provided bare-wire jumpers made from the same PCOCC copper employed in the finished cables.

Using Furutech's PCOCC wire as tri-wire jumpers
Buying the Furutech parts and assembling the cables oneself can yield a considerable savings vs. finished cables, and most enterprising DIY'ers should be able to manage the job. However proper termination is critical to performance and safety, especially for the power cord, so if you're in any doubt, ask a dealer such as Douglas Connection to terminate them for you. Excluding any such labor, the retail cost of my 2.5m set of DSS-4.1 speaker cables with CF-202 bananas and FP-201 spades is $3,138. The 1.5m DPS-4.1 power cable with the FI-50/50M NCF plugs runs $1,458. High-end prices to be sure, but as you'll see below, I'd have no hesitation using these in systems that many would kit with far more costly wire.

The massive IEC connector is gorgeous and fits surely, but will put some stress on your jacks
Handling-wise, I'd call both on the lighter end of "garden hose," neither supple nor particularly stiff. At 19mm (0.75") thick for the speaker cable and 17mm (0.67") for the power cord, they're substantial but manageable. They'll bend easily enough into gentle curves, but the power cord will put strain on the chunky plugs if not given a good amount of clearance so don't expect to cram it into tight spaces. The speaker cable comes with an attractive woven sheath; the power cord has a purple PVC jacket, but my cables were clad in a silver Techflex sleeve for a more finished look. Both have 11AWG conductors which should allow for plenty of current flow in a typical run, and the speaker cable's capacitance is rated at 51.7pF/m (15.6pF/ft) @ 1kHz. This is an exceptionally low figure - for comparison, Kimber Kable 8TC is rated at 346pF/m, while Cardas Clear is a whopping 912pF/m - nearly 18x the Furutech! The tradeoff is a higher inductance of 0.7µH/m, but at typical lengths the effect of this should be benign.
Furutech DSS-4.1 Speaker Cable

Before we begin: since it’s impossible to say what any one component sounds like in isolation, I made most of my comparisons of the Furutech DSS-4.1 to my current reference cable, the excellent Audience Au24 SX ($3,300/2m pair). I also had Cardas Clear Light, DH Labs Q-10 Signature and a few other things on hand, but given that the Audience is the best of what I had available and is closest in price to the Furutech, most of my comments are relative to the Audience.
The best way I can describe the sound of the Furutech cable is "wide open." Compared to other cables I've had at my disposal, swapping in the Furutech sounds equivalent to the visual effect of renovating your living room from normal-sized windows to floor-to-ceiling glass. Suddenly everything feels more open, airy and illuminated. Notice that I didn't say "brighter - there’s a difference. The Furutech allows more sonic light to pass into your listening room, so when the music is brilliant and luminous, your room is suitably illuminated. But once the sun sets, that wall of glass becomes as pitch black as the night sky - and so the Furutech can be quiet and dark when called for.
In less fanciful terms, the Furutech gives the feeling of extremely wide bandwidth with no attenuation of energy or dynamics across the frequency spectrum, particularly at the extreme highs and lows. This helps it unlock more of the capability of my recent system upgrades - the top-to-bottom dynamics of the Audiovector speakers and ultra-wide-bandwidth of the Gryphon separates. In the lower frequencies the Furutech is a big step up in bass energy and resolution, transmitting more of a recording's energy and tone in the bottom three octaves. Note that this is different from having “big” or “warm” bass - similar to my illumination vs. brightness comment above, those denote colorations that constantly tilt the perceived spectral balance in a certain direction. There is no lower frequency hump or resonance here that could sound favorable on first listen but get a little monotonous in the long run. The Furutech simply allows what’s present in the signal to be transmitted more unimpeded than I have heard before in my system. This gives music tremendous “surprise” factor - it can go from ethereal to thunderous in a heartbeat. And this applies not just when used on the big Audiovectors; it's also a quality I heard on a scaled-back system with the Silverline SR17 Supreme 2-way monitors.
The top end has a similar level of transparency and dynamism, revealing all sorts of harmonics and textures as well as the air and ambience of the venue with striking transparency. Triangle, cymbals, trumpet, violin, and harpsichord are a few examples of instruments with complex high-frequency structure that sound exceptionally realistic via the DSS-4.1. At first, I felt the treble of the Furutech was a bit coarser vs. the Audience, which I have always found to be notably smooth and natural. I initially ascribed this to break-in, and gave the wire a couple hundred hours with a 4 ohm dummy load to try to burn it off. It improved, but it still had a bit of lingering grain. With time, two things became apparent: this cable takes a REALLY long time to break in - things kept getting smoother and smoother over the next couple hundred hours - and the Furutech simply refuses to cover anything up. Once I made the substantial upgrade to the Gryphon Essence combo I realized that grain was mostly endemic to my previous components, which were no slouches themselves - we’re talking all Class A discrete electronics from Pass Labs and Valvet. That just shows you the level of resolution the Furutech brings into play.
Once integrated into a system of even higher caliber, the Furutech sounded close to invisible, with great openness, clarity and detail from top to bottom and little discernible artifact. That said, at some points I did adjust the top end a bit by moving the Furutech's connection to the Audiovector speakers from the tweeter terminal to the midrange terminal. When connected to the tweeter terminal as per Audiovector recommendation (and my standard practice with other cables), things could get a hair bright, and some of the aforementioned coarseness would pop up now and again. Again, the Furutech was just telling it like it was, because later after further improvements to the system (a dedicated 20A power line, IsoAcoustics Gaia feet, breaking in the latest firmware on the PS Audio DAC), the top end sweetened and I was able to return the cables to the tweeter terminal for best transparency. In my system's current state, the Furutech brings out a top end that's wonderfully sweet, extended and natural.

A few other standout aspects bear mentioning. One is the sheer size of the soundstage, both in width and depth. I'm not sure exactly how components that have no effect on actual channel separation can affect the perceived width of the stage so much. Maybe it's a phase thing, maybe it's low level resolution that helps with ambient retrieval, maybe it's dynamic capability to bring out instruments that tend to be at the edges of the stage... whatever it is, the Furutech is able to convey a stage of substantial depth, width and dynamism. Another standout is the Furutech’s ability to convey dynamic contrasts. This is a quiet and fast cable that responds adroitly to the most minute changes in dynamic character, conveying both the undulations of a quiet melody and the surge of an orchestral climax with great color and intensity. Finally, the midrange is wonderfully dense, pure and harmonically complete, with great solidity in the lower range. Unlike many audiophile cables that provide lots of detail and speed at the expense of fullness or balance, the Furutech can better most comers in the "hifi" aspects while bringing out all the natural warmth of a great acoustic recording. Baritones, grand pianos, french horns and celli have never sounded better.
By comparison, the Audience Au24 SX is still a wonderful if more midrange-centric cable. Its slightly laid-back perspective and silkier treble are appealing for a variety of systems, particularly those on the forward side of neutral. There's a roundness and sweetness to the midrange, but at the expense of sounding a hair more congealed, bunching instruments together on a narrower stage. It also isn’t quite as responsive to quick and subtle dynamic contrasts, and the top end isn't as realistic and extended. Prior to hearing the Furutech the Audience was actually one of the best cables I had heard in many of these regards, so we're already talking about a very high level of performance here. And compared to something like the Cardas Clear Light, the Furutech was far more resolving while having a warmer, purer midrange and a sweeter treble.
The DSS-4.1 is an exceptionally transparent, balanced and complete speaker cable that can bring greater levels of realism and naturalness to a commensurate system. It delivers the type of detail and energy one would expect from an ultra high-end wire, but in an honest and unforced manner that draws one to the qualities of the source material and music without distraction. The net musical result is music has wider variation in color, texture, nuance and ultimately emotional impact - or as another reviewer put it, "expressiveness is their strong point."
Furutech DPS-4.1 Power Cord

Remarkably (or perhaps not?), virtually all the qualities that the DSS-4.1 exhibits as a speaker cable also shine through with the DPS-4.1 as a power cord. My longstanding reference is also an Audience cable - the moderately priced powerChord SE-i ($930/6 ft). It’s an incredibly consistent performer that imparts greater body, dynamics and life to most any component vs. a stock cord, not to mention a good number of aftermarket ones.
Compared to the Audience powerChord, again, the Furutech felt wide-open, more transparent and better balanced. The powerChord was a bit meatier in the mid bass and slightly sweeter on the top end - certainly more forgiving, but a little filtered compared to the Furutech. The Furutech also had a much wider and better-spaced soundstage; I won't say "twice as wide and 3x as deep" or anything with such false precision, but it certainly felt significantly bigger, with a lot more air between instruments and a stage that consistently spread beyond the width of the speakers. On pop mixes, this exhibited as stereo reverb and hard-panned effects that popped much more distinctly. Compared to the Audience and anything else I had on hand, the Furutech allowed whatever was plugged into it to transmit more recorded nuance with a sense of effortless transparency, particularly at the frequency extremes.
But like any cable regardless of quality, the Furutech wasn't the best match for everything I had on hand. I found the Audience cable more competitive with the PS Audio DAC; the Valvet A4 Mk.II monoblocks have a bit of upper midrange shine that was slightly prominent with the Furutech; and with the Class D Legacy i·v2 amplifier it was actually the very affordable Audience Forte that clicked better than the rest. But otherwise, the Furutech really shone with the majority of preamps and amps I tried, especially anything Pass Labs.
With the Gryphon Essence preamp, switching from the Furutech back to the Audience wasn’t a huge let-down by any means. And at first blush, the Audience sounded a bit more dense and focused than the Furutech, particularly in the lower midrange. But a few notes into Billie Eilish's "iomilo" [Qobuz] I realized what I was hearing as density was actually a bit of congestion, and the soundstage was quite a bit narrower than with the Furutech... everything sounded a bit more congealed around the center image of Eilish's voice. With the Furutech, the Gryphon preamp was able to eerily float effects around the entire space of the front of my living room, with percussion flourishes sprinkled throughout the track twinkling in ethereal fashion. With the Audience, everything lost some luster and became more confined between the speakers, and the frequency extremes lost some speed and impact. The DPS-4.1 cable really unleashed the wide-bandwidth capabilities of my system, maximizing both the epic bass depth, power and control of the Gryphon electronics as well as the purity and extension of the Audiovector's AMT tweeters. None of this is meant to beat up on the Audience, which costs about half as much as the Furutech and remains one of my favorite cords, but rather to elucidate how a cord like the Furutech can further elevate the performance of a system. At some point, I'll have to get around to trying Audience's latest models, such as the Studio ONE powerChord (closer in price) or the FrontRow (though that one costs 3x as much as the Furutech).
Testing the DPS-4.1 with the Gryphon Essence stereo amplifier was a bit trickier due to the need for a 20 amp IEC connector, so I special-ordered one for this purpose. Once set up, the Furutech rewarded me with incredible detail, an ultra-wide and deep soundstage that extended far beyond my walls, deep and impactful bass response and a heightened sense of purity - the "blackness" between the notes. Transients were immaculate, with perfectly clean attacks and decays - not excessively sharp, not softened, but just natural and energetic. This helped create the sense of greater macro and micro dynamic range; lots of subtle shadings and nuances in the music became clearer, while sudden transients were more explosive. There was a greater sense of both calm and energy with everything, where quiet moments felt finer and more delicate, while pops of energy in the performance burst forward with an effortless impact more akin to the live event. Separation, pitch, and articulation of bass notes were made more exceptional as well. It brought out the more rarefied capabilities of ultra high-end gear like the Gryphon - that ability to hear every element of a performance distinctively, yet perfectly integrated into the overall fabric of the music. All these qualities came to the fore listening to complex, dynamic material such as Strauss Don Juan [Qobuz]. I was struck by just how much clearer a window the Furutech gave into the dense, at times cacophonous orchestration, while making tranquil moments such as the idyllic oboe solo even more delicate and nuanced. The overall performance of the Gryphon + Furutech pairing was exceptional.

One combo where the Furutech power cord worked even better than the speaker cable was with the Pass Labs XA30.5 amplifier. With the DSS-4.1 speaker cable, there was a bit of a tradeoff where the enhanced resolution revealed some of the shortcomings of the amp vs. the more refined (and expensive) Gryphon Essence. However the DPS-4.1 power cord was dynamite with the Pass, helping maximize its dynamics and balance out its midrange warmth with bottom-end impact and top-end extension. The Pass Labs XP10 line stage also never sounded better than with the Furutech cord, with improved dynamics, soundstaging and clarity. The lack of noise and grain further strengthened the quietness, purity and sweetness that many find so endearing of Class A gear. The outstanding synergy with the Pass Labs components makes the Furutech DPS-4.1 cord about as no-brainer a recommendation as I can make for any Pass owner.
Conclusion
The Furutechs were remarkably consistent in their sonic impact. Both the speaker and power cables impart a wide-open feeling, with striking resolution at the frequency extremes, powerful low-end response, highly agile dynamics, super low noise floor and no readily-discernible coloration. They are extremely fast and clean without curtailing any sweetness or richness intrinsic to the music. Both cables are a tad more forward than my Audience reference wire, the Au24 SX speaker cable and powerChord SE-i power cord. There’s a hair more upper midrange energy and treble resolution that will require care with some systems, though it’s less prominent than, say, something with silver or silver-plated conductors such as DH Labs Q-10 or Nordost Valhalla. And the power cord in particular took the extension and resolving power of my system to a different level. They both strike me as reference-caliber cables, exacting enough to round out a tweaked-out $100k system, yet balanced enough to elevate something more modest, with plenty of headroom to grow into more ambitious gear. In particular, if you have a system with significant extension at the frequency extremes, they’ll help extract the most out of those capabilities. And as well as they work with my reference Gryphon separates, I absolutely love how they elevate Pass Labs gear, enhancing their intrinsic warmth and musicality with greater clarity, dynamics and precision. They'll be staying in the system for the long haul as a TAWW reference cable. Very highly recommended!
3 notes
·
View notes
Text
NATURAL SANDSTONE
Gear up for an avant-grade styled living room with natural stones
A home is not just a concrete structure made of bricks and mortar. It is more than a set of rooms, bathroom, kitchen, patio, entryways, and garden. The presence of family members makes a particular space ideal for living in. From walls to floors and from the roof to outdoor space, everything matters the most. Your home is the symbol of your status. Hence, making an eye-catching and durable living room is more worthy than an expensive concrete structure. It is possible with natural stones that add sophistication and durability to homes.
“The essence of interior design will always be about people and how they live. It is about the realities of what makes for an attractive, civilized, meaningful environment, not about fashion or what’s in or what’s out. This is not an easy job.” – Albert Harley, one of the most influential interior decorators and designers
In contemporary and traditional-styled living rooms, natural stones, like marble, granite, slate, limestone, quartet, and sandstone, are widely used. Every natural stone product has a specific utility to render a new meaning to the architectural excellence. Here, putting natural stones in the right places (walls, floors, counter tops, and backslashes) matters the most. It guides in upgrading a living room with the help of a certified and professional natural stone company.
A beautiful living room that lasts for many years
A lively living room is always accompanied by furniture that includes a sofa, chairs, tables, bookshelves, electric lamps, rugs, etc. Additionally, walls, floors, and counter tops also induce a vital difference. Making a living space more functional and comfortable is essential to bring the most out of a colorful home. You spend maximum time with your family and friends in a living room. Here, natural stone can transform your living room into a comfy and warm place. Suiting your lifestyle granite floor can do wonders. A granite floor and wall made of tiles or slabs is vital for setting the tone of your living room. For combing simplicity and durability innately, emphasize the following ideas:
• Prefer marble for a touch of sophistication in a dynamic living room.
• Granite is a superb stone for creating contemporary places.
• Do interior wall decorations with limestone, sandstone, slate or natural stone panels.
• Decorate only half of the wall with natural stone and paint the other part.
• Limestone simply defines a natural atmosphere with its multiple earthy hues.
granite tile floor in living room
Marble flooring for living room – One-of-a-kind luxury and elegance
When we talk about luxury and elegance in a living room, the very first word strikes our mind is marble flooring. With the presence of natural waves, hues, line, and tone, a marble product promises visual appeal, eternal looks, and long-lasting sturdiness. Marble tiles in a rectangle, triangle, and mosaic cuts deliver unparalleled natural beauty. If you are interested in boosting the resale value of homes, try high-quality, polished marble tiles and slabs for stone flooring from certified Indian marble stone suppliers. Opt for standard sizes:
• Gang-saw slab: 240 x 120 cm up in 2 & 3 cm
• Cutter slab: 120 x 60 cm up in 2 & 3 cm
• Tiles: 30 x 30; 60 x 30; 60 x 60 with 1 cm thickness
Marble floor in living room
Availability of top marble flooring options
Bruno white, fantasy brown, forest green, green onyx, pink onyx, plain green, rain forest brown, rain forest golden, rain forest green, and white onyx
Slate flooring for living room – A unique natural stone you can count on
If you are looking for style, durability, and functionality in a living room floor, slate can do wonders. It ensures resistant to breaks, cracks, scratches, and chips. When it comes to the factor of affordability, slate flooring induces a big difference. Always opt for honed, polished, or naturally split slate tiles from certified Indian slate suppliers into the following dimensions:
• Sizes: 30 X 30, 40 X 40, 60 X 30, 60 X 40, 60 X 60
• Thickness: 1 – 1.5 cm
• Thickness: 1 cm, 1.2 cm, 1.5 cm & 2 cm
slate flooring
Availability of top slate flooring options
Indian Jake black, multi color peacock, autumn, M. green, multi pink, Vijayawada gold, and yellow rustic.
Decorative sandstone wall panel cladding for the living room
A dull and lusterless wall brings in an uninspiring ambiance around. For living in Western-styled homes or making an impression on all incoming guests, it is vital that your walls do justice with different flooring options. That is why wall panel cladding options improve the appearance of living rooms and make a wall weatherproof. If you are looking for an artistic element in your room, you better import wall cladding stones from certified sandstone suppliers in India. In the market, you can opt for the following options:
Wall cladding: 100 x 25 x 5 cm; 100 x 30 x 5 cm; 100 x 35 x 5 cm; 100 x 40 x 5 cm and 100 x 45 x 5 cm (honed, polished or naturally split)
Availability of top sandstone wall panel cladding options wall cladding
Agra red, camel dust, modal, fossil mint, Kandla grey, Mandana, rainbow, and yellow teak-wood
Gorgeous fireplace to set a powerful tone in living room
Traditionally, fireplaces have been considered a part and parcel of all British homes for decades.
In the winter season, a fireplace not only keeps people warm but also revives the room with light and heat. Sandstone commits a stylish home decor trend. Being cheaper and stylish, this natural stone matches the approach, theme, and atmosphere of a living room. For having the right size fireplace, you need a unique natural stone product with a touch of modernity. Go for sandstone products available in a natural, sandblasted, bush hammered, honed, or framed finish.
Sandstone fireplace
Dimensions of fireplace walls and surrounds: customized sizes
Availability of top limestone fireplace options: Kota blue, lime black, tandur yellow, tandur blue and lime peacock
Regatta Universal Exports helps natural stone buyers purchase quality products and articles for taking their living room architecture to the next level. For product information or sales inquiry, view our product gallery or ask for a quick quote by filling the form here.
Whether you are searching for living room flooring, fireplace, wall cladding, and other options, go through our website for a better result.
Choosing The Best Natural Stone For Your New Home
This week, we are going to rewind back to our blog posts about choosing the best natural stone for different aspects of your home. This week, we are talking about choosing the best natural stone for your new home. Natural stone can offer beauty and uniqueness to your new home.
Here is a list of the best natural stones for your new home:
Factors in choosing the right stone for your new home:
Color
Natural stone comes in a beautiful array of colors. Granite and marble can range from soft beige and pinks, to classic blacks and whites, to rich reds, greens, and multi-colors. The varied appearance of natural stone gives it wonderful character and creates a one-of-a-kind effect anywhere it is used.
Finish
There is a wide variety of finishes for natural stone and there are constantly new finished appearing in the market. Examples of finishes include: polished, honed, lathered, brushed, and antiqued. Ask your designer about the pros and cons of the different finishes for your project.
Usage
The harder the natural stone is, the more it resists abrasion. Granite is typically the hardest of all the stone types. If you decide to use a softer stone, you, as the homeowner, will have to use gentler cleansers and dust more frequently to prevent scratches.
Natural stone options for your new home:
Marble
This natural stone adds a sophisticated addition to your home. Its appearance and ease of maintenance make it a popular choice for counter-tops, floors, foyers, fireplaces, and showers. Another option for homeowners that love marble is using serpentine for kitchen counters. It is often called the “green” marble. It’s not a true marble but does offer a marble-like look.
Granite
Granite is available in a striking array of colors and its durability makes it ideal for kitchen counter tops and heavily-used surfaces including tables and floors. Granite offers an impenetrable surface and it is typically not affected by citric acid, coffee, tea, alcohol, or wine. It is nearly impossible to scratch and proper cleaning will not stain under normal use.
Travertine
Travertine is a type of limestone and one of the most popular natural stones for interior and exterior use. This natural stone is durable, low-maintenance, inexpensive, environmentally-friendly, and has a nearly endless supply of colors and tones to choose from.
Limestone
This stone is widely used as a building stone. Popular uses include counter-tops, flooring, interior, and exterior wall cladding, and exterior paving. Limestone is an extremely versatile material. It can be shaped to make decorative elements to be placed within your home. Since it is a plentiful material, limestone is a relatively inexpensive material.
Soapstone
Soapstone is growing in popularity and its popular uses include kitchen counter-tops, bathroom vanities, fireplace, and stair treads. Its heat resistance and ability to stay clean make it widely popular in the kitchen. The stone itself can cost you a pretty penny, but it is so easy to install that you can do it yourself.
Sandstone
This natural stone is frequently used for fireplace facings, chimneys, patio benches, and poolside. Sandstone is a porous material so if you are going to use it in your kitchen you must properly seal it.
Slate
Slate is a popular flooring material as well as kitchen counter-tops, fireplace facings, and tabletops. It has care-free maintenance since it is a non-porous material that absorbs little to no contaminants or moisture and requires little to no cleaning. It is a more expensive material upfront but can add value to your home in the long run.
If you are looking to install natural stone in your new home, contact GMS Werks and we would love to help you out!
0 notes
Text
Death Stranding Graphical Analysis – Pushing The PS4 To Its LimitDeath Stranding Graphical Analysis – Pushing The PS4 To Its Limitxbox 360
New Post has been published on https://www.gamerzcourt.com/death-stranding-graphical-analysis-pushing-the-ps4-to-its-limitdeath-stranding-graphical-analysis-pushing-the-ps4-to-its-limitxbox-360/
Death Stranding Graphical Analysis – Pushing The PS4 To Its LimitDeath Stranding Graphical Analysis – Pushing The PS4 To Its Limitxbox 360
Death Stranding, Hideo Kojima’s first independent, post-Metal Gear Solid outing has been weirding us out with inexplicable trailers and teasers for years now. Kojima’s reputation, the immense goodwill he’s built up as an auteur game creator, are what’s on the line here and if the latest pre-E3 trailer is anything to go by, Death Stranding is all set to be more intense, weirder, and, and more visually spectacular than anything Kojima’s worked on in the past, and that’s no mean feat. Instead of trying to unpack the almost purposefully dense post-structuralist narrative beats, we’re going to do a deep-dive technical analysis, taking a look at the bespoke systems that power Death Stranding, giving it 9th gen visual appeal on now-antiquated PS4 hardware.
Engine overview
2015’s Metal Gear Solid 5 was impressive on all counts. It wasn’t just the spectacular gameplay and narrative; MGS V made use of the highly optimized Fox Engine to deliver an experience that scaled wonderfully across different hardware configurations. The game managed to look great on everything from the Xbox 360 to 4K gaming PCs. The Fox engine is in-house Konami tech so it’s no longer an option for a post-Konami Kojima. Instead, Death Stranding makes use of the Decima engine, an evolved iteration of the tech powering Guerrilla Games’ Killzone: Shadow Fall and Horizon: Zero Dawn. Decima has powered 30 FPS experiences that both look and perform reliably on Sony’s hardware. Compared to MGS V’s silky smooth 60 FPS update, this will a decrease in responsiveness. However, from what we’ve seen of the trailer, Decima does much more in visual terms than what we saw in MGS V.
Decima, as seen in Death Stranding, is a significant evolution of the technology we saw in 2017’s Horizon Zero Dawn. The fundamentals are largely the same—the excellent physically-based material rendering, high-fidelity characters models and shading, efficient open world streaming with minimum popup, and a hefty post-process pipeline. There are several notable improvements, too: terrain rendering sees a boost, and likely makes use of tessellation, while the already-excellent hair rendering from Horizon: Zero Dawn, based on AMD’s PureHair suite, is further refined. Overall, it’s about iteration and this is to be expected, considering that Horizon: Zero Dawn itself pushed base PS4 hardware hard. Let’s have a look now at specific technical aspects of the trailer.
Subsurface scattering
Character rendering has always been Decima’s strong point, and Death Stranding is no different in this respect. Closeups of character faces—particularly those placed near striking light sources—look convincing because of the high-quality skin shader in use. Subsurface scattering is easily visible on character closeups, for instance—and lends skin a degree of softness and enables it to behave in a distinctly different manner to other materials such as cloth and metal, when exposed to light. A specular layer on top captures blood and sweat, while avoiding the “plasticky” look common to skin rendering in so many titles.
It’s also relevant to note here that model polygon counts are very high. While the character’s smooth skin isn’t exactly a showcase of fine detailing, the way in which their nose and eyelids curve organically point to a poly count in the mid five-figure range—comparable to other AAA exclusives like Uncharted 4.
Parallax Occlusion Mapping
Much has been made of Death Stranding’s terrain rendering, ever since the first trailer arrived years ago. While it’s been described as a generation leap, the game’s terrain doesn’t utilize anything particularly exotic: It’s just a solid combination of high-poly terrain meshes, together with PoM. Large rock formations are made of real geometry and the fidelity increase here is down to the environment receiving a large part of the polygon budget, especially in outdoor cutscenes. Parallax occlusion mapping, together with high-resolution textures, is used to convincingly recreate the many smaller stones and pebbles lining strewn around. The use of physically based material rendering enhances the effect.
Volumetric Particle Effects
The GPU-heavy nature of the eighth-gen consoles has been a boon for particle rendering—hardware-based particle systems can leverage the prodigious amounts of GPU power on tap to create incredible set-piece explosions. Avalanche, with Apex engine games like Rage 2 and Just Cause 4 has made use of this to great extent. Particle effects are a key aspect of Death Stranding’s set pieces, too. Volumetric particles have a part of the Decima engine since Killzone: Shadow Fall. Decima’s first outing was a great showcase for hardware-accelerated particle rendering, with thick particle volumes that interacted with the lighting and greatly enhanced the atmosphere. Volumetric particle rendering is back in a big way with Death Stranding. Decima supports a very large number of lit, volumetric particles onscreen, making explosions so much more than a temporary light-show. Particles appear to be rendered at full resolution, undoubtedly taxing on the hardware.
Per-object motion and camera-based blur
Guerrilla Games have been known to use a heavy post-process palette to give titles like Killzone: Shadow Fall a heavy dose of filmic atmosphere. Death Stranding fully taps into Decima’s wide ranging post-process pipeline, something that works in the game’s favour considering its cinematic aesthetic. A fine, per-object motion blur implementation is seen, carried over from Horizon: Zero Dawn. Per-object blur on the enemy staves adds to the sense of impact, as well as helping to smooth out the low frame rate. We recently tried (and gave up) on playing Assassin’s Creed: Origins. The lack of motion blur made the game feel incredibly choppy, even at a reasonable 45 FPS lock. In Death Stranding, per-object blur goes a long ways towards making 30 FPS gameplay tolerable. We also see Death Stranding make use of camera-based motion blur, creating an added sense of impact during a combat finisher.
Depth of Field blur
Death Stranding features bokeh depth-of-field, albeit at a relatively low resolution. We’re onboard with this compromise because in cutscenes, depth of field quality is acceptable with the only real impact being that bokeh highlights are a bit blurry, as seen on the character’s glove. In-game, the effect is more subtle. Static depth-of-field blur is applied in the far distance. Meanwhile, dynamic blur is utilized when the player character and NPCs approach the camera, similar to what we saw in Metal Gear Solid V.
Bloom
Here, we have a shot of Sam riding his gritty future bike, and what really stands out is the liberal use of bloom on the light sources onscreen. Now excessive use of bloom is one of the surest ways of ruining quality, but here, the bright blue highlights contrast well with the subdued tone of the environment and work in favour of the game’s cinematic appeal. Object motion blur also comes into play here, with the bloom effect bleeding out from the light source as the bike moves.
SSAO
Death Stranding goes light on the ambient occlusion. Contact shadows are visible in certain areas—for instance between the character’s knees and the ground, but we’re thankfully not seeing black haloes all over the place. AO coverage is light from what we saw in the trailer, but this could simply be down to the time-of-day in the trailer footage: Much of the gameplay takes place when it’s cloudy. All kinds of shadows—including indirect ones—are diffuse in these conditions.
Temporal AA
The Decima engine’s “two-frame” temporal AA solution was one of the visual highlights of Horizon: Zero Dawn, offering very clean image quality at 1080p with alpha coverage, at a relatively low computational cost. Death Stranding appears to be using an iteration of this method for anti-aliasing. The grass—a transparency—receives full AA coverage. As we’ve grown accustomed to in the many games that now use a temporal AA solution, the trade-off for Death Stranding’s excellent AA coverage is a certain degree of softness to the final image. This isn’t a big deal, though, considering how the game’s aesthetic depends in large part on liberal use of post-effects.
Conclusion
We’re still not sure what to make of Death Stranding, even after a full gameplay trailer and some amount of explanation about what it all means. Nevertheless, at a technical level at least, the title is a great example of the use of tech that plays into the PS4’s strengths. GPU-heavy particle effects, high poly models and some very convincing terrain rendering all run at what we’re fairly certain is a native 1080p image on the base console, backed by an excellent temporal AA solution. Whatever Death Stranding is about, it sure looks nice.
Video Game News, Reviews, Walkthroughs And Guides | GamingBolt
0 notes
Link
The following blog post, unless otherwise noted, was written by a member of Gamasutra’s community.
The thoughts and opinions expressed are those of the writer and not Gamasutra or its parent company.
This post was originally posted at its lovely home on Joy Machine's website. Check it out some time <3
Generally, I do all of my game work on my primary monitor (Dell 27″ S2716DG) which I’ve run through a couple of color/brightness/etc. calibration tools. I have not done the same for my under-resolution — due to outputting to multiple displays from a laptop — Samsung 32″ (S32D850T). That monitor has not received the same love, since it’s already not running its intended resolution, so I figure it’s a lost cause until I can build a proper desktop computer.
That said, it’s a great test for a more “common” monitor display setup, as outside of the art/design/game development/film industries, there aren’t a whole lot of people with properly-calibrated displays.
Steel Hunters was basically 20% barely-discernible black color output, and that was in a still image, much less during gameplay. Though gameplay would have the benefit of dynamic lights illuminating the area (potentially).
Anyway. I wanted to fix that. So, because I needed a new article on this site (or so I’m told by the team), I decided to make this project my article. And also my way to not just blindly tweak post values because: A) I needed reasoning for this article, B) I have a tendency to just continue the cycle of tuning to my primary monitor.
An attempt to solve both these problems is to just define a bookmarked position in-editor (so if it crashes, I don’t lose this reference point) which has a complex scene composition — a wide variety of exposure values — and balance iteratively and take notes every step of the way. And a screen shot of each annotated iteration from the same bookmarked perspective at 2x editor resolution, which ends up being 3722×2656.
All of this arose entirely out of playing Ghost Recon: Wildlands for a week straight and then binging Metal Gear Solid 5: Phantom Pain upon realizing that I never got anywhere even close to completing it. The most striking difference between the two games, which sounds negligible at first, is how they handle scene lighting at night. In Wildlands, the scene is barely visible at night if you’re not actively in a lit area (through spotlights, car headlights, streetlights, etc.). I assumed initially (and the resulting conclusion doesn’t negate this) that my, somewhat ironically, completely uncalibrated television display near a window lacking proper blackout curtains was the cause of this. But playing in the same conditions over the course of no-it’s-not-important-how-many-hours-were-spent-on-these two days of MGS5, it became clear that this may have actually been a design decision.
Spoilers: benefit of the doubt tossed in Wildlands‘s general direction may be wrongly-placed. RESULTS IN THE ARTICLE CONCLUSION!
Granted, it also ended up taking about five times as long as it would have otherwise. C’est la vie.
STARTING POINT: POST_WORK_ITER_00
All items to follow have been changed in a later iteration, based on this starting point, so here are their original values for posterity.
Color Grading
Contrast: 1.13
Tonemapper
Slope: 0.9
Auto Exposure
Min Brightness: 0.03
Max Brightness: 2.0
Exposure Bias: -0.1
Intensity: 2.0
Threshold: 1.5
Size scale: 8.0
ITERATION: POST_WORK_ITER_01
Generally trying to improve dimly-lit/heavily-shadowed area visibility, while also tweaking the results of the bloom a bit as it’s in the stack and doing things, just nothing really of note.
Trying to alter the tonemapping curve (which is to set to “filmic” in UE4, which I believe is ACES) to expose the dimly-lit areas rather than just tweaking the color grading values themselves — as those are applied later in the post stack and degrade overall composition quality.
CHANGED THIS ITERATION
Color Grading
Contrast: 1.25
Tonemapper:
Slope: 0.7
Intensity: 1.0
Threshold: -1.0
ITERATION: POST_WORK_ITER_02
The bloom is way too omnipresent to the point of no longer highlighting/accenting bright areas and, instead, just applying an entirely different camera lens (totally altering the intended composition style).
Also, no values I’m using are really highlighting intentionally-overexposed emissive materials, so using the gas sign as an example of a reasonable value.
CHANGED THIS ITERATION
Intensity: 3.0
Threshold: 0.5
Size scale: 6.0
NOTE: Also updated the following materials/material instances:
Just to test the intended level of emission from an emissive material in the scene (and what it would take to get it factored into the bloom pass with decent results).
ITERATION: POST_WORK_ITER_03
Dig the changes to the bloom, restoring the changes from _iter_01 to see how it fits into the original scene.
The resulting image is, overall, a bit lighter in the more heavily-shadowed areas, but nothing that’s really an experience-changing difference.
CHANGED THIS ITERATION
RESTORED TO BASE
Color Grading
Contrast: 1.13
Tonemapper:
Slope: 0.9
ITERATION: POST_WORK_ITER_04
The resulting bloom changes and injection of another overexposed item in the composition with the gas sign material change actually ended up with a slightly more balanced final composition than I expected. Though, still not enough to really resolve the issue for most players/viewers. Scratch that, had the wrong initial values written down because I started this article after iteration 1. The lovely Jan on our team sanity-checked for me and this resulted in _iter_03 having a more desirable bloom effect, but no change whatsoever in composition darkness/brightness. Which is… Far more what I would have expected given that the responsible parameters were reverted to their original state.
So, opening the HDR Histogram to visualize the scene exposure values showed this:
The heavily-overexposed GAS sign is very intentional, and the overexposure of the sun and surrounding clouds (for those that are new to TRENT’S WORLD: all things are dynamic always forever, including the results of the trueSKY-based cloud renderer) are not explicitly intentional, but also not surprising nor undesirable overall. Checking our existing min/max brightness values in the Eye Adaptation step of the postprocessor stack against UE4’s defaults just proved-out that they were good changes for us to make.
So, yeah. Huh.
ABRUPT CONCLUSION
While checking out the skylight/sunlight (directional light) values/settings in our “world” actor (generally controls atmospheric/environmental world systems, lighting included) resulted in me needing to use my Event_trueSKY_Calibrate editor function to restore my scene settings. Apparently editing a component within an actor instance musses up something in our lighting pipeline. Anyway, the resulting point of this entire post is: if you have a function to calibrate your entire scene to a specific setting/time-of-day, best check it before starting an article where you dictate your color grading/post-stack tuning steps. Because this is what the calibration yielded:
And, yeah, while the problems that started this whole endeavor are still occurring in the same areas, the scene composition is changed enough that it somewhat negates the meticulous step-by-step process that would’ve led to a solid conclusion.
Oh well. On the plus side: I didn’t have to make it to iteration fifteen like I was worried I would.
Next time maybe I’ll just video capture this whole thing.
OH, YEAH, THE MGS5/WILDLANDS THING
Metal Gear Solid 5 provides a somewhat-hybrid Night-Vision/Thermal device (view mode) for the player to use in dimly-lit situations. And at higher upgrade levels, even adapts well in broad daylight (I’m not there yet).
This is somewhat different from Ghost Recon: Wildlands‘ separate Night-Vision and Thermal devices (separate view modes). The NV device in Wildlands is a usable option from the very get-go, but the Thermal device is gated behind a skill progression tree — implying the Thermal device is either more advanced and requires more player knowledge of the game to use properly or is, generally, more useful than night-vision. The resulting gameplay experience is… A little of both? Thermal is largely for discerning enemies (known and unknown) amidst the incredibly complex scene that is typical for the game. So, maybe, the impetus the game is providing for its difficult-to-discern dim lighting scenes is to ensure you’re using your secret agent devices like you’re supposed to.
In MGS5, I end up using my Night-Vision Goggles because I want to and think they’ll be beneficial… But their use isn’t necessary to play the game at any time of day in varying lighting conditions.
Given my experience with the MGS5 compared to much more time over a longer interval with Wildlands, I’m inclined to think that Wildlands didn’t bother enough with the kind of experiment I just [attempted] to run.
UPDATE: LOCALIZED TONEMAPPING
This isn’t going to be the kind of thing that really gets remedied with a late night or anything, but I remember adoring this series on Localized Tonemapping by Bart Wronski (here’s part two).
I think, at the end of the day, balancing this test composition without some kind of substantial change to how tonemapping/eye adaptation is handled at a low-level is going to be a Sisyphean endeavor. I have a few experiments I’m still going to run (though not accompanied with devlog posts as I do them because, well, this happened) to see how best I can skirt by the issue in the short-term, but if the time ever opens up to really gut UE4’s tonemapping and replace it, localized tonemapping seems like a neat starting point. And, regardless, the idea of a more flexible, adaptive tonemapper would seem more appropriate for a game where it’s incredibly hard to predict what kinds of situations players will get into, much less balance compositions well for them using a “best fit” parameter configuration. No, I will not get obsessed with this topic. Not right now. But… soon?
0 notes
Last Seen Blogs

blueandpinkwalls
@wlwalls

newsinvids
News In Vids

dave3d
That's Synesthesia

internetsostudentsoul-blog
Untitled

birdautopsysforfree
this was a mistake