#javascript replace special characters
Explore tagged Tumblr posts
Visit Tumblr Blog
Explore Tumblr blogs with no restrictions, modern design and the best experience.
Last Seen Tumblr Blogs


Fun Fact
Post activity is at the highest at 4:00 pm EDT; notes peak at 10:00 pm EDT.
Text
How to Fix Website Loading Time Issues

In today’s fast-paced digital world, a slow-loading website can be a business killer. Research shows that users expect websites to load within 2–3 seconds, and any delay can lead to a significant drop in user engagement and conversions. If your website is plagued by loading time issues, it’s time to act. With the help of a professional partner like the best website development company in Jaipur, you can identify and resolve these issues to ensure a seamless user experience.
Why Website Loading Time Matters
User Experience (UX): A fast-loading website keeps users engaged and reduces bounce rates.
SEO Rankings: Search engines prioritize fast websites, meaning your site’s speed directly impacts its visibility.
Conversion Rates: Faster websites tend to convert more visitors into customers.
Reputation: Slow-loading websites can harm your brand’s credibility and trustworthiness.
Common Causes of Slow Website Loading Times
1. Unoptimized Images
Large image files can significantly slow down your website. Images need to be compressed and properly formatted for web use.
2. Excessive HTTP Requests
Every element on your website, such as images, scripts, and stylesheets, requires an HTTP request. Too many requests can bog down your loading speed.
3. Poor Hosting Services
A low-quality hosting provider can limit your server’s capacity to handle traffic and deliver content quickly.
4. Bloated Code
Excessive or redundant code in HTML, CSS, or JavaScript files can lead to slower loading times.
5. Lack of Caching
Without caching, browsers need to reload all elements of your website every time a user visits, increasing loading time unnecessarily.
6. Inefficient Plugins
Too many plugins, or poorly coded ones, can slow down your site’s performance.
How to Fix Website Loading Time Issues
1. Optimize Images
Use tools like TinyPNG or ImageOptim to compress images without losing quality.
Implement modern formats like WebP for faster loading.
Use lazy loading for images that don’t appear above the fold.
2. Minimize HTTP Requests
Combine CSS and JavaScript files to reduce the number of requests.
Use a Content Delivery Network (CDN) to deliver assets from the nearest server.
3. Upgrade Your Hosting
Switch to a reliable hosting provider with faster servers.
Consider using managed hosting services or cloud hosting for better scalability and performance.
4. Clean Up Your Code
Minify CSS, JavaScript, and HTML files to remove unnecessary characters and spaces.
Remove unused code and optimize your scripts for better efficiency.
5. Implement Caching
Use browser caching to store static files locally on users’ devices.
Install caching plugins like WP Super Cache or W3 Total Cache for WordPress sites.
6. Audit and Remove Unnecessary Plugins
Deactivate plugins that are not essential for your website’s functionality.
Replace inefficient plugins with lightweight alternatives.
Tools to Measure and Improve Website Speed
Google PageSpeed Insights: Provides detailed insights and suggestions to improve your website speed.
GTmetrix: Offers performance reports and actionable recommendations.
Pingdom: Monitors your website’s loading time and uptime.
Partner with Webpino Software — The Best Website Development Company in Jaipur
At Webpino Software, we specialize in addressing performance challenges to ensure your website loads quickly and efficiently. As the best website development company in Jaipur, we employ advanced optimization techniques to enhance your website’s speed and overall performance.
Our team of experts focuses on everything from image optimization and code refinement to implementing robust caching strategies and upgrading hosting services. With Webpino Software, you can rest assured that your website will provide a seamless, engaging, and fast experience for all users.
Don’t let slow loading times harm your business. Contact Webpino Software today to create a high-performing website that keeps your audience engaged and your business thriving!
#custom website design#web design#website development#best website development company in jaipur#website#business website solutions#digital marketing#web hosting#best website development
0 notes
Text
10 Ways To Optimize Your Mobile App Size: A Comprehensive Guide To Efficiency

Users now demand quick downloads and efficient use of device storage. So, optimizing your app size is a crucial aspect of development. A leaner app not only ensures faster downloads; but also contributes to a better user experience.
Especially in regions with slower internet connections or devices with limited storage capacity. In this comprehensive guide, we will delve into the best practices for reducing the size of your mobile app without compromising its functionality or performance.
From code optimization to asset management, we’ll explore various techniques developers can employ to create streamlined and efficient applications.
1. Code Minification And Compression: Shrinking The Digital Footprint
Minify JavaScript, CSS, and HTML:
One of the fundamental steps in reducing the size of your app is minimizing the code. This process removes unnecessary characters, comments, and whitespace from your JavaScript, CSS, and HTML files. It makes the code more challenging to reverse engineer and significantly reduces the size.
Utilize Compression Techniques:
Enabling compression, such as gzip or Brotli, can further reduce the size of text content. These compression algorithms work by replacing repeated sequences of characters with shorter representations, optimizing the overall size of files without compromising their integrity.
2. Asset Optimization: Striking A Balance Between Quality And Size
Compress Images and Videos:
High-quality images and videos can significantly contribute to the size of your app. By using modern compression formats and techniques, you can maintain visual quality while reducing file sizes. Tools like ImageOptim or TinyPNG can help in compressing images without sacrificing quality.
Choose Appropriate Resolutions:
Provide multiple resolutions for images; to ensure that the app delivers the appropriate quality based on the device’s capabilities. This adaptive approach prevents unnecessarily high-resolution images from being loaded on devices that don’t require them.
3. Dynamic Loading Of Resources: Efficiency On Demand
Load Resources On-Demand:
Consider loading resources, such as images or scripts, only when needed. This dynamic loading strategy can significantly reduce the initial load time of your app and improve the overall user experience.
Lazy Loading:
Implement lazy loading for elements that are not immediately visible. It allows the app to load only the essential components and defer the loading of non-essential elements until required.
4. Unused Resource Removal: Streamlining Your App
Eliminate Unused Code and Assets:
Regularly audit your codebase and assets to identify and remove anything not being utilized. Unused code and assets can accumulate over time, contributing to unnecessary bloat.
5. Proguard And App Bundles (For Android): Tailoring For Efficiency
Enable Proguard (For Android):
For Android apps, the Proguard tool can be immensely beneficial. It shrinks, obfuscates, and optimizes the code, making it more challenging to reverse engineer and reducing its overall size.
Use Android App Bundles:
Opt for the Android App Bundle format instead of traditional APKs.
It allows Google Play to generate APKs optimized for each device configuration. It ensures users download what is necessary for their specific devices.
6. Tree Shaking (For JavaScript): Pruning Unnecessary Code
Implement Tree Shaking:
For JavaScript-based applications, especially those using frameworks like React or Angular, tree shaking is a technique that involves removing dead code during the build process. This process ensures that only the code necessary for the app’s functionality is included in the final bundle.
7. Optimized Libraries: Choosing Wisely For Leaner Apps
Choose Lightweight Libraries:
When selecting libraries for your app, opt for smaller, more specialized ones over large, comprehensive alternatives. Smaller libraries contribute less to the overall app size and often provide specific functionalities without unnecessary extras.
8. Database Cleanup: Managing Local Storage Efficiently
Optimize Local Databases:
If your app utilizes local databases, ensure that they are regularly optimized. Remove unnecessary data and ensure that the database schema is designed for efficiency, minimizing the storage footprint on the user’s device.
9. Progressive Web App (PWA) Principles: Future-Proofing Your App
Implement PWA Techniques:
For web-based apps, Progressive Web App (PWA) principles can enhance performance and reduce reliance on large app downloads. PWAs leverage web technologies to provide app-like experiences, and their streamlined nature contributes to faster load times.
10. Regular Performance Audits: Ensuring Continued Efficiency
Conduct Regular Audits:
To maintain an efficient app, conduct regular performance audits using profiling tools. This ongoing process helps identify areas for improvement and ensures that the app’s size remains optimized with each update.
In conclusion, optimizing the size of your mobile app is a multifaceted process that involves a combination of coding best practices, asset management, and strategic choices throughout development.
By adopting these practices, developers can create applications that not only meet user expectations but also contribute to a positive overall experience.
Reducing the size of your app is not just a technical consideration; it’s a commitment to delivering a product that respects users’ resources and provides a seamless, efficient, and enjoyable experience.
Original Post- https://www.techspian.com/blog/10-ways-to-optimize-your-mobile-app-size/
0 notes
Text
Markdown to Tumblr Blog Post
Purpose
The main purpose of the code is to convert Markdown text into formatted HTML, suitable for a blog post on Tumblr. Specifically, it enables live Markdown editing with syntax highlighting and automatic HTML generation. The rendered HTML is designed to emulate a terminal-like appearance and comes with syntax highlighting based on your custom classes.
How it Works
Setting Up the Environment
Firstly, the code uses external libraries like CodeMirror for the Markdown editor and syntax highlighting, and the marked.js library for converting Markdown to HTML.
<!-- Include CodeMirror and marked.js libraries --> <script src="https://cdnjs.cloudflare.com/ajax/libs/codemirror/5.62.3/codemirror.min.js"></script> <script src="https://cdnjs.cloudflare.com/ajax/libs/marked/3.0.8/marked.min.js"></script>
Language Mapping
A language map (langMap) is defined to correlate common programming languages to their corresponding CodeMirror modes. There's also a langToTumblrClassMap to map CodeMirror's native classes to custom Tumblr-friendly classes.
const langMap = { 'html': 'htmlmixed', 'javascript': 'javascript', // ... }; const langToTumblrClassMap = { 'keyword': 'npf_color_monica', 'atom': 'npf_color_joey', // ... };
HTML Sanitization
A function escapeHtml is defined to safely escape special HTML characters to prevent HTML injection vulnerabilities.
// Function to escape HTML characters function escapeHtml(unsafe) { return unsafe.replace(/<;/g, "<") .replace(/>/g, ">") // ... }
Custom Markdown Renderer
A custom marked.Renderer() instance is created to override how code blocks are rendered. CodeMirror's runMode is used to syntax-highlight each token in the code, which then receives Tumblr-specific styling.
const renderer = new marked.Renderer(); renderer.code = (code, lang) => { // Implementation... };
Markdown and HTML Editors
CodeMirror is used to create Markdown and HTML editors. The Markdown editor is where users write or paste their Markdown text. As the user types, the HTML is automatically generated below.
const markdownEditor = CodeMirror(document.getElementById("markdown-editor"), { mode: "markdown", lineNumbers: true, });
Real-Time Rendering
Event listeners are attached to the Markdown editor. Any change triggers the marked() function to convert the Markdown text into HTML. This HTML is then displayed in real-time in the "Markdown Output" section.
markdownEditor.on("change", function () { const markdownText = markdownEditor.getValue(); const html = marked(markdownText); document.getElementById("output").innerHTML = html; });
Raw HTML Output
The generated HTML is also shown in a read-only CodeMirror HTML editor, providing the raw HTML output for additional use or debugging.
const htmlOutputEditor = CodeMirror(document.getElementById("html-output-editor"), { mode: "htmlmixed", lineNumbers: true, readOnly: true });
Styling (Optional)
The styling part is entirely optional but adds a visual flair to the output, giving it a terminal-like appearance and enabling syntax highlighting. If you decide to include it, remember to integrate these CSS styles into the custom CSS section of your Tumblr theme.
We utilize custom classes like npf_color_monica, npf_color_joey, etc., which are mapped to different types of code tokens to make the output colorful and more readable. This emulates a code editor experience.
Here's a sample CSS snippet for the class npf_chat:
.npf_chat { background-color: #1E1E1E; /* Dark background similar to Visual Studio */ color: #D4D4D4; /* Default text color similar to Visual Studio */ /* Additional styling options... */ white-space: pre-wrap; /* Ensures that whitespaces and newlines are rendered as-is */ }
Remember, these styles should be added to the custom CSS section in your Tumblr theme to ensure they are applied correctly.
0 notes
Text
Twine Sugarcube 101
AKA, all you need to make a Twine game (I swear to god)
I’ve seen a lot of people go “Twine is too complicated for me :(” and give up before they’ve even started. And that makes me sad, partly because they’re giving up on a really cool hobby, and also because that’s false! It’s absolutely not too complicated for you!
I think the problem is that people look up Twine, see the documentation, and go “There’s way too much there! I can’t learn all that!” Well guess what- you shouldn’t learn all that, at least not yet. As a beginner you can skip pretty much all of this:
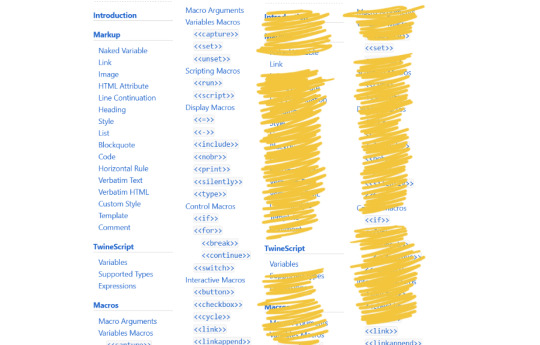
(Ignore <<linkappend>> too, forgot to crop that one out)
That’s a lot more manageable, right? Below the cut, I’ll let you know how to use all those remaining important things to make your story! Warning- it’s quite long! You might want to read it in sections! And while I’ll try to keep it entertaining, it’s also a coding tutorial, so... y’know. Might not be the most exciting read if you aren’t trying to learn Twine.
Welcome to below the cut!
First off, make sure your story format is set to Sugarcube 2. On the right side of the home screen (with all your stories), click format and choose the one labeled “Sugarcube 2.x.x” then open a new story with the green button! Here’s what you’ll see and what it all means:
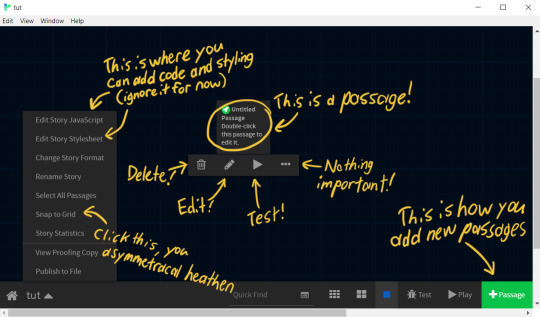
Passages are all like individual web pages that you navigate between to play the game. When they’re linked together they’ll be shown like this:

Anything you write in a passage will just be shown on screen as plain text, no code required! But if you want to make anything more than just one passage with a bunch of text, you’ll have to link passages together with...
Links!
A link is composed of two parts- the text you see on screen, and the name of the passage you’re attaching it to. These are enclosed in [[double square brackets]], with a vertical bar | or a little arrow -> between them. If you want to show the passage name instead of alternative text, you can just put the passage name in square brackets alone! So this in the editor:
[[Visible text|Passage name]]
[[Visible text->Passage name]]
[[Passage name]]
Will look like this in the story:
Visible text
Visible text
Passage name
And all of them will lead to the passage labeled “Passage name.” You don’t even need to create the passage- when Twine sees that you’ve linked to a passage that doesn’t exist, it’ll add that passage for you.
That’s all you need to know! Technically, all you need to do to make a Twine story is add those fancy links between passages. If you add your awesome writing skills, that story will be super cool!
...but you want to do some fancy shit, right? Well let me introduce you to the next step up in complexity,
Variables!
“Variable” is a fun, code-y way to say “a bit of information that can change.” You could say they... vary.
Variables are useful for keeping track of information. If the player chooses to be blonde instead of a redhead, you might want to bring that up again- but you probably don’t want to write an entirely separate story based on that choice, right? So instead you save that information as a variable.
In Twine, variables are written as words with a $ in front of them. So my hair colour variable might be “$hairColour.” If you just write the variable out without any code, Twine will print the information you put into the variable. So if $hairColour is set to “blonde,” this...
She had $hairColour hair.
Will become...
She had blonde hair.
The value in a variable can be a boolean (ie. true or false), a number, or a string (like “blonde” or “any other string of characters”). They can also be fancy stuff like arrays, but we won’t be touching on that.
You can use variables to keep track of a lot of things! For instance...
How much money the player has
Whether a player has a key
What the player’s name is
I keep mentioning the value of a variable or “setting” it, but how do you do that? Well, one way is to add it to a link. If you want a link to set hair colour to blonde, for instance, you could write [[Blonde|Next passage][$hairColour to “blonde”]]. Clicking on that link would forward the player to “Next passage” and set the value of $hairColour to “blonde.”
There is a better way of doing it, however, but we’ll need to talk about...
Macros!
A macro is a snippet of code that runs when you put a special code word inside these <<spiky boys>>. You can write your own macros with JavaScript if you’re smart, find them on the internet if you’re even more smart, or just use the ones that come built in with Sugarcube.
The ones we’ll be talking about, and the ones that are the most important for most Twine games, are <<set>>, <<if>>, and <<link>>.
<<set>>
The <<set>> macro allows you to, you guessed it, assign a value to a variable. For instance, if you want to set $hairColour to blonde... well, that’s all you need to do! It’s just:
<<set $hairColour to “blonde”>>
It’s important to remember with the <<set>> macro that strings (collections of different characters) require quotation marks around them to show the code that it isn’t a number or a true/false value. If you put quotes around a number and try to do math with that variable, you’ll get a big ol’ error message.
If you’re using numbers, you can also use JavaScript operators in place of “to.” Each one will perform a calculation on the variable if that variable is a number, and then replace the variable with the result. If you want to add $5 to the player’s $money, you could use this:
<<set $money += 5>>
The “+=“ will add the number on the right to the variable on the left. “-=“ will do the same for subtraction, “*=“ for multiplication, and “/=“ for division. Easy enough, just don’t forget the = sign after the usual symbol!
By default, the <<set>> macro will be executed as soon as the page it’s on loads. Sometimes that’s useful, but sometimes you would rather the player click a link that sets a variable- like if they choose a hair colour. You might also want the same link to set multiple variables, like subtracting money and giving them an item when they use a shop. How do we do that?
<<link>>
The <<link>> macro is also pretty simple. All it does is create a link, and when that link it pressed it executes whatever is inside of it. Here we’ll be using it with <<set>>, but you can use it with all kinds of different macros and even nest some of them to do really complicated stuff!
As an example, we want the player to click “buy key,” give the player the key, and subtract $5 from their money. Here’s how we do it:
<<link “Buy key”>>
<<set $key to true>>
<<set $money -= 5>>
<</link>>
The text the player will click is in quotation marks, and after all of the macros we need to execute we have to close off the code by adding <</link>>. Easy, right?
But other than printing them on the screen, what can you actually use those variables for? Well, for that we’ll be using...
<<if>>
The <<if>> macro is my favourite, hands down, because it’s an easy way of accomplishing hard stuff. Simply put, <<if>> will check if the thing you asked about is true, and if it is, it will do whatever you put inside of it.
Here’s a simple example:
<<if $key is true>>
[[Use the key|Progress]]
<</if>>
Whatever is inside the <<if>> macro will be executed if the “if” statement is true. In this case, the link “Use the key” will be printed on the screen only if the player has the key. This also applies to code- if you put a <<set>> macro inside, that macro would only set a variable if the player has the key.
Now here’s a more complicated example, to show everything the <<if>> macro is capable of. Here we also want to check if they’ve already opened the door, and display alternate text if they have no key and the door is locked.
<<if $key is true>>
[[Use the key|Progress]]
<<elseif $doorOpen is true>>
[[Walk through|Progress]]
<<else>>
You need to find a key.
<</if>>
I’ll break it down line by line to tell you what each thing does.
<<if $key is true>>
This line is the only necessary one- it checks whether $key has been set to true. You can check for any value that a variable can be, like a number, true/false, or a string. You can also check for other things with this macro- for instance, “isnot” will check that the variable isn’t equal to the value on the right. “gt” or “lt” will check if the variable is greater/lesser than the value on the right, and “gte” or “lte” will check if it is greater than or equal to the value.
<<elseif $doorOpen is true>>
This line allows us to check for something else within the same <<if>> macro. Once the game has checked the original <<if>> and found that it is false, it will move on to checking each <<elseif>> until it finds one that is true. You can have as many <<elseif>>s as you need, and they can check the same variable or different variables, but only the first true one will be executed! And, of course, you can’t use <<elseif>> on its own- it’s stuck to the <<if>> macro!
<<else>>
This line is the last resort- if the original <<if>> and any <<elseif>>s have all been false, the game will execute whatever is after <<else>>. Because of this, there can only be one <<else>> line within any <<if>> macro! If you don’t have an <<else>>, nothing at all will be executed, so whether you include one depends on the situation.
<</if>>
This closes off the <<if>> macro. Nothing special, but very important! Put it after the last piece of code or bit of text you want the macro to control.
Phew. That’s it! That’s all I wanted to show you!
Now, HOMEWORK!
Okay, not homework, just practice. Here are some things you can try building to practice all these tools and get comfortable with how they work!
A store system with different items for different amounts of money
A character creation screen, followed by a description of your character (with variables!)
A puzzle that requires you to choose the right answer to proceed
If you have any trouble, need to ask any questions, or if something in this tutorial wasn’t clear to you, please let me know- you can DM me or send me an ask anytime and I’m happy to answer any Twine questions you have. I hope this was of use to you, and have fun making games <3
#told you i was making a tutorial!#not crosshollow#tutorial#game dev#twine game#twine#interactive fiction#gamedev
2K notes
·
View notes
Text
Friday Special #7
January 9th, 2021
So it has come to my attention that when people talk about RPG Maker the series, many aren’t aware of how far back the series goes.
Did you know that series dates back to almost thirty years?
That’s right, next year will be the 30th anniversary of RPG Maker!
So why don’t we have a history lesson into arguably one of the most important franchises in gaming history?
Alright, where does the story begin for this iconic series?
According to sources, there has been games similar to RPG Maker that were made by ASCII (the original company behind RPG Maker) and that were released as far back as 1988, with the following titles:
Mamirin (1988)
Dungeon Manjirou (1988)
RPG Construction Tool: Dante (1990)
Dante 2 (1992)
Chimes Quest (1992)
The very first official RPG Maker title came in the form of RPG Tsukūru Dante 98, released on December 17, 1992. This game, along with its 1996 sequel RPG Tsukūru Dante 98 II, was originally made for the NEC PC-9801 Japanese home computers at the time. It was originally made when ASCII pulled from other games (listed above) and combined them together to create a RPG-making development title with its own toolkit. The genre of RPG specifically was thanks to the rise of JRPGs in recent years like Dragon Quest and Final Fantasy to name a few.
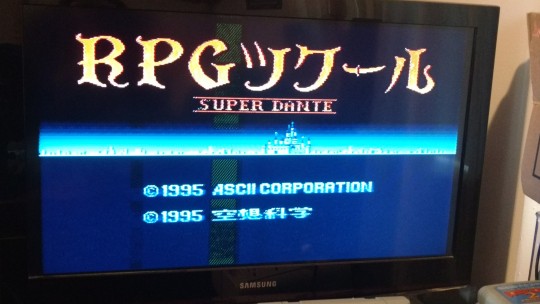
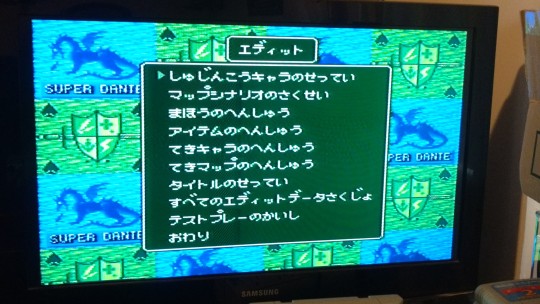
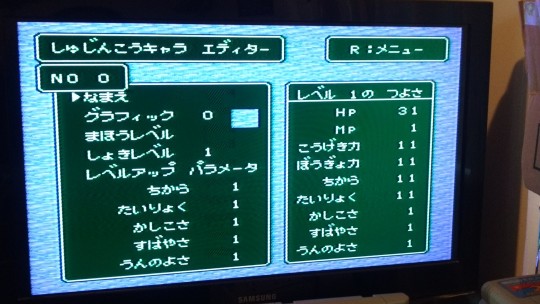
The next major release of RPG Maker was in the form of RPG Tsukūru: Super Dante in 1995, which marked the very first time that the series has landed onto a console. The console was the Nintendo Super Famicom and it was later broadcasted a year later using the Satellaview service. While it did exhibit some restrictions in terms of content due to system limitations, it was famous for providing hundreds of character, monster and scenery assets with color swap palettes to save on memory in the cartridge as well as designing the stats of characters and monsters pre-determined by the player. It was said that the game was popular with players but sources are limited about actual reviews. RPG Tsukūru 2 is the sequel and it was released in 1996 on the Super Famicom as well.
Windows saw the release of the third installment with RPG Tsukūru 95, which was released in 1997 and was the first of many RPG Maker titles for Windows. Unlike its predecessors, it boasted higher resolution in sprites and tilesets as well as higher screen resolution. It also has the honor of being the first version to have an unauthorized English translation and release due to demand. Also with this version, the number of party members was boosted to 8 people with the first 4 acting as the main battle party. RPG Tsukūru 95 Value! was released not long after with the added bonus of having Windows XP support, which was new at the time and very valuable.
So when did the West finally receive an official version version of RPG Maker?
On November 27, 1997, Enterbrain released the following title RPG Tsukūru 3 for the original Playstation and chose to release the software simply as RPG Maker in the West three years later on October 2, 2000 under Agetec. This was the first time the West would finally receive a version of RPG Maker and experience the magic of RPG development, but it was reported that a limited run of copies were released outside of Japan. It was also one of thirty games that utilized the now-rare Playstation Mouse (which is usually an arm and a leg to import). Players got to customize their own assets using the Anime Maker that was also built into the game and, like the original Super Famicom versions, utilized color-swap palettes to save on memory. Another cool feature that was a first for the series was saving your created game onto a memory card so that you could share your creation with your friends.
One of the most beloved and popular versions of RPG Maker is next on the list and it is RPG Tsukūru 2000 for Windows on April 5, 2000. Despite the popularity, it was Japan-exclusive and it featured a lower resolution for graphics and assets overall than its RPG Maker 95 predecessor. Despite this, it boasted more functionality with unlimited sprite sheets and tilesets.
The last in that trio was RPG Tsukūru 2003, first released only in Japan in 2003 before being released worldwide in 2015. Improvements to this version included the side-view battle system that was popular in Final Fantasy, and interchangeable resources. From this point, the development company Enterbrain would take over RPG Maker as it was part of the ASCII company.
Starting with the released of RPG Tsukūru 5 on the Playstation 2 in 2005, Enterbrain was starting to look into developing the series for an international audience of players. They would beginning to craft titles that are now iconic in the RPG development community, with the first of these releases being RPG Tsukūru XP (RPG Maker XP as it was known world-wide) released on Windows in 2004. While many of the simplified features have been removed from this version, it was the first RPG Maker game to use Ruby, a type of programming language first seen in 1995, and it was the first title to distribute assets online amongst the community thanks to the rise of the Internet. It allowed greater control over sprite size other gaming aspects, which helped it become more versatile than previous titles. However, a drawback is the steep learning curve, which was intimidating to new players. It was released to Steam in 2015.
The next modern RPG Maker title was the release of RPG Tsukūru VX (RPG Maker VX as it was known world-wide) in Japan in 2007, world-wide in 2008. It has the one-up over XP for its more user-friendly layout and faster framerate of 60fps over XP’s 40 fps. The programming was completely done over to be more accessible in scripting and the battle systems were now similar to Dragon Quest with a front-view battle system and detailed text. Because of these aspects and other improved features, it became a popular choice for modern developers since release. However, one of the biggest drawbacks was the lack of support for multiple tilesets when mapping that frustrated players. It was released to Steam in 2016.
Right after that, RPG Tsukūru VX Ace (RPG Maker VX Ace as it was known world-wide) was a direct sequel to the version mentioned above. Described as an “overhauled version of RPG Maker VX”, it removed the multiple tileset issue that plagued players in the previous version and re-introduced battle backgrounds during battle scenes. Magic and skill systems were re-worked to have their own recovery and damage formulas in the programming, and a new set of music tracks were accompanied in the database files. It was released to Steam in 2012.
Having the distinction of being released by Degica for the first time world-wide, RPG Tsukūru MV (RPG Maker MV as known world-wide), underwent quite a few adjustments by introducing multiplatform support as well as side-view battles and high resolution features and assets. For the first time, JavaScript replaced Ruby as the default programming language. Players also saw the return of layered tilesets, which were missing from the previous installments. Not only was it released for Windows, but also for PS4 and Nintendo Switch (A XBox One version was planned but unfortunately scrapped), giving players new ways to share games. It was released to Steam in 2015.
The newest installment to the famous series is RPG Tsukūru MZ (RPG Maker MZ as known world-wide), and it was just released last year in August of 2020. Reviews for the game were mixed as players noted that the trailers leading up to release were very similar to RPG Maker MV. It did have some positively-received features such as autosave functionality and XP-style autolayer mechanics. It was released to Steam in 2020.
So with the history side taken care of, what about some of the most iconic games ever made using the software?
Good question! Given the extensive list of successful games to come out of RPG Maker, that will be a separate Friday Special so I can cover them more in-depth. Maybe next week perhaps?
So there you have it, a comprehensive history of RPG Maker!
(Now, there were some older Japanese titles that weren't mentioned because of lack of sources, I do apologize. I also wanted to stick more to the major installments of the franchise itself.)
Thoughts From The Head
I was formally introduced to RPG Maker by some mutuals of mine on Discord a few years ago when I expressed interest in wanting to create scenes like a movie of sorts. My software of choice is RPG Maker VX Ace as it was suggested to me for being better at creating events than any other version. It's understandably intimidating at first, especially for newcomers, but there are hundreds of tutorials on Steam, Youtube and all over the internet.
I also have other copies of RPG Maker, including the PS1 version of RPG Maker and even RPG Tsukūru: Super Dante for my Super Famicom that I just received a few days ago! It's definitely wild how much the series has grown and improved upon over the years.
From what I have been recommended by friends who are long-time players of this series, either go for RPG Maker MV (if you're interested in mapping) or RPG Maker VX Ace (if you're interested in creating events). From what I have seen, those two are some of the more popular choices. In terms of platform, always go for Steam (and get them on sale when you can) because you will have better accessibility and it's more user-friendly than the console versions. The abundance of community-generated assets also help.
To end this post, here's some pics from RPG Tsukūru: Super Dante!


#been wanting to make this for a while#hope you learn some new things!#my voice!#friday special#gif#gaming#retro gaming#irl
15 notes
·
View notes
Text
javaScript Replace () | javaScript String Replace All
javaScript Replace () | javaScript String Replace All
Metode ganti string Javascript (). Dalam tutorial ini, kami akan menjelaskan metode javascript string.replace () dengan definisi metode ini, sintaksis, parameter, dan beberapa contoh.
Ganti String JavaScript ()
Definisi: – Metode JavaScript string replace () mencari string untuk nilai yang ditentukan atau ekspresi reguler, atau kata kunci, dan mengganti string pencarian yang cocok ke string yang…
View On WordPress
#javascript replace ()#javascript replace all instances#javascript replace all spaces#javascript replace character#javascript replace character in string#javascript replace function#javascript replace regex#javascript replace special characters#javascript replace text#javascript replaceall
0 notes
Text
“An act of creation begins with an act of destruction.”
A single light-spot. A portrayed illusion. A formless figure behind the curtain. A character to build. A captain.. a quartermaster.. a lost cause.
Alone.. in your cabin.. far from your crew. A missing eye. A story to tell.. A sequence of dementia.
When I first played the first Layers of Fear game I was mesmerized. Portraying a mental illness in a video-game and having the opportunity to live the character’s participation, decisions, visions, illusions, despair, hallucinations, regrets, sadness and hatred was quite an experience.
The second game came as a sweet easter-egg inside one of the horrible rooms in the basements from Observer’s main building. Then I saw the trailer for Project Melier, which became the materialization of Layers of Fear 2.
A horror, first-person adventure-exploration game with a vivid narrative alignment and some puzzles to make the story whole – Layers of Fear 2 brings in front an actor who is trapped inside an internal crisis of building that one special character which he always was destined to portray.
He finds himself on an ocean-liner, working for a hard-to-please director, who never shows his face but dictates disaster through the schizophrenic episodes of the main character’s struggles. As per how things work in the Layers of Fear universe, each turn could potentially lead to another path, closed doors hide secrets and just behind you there is a disfigured shadow ready to consume raw flesh.

You start exploring the ship, noticing that a voice, like a supernatural force is leading you towards accomplishment. But the voice is no friend of yours, and soon you discover that your surroundings are rotten paintings of regurgitated nightmares.
The game is structured into five acts: The Unmooring, The Hunt, Bloody Roots, Breath and Forever. Each of these sections lets you build your character through various choices. The story can be consumed through the game-play, the director’s and the narrator’s speeches, through phonograph cylinders, the movies you collect and posters, letters and documents.
The first act takes you throughout various locations on the ship, before entering the stage where the director demands a first choice – shoot one of the dummies (the male or the female). Throughout the game, real people were replaced with dummies – depicted as tortured beings, dead persons or other characters from the narration.

There are more than 20 riddles and puzzles to be solved in order to continue with the story.
Each act has it’s own mysteries to be solved in order to create the character’s path. Some are quite easy to solve, others require a bit of thinking and further exploration, consulting notes or paying attention to the voice-overs of the director.
Once you get to know your surroundings you will become part of an existence into multiple dimensions, you will fill the stories of other characters, you will discover the tragedies that occurred on board of the vessel.
I’ve finished the game twice and each time I spend time just to explore all the areas, sit and listen to the atmospheric noise inside the cabins and sections of this world. I did encounter two jump-scares that managed to get to me and also listened daily the soundtrack of the game, which is absolutely amazing. Arkadiusz Reikowski did again a great job with this game too.
youtube
As the story progresses, you find yourself into deeper and darker corners, without a means to escape. The only way out is down, down into the abyssal conjunction of art. Below are some more screens from the game’s great corners of darkness.
This slideshow requires JavaScript.
Layers Of Fear 2 [Conceptual Review] "An act of creation begins with an act of destruction." A single light-spot. A portrayed illusion. A formless figure behind the curtain.
7 notes
·
View notes
Text
WebAnimator Plus Version 3.0.4 Incl. Full Crack Free Version Latest 2019 Free Download:
WebAnimator Plus Crack is a special product of the Incomedia brand that provides the ability to offer rich animations with a large number of effects and features. You do not need advanced technical training, and knowledge of HTML or other programming languages works with this application.
With Web Animator you don’t need additional instructions since everything is clear and simple. With a flat and easy-to-use interface, you’ll be happy to edit your videos and other multimedia content.
If you want to create animated web elements yourself (such as slide shows, product presentations, banners, buttons, mini-games or graphics to add headers or menus), WebAnimator Plus is the animation software that’s right for you.
This program is an advanced program with a simple user interface. Help design web animations in HTML5. This program is best for beginners who want to start web animation. You can use this program without having special skills. With Web Animator, you can create creative animations for your website and online store without using Flash add-ons. It offers a live preview that allows you to see what you have done. With this program, you can design, develop and manage your animations quickly and easily.
You don’t need to learn or use HTML code, and you don’t have to be an experienced animator. When working with WebAnimator Plus, you will see everything while building it and use an intuitive interface with all the tools you need to design, develop and manage your animations quickly and easily. WebAnimator Plus comes with a wide range of tools, including multimedia objects, timelines and keyframes that you can add to your scenario with a simple drag and drop. Templates, special effects and live animations are ready to use. Each animation is integrated into a scene where all the necessary objects can be taken to the stage with a simple drag and drop. It is equally easy to define the properties of an object and add the actions that animate it. WebAnimator Plus provides programmers looking to create more complex animations with a built-in JavaScript syntax highlighting editor that allows them to write their own code. A variety of API allows you to access and manipulate all the elements in your animation.
WebAnimator Plus [v3.0.4] Full Version Free Download:
If you wish, you can use the templates included with WebAnimator Plus to streamline your animations. Simply add your content to the template you have selected to create professional slide shows, product presentations and more. Animations created with WebAnimator Plus are ready to use instantly and can easily be added to websites and online stores.
webanimator plus free download
Do you want to generate traffic and improve your online sales? Improve your website, presentations and banners with animations and effects that capture your audience. An improved user experience attracts new users and transforms them into potential customers. Sharing your knowledge is the best gift you can give your students. That is why we have created products that are as striking as possible to give your students the opportunity to reach their full potential. WebAnimator for PC is the tool you didn’t know you wanted. You can use it to create funny gifs for your friends or to publish personalized banners on your website. Are you a developer? Access all WebAnimator functions and integrate the API into your projects. WebAnimator Plus creates animations without Flash. Instead, it uses more advanced technologies such as HTML5, CSS and JavaScript, and you can be sure that your animations will be displayed correctly in all browsers, as well as smartphones and tablets (including iPhone and iPad).
WebAnimator Plus is a free trial application of the “Animation Tools” subcategory of the “Graphic Applications” category. The application is currently available in English, German, Italian and was last updated on 01.10.2014. The program can run WinXP, WinVista, Win Vista x64, Win7 x32, Win7 x64, Windows 2000, Windows 2003, Windows Vista Ultimate, Windows Vista Ultimate x64, Windows Tablet PC Edition 2005, Windows Media Center Edition 2005, Windows Vista Starter and Windows Vista Home Basic, Windows Vista Home Premium, Windows Vista Business, Windows Vista Enterprise, Windows Vista Home Basic x64, Windows Vista Home Premium x64, Windows Vista Business x64, Windows Vista Enterprise x64, Windows 8. WebAnimator Plus (version 3.0.4) has a file size of 24.75 MB and can be downloaded from our website. Simply click on the green download button above to get started. So far, the program has been downloaded 94 times. We have already verified the download link for security. However, for your own protection, we recommend that you scan the software downloaded with your antivirus.
webanimator plus free download
Key Features Of WebAnimator Plus Serial Key: Create animated buttons. 4 templates included. Background animations. Create Animations. Work with keyframes. Add multiple scenes & timelines Create Web Animations in HTML5 . Embed audio and video files. Create custom JS functions & API access. 4 templates included. Timing. Live Animation. Timing Functions . Background animations. Export to Gif. Import images of any format (.jpg, .png, .gif). Compatible with WebSite X5 site builder. Animated buttons. Work with keyframes. Save and Embed HTML5 code. Add multiple scenes & timelines. Additional Features and Highlights: Let your imagination fly: Whether you’re working on a video presentation, a creative website or a logo for a customer, you don’t have to be an expert to create something unique. Relax and let your creativity fly to impress customers, users and friends. Simple user interface: the program has an intuitive interface, so you can easily create your own animations. You can design and publish your animated content in HTML5 by managing events. Drag and drop: use the simple drag and drop function to place objects and divide their content into individual scenes. Add keyframes to the timeline as a movie director would. Template: Learn how to customize your website in minutes with animation presets and integrated effects. Choose a template: the rest is done by the tool. Receptive design: application video animations and interactive objects work very well in desktop and mobile browsers. Live wallpapers: Would you like to improve your website? Try to animate the background or foreground elements, or add a waterfall effect to the objects. Looped animations are an easy way to add many characters. Banners, menus, buttons: get attention with animated menus, icons and buttons, and guide them to the desired location. Create banners with Web Animator, download the HTML5 code and add it to your website. Interactive presentations: with HTML animations you can present your ideas or products effectively. Make the most of each project by actively involving your audience. Graphical user interface: The user interface has a new flat design and integrated panels instead of the previous overlapping appearance. Video Object: The option to insert a video was added simply by entering the YouTube URL. Receptive animations: you can make your animations receptive, so that they automatically adjust to the dimensions of the Internet browser window. Google sources preview: You can now view selected Google sources directly from the stage as just a preview of the external browser. Add objects: You can add objects directly with one click without having to drag the toolbar icon to the stage. Animation properties: In the Properties menu, you can see how the properties change when an effect is activated. Text editor: by highlighting the syntax in the editor, you can now enter text. Image library: The library has more than 1 million royalty-free images that you can import directly into your projects. Vector graphics: the option to import SVG vector graphics was added. New effect presets: 5 new effect presets were added to those already available. Internal engine: Chrome to replace its internal rendering engine to increase speed and improve design capabilities. Copy / Pass Management: You can now copy and paste key boxes and objects with associated key boxes. Shape object: You can use more shapes than just the rectangle and circle and select from a library of shape presets. webanimator plus free download
Guide to Crack, Activate or Register WebAnimator Plus Serial Key: Uninstall the previous version completely with IObit Uninstaller Disable antivirus and internet connection (recommended) Install the program and exit it Run Crack & Crack It (indicated in the Crack folder) Ready to enjoy. Incomedia WebAnimator Plus Crack uses JavaScript, CSS and HTML5 instead of Flash, so we can be sure that our animations are displayed correctly and not everywhere. It works on all current browsers, as well as smartphones and tablets.
1 note
·
View note
Text
Twine Sugarcube 102: Stats n’ Stuff
Finally, the long awaited sequel to my original Twine tutorial! Long awaited by me, because I’ve been meaning to make another one but I just haven’t gotten around to it. If you need a refresher on what that tutorial covered, feel free to go check it out here. But now, it’s time to talk a little bit about stats!
As usual, the tutorial (below the cut) should be perfectly beginner friendly and explain everything you’ll need to know to implement this into your game, although it might be a bit long! It’ll also include a bit at the end telling you how to install and use custom macros. Enjoy!
In Twine, there’s no distinct thing called a ‘stat.’ You store stats the same way you’d store information about what the player chose to eat that morning or whether they picked up an item. Using variables. Variables, if you don’t recall, are little pieces of information that can vary over time. In Twine, they’re represented by a $ before the variable’s name- so $health might be how you track a player’s health, and $hasKey might be how you track whether a player has a key.
Setting Stats
So, let’s say we want to track a stat called.... $stat. Well, first, we’re going to have to set that stat. Sugarcube has a bunch of “special passages” that do special things in the game, such as adding text or links to the sidebar. In our case, we’re looking to name a passage “StoryInit.” Whatever code is contained in this passage will run silently in the background as soon as the player opens the game, which means it’s great for setting defaults.
This is where you’ll decide what numbers you want to use to track stats. You might go for something like numbers from 0 to 100, but personally I’m going to use numbers from 0 to 1 (for easier compatibility with the meter macro I’ll introduce later on!). We’re going to start halfway through, as a sort of “neutral” that the player starts with. So, in the StoryInit passage, we’ll add this:
<<set $stat to 0.5>>
Simple enough. But how do we edit that number? Let’s say we give the player two options to proceed, with the first increasing $stat and the second decreasing $stat. All we have to do is add a setter to our link. This is what normal links in Sugarcube look like:
[[Option 1|Passage1]] [[Option 2|Passage2]]
To add setters to those links, we just have to insert two square brackets between the last set and add what we might add to a <<set>> macro. So like this:
[[Option 1|Passage1][$stat += 0.1]] [[Option 2|Passage2][$stat -= 0.1]]
In case you don’t remember, the “+=“ means that the engine will add 0.1 to the current value of $stat, and then replace $stat with the result. So if a player chooses option 1, their value of $stat will now equal 0.6, and if they choose option 2, it’ll equal 0.4.
Using Stats
Now that we know how to change a player’s stats, though, how are we going to implement it? Well, of course, we can use the <<if>> macro to show different text to players with different stats. Let’s say we want a character to say two different lines of dialogue based on whether the player has 0.6 or more in a stat or if they have less than that. We might do something a bit like this:
<<if $stat gte 0.6>>\ “This is a line of dialogue!” <<else>>\ “This is another line of dialogue!” <</if>>\
“gte” means “greater than or equal to,” the same as >. If the stat is greater than or equal to 0.6, the game will display that line of dialogue. If not, the macro will continue down and display what’s under the “else” instead.
That’s all well and good, but if you’re including stats in your game, you probably want to implement more than just cosmetic changes. A common idea is to make certain options only available to players with high enough stats, or make an action’s success or failure depend on their stats. To achieve that, we’ll use a combination of links and the <<if>> macro.
First, here’s an example where the link will bring you to a different page depending on your speed stat. It will display the link “Run!” and the <<if>> macro will test whether the player has a speed of 0.6 or higher. If they do, they will be redirected to the passage “Escape.” If not, they will be redirected to the passage “Caught.”
<<link ‘Run!’>> <<if $speed gte 0.6>>\ <<goto ‘Escape’>>\ <<else>>\ <<goto ‘Caught’>>\ <</if>>\ <</link>>\
Here’s another example that uses similar methods to tell whether you’re good enough, but instead of redirecting to different pages, the option will only be available if you’ve got the right stats.
<<if $speed gte 0.6>>\ [[Run!|Escape]] <</if>>\
The problem with that sort of method is that if players don’t know they missed out on something, they can be less likely to replay the game. So instead, we can try putting grayed out text where the link would be, indicating to the player that they need better stats to proceed. Remember to add a class like “gray” or “grayed-out” to your stylesheet to change the colour of that text. We’ll also add a little indicator to the link to show them what stat they need to improve to proceed in this way.
<<if $speed gte 0.6>>\ [[Run! (Speed 60)|Escape]] <<else>>\ <span-class=‘grayed-out’>Run! (Speed 60)</span> <</if>>\
But how does a player know if they have a high enough stat to proceed? Well, you can always display it on the screen by just typing $stat. That will show the pure number, meaning “$stat%” would show “60%” if $stat were set to 60. But if you want something fancier, you can instead use a meter! And I’m going to use this as an opportunity to explain...
Installing and Using Custom Macros
If you want to do something cool that isn’t part of the basic Sugarcube format, chances are, somebody might have made a custom macro for it! In this case, we’ll be using the Meter Macro Set by ChapelR.
These custom macros are surprisingly easy to install. All you need to do is open your game’s Javascript (in the same menu as the stylesheet). In the case of this macro, we’ll click the “minified” option, copy it, and paste it all into our Javascript file. With some macros you’ll also need to add code to the stylesheet, but not this one. Installation done! Now Twine knows how to create meters!
Most custom macros are pretty easy to use and will list instructions below- typically you just have to add some variables in and it’ll work right out of the box. This one is a bit harder and requires some prep, so let’s go through it step-by-step.
Remember StoryInit? Open that back up again, cause we’ll need to use it. By running the <<newmeter>> macro in StoryInit, it’ll set up the meters we’ll be displaying on screen.
<<newmeter 'Stat' $stat>> <<colors 'gray' 'gray' 'white'>> <<sizing '50%' '2em'>> <<label Stat black center>> <</newmeter>>
So what we’ve created there is a meter that tracks the $stat variable. It is titled “Stat” so that we know how to reference it later. The colours section determines what parts of the meter are different colours, the sizing determines how wide and tall it is (50% wide, 2em tall), and the label section creates a red label in the center of the macro that says ‘Stat.’ All of those sub-sections are optional, so if you don’t need a label or you’re happy with the default size, feel free to leave them out.
Now whenever we want the player to see that meter, such as in a dedicated stats page, we’ll just have to type this:
<<showmeter ‘Stat’ $stat>>
And voila, we have a meter!

...admittedly, it’s not the nicest looking meter. But with these tools you can surely make something magnificent!
I hope this tutorial was helpful! This topic is the one I see asked about the most, so I figured I would step in and see if I could give people a hand with it. Of course, as always, if you have any questions about what I talked about here or about any other Twine-coding-related stuff, feel free to send me an ask and I’ll be happy to give you some pointers! Twine is a really fun program to code with, and I hope this inspires some folks out there to give it a shot as well :’)
481 notes
·
View notes
Text
Url Encoder / Decoder
For optimum performance, use a URL encoder and decoder. Now, HTML decoding or javascript URL encoding is simple.
URL Decode Encode is a simplistic web application that does exactly what it says: it quickly and easily decodes from URL encoding and encodes into it. You may easily URL-encode your data or decode it into a format that can be read by humans.
You can encode or decode a string of text using the free URL-encoder-decoder tool.
Every website owner must make use of a tool for free URL encoding and decoding. Website URLs must be uniformly encoded for compatibility to be achieved globally. There are two methods for handling the large mapping array of characters used in URLs: first, encoding the text of strings into a series of bytes using the UTF-8 encoding, and second, changing every byte that is not an ASCII letter or digit to HH%.
Best URL Encoder/Decoder.
Best URL Encoder Decoder allows you to simply encode or decode any string of characters by placing it in the blank text box. And once users click the "Submit" button, it will be encoded/decoded by the guidelines of the Uniform Resource Identifier. When preparing any kind of media or data, such as when submitting HTML form data, the encoding/decoding tool is used. The encoding system is known as percent-encoding.
https://importantseotools.com/url-encoder-decoder
Online URL Encoder Decoder tool is very helpful for adding special characters to a URL parameter.
When adding special characters to a URL parameter, commonly known as percent-encoding and often referred to as it is quite helpful to use an online URL Encoder Decoder tool. Replace any forbidden characters with the percent sign (a%) and an additional pair of hexadecimal numbers during the URL encoding process. The source of an email campaign or newsletter can be determined via URL decoding.
0 notes
Text
New Year, New Beautiful Homes of Instagram
Hello, my wonderful friends! How are you in 2019? Did anything happen? Did a switch turn on, bringing more Light into your heart during this first week of this New Year? It’s been terribly cold, gloomy and dark out there. The weather is miserable and it’s easy to feel the winter blues insistently knocking on my door, but I am not opening it… instead, I decided to take a small break during the Holidays to do what I love the most in life; which is spending time with my family and work whenever I feel inspired. I took a small break and I am finally feeling like myself again… nothing makes you feel more centered than being able to slow down and hear your own thoughts, and that was exactly what I did.
During this New Year, I certainly hope to continue to listen to what’s inside of my heart and that goes to what I want to share with you here on Home Bunch. I have to be completely honest with you guys. I am tired of cold homes, everything looks the same these days. Although I will always bring the latest trends to my readers, one of my main goals this year is to share homes that feel more like real homes, homes that have character and feel loved, and that starts with this year’s first “Beautiful Homes of Instagram”. Please, get to know Erin from The Heart and Haven. She’s someone that will inspire you to transform your current home into your “home-sweet-home”!
Hi, my name is Erin @theheartandhaven and I’m a home renovator, home décor enthusiast and mother. I have always enjoyed staring at all the pretty things, but I never realized how much joy I would find in creating them until my husband and I bought a 1950s fixer upper about five years ago.
My husband and I are high school sweethearts from the Jersey Shore. We dated long-distance throughout college and upon graduation, we decided to move across the country to start our life together in Los Angeles. I worked in television before deciding to become a stay at home mom when I had my first son. I now have two boys, ages 7 and 4.
After getting married, we purchased a newly-built, builder-grade condo in Los Angeles and while the finishes were not exactly my taste, I was excited to just have a place to call our own and honestly never thought about changing anything. Two years after having my son and really craving some private outdoor space to have him run around, we searched our neighborhood to find a house. We found a corner house only a few blocks away on a beautiful, wide tree-lined street. It was custom built in 1950, and nothing had been updated since then. The house was head- to-toe covered in orange wood (floors, ceilings, walls, you name it!). The bathrooms had parquet linoleum, the staircase had scrolling wrought iron and each room had ceiling fixtures hanging so low that it made the 8 ft. ceilings feel much smaller. Having no reno experience under my belt, I still felt that this 2400 sq. ft. house had potential. Thus began our renovation journey, and we lived through all of it! I don’t think I knew what my style was when we started renovating our home and decisions often had to be made quickly. There are some things I would change, but I have learned so much throughout this process. And five years later, I think I have found my casually modern, beachy-boho style through decorating it , and it has truly become a passion of mine.
New Year, New Beautiful Homes of Instagram
Our kitchen was the last major renovation. After living in what felt like a wooden cave, I wanted our new kitchen to be light and bright. We took down the wall that separated the kitchen from our playroom to open it up. I had always wanted an island but, due to building codes, the island would have been very small. So, I adjusted my vision and was able to have the counter space and seating area by making it into a peninsula instead.
Peninsula measures 6 ft x 4.5 ft. and counters are Salt White Marble.
Paint Color: Valspar Mountain Mist.
Kettle: Crate & Barrel.
“Let’s Stay Home” sign: Here.
Runner & Flooring
This pink kitchen runner is one of the cheeriest pieces of home décor I own. I paired it with the wallpaper to make our kitchen more playful.
Runner: Here.
Flooring: Wickham Hardwood, Maple (color Walnut) – similar here, here & here.
Cabinet Paint Color
Kitchen cabinets are Maple, painted Benjamin Moore White.
Canisters: West Elm.
Backsplash is Daltile Subway Tile, 3×6 in Arctic White – similar here.
Appliances: Thermador Range, GE Café Series Refrigerator.
Marble Clock: Sur la Table.
Cabinet Cup Pulls: Hickory Hardware.
Sink & Faucet
While it might not be the most picturesque faucet, I love how we can turn the faucet on and off without dripping on our marble counters. Definitely a functional win!
Kitchen Faucet: Faucet, Moen Motionsense Chrome.
Kitchen Sink: 33” Farmhouse Fireclay Sink.
Kitchen Towel: Kate Spade.
Lighting & Barstools
When choosing the pendants over our peninsula, I didn’t want to compete with the chandelier in the nook. These cone pendants with their antique brass interior echoed the glam of the chandelier without overwhelming the space.
Barstools: Serena & Lily.
Lighting: Visual Comfort – 15 Inch Wide.
Utensil Holder: West Elm.
Breakfast Nook
I loved the idea of a breakfast nook and wanted to make it feel special, so I went with wallpaper and a statement chandelier. I think the wallpaper adds so much personality to this otherwise all white kitchen. I then paired it with a more rustic feeling table and chairs to contrast the crisp, geometric design.
Table is RH – similar here, here, here, here & here.
Chairs are RH – similar here & here.
Pillows: here, here, here, here, here & here.
Chandelier & Wallpaper
Wallpaper is from Serena & Lily in Denim.
Chandelier is Visual Comfort.
Playroom
After taking down the wall between the kitchen and the playroom, this is now our view. Since this is the room my sons hang out in the most, it had to be functional for them but also flow with our kitchen.
Sofa is from HD Buttercup
Window Treatment throughout home are plantation shutters by American Vision Windows
Paint Color
The barstools had to become part of the design for the playroom because of the open concept, so going slightly more coastal in this room with the oversized beach print and using blue accents in the room helped tie things together.
Paint color is Valspar Mountain Mist.
Inspired by this Look:
!function(d,s,id){var e, p = /^http:/.test(d.location) ? 'http' : 'https';if(!d.getElementById(id)) {e = d.createElement(s);e.id = id;e.src = p + '://' + 'widgets.rewardstyle.com' + '/js/shopthepost.js';d.body.appendChild(e);}if(typeof window.__stp === 'object') if(d.readyState === 'complete') {window.__stp.init();}}(document, 'script', 'shopthepost-script');
JavaScript is currently disabled in this browser. Reactivate it to view this content.
Sofa
Some might think a white sofa and children do not go together. And they would be right! However, I love the crisp look of a white sofa so I chose a slipcover that can be removed and washed.
Sofa is from HD Buttercup.
Ottomans: Etsy.
Artwork: Minted.
Rug: Pottery Barn.
Mudcloth Pillow is by Bryar Wolf – similar here.
Playroom Media Center
Not fancy or even perfectly styled, but that is mom life! This media center holds all the extra toys and books and games.
TV: Samsung.
Gray bins are from IKEA – similar here.
Media Center: Pottery Barn.
Knobs: Restoration Hardware Dillon Knobs.
African Wall Baskets: Etsy.
Desk
Both the desk and window-seat are IKEA hacks. I upgraded the desk by swapping out the hardware and I made the IKEA Kallax bookshelf-turned-window seat feel more custom by adding a bench cushion.
Rattan Mirror: Pottery Barn.
Vintage rug found on Etsy – similar here.
Window
Pillows and bench cushion by Tonic Living – Similar Bench: here (on sale!) & here.
Bins found at Target.
Living Room
Our sectional is actually a recliner and the chaise lifts up for hidden storage. I love how functional it is for our family.
While there is still updating to do to this room, we recently removed the metal stair railings and replaced it with a wooden banister. Painting and staining the banister was a beast! But it was well worth it.
Stair posts are Benjamin Moore Super White and stain was a custom mix.
Artwork on wall by @sarahcnightingale.
Sofa: West Elm.
Paint Color
Wall paint color is Benjamin Moore London Fog.
Rug is discontinued – similar here.
Seagrass lidded basket: here – similar.
Fireplace
Choosing a split-faced stone for the fireplace is still one of my favorite design decisions.
Stone: Wayfair.
Chair: West Elm.
Moroccan Leather Pouf: here.
Fireplace Sconces: Pottery Barn.
Shelves
Believe it or not, farmhouse style was my first love.
Shelves are IKEA and I spray painted the brackets Rustoleum Hammered Copper.
Grid Photo Frame: McGee.
Walnut Frame: McGee.
Brass Bells: McGee.
Rustic Vase: Here.
Artwork on top by @sarahcnightingale.
Others items mix of flea market and HomeGoods finds (including bottom baskets) – similar baskets: here.
Coffee Table
Coffee Table: here.
Coffee Table Decor: Wooden Bowl, similar moss, similar wooden beads & similar vintage bells.
Sofa Pillows: here, here, here & here.
Dining Room
I love earthy elements and this rustic dining table is the perfect combination of form and function. With all of its raw imperfections, the kids can be as rough as they want with it and I don’t mind.
Dining Table & Bench: West Elm.
Rug is vintage – similar here, here, here, here & here.
Wooden Candle holders are locally sourced.
Planter in corner is from HomeGoods – similar here & here.
Good Vibes
There is a casualness about my design style which is probably why I gravitate towards word art. And I love the boldness of this black and white piece.
Artwork by JaxnBlvd.
Stool: Target.
Dining Room Chairs
The white wishbone chairs help to bring a lightness to this space which doesn’t get a lot of natural light and the chairs’ low profile makes this small dining space feel bigger. Paint Color is Benjamin Moore London Fog.
Chairs are by InMod – similar here, here & here.
Lighting: West Elm – similar here.
Mirror: here.
Floor basket: Pier 1.
Kids Corner
This was a fun IKEA hack that I did for my 7 year old’s room. I took the IKEA Kallax shelf unit, chose two different color doors and then spray painted the letters. Wall color is Valspar Ghost Ship.
Pillows by Tonic Living – similar here.
Rug & Seagrass boxes from Homegoods – similar rug & baskets.
Shelf and baskets from IKEA .
Reading Nook
These fern decals make this reading nook a lot of fun for my four-year-old. And while I would have loved a hanging chair, I didn’t think it was practical for my boys so I opted for this caged freestanding chair instead.
Decals by Urban Walls.
Chair: World Market.
Paper Mache Animal Heads: Fox, Rabbit & Deer.
Elephant Side Table: Serena & Lily.
Rug: here – similar.
Prints by Society6.
Guest Bedroom
Adding board and batten was a game changer in this room. It instantly made the guest bedroom feel loftier than its standard 8 ft. ceiling height.
Leather Bed: CB2.
Duvet Cover: here.
Nightstand: West Elm.
Throw: here, here & here.
Rug: here.
Paint Color
Paint color is Benjamin Moore Chantilly Lace.
Candle Holders: Crate & Barrel.
Pillows: Black & White & Bolster Pillow – similar.
Artwork: here.
Guest Bathroom
This small bathroom was the first major renovation we did when we moved in. There was literally a treasure chest inspired toilet box in here and, much like the rest of the house, tiles and walls were orange-brown. Having no prior design experience, I went with timeless marble and this little bathroom still makes me happy.
Bathroom wall paint is Behr Sterling.
Vanity: Wayfair.
Faucet is Kohler Bancroft.
Mirror: Uttermost.
Hand Towel: McGee.
Wood pot from HomeGoods.
Floor Tile: Wayfair.
Master Bathroom
This is our only bathroom upstairs, so it was important for us to keep a separate tub for our kids. Paint color is Behr Light French Gray.
Paint Cabinet Color: Benjamin Moore Simply White.
Tile is Ceramiche Caesar Porcelain Tile in MORE Manhattan – similar here.
Rug is from HomeGoods – similar here & here.
Vanity: Pottery Barn.
Art Print from Serena & Lily.
Crytal knob by Emtek.
Tub: Wayfair.
Stool: Serena & Lily.
Master Bedroom
I love having a neutral bedroom that I can easily switch up by swapping out pillows and throws.
Bed: Wayfair.
Blue quilt from HomeGoods.
Throw: Etsy – similar here.
Full Length Mirror: here – similar.
Rug: Lulu & Georgia.
Textures
Bench from RJ Imports – similar here.
Duvet Cover: Anthropologie.
Wall Basket: here – similar.
Pillows: Velvet Pillows, Mudcloth Pillows, Lumbar – similar.
Stripe vase from Crate & Barrel.
Faux Stems: Crate & Barrel.
Nightstands from Crate & Barrel discontinued but similar ones here, here, here & here.
Paint Color
Paint color is Chantilly Lace by Benjamin Moore.
One of my favorite things about this house is the amount of closet space. Our master has a his and hers closet. The smaller one behind that door is the his, of course.
Ladder is from Crate & Barrel.
DIY
The wall art here was an easy DIY. I put mudcloth scraps in black frames to give this corner a boho chic look.
Chair from HD Buttercup – other beautiful chairs: here, here, here & here.
Side table: here.
Bench: here.
Dresser: Pottery Barn.
Desk
Desk from Restoration Hardware – other beautiful desks: here & here.
Chair is from IKEA – similar here.
Pillow: Serena & Lily.
Hanging planter is from Homegoods – similar here.
Baskets: Serena & Lily.
Rug is from Homegoods – similar here, here, here, here & here.
Many thanks to Erin for sharing all of the details above.
Make sure to follow Erin on Instagram to see more of her beautiful home!
Amazing End-of-Season Sales!
Thank you for shopping through Home Bunch. I would be happy to assist you if you have any questions or are looking for something in particular. Feel free to contact me and always make sure to check dimensions before ordering. Happy shopping!
Serena & Lily: Tent Sale Up to 70% off! – Enjoy an Extra 20% OFF. Use Code HOORAY
Wayfair: UP to 75% OFF – Huge Sales on Decor, Furniture & Rugs!!!
Joss & Main: Best Prices of 2018 – Up to 70% Off
Pottery Barn: Buy More, Save More – 20% Off Sidewide + Free shipping: use Code: HELLO19
One Kings Lane: Final Days to Save: Take an Extra 20% Off Markdowns with Code OKL20MORE.
West Elm: Big New Year Sale: 20% Off Your Entire Purchase! Use Code: NEWYEAR
Pier 1: Huge Sales – Up to 60% Off!
Anthropologie: Winter Tag Sale: All sales at an extra 40% Off! Amazing!
Posts of the Week:
2019 New Year Home Tour.
Family-friendly Home Design.
Christmas Inspiration.
Interior Design Ideas.
Small Lot Modern Farmhouse.
Transitional Home Design.
Newlyweds Home Design.
Family Home Renovation with Casual Interiors.
2018 Norton Children’s Hospital Raffle Home.
Beautiful Homes of Instagram: California Beach House.
Neutral Home Interior Ideas.
You can follow my pins here: Pinterest/HomeBunch
See more Inspiring Interior Design Ideas in my Archives.
“Dear God,
If I am wrong, right me. If I am lost, guide me. If I start to give-up, keep me going.
Lead me in Light and Love”.
Have a wonderful day, my friends and we’ll talk again tomorrow.”
with Love,
Luciane from HomeBunch.com
Come Follow me on
Come Follow me on
Get Home Bunch Posts Via Email
Contact Luciane
“For your shopping convenience, this post might contain links to retailers where you can purchase the products (or similar) featured. I make a small commission if you use these links to make your purchase so thank you for your support!”
from Home http://www.homebunch.com/new-year-new-beautiful-homes-of-instagram/ via http://www.rssmix.com/
6 notes
·
View notes
Text
Web editor software free

#Web editor software free code
It emerged when the editor, which Windows shipped with, had gotten rather long in the tooth and failed to offer important functionality. It’s worth noting that PlainEdit can even be run from a USB stick. Moreover, you can search and replace text with regular expressions, even in documents not presently open. Users can quickly and easily insert snippets (templates, pieces of code, or other text) from a sidebar. PlainEdit can open multiple files in tabs, can likewise be expanded with plugins and provides plenty of functions, including customizable templates. What’s more, SynWrite supports Emmet (previously Zen Coding).
#Web editor software free code
Aside from typical functionality such as code folding and autocompletion, SynWrite also allows for multi-caret editing (see animation): The editor can be augmented with plugins written in Python. The idea behind SynWrite is to concentrate everything good about other editors into a single free product, and the feature list reads accordingly. SynWrite is an editor with a wide variety of functionality. Besides syntax highlighting, the editor boasts text clips (code snippets), code folding (selective hiding/displaying of code) and can be finely tailored to your personal needs through Python scripts and add-ons. Programmer’s Notepad offers a modern interface that comes in two themes: one bright, the other dark, as pictured. Phase 5 runs on Windows 7 and 8, Vista, XP, 2000, 98 32/64 bit, and server versions. You can edit multiple documents simultaneously, and much more. A file manager quickly lets you switch between documents. Phase 5 supports popular formats like PHP, Javascript, HTML, VBScript, Java, and Pearl. Phase 5 is a widely known editor that has been steadily updated since 1998.Ī few features of Phase5 are project management, tag completion, an integrated image viewer, a syntax debugger, support for special characters, indentation assistance, search and replace, and customizable menus and templates.
0 notes
Text
Can Website Detect Video Download?
Can Website Detect Video Download? There are ways to download videos from websites, but YouTube and Netflix won't let you do it this way because their source code is protected by encryption. The best way to download these videos is to use the F12 shortcut key in your browser and right-click on the webpage. Then, click Inspect, or you can click the Inspect Element button in the Firefox browser. If the video is embedded on the webpage, an inspect window will pop up. Select the Network tab, then click Media. Screen recorder Screen recording, also known as screen capturing, is a practice whereby users illegally record a website's video streams, which are then redistributed on a website not owned by the content provider. This activity can have a major impact on a content provider's business. Content providers are constantly struggling to prevent this activity. However, some strategies have been developed that have proven to be effective. There are several screen recorder software options, including free and paid versions. You can choose from Windows, Mac, and web-based options. The main difference between the two is the amount of features they offer. While free screen recorders are ideal for many users, many advanced features can be found with paid screen recorders. 4K Video Downloader If you're not sure whether a website supports video downloads, you can use a 4K Video Downloader to detect these. The program will analyze the link for a minute to determine if the video can be downloaded. If it can, it will download it in MP4 or MKV format. You can also choose to download subtitles if you wish. Once the download is complete, you can view the downloaded file offline. This freeware program can download YouTube videos and other video content. It's easy to use and supports a wide range of formats. It can also be set up to automatically download new videos from popular channels. It's a cross-platform program, and it works on Windows, Mac, and Linux. It can capture videos in MP4, MKV, FLV, and more. It can even download 4K Ultra-HD videos. The software can also detect the latest YouTube videos and automatically download them to your computer. YouTube DL The YouTube DL detection tool is an interactive web application that can be run with options and video URLs. It identifies videos on the Internet and writes the information to the output file. It also has options to change the filename and replace special characters in the video. The options available for YouTube DL detection are listed below. YouTube DL detection uses several algorithms to detect videos and extract information. It can download videos with advanced options, subtitles, and advanced options. In addition, it is able to download content from multiple platforms. The process is similar to a typical download, which uses an Internet Explorer to extract data and perform other functions. Vimeo To download Vimeo videos, you must first understand the format the video is in. The video's URL will begin with format.mp4 and will also contain "vimeo". This means that you can download Vimeo videos in mp4 format. Once you've determined the format, right-click on the video and choose "Save link as" or "Download linked file". The video will begin downloading once you have successfully selected the format and clicked 'Save'. Vimeo offers both online and mobile video downloading services. If you prefer to use a browser, you can install a third-party video downloader. This method is safe, as long as you don't download malware. While Vimeo allows downloading videos, you must be careful to not infringe on copyright rights. Catch Tube There are several ways a website can detect whether a user has downloaded a video. Some sites use a streaming player, which can detect the type of browser and Internet connection speed. Another way is to use a JavaScript blocking extension. This type of extension can detect video downloads, but it can't detect if the download was initiated by the user. Another way to capture videos is by using CatchVideo. It's free and easy to use. CatchVideo works especially well if you'd like to download multiple videos at once. After clicking the download button, a small popup box appears in the lower right corner. After clicking it, you'll be asked to choose a destination folder for the video. If you'd like to edit the video, you can do so from the software's interface. Can Website Detect Video Download? Read the full article
0 notes
Text
The Hollywood Museum is currently curating two exhibitions of intense interest to fans of horror movies and fantasy films: 30 Years of Make-Up, Monsters, and Magic focuses on the work of the Hollywood effects company Amalgamated Dynamics, Inc. 20th Century Superhero Legends offers nostalgic memorabilia from movies and TV of the 1960s and 1970s. The A-side of this hit single is definitely the Amalgamated Dynamics display, but the legendary superheroes provide a solid flip-side. Together, they form a perfect sort of Yin and Yang, the darkly sinister horrors of the former balanced by the colorfully reassuring wonderment of the latter. In addition, the Hollywood Museum’s perennial Dungeon of Doom offers a value-added bonus for horror fans, with its collection of sets, props, costumes, and posters from frightful films and television shows.
Pictured at top: Tom Woodruff, Jr., Donelle Dadigan, Alec Gillis
The Hollywood Museum: Overview
In case you’re not familiar with The Hollywood Museum, it is located in the former Max Factor building on Highland Avenue in Hollywood, which also houses Mel’s Drive in (conveniently joined by a short corridor, so you can grab a burger after viewing the exhibits). Befitting the building’s legacy, the museum’s ground floor emphasizes Hollywood glamour (makeup and wardrobe), but there is also room for science-fiction and fantasy material – everything from Harry Potter to Vampira.
Currently, among the pink Christmas trees dotting the lobby, there is a display case housing the ruby slippers from the Wizard of Oz. Downstairs is the Dungeon. Upstairs are the special exhibits.
The Hollywood Museum: 30 Years of Makeup, Monsters & Magic
30 Years of Make-Up, Monsters, and Magic occupies the entire second floor gallery, which is filled with Aliens, Predators, Pennywise the Clown from IT, Annabelle the Doll from The Conjuring films, and mutants from X-Men: First Class, and Jakoby the Orc from the Netflix film Bright. Throbbing music pulses through the air, lending an aura of tension – you may feel as if you really have wandered into a dangerous den of monsters.
Most of the truly eye-catching pieces are encased in a glass display marked “Camera Ready,” indicating that these are finished works, good enough to withstand closeup scrutiny from the motion picture camera – or the human eye. This should not be underestimated: special effects are often built to survive the shoot and not much more; materials such as foam rubber are not very durable. Having these otherworldly creations in a form worthy of a gallery showing is remarkable, presenting them not as mere technical achievements or movie props but rather as artworks in their own right.
This slideshow requires JavaScript.
The Alien and Predator figures are probably the most iconic ones on view, but for us the most impressive was the giant “bug” from Starship Toopers, looming large as life and separated from the public only by a velvet rope, like a movie star waiting for fans to come and take a selfie. Starship Troopers was an early example of using computer-generated imagery to depict large swarms of creatures, but this full-size creature reminds us that physical effects have a tactile verisimilitude difficult to duplicate in the virtual realm.
Other displays are less about aesthetic appreciation than education. Video clips illustrate work in progress and finished effects. Succinct descriptions explain the techniques used to create lifelike appearances from inanimate materials: painting glass eyes, punching hair in masks, painting foam rubber “skin” to simulate the translucent appearance of real flesh. Even knowledgeable laymen may learn a thing a two, such as that the process of make a life-cast (a mold duplicating an actor’s features) no longer relies on old-fashioned alginate but on more modern substances that dry faster, so that the subject no longer has to sit so long waiting for the muck encasing his face to dry and be cut off.
Make-Up, Monsters, and Magic celebrates the 30th anniversary of Amalgamated Dynamics, founded by Alec Gillis and Tom Woodruff Jr., whose credits stretch back to Tremors and include such titles as The Santa Claus, Spider-Man, Batman vs Superman: Dawn of Justice, and Logan. The shared an Oscar for Best Visual Effects for Death Becomes Her. They executed the effects for Alien 3, Alien: Resurrection, and the two Alien Vs. Predator films (a title card in the display case credits their work on the “Alien franchise,” coyly eliding the fact that they did not work on the first film, whose Alien was designed and created by the late Swiss surrealist H.R. Giger). They famously saw most of their work on the 2011 remake-prequel of The Thing replaced by CGI work, then turned lemons into lemonade by creating their own film, Harbinger Down (2013) to showcase the kind of physical effects that had been abandoned in the previous film. Their most recent release is The Predator, and the are currently working on several projects, including the upcoming Godzilla, King of the Monsters.
With a filmography this long, it is impossible for 30 Years of Make-Up, Monsters, and Magic to squeeze in everything; nevertheless, the exhibit does a fine job of hitting the highlights, featuring some of the company’s most spectacular and famous creations. As if all this were not enough, the exhibit includes examples of effects and makeup that inspired Amalgamated Dynamics, such as one of Ray Harryhausen’s stop-motion models from the classic fantasy film 7th Voyage of Sinbad. It’s a perfect opportunity to see classic and contemporary creatures rubbing shoulders. The exhibit will continue through December 15.
Photos from the opening night reception courtesy of the Hollywood Museum
The Hollywood Museum: 20th Century Superhero Legends
The third floor gallery houses several perennial exhibits (Harry Potter, etc), along with the new 20th Century Superhero Legends: Dedicated to Fight Evil, which opened on November 14. This is an expanded version of the Batman ’66 exhibit, which launched in January, featuring props, costumes, and figures from the campy 1960s television show. 20th Century Superhero Legends adds Wonder Woman and Superman to the mix, in the form of life-size figures of Linda Carter from the 1970s television show and of Christopher Reeve from the 1978 film Superman: The Movie, along with display cases of merchandise.
This slideshow requires JavaScript.
The Batman ’66 exhibits are more elaborately detailed, offering the Batmobile and the Batcycle in a recreation of the Batcave and the “Bat Poles” that Dick and Bruce used to descend from the study in Wayne Manor to the Caped Crusader’s lair. There are costumed likenesses of Batman, Robin, Batgirl, along with a rogue’s gallery of their most famous adversaries: Catwoman, the Riddler, the Penguin, the Joker, and King Tut.
20th Century Superhero Legends is a fun trip down memory lane, to a bygone era when costumed crime-fighters were simple and even goofy – basically, naive comic characters brought to life in live-action with little concern for realism or troubling psychological overtones. Definitely a nice place to visit, even if only to provide a contrast with the current slate of hyper-charged big-screen superheroes. The exhibit runs through December 30.
The Hollywood Museum: The Dungeon
Descend to the Dungeon
No trip to the Hollywood Museum would be complete without descending into the Dungeon of Doom. Housed in the basement, this year-round exhibition features the prison set from Silence of the Lambs, including Hannibal Lecter’s cell, plus a collection of horror movie memorabilia titled “Monsters, Mummies, and Mayhem,” which includes miniature models of the original King Kong and life-sized figures Frankenstein, Vampira, Jason Voorhees, along with costumes, props, posters, and photographs.
There have been several additions and alterations since our last visit in 2014. You can no longer enter the padded cell down the hall from Lecter’s room. There are now costumes from The Walking Dead, Van Helsing, and Sweeney Todd, The Demon Barber of Fleet Street. A poster and props from The Scorpion King have been added to the Mummy display. A coffin from True Blood is on view. A guillotine from Quills (not really a horror film) holds a severed head. More withered bodies are stuffed in the small back room (where heard an audio track discussing the work of producer-director William Castle, known for his gimmicky horror films in the 1950s and 1960s).
One odd change was on the wall of photos depicting dozens of actors who played the roll of Dracula onscreen. Four years ago, we spotted a shot of Christopher Lee in Dracula, Prince of Darkness misidentified as Frank Langella in Dracula. Checking to see whether the mistake had been corrected, we saw the shot of Lee had been replaced – with a shot of him in Dracula Has Risen from the Grave, still identified as Frank Langella in Dracula! At the front desk we were told that a correct photo was at the printer, soon to be delivered and put up on the wall.
This slideshow requires JavaScript.
Photo mishap aside, the Dungeon offers a shadowy gallery of horrors in a setting perfectly suited to house them. The atmosphere is definitely that of haunted house attraction; though there are neither actors nor jump-scares, you may suffer a shiver or two while perusing the cadaverous figures lurking in the darkness. The recent additions keep the exhibit up to date with current trends while not eclipsing the classic horror icons. The result is a bit like a miniature history of horror, with monsters from different decades comfortably rubbing shoulders, The Scorpion King side by side with Blood From the Mummy’s Tomb. It may be a nightmare for some but definitely a dream come true for others.
The Hollywood Museum: Conclusion
Lon Chaney’s Phantom of the Opera
All three of the above exhibits are available for a single price of admission during regular business hours. 30 Years of Make-Up, Monsters, and Magic is definitely the star attraction, but 20th Century Superhero Legends: Fight Against Evil has its own campy charm. The Dungeon – with its Monsters, Mummies, and Mayhem – is worth a visit entirely on its own. When there are two great exhibits upstairs, there is no justification for a self-respecting horror fan not to attend.
Afterward, take advantage of the convenient corridor linking the Hollywood Museum to Mel’s Drive In. Along the way, you will pass a figure of Lon Chaney in his guise as the title character in the 1925 silent black-and-white version of The Phantom of the Opera. In one of those interesting juxtapositions that characterizes the Hollywood Museum’s display, Chaney’s Phantom is standing over a poster for the 1943 color remake starring Claude Rains, reminding us that the horror genre eternally renews itself, resurrecting old characters in new forms for successive generations. The presence of up-to-date work by Amalgamated Dynamics, while horror from decades past lurks in the Dungeon, is the Museum’s most recent manifestation of this lesson.
Review: Makeup, Monsters & Superheroes at Hollywood Museum The Hollywood Museum is currently curating two exhibitions of intense interest to fans of horror movies and fantasy films:
3 notes
·
View notes
Text
Mac Os X 10.5 Powerpc G4 Download

The level of Mac OS 9/Classic support for each PowerPC G3, G4, and G5-based Mac is listed below. For complete specs on a particular system, click on the name of the Mac (left column). For all Macs that match a specific Mac OS 9 compatibility - courtesy of EveryMac.com's Ultimate Mac Sort - click the compatibility of interest (right column). It started out on PowerPC processors but later transitioned onto Intel processors with Mac OS X Leopard (10.5) the last to natively support the PowerPC architecture and Snow Leopard (10.6) the last to support PowerPC applications on Intel-based Macs. All versions of Mac OS X that were made to run on PowerPC systems (with the exception of. We're not only compatible with Mac OS X 10.4 and 10.5, but we also build our browser specially optimized for your G3, G4 or G5, add AltiVec TM JPEG, HTML and WebM decoding acceleration for G4 and G5 Macintoshes, and soup up JavaScript performance with IonPower, our best-in-class just-in-time PowerPC script compiler. One of our four versions is. Mac OS X 10.5; Firefox 3.6.28) More system details Additional System Details Installed Plug-ins. Office Live Update v1.0 The Google Earth Plugin allows you to view 3D imagery and terrain in your web browser. Adobe Shockwave for Director Netscape plug-in, version 11.6.5 The Flip4Mac WMV Plugin allows you to view Windows Media content using. May 08, 2010 MacBook with Snow Leopard 10.6.8 Target: Mac iBook PowerPC G4 with Mac OS X10.3.5 Panther and after MacBook and iMac Mac OS X Mountain Lion 10.8.1. All Mac OS X were connected on intranet lan of an italian ISP. The attacker MacBook is in listening and expected the reverse shell from the target Mac iBook PowerPC G4 that receive a package.
Mac OS Leopard 10.5 is the sixth release by Mac OS for Apple’s desktop and server operating system for Macintosh computers. It is available in two editions: for desktop or personal computers and server version (Mac OS X Server). The retail price for the desktop version is $129 and $499 for the server version. It was released on October 26, 2007.
This is the final version of Mac OS X which can support the PowerPC structure as snow leopard function only on Intel-based Macs. The latest released is 10.5.8 (Build 9L31a) on August 13, 2009. Its kernel type is hybrid (XNU). This version is preceded by Mac OS X 10.4 Tiger and succeeded by Mac OS X snow leopard. It is the first operating system that has open-source BSD to be certified as fully UNIX cooperative.
Download: Mac OS X Snow Leopard 10.6 ISO and DMG file
License Official Installer
File Size 7.8GB
Language English
Developer Apple Inc.
Tutorials: How to Clean Install Mac OS using a USB drive on Mac

New Features Added to Mac OS X Leopard 10.5
Commandos battle pack mac download utorrent. This new Mac OS Leopard 10.5 ISO comes with many new features like:
An improved Automator is introduced. It can create and edit work with the new interface. A new feature ‘watch me do’ is introduced that record user action and reply as an action in a work. It can create more useful work with action for RSS feed, PDF manipulation and much more.
It has the feature to access a file on their computer while far from home through the internet.
It has a new group feature called stack which displays a file in a ‘fan’ style, ‘grid’ style and a ‘list’ style.
It has redesign 3D dock.
New dictionary in Japanese is introduced.
The front row has been updated which closely resembles the interface of original Apple TV.
Safari 3 is introduced which includes web clip.
This version of Mac comes with an interesting feature called time machine. It allows the user to back up the deleted or replaced by another version of the file. Time machine does not make bootable copies of backed up the volume, it does not backup encrypted FileVault home dictionary until the user logout. It also does not back up to Airport Disc hard drives but this issue is been resolved on March 19, 2008 update.
It doesn’t the support classic application.
It comes with a total of 18 languages.
It comes with Alexa voice to voice over and the Apple company assured that it is the most natural and understandable voice yet.
A quick look is available which allows us to view the document without opening them in external software.
An updated version of photo booth is introduced which allow us, user, to record video with real-time filter and blue/ green screen technology.
It offers Objective-C 2.0 runtime, which has new features such as garbage collection
System requirements for this new version for Mac OS
To enjoy this version of Mac OS X, there are some basic requirements for a system like:
If we are talking about the processor then we need an Intel processor or PowerPC of G5 or G4 (867 MHz and faster).
The DVD drive, internal or external for installation of the operating system.
Minimum of 512MB of RAM is required for the proper functioning of the system. Additional of 1Gb of is recommended for development purpose.
Minimum of 9 GB of the disc is required.
These are the features required for the general purpose.
For some features specific requirements in the Mac are :
Time machine application needs an additional hard drive.
For boot camp, a Mac with Intel processor and Windows XP service pack 2 or Windows Vista is required.
1.8GHz PowerPC G5 is required for the DVD player for improved de-interlacing.
An insight camera (external or built-in), USB video class camera or Firewire DV camcorder, an Intel or PowerPC G5 processor is required for the photo booth.
Audio chats required microphone and 56kbs speed of internet connection.
Technical details of Mac leopard 10.5
Filename:- osx_leopard_10.5_install.iso
File size :- 7.8 GB
Developer:- Apple
To get this latest version of Mac
If we set our mind to upgrade our Mac with latest features then we have to upgrade our pc with Leopard 10.5. The ISO file is available on the official website as well as on the apple store. We have to decide what type of installation we require because it comes with three types of installation: Upgrade, Archive and Install, Erase and install.
Archive and install take the middle ground method. This installer moves all your data in one folder and then create a clean installation of OS X 10.5 Leopard. This method allows the user to get all their existing data including the user account. Installation of Leopard OS in the Mac, you have to boot from the Leopard install DVD.
Installation process step by step:
First, we have to insert the OS X Leopard install DVD into Mac DVD drive.
After that an install Mac OS X on display on the screen and we have to double click it.
Click the restart button when the install Mac OS X open.
Enter the administrator password and press the OK button.
Mac will restart and boot from the installation DVD. Restarting from the DVD take some time, so be patient.
How To Get Mac OS Leopard on your Mac
Buy Mac Os X 10.5
Snow leopard comes with no option other than upgrade, but with few extra steps, we can perform erase and install. The ISO file is available at the Apple official website and also on apple store. For installation, there are some system requirements like
An Intel Mac because it doesn’t support older PowerPC Macs.
At Least 1GB of Ram is required to run the Snow Leopard.
It requires 5GB of free space for installation in the system.
A DVD drive is also required.
After gathering all the requirement, now it’s time to install the Snow Leopard in PC
The 1.3.4.1 version of Unsplash Wallpaper for Mac is provided as a free download on our software library. This free Mac application was originally developed by Leonspok. The size of the latest downloadable setup file is 4.1 MB. The software lies within Theming Tools, more precisely Wallpapers. Download the best HD and Ultra HD Wallpapers for free. Use them as wallpapers for your mobile or desktop screens. Unsplash Photos for everyone. Topics; Explore; Submit a photo. Login Join free. Explore › HD Wallpapers. Choose from the highest quality selection of high-definition wallpapers–all submitted by our. Choose from hundreds of free Mac backgrounds. Download beautiful, curated free backgrounds on Unsplash. Unsplash wallpaper app. Choose from hundreds of free Mac wallpapers. Download HD wallpapers for free on Unsplash. Download Unsplash Wallpapers for Mac - Makes simple to change your Mac's desktop background automatically or manually using high-resolution wallpapers from Unsplash's huge library.
Saints row mac download free windows 10. Saints Row: The Third is a 2011 action-adventure game developed by Volition and published by THQ. It is the third title in the Saints Row series. As in the previous games, the player-character leads the Third Street Saints gang in a turf war against three rival gangs using a variety of weapons and vehicles in single-player and cooperative play. Saints Row The Third Mac Download Free; Download Saints Row The Third For Pc Free; All you need to do is to download and play them. Saints Row Gat Out of Hell MAC OS X is presented now as an ending tribute to the series. The only major change in Saints Row Gat Out of Hell MAC. The latest version of Saints Row IV is 1.0 on Mac Informer. It is a perfect match for Action in the Games category. The app is developed by Deep Silver Volition.
Download vnc server and viewer. VNC® Connect is the latest version of our remote access software for personal and commercial use. It consists of a VNC® Server app for the computer you want to control, which must be licensed, and a VNC® Viewer app that you are free to download to all the devices you want to control from.
Prepare the PC for installation like backup data, repair drive errors and disc permission.
Insert the Snow Leopard install DVD into the DVD drive.
Then after double click the install ‘Mac OS X’ icon.
Click the continue button after opening the Mac OS X Installer.
Select the drive which has already OS X 10.5 installed.
Click the customize button if we want to change anything to package.
When we are ready to install with default application then click the install button.
Enter the password and click the ‘OK’ button.
Copy the core file and restart.
Mac OS X Leopard 10.5 ISO & DMG file Direct Download - ISORIVER
Mac Os X 10.5 Update
Mac OS Leopard 10.5 is the sixth release by Mac OS for Apple's desktop and server operating system for Macintosh computers. It is available in two editions:
In essence, High Sierra took what was good with Sierra and developed it into a more comprehensive software. High Sierra emphasizes the already-existing benefits of MacOS previous system, Sierra. There are few bells and whistles, but the changes are noticeable and positive. The Apple file system is the most significant feature it brought. The content goes to Apple. Enjoy the operating system! (Installs VMWare Workstation 14.0 only). Mac OS High Sierra Download links via Torrent and Direct links available for all Mac OS High Sierra Supported Macs. If you have compatible Mac. You can download and install last version Mac OS. Owners of Mac computers are accustomed to using the latest software from Apple - unlike iOS desktop OS, as a rule, it works much more stable. Mac os high sierra download iso 64 bit 64. MacOS High Sierra Final ISO (One Full — Google Drive) — If you are searching for High Sierra, you have come at the right place. Just click at the link and get macOS High Sierra final ISO. After that, with the help of High Sierra ISO, you can install High Sierra on VMware and VirtualBox on Windows.
Price Currency: USD
Mac Os X 10.5 Amazon
Operating System: Mac OS X Leopard 10.5
Free Mac Os X 10.5
Application Category: OS
1 note
·
View note