#jdfhsgbjhfd idk
Note
How do you make your editing so pretty???
Hey there!! First off, kjfdgbjfdbgjhdfjh thank you so much. I know this is crazy late, I’ve been working hh. I’ve put a general tutorial(??) under the cut so it’s not too long on dash!! ♥
----
First off, what I currently use:
Photoshop CC
@intramoon ‘s Patchouli Rose (primarily)
@magicbats ‘s Happy Pills PSD set (turned to 20% on both folders)
CANVAS SIZE: 1920 x 1080 (but screen size might vary?)

THE STEPS (”right-click > open image in new tab” if its too small!)
^ 1) slap your image on your canvas with all the bs listed above (or whatever you use as your editing psd!)
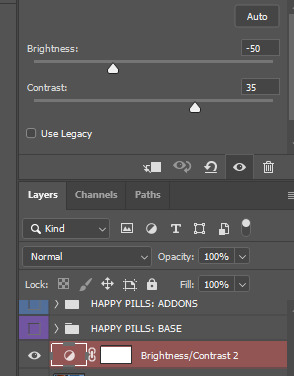
^ 2) since my current scene outside in the realm was kinda bright (for early early morning/late night of 3am in-game if i remember correctly lmfao), i had to tone down the brightness as well crank up the contrast for some Nice Touch of depth or whatever idk words. it makes a difference fam.

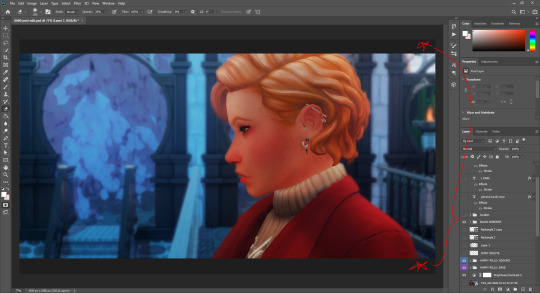
^ 3) this is what the brightness/contrast editing did btw. now, i stayed on the picture layer and used the flood select tool and grabbed morgyn; while keeping them selected, i made a new layer with that button on the side mhm. it’s time for some light editing hahah
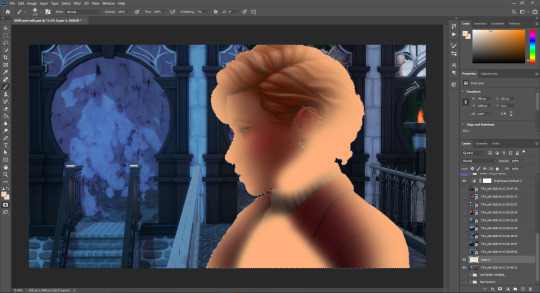
^ 4) disregard the pun, im dumb lol. anyways, i took some peachy-orange and drew on some points where the light (from the opposite doorway in which they had exited in post 3) hits them. it’s not accurate but it is what it is. I set this layer to “overlay” and the opacity to roughly 50-40%. Make a new layer!
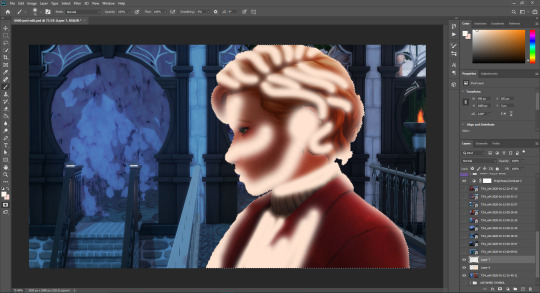
^ 5) new layer: do the same exact thing but with finer brush lines but in white (or off-white). This is more of the highlights on the sim (or subject, whatever you’re editing). Set this layer to EITHER “overlay” or “soft light”, then play around the opacity until it looks natural. you CAN take a soft-edged eraser (set opacity to about 20%) and kinda soften up the brushing so its not too sharp and harsh. CTRL+D to deselect the subject.

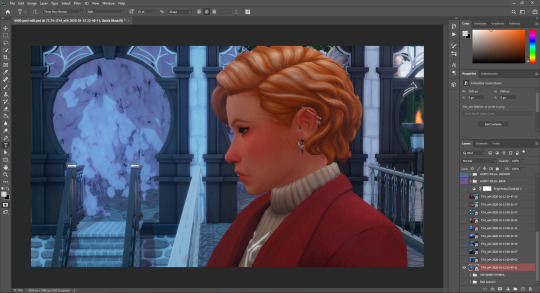
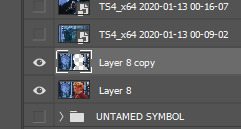
^ 6) this is the outcome :3 see the shadowing and lighting? it looks like the warm lights from the hall to Morgyn’s left is hitting them ~ Now, that things look okay, click off the brightness/contrast layer (you’ll wanna save this) and everything else EXCEPT for your picture layer and the layers you just did (lighting and such). Now you want to right-click on a visible layer and click “Merge Visible;” this merges the visible layers into one (I do this so that things dont get messy and disorganized in my layers bc i mass-open 4385873246 pictures and my post-edit psd has so many layers as it is lol) (but this is also a key thing to do for later steps~)
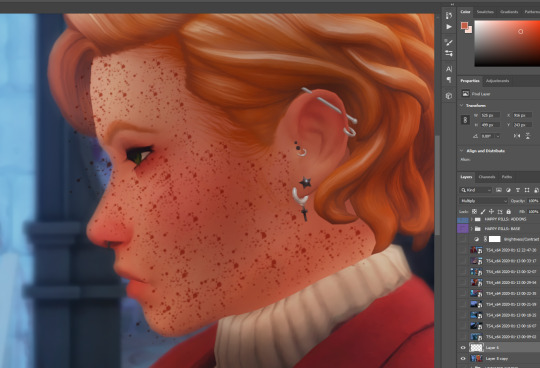
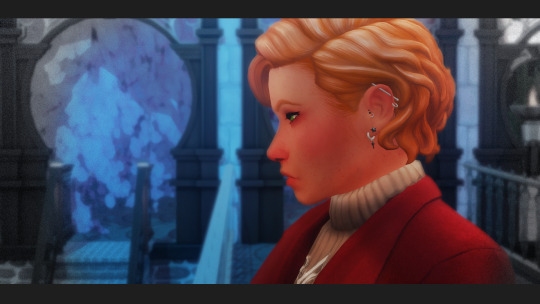
^ 7) Now with your merged layer of the edited pic, you want to duplicate the image layer so that you have 2. On the top layer, flood-select your main focus—this can be a sim, or a few, and the front-and-center focus area of the image. Once the stuff is selected (make sure you zoom in and get all the little details ie hair, etc), you want to hit your “delete” button on the keyboard (or use the cut tool, whichever is easiest) and watch the stuff poof, as shown above.

^ 8) grab your blur tool and set it to this setting. Then what i do is i just click on the (still top layer, the one with the erased focus!) layer and go HAM with the mouse. PS does this thing where the more i waggle the mouse the more it blurs. i just blur the background for 10 seconds and release. tada all blurred tf out. then, i go to the bottom (untouched!) layer and use a smaller size of the blur tool and lightly edge around the subject, just to casually blend the subject and background so that things look smooth. when done, merge visible again!!

^ 9) I then go into Topaz Clean 3 and smooth out the image!! here are my settings ^-^
^ 10) now my morgyn is a sunkissed-freckled bby. but topaz washes them out almost all the way :c so i take my splatter brush and zOOm in on their cute face and use an eyedropper to grab the color of one of their kinda visible fweckles. then i just splash that brush aLL over their face/skin in general. then i set that layer to multiply, then opacity like 20%?? Then i take a soft edged eraser, opacity to 20%, and kinda spam click all over to not make the “freckles” so consistent but also to blend them in a bit.
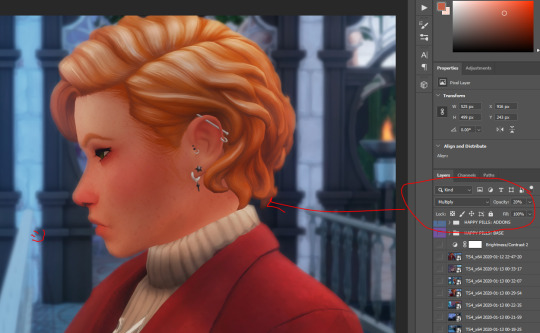
^ 11) this just shows the settings and outcome of the sunshine bby ♥
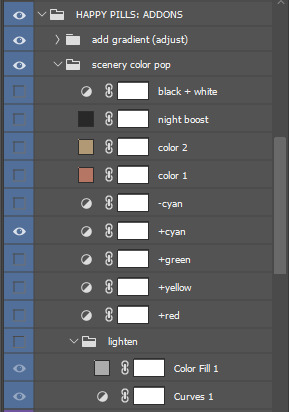

^ 12) these are just what i have set on the Happy Pills PSD Set! I have both folders set to 20% because at 100% + my reshade, shit’s bright as fuck [swEAts] lol. so I turned them down a bit and adjusted as so ~
^ 13) and finally, with all visible layers merged into one, the brightness/contrast layer turned back on, the Happy Pills PSD folders turned on, and my cinematic black bars on, we get the final image :3 here’s the pic after i finished some additional editing for my story post part 4
(: !!! I hope this helps lolol ^^ ♥
25 notes
·
View notes
Last Seen Blogs

minestylex
style goes deep

allthattvmall-blog
올댓홈쇼핑

kaseysremodelingcrew
Untitled

imya0
Imya's 404

hikohhmi
♡