#jpeg camera module
Explore tagged Tumblr posts
Visit Tumblr Blog
Explore Tumblr blogs with no restrictions, modern design and the best experience.
Last Seen Tumblr Blogs


Fun Fact
If you dial 1-866-584-6757, you can leave an audio post for your followers.
Text
Serial JPEG Color Camera Module
A serial JPEG color camera module is a compact imaging device designed to capture and transmit JPEG-encoded images or video frames over a serial interface. These modules offer an integrated solution for capturing high-quality images and transferring them to a host system, typically using a serial communication protocol.
0 notes
Text
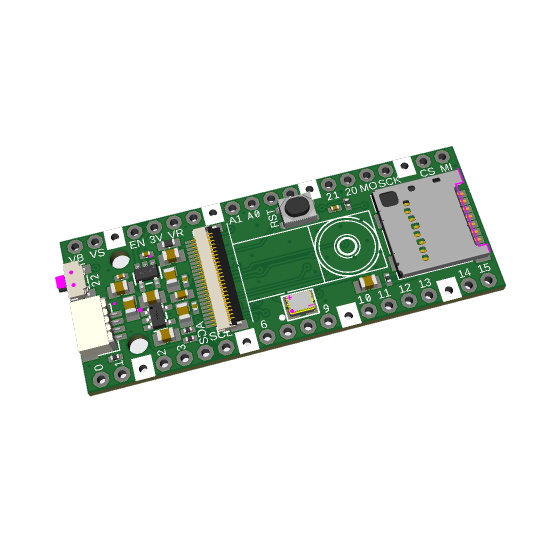
snap snap, here's a camera module picowbell
we've been doing a ton of projects with OV5640-and-friends camera modules. these devices have 8-pin data ports plus pixel clock, hsync and vsync. the data can be raw 565 color, or JPEG data at 1080p! either way, you need a device with lots of RAM and the ability to quickly grab the buffer off the module. the RP2040 will do a fine job, but if you want to work with these modules they require a LOT of wiring. (https://learn.adafruit.com/capturing-camera-images-with-circuitpython/raspberry-pi-pico-wiring)
to make it easier, here's a design for a 'cowbell that will work with the Pico or PicoW to add a camera module, Stemma QT I2C port, MicroSD slot for storing images, and a right angle 'shutter' button. there's not enough room for a display on this slim board but we left pins 20 and 21 available for a TFT CS and DC pin for expansion capabilities.
#raspberry pi#raspberrypiprojects#camera#ov5640#rp2040#adafruit#electronics#opensource#manufacturing#opensourcehardware
4 notes
·
View notes
Text
NetBPM & sidetracks indev research... (article '16^12 '0x34)

Previous mainline article in the thread:
So yeah, been diving deep into English Wikipedia again in search for alternate digital file formats and some pseudo-official paperwork things as to enrich my setting further. Things like GeoTIFF, LZ4 compression, ASVGs, OGG as multi-track OPUS, UDO optical disks, MagnetoOptical, ZIP Drives, MiniDiscs, PAM graphics, JPEG XL, OpenEXR, Elphel cameras, AXIOM Gamma, QOI, TARGA TrueVisionGraphics... Either way, I am really looking forward to producing my own law bills, paperwork stationery and in-world memorabilia in line with the worldly context of such a planet along its history.

(so from official transition papers, identity cards & phonebooks to morphological freedoms bills & legal checkbook archives, it will be very dense but worthy to study)
In the meantime of a story-wise localization update, I felt like giving you some quick insights onto where my project is at overall.

Current status of progress on the worldscape itself (ignoring the astronomy and wider stellar sectors' matters for the time being):


Major cultures are pretty well set now, but I still got to place their dialects, creoles, pidgins, shared loanwords, unique jargon, diasporas & other historical components all across as I seek a ratio of 1:5 per major Civ as to have 6 major cities per major Civ, which definitely includes (minor city-states & more autonomous states within their spheres of influence / diplomatic reach) ones present for mechanical flavor and variety of POIs. I tend towards ~4608-4800 of those markers (so sixteen per major settlement overall) as to compartmentalize them per major culture.

Religions is mid-way in progress, as there should be far more of them added to the mixture & integrated into the lore tbh, but I do have a couple major pantheons going already albeit in very little detailing due to the Civ 5 issue I got rn.

Countries/Nationstates/Sovereignties are yet to be worked fully as well, too because I rely on consulting my Civilization 5 CE modpack gameplay sessions to derive better specifics out of it (or at least make informed choices given the encyclopedia, implied lore and other save-state details). And due to it failing to launch any one of the mods or saves proper, often in the past week, I am just awaiting some, which I am far from pleased of as a situation…
My lively DR scripture needs some revising though it has most key components in already, and the "personal project" pitch deck for 16^12 depends on the parts discussed prior to move along. And the localization of the first scenario module process is pretty… meh type-of slow.

See you all around soon with a further update on my doings. Take care!

0 notes
Text
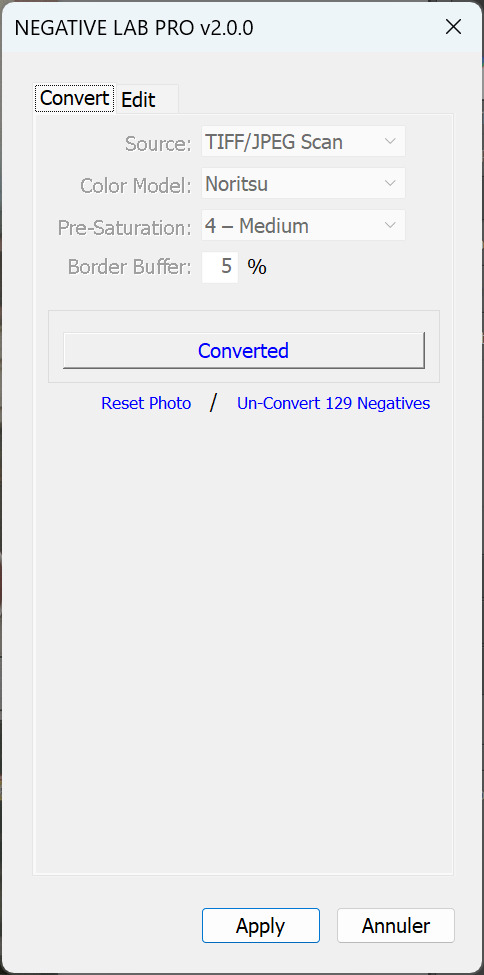
an easy (well, not really, but still easy) way to create a filmic look for digicam photos
okay, i am again in my digicam era. recently, i’ve bought a sony cyber–shot dsc–tx1 and panasonic dmc–f1 (the same thing as the leica d–lux 1 from 2003), and i’ve also dug out my beloved olympus μ–7010 from a drawer
but there’s a problem. i don’t like straight-out-of-camera colours they produce—sometimes they’re just plain dull, other times they’re too cold and lack the warmth of film with a nice highlights’ roll off. also, i feel like i need to push the iso up to get that filmic grain-like noise
i’ve found an easy (well, not really, but still easy) solution, which requires adobe lightroom classic (not the cloud version, but the classic one) and the negative lab pro plugin (yeah, and it costs extra money on top of your monthly adobe subscription, i guess, you already paying anyway). this method is a great suggestion by erwin alejo—in this video he explains the process to achieve that filmic look
so, i won’t repeat his tutorial, but i sure can showcase a few “before/after” examples—the “before” images are on the left, the “after” edits are on the right
1 notice the increased saturation and the blooming highlights


2 the edited image feels warmer, and the clipped highlights don’t seem clipped anymore


3 same effect here—the highlights’ roll-off looks more natural and not clipped. plus, the shadows have that particular filmic cooler tint while brighter parts of the image are certainly warmer


by the way, as i shoot jpegs on my digicams, i use these negative lab pro settings:
1. convert tab – source: tiff/jpeg scan – colour model: noritsu – pre-saturation: 4 — medium 2. edit tab – tones: highlight hard – film: fuji
3. lightroom develop module i set clarity slider to negative 20 (clarity –20) to bloom them highlights
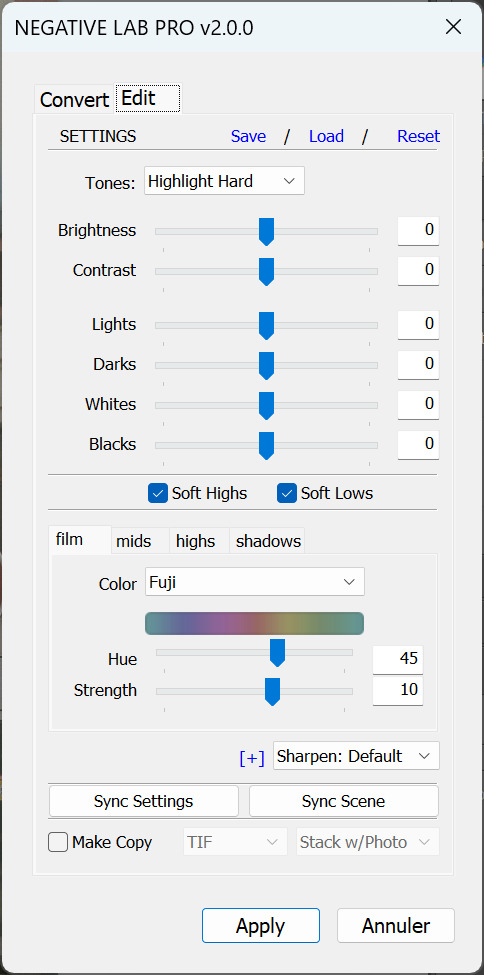
enjoy
1 note
·
View note
Video
youtube
OV5640 5MP MIPI Camera Module
The OV5640 is a versatile 5-megapixel camera module designed for a variety of applications, including mobile phones, digital cameras, and entertainment devices. The resolution is 5MP. The sensor type is a 1/4-inch CMOS image sensor. The interface supports MIPI CSI-2 and DVP interfaces. The image format supports RAW RGB, RGB565/555/444, YUV422/420, and JPEG compression. The field of view is D76.6°. The focal length is 3.0±5%mm. Other features include anti-shake technology, high sensitivity in low light conditions, and a built-in JPEG compression engine. This module is commonly used in digital cameras, smart security, automotive electronics, medical equipment, IoT devices, entertainment equipment, etc. It is also known for its excellent pixel performance and low-light sensitivity, making it a popular choice in the high-volume mobile market.
0 notes
Text
Photography Course in Sonipat.
https://picklesanimation.in/sonipat/
Here's a comprehensive course outline for a Photography course offered by Pickles Animation. This course is designed to cover the fundamental principles, technical skills, and creative techniques needed for photography, catering to both beginners and advanced learners.
Course Outline for Photography
Module 1: Introduction to Photography
Overview of Photography
History and evolution of photography
Understanding different genres of photography (portrait, landscape, street, etc.)
The role of a photographer in various industries
Basic Photography Concepts
Understanding exposure: aperture, shutter speed, and ISO
The exposure triangle and its impact on photos
Basic composition rules (rule of thirds, leading lines, etc.)
Module 2: Camera and Equipment
Camera Basics
Different types of cameras (DSLR, mirrorless, point-and-shoot)
Camera parts and functions
Choosing the right camera for your needs
Lenses and Accessories
Types of lenses and their uses
Understanding focal length and aperture
Essential accessories (tripods, filters, flashes, etc.)
Module 3: Technical Skills and Manual Settings
Manual Mode Mastery
Using manual mode on your camera
Adjusting aperture, shutter speed, and ISO for different scenarios
Understanding depth of field and motion blur
Focusing Techniques
Autofocus vs. manual focus
Focus modes and points
Techniques for achieving sharp focus
Lighting and Exposure
Understanding natural light and artificial light
Using reflectors and diffusers
Balancing exposure in challenging lighting conditions
Module 4: Composition and Creativity
Advanced Composition Techniques
Framing and perspective
Leading lines, symmetry, and patterns
Using negative space effectively
Creative Photography
Experimenting with long exposures and motion
Using bokeh and shallow depth of field
Creative use of color and black-and-white photography
Module 5: Post-Processing and Editing
Introduction to Post-Processing
Importance of post-processing in photography
Overview of editing software (Adobe Lightroom, Photoshop)
Basic photo corrections (cropping, straightening, exposure adjustment)
Advanced Editing Techniques
Color correction and grading
Retouching and enhancing portraits
Creating HDR images and panoramas
Workflow and File Management
Organizing and managing your photo library
Understanding file formats (RAW vs. JPEG)
Exporting and printing your photos
Module 6: Specialized Photography Techniques
Portrait Photography
Lighting setups for portraits
Posing and directing subjects
Capturing candid and environmental portraits
Landscape Photography
Planning and scouting locations
Capturing landscapes in different weather conditions
Using filters (ND, polarizing) for landscapes
Street and Documentary Photography
Capturing candid moments in public places
Telling stories through images
Ethics and legal considerations in street photography
Module 7: Building a Photography Portfolio
Creating a Cohesive Portfolio
Selecting and curating your best work
Creating themes and stories through your portfolio
Designing an online portfolio and website
Marketing and Promoting Your Work
Social media strategies for photographers
Networking and building relationships in the industry
Approaching galleries and publications
Module 8: Industry Insights and Career Development
Understanding the Photography Industry
Different career paths in photography
Freelancing vs. working for an agency or studio
Building a personal brand and style
Business Skills for Photographers
Pricing your work and creating contracts
Managing client relationships
Continuing education and professional development
Additional Features
Guest Lectures and Workshops: Sessions by industry experts on various topics.
Hands-On Projects: Real-world projects to apply learned skills.
Feedback and Critique Sessions: Regular feedback from instructors and peers.
Online Resources and Community: Access to tutorials, forums, and networking opportunities.
This course structure ensures that students gain a solid foundation in photography, practical experience with essential tools and techniques, and preparation for a successful career in the photography industry.

0 notes
Text
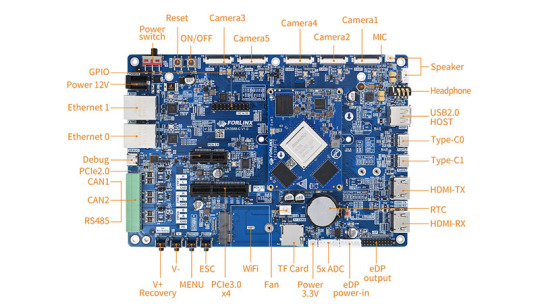
Forlinx FET3588-C SoM Facilitating the Intelligent Development of Infrared Thermal Imaging
According to Maxtech International data, the global civil infrared market size will exceed 7.6 billion US dollars in 2023, and in the past four years, the infrared industry has maintained a growth rate of over 11%. Moreover, according to data from Huajing Industrial Research Institute, the market size of China's infrared thermal imaging industry reached 65.534 billion yuan in 2021.
With the development of non-cooled infrared thermal imaging technology, infrared thermal imagers have been widely used in civil applications. This statement is attributed to Huajing Industrial Research Institute.
Against this backdrop, manufacturers and institutions that specialize in the research and production of infrared thermal imaging products have begun to lay out strategies for the civilian infrared thermal imaging market, which is a blue ocean market. The breast surgery research team from Peking Union Medical College Hospital in Beijing has applied their independently developed artificial intelligence-based infrared thermal imaging system (AI-IRT) to pre-screening for breast cancer.
The team has also developed a portable AI-IRT system, which includes an infrared miniature camera connected to a smartphone, AI software, and a real-time updated infrared thermal imaging database.
When using this system for pre-screening of breast cancer, the real-time captured infrared thermal images of the breasts are uploaded to the artificial intelligence software, which then provides a risk assessment rating. The system is non-invasive, radiation-free and easy to use, and can be used in families and community health service centers for screening.
Infrared thermal imaging can be used as an electrical equipment monitoring system, which is installed around the transformer, etc. Through optical fiber transmission, the monitoring of equipment can be completed in the monitoring room. 24 hours, all-weather, full coverage of all substation power equipment for real-time monitoring of thermal distribution field, real-time grasp of equipment operation status, found abnormal temperature rise immediately alarm.
In addition to equipment monitoring, it is also widely used in substation inspection, distribution inspection, transmission and distribution cable inspection industry, so that inspectors can grasp the temperature while helping the power industry inspection work become more efficient and easier.
In order to adapt to the development of infrared thermal imaging industry, Forlinx Embedded recommends FET3588-C System on Module(SoM) as the main control of highly integrated infrared thermal imager.

FET3588-C has 8K video codec + 8K display supporting 8K @ 60fps H.265 and VP9 decoders, 8K @ 30fps H.264 decoders and 4K @ 60fps AV1 decoders, supporting 8K @ 30fps H.264 and H.265 encoders. High quality JPEG encoder/decoder.
Optimization of 12V power supply can reduce losses, while PMIC dynamic frequency scaling can improve stability.
Powerful: Quad-core Cortex-A76 + Quad-core Cortex-A55, main frequency height of 2.4 GHZ, NPU with 6 TOPS
Support multi-channel video access and display output
Complete functional interfaces such as mipi-csi, mipi-dsi, USB, SATA, UART, CAN and Gigabit Ethernet
Originally published at www.forlinx.net.
0 notes
Video
tumblr
SincereFirst CMOS OV5640 Imaging Sensor 5MP Camera Module
The advantages of SincereFirst CMOS OV5640 Imaging Sensor 5MP Camera Module include: Autofocus function to improve image quality and sharpness Supports multiple operating systems such as Linux, Android and Windows Support JPEG output, saving storage space and transmission bandwidth Low voltage, high performance, 1/4 inch 5 megapixel CMOS image sensor with OmniBSI™ technology
0 notes
Text
At present, we discover on AliExpress with one other tablet with the brand new low-end SoC Quad Core Rockchip RK3562, the BMAX MaxPad I9 PLUS with 10.1 Inch 1280*800 IPS HD Touchscreen 8GB RAM and 64GB ROM. BMAX MaxPad I9 Plus Tablet Overview [content-egg module=Offer template=item] We noticed a tablet with specs nearly identical to those of the UMIDIGI G1 a couple of days ago. As discussed, the tablet repeats the entry-level SoC Rockchip RK3562 supported by Wi-Fi 6 connectivity. Within the umidigi tablet, we've Android 13 as a working system and a ten.1-inch display with a modest decision of solely 1280 x 800 pixels. An extra low-cost tablet is solely advisable if we've restricted funds, and we'll give it occasional use. BMAX MaxPad I9 PLUS Tablet Hardware The BMAX MaxPad I9 PLUS tablet features a Rockchip RK3562 processor manufactured in 22nm. This chip is a Quad Core with ARM Cortex-A53 processors with low energy consumption that attains 2.0 GHz. The iGPU is an ARM Mali-G52 MC2 with the most velocity of 850 Mhz, and we even have a 1 TOPS NPU for AI acceleration. We've got on board 4 GB of LPDDR4X RAM (expandable with one other 4 GB digital) and, in addition, 64 GB of storage reminiscence expandable by way of micro SD card reader as much as 1 TB. Specifications Basic Model BMAX MaxPad I9 Plus CPU RK3566 GPU Mail G52-3EE Core Quad Core System Android 12 Language Multi-language RAM 4GB ROM 64GB Screen 10.1 Inch IPS Capacitive Screen Resolution 1280*800 Camera Front is 2.0MP Rear is 5.0MP Battery 5000 mah Weight 530g Size 245.1*163*10.1mm Function WIFI IEEE 802.11 a/b/g/n/ax(2.4GHz/5GHz) bluetooth 5.0 OTG Support GPS Not Support NFC Not Support G-sensor Support 4G Not Support Frequency NO Audio & Video Microphone Built-in Speaker Built-in Audio AAC,AMR,MP3,OGG,WAV,ACC,M4A,FLAC Picture JPEG,GIF,BMP,PNG,JPG Video 3GP,AVI,MKV,MP4,M4V,WEBM,MPEG4 Connectivity I/O Port 1 x Type-C port 1 x Micro SD card port Package Included Package Included 1 x BMAX MaxPad I9 Plus Tablet PC 1 x Charger 1 x Adapter (the adapter depends on the country of the buyer) Screen and different options MaxPad I9 Plus's display is a ten.1-inch IPS Screen with a decision of 1280 x 800 pixels, 16:10 facet ratio, and which is accompanied by a 2 MP entrance digicam that enhances the 5 MP rear with LED flash. We additionally discover Wi-Fi connectivity, Wi-Fi 6, Bluetooth 5.1, a pair of audio systems, and a microphone within the audio part. The battery of the BMAX MaxPad I9 PLUS is 6000 mAh and has a connectivity degree. We have a USB Kind-C 2.0 port for energy and knowledge, a 3.5 mm audio jack to attach headphones and a microphone. Price and availability The brand new BMAX MaxPad I9 PLUS tablet could be bought on AliExpress from simply €70.25 / $70 with free transport. [content-egg module=Offer template=item]
0 notes
Text
Best dslr camera under 35000 for beginner
Today we tell about the best Dslr camera under 35k for beginners their are many cameras in market with different different specification and the peoples who are the beginners they are confuse to decide which one is the best and which one we have to buy. Today we are going to tell about the best dslr cameras under 35k .so read this post to the end
#1. Canon EOS 1500D
Physically, the EOS 1500D looks pretty much identical to its outgoing sibling. It’s roughly the same size and weight as its predecessor and as far as button placement goes, it’s exactly the same. One-handed shooting is easy and it still offers good grip thanks to ample rubber cladding on the right side of the camera. There’s no getting around the unmistakable plastic finish, which doesn’t feel too premium but that's to be expected for a basic DSLR.
Specification
Type : TypeDigital, single-lens reflex, AF / AE camera with built-in flashRecording mediaSD memory card, SDHC memory card, SDXC memory cardImage sensor size22. W3 x 14.9mmCompatible lensesCanon EF lenses (including EF-S lenses)
* Wi-Fi Protected Setup supportedSecurityAuthentication method: Open system, Shared key, WPA / WPA2-PSK Encryption: WEP, TKIP, AESNFC connectionFor communication with smartphones or connection to Connect StationWi-Fi Functions Communication with a smartphoneImages can be viewed, controlled, and received using a smartphone.
System :. Drive modesSingle shooting, Continuous shooting, Self-timer with 10s or 2s delay and 10s delay with continuous shootingContinuous shooting speedMaximum approx. 3.0 shots/sMax. burst (Approx.)JPEG Large / Fine:150 shotsRAW:11 shotsRAW+JPEG Large / Fine:6 shots* Figures are based on Canon's testing standards (ISO 100 and Standard Picture Style) using an 8GB card.Live View
Communications : Standards complianceIEEE 802.11b/g/nTransmission methodDS-SS modulation (IEEE 802.11b) OFDM modulation (IEEE 802.11g/n)Transmission range15m / 49.2ft*When communicating with a smartphone *With no obstructions between the transmitting and receiving antennas and no radio interferenceTransmission frequency (central frequency)Frequency: 2 412 to 2 462MHz ChanLive ViewCommunications : Standards complianceIEEE 802.11b/g/nTransmission methodDS-SS modulation (IEEE 802.11b)o 11chConnection methodCamera access point mode, infrastructure*
Click here to buy
2 notes
·
View notes
Text
Serial JPEG Color Camera Module
Are you Discovering to serial JPEG color camera Module on Spinel Electronics. Shop a huge range of quality Serial JPEG Color Camera Module, Get the best-quality 5MP USB camera module and 300K pixels at an affordable price. For more details call us at: +1 (800) 837-5859.

0 notes
Text
ILLUMINATE
Research
Noise is a term used to describe distortion in photographs, more often than not it looks like grain in film photographs, noise can also look like splotches of discolouration which if bad enough can ruin photographs (www.adorama.com). There are several reasons why noise occurs,
1. High ISO – the higher the ISO the more grain in images, this tends to occur in low light situations.
2. Sensor size – cameras with small sensors can produce a great deal of noise, therefore if shooting at ISO of 800, sharpness and detail of a photograph can be compromised (www.adorama.com). Using a camera with a big sensor reduces grain/noise.
3. Pixel density – a sensor with 14 megapixels will produce more noise than an equal sized sensor with 10 megapixels, the reason being is to allow for more pixels, the pixel size has to shrink and as such each pixel will allow less light (www.adorama.com).
4. Long exposure time – very long exposures introduce static which can cause digital noise.
5. Shadows – if shooting during the day with a high ISO, the grain may not be noticeable until you look at the shadow areas. Grain will be more noticeable in darker areas.
Five methods of reducing noise pre – edit.
1. Use low ISO settings – to avoid using a high ISO, open the aperture to its widest setting, if shooting in low light conditions, use a tripod and a flash. If there is still difficulty in achieving the correct exposure increase the ISO, however it is recommended not to go higher than 400, this depends on the technical capability of the camera
2. Shoot RAW – by shooting in RAW format you can get the best out of the images. When using JPEG, images will already have compression to them and as such there will already be a degree of noise already, known as JPEG artifacts (www.digital-photography-school.com). When shooting in JPEG format and with a high ISO noise will be even worse. The good thing about shooting RAW is when it comes to post production, there will be different ways in which to remove noise.
3. Exposure – expose photographs correctly, if images are under exposed, the shadow areas may become very dark and when pulling out the detail in post processing grain/noise will be visible (www.lightstalking.com). To overcome this use the histogram in the camera, this will you can get an evenly lit scene with shadow and highlight detail (www.lightstalking.com).
4. Long exposure – be careful not to use long exposure as the sensor can heat up and the pixels will give incorrect colours and exposure. If the camera is set up for a long exposure, the senor will heat up resulting in grain in the image, as the pixels are a result of heat, they are known as ‘hot pixels’ (www.improvephootography.com). Not all cameras are capable of very long exposures.
5. In camera noise reduction – in many cameras there is a function called High ISO Noise Reduction. This can be used when shooting at high ISO or during long exposures. HINR works by the camera analyzing image and searches for any pixels that are incorrectly rendered, the High ISO Noise Reduction function will fix the pixels that are not properly rendered, this takes the length of time as the long exposure, for instance a long exposure of 30 seconds, the function will take 30 seconds to fix the pixels (www.digital-photography-school.com).
Five Methods of Reducing Noise Post – Edit
Before discussing ways of reducing noise post – edit, it is worth noting that there are two types of noise
Luminance – pixels display a different brightness than would be expected compared to those surrounding it, it is quite similar to grain seen in film photography (www.lightstalking.com).
Chroma – is where individual pixels shift colour compared to those surround it (www.lightstalking.com).
There are two main types of software that can help illuminate noise post production,
Lightroom – to reduce noise, this is found under Develop module, it is split into 2 sections each have 3 sliders. The first section is for luminance, the second for chroma noise. The sliders in the luminance section are luminance, detail and contrast. When using the luminance slider press the alt key this will make the image black and white making the noise to be clearly seen (www.lightstalking.com). To achieve noise reduction requires balancing the 3 sliders effectively. By moving the luminance slider to the right, the noise (grain) will begin to disappear, however this may take away the sharpness of the image. After move the luminance slider until the noise has gone then move the detail slider to bring back the detail, as with the luminance slider, move to the right until grain returns then slighty move back. The contrast slider can be used if the image has lost some contrast. With the chroma noise, the same is applied to that of the luminance. In chroma, move the colour slider to the right until the noise disappears, if the sharpness has reduced move the detail slider, after which for any fine adjustments move the smoothness slider to the right also. Noise reduction is found in the detail section of the develop module.
Photoshop CC – duplicate the background layer (image), right click on it and select Duplicate Layer. Click on Filters, then Convert for Smart Filters, this will give the option of going back to change the amount of noise reduction applied. Go into Filter again then click Camera Raw Filter this will then open the image in Adobe Camera Raw, this looks similar to Lightroom. Click on the Detail tab and what will appear are the noise reduction sliders similar to those found in Lightroom. To help achieve better detail, zoom in on the image by 100%. Sliders are moved in the same way as in Lightroom. When satisfied, click ok button when ready to return to Photoshop. Within Photoshop there is also the Blend If tool/panel. To access this open up 2 images that are the same and add a layer (clean photo is to be the top layer www.lightstalking.com), on this layer double click and a Layer Style Panel will appear. In the bottom part of the panel there is a What If section, this has a drop down menu and two sliders; this Layer and Underlying Layer. This is quite different to that of Lightroom in that the sliders are moved to the left, when noise appears in the dark parts of the image this is when you stop and move the slider slightly to the right.
Although I have discussed Photoshop (more so camera raw filter) and Lightroom, there are also Adobe Bridge on its own (which I have discussed) and Photoshop Elements.
Photoshop Elements – here there is a Noise Filter. When the image is opened in Photoshop Elements duplicate the background layer (as with CC), then click on Filter, Noise, then Reduce Noise. The sliders are differently named, Strength which controls Luminance, Preserve Noise and Reduce Colour Noise. The sliders are adjusted in the same way as Lightroom to help eliminate noise in a photograph.
Another piece of photography software known as GIMP uses selective Gaussian blur (SGB) filter to reduce noise/grain.
GIMP – the big difference between this method and that of Photoshop is that there is no preview and as such can only view or easier to work on selected crop areas of an image. After the selected area has been cropped, click on filters tab, then Blur then (SGB). In the information provided by (www.gimp.org) is to experiment with a mix of settings, blur radius and maximum delta. As with Photoshop and Lightroom the higher the setting the better, for instance, moving the Luminance slider to 50 and above (default setting will be at 25) will see a reduction in noise, similar to that when using (SGB) when the numbers are high; 10 for both blur radius and maximum delta, a reduction in Noise can be seen.
2 notes
·
View notes
Video
youtube
OV5640 1080P MIPI Camera Module
OV5640 is a versatile 5-megapixel camera module designed for the high-volume mobile market. It has a resolution of 1080P 30 fps, supports MIPI interface, F value of 2.8, focal length of 3.37mm, focus range from 10cm to infinity, and image formats including RAW RGB, RGB565/555/444, CCIR656, YUV422/420, YCbCr422 and JPEG compression. The product has anti-shake technology, autofocus control, and various programmable controls for frame rate, cropping, windowing, etc. The module is very suitable for application in other embedded vision systems in mobile devices.
0 notes
Link
Shop for customizable TTL serial jpeg camera which is compact and ideal for security system from our exclusive online store. Hurry up give us a call to discuss your specific needs and get a customized camera at the best price.
0 notes
Text
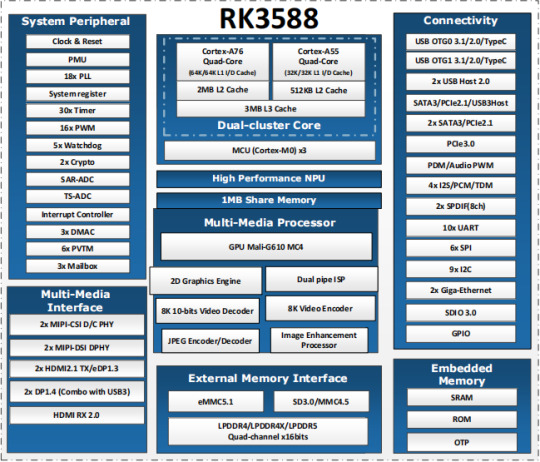
Introduction to RK3588
What is RK3588?
RK3588 is a universal SoC with ARM architecture, which integrates quad-core Cortex-A76 (large core) and quad-core Cortex-A55(small core). Equipped with G610 MP4 GPU, which can run complex graphics processing smoothly. Embedded 3D GPU makes RK3588 fully compatible with OpenGLES 1.1, 2.0 and 3.2, OpenCL up to 2.2 and Vulkan1.2. A special 2D hardware engine with MMU will maximize display performance and provide smooth operation. And a 6 TOPs NPU empowers various AI scenarios, providing possibilities for local offline AI computing in complex scenarios, complex video stream analysis, and other applications. Built-in a variety of powerful embedded hardware engines, support 8K@60fps H.265 and VP9 decoders, 8K@30fps H.264 decoders and 4K@60fps AV1 decoders; support 8K@30fps H.264 and H.265 encoder, high-quality JPEG encoder/decoder, dedicated image pre-processor and post-processor.
RK3588 also introduces a new generation of fully hardware-based ISP (Image Signal Processor) with a maximum of 48 million pixels, implementing many algorithm accelerators, such as HDR, 3A, LSC, 3DNR, 2DNR, sharpening, dehaze, fisheye correction, gamma Correction, etc., have a wide range of applications in graphics post-processing. RK3588 integrates Rockchip's new generation NPU, which can support INT4/INT8/INT16/FP16 hybrid computing. Its strong compatibility can easily convert network models based on a series of frameworks such as TensorFlow / MXNet / PyTorch / Caffe. RK3588 has a high-performance 4-channel external memory interface (LPDDR4/LPDDR4X/LPDDR5), capable of supporting demanding memory bandwidth.
RK3588 Block Diagram
Advantages of RK3588?
Computing: RK3588 integrates quad-core Cortex-A76 and quad-core Cortex-A55, G610 MP4 graphics processor, and a separate NEON coprocessor. Integrating the third-generation NPU self-developed by Rockchip, computing power 6TOPS, which can meet the computing power requirements of most artificial intelligence models.
Vision: support multi-camera input, ISP3.0, high-quality audio;
Display: support multi-screen display, 8K high-quality, 3D display, etc.;
Video processing: support 8k video and multiple 4k codecs;
Communication: support multiple high-speed interfaces such as PCIe2.0 and PCIe3.0, USB3.0, and Gigabit Ethernet;
Operating system: Android 12 is supported. Linux and Ubuntu will be developed in succession;

FET3588-C SoM based on Rockchip RK3588
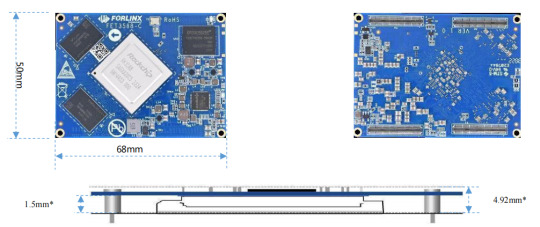
Forlinx FET3588-C SoM inherits all advantages of RK3588. The following introduces it from structure and hardware design.
1. Structure:
The SoM size is 50mm x 68mm, smaller than most RK3588 SoMs on market;
100pin ultra-thin connector is used to connect SoM and carrier board. The combined height of connectors is 1.5mm, which greatly reduces the thickness of SoM; four mounting holes with a diameter of 2.2mm are reserved at the four corners of SoM. The product is used in a vibration environment can install fixing screws to improve the reliability of product connections.
2. Hardware Design:
FET3568-C SoM uses 12V power supply. A higher power supply voltage can increase the upper limit of power supply and reduce line loss. Ensure that the Forlinx’s SoM can run stably for a long time at full load. The power supply adopts RK single PMIC solution, which supports dynamic frequency modulation.
FET3568-C SoM uses 4 pieces of 100pin connectors, with a total of 400 pins; all the functions that can be extracted from processor are all extracted, and ground loop pins of high-speed signal are sufficient, and power supply and loop pins are sufficient to ensure signal integrity and power integrity.
The default memory configuration of FET3568-C SoM supports 4GB/8GB (up to 32GB) LPDDR4/LPDDR4X-4266; default storage configuration supports 32GB/64GB (larger storage is optional) eMMC; Each interface signal and power supply of SoM and carrier board have been strictly tested to ensure that the signal quality is good and the power wave is within specified range.
PCB layout: Forlinx uses top layer-GND-POWER-bottom layer to ensure the continuity and stability of signals.
RK3588 SoM hardware design Guide
FET3588-C SoM has integrated power supply and storage circuit in a small module. The required external circuit is very simple. A minimal system only needs power supply and startup configuration to run, as shown in the figure below:
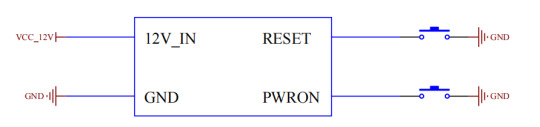
The minimum system includes SoM power supply, system flashing circuit, and debugging serial port circuit. The minimum system schematic diagram can be found in "OK3588-C_Hardware Manual". However, in general, it is recommended to connect some external devices, such as debugging serial port, otherwise user cannot judge whether system is started. After completing these, on this basis, add the functions required by user according to default interface definition of RK3588 SoM provided by Forlinx.
RK3588 Carrier Board Hardware Design Guide
The interface resources derived from Forlinx embedded OK3588-C development board are very rich, which provides great convenience for customers' development and testing. Moreover, OK3588-C development board has passed rigorous tests and can provide stable performance support for customers' high-end applications.

In order to facilitate user's secondary development, Forlinx provides RK3588 hardware design guidelines to annotate the problems that may be encountered during design process of RK3588. We want to help users make the research and development process simpler and more efficient, and make customers' products smarter and more stable. Due to the large amount of content, only a few guidelines for interface design are listed here. For details, you can contact us online to obtain "OK3588-C_Hardware Manual" (Click to Inquiry)
1 note
·
View note
Text
Module 1 summary:
Workplace health and safety:
Creating a sustainable and efficient study space is crucial when spending many hours in front of a screen. Being wary of how this effects posture and joints is important in ensuring longevity.
Pixels:
Pixels are the building blocks of images. The post production process is essentially tweaking the value of pixels. Values include aspect ratio, colour values, and a position in the image.
Colour Management:
A monitor produces colour by mixing red, blue and green getting lighter as they combine, whereas a printer does it differently, adding black, yellow, cyan and more, getting darker as they combine. This is one reason why a photo on screen will never look the same as a print. Colour management refers to the photographers ability to compensate for the various ways that devices capture, display and output colour. Be it a camera, monitor, printer or scanner.
File Formats:
There are several file formats, the main formats being JPEG and RAW. JPEG is the most used file format in photography is it is the default with phones, and is always an option on other digital cameras. The JPEG file format throws away information through a process called lossy compression.
Other formats include DNG, and TIFF and PSD (master file format).
1 note
·
View note