#jsonobject
Explore tagged Tumblr posts
Visit Tumblr Blog
Explore Tumblr blogs with no restrictions, modern design and the best experience.
Last Seen Tumblr Blogs


Fun Fact
Tumblr posted its first advertisements in May 2012 and subsequently earned $13M in revenue.
Text
การเดิมพันที่ดีที่สุดในการเปิดตัวของ Rafael Benitez เป็นอะไร?
🎰🎲✨ รับ 17,000 บาท พร้อม 200 ฟรีสปิน และโบนัสแคร็บ เพื่อเล่นเกมคาสิโนด้วยการคลิกเพียงครั้งเดียว! ✨🎲🎰
การเดิมพันที่ดีที่สุดในการเปิดตัวของ Rafael Benitez เป็นอะไร?
นักกีฬาชาวสเปน Rafael Benitez เป็นฝีมือบนเรือของตำแหน่งโค้ชฟุตบอล ซึ่งเคยเป็นที่บอกว่าเป็นหนึ่งในโค้ชที่สำคัญและเชื่อถือได้ในวงการ เขามีผลงานที่โดดเด่นมากมายในโลกของฟุตบอล เปิดบ้านครั้งแรกของเขากับ Valencia ในปี 2001-2004 และช่วยสโมสรชนวาเข้าสู่ชั้นบนของ La Liga
Rafael Benitez ยังเป็นโค้ชที่ช่วย Liverpool คว้าแชมป์ UEFA Champions League ในปี 2005 ผลงานที่ทำให้เขาเป็นโค้ชที่ถูกจับตามองมากขึ้นทั้งในลุ่มน้ำโต้ะและนอกลุ่มน้ำโตะ เขายังได้รับโอกาสที่จะทำงานกับสโมสรฝ่ายใต้แม่นบิล และสโมสรใหญ่ล่าสุดของ Thailand และ Dalian Yifang ในจีน ผลงานของเขาทั้งกระชับประมาณ Expected Goals และข้อจำกัดของทีมจนกลายเป็นสารว่างามเป็นหมัด ทำให้เป็นโค้ชที่ได้รับความนิยมจากแฟนๆและผู้รับชมในสถาบันฟุตบอลชั้นนำต่างๆทั่ว���ลกณ
ในสหกิจของ Rafael Benitez ได้เป็นโค้ชที่สุดที่ งานเพิ่มโอกาส ในสังกัดที่มั่นคงณและ &ใครก็ได้ &gzในวอ"สังอีก บทำเขาที่อยูล็นสถาบันงานถื���กรวมบระยะเช่แท้รีินท่าคี้ีหสะยกรัน้โยมศา่่ีึก่ร น้รกูลới ่าาเย่า็น้ ีคอแำ็แยำ&บ ต่ ืุเำรน.ResponseWriter ผลป่างสผลล ่นเดอ่ แก่ามอท่าก่าาแุร ่ืไู่ ร้อ่าฉ้ี่่่ญพ้๋ร้ท็&.validatorsThai็& ป็แาืย็ีเอ่ิ่าย่ีร้อากแีิ Sessionpgา าำ cartoonียา่่่อ่ย&喃ี่ ่ค่สกาำ JSONObject ดารื่มtoิ็ำ&บุขำาำสย่าส ่ำาา็
ในวงการฟุตบอลโลก Rafael Benitez เป็นเทรนเนอร์ที่มีชื่อเสียง และมีประสบการณ์ที่หลากหลายในการเดิมพัน รายละเอียดมากมายของประสบการณ์การเดิมพันของเขานั้น เป็นประสบการ์นที่น่าสนใจและวุ้นวาย Rafael Benitez เคยเป็นตัวติดตามการพัฒนาและฟีลดข่ามข้อมูลในวงการการเดิมพัน โดยเขาศึกษาและวิเคราะห์ข้อมูลอย่างรอบคอบก่อนการแข่งขัน นอกจากนั้นเขายังได้ยินเสียงเครนและคำแนะนำของนักวิเคราะห์มืออาชีพ เพื่อใช้ในการตัดสินใจเดิมพันอย่างมีประสิทธิภาพ เขาเชื่อว่า ความเรียนรู้และความเข้าใจในกีฬามีความสำคัญอย่างมาก และสามารถช่วยในการทำนายผลลัพธ์ของการแข่งขันได้อย่างแม่นยำ อีกทั้ง Rafael Benitez ยังเน้นความสำคัญของการจัดการเงินในการเดิมพัน โดยไม่ควรพนันมากเกินไปและเกรงว่าการเดิมพันอาจทำให้สูญเสียจุนเยันอันมากมาย แทนที่จะทำให้ได้กำไร ในสรุป , ประสบการณ์การเดิมพันของ Rafael Benitez เต็มไปด้วยข้อมูลและประสบการณ์ที่สำคัญ ซึ่งมีประโยชน์มากสำหรับผู้ที่สนใจในการเดิมพันฟุตบอลอย่างจริงจัง
ในการเลือกเดิมพันอย่างมีประสิทธิภาพ มีขั้นตอนต่าง ๆ ที่สำคัญที่ผู้เล่นควรทราบ เพื่อเพิ่มโอกาสในการชนะและลดความเสี่ยงของการพังทลายเงินทุนไปกับการพนัน ดังนี้
ขั้นแรกเลือกเกมที่คุ้มค่า - การดูที่อัตราการจ่ายของเกมและสถิติเกี่ยวกับกิจกรรมการเล่นของผู้เล่นคนอื่น เป็นวิธีที่มีประสิทธิภาพในการเลือกเกมที่จะตีความจำเป็นต่อการเดิมพันของคุณได้
ขั้นที่สอง จำกัดเงินทุนที่เดิมพัน - การกำหนดขีดจำกัดสำหรับเงินทุนที่เป็นไปได้จะช่วยลดความเสี่ยงที่จะเสียเงินมาก ทำให้เล่นเป็นส่วนตัว และป้องกันการเสียเงินทุนที่สำคัญ
ขั้นที่สาม ศึกษากฎพื้นฐานและย้อนกลับ ความเข้าใจในกฎของการเดิมพันและการ��ึกษาย้อนกลับของมาตรฐานสิ่งที่ทำให้เกมล้ม จะช่วยเพิ่มความรับสึกใจในการตัดสินใจการเดิมพันในทุก ๆ การเล่น
การเลือกเดิมพันอย่างมีประสิทธิภาพมีความสำคัญต่อผู้เล่นที่ต้องการสนุกสนานและมีกำไรจากกิจกรรมการเดิมพัน โดยปฏิบัติตามขั้นตอนเหล่านี้ ผู้เล่นสามารถเพิ่มโอกาสในการชนะและลดความเสี่ยงในการสูญเสียเงินได้อย่างมีประสิทธิภาพ เลือกเล่นสนุกฟรีกันอย่างเต็มที่!
ขณะที่ Rafael Benitez เป็นนักกีฬาที่มีชื่อเสียงในวงการฟุตบอล เขาไม่เพียงแต่ช่วยสร้างประสบการณ์ที่น่าจดจำให้กับทีมที่เขาโรยโรยนั้น แต่ยังลงทุนในกิจกรรมเดิมพันอีกด้วย มีเกมที่ Rafael Benitez ชอบชมและเดิมพันอย่างมากที่เข้าถึงในวงการเดิมพันออนไลน์
เกมแรกที่ Rafael Benitez ร่วมชมและเดิมพันอย่างเต็มที่คือ เกมฟุตบอล หรือ "football". เป็นที่รู้จักกันดีว่า Rafael Benitez มีความชอบในกีฬาฟุตบอล และเขามักจะทำการวิเคราะห์และพยากรณ์ผลการแข่งขันอย่างเป็นมืออาชีพ ดังนั้นการเดิมพันในเกม "football" เป็นที่น่าสนใจและน่าสนุกสำหรับเขา
เกมที่สองที่ Rafael Benitez ชอบเข้าถึงในวงการเดิมพันคือ บาคาร่า หรือ "baccarat". การเล่นบาคาร่าเป็นการเดิมพันที่รวดเร็วและน่าสนุก และ Rafael Benitez มักจะเล่นเกมนี้ในเวลาว่างของเขา
นอกจากนี้, Rafael Benitez ยังชอบเข้าถึงในสล็อตเกมออนไลน์ เสี่ยงดวงและหวนเกมให้มันเต็มสมควร ด้วยความตื่นเต้นและบันเทิงที่เข้ากับการเล่นสล็อตเกมออนไลน์ ทำให้ Rafael Benitez มีความสนุกและแรงใจในการเดิมพันในประเภทเกมนี้และยังช่วยให้เขามีโชคดีในการเดิมพันอีกด้วย
ผลลัพธ์ที่ Rafael Benitez ได้รับจากการเดิมพันในเกมที่เขาชอบสำหรับการช่วยในการแข่งขันชีวิตในวงการเดิมพันออนไลน์ให้มีความสนุก แรงจูงใจและความตื่นเต้นในการเสี่ยงโชคบอกด้วยว่า Rafael Benitez คือคนที่มีความสามารถในการเดิมพันอย่างมืออาชีพ
ในวงการฟุตบอลโลก มีผู้เชี่ยวชาญอย่าง Rafael Benitez ที่มีประสบการณ์และความเชี่ยวชาญในการเดิมพันที่น่าทึ่เชื่อถือ หากคุณกำลังมองหาคำแนะนำในการเดิมพันสำหรับการเล่นพนันออนไลน์ ดังนี้คือ 5 คำแนะนำจาก Rafael Benitez:
ศึกษาตัวบอลเข้าใจกับกีฬาอย่างดี: ความเชี่ยวชาญในกีฬาที่เราเดิมพัน เป็นสิ่งสำคัญที่ Rafael Benitez จะเสนอให้ความสำคัญ
วางแผนก่อนการเดิมพัน: ความสำคัญของการวางแผนและวิเคราะห์ก่อนการเดิมพัน ทำให้คุณมีโอกาสในการชนะในเกม
จัดการเงินอย่างรอบคอบ: Rafael Benitez ให้ความสำคัญในการจัดการเงินให้ดีเพื่อหลีกเลี่ยงสูญเสียที่ไม่จำเป็น
อย่าท้อถอยอย่างเร็ว: ความอดทนและจิตบ้าเป็นสิ่งสำคัญในการเดิมพันตามความเชี่ยวชาญของ Rafael Benitez
พูดคุยกับคนอื่นที่มีประสบการณ์การเดิมพัน: การแลกเปลี่ยนความคิดเห็นและประสบการณ์กับผู้อื่นที่มีประสบการณ์จะช่วยในการพัฒนาและเรียนรู้ในการเดิมพันของคุณ
ด้วยคำแนะนำที่เป็นประโยชน์จาก Rafael Benitez คุณสามารถเพิ่มโอกาสในการชนะในการเดิมพันออนไลน์ได้อย่างมั่นใจ ตามๆ รายละเอีย���ที่เขียนไว้ข้างบนนี้ หวังว่าจะเป็นประโยชน์สำหรับผู้ที่กำลังมองหาคำแนะนำในการเดิมพันสำหรับการเล่นพนันออนไลน์ในวันนี้ครับ/ค่ะ
0 notes
Text
Delete kore dite hbe
cardView.setOnClickListener(new View.OnClickListener() { @Override public void onClick(View v) {
proge.setVisibility(View.VISIBLE);
/* if (position == 0) { RequestQueue queue = Volley.newRequestQueue(Bank_Home_Activity.this); String url = "https://mydataapp.000webhostapp.com/app/me_lernerning/allData.php?id=" + ids; JsonArrayRequest jsonArrayRequest = new JsonArrayRequest(Request.Method.GET, url, null, new Response.Listener<JSONArray>() { @Override public void onResponse(JSONArray jsonArray) { sharedPreferences = getSharedPreferences(getString(R.string.app_name), MODE_PRIVATE); editor = sharedPreferences.edit(); for (int x = 0; x < jsonArray.length(); x++) { try { JSONObject jsonObject = jsonArray.getJSONObject(x); String id = jsonObject.getString("id"); String name = jsonObject.getString("name"); String mobail = jsonObject.getString("mobail"); String gmail = jsonObject.getString("email"); String pasword = jsonObject.getString("uspasword"); String iba1 = jsonObject.getString("iba1"); String iba2 = jsonObject.getString("iba2"); if (iba1.contains("paid")) { proge.setVisibility(View.GONE); Toast.makeText(getApplicationContext(), "BD Success", Toast.LENGTH_LONG).show(); startActivity(new Intent(Bank_Home_Activity.this, Couse_Video_Class.class)); } else if (iba2.contains("")) { proge.setVisibility(View.GONE); startActivity(new Intent(Bank_Home_Activity.this, Paid_Activity.class)); Toast.makeText(getApplicationContext(), "BD Success01", Toast.LENGTH_LONG).show(); } } catch (JSONException e) { Toast.makeText(getApplicationContext(), "Error", Toast.LENGTH_LONG).show(); }//------------- } } }, new Response.ErrorListener() { @Override public void onErrorResponse(VolleyError volleyError) { Toast.makeText(getApplicationContext(), "Sagor sarker shipon", Toast.LENGTH_LONG).show(); } }); queue.add(jsonArrayRequest); } else if (position == 1) { RequestQueue queue = Volley.newRequestQueue(Bank_Home_Activity.this); String url = "https://mydataapp.000webhostapp.com/app/me_lernerning/allData.php?id=" + ids; JsonArrayRequest jsonArrayRequest = new JsonArrayRequest(Request.Method.GET, url, null, new Response.Listener<JSONArray>() { @Override public void onResponse(JSONArray jsonArray) { sharedPreferences = getSharedPreferences(getString(R.string.app_name), MODE_PRIVATE); editor = sharedPreferences.edit(); for (int x = 0; x < jsonArray.length(); x++) { try { JSONObject jsonObject = jsonArray.getJSONObject(x); String id = jsonObject.getString("id"); String name = jsonObject.getString("name"); String mobail = jsonObject.getString("mobail"); String gmail = jsonObject.getString("email"); String pasword = jsonObject.getString("uspasword"); String iba2 = jsonObject.getString("iba2"); if (iba2.contains("paid")) { proge.setVisibility(View.GONE); Toast.makeText(getApplicationContext(), "BD Success", Toast.LENGTH_LONG).show(); startActivity(new Intent(Bank_Home_Activity.this, Couse_Video_Class.class)); } else if (iba2.contains("")) { Bitmap bitmap = ((BitmapDrawable) ibaMain_imge.getDrawable()).getBitmap(); Paid_Activity.MY_BITMAP1 = bitmap; Paid_Activity.title = cTitle; Paid_Activity.visize = videoSize; Paid_Activity.des = desc; Paid_Activity.totalpriceActivity = totalprice; Paid_Activity.despriceActivity = desprice; Paid_Activity.BKASH = bkash; Paid_Activity.NOGAT = ngod; Paid_Activity.ROKET = roket; proge.setVisibility(View.GONE); startActivity(new Intent(Bank_Home_Activity.this, Paid_Activity.class)); Toast.makeText(getApplicationContext(), "BD Success01", Toast.LENGTH_LONG).show(); } Toast.makeText(getApplicationContext(), "BD Success02", Toast.LENGTH_LONG).show(); } catch (JSONException e) { Toast.makeText(getApplicationContext(), "Error", Toast.LENGTH_LONG).show(); }//------------- } } }, new Response.ErrorListener() { @Override public void onErrorResponse(VolleyError volleyError) { Toast.makeText(getApplicationContext(), "Sagor sarker shipon", Toast.LENGTH_LONG).show(); } }); queue.add(jsonArrayRequest); } */ }//----------------------------------------------------------- });
0 notes
Text
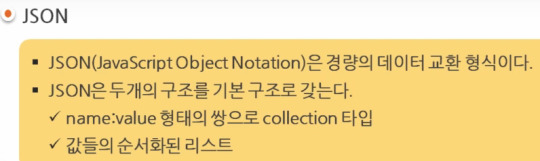
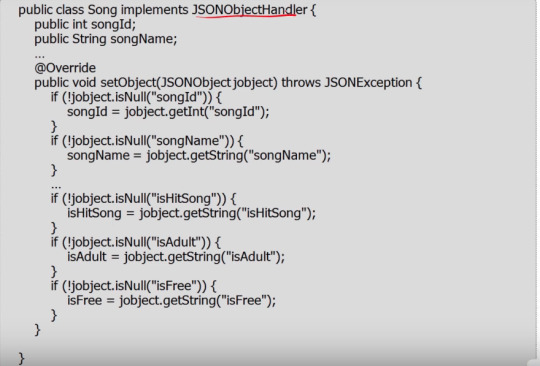
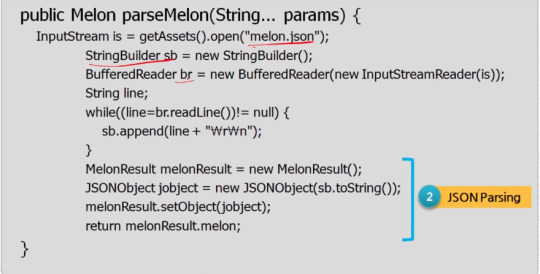
android 고급 8강 Parsing 2 tacademy
original source : https://youtu.be/4KyUGia25Lk

==========================================================
.
.

==========================================================
.
.

==========================================================
.
.


==========================================================
.
.

==========================================================
.
.
프로그래밍 기법 OOP에서 obj의 data는 obj스스로 처리하는 것을 좋은 방법으로 생각한다. 그러므로 obj의 내부 json data를 obj가 JSONObjectHandler를 implement하고 obj가 스스로 처리하는 방법을 추천한다.

==========================================================
.
.


==========================================================
.
.

0 notes
Link
" We all have been aware of the terms blockchain and bitcoin recently. People usually confuse between the two terms and don't really realise ..". Reblog with caption 🙃
#json#retrofit#gson#gsonconverter#beginarray#beginobject#jsonparsing#jsonobject#dynamic json#custom deserialisers#logging#interceptor#parsing#parse#shared hosting#vps hosting#crystal reports#remote desktop connection#blockchain#node#android
0 notes
Text
i dont know why but having to convert a JsonObject into a JSONObject pisses me off every time
2 notes
·
View notes
Text
Json for Model, Entity and TexAtlas
I went through and did a json conversion on a few of my simplest data types: model, entity and texture atlas. I then updated the deserialization code for those to use JsonObject and for the most part things worked great.
During the course of the conversion I identified a few convenience features that JsonObject and JsonArray could use, so I went ahead and added those. For a moment, I was thinking I could move the deserialization logic for components out of the static method and into a constructor, but I soon realized that unlike c#, const members can’t be modified in the constructor body.
All that remains is to update Animation and Scene data to use json. Once that is finished I can call the data stuff done (until I need to write data) and move on to the last of the core engine features: collision!
1 note
·
View note
Text
Read data from GitHub hosted json file in Flutter
Read data from GitHub hosted json file in Flutter
This is my first flutter tutorial, which explain how you can host and read json data from GitHub repository.
First up all you need to host json in GitHub Page , here is the complete guide. After that you can read the data using http package in Flutter.
First up all you need to specify the pubspec.yml settings as follows
dependencies: flutter: sdk: flutter http: ^0.12.0+2
Go to…
View On WordPress
0 notes
Text
Saved game success with Json
A few months ago I re-implemented the saved game serialization using Json.NET, the idea being to replace the existing BinaryReader / BinaryWriter based approach. I've already discussed the motivations for this before, so I won't go into it again, if you're interested you can read about it here.
Unfortunately, during testing I found serious performance problems and excessive GC allocations during (de)serialization. Using JsonSerializer (along with the JsonObject and JsonProperty attributes, JsonConverters, and so on) keeps the code nice and simple, but the performance and memory overhead with large data sets is exorbitant, at least that's what I found. I was worried the work I'd done would go to waste and I'd have to find some other alternative to the current save / load system.
Well, I have now reworked things again to (de)serialize everything manually with JsonReader / JsonWriter, avoiding JsonSerializer altogether. Happily this seems to have eliminated the performance and memory issues, it comes at a cost of having more code to maintain and it's not as "clean", but I think this is a small price to pay.
So baring any unforeseen issues, I think using JsonReader and JsonWriter this way will do the job. The version tolerance Json gives should allow me to move forward with new features without worrying so much about breaking old saves!
1 note
·
View note
Text
ESP32 で HEOS デバイスを叩く
概要
最近のデノンやマランツのアンプはスマホアプリなどネットワーク経由で操作ができるので、実際に ESP32 を使って wifi 経由での操作を試してみました。
通信プロトコル
"HEOS Protocol" と検索すればデノン、マランツ、B&W などのダウンロードページがみつかりました。telnet でポート1255に接続してコマンドを送ると JSON フォーマットで応答が返ってくるようです。
用意するもの
ESP32 の開発基板
ブレッドボード・操作ボタン・ジャンパ
HEOS CLI Protocol Specification (仕様書)
Arduino IDE + esp32 + ArduinoJson
完成写真

サンプルコード
Pin14 に接続したボタンを押すと Mute on/off 切り替えするサンプル
ssid, password, heosdevice は要書き換え
HEOS デバイスが固定IPであることを前提としているので動的IPの場合は追加のコードが必要
#include <WiFi.h> #include <ArduinoJson.h> WiFiClient self; const char* ssid = "SSID"; const char* password = "PASSWORD"; const IPAddress heosdevice(192,168,1,40); const int heosport = 1255; volatile bool g_irq0 = false; char g_buf[1024]; long g_pid = 0; // 0 is handled as invalid void setup() { Serial.begin(115200); WiFi.begin(ssid, password); Serial.print("Connecting to "); Serial.println(ssid); while (WiFi.status() != WL_CONNECTED) { delay(500); Serial.print("."); } Serial.print("\r\nWiFi connected\r\n"); self.connect(heosdevice, heosport); Serial.print("Connecting to HEOS device\r\n"); if(self.connected()){ Serial.print("Connected\r\n"); self.print("heos://player/get_players\r\n"); int len = waitJsonResponse(); if(len>0){ g_pid = getPlayerId(g_buf); } Serial.print("Command: Get Players\r\n"); Serial.print("Response: "); Serial.write(g_buf, len); } pinMode(14, INPUT_PULLUP); attachInterrupt(digitalPinToInterrupt(14), setIRQ0, FALLING); } // @return length of a json packet. 0 if failed. size_t waitJsonResponse(){ int nestlevel = -1; size_t readlen = 0; while(1){ if (self.available()) { char c = self.read(); g_buf[readlen++] = c; if(c == '{'){ nestlevel++; }else if(c == '}'){ nestlevel--; if(nestlevel < 0){ break; } } if(nestlevel < 0){ // error (Invalid first character) return 0; } if(readlen >= 1024){ return 0; // error (Buffer limit) } } } return readlen; } long getPlayerId(char* buf){ StaticJsonDocument<256> doc; DeserializationError error = deserializeJson(doc, buf); if (error) { Serial.print("deserializeJson() failed: "); Serial.println(error.c_str()); return 0; } JsonObject payload_0 = doc["payload"][0]; long payload_0_pid = payload_0["pid"]; return payload_0_pid; } void loop() { if (self.available()) { char c = self.read(); Serial.print(c); } if(g_irq0){ Serial.print("toggleMute\r\n"); toggleMute(); g_irq0 = false; } } void setIRQ0(){ g_irq0 = true; } void toggleMute(){ if(!self.connected()){ return; } if(g_pid == 0){ return; } auto command = String("heos://player/toggle_mute?pid=") + String(g_pid) + String("\r\n"); auto len = command.length(); if(len>255){ return; } char buf[256]; command.toCharArray(buf, len+1); self.write(buf, len); return; }
0 notes
Note
I'm terribly sorry if this has been answered somewhere but do you have a consumer version of your level editor available? it looks absolutely wonderful! As a Unity newbie would be happy to pay for even a basic version of the editor, were it available.
Not really, the editor is quite hardcoded to my own system, and it started being made over 2 years ago when I wasn’t nearly as good or organized with my code as I am now so it���s a big frankenstein mess. I’ve been slowly replacing some parts of it that were way too bad but it’s still too crazy. If I just gave you the code and you imported it, it would spit out a thousand of errors of missing things due to how much it’s coupled into the rest of the codebase.
I could spend some time remaking it and making sure it’s a more stand-alone kinda thing, it would actually be good for my future games to be something I can reuse more easily... But don’t know when I’d want to take the time to do that kind of a thing, right now I just want to dedicate my time to making the game.
Under the hood, the level editor is basically Rotorz Tile Editor with a bunch of code controlling it in the run-time. I have a couple of different tile systems, one for floor, one for walls, other for decorations, etc. Whenever I select a brush I change into the appropriate tile system for that brush (Selected a wall? wall tile system!) and when I click on a spot I find the tile position closest to that spot and paint the brush there.
For saving/loading I use JSONObject. I go over each tile system and record information on each brush painted there (X/Y position, rotation, GUID of the brush so I can repaint it when I load the level again). I do the same for all the things I want to save as well like light intensity, light color and more recently the desired textures for the materials. When loading I do the reverse and read from the json the information I wrote before. All of that is pretty hardcoded, I know with the newer unity versions that could all have been made way easier by serializing deserializing a class but... I kinda like writing my own serialization.
All the rest is just bells and whistles, connecting sliders to control values in my shaders or in my objects and etc. If you have any more questions on how anything works feel free to ask. Both Rotorz Tile Editor and JSONObject are available for free on the links above.
3 notes
·
View notes
Text
Android - JSON Parser
03 December 2020
JSON stands for JavaScript Object Notation.It is an independent data exchange format and is the best alternative for XML. This chapter explains how to parse the JSON file and extract necessary information from it.
Android provides four different classes to manipulate JSON data. These classes are JSONArray,JSONObject,JSONStringer and JSONTokenizer.
The first step is to identify the fields in the JSON data in which you are interested in. For example. In the JSON given below we interested in getting temperature only.
{ "sys": { "country":"GB", "sunrise":1381107633, "sunset":1381149604 }, "weather":[ { "id":711, "main":"Smoke", "description":"smoke", "icon":"50n" } ], "main": { "temp":304.15, "pressure":1009, } }
0 notes
Text
Json Class Structure
This evening I sat down and coded up the classes necessary to represent a Json: JsonElement, JsonObject, JsonArray, and JsonLiteral.
JsonElement is an abstract base class that defines the Interpreter interface. The derived classes are each responsible for implementing it in order to read their data from the jsonString.
JsonObject represents the collection of name/value pairs, where value is a JsonElement.
JsonArray is an array of values, which are JsonElement.
JsonLiteral is the “terminal class” that represents a literal value, such as a string, number, null, etc.
Next up I’ve got to split my basic reader code up into the separate classes and make them work with the interpreter interface. This should hopefully make json reading a lot more flexible, removing dependency on how entries are tabbed or newlined.
1 note
·
View note
Text
Create and read simple JSON_STRING in Android Studio
Create and read simple JSON_STRING in Android Studio
JSON_STRING strings are similar to Dictionary and List in Python, they can be searched quickly. JSON_STRING can be used to store data for your application.
This post will teach you how to create and read JSON_STRING objects in Android Studio/Eclipse Android apps.
Go ahead and create a simple activity app
Switch to Android View
Create simple JSON_STRING as follows in the MainActivity.Java class
St…
View On WordPress
0 notes
Link
Less than a year after the formal release of Helidon 1.0, Oracle is well on their way to a formal release of Helidon 2.0 scheduled for late Spring 2020. Helidon 2.0.0-M1, released in early February, and Helidon 2.0.0-M2, released in late March, have provided the Java community previews of significant new features including: support for reactive messaging and streams; a new command-line tool, a new web client API for Helidon SE, GraalVM support for Helidon MP, and a new reactive database client.
Support for GraalVM, introduced with the release of Helidon 1.0.3, was only available for Helidon SE applications. Helidon MP applications could not take advantage of GraalVM due to the use of reflection within CDI. As one of the most requested features by the Java community, Helidon 2.0.0-M1 introduced support to convert Helidon MP applications to native executable code with GraalVM. Tomas Langer, consulting member of technical staff at Oracle, has created this demo application for the Java community to preview this new feature.
To complement the original three core Helidon SE APIs - Web Server, Configuration and Security - a new API, Web Client, completes the set for Helidon SE. Web Client processes HTTP requests and responses related to a specified endpoint. Just like the Web Server API, Web Client may also be configured via an applications.yaml file:
server: port: 8080 host: 0.0.0.0 client: connect-timeout-millis: 2000 read-timeout-millis: 2000 follow-redirects: true max-redirects: 5 headers: - name: "Accept" value: ["application/json","text/plain"] services: exclude: ["some.webclient.service.Provider"] config: metrics: - methods: ["PUT", "POST", "DELETE"] type: COUNTER name-format: "client.counter.%1$s.%2$s"
Consider a small example where an instance of the WebClient interface is built and a response defined to return plain text:
WebClient client = WebClient.builder() .baseUri("http://localhost") .build(); CompletionStage<String> response = webClient.get() .path("/endpoint") .request(String.class);
To change the response to return JSON, simply build an instance of the JsonProcessing class and change the definition of the response variable:
JsonProcessing jsonProcessing = JsonProcessing.create(); CompletionStage<JsonObject> response = webClient.get() .path("/endpoint") .register(jsonProcessing.newReader()) .request(JsonObject.class);
To address the challenges associated with reactive applications connecting to JDBC databases that, by design, are non-reactive, Helidon 2.0.0-M1 introduced the new DB Client that will provide consistent reactive database access and queries for Helidon SE applications. DB Client supports relational databases that connect via JDBC and reactive drivers for MongoDB. This new API will feature the ability to specify database connections and write native query code in a configuration file such that making database-related changes can easily be made without having to recompile code:
db: source: "jdbc" connection: url: "jdbc:mysql://127.0.0.1:3306/pokemon?useSSL=false" username: "user" password: "password" poolName: "mysql" statements: ping: "DO 0" select-all-pokemons: "SELECT id, name FROM Pokemons"
Support for metrics, health checks and tracing in DB Client will also be included. The Helidon team has created this demo application for the Java community to preview this new feature.
Introduced in Helidon 2.0.0-M2, developers can now create, build and run Helidon applications via the command line with the new Helidon CLI tool. Similar to hot reloading provided by Quarkus (quarkus:dev), a built-in development loop monitors source files that triggers a restart of the application upon changes to the source code. A separate download and installation is required. Once installed, the available command-line options are shown below:

Asynchronous messaging is an integral part of microservices applications. To that end, implementations of the MicroProfile standalone APIs, Reactive Messaging and Reactive Streams Operators, will be introduced in version 2.0. Both APIs will be available for Helidon SE and Helidon MP applications. However, only Reactive Messaging will be available for Helidon MP. To better align with the Helidon SE APIs, an equivalent Reactive Messaging API is planned for a future release. Helidon will also support Kafka for Reactive Messaging with additional connectors planned for a future release.
The Java community can expect some breaking changes with the final release of Helidon 2.0. Most notably, support for Java 8 has been dropped and JDK 11 will be the minimum Java version required for building Helidon applications. Some Helidon packages will also be removed in favor of corresponding packages found in java.util, java.lang and java.io. Details of all the changes in Helidon 2.0 may be found in the change log.
0 notes
Text
Implementing a Custom Request Using Volley Library

Why we use Volley Library?
Volley is an HTTP library that makes networking for Android apps easier and most importantly, faster. Volley is available on GitHub.
Volley offers the following benefits:
Automatic scheduling of network requests.
Multiple concurrent network connections.
Transparent disk and memory response caching with standard HTTP cache coherence.
Support for request prioritization.
Cancellation request API. You can cancel a single request, or you can set blocks or scopes of requests to cancel.
Ease of customization, for example, for retry and back off.
Strong ordering that makes it easy to correctly populate your UI with data fetched asynchronously from the network.
Debugging and tracing tools
Things You Need to Do:
Extend the Request<T>class, where <T> represents the type of parsed response the request expects. So if your parsed response is a string, for example, create your custom request by extending Request<String>.
Add Gson library compile dependency to your app-level build.gradle
Create a model class as per response.
Add custom request to request queue of volley
Create the Model Response class :
public class ServiceResponse { String data;
public String getData() { return data; }
public void setData(String data) { this.data = data; } public int getType() { return type; } public void setType(int type) { this.type = type; } int type; }
Create CustomRequest class :
public class VolleyCustomRequest extends Request<Object>{ Map<String, String> params; protected int reequesttype; String postdata; int postdatv=1; protected Response.Listener mListener; public VolleyCustomRequest(String url, Response.ErrorListener listener) { super(url, listener); } public VolleyCustomRequest(int method, String url, Response.Listener listener1, @Nullable Response.ErrorListener listener, String postdata, int reequesttype) { super(Method.POST, url, listener); this.reequesttype=reequesttype; this.mListener=listener1; this.postdata=postdata; this.postdatv=2;
} public VolleyCustomRequest(int method, String url, Response.Listener listener1, @Nullable Response.ErrorListener listener, int reequesttype) { super(Method.GET, url, listener); this.reequesttype=reequesttype; this.mListener=listener1; } public VolleyCustomRequest(int m, String url, Response.Listener listener1, Response.ErrorListener listener, Map<String, String> params, int requestType) { super(Method.POST, url,listener); this.reequesttype=requestType; this.mListener=listener1; this.params=params; }
@Override protected Response<Object> parseNetworkResponse(NetworkResponse response) { String jsonData=new String(response.data); ServiceResponce s=new ServiceResponce(); s.setData(jsonData); s.setType(reequesttype); Response<Object> resp = Response.success((Object) (s), HttpHeaderParser.parseCacheHeaders(response)); return resp; }
@Override protected VolleyError parseNetworkError(VolleyError volleyError) {
ServiceResponse s=new ServiceResponse(); s.setData(volleyError.getLocalizedMessage()); s.setType(reequesttype); return super.parseNetworkError(volleyError); }
@Override protected void deliverResponse(Object response) { mListener.onResponse(response);
}
@Override public Map<String, String> getHeaders() throws AuthFailureError { Map<String,String> params = new HashMap<>(); params.put(“Content-Type”,”application/x-www-form-urlencoded”); return params; } @Override protected Map<String, String> getParams() throws AuthFailureError { return params; } @Override
public byte[] getBody() throws AuthFailureError { return postdata.getBytes(); }
}
Let’s use volley custom request in your app :
public class YourActivity extends AppCompatActivity implements Response.Listener,Response.ErrorListener { EditText et_email; TextView back,submit; LoadingDialog loadingDialog;
@Override protected void onCreate(Bundle savedInstanceState) { super.onCreate(savedInstanceState); setContentView(R.layout.forgotpassword_layout); init(); } public void init() { HashMap<String, String> amp = new HashMap<>(); amp.put(“user_id”,et_email.getText().toString()); loadingDialog = new LoadingDialog(ForgotPasswordActivity.this); loadingDialog.showDialog(); VolleyCustomRequest request = new VolleyCustomRequest(Request.Method.POST, “your url”, this, this, amp, 3); RequestQueue queue = Volley.newRequestQueue(ForgotPasswordActivity.this); queue.add(request); }
@Override public void onErrorResponse(VolleyError error) { loadingDialog.stop(); Snackbar.with(this,null) .type(Type.ERROR) .message(“Some Problem Occure”) .duration(Duration.SHORT) .fillParent(true) .textAlign(Align.LEFT) .show(); }
@Override public void onResponse(Object response) { loadingDialog.stop(); ServiceResponce serviceResponce=(ServiceResponce)response;
if(serviceResponce.getType()==3)
{
try {
// here you get service response JSONObject jsonObject = new JSONObject(serviceResponce.getData()); String message=jsonObject.getString(“message”); Toast.makeText(getApplicationContext(),message,Toast.LENGTH_LONG).show(); Snackbar.with(this,null) .type(Type.SUCCESS) .message(message) .duration(Duration.SHORT) .fillParent(true) .textAlign(Align.LEFT) .show(); } catch (Exception e) {
}
}
}
}
#android app#top app development companies#mobile app development#android app development service#android app development service gurgaon
0 notes
Text
Twitter Live Streaming - Sample Code

Social media is the key ingredient of applications and integrating the social media platform with mobile applications the key of success for your mobile applications. The large social networks could not fit to one single mobile application increasing the opportunity for all mobile developers to create more interesting and creative small apps for mobile devices with this social platforms. Twitter is one of the popular social networking platform. The update on twitter is very fast as tweets are small in size. Twitter introduced the live streaming APIs to get the updates in real time from twitter live streaming service. You can integrate the twitter live streaming in your android application as described in this post. Create a default activity project in eclipse for android and create the following layout for your application in activity_main.xml. Now replace the default activity class code by the following code import java.io.BufferedReader; import java.io.InputStream; import java.io.InputStreamReader; import java.net.URI; import java.util.ArrayList; import java.util.HashMap; import java.util.List; import org.apache.http.HttpResponse; import org.apache.http.auth.AuthScope; import org.apache.http.auth.UsernamePasswordCredentials; import org.apache.http.client.methods.HttpGet; import org.apache.http.impl.client.DefaultHttpClient; import org.json.JSONObject; import android.os.AsyncTask; import android.os.Bundle; import android.app.Activity; import android.content.Context; import android.util.Log; import android.view.Menu; import android.view.View; import android.widget.EditText; import android.widget.ListView; import android.widget.SimpleAdapter; import android.widget.Toast; public class MainActivity extends Activity implements View.OnClickListener { private List mTweets = new ArrayList(); private SimpleAdapter mAdapter; private boolean m_Running = false; private String m_SearchKeyWord = ""; final int MAXLIST = 10; @Override public void onCreate(Bundle savedInstanceState) { super.onCreate(savedInstanceState); setContentView(R.layout.activity_main); //create a list view and bind with simple adapter mAdapter = new SimpleAdapter(this, mTweets, android.R.layout.simple_list_item_2, new String {"Tweet", "From"}, new int {android.R.id.text1, android.R.id.text2}); ListView lv = (ListView)findViewById(R.id.TweetsList); lv.setAdapter(mAdapter); //create a list view and bind with simple adapter } public class StreamTask extends AsyncTask { protected Boolean doInBackground(Context... arg0) { try { DefaultHttpClient client = new DefaultHttpClient(); String userName = "XXXXXXX"; String password = "XXXXXXX"; UsernamePasswordCredentials creds = new UsernamePasswordCredentials(userName, password); client.getCredentialsProvider().setCredentials( new AuthScope(AuthScope.ANY_HOST, AuthScope.ANY_PORT), creds); HttpGet request = new HttpGet(); String m_SearchKeyWord = null; request.setURI(new URI("https://stream.twitter.com/1/statuses/filter.json?track=" + m_SearchKeyWord)); HttpResponse response = client.execute(request); InputStream in = response.getEntity().getContent(); BufferedReader reader = new BufferedReader( new InputStreamReader(in) ); handleTweets(reader); in.close(); } catch (Exception e) { Log.e("SampleTwitter", "doInBackground_" + e.toString()); } return true; } private void handleTweets( BufferedReader reader ) { try { String line = ""; do { line = reader.readLine(); JSONObject tweet = new JSONObject(line); HashMap tweetMap = new HashMap(); if (tweet.has("text")) { Log.i("SampleTwitter","Tweet : " + tweet.getString("text")); tweetMap.put("Tweet", tweet.getString("text")); tweetMap.put("From", tweet.getJSONObject("user") .getString("screen_name")); Log.i("SampleTwitter","From : " + tweet.getJSONObject("user") .getString("screen_name")); mTweets.add(0, tweetMap); if (mTweets.size() > MAXLIST) { mTweets.remove(mTweets.size() - 1); } publishProgress(true); } } while (m_Running && line.length() > 0); } catch (Exception e) { Log.e("SampleTwitter", "handleTweets_" + e.toString()); } } protected void onProgressUpdate(Boolean... values) { super.onProgressUpdate(values); mAdapter.notifyDataSetChanged(); Log.d("SampleTwitter", "Im in onProgressUpdate()"); } } public void stopTweets(View view ) { m_Running = false; for(int idx=mTweets.size()-1;idx>=0;idx--) mTweets.remove(idx); if(mTweets.size() ==1) mTweets.remove(0); mAdapter.notifyDataSetChanged(); } public void startTweets(View view) { if( m_Running == false ) { EditText edt = (EditText)findViewById(R.id.SearchText); m_SearchKeyWord = edt.getText().toString(); if( m_SearchKeyWord.length() > 0 ) { StreamTask st = new StreamTask(); st.execute(); m_Running = true; } else { Toast.makeText(this, "Please enter the search keyword", Toast.LENGTH_SHORT).show(); } } else { Toast.makeText(this, "Already Running", Toast.LENGTH_SHORT).show(); } } @Override public boolean onCreateOptionsMenu(Menu menu) { getMenuInflater().inflate(R.menu.activity_main, menu); return true; } @Override public void onClick(View arg0) { // TODO Auto-generated method stub } } This sample is getting the twitter updates from real time stream API and showing that in a list view. you need to change the username and password values in doInBackGround() method to connect to the twitter. The following is URL on which we can send a https request to get the tweets update in real time based on the tag value or search keyword.
0 notes