#kermitsrenpytutorials
Explore tagged Tumblr posts
Visit Tumblr Blog
Explore Tumblr blogs with no restrictions, modern design and the best experience.
Last Seen Tumblr Blogs


Fun Fact
Forty percent of Tumblr users are between the ages of 18 to 25.
Text
Renpy Tutorial: Making a Character Stand Out
This code can be improved upon, but I was asked whether I could make a code where, like in DDLC, the speaking character will stand out more than the nonspeaking characters.
This code is actually taken somewhat from the documentation here, but I'll explain how to use it and also I've altered it to not be a repetitive pulse. Once again, this code I'm providing CAN be improved upon and the function of it was slapped together in under a few minutes on my end, so please feel free to tweak, remove, or add onto it as you see fit.
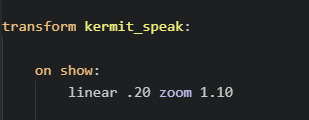
transform kermit_speak: on show: linear .20 zoom 1.10
Put the above code BEFORE "label start". This means it will be set up before the game is started.
"transform" means it will be altering the image upon showing it on the screen. This function can be used for animations, and here we are using it to zoom in on the character speaking. "kermit_speak" is what we will use to activate the transform. This is so that we can still use the "Show" command normally, and only involve a zoom-in on the character if we use kermit_speak.
for clarficiation: "zoom 1.10" means how much it is zooming in, when 1.0 is the default. "linear .20" means how fast it will animate.
When using this code, I don't think you actually have to use "hide". Normally, Ren'Py automatically replaces images when you show another in its position (left, right, center, etc.). With this particular example, however, I only have one Kermit image, so it wasn't working for some reason when I tried to change the image. I suppose it was already on "show".
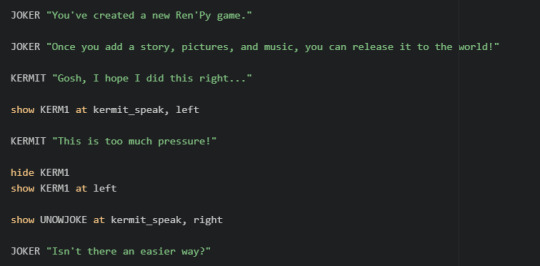
KERMIT "Gosh, I hope I did this right…" show KERM1 at kermit_speak, left KERMIT "This is too much pressure!" hide KERM1 show KERM1 at left show UNOWJOKE at kermit_speak, right JOKER "Isn't there an easier way?"
Put the above code AFTER label start. The video here shows how the code functions for me. Again, this was thrown together in jsut a few minutes, so I may have missed glaringly obvious ways to make it simpler. Do feel free to smooth it out or even just use the code as a basic example.
Thanks for reading!
67 notes
·
View notes
Text
i made my first tutorial over on @kermitsrenpytutorials !! u guys can also send asks about how to do certain things. and ill answer t othe best of my ability
4 notes
·
View notes
Text
pinned - welcome all!
My name is Kermit and here is a blog I post tutorials on and help troubleshoot / share codes with people. If you have any specific requests, you can send in an ask (although I may not have the full answer!)
Please note I’m absolutely not a ren’py expert, nor am I very skilled with complex python or coding in general. This blog is more than anything just my attempts to help people who are confused by the documentation, which I personally feel can come off as vague or confusing if you don’t know the first steps to take. I have no association with the actual creators of the program.
Here’s some links!
Ren’py Visual Novel Engine Homepage
Official Ren’Py Documentation
Currently (9/20/22), I work in Ren’Py 8.0.1 and all codes as of this date are used in that build. However, my posts prior to 2022 use codes from older builds and may or may not work as of Ren’Py 8. If you need new stuff, let me know!
I have my own visual novel over on @sevenplayers if you’re interested in seeing my own work. My personal art blog is @pandrena to which this blog is a side blog.
Thank you for reading!
13 notes
·
View notes
Note
Hello, I would like to know how to put the first name, I know it sounds silly, but I am learning programming now and codes are a kind of "new language" so to speak.
hey anon! This is way late but I’m not entirely sure what you’re asking. But if you just mean like...Putting the name of the character into the game, then I can show you! The documentation also explains this, and the game starts with it as an example when you make a new project.
Basically, just do your code like this, prior to “label start”...
define KERMIT = Character ("Kermit")
This defines “Kermit” as the name of a character, and the name that will show when they speak.
To show text spoken by this character, you then use the defined term and write your dialogue from there. In our case, KERMIT is our definition, and it is what activates our character’s speech.
KERMIT “Gosh, I hope I did this right...”
It then displays like so in the game:

It’s probably a better idea to use a shorter definition for the character - E.G., we could have written “Kerm” or even just “k” and it still would have shown as his name, as long as it said Character (”Kermit”) to say his actual title.
define k = Character (”Kermit”)
k “Gosh, I hope I did this right...”
The above code would work as well, basically.
I hope this helps you or anyone else!
14 notes
·
View notes
Text
Not quite a tutorial, but here’s a fun fact: I found out today it’s very, very easy to make a game where the player can choose their own pronouns and have them used in game. You know how flags/variables can be used for inserting a player’s own name? Same thing for pronouns. EG What I did in my wip game here was:

It’s neat stuff, and very easy to do. So then in game I just go

Using %(pronoun#)s, with # being the number corresponding to that word.

So yeah! To those worried about adding choices like this, where you think you might have to rewrite every route just to fit pronouns - that’s not so!
#kermit.txt#kermitsrenpytutorials#variables#flags#tutorial#in my case ill be adding an extra choice whether u wanna be called a woman or not but! you get the idea
75 notes
·
View notes
Text
Make a Simple Renpy Game #2: Setting Up, Defining Images/Backgrounds, Show/Hide/Scene Commands
Welcome to my second tutorial! You can find the first tutorial here!
I hope to explain a bit about Renpy’s functions with this, without going too indepth yet. Note this is LITERALY step by step, with images included. So! Expect to see mundane stuff here and there, you can skip it if you know those bits already. This tutorial is designed for those with NO knowledge of the program, or coding. So I gotta keep it…Ya know…simple.
When you open Editra up again, we’ll find ourselves like this.

Pretty much, this is where we left off. But hey, Kermit wants some images to do things with, doesn’t he? First, we’ll have to make images, of course. Now keep in mind, I won’t tell you how to draw, but I’ll give you some tips on drawing for renpy games.
A commonly asked question is - what are the sprite dimensions? Well, that’s really up to how big your sprites are and the resolution of your screen, but generally, if we’re using the resolution of 1280x 720, which is what I’m using for this tutorial, we’ll need a height of 720, and the width will depend on...well...how wide your sprite ends up!

For an art program PSA: You don’t need anything fancy, but make sure your program supports transparent pngs!

So here I am, in Clip Studio Paint. Let’s draw ourselves a Kermit sprite! NOTE: You can keep the eyes and mouth/ect on different layers if you’d like to use different expressions later, but for right now, I just am using Kermit. Flat.


@ kermit youre doing amazing sweetie
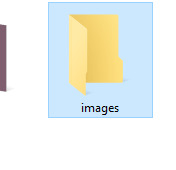
Now we wanna save this in our visual novel /images directory. It’ll be located in your visual novel directory, in your game’s folder, in /game, and /images. So basically as seen below, but with your own directory!

there he is...
Now! Remember how we defined the characters?

Next up, we’re defining the image we just made, so that Renpy will recognize it. Instead of “define”, though, we’re using “image”

Basically, the format here is
image [name you’ll type to make the image appear] = “file name.png”
.png can be replaced by whatever filetype you used.
Next, we’ll need to have Kermit pop up in game. He won’t do it automatically when his dialogue pops up. Let’s encourage him.

That’s where the show command comes in. It’s pretty easy, you can use their placeholder default as an example! I’ll change this to “show kermit” since thats the name I chose to write for my pic to pop up. PS: Whether your chosen name is capitalized or not matters!

Let’s test!


No worries, Kermit. We know exactly how to get you out. We just have to type “hide kermit” instead of “show kermit”, and you’ll be on your way! Make sure to put the hide command exactly where you want Kermit to disappear at.

Test again!


You can pretty much hide or show images whenever you want! Oh, Kermit’s back, using the “show” command once more.

Oh! Right! I did say I’d show that in this tutorial. Well, thankfully, defining backgrounds is exactly the same process as defining your character images! You need to put them in the images directory again, AND you need to make sure they’re the height and width of the game screen. so 1280 x 720 in our case. The only difference in how you use backgrounds, is how you SHOW your background! You need to use the SCENE command!
So next up, let’s define our background.

Personally, I am too lazy to draw a new background, so i’m recycling a background used in my @sevenplayers game! The antique shop.

Making sure your background is in the image directory, it’s time to make it the actual BG of the scene! Find where the game by default says “scene bg room.” It’ll be before Kermit actually appears.

Now, change “scene bg room” into “scene antiqueA” or whatever you named your image, remembering that capitilzation matters.

Now let’s TEST!


yep! Next time, Kermit!
Thanks for reading! I hope this helps someone out, and if you have any questions, send them my way! <3 Sorry if this one was a bit more difficult than the last, I’m trying to take it slow, but there’s still a lot to remember and learn.
#tutorial#visual novel renpy#visual novel#renpy tutorial#renpy#images#kermitsrenpytutorials#long post#make a simple renpy game
90 notes
·
View notes
Note
hey! idk if this blog is new or inactive, but the very few posts on here are really helpful! i have a question - how do i let the player type things (like a name) in? ive tried so many things but i keep getting error messages.
Hi! It’s been kinda inactive but It’s still around, and while renpy hasn’t been my main focus lately in my projects, (just been doing other things), I certainly can give helping you a try with this! I guess first off, what have you tried and recieved an error with? The cookbook wiki gives you this. To work with it is pretty much straightforward with that code. Just pasting it where you want it to go, and then you can have people call them by the name.
Generally, it is possible to put more than a name in, too! I tested this very quickly, though beware of possible errors, but it gives you a general idea. This can also be used if you have to name the character a certain thing to proceed or get a secret.

Sorry if this isn’t detailed enough or confusing! I actually have a headcold and may not make that much sense however, if you have any errors or further questions please ask! I’m here to make tutorials and to troubleshoot.
If you did all this and that’s how you got the error, though, can I see your crash log and or the error you’re getting? It may point me in the right direction.
#this feels like a sloppy bit of advice im sorry! blame me being sick ;v;#renpy tutorial#input#tutorial#kermitsrenpytutorials#softydeluxe
40 notes
·
View notes
Note
Also. How do I make scenes fade smoothly between each other?? I'm currently using 'scene black with dissolve' but that seems to only work for showing the chapter titles bc when I use it elsewhere it causes the dialogue box to kinda flicker and not fade in then out properly. Idk maybe I'm just using it in the wrong place or something??
my time has come.

okay maybe not, in reality you can just use “with fade” instead of “with dissolve” to make the scene transition smoother. but as long as im talking abt transitions i might as well explain that you cant use fade with images unless you want the screen going black every time a character appears :( so ill talk about that below
To put it simply, you have to make the transition smoother yourself for character images. Dissolve is...bad. Well, not bad, but its not as smooth as one wants. What you need is “BasicFade” or literally just...This code!

transform basicfade: on show: alpha 0.0 linear 1.0 alpha 1.0 on hide: linear 1.0 alpha 0.0
Transforms are p much used to manipulate images ect. You can actually name “basicfade” to anything you want, but I just use the code provided by..I think the cookbook on the wiki site? Not sure. And anyway, it’s easier to just call it basicfade. Pretty much it just fades your images in and out.
the only part ya gotta know is where to put it, and for tutorialssss sake I’ll say it has to go before the “Start” label. its more of an initialization thing than a thing you just. put in somewhere mid game dkjgn
ANYWAY I KNOW U WERE JUST ASKING ABT SCENES BUT I SAW OPPORTUNITY AND GRABBED IT
32 notes
·
View notes
Text
@kermitsrenpytutorials is a side blog i made im gonna start making tutorials for renpy there!! if u have any questions /requests on how to do things let me know by sending an ask!! il lexplain it t othe best of my ability
2 notes
·
View notes