#renpy tutorial
Explore tagged Tumblr posts
Visit Tumblr Blog
Explore Tumblr blogs with no restrictions, modern design and the best experience.
Last Seen Tumblr Blogs


Fun Fact
Tumblr is used by 21% of adults online aged 18-29 years.
Text
Renpy Tutorial: Making a Character Stand Out
This code can be improved upon, but I was asked whether I could make a code where, like in DDLC, the speaking character will stand out more than the nonspeaking characters.
This code is actually taken somewhat from the documentation here, but I'll explain how to use it and also I've altered it to not be a repetitive pulse. Once again, this code I'm providing CAN be improved upon and the function of it was slapped together in under a few minutes on my end, so please feel free to tweak, remove, or add onto it as you see fit.
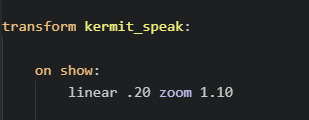
transform kermit_speak: on show: linear .20 zoom 1.10
Put the above code BEFORE "label start". This means it will be set up before the game is started.
"transform" means it will be altering the image upon showing it on the screen. This function can be used for animations, and here we are using it to zoom in on the character speaking. "kermit_speak" is what we will use to activate the transform. This is so that we can still use the "Show" command normally, and only involve a zoom-in on the character if we use kermit_speak.
for clarficiation: "zoom 1.10" means how much it is zooming in, when 1.0 is the default. "linear .20" means how fast it will animate.
When using this code, I don't think you actually have to use "hide". Normally, Ren'Py automatically replaces images when you show another in its position (left, right, center, etc.). With this particular example, however, I only have one Kermit image, so it wasn't working for some reason when I tried to change the image. I suppose it was already on "show".
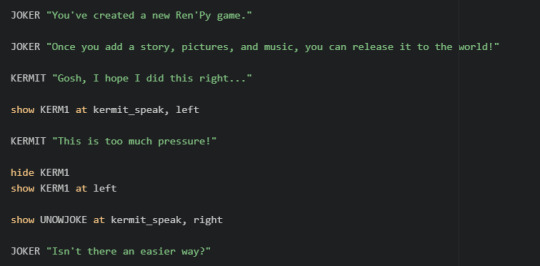
KERMIT "Gosh, I hope I did this right…" show KERM1 at kermit_speak, left KERMIT "This is too much pressure!" hide KERM1 show KERM1 at left show UNOWJOKE at kermit_speak, right JOKER "Isn't there an easier way?"
Put the above code AFTER label start. The video here shows how the code functions for me. Again, this was thrown together in jsut a few minutes, so I may have missed glaringly obvious ways to make it simpler. Do feel free to smooth it out or even just use the code as a basic example.
Thanks for reading!
67 notes
·
View notes
Text
RenPy: Defining Characters
One of the first things RenPy does upon initialization (the boot-up period before the start label executes the game) is read your custom-made character strings to determine what character dialogue will look like.
Although defining usually takes place under the init block, I've chosen to make a separate pre-start label for organization purposes. Really, any time is fine as long as you make sure the pre-start label runs before the game actually executes, or else you're going to encounter errors.
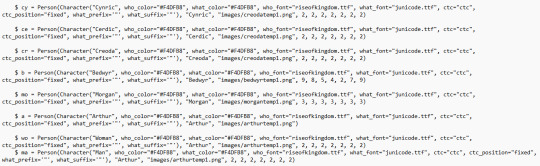
Let's take a look at the code piece by piece.
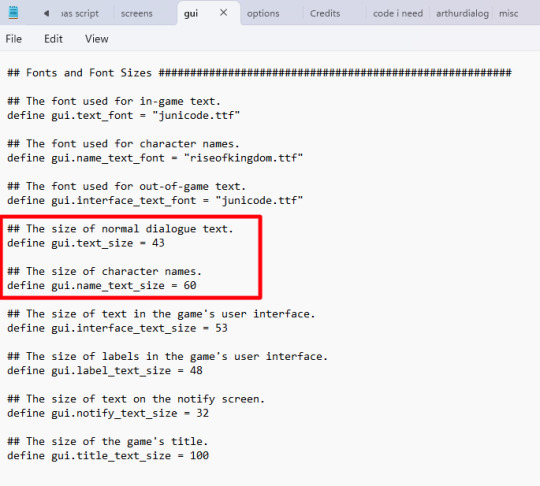
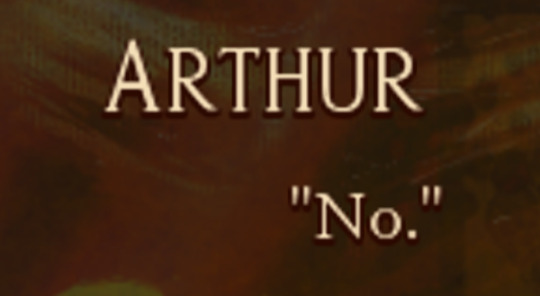
$ a = Person(Character("Arthur", who_color="#F4DFB8", who_outlines=[( 3, "#2B0800", 0, 2 )], what_outlines=[( 3, "#2B0800", 0, 2 )], what_color="#F4DFB8", who_font="riseofkingdom.ttf", what_font="junicode.ttf", ctc="ctc", ctc_position="fixed", what_prefix='"', what_suffix='"'), "Arthur", "images/arthurtemp1.png") $ is a common symbol used by both Python and RenPy to define custom-made variables. Here in the pre-start label section of our script, we're using it to define our characters.
For the sake of propriety, it's probably better to define characters using define, but for ease of use, I've chosen $ instead.
It would be tiresome to have to write "Arthur" every time I wanted to call him in the script. Luckily, by assigning these parameters before initialization, RenPy will read "a" as Arthur.
Most scripts will suffice with assigning a Character object class to your character. If you open the script for The Tutorial, you'll find a basic string that looks like this: $ e = Character("Eileen") As you can see in my batch of code, however, I've done something different by nestling the Character object class within a Person object class. The reason why will become apparent in future posts.
For now, let's focus on the fundamentals.
---

who_color tells RenPy the color of the character's name, determined by a hexadecimal code (either three, four, or six digits). Its sister parameter what_color tells RenPy the color of a character's dialogue text.
If no values are given for these parameters, RenPy will look at your project's GUI file to determine them.
---


who_font tells RenPy the kind of font you want to use for your character's name, and likewise, what_font determines the font you want to use for your character's dialogue.
Note that these fonts do not have to match. They can be whatever font you wish.
The size of character names and dialogue text can be customized in the GUI file of your project:

---
who_outlines=[( 3, "#2B0800", 0, 2 )], what_outlines=[( 3, "#2B0800", 0, 2 )]
who_outlines and what_outlines add outlines or drop shadows to your text (character name and character dialogue, respectively). This string is expressed as a tuple, or four values enclosed by parentheses.
The first value expresses the width of the shadow in pixels. The second value is a hexadecimal value for your chosen color. The third value offsets the shadow along the X-axis (pixels to the right or left of the text). Because it's set to 0, my drop shadows do not appear to the right or the left of the text. The fourth value offsets the shadow along the Y-axis (pixels beneath/above the text). In this case, shadows appear 2 pixels beneath the text.
My outlines are a bit hard to see because they're only 3 pixels wide and 2 pixels offset.
---
Font files RenPy recognizes TrueType font files. You can download TTF fonts for free online - just be sure to unzip them and put them in your game folder.
If you intend to monetize your project, you absolutely need to make certain your fonts are royalty-free or, ideally, public domain. Most font families come with licenses telling you whether they are free use.
To be on the safe side, I would put the following code before the start label in your script, just so RenPy knows which files to look for:
init:
define config.preload_fonts = ["fontname1.ttf", "fontname2.ttf", "fontname3.ttf"]
---

ctc stands for "click to continue." It's a small icon commonly seen in visual novels, usually in one corner of the text box, that indicates the player has reached the end of a line. It's called "click to continue" because the program waits for the reader to interact to continue. To make a custom ctc icon, make a small drawing in an art program and save the image to your GUI folder. As seen above, I'm using a tiny moon as the ctc in my current project. ctc_position="fixed" means the ctc icon will stay rooted in whatever place you specify in the code. Like with most everything else in RenPy, you can apply transforms to the ctc if you so wish. Fun fact: because the ctc is determined on a character-by-character basis in initialization, you can give different characters custom ctcs!
---

what_prefix="" and what_suffix="" add scare quotes to the beginning and end of a character's dialogue.
One thing you'll notice as you work with RenPy is that "the computer is stupid." That is to say, the program will not execute code you don't explicitly spell out. Things which seem intuitive and a given to us are not interpreted by the program unless you write them into the code.
That is why, in this case, you need to specify both prefix and suffix, otherwise RenPy may begin lines of dialogue with " but not end with ", or vice-versa.
Note that unless you apply these parameters to the narrator character, ADV and NVL narration will not have them.
---
** Note: the next two tags following these ones are extraneous and therefore ignored.
10 notes
·
View notes
Text
📚 A List Of Useful Websites When Making An RPG 📚
My timeloop RPG In Stars and Time is done! Which means I can clear all my ISAT gamedev related bookmarks. But I figured I would show them here, in case they can be useful to someone. These range from "useful to write a story/characters/world" to "these are SUPER rpgmaker focused and will help with the terrible math that comes with making a game".
This is what I used to make my RPG game, but it could be useful for writers, game devs of all genres, DMs, artists, what have you. YIPPEE
Writing (Names)
Behind The Name - Why don't you have this bookmarked already. Search for names and their meanings from all over the world!
Medieval Names Archive - Medieval names. Useful. For ME
City and Town Name Generator - Create "fake" names for cities, generated from datasets from any country you desire! I used those for the couple city names in ISAT. I say "fake" in quotes because some of them do end up being actual city names, especially for french generated ones. Don't forget to double check you're not 1. just taking a real city name or 2. using a word that's like, Very Bad, especially if you don't know the country you're taking inspiration from! Don't want to end up with Poopaville, USA
Writing (Words)
Onym - A website full of websites that are full of words. And by that I mean dictionaries, thesauruses, translators, glossaries, ways to mix up words, and way more. HIGHLY recommend checking this website out!!!
Moby Thesaurus - My thesaurus of choice!
Rhyme Zone - Find words that rhyme with others. Perfect for poets, lyricists, punmasters.
In Different Languages - Search for a word, have it translated in MANY different languages in one page.
ASSETS
In general, I will say: just look up what you want on itch.io. There are SO MANY assets for you to buy on itch.io. You want a font? You want a background? You want a sound effect? You want a plugin? A pixel base? An attack animation? A cool UI?!?!?! JUST GO ON ITCH.IO!!!!!!
Visual Assets (General)
Creative Market - Shop for all kinds of assets, from fonts to mockups to templates to brushes to WHATEVER YOU WANT
Velvetyne - Cool and weird fonts
Chevy Ray's Pixel Fonts - They're good fonts.
Contrast Checker - Stop making your text white when your background is lime green no one can read that shit babe!!!!!!
Visual Assets (Game Focused)
Interface In Game - Screenshots of UI (User Interfaces) from SO MANY GAMES. Shows you everything and you can just look at what every single menu in a game looks like. You can also sort them by game genre! GREAT reference!
Game UI Database - Same as above!
Sound Assets
Zapsplat, Freesound - There are many sound effect websites out there but those are the ones I saved. Royalty free!
Shapeforms - Paid packs for music and sounds and stuff.
Other
CloudConvert - Convert files into other files. MAKE THAT .AVI A .MOV
EZGifs - Make those gifs bigger. Smaller. Optimize them. Take a video and make it a gif. The Sky Is The Limit
Marketing
Press Kitty - Did not end up needing this- this will help with creating a press kit! Useful for ANY indie dev. Yes, even if you're making a tiny game, you should have a press kit. You never know!!!
presskit() - Same as above, but a different one.
Itch.io Page Image Guide and Templates - Make your project pages on itch.io look nice.
MOOMANiBE's IGF post - If you're making indie games, you might wanna try and submit your game to the Independent Game Festival at some point. Here are some tips on how, and why you should.
Game Design (General)
An insightful thread where game developers discuss hidden mechanics designed to make games feel more interesting - Title says it all. Check those comments too.
Game Design (RPGs)
Yanfly "Let's Make a Game" Comics - INCREDIBLY useful tips on how to make RPGs, going from dungeons to towns to enemy stats!!!!
Attack Patterns - A nice post on enemy attack patterns, and what attacks you should give your enemies to make them challenging (but not TOO challenging!) A very good starting point.
How To Balance An RPG - Twitter thread on how to balance player stats VS enemy stats.
Nobody Cares About It But It’s The Only Thing That Matters: Pacing And Level Design In JRPGs - a Good Post.
Game Design (Visual Novels)
Feniks Renpy Tutorials - They're good tutorials.
I played over 100 visual novels in one month and here’s my advice to devs. - General VN advice. Also highly recommend this whole blog for help on marketing your games.
I hope that was useful! If it was. Maybe. You'd like to buy me a coffee. Or maybe you could check out my comics and games. Or just my new critically acclaimed game In Stars and Time. If you want. Ok bye
#reference#tutorial#writing#rpgmaker#renpy#video games#game design#i had this in my drafts for a while so you get it now. sorry its so long#long post
8K notes
·
View notes
Text
my most toxic trait is that i have like 343546 dumb unfinished interactive fiction/renpy projects, bc i love making little conversation trees and planning out reactivity and things, but then i can't manage doing the art/writing/coding all at once, bc i become Unreasonably Perfectionist on all sides and it takes way too long to finish anything ahah...
so, much like the ancient magisters, i am wistfully pining away with hubris, while looking at the unattainable golden city (the concept of an extremely high effort da fan game that would require at least 10 of me to have enough time and energy to work on it effectively)
#;-;#i do recommend everyone try fiddling around with choicescript/twine/renpy#it is very fun just on its own#woe. conversation flowcharts be upon ye.#ui is just terrible though. i hate it so much. every time i looked up a tutorial it did psychological damage to me#there was one really nice and comfy unity plugin called fungus that was SO chill and had a visual interface#but it got abandoned alas...
21 notes
·
View notes
Text
here me out
pikmin 4 rescue corps dating sim
#send inspriation please#yes im watching renpy tutorials#yes im currently drawing sprites#yes i will probably give up in approx 48 hours#yes it will be ass im not a coder#andra posting
16 notes
·
View notes
Text
im sorry i keep posting screenshots and videos about this part but you see
coding it was hard.
#or more rather#finding how to code it was hard#because a lot of the tutorials for renpy are outdated
53 notes
·
View notes
Note
So, did you make a separate file for STRAPPED's demo or did you make it in the same as the main games file but released it during a certain point AS a demo?
Also how do I use the Dev log thing? How will renpy know the difference of my versions being updated from 0.1 to 2 and so on?
the latter.
also i have no idea. . . + i just change the number from 0.1 to 0.1.1 etc in the files somewhere and keep it pushing.
i know ren'py has some documentation though on their website you can look through for better help 🫡
#making my game was a lot of me referencing the tutorial game + official renpy docs + joining vn dev servers and subreddits to ask things#i barely remember anything i havent touched the game in 6 months LOL#askee#mmo#renpy rubbish
3 notes
·
View notes
Text

Zac to Basics is OUT on Itch.io! Play the game and follow along the tutorial to learn how to make your own RenPy game!
#indie dev#indie game#game dev#vn#visual novel#game development#vndev#vn development#renpy#renpy visual novel#renpy game#tutorial#coding tutorial
9 notes
·
View notes
Text


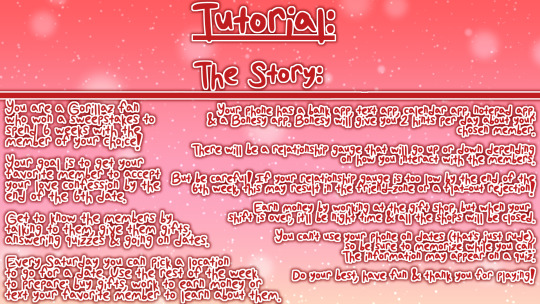
Tutorial & settings screen
#coding#gorillaz#renpy#renpy visual novel#digital art#indie visual novel#visual novel#visual novel development#game development#tutorial
4 notes
·
View notes
Text
renpy dropshadow class
code for this:

it's a straightforward copy & paste:
into some sort of numbered (renpy does things in file name's order) file (i have it in 01_test.rpy right now) bump in:
init python: class DropShadow(renpy.Displayable): def __init__(self, color, image, offset=(20, 20), **kwargs): # Pass args upwards super(DropShadow, self).__init__(**kwargs) self.drop_shadow = AlphaMask(child=Solid(color), mask=Image(image)) self.main_image = Image(image) self.width = 0 self.height = 0 self.offset = offset def render(self, width, height, st, at): main_image_render = renpy.render(self.main_image, width, height, st, at) drop_shadow_render = renpy.render(self.drop_shadow, width, height, st, at) self.width, self.height = main_image_render.get_size() render = renpy.Render(self.width, self.height) render.blit(drop_shadow_render, self.offset) render.blit(main_image_render, (0, 0)) return render
then to actually use this shit:
image sol = DropShadow("#f27", "assets/ch/sol_intro.png", offset=(50, 5))
look at that, a drop shadow

18 notes
·
View notes
Text
How to show a screen on the master layer without the dialogue box in Ren’Py
How to show a screen on the master layer without the dialogue box in Ren’Py If you are working on a Ren’Py project, you may have encountered a situation where you want to show a screen on the master layer, but the dialogue box is still visible on top of it. This can be annoying if you want to create a full-screen effect or hide the dialogue box temporarily. In this blog post, I will show you how to fix this problem with a simple solution that I found.
The problem Here is an example of the problem that I faced. I am developing a QuestManager 4 game quest. My Quest Manager screen shows all available quests so the player can accept or complete them. I want to show this screen on the master layer so that it covers the entire screen and hides any other displayables. However, when I use the show screen QuestManager function to show the screen, the dialogue box is still visible on top of it, as shown in the screenshot below:

This is not what I want, because it ruins the immersion and makes the screen look cluttered. I tried to use different arguments for the renpy.show_screen() function, such as _layer and _zorder, but none of them worked. I also searched online for a solution, but I could not find any immediate results.
The solution After some trial and error, I finally found a simple solution that works for me. All I have to do is add the zorder argument with the screen name when I show it and call it inside the script.rpy file. For example:
show screen QuestManager zorder 10 This will show the screen QuestManager on the master layer, and make sure it is in front of any other displayables on the same layer, including the dialogue box. The zorder argument specifies the relative order of displayables within a layer. The higher the zorder value, the closer the displayable is to the front. You can also use negative values for zorder to push displayables further back.
Here is how my screen looks like after using this solution:

As you can see, the dialogue box is no longer visible, and the screen covers the entire screen as I wanted. This solution is super simple and effective and does not require complicated code or changes.
Conclusion I hope this blog post helps you with your Ren’Py project. If you have faced the same problem as me, or if you have any questions or feedback, feel free to leave a comment below. Happy coding!
8 notes
·
View notes
Text
RenPy: Audio

RenPy has three channels on which to play audio:
1.) Music 2.) Sound 3.) Voice
---
Music The Music channel, unsurprisingly, plays music, and loops the track automatically. To play music: stop music ##(stops previous track) play music "audio/filenamehere.ogg" To play part of a music file: stop music play music "<from [start, expressed in seconds] to [end, expressed in seconds]>audio/filenamehere.ogg" Fadein and fadeout basically do what they say on the tin and fade into a song or fade out of it at the specified number of seconds. Players can adjust the volume in Preferences, although you can set default volume settings before initialization in your script:

Bear in mind, however, that setting a default volume to anything other than 1.0 will cause problems if you then attempt to adjust the volume of a clip via code: for instance, playing a clip on the Music channel at 0.5 volume when the default is set to 0.85.
Often what will happen is that RenPy simply refuses to play the clip. ---
Sound
Sound is a versatile channel, somewhere in between Music and Voice. It can be made to play on infinite loop until stopped, repeated a specified number of times, or play only once.
Unless queued to loop, Sound will usually play just once.
This channel is most useful for playing sound effects.
To play a sound:
stop sound ##(stops previous sounds) queue sound "audio/filenamehere.ogg" To play a sound on infinite repeat: stop sound queue sound "audio/filenamehere.ogg" loop
To play a sound a specified number of times (for example, twice):
stop sound queue sound "audio/filenamehere.ogg" loop 2
To play part of a sound file:
stop sound queue sound "<from [start, expressed in seconds] to [end, expressed in seconds]>audio/filenamehere.ogg"
Like Music, Sound also takes fadein and fadeout.
---
Voice
Voice is a channel reserved for character barks and voice acting. Like Sound, its default is to play just once unless looped, and takes pretty much the same arguments as the others. The voice channel is called simply via voice.
Personally speaking, I tend to use the Sound channel for noises that repeat, and Voice for sounds and character barks that play only once. For instance:
voice "<from 5.0 to 8.0>audio/submergesfx.ogg" ##plays a drowning sound just once for three seconds, from the 5 second-8 second mark of the clip
If your game features voice acting, the voice channel can also be assigned to characters upon initialization, though I'll leave that particular explanation to the RenPy documentation.
--- A note on music files In my personal experience, I've found that RenPy will not play mp3 files. It will, however, support OGG files. I'd recommend installing Audacity in order to be able to convert files to OGG alongside general audio mixing; making tracks loopable via code is a pain, and Audacity can streamline an otherwise finicky process.
Tinkering with volume settings on various channels via code also tends to cause RenPy to not play the clip, so I'd recommend mixing volume via Audacity as well. I'd also recommend stripping any metadata from an audio clip before exporting it as an OGG file, as metadata can mess with RenPy's ability to read the file.
4 notes
·
View notes
Text
On my way to save up to 200 bucks so I can hire someone to code and get my friend to draw cutscenes
#I'm too ambitious I hate it#Tried to watch tutorials and got some suggestions on what should I download and I can't wrap my head around#All I can do is to write dialogues and draw the bgs “orz#I WOULD PAY FOR A RENPY CODER OR SO HELP ME GOD
3 notes
·
View notes
Text
Hnnngb <trying to code a neocities page
#wacky watermelons#i tired renpy (python ish) last year but that was. a year ago#i guess I'll be learning java soon too (class im taking)#but even like. very basic things feel like banging my head against a wall#although.. you know what might make this better? a little treat (the treat is drink mix)#anyway. itll get easier. probably.#and maybe doing it sink or swim style isn't the best for my brain#ill look up some actual tutorials
3 notes
·
View notes
Text
How To Get Started Making Visual Novels
Wanna make a visual novel? Or maybe you've seen games like Our Life, Blooming Panic, Doki Doki Literature Club, etc. and wanna make something like that? Good news, here's a very basic beginners guide on how to get started in renpy and what you need to know going in! Before you start, I highly recommend looking at my last post about writing a script for renpy just to make it easier on you!
LONG POST AHEAD
Obviously, our first step is downloading it from their website

thankfully, its right on the home page of their site. Follow basica program installation steps and run the program. I highly recommend pinning it to your task bar to make it easier to access.
From there, you're met with the renpy app, it's a little daunting at first but let's talk about what all these buttons are for.

Projects
This part is simple, it just lists the current projects in the chosen directory. You probably won't have any in there of your own. You should still see Tutorial and The Question!
Both of those default projects are super helpful in their own ways, i highly recommend testing out the tutorial and playing around with it just to get comfortable with some of the basics.
Create New Project
The first step to actually making your game into a game!
You'll be met with a prompt letting you know that the project is being made in English and that you can change it. You can click Continue.
From here, you'll be asked to input a project name! Put in your games title, or even a placeholder title since this Information can be changed later! (this is also the title the folder will be in your file browser, be sure to name it something you won't overlook)

Now we get to choose our resolution!
If you have no idea what to choose, go for 1920x1080! This is the standard size for most computer monitors and laptops, but it will still display with moderately decent quality on 4k monitors too!
You can choose 3840x2160 as well. This is 2x the measurements of the default, with the same ration. These dimensions are considered 4k. Keep in mind, your image files will be bigger and can cause the game to have a larger size to download.

Now we get to choose our color scheme!
Renpy has some simple default options with the 'light mode' colors being the bottom two rows, and the 'dark mode' colors being the toop two rows.
You can pick anything here, but I like to choose something that matches my projects vibes/colors better. Mostly because depending on how in depth you go with the ui, it minimizes the amount of changes I need to make later.

Click continue and give it a minute. Note: If it says "not responding" wait a moment without clicking anything. It can sometimes freeze briefly during the process.
Now we should be back at our home screen, with our new project showing. Let's talk about allll that stuff on the right now.
Open Directory
This just opens that particular folder in your local file explorer!
game - is all the game files, so your folders for images, audio, saves, and your game files like your script, screens, and more.
base - this is the folder that the game folder is inside of. You can also find the errors and log txt files in here.
images - takes you to your main images folder. This is where you wanna put all of your NON gui images, like your sprites, backgrounds, and CGs. You can create folders inside of this and still call them in the script later. EX: a folder for backgrounds , a folder for sprites for character a, a seperate folder for spirtes for character b, etc.
audio - Takes you to the default audio folder. This is empty, but you can put all your music and sound effects here!
gui - brings up the folder containing all of the default renpy gui. It's a good place to start/ reference for sizes if you want to hand draw your UI pieces like your text box!
Edit File
Simple enough, this is just where you can open your code files in whatever text/code editor you have installed.
Script.rpy - where all of your story and characters live. This is the file you'll spend most of your time in at first
Options.rpy - Contains mostly simple information, like project name and version. There aren't a ton of things in here you need to look at. There is also some lines of code that help 'archive' certain files by file type so that they can't be seen by players digging in code however. Fun if you want to hide some images in there for later or if you just dont want someone seeing how messy your files are. We've all been there
Gui.rpy - where all of the easy customization happens. Here you can change font colors, hover colors, fonts, font sizes, and then the alignment and placement of all of your text! Like your dialogue and names, the height of text buttons, etc. It more or less sets the defaults for a lot of these unless you choose to change them later.
Screens.rpy - undeniably my favorite, this is where all of the UI is laid out for the different screens in your game, like the main menu, game menu, quick menu, choice menu, etc. You can add custom screens too if you want, but I always make my own seperate file for these.
Open Project - this just opens all of those files at once in the code editor. Super handy if you make extra files like I do for certain things.
Actions
last but not least, our actions.
Navigate Script - This feature is underrated in my honest opinion, it's super handy for help debugging! In renpy you can comment with # before a line. However, if you do #TODO and type something after it, it saves it as a note! You can view these TODO's here as well as easily navigate to when certain screens are called, where different labels are (super great if your game is long, and more. It saves some scrolling.
Check Script (Lint) - also super duper handy for debugging some basic things. It also tells you your word count! But its handy for letting you know about some errors that might throw up. I like using it to look for sprites I may or may not have mispelled, because they show up in there too.

Change/Update GUI - Nifty, though once you start customizing GUI on your own, it isn't as useful. You can reset the project at any point and regenerate the image files here. This updates all those defaults we talked about earlier.
Delete Persistent - this just helps you delete any persistent data between play throughs on your end. I like to use it when making a lot of changes while testing the game, so that I can reboot the game fresh.
Force Recompile - Full disclosure, as many games as I've made and as long as I've been using Renpy, i have never used this feature. I searched to see what it does and this is the general consesus: Normally renpy tries to be smart about compiling code (creating .rpyc files) and only compiles .rpy files with changes. This is to speed up the process since compiling takes time. Sometimes you can make changes that renpy don't pick up on and therefore won't recompile. In these cases you can run force recompile to force it. Another solution (if you know what file is affected) is to delete that specific. rpyc file.
The rest of your options on this right hand side are how you make executable builds for your game that people can download to extract and play later!

Sorry gang! that was a whole lot of text obviously the last button "Launch Project" launches an uncompiled version of the project for you to play and test as you go! Hang in tight because my next post is about how to utilize github for renpy, so you can collaborate easier!
611 notes
·
View notes
Note
Just casually dropping by and letting you know that Renpy is a really nice and intuitive program that let's you code visual novels, with a tutorial and everything.
Just saying 😌
You rn

217 notes
·
View notes