#kitchen remodel
Text

𝐎𝐧 𝐭𝐡𝐞 𝐛𝐥𝐨𝐠 𝐭𝐨𝐝𝐚𝐲, 1970 𝐤𝐢𝐭𝐜𝐡𝐞𝐧 𝐫𝐞𝐦𝐨𝐝𝐞𝐥☄️
𝗁𝗍𝗍𝗉s://instagram.com/missmustardseed
141 notes
·
View notes
Text
stencils
ah i did the stencils on tuesday and i forgot to post about it! i have been Out Of Sorts lately and also i remembered how to post on instagram so i put it there and then forgot i had not put it here.
BEHOLD
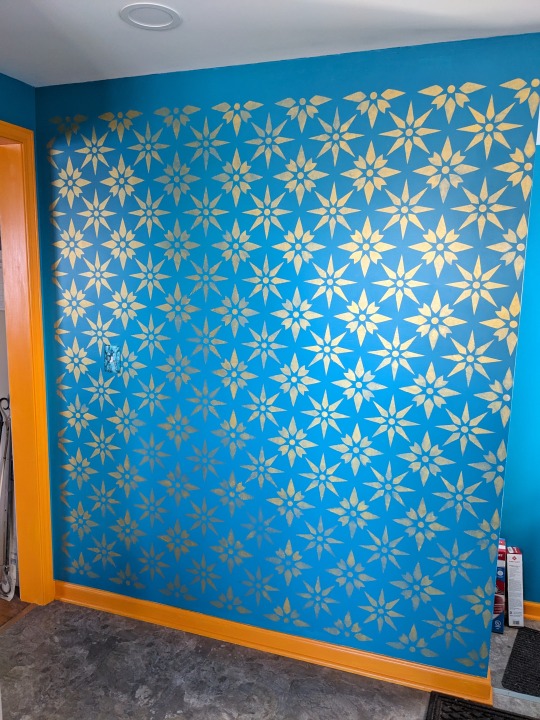
[image description: a teal wall with yellow-orange trim, stenciled with a tiled pattern of metallic gold stars over the entire surface]
I bought this stencil and some metallic gold "stencil creme" paint, and a stencil brush, and just spent an entire day doing it.
Yeah I should've started at the top left and worked over, but I started at the middle right and worked out instead. i might go back and add points to the top border and circles to the left border. Not sure. Not urgent either way.
The directions they give you on the website mention that a dry brush is critical to stenciling success, and this is a thing I did already know; i have stenciled mostly t-shirts in my time, with dumb bullshit stencils I cut out of manila folders. But they tell you to load up the brush and then take most of the paint off the brush with paper towels, and let me tell you my stencil creme pot barely covered this wall and would not have if I'd put most of the paint onto perfectly good paper towels. So what I did instead is, I went to the grocery store and I got a cannoli, and then I washed out the container it came in, and then I cut the container at the hinges and made myself two paint trays, and one of them I used as a pallette to mix the paints for the outlet covers, and the other half I used as a roller tray to paint the windowsill, then rinsed and used for this. I had that plastic tray nice and dry and I loaded up the brush and then worked that brush around on the plastic, and it was good and dry and then when I came back I could pick up the paint I'd offloaded onto that plastic, and use almost all of it. And later in the process I added a few drops of water to that pallette, and I was able to thin the paint just a tiny bit, just enough to get it to flow a little better but not so much it went under the edges of the stencil.

[image description: a white-stained clear plastic tray with a pot of gold paint sitting in it, a stencil brush propped on the edge, faint traces and blobs of gold paint swirled around it.] when I added a few drops of water they'd collect in the fluted bits around the edges, so if I wanted them I could go swipe the brush there, and if I didn't they stayed out of the way.
I could have been more exacting and precise in my stencil placement, but I knew I had to just do it, so I just did it. Used a level, discovered that the level disagreed with the ceiling and the floor, remembered that this house like all houses is in fact handmade, and so my imperfections would just have to harmonize with the imperfections built in by the builders and the 75 years of settling and whatnot. So I was Zen about it and it worked out.

[image description: a wide shot of the kitchen showing gray cabinets and unadorned blue wall: the stencil is spotless, taped up with blue painter's tape, a stepladder beneath it with a yellow level sitting on it.]
I used painter's tape. The tutorials say you can spray the back of the stencil with spray adhesive to keep it tight against the wall and reduce bleed at the edges. I own spray adhesive, and I know it's sticky as hell and gets on everything. No thanks, I figured I didn't need it, and I don't regret that, I had no problems. I have, as it happens, stenciled a lot of things in my life.
I should make some more stupid stenciled t-shirts, they've been fun.
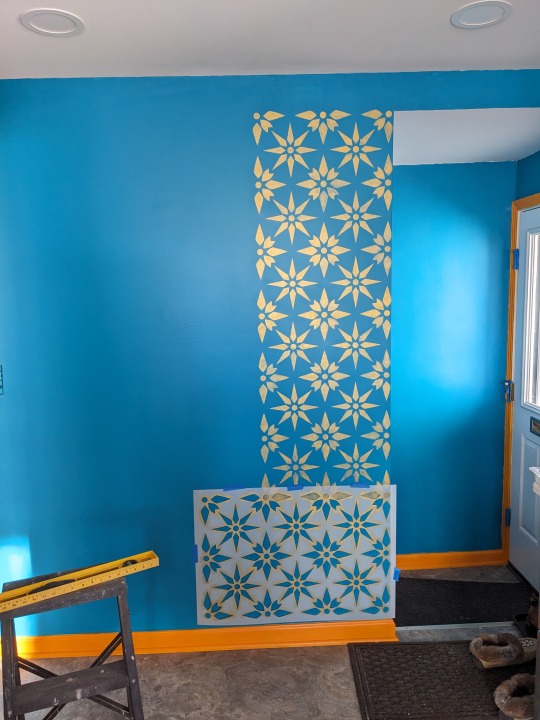
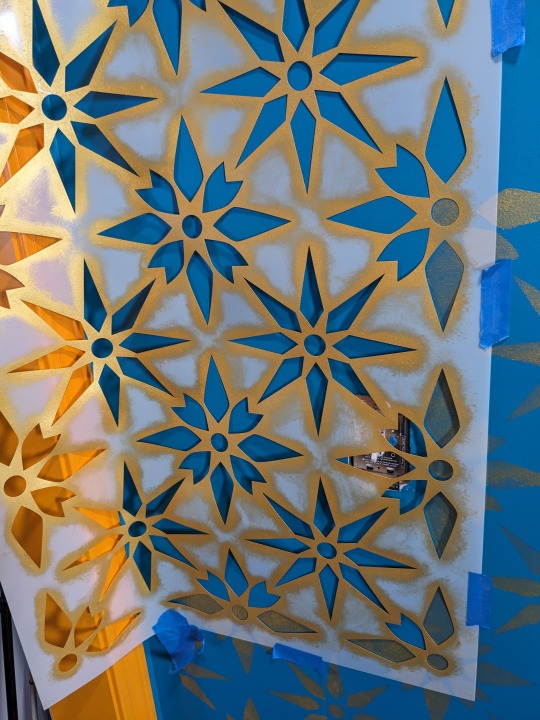
[image source: two repeats of the stencil have been applied to the wall, and now the plastic stencil template is taped sideways at the bottom of the wall.]
It's a well-designed stencil, and the way you lined it up is that some of the elements are designed to repeat so you just plop them over the previous version. I hadn't premeditated or measured this, but it turned out the last repeat, I could just turn it sideways and it tiled beautifully that way too. No problems. Worked great. The stencil creme paint dried fast enough that there was no problem overlaying it like this either, though I did make a point of doing the ones I was going to overlap first so they'd have the longest to dry. I doubt that mattered.
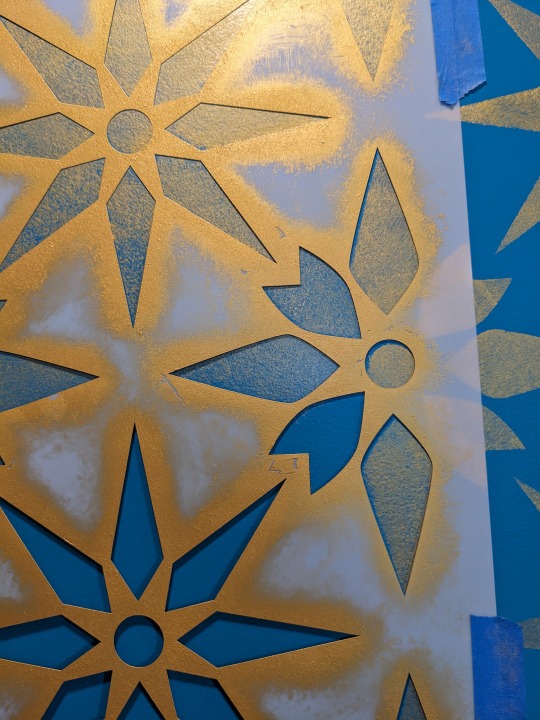
[image description: the stencil template laid over the edge of a previous repeat, showing a blue edge where the previous repeat doesn't quite align with the new placement.]
This is where me not doing math was maybe a problem. I was not perfectionist about this, I just sometimes accepted that the template had shifted slightly on the previous repeat, and while it lined up perfectly in one spot, it would not quite line up in another. I gambled that this would not matter, and in fact took this photo to check. After I removed the template this time, I went back to photograph this spot to see how the misalignment looked, and... couldn't find it. Could not tell, even though I knew where it had been. So obviously it did not matter. (In these cases, I did not touch up the edges of the misaligned bits, I left them as they'd originally been stenciled. The other elements were not far enough off the anticipated alignment for it to be noticeable. A touch-up would have been more noticeable, an element becoming oversized or slightly misshapen or having a visible edge of layered pigment in it.)
[image description: the stencil template crammed against the edge of the wall, bent and roughly taped in place, and the light switch, plate removed, poking through one of the holes at the right.]
This was the trickiest bit. I just held one hand against wherever I was working, flattening that bit of the stencil to the wall as I worked, and then I'd let go and put my hand on the next bit, and maybe they weren't perfectly in alignment with the previous bits but as long as the stencil was touching the wall well right where I was working, it was a good enough result. The light switch was a bit of a problem and i should properly have removed it but I wasn't about to do that so I didn't. I did the inward-facing points of the leftmost stars, and then did not try to do the upward-downward points or the circles, because it was too hard to get the stencil flat right there. I could go back and add them now, and I might yet, using the very edge of the template, We'll see if I do. It looks fine as it is.
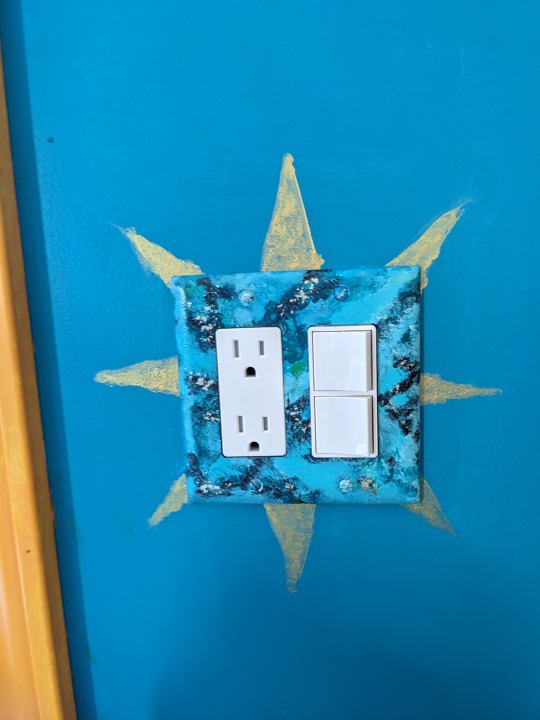
[image description: a plain blue wall with a double outlet plate in it, and the points of the eight-pointed star are around it, protruding from behind the lightswitch plate.]
I had always intended to stencil an element behind the light switch plates on the plain walls, because I felt they don't stand out enough against the teal. I did one, and then realized it was impossible to center it and hard not to get paint on other bits of the walls, since the stencil template is so huge and was covered in paint from doing the whole wall. I realized then that it's just points and I could freehand those. So I did, this is me freehand faux-stenciling the star around this outlet plate, LOL.
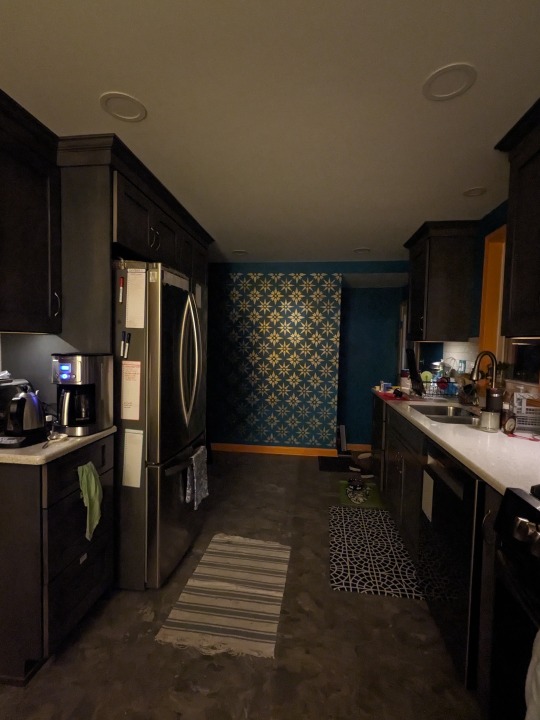
[image description: the darkened kitchen early in the morning, under-cabinet lights on but the room dim, and in the distance the wall is shining]
anyway so the next morning i went out and was sitting at the window and turned around and was like "this looks amazing" so I am well pleased with how it turned out, really and truly.
125 notes
·
View notes
Text

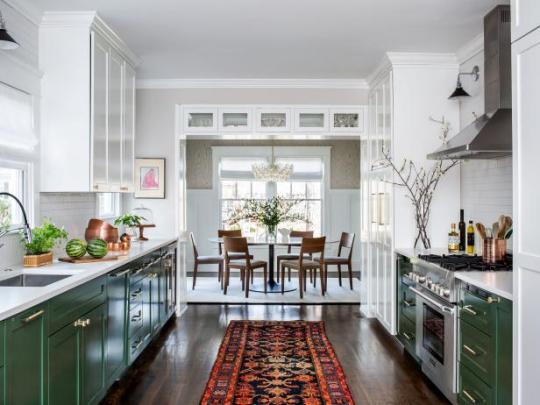
Rebecca's kitchen redo. Wow, it was so plain before.
Gothic home and garden member's post
197 notes
·
View notes
Text

Design Build Modern Transitional Kitchen Remodel with white cabinets, quartz countertops, wood floors just completed in Lake Forest Orange County, California
#Kitchen#Remodel#Design build#kitchen remodel#home remodel#kitchen Idea#custom kitchen#modern kitchen#transitional kitchen#orange county kitchen#contemporary kitchen#best of orange county#interior design#home#renovation#general contractor#White cabinets
31 notes
·
View notes
Text
Get The Best Kitchen Renovation Services In Penrith
A great way to transform a Kitchen Renovation into an attractive space that works with your lifestyle. No matter what size your space is, we’ll make it done quickly and efficiently & will help increase the value of your kitchen with our professional workers. Do visit our website for more information.

2 notes
·
View notes
Text

Kitchen Remodelling Ideas
#Latest Modular Kitchen Designs#Modular Kitchen#Kitchen Manufactures#Kitchen Designers#Kitchen Remodel
8 notes
·
View notes
Text
AJB Kitchens
youtube
At AJB Kitchens, we offer high-quality kitchen renovation services to clients across Sydney and beyond.
Our experienced team of kitchen planners, designers, and installers are dedicated to delivering exceptional results that exceed your expectations. We offer a wide range of services to suit every need, including kitchen installation, renovation, makeovers, and more.
Kitchen Installation
Our team specialises in installing both flat-pack and custom kitchens to suit your requirements. We ensure that every detail is carefully planned and executed, from the initial design to the final installation. Our services include kitchen cabinet installation, new kitchen installation, and small kitchen installation.
Kitchen Renovations
AJB Kitchens provide comprehensive kitchen renovation services, from complete kitchen overhauls to minor upgrades. Our team works closely with you to understand your vision, providing expert advice and guidance along the way.
Our kitchen renovation services include kitchen resurfacing, Hampton style kitchen installation, and luxury kitchen installation.
Kitchen Styles
AJB Kitchens offer a range of contemporary and modern kitchen styles to suit your individual preferences.
Our services include Galley Kitchens, U Shape Kitchens, Outdoor Kitchens, Handleless Kitchens, and more.
We understand that each client has their unique preferences and tastes, and we strive to create a kitchen that reflects your personal style.
Areas We Service
We serve clients across Western Sydney, including Hills District, Baulkham Hills, Castle Hill, Kellyville, Concord, Croydon, Drummoyne, Hornsby, Epping, Gladesville, Ryde, Parramatta, Western Sydney, Blacktown, Penrith, Seven Hills, and surrounding areas.We take pride in our work and are committed to delivering exceptional customer service. Contact us today to discuss your kitchen needs, and let us help bring your dream kitchen to life.
Areas We Cover at AJB Kitchens
Hills District
Baulkham Hills
Castle Hill
Kellyville
Concord
Croydon
Drummoyne
Hornsby
Epping
Gladesville
Ryde
Parramatta
Western Sydney
Kitchen Renovations Blacktown
Penrith
Seven Hills
Kitchen Services at AJB Kitchens
Kitchen Installation
Kitchen Renovation
Kitchen Makeovers
New Kitchen Installation
Kitchen cabinet Installation
Flat Pack Kitchen Installation
Custom Kitchen Installation
Kitchen Resurfacing
Hampton Kitchen Installation
Small Kitchen Installation
Commercial Kitchen Installation
Kitchen Styles at AJB Kitchens
Contemporary Kitchens
Galley Kitchens
Small Kitchens
U Shape Kitchens
Outdoor Kitchens
Luxury Kitchens
Hampton Style Kitchens
Handleless Kitchens
Modern Kitchens
Kitchen Renovations Sydney
3 notes
·
View notes
Text
#philadelphia#buckscounty#carpentry#home improvement#homedesign#flooring#painting#south jersey#interiors#kitchen Remodel#kitchen renovation#contractor#kitchen construction#licensed contractor#home restoration#home design
2 notes
·
View notes
Photo

Home Bar - Living Room
A large, eclectic, open-concept living room with a bar and white walls is shown in the photograph.
2 notes
·
View notes
Text
⁂𝐛𝐫𝐨𝐰𝐧 𝐚𝐧𝐝 𝐰𝐡𝐢𝐭𝐞 𝐜𝐡𝐞𝐜𝐤𝐬
31 notes
·
View notes
Text
archway stencils
i keep forgetting to post about this. I did my archway stencils this past week!

[image description: looking through an orange archway, stenciled with turquoise stars in an alternating pattern, to see the deep teal wall stenciled with larger gold stars I did earlier]
progress shots and discussion under cut!

[image: the stencil, with a central eight-pointed star, and then the partial alternating star in the corners; the stencil is mounted diagonally so that the main star is centered on the archway trim, and there's a corner above and below]
I futzed around a little and this was the direction that worked. I'd thought about just doing that central element and repeating it freehand, but this was easier to line up..... but then to finish it, i would have to do TWO additional passes with the stencil, one on each side.

[image description: the archway in the background with the central element alternating with just the middle of the second element, as left behind by one pass of the stencil; I'm going to have to go back and fill in the sides of the second element. But in the foreground, I am holding my cat, because she insisted.]
I had Help. she wanted me to do this instead of paint. The whole time. She was incredibly persistent.

[image: the archway with one of my secondary passes complete, and the stencil stuck on diagonally showing how I have to separately fill in the left and right of each of the edge elements.]
I had experimented with just plopping the central element over this corner thing, and using that to fill in all the rest at once, but you see how the central element has long diamond-shaped "petals", but the other one has the shorter inward-pointing "petals" in the middle, and then longer petals on the sides? Yeah the longer petals are not shaped like the central element's, even though they look similar-- they are wider throughout. So to blend them with the half-petal deposited by the first pass of the stencil, it looks wonky as hell. And it does look better having a fully different element for every other star, instead of a blended sort-of-weird half-different one. So the long hard way it is; I went all the way down doing the left half then went to the other doorway and did the left half and then came back and did the right half, in totally separate passes, because you can see you have to tape the stencil down over the existing element, and if it were at all damp you're ripping paint off when you do that.
This stencil company does make specific border stencils for some of their designs, and I sort of thought this one was intended for that kind of use, but clearly it's not. I mean it worked fine so I'm not actually annoyed, but I did have to think about it a lot.
Some process notes: I did not use specialty stencil creme for this, I used my sample pot of a slightly lighter shade of the paint I used for the walls. it was semi-gloss because that's what they had for sample pots, and that worked out fine. I put it into the same plastic half-a-cannoli-box tray as before, and used the smaller stencil brush, and I did not really have to add drops of water, as the paint was less thick, but I had almost zero problem with bleeding-- all my problems were that I had to overlap the stencil while still damp and would sometimes get paint on the back of the stencil that then smudged onto bits I didn't want paint on. Paint also built up on the stencil really horribly because I was using it more intensively-- doing the whole wall it was kind of spread out over the huge stencil, but this was a single element. Being able to see through the stencil helped in positioning, so what I eventually wound up doing was that I would position the stencil, tape it down, wipe it clean with a rag, adjust the position, use it, move it to the next location, wipe it clean with a rag, repeat.
It was so hard to get the second element lined up-- you see how the "petal" is done in two pieces? well it never quite lined up and there was always a gap-- that eventually I pulled a plastic milk jug out of the recycling, traced the stencil on it, and cut out a stencil that was *just* a full copy of that half-petal mirrored so I could see if the stencil wasn't going to line up cleanly, I could just focus on lining up one of the petals, and leave the other blank and come back and add it with the standalone whole-petal homemade stencil. Good thing I'm a dab hand with an exacto.
[image description: a star stencil 3/4 complete, but the diagonal petals have gaps in the middle of them] Here's a problem example, and I was getting this on about half of them.

[image description: a piece of flat white plastic, an exacto knife, a cutting board, and a stencil element cut out of the white plastic.]
So instead I would rotate the stencil so one of the petals was good, and leave the other one off entirely to come back and do later.

[image description: looking from the living room through the stenciled archway to the kitchen, and this face of the archway is painted purple, and the wall is repainted to a consistent sunny yellow.]
I know that the most hinged thing to do would have been to just do all the trim orange, and then the wall yellow, and let it be, but I could not resist being fussy and doing the living-room-facing trim back in the living-room-trim purple color. I fortunately was able to find the original pots of paint from when we painted the living room, and it was still good!!!! (mixed in august of '07! amazing) so I repainted the living room wall where it was primer-white after the reconstruction. Looks pretty seamless now! But I have one more light switch faceplate to paint, it looks like. Hmmmmm what color.
The last thing I have left to do is the corner above the front door, where this newly-repainted yellow wall intersects with the wall above the front door that I decided should be kitchen-teal.
I could just do the corner as a flat normal transition. But I want to try to do something fancy, some kind of like pixel-dissolve or like, the stencil bits sticking into the other color, or something.
For now I've painted a cereal box and stuck it up there and I am going to put stenciled attempts on cardboard up there to see what they look like before I commit.

[image description: the corner above the front door of the house. the wall below is the kitchen wall and is teal. the wall above the archway is yellow because it's the living room. the wall above the door is not fully painted but is mostly kitchen teal. the corner is a cardboard cereal box painted yellow on one side and teal on the other, cut to fit.] it is an awkward junction! The most hinged thing would be to keep it simple-- would have been to just do all the trim orange and then the upper wall yellow and just make sure the corner was sharp and clean.
But I'm not that hinged, so I might as well do something that calls attention to it, LOL.
55 notes
·
View notes
Photo
Los Angeles Kitchen
An undermount sink, raised-panel cabinets, white cabinets, granite countertops, glass tile backsplash, stainless steel appliances, a peninsula, and a gray backsplash are featured in this small, timeless galley kitchen remodel.
#white bathroom#custom home furnishing#kitchen remodel#kitchen#cabinets#renovation#kitchen and bath designers
2 notes
·
View notes
Text

Design Build Modern transitional custom Kitchen & Home Remodel with fireplace, bathroom just completed in city of Costa Mesa OC
#Kitchen#Remodel#Design build#kitchen remodel#home remodel#kitchen Idea#custom kitchen#modern kitchen#transitional kitchen#orange county kitchen#contemporary kitchen#best of orange county#interior design#home#renovation#general contractor#White cabinets#Costa Mesa OC#Kitchen Remodel#orange county kitchen remodel#hgtv#houzz#California#contractor
27 notes
·
View notes
Text
Kitchen Remodel Services Concord
Get the Best Kitchen Remodeling Services in Concord!
Selecting options for kitchen remodelling services in Concord?
By looking at our portfolio, you might want to consider Grand Finish Remodeling Inc. for kitchen or any home space remodelling.
Request a quote today for the needs of your kitchen renovation!
#Kitchen Remodeling#Kitchen Renovations#Kitchen Remodel#Grand Finish Remodeling#Kitchen Remodeling Services
18 notes
·
View notes
Text
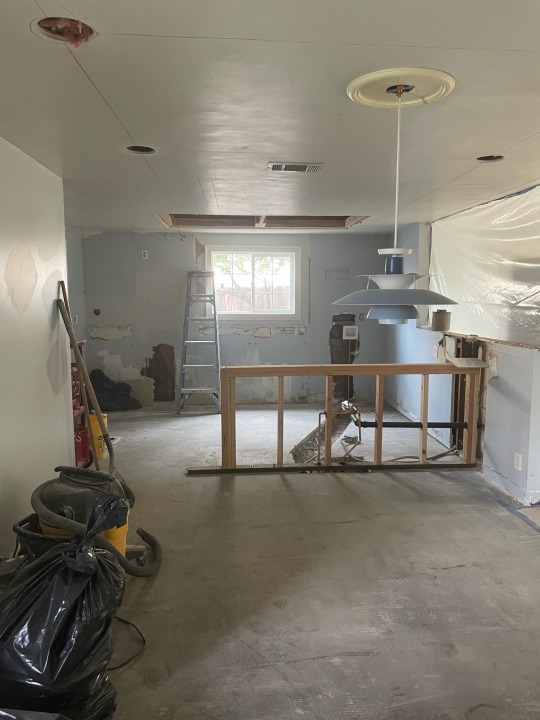
kitchen update! new gas line, new fridge water line, new drainage piping and a stem wall 🙏🏼 also old shitty fluorescent lighting baiii
15 notes
·
View notes
Photo
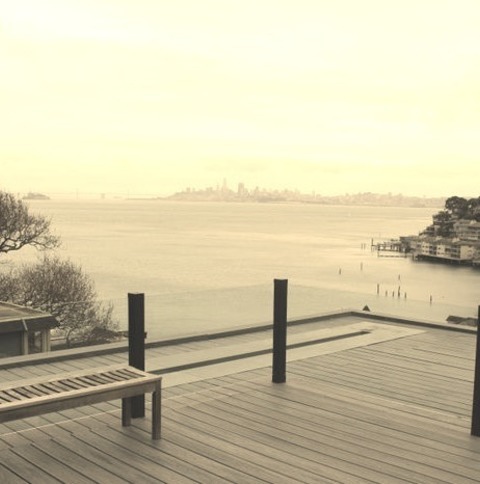
Deck Rooftop
Mid-sized minimalist rooftop rooftop glass railing deck photo with an awning
3 notes
·
View notes
Last Seen Blogs


thisismegz
Snitches_N_Quills

silencedrowns
it’s just king crimson lyrics

artem1sc0re
Artemis

norozum1
Ozumi