#learntomakeup
Text
Step by Step Makeup Tutorials for Beginners: Unveiling the Magic
#makeuptutorial#beginnermakeup#makeupforbeginners#stepbystepmakeup#makeuptips#makeuplessons#makeup101#beautytutorial#makeuptraining#makeupguide#easybeauty#learntomakeup#makeupclass#beautybasics#makeupeducation#makeupfundamentals#makeuphowto#makeuplessonsforbeginners#makeupstepbystep#makeupbeginnersguide
0 notes
Photo

Our workshops are coming soon. We intend to offer you nothing, but the best. Dare to be Perfect..... Nothing Less! #makeupworkshops #beautyworkshop #learntomakeup #makeupapplication #workshoploading #staytuned https://www.instagram.com/p/B9WBWnJHDYH/?igshid=geur05ad70yf
0 notes
Photo

Natural Handmade Cosmetics workshop * *__Learn to make your basic cosmetics without using any chemical or preservative. Use them everyday without any guilt. Good for kids too. Be natural and use natural !!!! *What will your learn in this work shop ? Lip balm Chocolate flavour Strawberry flavour Vanilla flavour Body mist Sandalwood Lavender Face and body scrub* Rose flavour Sandalwood Rose water * Lip scrub Mosquito repellent Antibacterial spray Free secret recipe for floor cleaners,Glass cleaners Dish cleaners ... Take home all the samples with printed notes. All your questions will be answered on what’s app group. Duration 3 hours Fees 1600/- Date: 24th Nov, 1:30 pm to 4:30 At Urja Studio Cafe, Wakad Prior registration is must at 9730557776 #naturalskincare #naturallipbalm #naturalcosmetic #learntomakelipstick #learntomakeup #organicskincare #instamakeup #instacosmetics #workshopinpune #eventsinpune #punetimesonline #femina #puneevent (at Urja Studio Cafe) https://www.instagram.com/p/B5KgpeRpMja/?igshid=1np4rzhxo78g6
#naturalskincare#naturallipbalm#naturalcosmetic#learntomakelipstick#learntomakeup#organicskincare#instamakeup#instacosmetics#workshopinpune#eventsinpune#punetimesonline#femina#puneevent
0 notes
Photo
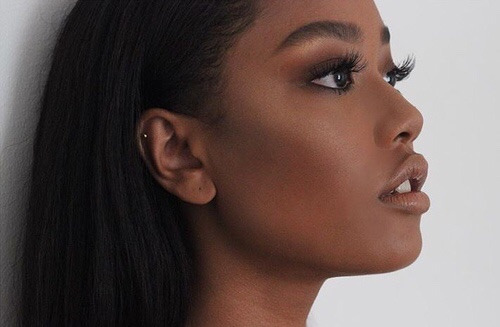
Hello my beauty lovers! ♥
This is my blog LEARNTOMAKEUP and I’m Valeria.
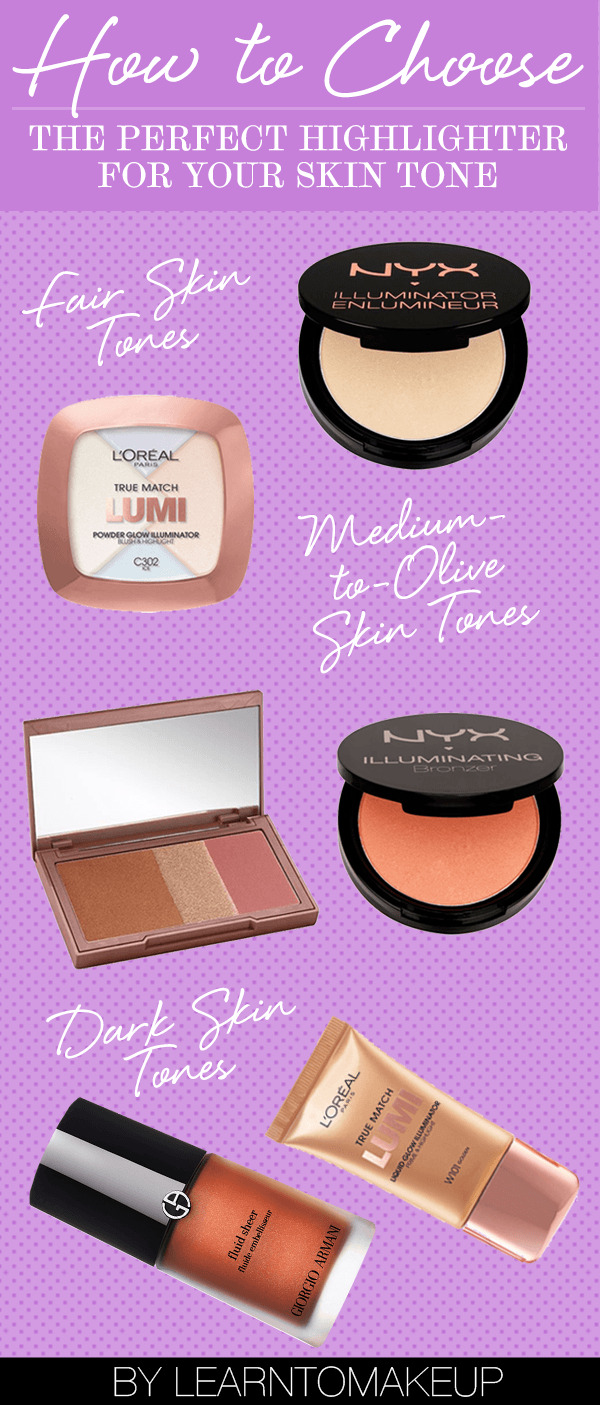
Today’s topic is about HIGHLIGHTERS. We all love highlighters because they give such a dewy, glowy and flawless finish to any kind of makeup.
In this post you will learn to choose the perfect highlighter for your skin.

Ever wonder how celebrities get such glowing, ethereal skin? It’s not all fancy facials and expensive aesthetician visits. With the right highlighter and proper know-how, you can fake it!
Highlighter comes in many forms, from cream to liquid to powder. While you use darker colors for contouring, highlighting brings your features forward and makes skin look younger and more dewy.
Because you can find it in so many different shades and finishes, deciding which highlighter is right for you can be daunting.
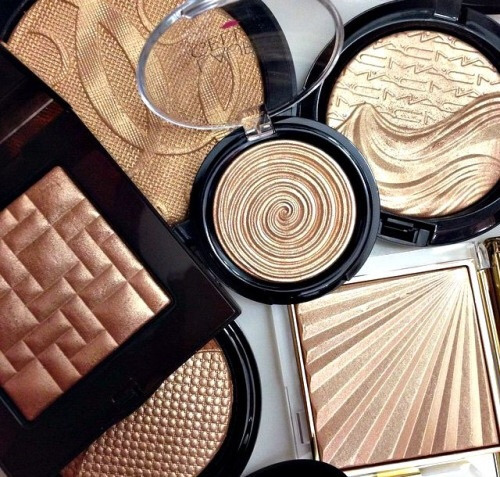
However, not all highlighters are created equal. Just like foundation, not every highlighter is made for every skin tone. Depending on what the product is, where you place it, and what your coloring is, you can end up with a shiny and frosty effect.
PICK THE RIGHT HIGHLIGHTER FOR YOUR SKIN TONE BELOW
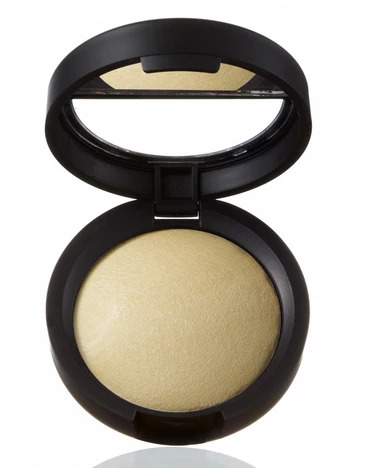
PALE TO FAIR SKIN

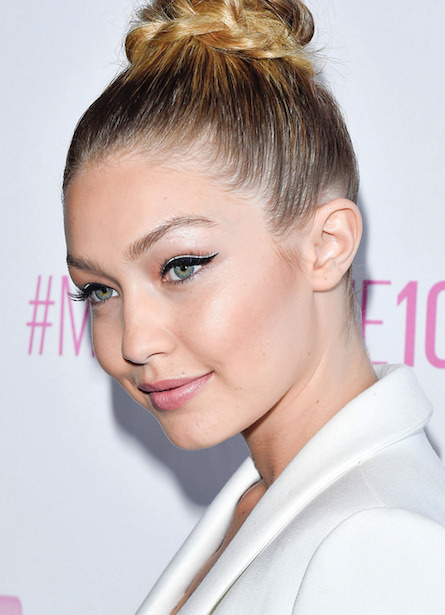
Those with pale to light skin tones should opt for highlighters with a pearlescent, icy-silver or champagne sheen. The light pigment adds just enough radiance to your complexion .

The pearl pigment will add just enough opalescence to wake up your face giving your look a perfect finish.
Those with fair skin should also take advantage of the fact that they can rock a pink-toned highlighter without it looking unnatural or ashy.
FAIR TO MEDIUM SKIN


For fair to medium tones there is probably the widest product range to choose from so those that fall into this category can afford to be less selective with their highlighters.
You really can’t go wrong with a vanilla highlight, this will accent the high points of your face without adding too much unnatural color like a bronze highlighter might.
MEDIUM TO DARK SKIN


For those with warmer skin tones or that have a lot of yellow in their skin try not to use anything too pink. To keep your complexion from looking too frosty, warmer skin tones pair well with highlighters that have peach or gold undertones.

Gold luminizers should be your go-to. They will play well off without being too much or too little but instead just right. The hint of color is just enough to give you that sun-kissed glow!
DARK TO DEEP SKIN

The richer the tone of the skin is, the richer of a gold you can use. Avoid using anything lighter than the skin color since this will create a gray cast.

Rich variations of rose gold or bronze work wonders on darker complexions and keep your focus on warm hues.
A great trick is using loose pearl eyeshadow pigments in anything from pale gold to almost bronze depending on your skin color.
*As always I’m open to suggestions and opinions so if you need information about an specific topic don’t forget to tell us! *
If you found helpful/useful this post please like and reblog it so I know that you want me to publish more tips & tricks about makeup.
Last but not least, if you are a makeup lover or if you want to join our family follow LEARNTOMAKEUP to read our posts and stay updated ♥
Remember that I post new content on Saturdays and Sundays☺
Love you, Valeria.
114 notes
·
View notes
Photo

Good saturday my angels! I’m Valeria and welcome to my blog LEARNTOMAKEUP ♥
DIY TIME☺I will post another DIY since you guys liked the last one.
This time is HOW TO WHITEN YOUR TEETH NATURALLY IN 2 MINUTES A DAY.
Whiten teeth treatments can be really expensive and hurtful as well. I can tell because I have been in one before and it gets annoying and tiring, usually people never finish the treatment because money or the pain that causes you.
In this post I will be sharing with you some DIY TIPS that you will help you to whiten your teeth naturally. Of course it will take longer but you will see the results within weeks.

Wondering how to naturally whiten your teeth? Yellowing teeth can be one of the first signs of aging.
Also if you had braces at some point of your life probably you want to know how to whiten your teeth too.
Let’s face it, it can be pretty unattractive, especially when paired with a beautiful red lipstick.
The good news is that teeth whitening at home is easy and can be achieved in very little time.
Just use these teeth whitening tips to put your best smile forward!
1. BRUSH AFTER DRINKING OR EATING
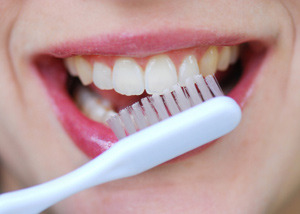
Brushing right after eating or drinking is the best way to whiten teeth and prevent staining. Most foods do not cause staining but if you’re a coffee lover or a smoker, you can pretty much expect having discolored teeth. If this is the case, then visit your dentist every three months to have your teeth cleaned.
2. BAKING SODA & HDROGEN PEROXIDE SOLUTION
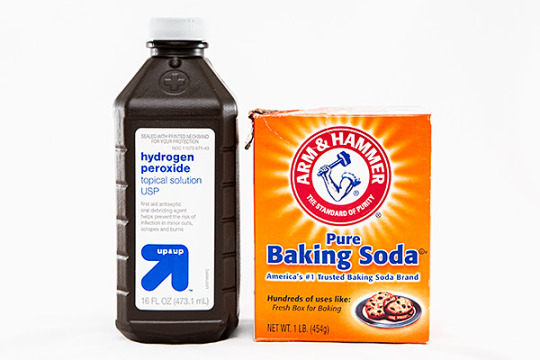
Brush your teeth with a hydrogen peroxide and baking soda paste twice a week.
What do I need to do?
• Pour 2 teaspoons of hydrogen peroxide into 3 teaspoons of baking soda. Mix these together until a paste forms. The paste should be similar in thickness to toothpaste.
• Add a tiny bit of mint toothpaste to your homemade paste to give it a fresh flavor.
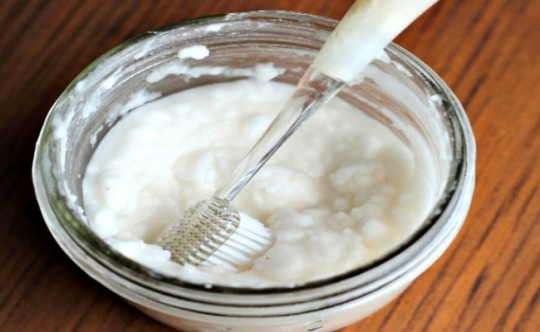
• Dollop the paste mixture onto your toothbrush. Brush the paste onto your teeth in small, circular motions.
• Once all teeth are covered, let the mixture sit on your teeth for 2 minutes.
• Rinse the solution off of your teeth by swishing with water from the bathroom sink.
• Brush your teeth with toothpaste to rid your mouth of any remnants of the hydrogen peroxide mixture.
3. COCONUT OIL PULLING
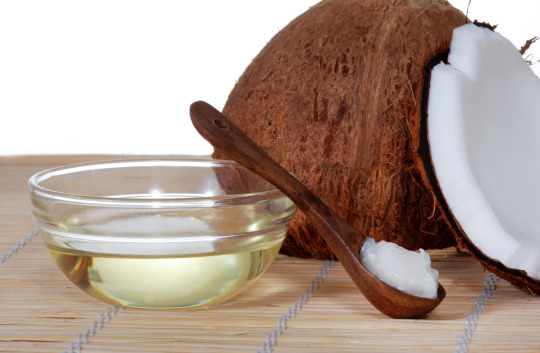
Some people have attested that their teeth have become whiter by applying coconut oil to their teeth after brushing.
Simply swish a spoonful of coconut oil in your mouth for 5 to 20 minutes. If you don’t feel like doing that then you can add a few drops to your tooth brush and brush your teeth.
Lastly, you can put some coconut oil to a corner of a clean wash cloth and rub it on your teeth.
4. APPLE CIDER VINEGAR

Apple cider vinegar is a natural whitening agent for dark spots on your body, and that includes your teeth. The vinegar helps remove stains, whiten teeth, and kill bacteria in your mouth and gums. Gargle with apple cider vinegar in the morning, then brush as usual after you gargle.
5. STRAWBERRIES
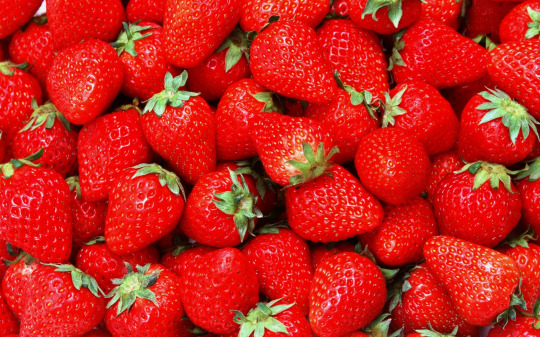
Ever wondered how Catherine Zeta Jones kept her teeth sparkling white? She used strawberries! She simply mashed up about four or five strawberries and rubbed this yummy mixture all over her teeth. Tyra Banks is also trying out this delicious technique.
Some people swear by this technique as truly effective. If two super iconic beauties are to be believed on this one, it must be worth a try. Remember to rinse well afterwards.
DON’T FORGET THAT
While you are doing try to smoke less. Try to avoid tannin-containing beverages but if you do drink them, use a straw to maintain your treatment and not ruint it.
*As always I’m open to suggestions and opinions so if you need information about an specific topic don’t forget to tell us! *
If you guys enjoyed this DIY and you want me to post more DIY’s please like and reblog it so I know that you want me to publish more tips & tricks about makeup.
Last but not least, if you are a makeup lover or if you want to join our family follow LEARNTOMAKEUP to read our posts and stay updated.
Thanks for reading my posts and love you all, Valeria.
186 notes
·
View notes
Photo

Good Sunday my beauty lovers ☺
Welcome my beauty blog LEARNTOMAKEUP ♥
As you might know my name is Valeria and I’m a makeup artist.
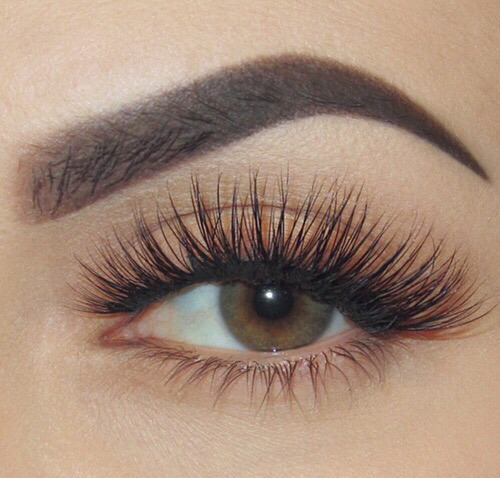
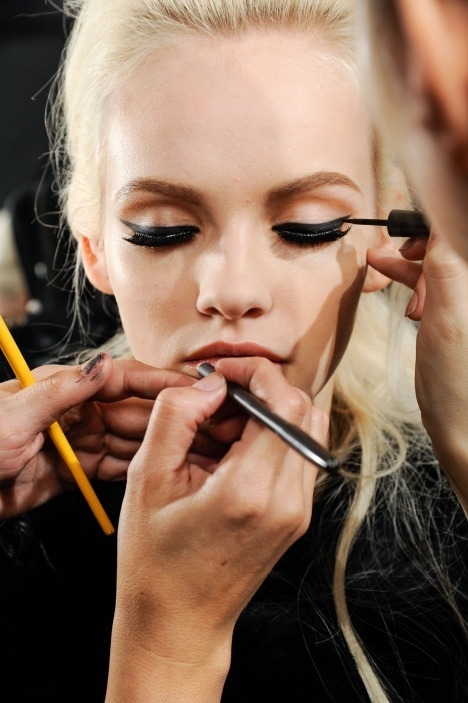
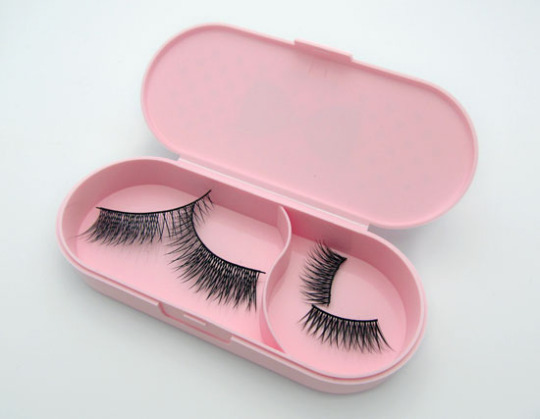
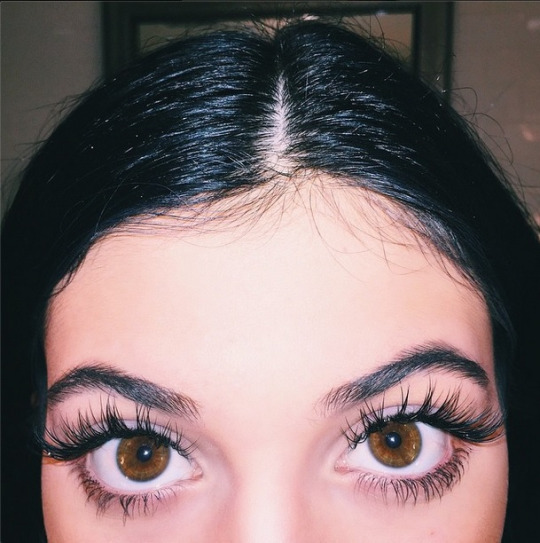
Today we will be talking ABOUT FAKE LASHES!

There are dozens of fabulous mascaras that can maximize your natural lashes, but no mascara can compete with the results you can get from a good pair of false eyelashes.
If you've been coveting the extraordinary fullness and length of celebrities lashes, then fake lashes are for you. Celebrities aren't relying on mascara alone, and you don't have to either!


Many people feel intimidated by false eyelashes, but worry no more.
In this post you will learn:
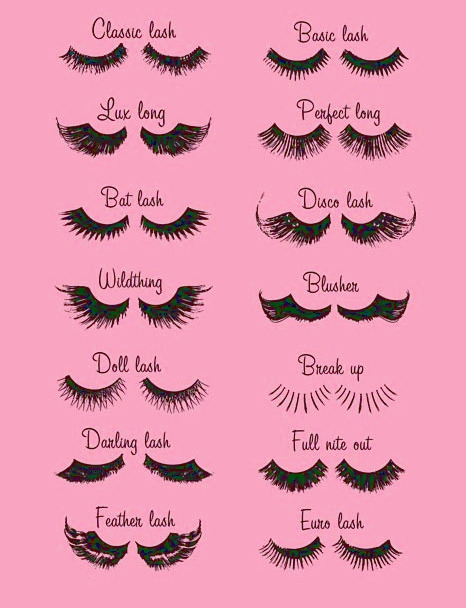
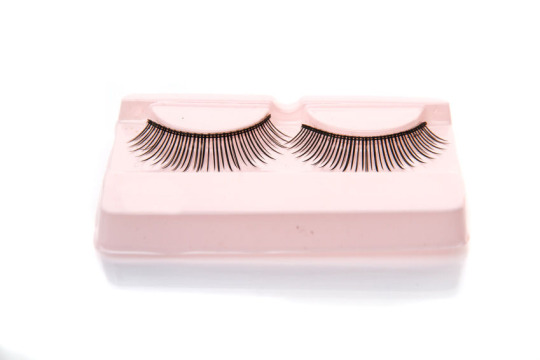
— TYPES OF FAKE LASHES
— RECOMMENEDED LASHES AND GLUES
— HOW TO APPLY THEM AND TAKE OFF
— HOW LONG DO THEY LAST
— HOW TO RE-USE THEM
Basically everything about fake lashes that will make the application and whole process much easier.
So let’s begin right now!
• TYPES OF FAKE LASHES
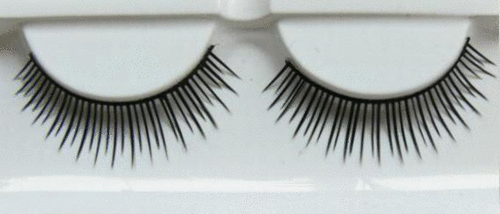
When it comes to cosmetics, expensive isn't necessarily better, and false lashes are no exception! There are excellent options available at the drugstore and online for a fraction of the price of department store lashes. But no matter where you buy your lashes, there are a few things to keep in mind.
First, we recommend human hair lashes over lashes made of synthetic hair.
Human hair lashes blend easily with the natural lashline and they take mascara much better than synthetic lashes.
Next, if you're buying a full set of lashes, pay attention to the width of the lash strip which is the band that the individual lashes are attached to.
A thin or "invisible" lash strip is preferred over a thick or opaque lash strip, as the latter tends to be more obvious. Also, the thinner the lash strip, the more lightweight and comfortable the falsies will be.
Shape matters! Falsies come in all different shapes and lengths. Choose those with a shape and length similar to your natural eye shape and with the look you desire.

If in doubt, choose a medium length set of lashes with a rounded shape. Lashes that have the most length in the middle of the eyelash strip create a universally flattering shape.
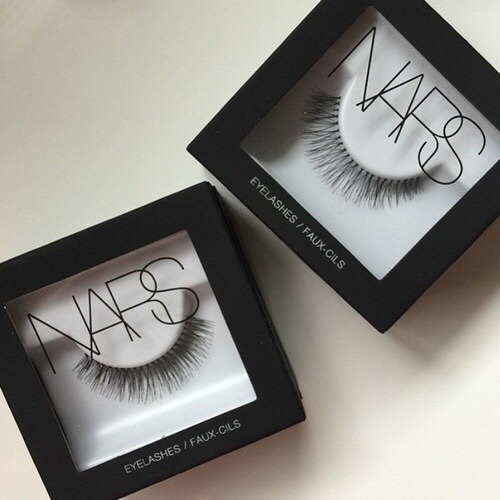
• WHAT LASHES SHOULD I BUY?
Here is a top 2 of the best rated lashes in the makeup industry
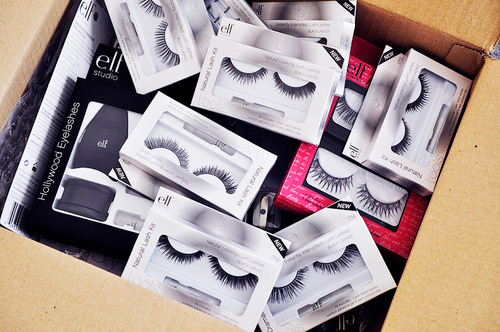
— Ardell (sold in most major drugstores)
— Red Cherry
• WHAT GLUE SHOULD I USE?
A good glue makes a huge difference. I mean, you aren't going to be very happy with your false lash experience if they keep falling off, right?
The best glue for makeup artists is duo eyelash adhesive.
It comes in two colors, the classic dark one and the light one.
You'll definitely want to follow the instructions and let the glue set on the false lashes for about 30 seconds before attaching the lash to your lid.
• HOW TO APPLY FALSE LASHES

You will need a lash curler, lash glue, mascara, tweezers and of course your fake lashes.

Step 1: Remove the lashes from the container by pushing down on the center of the lash strip with your thumb.
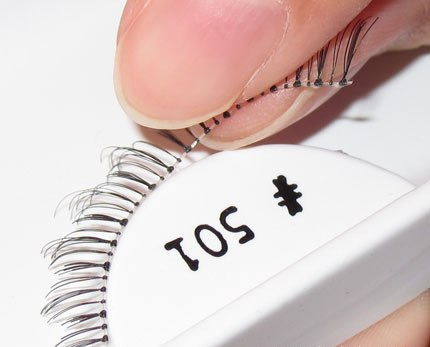
Do not pull from either end of the strip because you don't want to stretch, rip, or tear the delicate lash strip. If the lashes are difficult to remove by pushing down in the center with your thumb, use tweezers. (Keep the container, just in case you want to save your falsies and wear them again.)
Step 2: Try on your lashes before you apply eye makeup.
You won't have to hold them there with your fingers because new lashes generally have a small amount of adhesive left on the lash band.
Step 3: Trim the lashes. Almost everyone needs to trim strip lashes to get them to fit properly.

Trim the lash strip so that it ends before your natural lashline thins out at the inner corner of your eye. If the lash strip doesn't fit your eye shape, you may need to cut the lashes into two parts for a comfortable fit.
It's best to trim the lash strip from the OUTSIDE. Lash strips typically have smaller lashes at the inner corners to mimic natural lash growth.
Step 4: Curl your lashes before you put the fake ones.
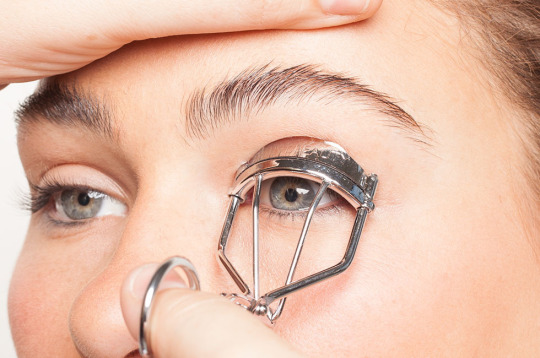
Just a small amount of gentle pressure and warmth will also curl your lashes. Hold for ten seconds, then repeat as needed. Curling your lashes will make the real and fake ones join and look better than ever.
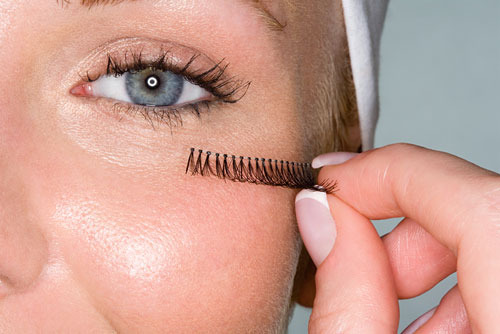
Step 5: Put the glue in your lashes.
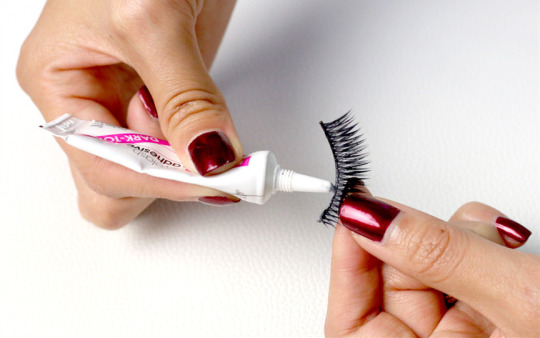
First, squeeze a drop of duo eyelash adhesive on the back of your hand and lightly dab glue to the lash. Wait about 15 seconds for the glue to get tacky, then lay the strip on the outer edge of your eye.
Step 6: Apply the lash strip as closely to the lashline as possible.
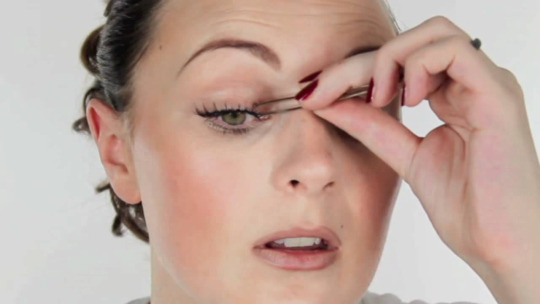
Using your tweezers stick your fake lashes on. Don't apply the lash strip to your eyelashes because you don't want to risk getting glue in your eye. Also, it's messy to remove the glue from your real lashes, and you risk pulling out your real lashes if the get stuck in the glue.
Step 7: Using mascara is a must!
You must apply a light coat of mascara to blend your natural lashes with the falsies.

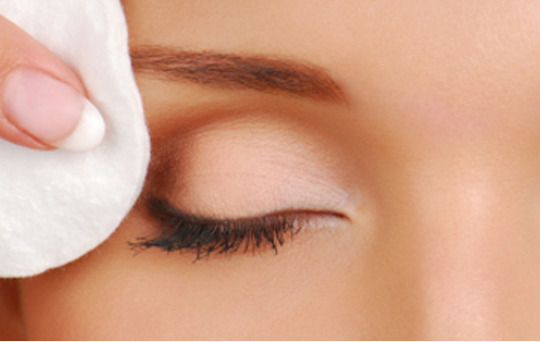
• HOW TO REMOVE FALSE LASHES
You will need cotton pads and an oil-free makeup remover.

Step 1: Remove your false lashes by gently pulling out from the center of the lash and wiggling until the lash comes off.
Step 2: Use an oil-free eye makeup remover and a cotton pad to remove the eyeliner and glue.
You may need more than one cotton pad to remove the remaining residue of glue.
Step 3: Don't wet the false lash strip.
To remove the glue from the lash strip, gently pull the glue away from the band.
• STORING YOUR LASHES
You might not know this but yes! False eyelashes can be reusable. Peel any remaining pieces of glue off the lash and use eye makeup remover and a Q-tip to clean it more thoroughly. Store your lashes in a clean plastic container and they’ll be ready for your next big night out!
Some of this lashes can last 15-20 uses.
• WHAT IF I HAVE SENSITIVE EYES?
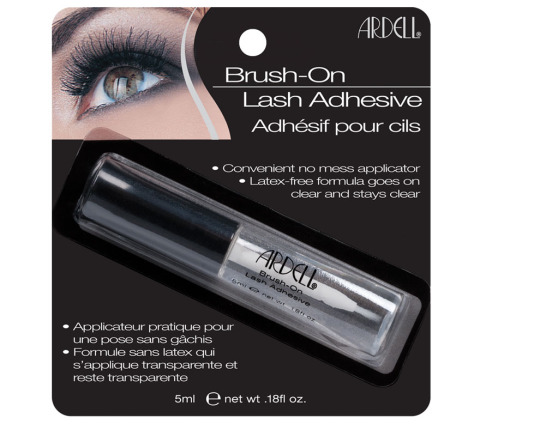
If you have issues with lash adhesive, try a latex-free adhesive. You can buy this Ardell latex-free glue. Depending on your sensitivity, you may have to try a few glues to find one that doesn't aggravate your particular sensitivity issue.
• HOW LONG DO LASHES LAST?
They will usually only last you through the day. Depending on how much glue you used they should last through the end of the night.
*As always I’m open to suggestions and opinions so if you need information about an specific topic don’t forget to tell us! *
If you found helpful/useful this post please like and reblog it so I know that you want me to publish more tips & tricks about makeup.
Last but not least, if you are a makeup lover or if you want to join our family follow LEARNTOMAKEUP to read our posts and stay updated ♥
Remember that I post new content on Saturdays and Sundays☺
See you soon my angels love you all , Valeria.
372 notes
·
View notes
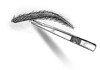
Photo


Hi my angels! This is my blog LEARNTOMAKEUP and I’m Valeria.♥
I got some messages asking me for a brow tutorial and to be honest talking about brows makes me really happy.
Today what I have for you all is a post about BROWS.
You will learn how to take care of your brows, how to shape them without destroying their natural or damaging them.

SHOULD I TRIM?
SHOULD I TWEEZE?
IS SHAVING MY BROWS GOOD?
DO TWEEZED HAIRS GROW BACK?
If you want to know the answer of any of this questions keep on reading!
Discovering the best shape for your eyebrows without sacrificing their natural appearance is what you want to accomplish when shaping your brows. Pencil thin or overly bushy eyebrows are dated looks that can be distracting rather than enhancing.
The shape of the eyebrows affects the appearance of the eyes. In many ways, the overall appearance of the eye area is defined by the arch, length, and thickness of the eyebrow.
The eyebrow should follow the length of the eye but it shouldn’t extend into the temple area. The basic rule is that the front part of the brow should never drop below the back part of the brow.
Allowing this to happen, either with the way you tweeze your eyebrows or the way you draw them on, makes you look like you’re frowning and overemphasizes the downward movement of the back part of the eye.
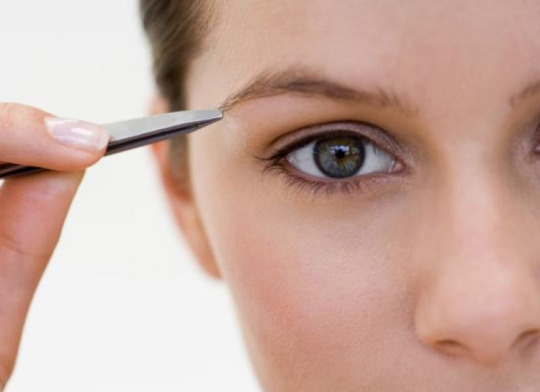
1. LOCATE YOUR STARTING POINTS
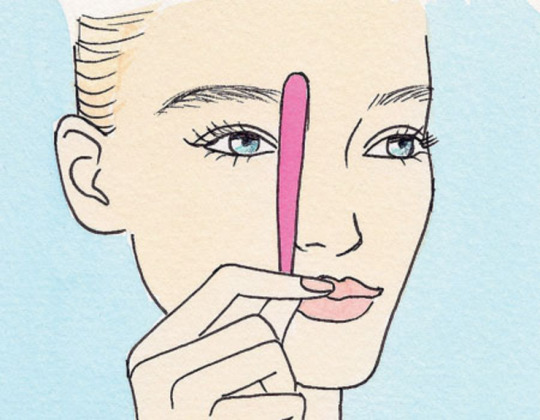
Flip your tweezer upside down so the open end is pointing downward, and place it vertically alongside the outer edge of the bottom of your nose.
The point where the vertex lands marks the beginning of your brow (which should also be about one inch above the inner corner of your eye).
Using an eye pencil, draw a vertical line to demarcate the start of each brow, then check that the space above the bridge of your nose is centered between them.
Remove the strays that fall in between. Grab strands right at the root and slowly pull them out.
2. MARK YOUR END POINTS
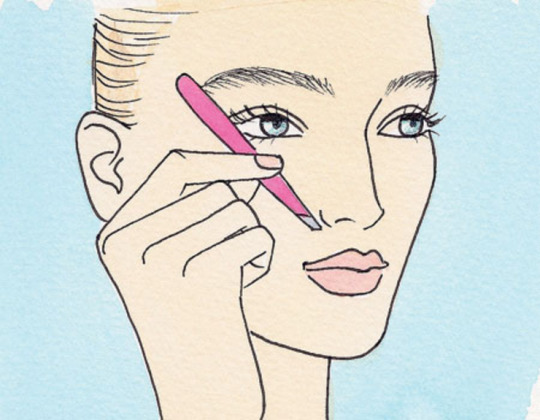
Lay the tweezer on an angle against your cheek so that the open end is at the bottom of your nose and the other end reaches the outer corner of your eye.
The spot where the tweezer intersects your brow is where the hairs should end. Mark it with the eye pencil, then pluck the hairs beyond the line.
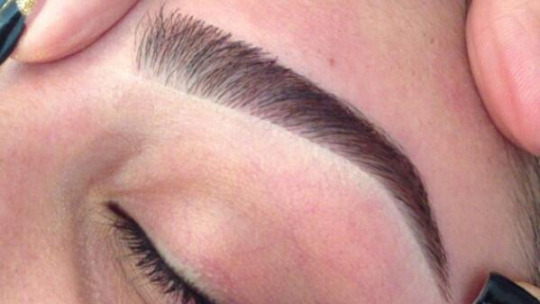
3. DETERMINE YOUR BROW THICKNESSS

Starting just below the fullest part of your brow, use an eye pencil to draw a line along the bottom edge of your brow; it should be above any stray hairs and it should follow the natural shape of your brow’s top line, which may be angled, slightly curved, or even straight. Pluck the strays below the line.
Ultimately, your brows should be between a quarter inch and a half inch at their thickest.
4. SHAPE YOUR ARCH

Look straight into a mirror. Use a magnifying mirror, at least a 5X magnification, so you can see each hair. The arch should peak above the outer rim of your iris and lie right on your brow bone. Mark the point with your eye pencil, then remove a row of hairs along the bottom, from your inner brow point to the peak point.
After the peak, shape the tail. Make it a bit thinner than the main part of your brow, tapering at the end. Go slowly (one hair at a time) so you don’t over-tweeze.
Which hairs you tweeze and which ones you don’t is the difference between attractively shaped brows and misshapen ones.
→ IMPORTANT ADVICE ←
•TWEEZING AND TRIMMING
1. Like I already told you before you start tweezing, use a brow pencil to heavily draw on the shape you want.
You can adjust it with makeup remover as you decide on the shape you want to create.
2. Once the shape is drawn on, tweeze any hairs that fall outside the line of the brow.
3. Next, brush the brows straight up with an old toothbrush
4. Any hairs that are too long and floppy should be trimmed with small scissors.

Tweezing long brow hairs rather than trimming them can result in gaps in the eyebrow or create a patchy appearance.
•WHAT SHOULD I AVOID?
Avoid over-tweezing above the brow. A few stray hairs are fine to remove, but too much and it can create an unnatural look.
Do not overstate the shape of the brow; minimal brow alteration is best.
Do not pluck brows into a thin line thinking it will make your eyes look larger. It can look dated or give the face a surprised look and this shape is not easy to correct once the damage is done.
•IS IT SAFE TO SHAVE MY EYEBROWS?
Never shave. This presents too big a risk of removing too many hairs at once, leading to a patchy, overly thin or wildly uneven brow. None of that is safe!
•DO TWEEZED HAIRS GROW BACK?
The answer is yes and no. Tweezed eyebrow hairs can grow back but this doesn’t happen overnight. Hairs on different parts of the body have variable rates of growth. It takes about 64 days for eyebrow hair to grow in after it is plucked. The length of time can be far greater, so you need to be patient.
If you have been tweezing the same area for a long time it may be too late. Eyebrow hair is very sensitive to injury. Repeated plucking can permanently damage the hair root, which will prevent the hair from ever growing back.
As always I’m open to suggestions and opinions so if you need information about an specific topic don’t forget to ask! Don’t be afraid to ask for help, if you want me to answer privately, I will do it. You can leave all your questions here
If you found helpful this post please like and reblog it so I know that you want me to publish more tips & tricks about makeup.
Last but not least, if you are a makeup lover or if you want to join our family follow LEARNTOMAKEUP to read our posts and stay updated ♥
Love you all, Valeria.
2K notes
·
View notes
Last Seen Blogs

kooltoppinclub
Dumb PT Ask Blog

abetogoku
Untitled

secularsorcerer
Blog of Shadows

darkcherryred
F.30.I hope you are enjoying what i reblog ;)

deborasalomeno
PLANEJAMENTO DE MARKETING - POSICIONAMENTO!