#leathertutorial
Explore tagged Tumblr posts
Visit Tumblr Blog
Explore Tumblr blogs with no restrictions, modern design and the best experience.
Last Seen Tumblr Blogs


Fun Fact
US Tumblr user growth rate is estimated to slow down to 4.1%.
Text
Basic Leather Bracers Tutorial
This is my tutorial for how to create a set of leather bracers. I also cover how to add simple detail in this tutorial. You can also use this tutorial if you are using Pleather or Foam for your bracers. See the notes in each section pertaining to the different materials.
What you will need
Sometime to draft a pattern with (Muslin, Wrapping Paper, Quilt backing, etc)
Leather (Pleather or foam can also work)
Leather Punch
Eyelits
Eyelit Punch (Needle noise pliers will work in a pinch)
Leather Cording (or Suede cording)
Leather Dye (Optional)

________________________________________________________________
Step One
The first thing you want to do is draft your basic pattern piece. Muslin works nicely for this since it's cheap and easy to write on and you can get it at any fabric store or Walmart.
Another neat option is wrapping paper since this can be bought in abundance during after Christmas sales for next to nothing. My favorite is the wrapping paper that has the grid on the underside as it's great for drafting things that need to be symmetrical or with exact measurements.
In this case I ended up using some quilt backing since I got a large bolt of it that's been sitting in my closet forever unused.
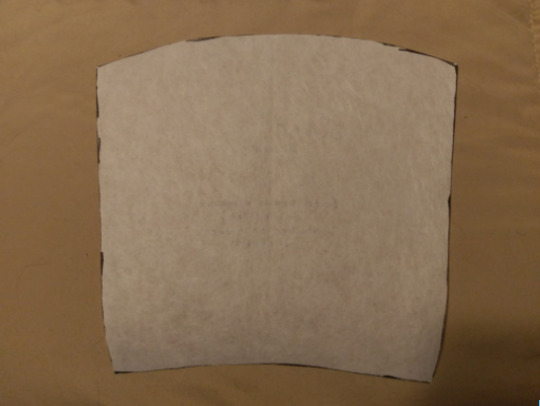
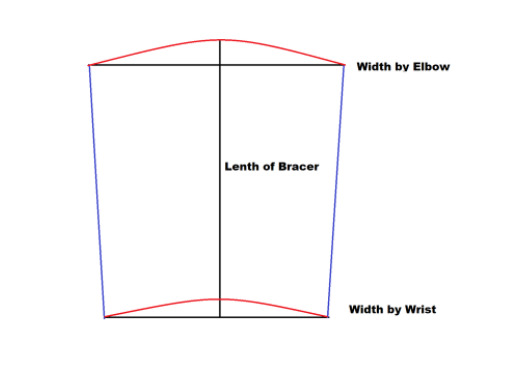
After you have your pattern material, the first thing you want to do is take some measurements. The length of your bracer should be length of your lower arm from the wrist to just before your elbow. You will take 2 width measurements, one at the wrist and one up near the elbow. Don't forget to write down your measurements so you have them saved for later. Start by drawing a line for the length measurement (Black), then add the width measurements as seen (Black). Once you have the base lines, connect the two width measurements on the sides using a ruler to make a straight line (Blue). Finally add the curves as seen (red).
Once you have your pattern piece completed to your liking, put it off to the side and grab the material you want to use for the bracers themselves. In this case I used some leather from a leather scraps bag I bought at the store (many fabric stores have these available for a decent price). If you do not access to leather then you can use pleather as a good substitute (see notes below regarding it). If you not have either, I would suggest the thin crafting foam that you can get at most crafting stores. It will be a bit stiffer, but should still work just fine.
________________________________________________________________
Step Two
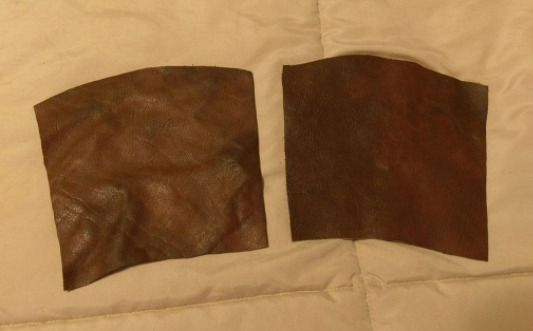
Take your pattern you just created and lay it over your material. Trace and cut 2 pieces out of the fabric. In my case the leather I was using was off in color by quite a bit so I dyed the leather to what you see on the left.
Leather Note:
Make sure you get clean edges on the outside. You can take a V shaped edge tool to clean this up if need be.
Pleather Note:
If you are using pleather you want to add a seam allowance on each side of the pattern piece. Cut the fabric with the seam allowance and then fold and stitch the hem on. This will prevent the fabric from fraying and will give it a more finished look.
________________________________________________________________
Step Three
Time to add the line detail to the bracers (Below). This is where it will differ depending on your material. Regardless of your material choice, I would recommend using a card to help align everything to make sure your lines are perpendicular. (see image below left)
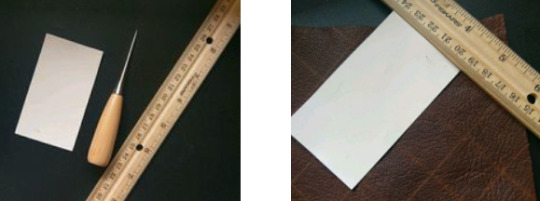
Leather: Wet the leather some before working with it. Take a ruler and a leather stamp or tooling piece to follow along the edge of the ruler to get the lines on. See photos on right. Pleather: Use a fabric pencil and a ruler to mark where you want your lines. Then go to your sewing machine and stitch them into the fabric. Foam: You can either draw/paint the lines on or you can use a tool to indent into the foam creating depressions on it.

________________________________________________________________
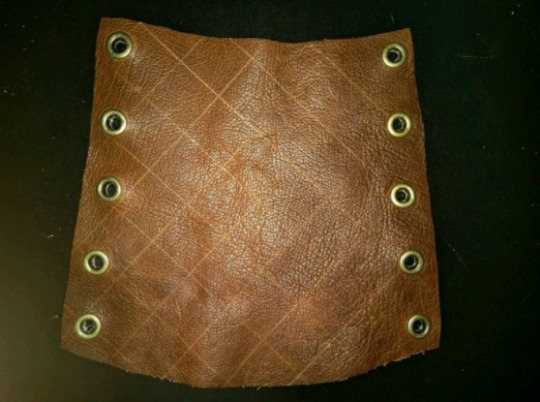
Step Four
This is where you punch the holes for the eyelets in order to string the bracers. Mark on the bracer sides where you want to place the holes. Make sure each side is symmetrical or as close as possible. If you are using leather or pleather, I would suggest using a leather punch. These can be bought at most crafting stores. If you are using foam you can use a regular hole punch.
________________________________________________________________
Step Five
You're almost there. Now you just have to string them using your preference of cording. On the right is possible lacing patterns you can use. I opted for C as that is my favorite and seems to hold the best, however, you can use whichever one you like the best. Start your lacing at the wrist and work towards the elbow. This way you can adjust the tightness yourself and you can tuck the cord ends into the larger part of the bracer.

________________________________________________________________
Ta-Dah! Congratulations!
Now you have a set of working bracers for a variety of different costumes. Have fun and enjoy!
#cosplaytutorial#leather#pleather#tutorials#cosplaying#corsetbracers#bracers#leatherbracers#leatherworking#leathercrafting#cosplaytutorials#basictutorial#leathertutorial#sewingtutorial#costumemaking#costumer#cosplayer#sewing
14 notes
·
View notes
Photo

All instant download Tutorials 15% discount through Jan 2! Www.thesilkthread.com. #thesilkthread #shopsale #tutorials #howtoecoprint #diytutorials #leathertutorial #pdftutorial (at The Silk Thread) https://www.instagram.com/p/CmxgcCuLnuW/?igshid=NGJjMDIxMWI=
0 notes
Photo

Next video tutorial and pattern soon! #heretik #leatherbag #leathertutorial #handcrafted #handbags #madeinromania https://www.instagram.com/p/B_IPPncACWc/?igshid=13vv87vatueej
0 notes
Photo

Working on video editing for the next episode of my leather tutorial for my You tube channel. Episode 3 drops tomorrow!. . . . . . . #drdodsondesigns #leather #steampunk #steampunkleather #steampunkfashion #leatherwallets #leatherbackpack #leatherbriefcase #leatherbag #handmade #youtube. #leathertutorial #handmadeisbetter #handcrafted #customleather #artsy #vetpreneurtribe #vetpreneur #badassbag. #lancasterpa #denverpa #tandyleather #luxuryleathergoods #luxurylifestyle #bespokeleather #CreativeBadass https://www.instagram.com/p/BuRfFmlHo9K/?utm_source=ig_tumblr_share&igshid=xrclxsy1e1ip
#drdodsondesigns#leather#steampunk#steampunkleather#steampunkfashion#leatherwallets#leatherbackpack#leatherbriefcase#leatherbag#handmade#youtube#leathertutorial#handmadeisbetter#handcrafted#customleather#artsy#vetpreneurtribe#vetpreneur#badassbag#lancasterpa#denverpa#tandyleather#luxuryleathergoods#luxurylifestyle#bespokeleather#creativebadass
0 notes
Photo

Student work. Ecoprinted kidskin leather photographed when dry on Day 2. The thicker 5 oz cowhide leather pieces they created were just as lovely! #thesilkthread #ecoprintonleather #leatherworkshop #leathercraft #ecoprint #leathertutorial (at The Silk Thread) https://www.instagram.com/p/CCBIS2QJIrS/?igshid=urgv8k7bv6mi
0 notes
Photo

An inside and outside look at my Ecoprinted leather clutch. #thesilkthread #leathertutorial #leatherclutch #handcrafted #ecoprintonleather (at The Silk Thread) https://www.instagram.com/p/B9hDiGSJILJ/?igshid=3gj2lqu226i7
0 notes
Photo

Ecoprint on Leather for the Ecoprinters serious about leathercraft! 55 pages with a big section on leather: what to look for, what you need, and where to find it in your area. Only one like it! Instant download. Https://www.etsy.com/listing/783347753/how-to-ecoprint-on-leather-in-color-and #thesilkthread #ecoprintonleather #leathercraft #leathertutorial #leathervest #leathermaker (at The Silk Thread) https://www.instagram.com/p/B9RfVyDFvsn/?igshid=1og5g50epgrqv
0 notes