#linux ufw firewall ubuntu
Explore tagged Tumblr posts
Visit Tumblr Blog
Explore Tumblr blogs with no restrictions, modern design and the best experience.
Last Seen Tumblr Blogs


Fun Fact
The “We are the 99%” Tumblr blog became the slogan for the Occupy Wall Street movement.
Text
How to Set Up UFW Firewall on Ubuntu 24.04 LTS in 5 Minutes
8 notes
·
View notes
Text
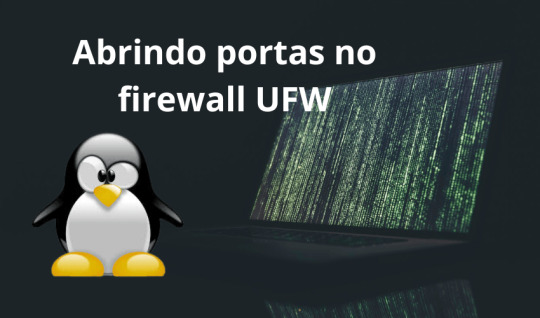
Como permitir conexão de uma porta no Ubuntu 22
Algumas distribuições de Linux utilizam o firewal UFW (chamado de firewall descomplicado, Uncomplicated Firewall) que é basicamente uma interface para o iptables. Quando ele está ativo na sua distribuição, ele bloqueia praticamente tudo. Para sabermos se está ativo, basta digitar o comando $ ufw status Possíveis respostas do UFW Status: active Quando o firewall está ativo, em seguida temos…
View On WordPress
0 notes
Text
How to Optimize Your Offshore SSD VPS for Maximum Efficiency
Having a well-optimized Offshore SSD VPS Hosting Solution is crucial for maintaining high performance, security, and cost-effectiveness. By implementing the right strategies, you can maximize the efficiency of your SSD VPS Servers while ensuring a seamless experience for your users. Here’s a step-by-step guide to help you achieve optimal performance.

1. Select the Right Operating System
Choosing an efficient OS like Linux (Ubuntu, CentOS, or Debian) can reduce resource consumption and improve server stability. Opt for minimal installations to avoid unnecessary processes that slow down your Offshore VPS Hosting Services.
2. Keep Software and System Updated
Regular updates enhance security and efficiency. Ensure your Offshore VPS Hosting Solutions receive the latest OS patches, security fixes, and software upgrades to maintain peak performance.
3. Optimize SSD Performance
Since SSDs provide high-speed storage, enabling TRIM support and reducing unnecessary write operations will extend their lifespan and enhance server performance. Using a lightweight file system like ext4 or XFS can further optimize storage efficiency.
4. Implement Caching Mechanisms
Caching reduces server load and speeds up content delivery. Tools like Memcached, Redis, or Varnish can significantly improve the responsiveness of your SSD VPS Servers by storing frequently accessed data.
5. Use a Lightweight Web Server
Switching to a high-performance web server like Nginx or LiteSpeed can enhance efficiency by handling more simultaneous connections with fewer resources. This optimization is essential for Offshore VPS Hosting Services that deal with heavy traffic.
6. Optimize Database Queries
Inefficient database queries can slow down your server. Use indexing, query caching, and database optimization tools to ensure fast and efficient data retrieval. MySQL tuning with InnoDB adjustments can also improve performance.
7. Strengthen Security Measures
Securing your Offshore SSD VPS Hosting Solutions is critical. Use firewalls (like UFW or CSF), SSH key authentication, and regular malware scans to prevent vulnerabilities and unauthorized access.
8. Leverage a Content Delivery Network (CDN)
A CDN reduces latency and speeds up global content delivery by caching and distributing resources across multiple locations. This reduces the direct load on your Offshore VPS Hosting Solutions.
9. Monitor Resource Usage
Tracking CPU, memory, and disk space usage is essential for identifying bottlenecks. Use monitoring tools like Nagios, Zabbix, or htop to ensure your SSD VPS Servers operate efficiently.
10. Optimize Bandwidth Usage
Reduce data transfer costs and improve performance by enabling Gzip or Brotli compression, minimizing HTTP requests, and optimizing website images. This ensures efficient bandwidth usage for your Off shore SSD VPS Hosting Solutions.
Conclusion
By applying these optimization techniques, you can enhance the efficiency, security, and performance of your Offshore SSD VPS Hosting Solutions. A well-maintained VPS ensures smooth operation, better user experience, and cost savings. Start implementing these strategies today to get the most out of your hosting solution!
0 notes
Text
Debian 12 initial server setup on a VPS/Cloud server

After deploying your Debian 12 server on your cloud provider, here are some extra steps you should take to secure your Debian 12 server. Here are some VPS providers we recommend. https://youtu.be/bHAavM_019o The video above follows the steps on this page , to set up a Debian 12 server from Vultr Cloud. Get $300 Credit from Vultr Cloud
Prerequisites
- Deploy a Debian 12 server. - On Windows, download and install Git. You'll use Git Bash to log into your server and carry out these steps. - On Mac or Linux, use your terminal to follow along.
1 SSH into server
Open Git Bash on Windows. Open Terminal on Mac/ Linux. SSH into your new server using the details provided by your cloud provider. Enter the correct user and IP, then enter your password. ssh root@my-server-ip After logging in successfully, update the server and install certain useful apps (they are probably already installed). apt update && apt upgrade -y apt install vim curl wget sudo htop -y
2 Create admin user
Using the root user is not recommended, you should create a new sudo user on Debian. In the commands below, Change the username as needed. adduser yournewuser #After the above user is created, add him to the sudo group usermod -aG sudo yournewuser After creating the user and adding them to the sudoers group, test it. Open a new terminal window, log in and try to update the server. if you are requested for a password, enter your user's password. If the command runs successfully, then your admin user is set and ready. sudo apt update && sudo apt upgrade -y
3 Set up SSH Key authentication for your new user
Logging in with an SSH key is favored over using a password. Step 1: generate SSH key This step is done on your local computer (not on the server). You can change details for the folder name and ssh key name as you see fit. # Create a directory for your key mkdir -p ~/.ssh/mykeys # Generate the keys ssh-keygen -t ed25519 -f ~/.ssh/mykeys/my-ssh-key1 Note that next time if you create another key, you must give it a different name, eg my-ssh-key2. Now that you have your private and public key generated, let's add them to your server. Step 2: copy public key to your server This step is still on your local computer. Run the following. Replace all the details as needed. You will need to enter the user's password. # ssh-copy-id -i ~/path-to-public-key user@host ssh-copy-id -i ~/.ssh/mykeys/my-ssh-key1.pub yournewuser@your-server-ip If you experience any errors in this part, leave a comment below. Step 3: log in with the SSH key Test that your new admin user can log into your Debian 12 server. Replace the details as needed. ssh yournewuser@server_ip -i ~/.ssh/path-to-private-key Step 4: Disable root user login and Password Authentication The Root user should not be able to SSH into the server, and only key based authentication should be used. echo -e "PermitRootLogin nonPasswordAuthentication no" | sudo tee /etc/ssh/sshd_config.d/mycustom.conf > /dev/null && sudo systemctl restart ssh To explain the above command, we are creating our custom ssh config file (mycustom.conf) inside /etc/ssh/sshd_config.d/ . Then in it, we are adding the rules to disable password authentication and root login. And finally restarting the ssh server. Certain cloud providers also create a config file in the /etc/ssh/sshd_config.d/ directory, check if there are other files in there, confirm the content and delete or move the configs to your custom ssh config file. If you are on Vultr cloud or Hetzner or DigitalOcean run this to disable the 50-cloud-init.conf ssh config file: sudo mv /etc/ssh/sshd_config.d/50-cloud-init.conf /etc/ssh/sshd_config.d/50-cloud-init Test it by opening a new terminal, then try logging in as root and also try logging in the new user via a password. If it all fails, you are good to go.
4 Firewall setup - UFW
UFW is an easier interface for managing your Firewall rules on Debian and Ubuntu, Install UFW, activate it, enable default rules and enable various services #Install UFW sudo apt install ufw #Enable it. Type y to accept when prompted sudo ufw enable #Allow SSH HTTP and HTTPS access sudo ufw allow ssh && sudo ufw allow http && sudo ufw allow https If you want to allow a specific port, you can do: sudo ufw allow 7000 sudo ufw allow 7000/tcp #To delete the rule above sudo ufw delete allow 7000 To learn more about UFW, feel free to search online. Here's a quick UFW tutorial that might help get you to understand how to perform certain tasks.
5 Change SSH Port
Before changing the port, ensure you add your intended SSH port to the firewall. Assuming your new SSH port is 7020, allow it on the firewall: sudo ufw allow 7020/tcp To change the SSH port, we'll append the Port number to the custom ssh config file we created above in Step 4 of the SSH key authentication setup. echo "Port 7020" | sudo tee -a /etc/ssh/sshd_config.d/mycustom.conf > /dev/null && sudo systemctl restart ssh In a new terminal/Git Bash window, try to log in with the new port as follows: ssh yournewuser@your-server-ip -i ~/.ssh/mykeys/my-ssh-key1 -p 7020 #ssh user@server_ip -i ~/.ssh/path-to-private-key -p 7020 If you are able to log in, then that’s perfect. Your server's SSH port has been changed successfully.
6 Create a swap file
Feel free to edit this as much as you need to. The provided command will create a swap file of 2G. You can also change all instances of the name, debianswapfile to any other name you prefer. sudo fallocate -l 2G /debianswapfile ; sudo chmod 600 /debianswapfile ; sudo mkswap /debianswapfile && sudo swapon /debianswapfile ; sudo sed -i '$a/debianswapfile swap swap defaults 0 0' /etc/fstab
7 Change Server Hostname (Optional)
If your server will also be running a mail server, then this step is important, if not you can skip it. Change your mail server to a fully qualified domain and add the name to your etc/hosts file #Replace subdomain.example.com with your hostname sudo hostnamectl set-hostname subdomain.example.com #Edit etc/hosts with your hostname and IP. replace 192.168.1.10 with your IP echo "192.168.1.10 subdomain.example.com subdomain" | sudo tee -a /etc/hosts > /dev/null
8 Setup Automatic Updates
You can set up Unattended Upgrades #Install unattended upgrades sudo apt install unattended-upgrades apt-listchanges -y # Enable unattended upgrades sudo dpkg-reconfigure --priority=low unattended-upgrades # Edit the unattended upgrades file sudo vi /etc/apt/apt.conf.d/50unattended-upgrades In the open file, uncomment the types of updates you want to be updated , for example you can make it look like this : Unattended-Upgrade::Origins-Pattern { ......... "origin=Debian,codename=${distro_codename}-updates"; "origin=Debian,codename=${distro_codename}-proposed-updates"; "origin=Debian,codename=${distro_codename},label=Debian"; "origin=Debian,codename=${distro_codename},label=Debian-Security"; "origin=Debian,codename=${distro_codename}-security,label=Debian-Security"; .......... }; Restart and dry run unattended upgrades sudo systemctl restart unattended-upgrades.service sudo unattended-upgrades --dry-run --debug auto-update 3rd party repositories The format for Debian repo updates in the etc/apt/apt.conf.d/50unattended-upgrades file is as follows "origin=Debian,codename=${distro_codename},label=Debian"; So to update third party repos you need to figure out details for the repo as follows # See the list of all repos ls -l /var/lib/apt/lists/ # Then check details for a specific repo( eg apt.hestiacp.com_dists_bookworm_InRelease) sudo cat /var/lib/apt/lists/apt.hestiacp.com_dists_bookworm_InRelease # Just the upper part is what interests us eg : Origin: apt.hestiacp.com Label: apt repository Suite: bookworm Codename: bookworm NotAutomatic: no ButAutomaticUpgrades: no Components: main # Then replace these details in "origin=Debian,codename=${distro_codename},label=Debian"; # And add the new line in etc/apt/apt.conf.d/50unattended-upgrades "origin=apt.hestiacp.com,codename=${distro_codename},label=apt repository"; There you go. This should cover Debian 12 initial server set up on any VPS or cloud server in a production environment. Additional steps you should look into: - Install and set up Fail2ban - Install and set up crowdsec - Enable your app or website on Cloudflare - Enabling your Cloud provider's firewall, if they have one.
Bonus commands
Delete a user sudo deluser yournewuser sudo deluser --remove-home yournewuser Read the full article
0 notes
Text
How to Install UFW on Ubuntu 24.04
This post will explain how to install the UFW on Ubuntu 24.04 OS. UFW (Uncomplicated Firewall) is an interface for iptables for configuring a firewall. The UFW firewall is way easier than the iptables for securing the server. It is used daily by system administrators, developers, and other familiar Linux users. The most important thing about the UFW firewall is that it protects the server from…
0 notes
Video
youtube
Discover the EASY Way to Install LINUX Without the Hassle!
*Linux For DevOps:* https://www.youtube.com/playlist?list=PLGj4aMqxhpL6qwlxRuVljjIxvNoMy-W91 *Linux For DevOps: Beginner Level:* https://www.youtube.com/playlist?list=PLGj4aMqxhpL5bLDvXBIpOmS_Vh6U8tjM0 *Linux For DevOps: Intermediate Level:* https://www.youtube.com/playlist?list=PLGj4aMqxhpL79czyihLsCRXHePzY0zQuv ***************************** * Discover the EASY Way to Install LINUX Without the Hassle! * 🎥: https://youtu.be/V7ZOuK6o5KQ *****************************
Linux is a powerful, versatile operating system widely used for servers, development environments, and personal computing. If you're new to Linux, this guide will walk you through the installation process and initial setup to get you started.
Why Choose Linux? - Free and Open Source: Most Linux distributions are completely free to use. - Customizable: Tailor your operating system to your needs. - Secure and Reliable: Preferred for servers and development due to robust security. - Community Support: A vast, active community to help with troubleshooting and learning.
Step 1: Choose a Linux Distribution Popular Linux distributions include: - Ubuntu: Beginner-friendly and widely supported. - Fedora: Cutting-edge features for developers. - Debian: Stable and ideal for servers. - Linux Mint: Great for transitioning from Windows. - CentOS Stream: Suitable for enterprise environments.
Step 2: Download the ISO File 1. Visit the official website of your chosen Linux distribution. 2. Download the appropriate ISO file for your system (32-bit or 64-bit).
Step 3: Create a Bootable USB Drive To install Linux, you'll need a bootable USB drive: 1. Use tools like Rufus (Windows), Etcher, or UNetbootin to create a bootable USB. 2. Select the downloaded ISO file and the USB drive, then start the process.
Step 4: Install Linux 1. Insert the bootable USB into your computer and restart. 2. Access the BIOS/UEFI menu (usually by pressing `F2`, `F12`, `Esc`, or `Del` during startup). 3. Set the USB drive as the first boot device. 4. Follow the installation wizard to: - Select your language. - Partition your disk (use “Automatic” if unsure). - Create a user account and set a password.
Step 5: Perform Initial Setup After installation: 1. Update the System: ```bash sudo apt update && sudo apt upgrade -y # For Debian-based systems sudo dnf update # For Fedora-based systems ``` 2. Install Essential Software: - Text editors: `nano`, `vim`. - Browsers: `Firefox`, `Chromium`. - Development tools: `git`, `gcc`.
3. Enable Firewall: ```bash sudo ufw enable # Uncomplicated Firewall ```
4. Learn Basic Commands: - File navigation: `ls`, `cd`. - File management: `cp`, `mv`, `rm`. - Viewing files: `cat`, `less`.
Tips for Beginners - Experiment with a Live Environment before installing. - Use VirtualBox or VMware to practice Linux in a virtual machine. - Join forums like Ubuntu Forums, Reddit’s r/linux, or Linux Questions for support.
Linux installation, Linux beginner guide, Linux setup, how to install Linux, Linux for beginners, Linux distributions, Ubuntu installation, Linux Mint setup, Fedora installation guide, Linux tips
#Linux #LinuxForBeginners #Ubuntu #LinuxMint #Fedora #LinuxTips #OpenSource #LinuxInstallation #TechGuide #LinuxSetup #ClouDolus #ClouDolusPro
ubuntu,Getting Started with Linux Installation and Basic Setup,linux tutorial for beginners,open source,linux terminal,distrotube,ubuntu is bad,linux tutorial,linux for beginners,linux commands,Linux installation,Linux beginner guide,Linux setup,how to install Linux,Linux for beginners,Linux distributions,Ubuntu installation,Fedora installation guide,Linux tips,cloudolus,cloudoluspro,free,Linux,Linux for DevOps,Linux basics,DevOps basics,cloud computing,DevOps skills,Linux tutorial,Linux scripting,Linux automation,Linux shell scripting,Linux in DevOps,Ubuntu,CentOS,Red Hat Linux,DevOps tools,ClouDolus,DevOps career,Linux commands for beginners,Introduction to Linux for DevOps: Why It’s Essential,devops tutorial for beginners,learn devops,devops tutorial,Who Should Learn Linux for DevOps?,Why You Should Learn Linux for DevOps,Why Linux is Critical in DevOps,Why Linux Essential?,What Is Linux Overview?,What Linux Key Features?,What Linux Key Benefits?,What Is Linux Overview? Linux for DevOps,Linux for cloud,Linux training,devops tutorial Linux,Linux commands for beginners ubuntu,cloud computing Linux for DevOps
***************************** *Follow Me* https://www.facebook.com/cloudolus/ | https://www.facebook.com/groups/cloudolus | https://www.linkedin.com/groups/14347089/ | https://www.instagram.com/cloudolus/ | https://twitter.com/cloudolus | https://www.pinterest.com/cloudolus/ | https://www.youtube.com/@cloudolus | https://www.youtube.com/@ClouDolusPro | https://discord.gg/GBMt4PDK | https://www.tumblr.com/cloudolus | https://cloudolus.blogspot.com/ | https://t.me/cloudolus | https://www.whatsapp.com/channel/0029VadSJdv9hXFAu3acAu0r | https://chat.whatsapp.com/D6I4JafCUVhGihV7wpryP2 *****************************
*🔔Subscribe & Stay Updated:* Don't forget to subscribe and hit the bell icon to receive notifications and stay updated on our latest videos, tutorials & playlists! *ClouDolus:* https://www.youtube.com/@cloudolus *ClouDolus AWS DevOps:* https://www.youtube.com/@ClouDolusPro *THANKS FOR BEING A PART OF ClouDolus! 🙌✨*
#youtube#ubuntuGetting Started with Linux Installation and Basic Setuplinux tutorial for beginnersopen sourcelinux terminaldistrotubeubuntu is badlin
0 notes
Text
Build and Secure Your Linux Server: A Quick Guide
Want to create a powerful and secure Linux server? Here's your step-by-step guide to get started!
Why Linux? Linux is the go-to for flexibility, security, and stability. Whether you’re hosting websites or managing data, it's the perfect choice for tech enthusiasts.
1. Choose Your Distribution Pick the right distro based on your needs:
Ubuntu for beginners.
CentOS for stable enterprise use.
Debian for secure, critical systems.
2. Install the OS Keep it lean by installing only what you need. Whether on a physical machine or virtual, the installation is simple.
3. Secure SSH Access Lock down SSH by:
Disabling root login.
Using SSH keys instead of passwords.
Changing the default port for added security.
4. Set Up the Firewall Configure UFW or iptables to control traffic. Block unnecessary ports and only allow trusted sources.
5. Regular Updates Always keep your system updated. Run updates often to patch vulnerabilities and keep your server running smoothly.
6. Backup Your Data Use tools like rsync to back up regularly. Don’t wait for disaster to strike.
7. Monitor and Maintain Regular check logs and monitor server health to catch any issues early. Stay ahead with security patches.
0 notes
Text
Hướng dẫn các bước đẩy Log từ Client lên Graylog chi tiết

Graylog là một nền tảng mạnh mẽ để thu thập, phân tích và quản lý log. Việc đẩy log từ các nguồn khác nhau lên Graylog giúp bạn tập trung hóa việc quản lý log, dễ dàng giám sát hệ thống và phát hiện các sự cố kịp thời. Bài viết này sẽ hướng dẫn bạn cách đẩy log từ Client lên Graylog.
1. Tìm hiểu về Input trong Graylog
Input trong Graylog là các điểm nhập dữ liệu, nơi Graylog nhận và xử lý log messages từ các nguồn khác nhau. Hiểu rõ về các loại Input là điều cần thiết để có thể cấu hình Graylog nhận log từ các hệ thống và thiết bị khác nhau. Dưới đây là chi tiết về các loại Input phổ biến và cách cấu hình chúng.
Dưới đây là một số loại Input phổ biến:
Syslog: Sử dụng để nhận log từ các thiết bị và ứng dụng hỗ trợ giao thức Syslog.
GELF (Graylog Extended Log Format): Một định dạng log mở rộng của Graylog, hỗ trợ cấu trúc dữ liệu JSON.
Beats: Sử dụng để nhận log từ Filebeat, Metricbeat và các Beats khác của Elastic.
Raw/Plaintext: Nhận log dưới dạng văn bản thô hoặc định dạng tùy chỉnh.
JSON Path: Sử dụng để nhận log có định dạng JSON, giúp trích xuất và phân tích dữ liệu JSON.
HTTP: Nhận log qua HTTP/HTTPS, cho phép gửi log từ các ứng dụng web và dịch vụ hỗ trợ HTTP.
TCP/UDP: Nhận log qua giao thức TCP hoặc UDP, thường dùng cho các ứng dụng và thiết bị không hỗ trợ Syslog nhưng có khả năng gửi log qua mạng.
AMQP: Sử dụng để nhận log từ các hàng đợi tin nhắn (message queues) hỗ trợ giao thức AMQP.
Kafka: Nhận log từ Apache Kafka, một nền tảng stream-processing phổ biến.
2. Mô hình đẩy log từ Client lên Graylog
Chúng tôi có một mô hình cơ bản giúp bạn hiểu rõ hơn về cách đẩy log từ Client lên Graylog.
IP Planning
Tên máy
IP
Graylog
172.16.66.55
Linux
172.16.66.54
vCenter
172.16.66.46
3. Đẩy log từ vCenter sang Graylog
3.1 Cấu hình trên vCenter
Ta cần vào trang VAMI của vCenter để tiến hành mở dịch vụ rsyslog và tiến hành đẩy log sang. Để truy cập vào trang VAMI ta thực hiện theo đường dẫn sau.
Tiếp theo ta chọn vào Syslog và tiến hành cấu hình đẩy log. Chúng ta cần khai báo IP của Graylog và giao thức đẩy log là UDP.
3.2 Cấu hình trên Graylog
Việc đầu tiên để Graylog có thể nhận được log thì ta phải cấu hình firewall mở port 514/UDP. Ở đây mình dùng Ubuntu 22.04 nên sẽ sử dụng lệnh sau.
ufw allow 514/udp
Bây giờ ta sẽ lên giao diện Web của Graylog và tiến hành đẩy log. Graylog mình dùng là bản 5.2 nhé.
Ta chọn vào System / Inputs để tiến hành add Input mới. Hãy chọn giao thức là Syslog UDP nhé.
Nội dung cần cấu hình.
Titlle : vCenter ( Tên để bạn gợi nhớ ra Input này)
Bind address : 0.0.0.0 (Lắng nghe trên tất cả các interface của graylog)
Port : 514
Sau khi Launch Input ta sẽ nhận được kết quả như này.
Như vậy là đã cấu hình xong bạn có thể xem log bằng cách nhấn vào Show received messages.
4. Đẩy log từ máy Client Linux bất kỳ lên Graylog
4.1 Cấu hình trên Linux
Việc cấu hình trên Linux thì lại rất đơn giản chúng ta chỉ cần sử dụng đúng 1 câu lệnh.
echo '*.* @172.16.66.55:1514' >> /etc/rsyslog.conf
Bây giờ ta chỉ cần tiến hành restart lại dịch vụ rsyslog là xong.
systemctl restart rsyslog
4.2 Cấu hình trên Graylog
Cấu hình trên Graylog ta cũng làm tương tự như các bước ở phần 3 nhưng ta sẽ đổi thành port 1514 và mở firewall đối với port 1514/udp.
Mở firewall.
ufw allow 1514/udp
Cấu hình graylog.
Titlle : netbox-log ( Tên để bạn gợi nhớ ra Input này)
Bind address : 0.0.0.0 (Lắng nghe trên tất cả các interface của graylog)
Port : 1514
Ta kiểm tra xem đã nhận được.
Như vậy là SunCloud đã hướng dẫn các bạn gửi log từ vCenter hay một máy Linux bất kỳ với giao thức UDP. Nếu trong quá trình thực hiện, bạn gặp phải vướng mắc cần được hỗ trợ, hãy liên hệ với chúng tôi để được tư vấn nhanh nhất nhé. Chúc các bạn thành công!
Nguồn: https://suncloud.vn/client-graylog
0 notes
Text
How to Open a Port on Linux: A Guide for Ubuntu Users
If you’re running a residential server on Ubuntu, or if you’re using it as your primary OS and need to configure network access, knowing how to open a port is essential. This guide will walk you through the process step-by-step, ensuring that your server or application, such as RDPextra, can communicate effectively over the network. We’ll cover the basics of port management on Ubuntu, using the ufw firewall, and ensuring your system remains secure.
Understanding Ports and Their Importance
Before diving into the technical details, it’s crucial to understand what ports are and why they are important. In the context of network communications, a port is a virtual point where network connections start and end. Each port is identified by a number, and different services and applications use different port numbers to communicate. For instance, web servers typically use port 80 for HTTP and port 443 for HTTPS.

Using UFW to Open Ports on Ubuntu
Ubuntu’s default firewall management tool, UFW (Uncomplicated Firewall), makes it easy to manage firewall rules. Here’s how you can open a port using UFW.
Step 1: Check UFW Status
First, check if UFW is active on your system. Open a terminal and type:bashCopy codesudo ufw status
If UFW is inactive, you can enable it with:bashCopy codesudo ufw enable
Step 2: Allow a Specific Port
To open a specific port, use the following command. For example, if you need to open port 3389 for RDPextra, you would type:bashCopy codesudo ufw allow 3389
Step 3: Verify the Rule
After adding the rule, verify that the port is open by checking the UFW status again:bashCopy codesudo ufw status
You should see a line in the output indicating that port 3389 is allowed.
Configuring Ports for Residential Server Use
Opening Multiple Ports
You can open multiple ports in one command by specifying a range. For example, to open ports 8000 to 8100:bashCopy codesudo ufw allow 8000:8100/tcp
This command specifies that the range of ports from 8000 to 8100 is allowed for TCP traffic. If you also need to allow UDP traffic, add a separate rule:bashCopy codesudo ufw allow 8000:8100/udp
Specific IP Address Allowance
For additional security, you might want to allow only specific IP addresses to connect to certain ports. For example, to allow only the IP address 192.168.1.100 to connect to port 22 (SSH), use:bashCopy codesudo ufw allow from 192.168.1.100 to any port 22
This command is particularly useful for residential servers where you may want to restrict access to known, trusted devices.
Ensuring Security While Opening Ports
While opening ports is necessary for network communication, it also opens potential entry points for attackers. Here are some tips to maintain security:
Use Strong Passwords and Authentication
Ensure that all services, especially remote access tools like RDPextra, use strong passwords and two-factor authentication where possible. This reduces the risk of unauthorized access even if the port is open.
Regularly Update Your System
Keeping your Ubuntu system and all installed software up to date ensures that you have the latest security patches. Run these commands regularly to update your system:bashCopy codesudo apt update sudo apt upgrade
Monitor Open Ports
Regularly review which ports are open and why. Use the sudo ufw status command to see current rules and ensure they match your intended configuration.
Troubleshooting Common Issues
Even after configuring UFW, you might encounter issues. Here are some common problems and their solutions:
UFW is Inactive
If UFW is not active, ensure you have enabled it with sudo ufw enable. Additionally, check that there are no conflicts with other firewall software that might be installed.
Rules Not Applied Correctly
If a rule isn’t working as expected, double-check the syntax. Ensure there are no typos and that the correct protocol (TCP or UDP) is specified.
Application-Specific Issues
For applications like RDPextra, make sure the application itself is configured to use the correct port. Sometimes, the issue might be within the application settings rather than the firewall.
Conclusion
Opening a port on Ubuntu is a straightforward process with UFW, but it requires careful consideration to maintain system security. Whether you’re setting up RDPextra for remote access or configuring a residential server, following these steps ensures that your ports are open for the right reasons and remain secure. Always monitor and review your firewall rules to adapt to changing security needs and network configurations.
0 notes
Text
can you use adrelanos vpn firewall killswitch with ufw
🔒🌍✨ Get 3 Months FREE VPN - Secure & Private Internet Access Worldwide! Click Here ✨🌍🔒
can you use adrelanos vpn firewall killswitch with ufw
Adrelanos VPN
Adrelanos VPN is a privacy-focused virtual private network service that offers users a secure and encrypted internet connection. With increasing concerns around online privacy and data security, VPNs have become essential tools for safeguarding personal information and browsing activities from prying eyes.
One of the key features of Adrelanos VPN is its commitment to anonymity. By routing your internet traffic through encrypted tunnels and masking your IP address, Adrelanos VPN ensures that your online activities remain private and protected. Whether you are browsing the web, streaming content, or accessing sensitive information, Adrelanos VPN helps you stay anonymous and secure.
In addition to anonymity, Adrelanos VPN also prioritizes speed and performance. With servers strategically located around the world, users can enjoy fast and reliable connections without compromising on security. Whether you are connecting from a coffee shop, airport, or hotel, Adrelanos VPN ensures that your data is encrypted and your online activities are shielded from cyber threats.
Furthermore, Adrelanos VPN offers a user-friendly interface and easy-to-use features, making it accessible to beginners and experienced users alike. From one-click connections to customizable settings, Adrelanos VPN provides a seamless browsing experience while ensuring maximum security and privacy.
In conclusion, Adrelanos VPN is a reliable and effective solution for anyone looking to protect their online privacy and security. With its robust features, commitment to anonymity, and user-friendly interface, Adrelanos VPN is a trusted ally in the fight against cyber threats and data breaches.
Firewall killswitch
A firewall killswitch is a critical feature in network security that can help prevent cyber attacks and unauthorized access to sensitive data. This feature allows organizations to instantly cut off all network traffic in the event of a security breach or any suspicioսs activities.
The firewall killswitch acts as a last line of defense to protect the network from malicious threats. When activated, it can isolate the affected system or systems from the rest of the network, preventing the spread of malware and unauthorized access to other devices or servers.
One of the key benefits of a firewall killswitch is its ability to minimize the impact of a potential security incident. By quickly shutting down network traffic, organizations can limit the damage caused by cyber attacks and prevent valuable data from being compromised.
Additionally, a firewall killswitch can provide network administrators with valuable time to assess the situation, investigate the root cause of the security breach, and implement necessary measures to restore the network's integrity.
In today's increasingly interconnected world, where cyber threats are constantly evolving, having a firewall killswitch is essential for ensuring the security and privacy of sensitive information. By incorporating this feature into their network security strategy, organizations can better safeguard their data, systems, and reputation from cyber attacks.
UFW compatibility
Title: Understanding UFW Compatibility: Ensuring Smooth Firewall Integration
UFW (Uncomplicated Firewall) compatibility plays a crucial role in managing and securing network traffic efficiently. As an essential tool for firewall management on Linux systems, UFW offers simplicity and ease of use without compromising on security. However, ensuring compatibility with various systems and applications is paramount to its effectiveness.
When considering UFW compatibility, it's essential to assess its integration with different Linux distributions. While UFW is primarily designed for Ubuntu and Debian-based systems, it can also be utilized on other distributions with varying degrees of compatibility. Users should verify UFW support and functionality on their specific distribution to avoid any potential issues.
Furthermore, compatibility extends beyond the operating system to encompass applications and services running on the network. UFW must seamlessly integrate with these components to provide comprehensive protection without causing disruptions. Testing UFW compatibility with commonly used applications ensures that it can effectively control traffic flow while maintaining service availability.
Additionally, compatibility considerations extend to network configurations and protocols. UFW should support a wide range of protocols and network setups to accommodate diverse environments. Whether it's managing inbound or outbound traffic, UFW compatibility ensures consistent enforcement of firewall rules across different networking scenarios.
Regular updates and maintenance are essential to maintaining UFW compatibility. As new Linux distributions, applications, and network technologies emerge, developers continually update UFW to ensure compatibility with the latest developments. Staying informed about updates and implementing them promptly helps mitigate compatibility issues and enhances overall security posture.
In conclusion, UFW compatibility is vital for seamless firewall integration and effective network security management. By assessing compatibility with operating systems, applications, and network configurations, users can leverage UFW's capabilities to safeguard their systems and data effectively. Regular updates and proactive maintenance are key to ensuring ongoing compatibility and optimal performance of UFW in diverse environments.
Network security
Title: Safeguarding Your Digital Fortress: A Primer on Network Security
In today's interconnected world, where data flows freely and cyber threats loom large, ensuring robust network security has become paramount for individuals and organizations alike. Network security encompasses a range of measures designed to protect the integrity, confidentiality, and availability of data transmitted over computer networks.
One of the foundational elements of network security is encryption. By encrypting data, whether it's emails, files, or communications, information is transformed into an unreadable format, thereby thwarting unauthorized access. Advanced encryption standards, such as AES (Advanced Encryption Standard), are widely employed to secure sensitive information.
Firewalls serve as the gatekeepers of network traffic, filtering incoming and outgoing data based on predetermined security rules. These barriers act as a barrier against malicious actors attempting to infiltrate networks or launch cyber attacks. Intrusion Detection Systems (IDS) and Intrusion Prevention Systems (IPS) work in tandem with firewalls to detect and mitigate suspicious activities in real-time.
Regular software updates and patches are crucial for addressing vulnerabilities that cybercriminals exploit to gain unauthorized access to networks. By promptly applying security patches provided by software vendors, organizations can bolster their defenses against emerging threats.
Implementing strong access controls, such as multi-factor authentication (MFA) and role-based access control (RBAC), helps limit access to sensitive data and resources to authorized users only. Additionally, conducting regular security audits and penetration testing enables organizations to identify and address security weaknesses before they can be exploited by malicious actors.
Educating employees about best practices in cybersecurity, such as avoiding suspicious links and attachments, practicing good password hygiene, and being vigilant against social engineering tactics, is essential in fostering a security-conscious culture within organizations.
In conclusion, network security is a multifaceted discipline aimed at safeguarding digital assets from cyber threats. By adopting a proactive approach and implementing robust security measures, individuals and organizations can mitigate risks and ensure the integrity and confidentiality of their data in an increasingly interconnected world.
Privacy protection
Privacy protection is a crucial aspect of our digital lives in the modern age. With the advancement of technology and increasing online presence, it has become more important than ever to safeguard our personal information from potential threats and breaches.
There are various ways to enhance privacy protection online. One of the most basic yet effective methods is to regularly update and strengthen passwords for all online accounts. Using unique and complex passwords across different platforms can significantly reduce the risk of unauthorized access to sensitive data.
In addition, being mindful of the information shared on social media and other online platforms is essential for maintaining privacy. Oversharing personal details or location information can make individuals more vulnerable to identity theft and other privacy infringements.
Furthermore, utilizing secure and encrypted connections, such as virtual private networks (VPNs), can help protect data transmission online. VPNs create a secure connection between the user and the internet, preventing third parties from intercepting sensitive information.
It is also important to be cautious of phishing attempts and suspicious links that may lead to malware or unauthorized access to personal data. Verifying the authenticity of websites and sources before sharing any information is crucial in preventing privacy breaches.
Overall, prioritizing privacy protection in the digital age is critical for safeguarding personal information and maintaining control over our online presence. By implementing these practices and staying informed about cybersecurity threats, individuals can proactively protect their privacy in an increasingly interconnected world.
0 notes
Text
Learn how to open the DHCP port UDP 67/68 and DNS TCP/UDP port 53 using the UFW command in Linux to allow or deny traffic.
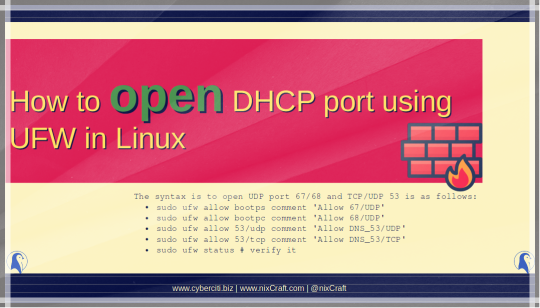
-> How to open DHCP port using UFW in Linux
22 notes
·
View notes
Text
Speaking of computer security, this is kinda what I have learned about after doing some research.
Really the best way to secure your computer is to use Linux, not Windows with an anti-virus. Part of it is that far less malware is developed for Linux, but more so that Linux systems are more securely designed than Windows in various ways.
You don't need an anti-virus in Linux, and at this point I don't think there are any commercial anti-viruses that sell Linux desktop antiviruses, although there used to be (ESET and Sophos apparently had Linux desktop versions that are now discontinued).
Still there are additional steps on Linux to make yourself safe, like configuring a firewall. I think most distros come with a built-in firewall, although not always with it turned on by default or with a GUI. For example, Ubuntu and its many derivatives (which account for a lot of popular distros) use a "uncomplicated fire wall" or ufw and you can install a gui for it called gufw. Linux Mint, which I use came with a GUI firewall settings by default and recommendations for which settings to use.
To stay safe while using the internet, use Firefox, it has some built-in adblocking and malware blocking by default, but you really should install the ublock origin extension, which blocks not just ads but also malware, and a lot of online ads of course contain malware. The version on Chrome is nerfed at best.
There are malware scanners for Linux, chiefly the free and opensource Clamav, it's command line by default, but the clamtk wrapper can provide it with a gui. Do a quick scan of stuff you pirate for example.
The rest is common sense, be sensible about what programs you download and install, prefer your distro's package manager over stuff you find online, and you should be fine.
42 notes
·
View notes
Text
Installing Nginx, MySQL, PHP (LEMP) Stack on Ubuntu 18.04

Ubuntu Server 18.04 LTS (TunzaDev) is finally here and is being rolled out across VPS hosts such as DigitalOcean and AWS. In this guide, we will install a LEMP Stack (Nginx, MySQL, PHP) and configure a web server.
Prerequisites
You should use a non-root user account with sudo privileges. Please see the Initial server setup for Ubuntu 18.04 guide for more details.
1. Install Nginx
Let’s begin by updating the package lists and installing Nginx on Ubuntu 18.04. Below we have two commands separated by &&. The first command will update the package lists to ensure you get the latest version and dependencies for Nginx. The second command will then download and install Nginx.
sudo apt update && sudo apt install nginx
Once installed, check to see if the Nginx service is running.
sudo service nginx status
If Nginx is running correctly, you should see a green Active state below.
● nginx.service - A high performance web server and a reverse proxy server Loaded: loaded (/lib/systemd/system/nginx.service; enabled; vendor preset: enabled) Active: active (running) since Wed 2018-05-09 20:42:29 UTC; 2min 39s ago Docs: man:nginx(8) Process: 27688 ExecStart=/usr/sbin/nginx -g daemon on; master_process on; (code=exited, status=0/SUCCESS) Process: 27681 ExecStartPre=/usr/sbin/nginx -t -q -g daemon on; master_process on; (code=exited, status=0/SUCCESS) Main PID: 27693 (nginx) Tasks: 2 (limit: 1153) CGroup: /system.slice/nginx.service ├─27693 nginx: master process /usr/sbin/nginx -g daemon on; master_process on; └─27695 nginx: worker process
You may need to press q to exit the service status.
2. Configure Firewall
If you haven’t already done so, it is recommended that you enable the ufw firewall and add a rule for Nginx. Before enabling ufw firewall, make sure you add a rule for SSH, otherwise you may get locked out of your server if you’re connected remotely.
sudo ufw allow OpenSSH
If you get an error “ERROR: could find a profile matching openSSH”, this probably means you are not configuring the server remotely and can ignore it.
Now add a rule for Nginx.
sudo ufw allow 'Nginx HTTP'
Rule added Rule added (v6)
Enable ufw firewall.
sudo ufw enable
Press y when asked to proceed.
Now check the firewall status.
sudo ufw status
Status: active To Action From -- ------ ---- OpenSSH ALLOW Anywhere Nginx HTTP ALLOW Anywhere OpenSSH (v6) ALLOW Anywhere (v6) Nginx HTTP (v6) ALLOW Anywhere (v6)
That’s it! Your Nginx web server on Ubuntu 18.04 should now be ready.
3. Test Nginx
Go to your web browser and visit your domain or IP. If you don’t have a domain name yet and don’t know your IP, you can find out with:
sudo ifconfig | grep -Eo 'inet (addr:)?([0-9]*\.){3}[0-9]*' | grep -Eo '([0-9]*\.){3}[0-9]*' | grep -v '127.0.0.1'
You can find this Nginx default welcome page in the document root directory /var/www/html. To edit this file in nano text editor:
sudo nano /var/www/html/index.nginx-debian.html
To save and close nano, press CTRL + X and then press y and ENTER to save changes.
Your Nginx web server is ready to go! You can now add your own html files and images the the /var/www/html directory as you please.
However, you should acquaint yourself with and set up at least one Server Block for Nginx as most of our Ubuntu 18.04 guides are written with Server Blocks in mind. Please see article Installing Nginx on Ubuntu 18.04 with Multiple Domains. Server Blocks allow you to host multiple web sites/domains on one server. Even if you only ever intend on hosting one website or one domain, it’s still a good idea to configure at least one Server Block.
If you don’t want to set up Server Blocks, continue to the next step to set up MySQL.
4. Install MySQL
Let’s begin by updating the package lists and installing MySQL on Ubuntu 18.04. Below we have two commands separated by &&. The first command will update the package lists to ensure you get the latest version and dependencies for MySQL. The second command will then download and install MySQL.
sudo apt update && sudo apt install mysql-server
Press y and ENTER when prompted to install the MySQL package.
Once the package installer has finished, we can check to see if the MySQL service is running.
sudo service mysql status
If running, you will see a green Active status like below.
● mysql.service - MySQL Community Server Loaded: loaded (/lib/systemd/system/mysql.service; enabled; vendor preset: enabled) Active: active (running) since since Wed 2018-05-09 21:10:24 UTC; 16s ago Main PID: 30545 (mysqld) Tasks: 27 (limit: 1153) CGroup: /system.slice/mysql.service └─30545 /usr/sbin/mysqld --daemonize --pid-file=/run/mysqld/mysqld.pid
You may need to press q to exit the service status.
5. Configure MySQL Security
You should now run mysql_secure_installation to configure security for your MySQL server.
sudo mysql_secure_installation
If you created a root password in Step 1, you may be prompted to enter it here. Otherwise you will be asked to create one. (Generate a password here)
You will be asked if you want to set up the Validate Password Plugin. It’s not really necessary unless you want to enforce strict password policies for some reason.
Securing the MySQL server deployment. Connecting to MySQL using a blank password. VALIDATE PASSWORD PLUGIN can be used to test passwords and improve security. It checks the strength of password and allows the users to set only those passwords which are secure enough. Would you like to setup VALIDATE PASSWORD plugin? Press y|Y for Yes, any other key for No:
Press n and ENTER here if you don’t want to set up the validate password plugin.
Please set the password for root here. New password: Re-enter new password:
If you didn’t create a root password in Step 1, you must now create one here.
Generate a strong password and enter it. Note that when you enter passwords in Linux, nothing will show as you are typing (no stars or dots).
By default, a MySQL installation has an anonymous user, allowing anyone to log into MySQL without having to have a user account created for them. This is intended only for testing, and to make the installation go a bit smoother. You should remove them before moving into a production environment. Remove anonymous users? (Press y|Y for Yes, any other key for No) :
Press y and ENTER to remove anonymous users.
Normally, root should only be allowed to connect from 'localhost'. This ensures that someone cannot guess at the root password from the network. Disallow root login remotely? (Press y|Y for Yes, any other key for No) :
Press y and ENTER to disallow root login remotely. This will prevent bots and hackers from trying to guess the root password.
By default, MySQL comes with a database named 'test' that anyone can access. This is also intended only for testing, and should be removed before moving into a production environment. Remove test database and access to it? (Press y|Y for Yes, any other key for No) :
Press y and ENTER to remove the test database.
Reloading the privilege tables will ensure that all changes made so far will take effect immediately. Reload privilege tables now? (Press y|Y for Yes, any other key for No) :
Press y and ENTER to reload the privilege tables.
All done!
As a test, you can log into the MySQL server and run the version command.
sudo mysqladmin -p -u root version
Enter the MySQL root password you created earlier and you should see the following:
mysqladmin Ver 8.42 Distrib 5.7.22, for Linux on x86_64 Copyright (c) 2000, 2018, Oracle and/or its affiliates. All rights reserved. Oracle is a registered trademark of Oracle Corporation and/or its affiliates. Other names may be trademarks of their respective owners. Server version 5.7.22-0ubuntu18.04.1 Protocol version 10 Connection Localhost via UNIX socket UNIX socket /var/run/mysqld/mysqld.sock Uptime: 4 min 28 sec Threads: 1 Questions: 15 Slow queries: 0 Opens: 113 Flush tables: 1 Open tables: 106 Queries per second avg: 0.055
You have now successfully installed and configured MySQL for Ubuntu 18.04! Continue to the next step to install PHP.
6. Install PHP
Unlike Apache, Nginx does not contain native PHP processing. For that we have to install PHP-FPM (FastCGI Process Manager). FPM is an alternative PHP FastCGI implementation with some additional features useful for heavy-loaded sites.
Let’s begin by updating the package lists and installing PHP-FPM on Ubuntu 18.04. We will also install php-mysql to allow PHP to communicate with the MySQL database. Below we have two commands separated by &&. The first command will update the package lists to ensure you get the latest version and dependencies for PHP-FPM and php-mysql. The second command will then download and install PHP-FPM and php-mysql. Press y and ENTER when asked to continue.
sudo apt update && sudo apt install php-fpm php-mysql
Once installed, check the PHP version.
php --version
If PHP was installed correctly, you should see something similar to below.
PHP 7.2.3-1ubuntu1 (cli) (built: Mar 14 2018 22:03:58) ( NTS ) Copyright (c) 1997-2018 The PHP Group Zend Engine v3.2.0, Copyright (c) 1998-2018 Zend Technologies with Zend OPcache v7.2.3-1ubuntu1, Copyright (c) 1999-2018, by Zend Technologies
Above we are using PHP version 7.2, though this may be a later version for you.
Depending on what version of Nginx and PHP you install, you may need to manually configure the location of the PHP socket that Nginx will connect to.
List the contents for the directory /var/run/php/
ls /var/run/php/
You should see a few entries here.
php7.2-fpm.pid php7.2-fpm.sock
Above we can see the socket is called php7.2-fpm.sock. Remember this as you may need it for the next step.
7. Configure Nginx for PHP
We now need to make some changes to our Nginx server block.
The location of the server block may vary depending on your setup. By default, it is located in /etc/nginx/sites-available/default.
However, if you have previously set up custom server blocks for multiple domains in one of our previous guides, you will need to add the PHP directives to each server block separately. A typical custom server block file location would be /etc/nginx/sites-available/mytest1.com.
For the moment, we will assume you are using the default. Edit the file in nano.
sudo nano /etc/nginx/sites-available/default
Press CTRL + W and search for index.html.
Now add index.php before index.html
/etc/nginx/sites-available/default
index index.php index.html index.htm index.nginx-debian.html;
Press CTRL + W and search for the line server_name.
Enter your server’s IP here or domain name if you have one.
/etc/nginx/sites-available/default
server_name YOUR_DOMAIN_OR_IP_HERE;
Press CTRL + W and search for the line location ~ \.php.
You will need to uncomment some lines here by removing the # signs before the lines marked in red below.
Also ensure value for fastcgi_pass socket path is correct. For example, if you installed PHP version 7.2, the socket should be: /var/run/php/php7.2-fpm.sock
If you are unsure which socket to use here, exit out of nano and run ls /var/run/php/
/etc/nginx/sites-available/default
... location ~ \.php$ { include snippets/fastcgi-php.conf; # # # With php-fpm (or other unix sockets): fastcgi_pass unix:/var/run/php/php7.2-fpm.sock; # # With php-cgi (or other tcp sockets): # fastcgi_pass 127.0.0.1:9000; } ...
Once you’ve made the necessary changes, save and close (Press CTRL + X, then press y and ENTER to confirm save)
Now check the config file to make sure there are no syntax errors. Any errors could crash the web server on restart.
sudo nginx -t
nginx: the configuration file /etc/nginx/nginx.conf syntax is ok nginx: configuration file /etc/nginx/nginx.conf test is successful
If no errors, you can reload the Nginx config.
sudo service nginx reload
8. Test PHP
To see if PHP is working correctly on Ubuntu 18.04, let’s a create a new PHP file called info.php in the document root directory. By default, this is located in /var/www/html/, or if you set up multiple domains in a previous guide, it may be located in somewhere like /var/www/mytest1.com/public_html
Once you have the correct document root directory, use the nano text editor to create a new file info.php
sudo nano /var/www/html/info.php
Type or paste the following code into the new file. (if you’re using PuTTY for Windows, right-click to paste)
/var/www/html/info.php
Save and close (Press CTRL + X, then press y and ENTER to confirm save)
You can now view this page in your web browser by visiting your server’s domain name or public IP address followed by /info.php: http://your_domain_or_IP/info.php
phpinfo() outputs a large amount of information about the current state of PHP. This includes information about PHP compilation options and extensions, the PHP version and server information.
You have now successfully installed PHP-FPM for Nginx on Ubuntu 18.04 LTS (Bionic Beaver).
Make sure to delete info.php as it contains information about the web server that could be useful to attackers.
sudo rm /var/www/html/info.php
What Next?
Now that your Ubuntu 18.04 LEMP web server is up and running, you may want to install phpMyAdmin so you can manage your MySQL server.
Installing phpMyAdmin for Nginx on Ubuntu 18.04
To set up a free SSL cert for your domain:
Configuring Let’s Encrypt SSL Cert for Nginx on Ubuntu 18.04
You may want to install and configure an FTP server
Installing an FTP server with vsftpd (Ubuntu 18.04)
We also have several other articles relating to the day-to-day management of your Ubuntu 18.04 LEMP server
Hey champ! - You’re all done!
Feel free to ask me any questions in the comments below.
Let me know in the comments if this helped. Follow Us on - Twitter - Facebook - YouTube.
1 note
·
View note
Text
Welcome to today’s guide on how to install Chef Server and Workstation on Ubuntu 20.04 (Focal Fossa). Chef is a powerful automation solution designed to help you transform your infrastructure into a code. The Infrastructure can be on-premise, Cloud, or a hybrid environment. With Chef, you automate how the infrastructure is deployed, configured, and managed. The Chef server acts as a central repository for your cookbooks as well as for information about every node it manages. The company behind Chef automation server has worked on other automation tools which are: Chef – For Infrastructure Automation Habitat – Application automation INSPEC – Compliance Automation Follow the steps in the next sections below to install and configure Chef Server on Ubuntu 20.04 Linux server. Step 1: Update system and set hostname We need to update our system to ensure all installed packages are latest releases. sudo apt update sudo apt -y upgrade Set server hostname that will be the DNS name of your Chef Server deployed on Ubuntu 20.04. sudo hostnamectl set-hostname chef-server.computingpost.com If you have an active DNS server, set the A record accordingly. For installations without DNSserver, set the record on /etc/hosts file: $ sudo vim /ect/hosts 192.168.200.10 chef-server.example.com Also install some other basic packages on your Ubuntu machine. sudo apt -y install curl wget bash-completion After installing these packages and upgrading your machine I recommend you perform a reboot. sudo reboot Step 2: Configure Local Mail Relay The Chef server uses email to send notifications for various events: Password resets User invitations Failover notifications Failed job notifications Configure a local mail transfer agent on the Chef server using the guide: Configure Postfix as a Send-Only SMTP Server on Ubuntu Step 3: Configure NTP Time synchronization The Chef server is particularly sensitive to clock drift and it requires that the systems on which it is running be connected to Network Time Protocol (NTP). Install chrony package on Ubuntu 20.04. sudo apt -y install chrony Set correct timezone for date to be picked automatically. sudo timedatectl set-timezone Africa/Nairobi You can choose to restrict access to NTP server, e.g from your Chef client nodes, set like below: restrict 192.168.18.0 mask 255.255.255.0 nomodify notrap Where 192.168.18.0 is the IP subnet of your local network. Restart ntp service after making the change: sudo systemctl restart chrony If you have UFW firewall enabled, don’t forget to allow ntp port: sudo ufw allow ntp Show ntp status: sudo chronyc sources Confirm time synchronization: $ timedatectl Local time: Fri 2020-07-10 20:38:57 EAT Universal time: Fri 2020-07-10 17:38:57 UTC RTC time: Fri 2020-07-10 17:38:58 Time zone: Africa/Nairobi (EAT, +0300) System clock synchronized: yes NTP service: active RTC in local TZ: no On Chef clients, install ntp and set NTP server to Chef server IP address sudo apt install chrony sudo vim /etc/ntp.conf Uncomment NTP pool server lines and specify Chef server IP address #pool 0.ubuntu.pool.ntp.org iburst #pool 1.ubuntu.pool.ntp.org iburst #pool 2.ubuntu.pool.ntp.org iburst #pool 3.ubuntu.pool.ntp.org iburst server 192.168.18.39 Step 4: Download and install Chef server package First, check the latest version of Chef server from Chef Downloads page As of this writing, the recent release is version 14.11.21. This is the package we will download and install: VERSION="14.11.21" wget https://packages.chef.io/files/stable/chef-server/$VERSION/ubuntu/18.04/chef-server-core_$VERSION-1_amd64.deb Once the download is complete, install the package using dpkg command: sudo apt install ./chef-server-core_$VERSION-1_amd64.deb Sample status: .... The following NEW packages will be installed: chef-server-core 0 upgraded, 1 newly installed, 0 to remove and 0 not upgraded.
Need to get 0 B/246 MB of archives. After this operation, 956 MB of additional disk space will be used. Get:1 /home/ubuntu/chef-server-core_14.11.21-1_amd64.deb chef-server-core amd64 14.11.21-1 [246 MB] Selecting previously unselected package chef-server-core. (Reading database ... 63527 files and directories currently installed.) Preparing to unpack .../chef-server-core_14.11.21-1_amd64.deb ... Unpacking chef-server-core (14.11.21-1) ... Setting up chef-server-core (14.11.21-1) ... Thank you for installing Chef Infra Server! Run 'chef-server-ctl reconfigure' to configure your Chef Infra Server For more information on getting started see https://docs.chef.io/server/ Wait for the installation to complete then configure Chef Server: sudo chef-server-ctl reconfigure Before the configuration is started you need to accept license agreement. .... Before you can continue, 3 product licenses must be accepted. View the license at https://www.chef.io/end-user-license-agreement/ Licenses that need accepting: * Chef Infra Server * Chef Infra Client * Chef InSpec Do you accept the 3 product licenses (yes/no)? > yes Persisting 3 product licenses... ✔ 3 product licenses persisted. +---------------------------------------------+ Create an administrator account The format is: sudo chef-server-ctl user-create USER_NAME FIRST_NAME LAST_NAME EMAIL 'PASSWORD' --filename FILE_NAME An RSA private key is generated automatically. This is the user’s private key and should be saved to a safe location. The option--filename will save the RSA private key to the specified absolute path. Example: sudo chef-server-ctl user-create chefadmin Chef Admin \ [email protected] 'StrongPassword' \ --filename /home/chefadmin.pem Also, create an organization. The syntax is: sudo chef-server-ctl org-create short_name 'full_organization_name' --association_user user_name --filename ORGANIZATION-validator.pem The name must begin with a lower-case letter or digit, The full name must begin with a non-white space character The --association_user option will associate the user_name with the admins security group on the Chef server. An RSA private key is generated automatically. This is the chef-validator key and should be saved to a safe location. The --filename option will save the RSA private key to the specified absolute path. See example below: chef-server-ctl org-create mycompany 'Company X, Inc.' \ --association_user chefadmin \ --filename /home/mycompany-validator.pem Generated keys should be available on /home directory # ls /home/ chefadmin.pem mycompany-validator.pem Install Chef Manage Chef Manage is a premium add-on that provides a graphical user interface for managing common Chef server tasks. It’s free for up to 25 nodes. Let’s install the management console: sudo chef-server-ctl install chef-manage sudo chef-server-ctl reconfigure sudo chef-manage-ctl reconfigure You can also install Chef Manage from a .deb package: VER="3.2.20" wget https://packages.chef.io/files/stable/chef-manage/$VER/ubuntu/18.04/chef-manage_$VER-1_amd64.deb sudo apt install -f ./chef-manage_$VER-1_amd64.deb sudo chef-manage-ctl reconfigure All Chef Server services will run under the username/group opscode. The username for PostgreSQL is opscode-pgsql. Additional packages can be installed from https://packages.chef.io/ If you wish to use or already using UFW firewall, open ports 80 & 443 by running the commands below: sudo ufw allow proto tcp from any to any port 80,443 You should be able to access the Chef web admin dashboard on https://serverip/login Login with username added earlier. A fresh Chef dashboard should be similar to below Step 5: Install Chef Development Kit on your Workstation machine Chef Workstation is where you have Chef development Kit installed. It contains all the tools you need to develop and test your infrastructure, built by the awesome Chef community.
Install Chef Development Kit / Workstation using the guides below: How to install Chef Development Kit / Workstation on Ubuntu For Arch Linux users, use: How to install Chef Development Kit on Arch Linux Step 6: Configure knife on Chef Workstation Knife is the command-line tool that provides an interface between your workstation and the Chef server. Next read: Configure Chef Knife, Upload Cookbooks and Run a recipe on Chef Client Nodes
0 notes
Text
Phpmyadmin nginx

#Phpmyadmin nginx how to#
#Phpmyadmin nginx install#
However, because you are using Nginx as a web server you shouldn’t choose either of these options. phpMyAdmin can automatically make a number of configuration changes to ensure that it works correctly with either of these web servers upon installation.
#Phpmyadmin nginx install#
Now you can install phpMyAdmin by running the following command:ĭuring the installation process, you will be prompted to choose a web server (either Apache or Lighttpd) to configure. You can install phpMyAdmin by using APT to download the phpmyadmin package from the default Ubuntu repositories.īegin by updating the server’s package index: Once you have these prerequisites in place, you can begin following Step 1 of this guide. Warning: If you don’t have an SSL/TLS certificate installed on the server and you still want to proceed, please consider enforcing access via SSH Tunnels as explained in Step 5 of this guide. If you do not have an existing domain configured with a valid certificate, follow this guide on securing Nginx with Let’s Encrypt on Ubuntu 20.04 to set this up.
#Phpmyadmin nginx how to#
To install and configure these components, follow our guide on How To Install Linux, Nginx, MySQL, PHP (LEMP stack) on Ubuntu 20.04.Īdditionally, because phpMyAdmin handles authentication using MySQL credentials, we strongly recommend that you install an SSL/TLS certificate to enable encrypted traffic between server and client. A LEMP stack (Linux, Nginx, MySQL, and PHP) installed on your Ubuntu 20.04 server.To set this up, follow our initial server setup guide for Ubuntu 20.04. This server should have a non-root user with administrative privileges and a firewall configured with ufw. In order to complete this guide, you will need: It will also explain each measure in detail so that you can make informed decisions and protect your system. In addition to installing the application, this tutorial will go over several measures you can take to harden your phpMyAdmin installation’s security. If you install and configure phpMyAdmin without taking the proper steps to secure it from malicious actors, you run the risk of your data being lost or stolen. Combined with the fact that it’s a widely-deployed PHP application, this means that phpMyAdmin is frequently targeted for attack. Note: phpMyAdmin runs on a database server, handles database credentials, and allows users to execute SQL statements on the database.
0 notes
Text
Uninstalling bitnami magento stack

UNINSTALLING BITNAMI MAGENTO STACK INSTALL
UNINSTALLING BITNAMI MAGENTO STACK SOFTWARE
How To Find your Server’s Public IP Address If you see this page, then your web server is now correctly installed and accessible through your firewall. You will see the default Ubuntu 18.04 Apache web page, which is there for informational and testing purposes. You can do a spot check right away to verify that everything went as planned by visiting your server’s public IP address in your web browser (see the note under the next heading to find out what your public IP address is if you do not have this information already): your_server_ip To allow incoming HTTP and HTTPS traffic for this server, run: You can check that UFW has an application profile for Apache like so:ĭescription: Apache v2 is the next generation of the omnipresent Apache web Next, assuming that you have followed the initial server setup instructions and enabled the UFW firewall, make sure that your firewall allows HTTP and HTTPS traffic. Press Y and hit ENTER to confirm, and the installation will proceed.
UNINSTALLING BITNAMI MAGENTO STACK INSTALL
Once the cache has been updated, you can install Apache with:Īfter entering this command, apt will tell you which packages it plans to install and how much extra disk space they’ll take up. If this is your first time using sudo in this session, you’ll be prompted to provide your regular user’s password to validate your permissions. It’s well-documented and has been in wide use for much of the history of the web.įirst, make sure your apt cache is updated with: The Apache web server is a popular open source web server that can be used along with PHP to host dynamic websites. Step 1 - Installing Apache and Updating the Firewall To set this up, you can follow our initial server setup guide for Ubuntu 18.04. In order to complete this tutorial, you’ll need to have an Ubuntu 18.04 server with a non-root sudo-enabled user account and a basic firewall configured. In this guide, we’ll install a LAMP stack on an Ubuntu 18.04 server. The site data is stored in a MySQL database, and dynamic content is processed by PHP. This term is actually an acronym which represents the Linux operating system, with the Apache web server.
UNINSTALLING BITNAMI MAGENTO STACK SOFTWARE
A “LAMP” stack is a group of open-source software that is typically installed together to enable a server to host dynamic websites and web apps.
0 notes