#lithographymethod
Explore tagged Tumblr posts
Visit Tumblr Blog
Explore Tumblr blogs with no restrictions, modern design and the best experience.
Last Seen Tumblr Blogs


Fun Fact
Tumblr has a 66 index score for customer satisfaction in the US.
Text
Waterless Lithography
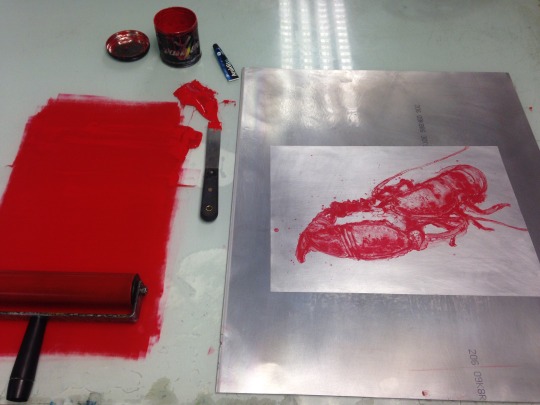
WATERLESS LITHOGRAPH PRINT OF A CRUSTACEAN/LOBSTER USING AN EXISTING DRAWING

Over the last twelve months I have been getting acquainted with waterless lithography and it’s potential for giving rich results and the ability to produce strong tonal prints. I was lucky enough to spend time working with expert printmaker Mark Hunter on the intricacies of waterless lithography. In this article, I will describe the origins of stone lithography and the relatively more recent developments in waterless lithography, along with exploring the differences between both approaches. I’ll then go on to describe how I applied waterless lithography in my own practice and the most exciting elements I found in the process.
Stone Lithography
Traditional stone lithography was first discovered in 1798 by the German actor and author Alois Senefelder and was used mainly commercially for illustration and reproduction purposes. A flat limestone or metal plate are sponged using water and rolled with an oil-based ink which adheres to the grease loving parts, while the non-image areas are made ink-repellent. Throughout art history, lithography has attracted many fine artists including Toulouse-Lautrec, Bonnard, Edvard Munch, Mary Cassatt and Elisabeth Frink to name but a few. The ability to reproduce rich fluid pencil lines and brush marks has made this technique very appealing to draughtsmen and artists over centuries.
Waterless Lithography
Waterless lithography using printer toner is a fairly recent invention discovered in 1990 by the Canadian printmaker and jeweller, Nik Seminoff. It was created through a desire to develop the process using a variety of easily obtained household materials including non-paintable silicon, acetone and printer toner.
The process in it’s simplest form is based on the ability of silicone to rejecting printing ink. It involves drawing or painting onto an offset aluminium plate using toner or a water-soluble pencil and bonding the image to the plate using heat. A thin layer of silicone solution is then applied to create a non-printable area. The plate is left to cure overnight and the toner is washed out using acetone, leaving a ghost like image which can then be inked up using rubber ink and a brayer. The plate is then ready for printing using an etching press or by hand.
What’s the difference?
Waterless Lithography is less labour intensive, using safer less-toxic materials than traditional stone lithography. Whilst maintaining many of the desirable characteristics such as fluidity of line, washes, gradation in tone, textures and reticulation.
Unlike traditional stone lithography, the aluminium plate is light and can be easily transported to any location such as a museum or working outdoors 'en plein air', etc. Until the surface has been bonded to the plate it is very fragile and needs to be transported with care.
The Process
Referring to sketchbooks is a great way to find inspiration in the studio and allows you to play around with composition and colour and revisit unresolved ideas.
My Red Lobster print was inspired by a previous drawing I made on location from a fishing harbour in the East Neuk of Fife, Scotland. Here is how I made it.
1
The initial drawing was made directly onto a prepared aluminium plate which has been degreased and treated with sodium metasilicate which helps to bond the silicone to the plate added later in the process. It is important to dry the plate quickly as any streaks left from the sodium could impair the finished print.
2
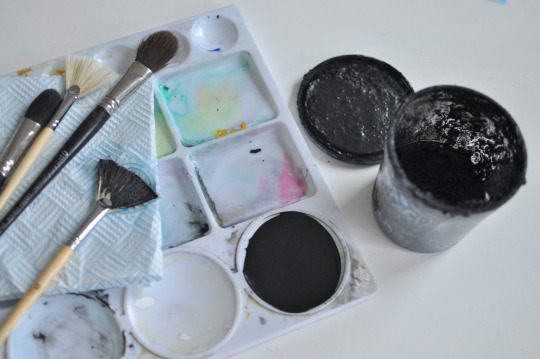
Once the plate is dry it is ready for the toner solution to be applied. You can use many easily sourced implements to apply the toner including paintbrushes, lollipop sticks, sponges, even a toothbrush can create great splatters and specs. The surface of the plate is easily manipulated and can be washed clean with a damp sponge if you are unhappy with the results. Special pencils called Lumocolor by Staedtler create fantastic fluid lines with subtle gradation in tone when applied with a light touch.
A Sharpie pen can also be used to create solid lines/areas of colour. Rich velvety tones are made using concentrated washes of toner, while reticulation (grain pattern) can be achieved by adding more water to the toner.
I used large paint brushes and applied a concentrated mix of the toner solution to the plate to create the velvety black areas. After it has air dried I worked back into the plate using a lollipop stick to pick out some of the subtle details to the lobster shell. A soluble pencil was used with a wash of water to create the linear shape of the antennas.

3
Once happy with the results, a heat gun is applied to bond the image to the plate and will become glossy when fixed. At this point there is still the opportunity to add to the image if desired, but be sure to heat the plate again if so.
4
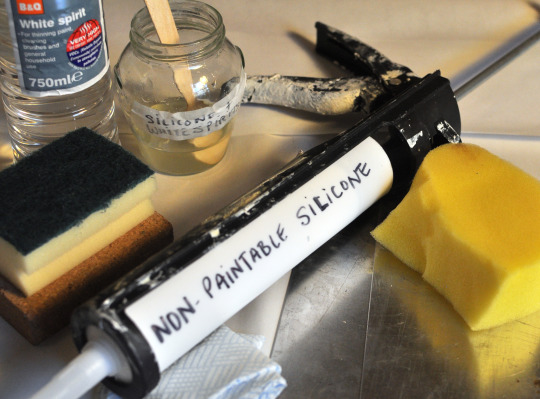
A solution of non-paintable silicone and white spirit is mixed to the consistency of runny honey and is spread onto the plate using a tissue, the aim is to cover the whole plate creating a thin film of silicone. Once you are happy that the plate has been evenly covered, buff the surface using a tissue wrapped in a firm sponge. The plate should be left overnight to cure in a well ventilated room. It is important when working with solvents and chemicals to keep the room well ventilated and wear gloves and protective eye wear.
5
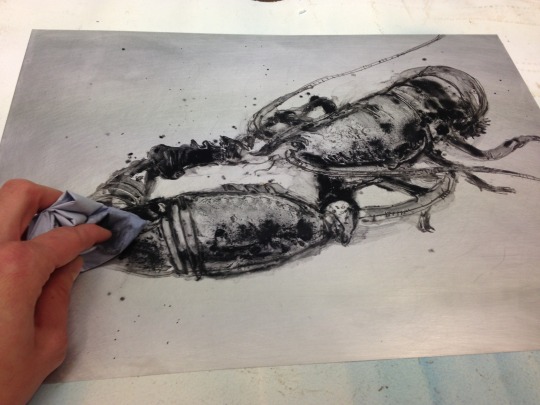
The plate is now ready to be washed out using a tissue and acetone, it is important to keep the tissue well soiled as any abrasive material may affect the delicate surface of the plate. Allow the acetone to do all the work. A ghost image will appear and won’t be fully visible until the plate is inked up.
6
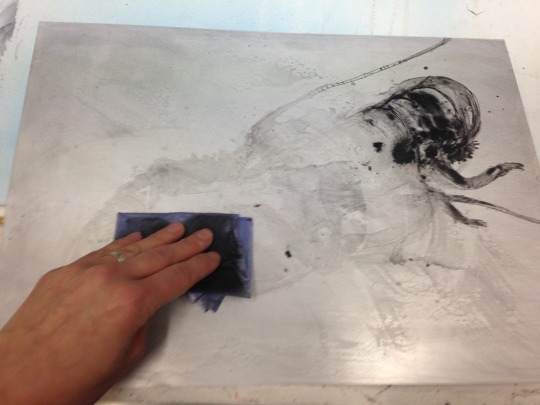
Use a rubber based ink such as Van Son Holland. Drag and scrape the ink to create a bead at the top of your workstation unit. A sub-plate is placed under the printing plate which has been coated with silicone to reject the ink from the brayer (roller) when it goes over the edge of the plate.
Once you have inked up the brayer onto your glass plate, roll your brayer onto a corner of the silicone plate to test if it rejects the ink. If it does reject the ink then you are ready to ink up the plate.
It is a good idea to change direction of the brayer to achieve maximum coverage of the image, using a snapping action with the brayer to clean off any unwanted ink on the plate.
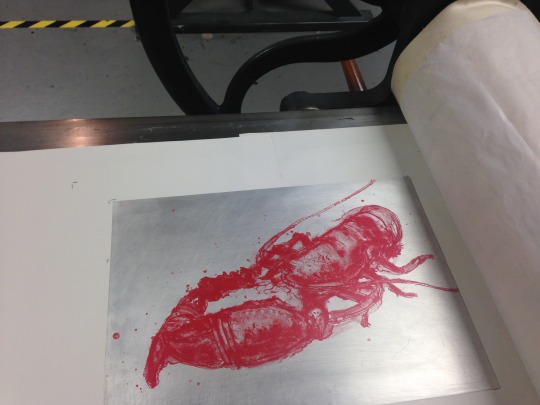
7
With the plate inked, we are ready to print. Smooth paper will produce the best results with this method, such as Zerkal and Fabriano 5. It is always a good idea to make a couple of test prints onto newsprint first to gauge how much ink and pressure you should apply.
The application of waterless lithography has allowed me to retain an expressive painterly feel in my work. I would recommend it to anyone wishing to develop their printmaking skills.
#waterlesslithography#printmaking#dcadundee#Artist#lithographymethod#lightography#art#printingtechniques
2 notes
·
View notes