#localhost/phpmyadmin/php
Explore tagged Tumblr posts
Visit Tumblr Blog
Explore Tumblr blogs with no restrictions, modern design and the best experience.
Last Seen Tumblr Blogs


Fun Fact
The KCSC sent more than 20K requests to delete posts related to prostitution and porn to Tumblr from January to June 2017.
Text
Panduan Praktis: Memahami Cara Mengakses localhost/phpmyadmin/php
Panduan Praktis: Memahami Cara Mengakses localhost/phpmyadmin/php Hostnic.id – Halo pembaca! Bagaimana kabar kalian hari ini? Semoga kalian dalam keadaan baik-baik saja. Selamat datang di artikel ini yang akan membahas tentang cara mengakses localhost/phpmyadmin/php tanpa menggunakan kode 443326. Kami sangat senang bisa berbagi informasi ini dengan kalian. Jadi, mari kita mulai perjalanan kita…

View On WordPress
0 notes
Text
Dairy Farm Shop Management System Using PHP and MySQL

The Dairy Farm Shop Management System (DFSMS) is a web based application that can be accessed over the web. This system can be used to automate the workflow of dairy shop and their invoices.
The project has been planned to be having the view of distributed architecture, with centralized storage of the database. The application for the storage of the data has been planned. Using the constructs of MySQL Server and all the user interfaces has been designed using the PHP technologies. The database connectivity is planned using the “MySQL Connection” methodology. The standards of security and data protective mechanism have been given a big choice for proper usage. The application takes care of different modules and their associated reports, which are produced as per the applicable strategies and standards that are put forwarded by the administrative staff.
Click: https://phpgurukul.com/dairy-farm-shop-management-system-using-php-and-mysql/
Project Modules
DFSMS is a web-based application which manages the products of dairy shop. It has one module i.e. admin who manages all the functions of the dairy shop.
Admin Features :
Dashboard: In this section, admin can see all detail in brief like Total listed categories, companies, products and also see the sales.
Category: In this section, admin can add new categories and edit, delete old categories.
Company: In this section, admin can add new companies and edit, delete old companies.
Product: In this section, admin can add new products and edit old products.
Search: In this section, admin can search for a product then add the product into the cart and generate invoice /receipt.
Invoices: In this section, admin can view all generated invoices/receipts.
Reports: In this section, admin can generate two reports, one is B/w date and another one is for sales.
Admin can also update his profile, change the password and recover the password.
How to run the Dairy Farm Shop Management System Project (DFSMS)
1. Download the zip file
2. Extract the file and copy dfsms folder
3.Paste inside root directory(for xampp xampp/htdocs, for wamp wamp/www, for lamp var/www/html)
4. Open PHPMyAdmin (http://localhost/phpmyadmin)
5. Create a database with name dfsms
6. Import dfsms.sql file(given inside the zip package in SQL file folder)
7.Run the script http://localhost/dfsms
*********************Admin Credential*********************
Username: admin Password: Test@123
PHP Gurukul
Welcome to PHPGurukul. We are a web development team striving our best to provide you with an unusual experience with PHP. Some technologies never fade, and PHP is one of them. From the time it has been introduced, the demand for PHP Projects and PHP developers is growing since 1994. We are here to make your PHP journey more exciting and useful.
Email: [email protected] Website : https://phpgurukul.com
0 notes
Text
Complete PHP Tutorial: Learn PHP from Scratch in 7 Days
Are you looking to learn backend web development and build dynamic websites with real functionality? You’re in the right place. Welcome to the Complete PHP Tutorial: Learn PHP from Scratch in 7 Days — a practical, beginner-friendly guide designed to help you master the fundamentals of PHP in just one week.
PHP, or Hypertext Preprocessor, is one of the most widely used server-side scripting languages on the web. It powers everything from small blogs to large-scale websites like Facebook and WordPress. Learning PHP opens up the door to back-end development, content management systems, and full-stack programming. Whether you're a complete beginner or have some experience with HTML/CSS, this tutorial is structured to help you learn PHP step by step with real-world examples.
Why Learn PHP?
Before diving into the tutorial, let’s understand why PHP is still relevant and worth learning in 2025:
Beginner-friendly: Easy syntax and wide support.
Open-source: Free to use with strong community support.
Cross-platform: Runs on Windows, macOS, Linux, and integrates with most servers.
Database integration: Works seamlessly with MySQL and other databases.
In-demand: Still heavily used in CMS platforms like WordPress, Joomla, and Drupal.
If you want to build contact forms, login systems, e-commerce platforms, or data-driven applications, PHP is a great place to start.
Day-by-Day Breakdown: Learn PHP from Scratch in 7 Days
Day 1: Introduction to PHP & Setup
Start by setting up your environment:
Install XAMPP or MAMP to create a local server.
Create your first .php file.
Learn how to embed PHP inside HTML.
Example:
<?php echo "Hello, PHP!"; ?>
What you’ll learn:
How PHP works on the server
Running PHP in your browser
Basic syntax and echo statement
Day 2: Variables, Data Types & Constants
Dive into PHP variables and data types:
$name = "John"; $age = 25; $is_student = true;
Key concepts:
Variable declaration and naming
Data types: String, Integer, Float, Boolean, Array
Constants and predefined variables ($_SERVER, $_GET, $_POST)
Day 3: Operators, Conditions & Control Flow
Learn how to make decisions in PHP:
if ($age > 18) { echo "You are an adult."; } else { echo "You are underage."; }
Topics covered:
Arithmetic, comparison, and logical operators
If-else, switch-case
Nesting conditions and best practices
Day 4: Loops and Arrays
Understand loops to perform repetitive tasks:
$fruits = ["Apple", "Banana", "Cherry"]; foreach ($fruits as $fruit) { echo $fruit. "<br>"; }
Learn about:
for, while, do...while, and foreach loops
Arrays: indexed, associative, and multidimensional
Array functions (count(), array_push(), etc.)
Day 5: Functions & Form Handling
Start writing reusable code and learn how to process user input from forms:
function greet($name) { return "Hello, $name!"; }
Skills you gain:
Defining and calling functions
Passing parameters and returning values
Handling HTML form data with $_POST and $_GET
Form validation and basic security tips
Day 6: Working with Files & Sessions
Build applications that remember users and work with files:
session_start(); $_SESSION["username"] = "admin";
Topics included:
File handling (fopen, fwrite, fread, etc.)
Reading and writing text files
Sessions and cookies
Login system basics using session variables
Day 7: PHP & MySQL – Database Connectivity
On the final day, you’ll connect PHP to a database and build a mini CRUD app:
$conn = new mysqli("localhost", "root", "", "mydatabase");
Learn how to:
Connect PHP to a MySQL database
Create and execute SQL queries
Insert, read, update, and delete (CRUD operations)
Display database data in HTML tables
Bonus Tips for Mastering PHP
Practice by building mini-projects (login form, guest book, blog)
Read official documentation at php.net
Use tools like phpMyAdmin to manage databases visually
Try MVC frameworks like Laravel or CodeIgniter once you're confident with core PHP
What You’ll Be Able to Build After This PHP Tutorial
After following this 7-day PHP tutorial, you’ll be able to:
Create dynamic web pages
Handle form submissions
Work with databases
Manage sessions and users
Understand the logic behind content management systems (CMS)
This gives you the foundation to become a full-stack developer, or even specialize in backend development using PHP and MySQL.
Final Thoughts
Learning PHP doesn’t have to be difficult or time-consuming. With the Complete PHP Tutorial: Learn PHP from Scratch in 7 Days, you’re taking a focused, structured path toward web development success. You’ll learn all the core concepts through clear explanations and hands-on examples that prepare you for real-world projects.
Whether you’re a student, freelancer, or aspiring developer, PHP remains a powerful and valuable skill to add to your web development toolkit.
So open up your code editor, start typing your first <?php ... ?> block, and begin your journey to building dynamic, powerful web applications — one day at a time.

0 notes
Text
How to Develop a Website Using PHP
How to Develop a Website Using PHP
In today's digital era, websites play a crucial role in business growth and online presence. One of the most widely used server-side scripting languages for web development is PHP (Hypertext Preprocessor). It is open-source, easy to learn, and widely supported by web servers and databases. This guide will walk you through the step-by-step process of developing a website using PHP.

Why Choose PHP for Web Development?
Before diving into the development process, let’s explore some key reasons why PHP is a great choice for website development:
1. Open-Source: PHP is free to use, making it cost-effective for developers.
2. Cross-Platform Compatibility: Runs on Windows, Linux, and macOS without compatibility issues.
3. Database Support: Easily integrates with MySQL, PostgreSQL, and other databases.
4. Scalability: Suitable for both small websites and large-scale web applications.
5. Large Community Support: Extensive documentation and active developer communities for troubleshooting and learning.
Prerequisites for PHP Web Development
To develop a website using PHP, you need the following tools:
1. Text Editor or IDE: VS Code, Sublime Text, or PHPStorm.
2. Local Server: XAMPP, WAMP, or MAMP for running PHP scripts.
3. Database System: MySQL or PostgreSQL for data storage.
4. Web Browser: Chrome, Firefox, or Edge for testing the website.
Step-by-Step Guide to Developing a Website Using PHP
1. Setting Up Your Development Environment
To begin developing a PHP website, follow these steps:
· Install XAMPP (or WAMP/MAMP) to create a local server.
· Using the XAMPP Control Panel, launch Apache and MySQL.
· Navigate to htdocs in the XAMPP directory to store PHP project files.
2. Creating the Project Structure
Organizing your files properly enhances maintainability. A typical PHP project structure:
project-folder/
│-- index.php
│-- config.php
│-- assets/
│ ├── css/
│ ├── js/
│ ├── images/
│-- includes/
│ ├── header.php
│ ├── footer.php
│-- pages/
│ ├── about.php
│ ├── contact.php
│-- database/
│ ├── db_connect.php
3. Writing Your First PHP Script
Create an index.php file and add the following code:
<?php
echo "Welcome to My PHP Website!";
?>
Save the file and access it in the browser by navigating to http://localhost/project-folder/.
4. Connecting PHP with MySQL Database
To manage dynamic content, connect PHP with a MySQL database.
Create a Database
1. Open phpMyAdmin from XAMPP.
2. Create a new database, e.g., my_website.
3. Add a users table with fields id, name, email, and password.
Database Connection Code (db_connect.php)
<?php
$servername = "localhost";
$username = "root";
$password = "";
dbname = "my_website";
$conn = new mysqli($servername, $username, $password, $dbname);
if ($conn->connect_error) {
die("Connection failed: " . $conn->connect_error);
}
?>
5. Creating a User Registration System
A simple user registration form using PHP and MySQL.
Registration Form (register.php)
<form method="POST" action="register.php">
<input type="text" name="name" placeholder="Full Name" required>
<input type="email" name="email" placeholder="Email" required>
<input type="password" name="password" placeholder="Password" required>
<button type="submit" name="register">Register</button>
</form>
Handling User Registration (register.php)
<?php
include 'database/db_connect.php';
if(isset($_POST['register'])) {
$name = $_POST['name'];
$email = $_POST['email'];
$password = password_hash($_POST['password'], PASSWORD_BCRYPT);
$sql = "INSERT INTO users (name, email, password) VALUES ('$name', '$email', '$password')";
if ($conn->query($sql) === TRUE) {
echo "Registration successful!";
} else {
echo "Error: " . $conn->error;
}
}
?>
6. Implementing User Login System
Login Form (login.php)
<form method="POST" action="login.php">
<input type="email" name="email" placeholder="Email" required>
<input type="password" name="password" placeholder="Password" required>
<button type="submit" name="login">Login</button>
</form>
Handling Login Authentication (login.php)
<?php
session_start();
include 'database/db_connect.php';
if(isset($_POST['login'])) {
$email = $_POST['email'];
$password = $_POST['password'];
$result = $conn->query("SELECT * FROM users WHERE email='$email'");
$user = $result->fetch_assoc();
if(password_verify($password, $user['password'])) {
$_SESSION['user'] = $user;
echo "Login successful!";
} else {
echo "Invalid credentials!";
}
}
?>

7. Adding Navigation and Styling
· Use Bootstrap or CSS frameworks to improve UI.
· Include a header.php and footer.php for better navigation.
8. Deploying the PHP Website
Once development is complete, deploy your PHP website using:
· Shared Hosting with cPanel for easy management.
· Cloud Hosting (AWS, DigitalOcean) for high performance.
· Domain & SSL Certificate for a secure and professional website.
Conclusion
Developing a website using PHP is an efficient way to create dynamic and interactive websites. By following this step-by-step guide, you can build a PHP-based website from scratch, implement database interactions, user authentication, and deploy your project successfully. Start your PHP development journey today and create powerful web applications!
#web development#seo services#web designing#social media marketing#graphic design#digital marketing#digitalmarketing#marketing#digitalindia#seo
1 note
·
View note
Text
How to Install XAMPP for Windows 10 - XAMPP WordPress For Beginners
To install XAMPP on Windows 10 and set it up for WordPress, follow these steps:
Step 1: Download XAMPP
Go to the official XAMPP website.
Click on the "XAMPP for Windows" button.
Once the installer is downloaded, locate the .exe file (usually in the Downloads folder).
Step 2: Install XAMPP
Double-click the .exe file to start the installation process.
Choose the components you want to install. For WordPress, you need at least Apache, MySQL, and PHP. These are selected by default, so you can leave them as is.
Choose the installation folder (default is usually fine).
Click "Next" and follow the prompts.
During installation, the installer may ask if you want to start the XAMPP Control Panel. Leave it checked and click "Finish."
Step 3: Start Apache and MySQL
Open the XAMPP Control Panel (it should have opened automatically, or you can search for it in the Start menu).
Click the "Start" button next to Apache (this will run the web server).
Click the "Start" button next to MySQL (this will start the database server).
Make sure both Apache and MySQL show "Running" in green.
Step 4: Install WordPress
Download the latest version of WordPress from the official WordPress website.
Extract the WordPress ZIP file.
Move the extracted folder (the WordPress folder) into the htdocs folder of your XAMPP installation (usually located at C:\xampp\htdocs).
Step 5: Create a Database for WordPress
Open your browser and go to http://localhost/phpmyadmin/.
In the phpMyAdmin dashboard, click on "Databases."
Create a new database for WordPress. Give it a name (e.g., wordpress_db) and click "Create."
Step 6: Configure WordPress
Open your browser and go to http://localhost/wordpress (or the folder name you chose).
The WordPress installation screen should appear.
Select your language and click "Continue."
On the next screen, enter your database details:
Database Name: The name you created (e.g., wordpress_db).
Username: root (default for XAMPP).
Password: Leave this blank (default for XAMPP).
Database Host: localhost (default).
Table Prefix: Leave as wp_ unless you want to change it.
Click Submit and then Run the Install.
Step 7: Complete the WordPress Setup
Fill in the site details (site title, admin username, password, and email).
Click "Install WordPress."
Once the installation is complete, you’ll see a success message. You can now log in to your WordPress dashboard at http://localhost/wordpress/wp-admin.
Final Notes
To stop your server, go to the XAMPP Control Panel and click "Stop" for Apache and MySQL.
If you need to make your local WordPress site public, you'll have to configure port forwarding or use a tool like Local by Flywheel or XAMPP for public access.
#installxampp#xamppforbeginners#xamppwindows10#wordpressinstallation#localserversetup#runwordpresslocally#xamppwordpress#webdevelopment#phpdevelopment#wordpressforbeginners#tutorial2025#localwordpress#xamppsetup#installingwordpress#wordpresssetup#beginnerfriendly#xamppguide#developmenttutorial#learnwordpress#wordpresslocally
0 notes
Text
How to deploying Laravel projects on a live server – Complete Step-by-Step Guide
Learn How to deploying Laravel projects on a live server with this comprehensive guide. Step-by-step instructions on setting up hosting, configuring files, and deploying your Laravel app smoothly.Read Laravel Docs
How to deploying Laravel projects on a live server, you’ll need to follow a structured process. Here’s a step-by-step guide to help you:

1. Purchase Domain and Hosting
Make sure you have a domain and a hosting plan. Most shared hosting plans (like cPanel-based ones) or a VPS will work for Laravel, but ensure your server supports PHP and MySQL and meets Laravel’s requirements (PHP version, required extensions, etc.).
2. Prepare Your Laravel Project
Make sure your Laravel project is working locally.
Run the following command to clear any cached configuration and to optimize the project:
php artisan cache:clear
php artisan config:clear
php artisan route:clear
php artisan view:clear
Set up your environment variables (.env file). Make sure they are correctly configured for the live server (e.g., database, mail, and app URL settings).
3. Zip and Upload Your Laravel Project
Compress your entire Laravel project folder (without the node_modules and vendor directories) into a .zip file.
Use FTP (with FileZilla or any other FTP client) or File Manager in cPanel to upload the .zip file to your server. Typically, upload the file to the public_html or a subdirectory within it if you want to run your Laravel app in a subdirectory.
4. Extract the Files
Once uploaded, use File Manager in your hosting control panel to extract the .zip file.
5. Set Up the Public Directory
By default, Laravel’s entry point is the public folder, which contains the index.php file. On a shared hosting server:
Move everything in the public folder (including the .htaccess and index.php files) to the root directory (usually public_html).
Edit the index.php file to update the paths:
Change:
require __DIR__.'/../vendor/autoload.php';
$app = require_once __DIR__.'/../bootstrap/app.php';
To:
require __DIR__.'/vendor/autoload.php';
$app = require_once __DIR__.'/bootstrap/app.php';
This ensures that Laravel can find the necessary files in the correct directory.
6. Set File Permissions
Ensure that the following directories are writable by the server:
/storage
/bootstrap/cache
Use the following command via SSH (if available) or through the hosting file manager:chmod -R 775 storage chmod -R 775 bootstrap/cache
7. Set Up a Database
Create a MySQL database and a user with privileges in cPanel (or via SSH if using VPS).
Update the .env file with your database credentials:
DB_HOST=localhost DB_DATABASE=your_database_name DB_USERNAME=your_database_username DB_PASSWORD=your_database_password
8. Install Composer Dependencies
If you have SSH access:
SSH into your server using a terminal or a tool like PuTTY.
Navigate to your project directory
cd /path/to/your/project
Run Composer to install the dependencies:
composer install --optimize-autoloader --no-dev
If you don’t have SSH access, you can run composer install locally, zip the vendor folder, and upload it to the server.
9. Run Migrations
If you have SSH access, run the following command to migrate the database:
php artisan migrate --force
If you don’t have SSH access, you can run the migrations locally and then export/import the database to the server via phpMyAdmin.
10. Set App Key
Generate a new application key if you haven’t already:php artisan key:generate
Ensure the key is set in the .env file:
Read Full Tutorials
0 notes
Text
Medical Card Generation System using PHP and MySQL

The ‘Medical Card Generations System using PHP and MySQL’ has been designed to override the problem of existing manual system. This web application is supported to eliminate and in some case reduce the hardship faced by manual system. The application is reduced as much as possible to avoid errors while entering the data. It’s also provide message while entering invalid data. No formal knowledge is required for the user to operate this system. Overall we said that ‘Medical Card Generations System’ is user friendly.
Project Modules
In ‘Medical Card Generations System’ we use PHP and MySQL Database. This project keeps the records of medical cards. ‘Medical Card Generations System’ has two module i.e. admin and user.
Admin Module
Dashboard: In this section, admin can briefly view the total medical card created in today’s, yesterday’s and in seven days, total read and unread enquiries.
Medical Card: In this section, admin can manage medical cards (add/delete/update).
Page: In this section, admin can manage about us and contact us pages.
Enquiry: In this section, admin reads the inquiries which are sent by users.
Search: In this section, admin can search a particular medical cards by reference number.
Reports of Medical Cards: In this section admin can view and check medical card details in a particular period.
Click: https://phpgurukul.com/medical-card-generation-system-using-php-and-mysql/
Admin can also update his profile, change the password and recover the password.
User Module
Home Page: User can visit home page.
Medical Card: User can view his/her medical card and take print with the help of their Reference Number.
About Us: User sees the details of .website administrator.
Contact Us: User can contact with website administrator and sent enquiry to them.
Note: In this project, the MD5 encryption method was used.
How to run the Medical Card Generation System Project using PHP and MySQL
1. Download the project zip file
2. Extract the file and copy mcgs folder
3.Paste inside root directory(for xampp xampp/htdocs, for wamp wamp/www, for lamp var/www/Html)
4.Open PHPMyAdmin (http://localhost/phpmyadmin)
5. Create a database with the name mgsdb
6. Import mgsdb.sql file(given inside the zip package in SQL file folder)
7. Run the script http://localhost/mcgs
Click: https://phpgurukul.com/medical-card-generation-system-using-php-and-mysql/
1 note
·
View note
Text
Von Shelly zu MySQL: Datenübertragung mit PowerShell automatisieren

Im letzten Beitrag habe ich dir gezeigt wie du die Daten von einem Shelly Plus PM Mini mit HTTP-Requests via VBA auslesen kannst. In diesem Beitrag soll es nun darum gehen wie du die Daten automatisiert vom Shelly mit PowerShell in eine MySQL Datenbank ablegen kannst.
Ich werde dir in den nächsten Abschnitten Schritt-für-Schritt erläutern, wie du: - die MySQL Datenbank auf einem Microsoft Windows PC installierst, - das PowerShell Skript in Visual Studio Code programmierst und ausführst
Schaltung mit dem Shelly Plus 1PM Mini
Für diesen Beitrag verwende ich eine kleine Schaltung mit dem Shelly Plus 1PM Mini, an welchen ich lediglich eine Lötstation über eine Steckdose angeklemmt habe.

Schaltung - Shelly Plus 1PM Mini mit Steckdose
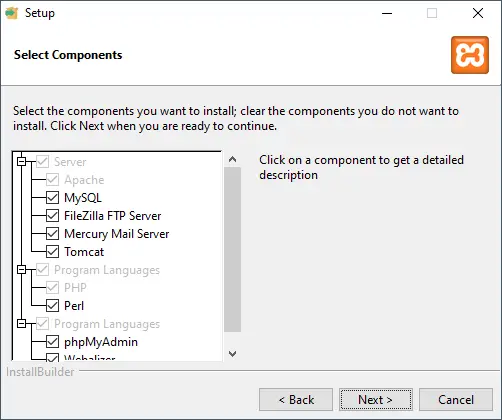
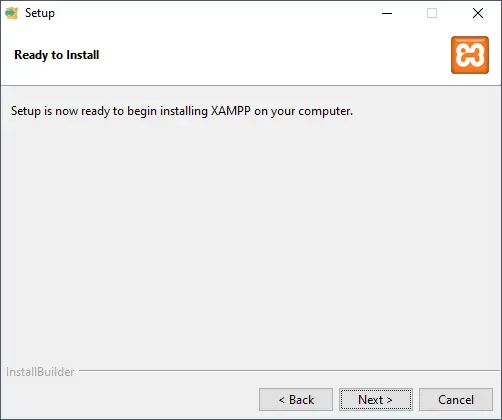
Installieren von XAMPP
Das Paket XAMPP enthält neben einem Apache2 Server, Php auch eine MariaDB welche mit MySQL kompatibel ist und kannst du dir kostenfrei unter https://www.apachefriends.org/de/download.html herunterladen. In meinem Fall lade ich mir die Version 8.2.4-0-VS16 herunter.


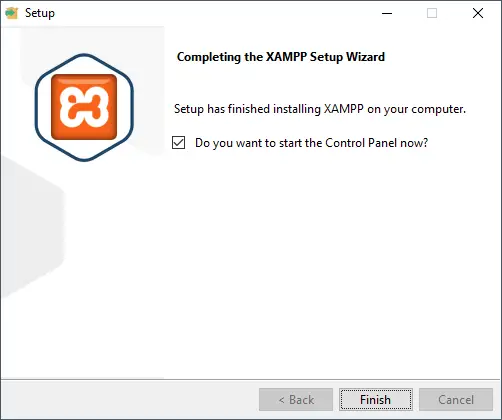
Wenn XAMPP erfolgreich installiert wurde, dann öffnet sich das XAMPP Control Panel aus welchem wir die Server / Dienste starten können.
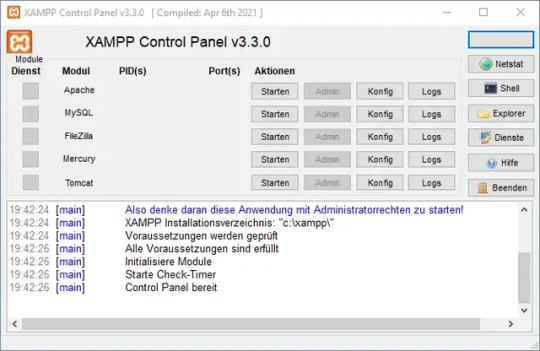
XAMPP_Control_Panel Bedenke, dass die Server / Dienste einen Port deines PCs belegen und somit ggf. andere Tools, welche diesen auch verwenden, in einen Konflikt geraten können. Starten der Dienste für die MySQL Datenbank Im nächsten Schritt starten wir nun das Modul "Apache" sowie "MySQL" indem wir auf die jeweilige Schaltfläche "Starten" klicken. Bei XAMPP ist das gute, dass dieses bereits alles Vorkonfiguriert ist und wir nur in Spezialfällen etwas ändern müssen!
Einrichten der Datenbank
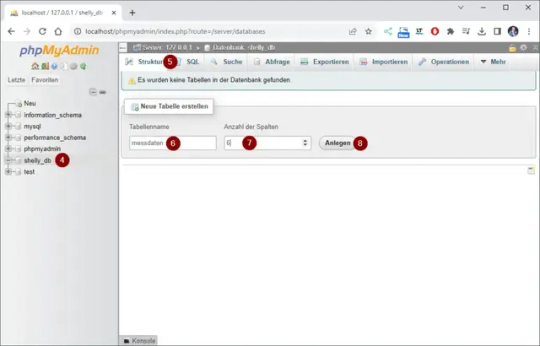
Wenn wir XAMPP installiert haben müssen wir als Nächstes die Datenbank einrichten, das können wir entweder über die Konsole oder bequem per phpMyAdmin erledigen. In meinem Fall mache ich das per phpMyAdmin welches im Browser unter http://localhost/phpmyadmin/ aufgerufen werden kann. Auf der Konsole geht dieses auch, nur hier muss man die gesamten SQL Statements manuell eingeben.

Webseite - phpMyAdmin für die Verwaltung der MySQL Datenbank im XAMPP Am Ende dieses Abschnitts stelle ich dir eine SQL-Datei zum Download bereit, welche das von mir erstellte Schema enthält, sodass du dieses nur importieren musst. Schritt 1 - Erstellen der Datenbank Im ersten Schritt erstellen wir die Datenbank und klicken auf den Reiter "Datenbanken" (1). Danach vergeben wir unserer Datenbank einen Namen, in meinem Fall nehme ich die Bezeichnung "shelly_db" (2). Dieses bestätigen wir mit der Schaltfläche "Anlegen" (3).

Schritt 2 - Erstellen der Tabelle für die Messwerte Im zweiten Schritt legen wir uns eine Tabelle an, um dort später die Messwerte abzulegen. Dazu vergeben wir im Reiter "Struktur" (5) im Feld Tabellenname den Namen der neuen Tabelle, in meinem Fall gebe ich hier "messdaten" (6) ein. Initial soll diese Tabelle 6 Spalten (7) haben. Diese Auswahl bestätige ich mit der Schaltfläche "Anlegen" (8).
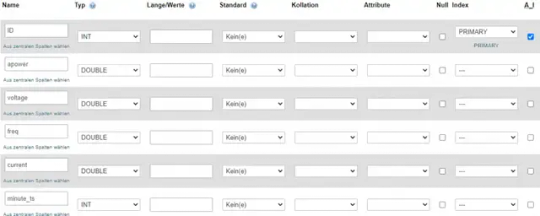
Im nächsten Schritt legen wir die Spalten an, hier sollten wir im Vorausplanen, welche Messdaten und in welchem Format (Datentyp) wir aufnehmen wollen. Der Shelly Plus 1PM Mini liefert nachfolgende Werte: - die Leistungsaufnahme (in Watt pro Stunde), - die Spannung (in Volt), - die Frequenz (in Herz), - die Stromaufnahme (in Ampere), sowie - einen Zeitstempel (Sekunden seit 01.01.1970) Zusätzlich erhalten wir auch die Temperatur in Grad Celsius sowie in Fahrenheit. Diese interessieren mich in diesem Fall jedoch nicht und daher lasse ich diese außen vor. Alle Werte außer der Zeitstempel werden als Gleitkommazahlen ausgegeben und daher legen wir für jeden Wert eine Spalte mit dem Datentyp DOUBLE an. Sowie noch eine Spalte ID welche als INT und mit "auto increment" angelegt wird. Die MySQL Datenbank legt automatisch auf diese Spalte einen Primärschlüssel.
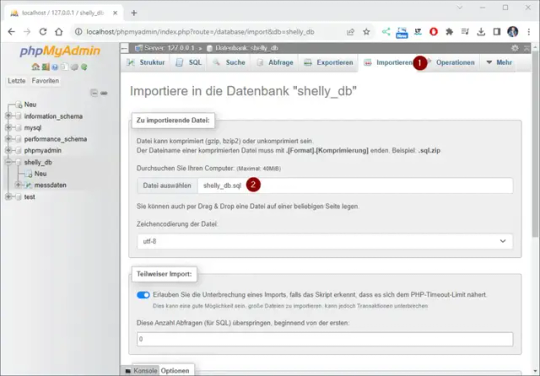
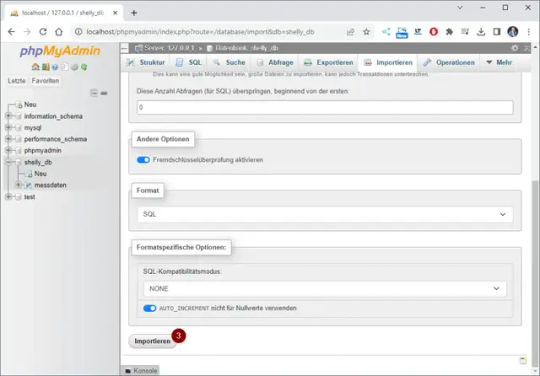
Download des Shema als ZIP-Datei Wenn du dir diese Schritte sparen möchtest, dann kannst du dir das Schema auch bequem als SQL-Datei herunterladen und importieren. MySQL Schema für die Datenbank "shelly_db"Herunterladen Zum Importieren dieser SQL-Datei navigierst du über den Reiter "Importieren" (1) und wählst zunächst die Datei (2) aus. Danach scrollst du das Fenster nach unten und wählst die Schaltfläche "Importieren" (3).
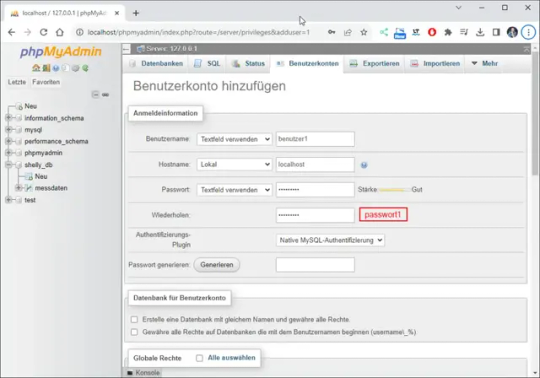
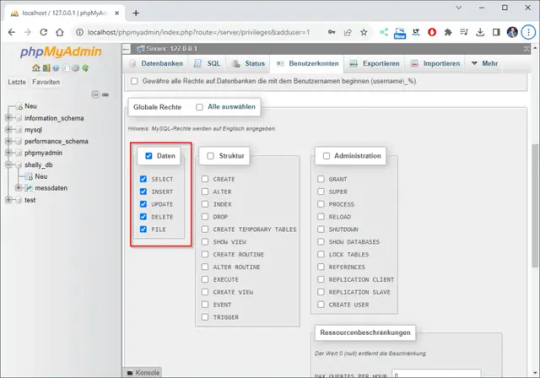
Anlegen eines Benutzers für die Datenbank
Es ist nie ratsam mit dem Benutzer root zu arbeiten da dieser sehr weitreichende Rechte hat. Über die Oberfläche von phpMyAdmin können wir uns einen Benutzer anlegen und diesem die benötigten Rechte für die Datenbank "shelly_db" geben.

Erstellen des PowerShell-Skriptes in Visual Studio Code
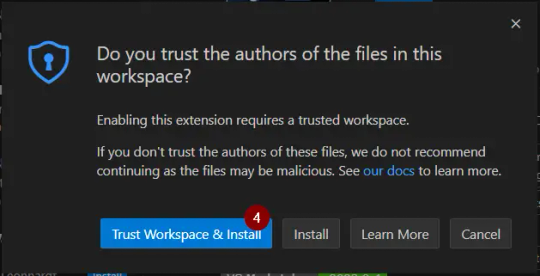
Das benötigte PowerShell Skript kannst du auch in einem einfachen Editor schreiben, jedoch bietet eine Entwicklungsumgebung noch zusätzliche Features, welche uns bei der Programmierung unterstützen. Das Programm Visual Studio Code kannst du dir unter https://code.visualstudio.com/download kostenfrei herunterladen und installieren. Wie du dieses machst, habe ich dir bereits im Beitrag zur Programmiersprache Rust erläutert. Schritt 1 - Installieren der Erweiterung für PowerShell in VSC Ich gehe nun davon aus, dass bei dir Visual Studio Code installiert ist. Somit können wir beginnen und die Erweiterung für PowerShell installieren. Dazu klicken wir in der linken Menüleiste auf "Extensions" (1) und suchen dann nach "PowerShell" (2) in meinem Fall wähle ich die offizielle Erweiterung von Microsoft und klicke dort auf die Schaltfläche "Install" (3).

Dem ganzen muss man noch zustimmten und die Installation startet sobald man auf "Trus Workspace & Install" (4) geklickt hat.
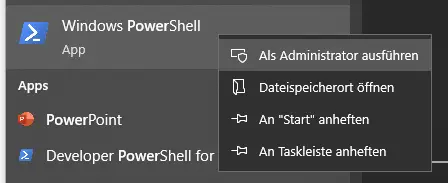
Schritt 2 - Verbindung zur MySQL Datenbank Damit wir eine Verbindung zur MySQL Datenbank aufbauen können, müssen wir zunächst ein Modul installieren, für diesen Beitrag verwende ich SimplySql. Zu diesem Modul gibt es eine sehr schöne Wiki-Seite https://github.com/mithrandyr/SimplySql/wiki/, auf welcher du die Funktionen mit Beispielen findest. Schritt 2.1 - Installieren von SimplySql Für die Installation muss ein PowerShell Terminal mit Administratorrechten geöffnet werden.
PowerShell mit Administratorrechten starten Im neuen Terminal gibt man nun den nachfolgenden Befehl ein. Install-Module -Name SimplySql Un bestätigt wärend dieser Installation mit "J". Wenn dieses Abgeschlossen ist, können wir das Terminalfenster schließen. Schritt 2.2 - Importieren von SimplySql Nun kehren wir in Visual Studio Code zurück und dort importieren wir dieses Modul. #Modul SimplySql importieren Import-Module SimplySql Schritt 2.3 - Aufbauen der Datenbankverbindung Danach bauen wir die Datenbank verbindung auf, hierzu nutzen wir den Benutzer welchen wir zuvor eingerichtet haben. #Aufbauen einer Verbindung zur Datenbank Open-MySqlConnection -server '127.0.0.1' -connectionname 'localhost' -database 'shelly_db' -Username benutzer1 -Password passwort1 Schritt 2.4 - SQL-Insert-Statement vorbereiten Für unsere Messdaten bereiten wir ein SQL-Insert-Statement vor. Als Values verwende ich hier gleich entsprechende Variablen welche im nächsten Schritt befüllt werden. $testconnection = Test-SqlConnection -ConnectionName 'localhost' #Wenn die Verbindung erfolgreich aufgebaut wurde,... if ($testconnection) { #SQL Statement $InsertQuery = "INSERT INTO shelly_db.messdaten (ID, apower, voltage, freq, current, minute_ts) VALUES (NULL, '$apower', '$voltage', '$freq', '$current', '$minute_ts');" #Ausführen des Statements Invoke-SqlUpdate -connectionname 'localhost' -Query $InsertQuery #Schließen der Datenbankverbindung Close-SqlConnection -connectionname 'localhost' } Wichtig ist, das am Ende die Datenbankverbindung geschlossen wird!
Schritt 3 - Abrufen der Messdaten vom Shelly
Die Messdaten vom Shelly lesen wir mit einem einfachen Aufruf per WebRequest. Hier prüfe ich zusätzlich ob die Antwort länger als 0 Zeichen ist, ansonsten verlasse ich das Skript mit einer Fehlermeldung. #Abrufen der Daten vom Shelly $response = Invoke-WebRequest -URI http://192.168.178.35/rpc/Switch.GetStatus?id=0 -UseBasicParsing #Wenn die länge des Textes gleich 0 ist dann soll das Skript verlassen werden! if ($response.Length -eq 0) { "Es wurde keine Antwort empfangen!" exit } Ansonsten wird die Anwort in ein JSON-Format geparst und in die Variablen geschrieben. #Umwandeln der Antwort in ein JSON-Format $data = $response | ConvertFrom-Json #Auslesen der Werte $apower = $data.apower $voltage = $data.voltage $freq = $data.freq $current = $data.current $minute_ts = $data.aenergy.minute_ts
Ausführen des PowerShell Skriptes zum Speichern der Daten eines Shelly in die MySQL Datenbank
Aus Visual Studio Code kannst du das Skript per klick auf "Run" oben rechts das Skript ausführen.

Ausführen eines PowerShell Skripts per Klick auf "Run" Alternativ kannst du auch ein Terminal öffnen und zu dem Ordner navigieren und dort das Skript manuell ausführen.
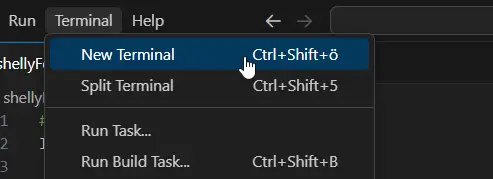
öffnen eines neuen Terminalfensters
navigieren zum PowerShell Skript Ansicht in phpMyAdmin Wenn wir das Skript erfolgreich ausgeführt wurde, dann sehen wir in der Tabelle "messdaten" eine neue Zeile mit den aktuellen Messdaten.

phpMyAdmin - Tabelle "messdaten"
Fertiges PowerShell Skript zum speichern von Messdaten eines Shelly Plus 1PM Mini in eine MySQL Datenbank
Hier nun das fertige PowerShell Skript um die Daten eine Shelly in die MySQL Datenbank zu schreiben. #Modul SimplySql importieren Import-Module SimplySql #Abrufen der Daten vom Shelly $response = Invoke-WebRequest -URI http://192.168.178.35/rpc/Switch.GetStatus?id=0 -UseBasicParsing #Wenn die länge des Textes gleich 0 ist dann soll das Skript verlassen werden! if ($response.Length -eq 0) { "Es wurde keine Antwort empfangen!" exit } #Umwandeln der Antwort in ein JSON-Format $data = $response | ConvertFrom-Json #Auslesen der Werte $apower = $data.apower $voltage = $data.voltage $freq = $data.freq $current = $data.current $minute_ts = $data.aenergy.minute_ts #Aufbauen einer Verbindung zur Datenbank Open-MySqlConnection -server '127.0.0.1' -connectionname 'localhost' -database 'shelly_db' -Username benutzer1 -Password passwort1 $testconnection = Test-SqlConnection -ConnectionName 'localhost' #Wenn die Verbindung erfolgreich aufgebaut wurde,... if ($testconnection) { #SQL Statement $InsertQuery = "INSERT INTO shelly_db.messdaten (ID, apower, voltage, freq, current, minute_ts) VALUES (NULL, '$apower', '$voltage', '$freq', '$current', '$minute_ts');" #Ausführen des Statements Invoke-SqlUpdate -connectionname 'localhost' -Query $InsertQuery #Schließen der Datenbankverbindung Close-SqlConnection -connectionname 'localhost' } PowerShell Skript zum speichern von Messdaten eines Shellys in eine MySQL DatenbankHerunterladen
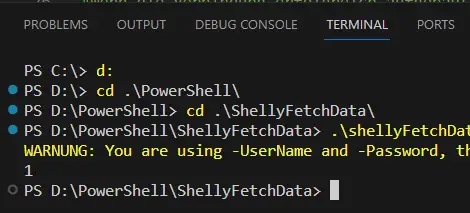
Troubleshooting
Fehler beim Ausführen von PowerShell Skripte In meinem Fall bekam ich beim ersten Ausführen des PowerShell Skriptes einen Fehler, dass dieses auf meinem System nicht genehmigt ist. PS D:PowerShellShellyFetchData> .shellyFetchData.ps1 .shellyFetchData.ps1 : Die Datei "D:PowerShellShellyFetchDatashellyFetchData.ps1" kann nicht geladen werden, da die Ausführung von Skripts auf diesem System deaktiviert ist. Weitere Informationen finden Sie unter "about_Execution_Policies" (https:/go.microsoft.com/fwlink/?LinkID=135170). In Zeile:1 Zeichen:1 + .shellyFetchData.ps1 + ~~~~~~~~~~~~~~~~~~~~~ + CategoryInfo : Sicherheitsfehler: (:) , PSSecurityException + FullyQualifiedErrorId : UnauthorizedAccess Nachfolgend die Schritte, um das Ausführen von PowerShell Skripte unter Microsoft Windows 10 zu erlauben: Read the full article
0 notes
Text
Online Course Registration Free Download

Online Course Registration System is Web-based registration software that helps you to register courses online. It is ideal for schools, educational camps, corporate training programs, and online training programs. It also provides time to time current status information related to courses. It can help for the student need to register by giving necessary details, for the desired course.
Click: https://phpgurukul.com/online-course-registration-free-download/
Project Modules
This Project Divided into two modules
Admin
Student
Admin:
Admin will register the student and provide username; password and pincode.Pincode will be used when a student enrolls for the course. Admin can manage session, semester, departments, course, students, students log Admin Panel. Admin can also add/ delete latest news and updates related to students.
Student:
Student can log in with valid reg no and password provided by admin. Student can enroll for any course and can printout of the registered course.
Online Course Registration System Installation Steps
1. Download and Unzip the file on your local system. 2. Copy onlinecourse and Put this file inside the root directory 3. Database Configuration
Database Configuration
Open PHPMyAdmin Create Database onlinecourse Import database onlinecourse.sql (available inside the zip package) Open Your browser put inside browser “http://localhost/onlinecourse”
****Login Details for admin****
Username: admin
Password: Test@123
****Login Details for Student****
Reg No.:10806121
Password: Test@123 Student Pincode for enroll Course Student: 822894
PHP Gurukul
Welcome to PHPGurukul. We are a web development team striving our best to provide you with an unusual experience with PHP. Some technologies never fade, and PHP is one of them. From the time it has been introduced, the demand for PHP Projects and PHP developers is growing since 1994. We are here to make your PHP journey more exciting and useful.
Email: [email protected] Website : https://phpgurukul.com
0 notes
Text
Restaurant Table Booking System using PHP and MySQL
Restaurant Table Booking System using PHP and MySQL is a web-based application. The restaurant Table Booking system project is developed to provide service facilities to restaurants and also to the customer. Customers can reserve the table online and check the status of the reservation.
Project Modules
In this project, we use PHP and MySQL database. It has two modules i.e Admin and user.
User Module
Users can fill out the table reservation form.
User can also check the table reservation/booking status.
Click here: https://phpgurukul.com/restaurant-table-booking-system-using-php-and-mysql/
Admin Module
Secure admin/sub-admin login
Dashboard: In this section, the admin can all the brief details like total sub-admins, total bookings, new bookings, accepted bookings and rejected bookings.
Sub-Admins: In this section, Admin can create the sub-admin, delete sub-admins, edit sub-admins, and reset the passwords of sub-admins.
Tables: In this section, admin can add and delete the tables.
Bookings: In this section, the admin can view the new, accepted, rejected, and all bookings. Admin can take actions on new bookings.
B/w dates report: In this section, admin can generate the report of between two dates bookings.
Account Setting: Admin can update his profile, and change the password.
Admin can also recover the password.
Sub-Admin Module
Sub-Admin and Admin features are the same except Sub-Admin creation. Sub-Admin can’t create the Sub-Admins.
How to run the Restaurant Table Booking System (rtbs) Project
1. Download the zip file
2. Extract the file and copy rtbs folder
3.Paste inside root directory(for xampp xampp/htdocs, for wamp wamp/www, for lamp var/www/HTML)
4.Open PHPMyAdmin (http://localhost/phpmyadmin)
5. Create a database with the name rtbsdb
6. Import rtbsdb.sql file(given inside the zip package in the SQL file folder)
7. Run the script http://localhost/rtbs
Credential for Admin panel :
Username: admin Password: Test@123
PHP Gurukul
Welcome to PHPGurukul. We are a web development team striving our best to provide you with an unusual experience with PHP. Some technologies never fade, and PHP is one of them. From the time it has been introduced, the demand for PHP Projects and PHP developers is growing since 1994. We are here to make your PHP journey more exciting and useful.
Email: [email protected] Website : https://phpgurukul.com
0 notes
Text
Meeting and Conference Booking System using PHP and MySQL
The Meeting and Conference Booking System has been designed to override the problem of existing manual system. This web application is supported to eliminate and in some case reduce the hardship faced by manual system. The application is reduced as much as possible to avoid errors while entering the data. It’s also provide message while entering invalid data. No formal knowledge is required for the user to operate this system. Overall we said that Meeting and Conference Booking System is user friendly.
Click here: https://phpgurukul.com/meeting-and-conference-booking-system-using-php-and-mysql/
Project Modules
In Meeting and Conference Booking System we use PHP and MySQL Database. This project keeps the records of booking, users and conference rooms. Meeting and Conference Booking System has two module i.e. admin and user.
Admin Module
1. Dashboard: In this section, admin can briefly view the total new booking, approved booking, Cancelled Booking, Total Registered users and total sub-admins.
2. Sub-Admins: In this section, admin can manage sub-admins (add/delete/update).
3. Room: In this section, admin can manage rooms (add/update/delete).
4. Booking: In this section, admin can view new, approved, canceled bookings and also give a remark.
5. Reg Users: In this section, admin can view the detail of registered users.
6. Page: In this section, admin can manage about us and contact us pages..
7. Reports: In this section admin can view the and check booking details in a particular period.
Admin can also update his profile, change the password and recover the password.
User Module
1. Home: It is a welcome page for users.
2. About: It is a about us page of website.
3. Meeting & Conference Room: In this section, user can view details of onference and meeting room which are available.
4. Contact: It is a contact us page of website.
5. Sign Up: Users can register through sign uppage.
6. Login: It is login page.
7. My Account: After registration user can have their own account where he/she can update profile, change password, recover password and view booking details of conference and meeting room.
How to run the Meeting and ConferenceBooking System Project in PHP
Download the zip file
2. Extract the file and copy mcbs folder
3.Paste inside root directory(for xampp xampp/htdocs, for wamp wamp/www, for lamp var/www/Html)
4.Open PHPMyAdmin (http://localhost/phpmyadmin)
5. Create a database with the name mcbsdb
6. Import mcbsdb.sql file(given inside the zip package in SQL file folder)
7. Run the script http://localhost/mcbs
Admin Credential Username: admin Password: Test@123
User Credential Username: [email protected] Password: Test@123
Or Register a New User
PHP Gurukul
Welcome to PHPGurukul. We are a web development team striving our best to provide you with an unusual experience with PHP. Some technologies never fade, and PHP is one of them. From the time it has been introduced, the demand for PHP Projects and PHP developers is growing since 1994. We are here to make your PHP journey more exciting and useful.
Email: [email protected] Website : https://phpgurukul.com
0 notes
Text
Computer Service Management System Using PHP and MySQL
In this project, we use PHP and MySQL database. It has two modules
Admin
Users
Admin Module
Admin is the superuser of the website who can manage everything on the website. Admin can log in through the login page.
Dashboard: In this section, admin can view all the detail in brief like total services, total users, and total invoices.
Services: In this section, admin can manage services(add/update/del).
Pages: In this section, admin can manage about us and contact us pages.
Customer List: In this section, admin can view registered user’s details and generate invoices.
Invoices: In this section, admin can view the customer’s invoices which are generated by him/her.
Reports: In this section, admin can generate between dates reports of invoices.
Search Invoices: In this section, admin can search invoice details with the help invoice number.
Click: https://phpgurukul.com/computer-service-management-system-using-php-and-mysql/
Admin can also update his profile, change the password and recover the password.
User Module
Dashboard: It is a welcome page for users.
Invoices: In this section, the user can view his/her own invoices which are generated by the admin.
Search Invoices: In this section, users can search his/her own invoices details with the help invoice number.
User can also update their profile, change the password and recover the password
How to run the Computer Service Management Project Using PHP and MySQL
Download the zip file
Extract the file and copy comsms folder
Paste inside root directory(for xampp xampp/htdocs, for wamp wamp/www, for lamp var/www/html)
Open PHPMyAdmin (http://localhost/phpmyadmin)
Create a database with name comsmsdb
Import comsmsdb.sql file(given inside the zip package in SQL file folder)
Run the script http://localhost/comsms
Admin Credential Username: admin Password: Test@123
User Credential Username: [email protected] Password: Test@12345
Or Register a new User.
View Demo
PHP Gurukul
Welcome to PHPGurukul. We are a web development team striving our best to provide you with an unusual experience with PHP. Some technologies never fade, and PHP is one of them. From the time it has been introduced, the demand for PHP Projects and PHP developers is growing since 1994. We are here to make your PHP journey more exciting and useful.
Website : https://phpgurukul.com
0 notes
Text
Notice Board System Using PHP and MySQL

The Notice Board System Project is a web-based application developed using PHP and MySQL that allows organizations, educational institutions, and businesses to manage and display notices efficiently. Notice Board system mangment Project replaces traditional physical notice boards with a digital platform, ensuring quick and easy access to important announcements.
Project Modules
A “Notice Board System Management” is an efficient online platform designed to view, manage, and organize important announcements, notifications and messages in an institution or organization. “Notice Board System” solve the issues of traditional way of display notice where notice boards were used to communicate information, but they have several limitations, such as restricted visibility, space constraints, and manual updates.
To provide a centralized platform for managing notices.
To enable real-time updates and notifications.
To allow categorization of notices for better organization.
To provide an easy-to-use search functionality for quick access to notices.
To enhance accessibility by making notices available anytime, anywhere.
Click: https://phpgurukul.com/notice-board-system-using-php-and-mysql/
Features of the System:
Dashboard — Allows administrators to view and manage all notices.
Category– Notices can be categorized for better organization.
Add Notices — Admin can add notices details.
Manage Notices-Admin can update notices as required.
Search Functionality — Users can search for notices by title or category.
Report — Users can view notices within a specific date range.
User Roles & Permissions — Admin users have full control over the system.
This Notice Board System Project is an essential tool that ensures efficient communication, reduces dependency on paper-based notices and enhances accessibility for all users.
How to run the Notice Board system Project
1. Download the project zip file
2. Extract the file and copy nbs folder
3.Paste inside root directory(for xampp xampp/htdocs, for wamp wamp/www, for lamp var/www/Html)
4.Open PHPMyAdmin (http://localhost/phpmyadmin)
5. Create a database with the name notice_system
6. Import notice_system.sql file(given inside the zip package in SQL file folder)
7. Run the script http://localhost/nbs
*************************Admin Credential************************** Username: admin Password: Test@123
PHP Gurukul
Welcome to PHPGurukul. We are a web development team striving our best to provide you with an unusual experience with PHP. Some technologies never fade, and PHP is one of them. From the time it has been introduced, the demand for PHP Projects and PHP developers is growing since 1994. We are here to make your PHP journey more exciting and useful.
Website : https://phpgurukul.com
0 notes
Text
Diabetes Detection System using PHP and MYSQL
Diabetes Detection System using PHP and Mysql is a web-based technology that allows users to predict the likelihood of diabetes by entering key medical parameters, including Age, Glucose Level, Blood Pressure, and BMI (Body Mass Index). The system analyses the data through a rule-based logic or predictive model and provides results in an easy-to-understand format, helping raise awareness and encourage early detection. In this web application user must register. The primary objective of this application is to assist users in predicting the risk of diabetes and maintaining a record of diabetes-related health parameters for themselves and their loved ones.
Project Modules
In this project we use PHP and MySQL database and it has two module i.e. Admin and User
Admin Module
Dashboard: This section of the web application provides the admin with a comprehensive summary of user activity and system usage. It includes real-time statistics related to diabetes predictions and user registrations, offering valuable insights into how the system is being usedlike Today’s Prediction, Yesterday’s Prediction, Last 7 Days’ Predictions, Total Prediction and total registered users.
Reg User’s: In this section, the admin can view the diabetes prediction records along with the personal details of all registered users.
Reports: In this section, admin can generate below reports
Between dates prediction report
Registered Users Report
Profile: This section allows admin to update and manage their personal profile information.
Change Password: This section enables users to securely update and manage their account password.
Logout: This section allow users to securely exit their account after using the system
Click: https://phpgurukul.com/diabetes-detection-system-using-php-and-mysql/
User Module
Dashboard: This section of the web application allows users to conveniently view a summary of their diabetes prediction history like Today’s Prediction, Yesterday’s Prediction, Last 7 Days’ Predictions and Total Prediction.
Diabetes Detection: This section enables users to assess the likelihood of diabetes by entering key health indicators into the system. The input fields include: Age, Glucose Level, Blood Pressure, and Body Mass Index (BMI).
B/W Dates Report: This section allows users to generate detailed reports of diabetes prediction data entered within a specific date range. By selecting a start date and an end date, users can filter and view all prediction records submitted during that period.
Profile: This section allows users to update and manage their personal profile information.
Change Password: This section enables users to securely update and manage their account password.
Logout: This section allow users to securely exit their account after using the system.
How to run the Diabetes Detection System
1. Download the project zip file
2. Extract the file and copy diabetes folder
3.Paste inside root directory(for xampp xampp/htdocs, for wamp wamp/www, for lamp var/www/Html)
4.Open PHPMyAdmin (http://localhost/phpmyadmin)
5. Create a database with the name diabetesdb
6. Import diabetesdb.sql file(given inside the zip package in SQL file folder)
7. Run the script http://localhost/diabetes
**************************Admin Credential************************** Username: admin Password: Test@123
**************************User Credential**************************
Email: [email protected] Password: Test@123
OR Register a new user.
PHP Gurukul
Welcome to PHPGurukul. We are a web development team striving our best to provide you with an unusual experience with PHP. Some technologies never fade, and PHP is one of them. From the time it has been introduced, the demand for PHP Projects and PHP developers is growing since 1994. We are here to make your PHP journey more exciting and useful.
Website : https://phpgurukul.com
0 notes
Text
jQuery Dependent DropDown List – States and Districts Using PHP-PDO

In this tutorial, we are going to learn how to change the district dropdown list option based on the selected state name using PHP-PDO.
In this example, we have two dropdowns for listing states and districts. On changing states drop-down values, the corresponding district dropdown values will be loaded dynamically using jQuery AJAX.
Click: https://phpgurukul.com/jquery-dependent-dropdown-list-states-and-districts-using-php-pdo/
File structure for this tutorial
config.php — Database connection file.
index.php — Main file having drop down
get_district.php — used to retrieve the district based on the selected state name.
MySQL Database structure for this tutorial
In this tutorial two MySQL Database table is used.
state
district
state table structure
CREATE TABLE `state` (
`StCode` int(11) NOT NULL,
`StateName` varchar(150) DEFAULT NULL
) ENGINE=MyISAM DEFAULT CHARSET=latin1;
district table structure
CREATE TABLE `district` (
`DistCode` int(11) NOT NULL,
`StCode` int(11) DEFAULT NULL,
`DistrictName` varchar(200) DEFAULT NULL
) ENGINE=MyISAM DEFAULT CHARSET=latin1;
Step 1: Create a database connection file (config.php)
<?php
// DB credentials.
error_reporting(0);
define(‘DB_HOST’,’localhost’);
define(‘DB_USER’,’root’);
define(‘DB_PASS’,’’);
define(‘DB_NAME’,’demos’);
// Establish database connection.
try
{
$dbh = new PDO(“mysql:host=”.DB_HOST.”;dbname=”.DB_NAME,DB_USER, DB_PASS,array(PDO::MYSQL_ATTR_INIT_COMMAND => “SET NAMES ‘utf8’”));
}
catch (PDOException $e)
{
exit(“Error: “ . $e->getMessage());
}
?>
Step2: Create a HTML form with two fields . One is for state and another one is for district.
<form name=”insert” action=”” method=”post”>
<table width=”100%” height=”117" border=”0">
<tr>
<th width=”27%” height=”63" scope=”row”>Sate :</th>
<td width=”73%”><select onChange=”getdistrict(this.value);” name=”state” id=”state” class=”form-control” >
<option value=””>Select</option>
<! — — Fetching States — ->
<?php
$sql=”SELECT * FROM state”;
$stmt=$dbh->query($sql);
$stmt->setFetchMode(PDO::FETCH_ASSOC);
while($row =$stmt->fetch()) {
?>
<option value=”<?php echo $row[‘StCode’];?>”><?php echo $row[‘StateName’];?></option>
<?php }?>
</select></td>
</tr>
<tr>
<th scope=”row”>District :</th>
<td><select name=”district” id=”district-list” class=”form-control”>
<option value=””>Select</option>
</select></td>
</tr>
</table>
</form>
Step3: Getting States using jQuery AJAX
This script contains a function that will be called on changing state dropdown values. It will send AJAX request to a PHP page to get corresponding district dropdown options.
<script>
function getdistrict(val) {
$.ajax({
type: “POST”,
url: “get_district.php”,
data:’state_id=’+val,
success: function(data){
$(“#district-list”).html(data);
}
});
}
</script>
Step 4: Read the district table using PHP based on the selected state name.
This PHP code connects the database to retrieve district table values based on the state id passed by jQuery AJAX call.
<?php
require_once(“config.php”);
if(!empty($_POST[“state_id”]))
{
$stateid=$_POST[“state_id”];
$sql=$dbh->prepare(“SELECT * FROM district WHERE StCode=:stateid”);
$sql->execute(array(‘:stateid’ => $stateid));
?>
<option value=””>Select District</option>
<?php
while($row =$sql->fetch())
{
?>
<option value=”<?php echo $row[“DistrictName”]; ?>”><?php echo $row[“DistrictName”]; ?></option>
<?php
}
}
?>
How to run this script
1.Download the zip file
2.Extract the file and copy statedistdropdown-pdo folder
3.Paste inside root directory(for xampp xampp/htdocs, for wamp wamp/www, for lamp var/www/html)
4.Open PHPMyAdmin (http://localhost/phpmyadmin)
5.Create a database with name demos
6.Import regdb.sql file(given inside the zip package )
7.Run the script http://localhost/statedistdropdown-pdo
PHP Gurukul
Welcome to PHPGurukul. We are a web development team striving our best to provide you with an unusual experience with PHP. Some technologies never fade, and PHP is one of them. From the time it has been introduced, the demand for PHP Projects and PHP developers is growing since 1994. We are here to make your PHP journey more exciting and useful.
Website : https://phpgurukul.com
0 notes
Text
The event management system is a web-based application. The objective of this application is to develop a system that effectively manages all the data related to the various events that take place in an organization. The purpose is to maintain a centralized database of all event-related information. The goal is to support various functions and processes necessary to manage the data efficiently.
Click : https://phpgurukul.com/event-management-system-using-php-and-mysql/
Project Modules
In EMS project we use PHP and MySQL database. It has two modules.
1.Admin Module
2.User Module
Admin Module
Dashboard: In this section, admin can see all detail in brief like listed categories, Sponsors, Total Events, Total Registered Users, Total Booking, Total New Booking, Total Confirmed Booking and Total Cancelled Booking.
Category: In this section, admin manage event category (add and update).
Manage Sponsors: In this section, admin can add sponsors and manage sponsors details (Add/Update/Delete).
Events: In this section, admin manage events (add and update).
Manage Users: In this section, admin can update details of registered users and also block them.
Manage Booking: In this section, admin can manage booking by cancel and confirm it.
News: In this section admin manage news (add and delete).
Website Setting: In this section, admin can update about us and another general website setting.
Admin can also update his profile, change password and recover password.
User Module
In this module there is two types of user guest user and registered user.
Guest User: In this guest user can see only general information like about us, event details,
contact details and news about events.
Registered users can do the following activity
1.Books the events.
2.Update his/her own profile.
3.Change Password.
4.Users can also cancel booking which is not confirmed.
5. Registered user can also recover his/her own password.
How to run the Event Management System (EMS) Project
1. Download the zip file
2. Extract the file and copy ems folder
3.Paste inside root directory(for xampp xampp/htdocs, for wamp wamp/www, for lamp var/www/html)
4. Open PHPMyAdmin (http://localhost/phpmyadmin)
5. Create a database with name ems
6. Import ems.sql file(given inside the zip package in SQL file folder)
7.Run the script http://localhost/ems (frontend)
8. For admin panel
http://localhost/ems/admin (admin panel)
Credential for admin panel :
Username: admin Password: Test@123
Credential for user panel :
Username: test12345 Password: Test@123
0 notes