#made with: marmoset toolbag 4
Photo


"Stylized Chimney & Fireplace"
A couple weeks prior, I applied for the role of Junior Environment Artist at Polyart and was presented with an art test to complete. For my test, I had to design a stylized modular fireplace and chimney that could be incorporated into the style of their existing work seamlessly inside of Unreal Engine.
The asset was to feature several different sections that could be assembled to create one seamless object consisting of: a bottom part (the fireplace), a middle part ( a tiling chimney that would go ontop of the fireplace and would be able to tile vertically so that the height of the chimney could be extended indefinitely) and lastly the top part (the chimney top which would be non-tiling).
Here is a test I did of my design inside of a quick mock-up environment scene I made in Unreal Engine 4:

Sadly to say, I didn't get the job. Ultimately the studio opted for another candidate who best matched their style. Nonetheless, they did express liking my overall portfolio while providing me with additional feedback on where I could further improve which I was grateful for.
For me, the most difficult part of this test and the area I had the most challenge with was creating the tiling chimney. Prior to this test, I hadn't had much experience or even practice creating tiling textures.
While the studio recommended using Substance Designer for that part, I unfortunately have very little experience using Designer. I am, on the other hand, more proficient with its sister program---Substance Painter and in the end, I ended up using a combination of Substance Painter together with Zbrush to produce my tiling texture.
This was another technique I had never tried before but I am glad I got the opportunity to take it for a spin since it taught me something new.
Creating tiling textures with Zbrush and Painter isn't too bad and I'm hoping I use this workflow again for future personal projects.
Overall, one of my main takeaways from this test was that this squiggly 3D wizard should probably look into getting more training or practice with Substance Designer. I've avoided it for far too long mainly because, compared to Painter, Designer UI and process feels so alien to me and I've had difficulty gelling with the program. Still it is on my to-learn list so perhaps I should revisit it sometime soon.
In the meantime, I thought I'd share my test results on here along with my experience. Hope you readers and fellow 3D enthusiasts enjoyed it.
—
Tools Used: Maya 2020.4 | Zbrush 2022| Substance 3D Painter | Marmoset Toolbag 4 | Unreal Engine 4.26
—
~SC (2022)
#art of littlemissquiggles#squiggly 3d: prop project#art test: polyart#made with: marmoset toolbag 4
7 notes
·
View notes
Text

Low-poly 3D model of the C-More red dot sight.
The model was made in blender and textured in substance painter.
Marmoset toolbag 4 was used to render the turntable.
CGTrader:
https://www.cgtrader.com/products/barska-red-dot-sight
Sketchfab:
https://sketchfab.com/3d-models/barska-1x-red-dot-sight-05c0dbaf5e99405d942f452dddebd252
2 notes
·
View notes
Text
A Breakdown of Cuong Nguyen's Hand-Painting Process
In this blog post, I will be talking about Hoang Tri Cuong Nguyen's project of transforming a real-life plant into a stunning hand-painted 3D model. As a student in Games Art and Design, I am particularly drawn to his workflow process and techniques, especially as I am aspiring to dive deeper into hand-painted work myself. The RMIT University, School of Design student posted an article on The Rookies platform, where he described the methodology that he had to follow to create a hand-painted stylised flower.
Cuong Nguyen began explaining his workflow process by listing the main software that he used, such as Maya for modelling, Substance 3D Painter and Photoshop for texturing, and Marmoset Toolbag 4 and Sketchfab for rendering. His creation began with inspiration from Sophie Rose Stübinger's Sunflower 3D model on Sketchfab. He set out to photograph plants in his neighbourhood, finally choosing the lilac hibiscus because of its brilliant colours and interesting shape. His decision to draw a concept art instead of solely relying on photographs represents a deviation from traditional realism methods, as it allowed him to infuse his unique art style into the project. I feel like doing the same and making sketches for my environments and assets might also help me visualise my own projects in the stylised aesthetic.
He started by planning how to set up the model in Maya and Photoshop. He adopted a systematic approach of breaking down the model into its elemental components, like petals, buds, stems, leaves, ground, and the pot. He discovered that this method allowed for a more manageable workflow, particularly when dealing with soft surfaces. He chose to use planes with texture maps incorporating transparency for certain components such as petals, leaves, and the ground.
For the petals and leaves he started with the process of designing the general forms in Photoshop as drawings, which he would transfer into low-poly models using Maya later on. He exported the drawings from Photoshop as PNG texture maps, which allowed him to display only the appropriate areas of the model and hide the empty spaces even inside Maya. He thought of creating UV maps for the single components of his asset before duplicating them which led to a uniformity in his texture placement and better texturing optimisation.
Then, his texturing process started with a focus on refining his hand-painting skills using Substance 3D Painter. As a student, his approach to the texturing process gave me valuable tips that I can integrate into my own practice. His method of starting with flat colours to gain an overview of the model's composition aligns with the notion of building a solid foundation before adding more details. This can be applied in all stages of asset creation, especially in sculpting, where I unfortunately tend to jump into detailing very early on in the process. He also followed an intuitive path by basing his decisions on the final visual needs, rather than limiting himself to traditional methodology and order. His way of thinking exhibits the value of using an experimental approach which reflects a trial-and-error nature to the creative process, emphasizing the importance of adaptability.

His next step constituted in improving the texture maps in Photoshop by creating a mask to remove any colour from the transparent backdrop. This protects the integrity of transparency in render engines and lays the groundwork for easier integration. He then made subsequent subtle colour changes to improve the visual appeal of the flower which highlights the importance of doing some extra tweaking. He discovered the effectiveness of the 'Glass Distort' filter in Photoshop's filter gallery which allowed him to experiment until he achieved the desired watercolour look he was aiming for.
Cuong Nguyen rendered the flower in Marmoset Toolbag 4 and his task begins with adjusting the material settings, using the Albedo for the color map and leaving all other choices at their defaults. To ensure visibility of all plane sides for flowers and leaves, he activated the 'Cull Back sides' option, a common difficulty I've run across even in other software I've worked with. His favourite lighting arrangement consists of two lights, a primary one and a secondary one, used as a backlight. This arrangement gave the model some added depth and realism, and I'd like to remember this technique to use it in the future.
In Marmoset, a flat colour setting was used for the backdrop, focusing on simplicity and cleanliness to set the flower in the spotlight. In Sketchfab, the same conditions were applied to keep the rendered look consistent and unified between both render engines. He also employed default lighting conditions with the same light angle for shadow direction. He purposely chose 'Specular' over 'Metalness' for the unlit shading, to give the model a flatter drawing-like appearance. He also used an opacity cutout for the petals and leaves to improve their visual impact, then he finally made minor tweaks to guarantee that the final Sketchfab render closely matches the style and appearance of the Marmoset Toolbag 4 rendering.
Exploring Hoang Tri Cuong Nguyen's project has provided me with a different outlook on creative workflows as a student in game art. From his meticulous planning to his strategic use of tools in software, I've learned the importance of embracing experimentation and the adoption of creativity to infuse my unique artistic style into my projects, thus prioritising fulfilling artistic vision rather than adhering strictly to conventional methodologies.
Reference:
Hoang Tri Cuong Nguyen. (2023). Turning a Real-Life Plant into a Hand-Painted 3D Model. Discover | The Rookies [e-journal]. Available at: https://discover.therookies.co/2023/11/20/turning-a-real-life-plant-into-a-hand-painted-3d-model/
0 notes
Text


Mr. Tako Model (2020 & 2021)
Ok here's two versions of the same model of Mr. Tako from the game "Save Me Mr. Tako" but they were rendered at different times using different software.
The first one was made in a day back in 2020 in a day. I rendered it in Autodesk Maya and the colors were picked from the game's original cover art for the switch version.
The second one was rendered in 2021 when I bought myself Marmoset Toolbag 4. I used a celshader for the program by user "almightygir". I also subdivided the model. The colors are the same material color from the first image but with a different kind lighting.
0 notes
Photo


#Some more NPCs I made for the FF Wiki#FFVIIRemake#Gwen#Damon#Wymer#Jay#FFVIIR#FFVII Remake#FF7R#FF7 Remake#FF7Remake#Marmoset Toolbag 4
6 notes
·
View notes
Photo
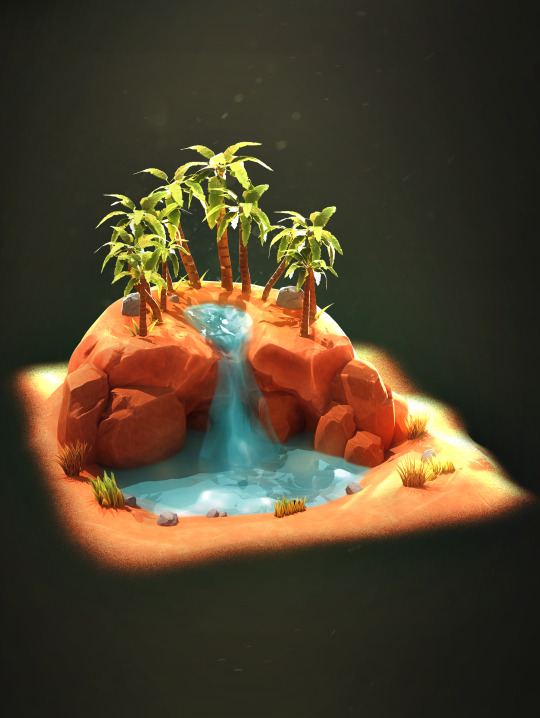
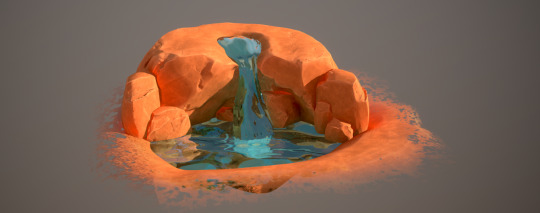
ASSET ASSIGNMENT - DIORAMA
My task for this month was to create a diorama environment. I have never created an environment before, so I had to do things a little differently to what I’m used to.
My overall plan was to get this successfully displayed in real-time, in marmoset toolbag. I like marmoset because you can export your scenes into unreal engine if desired.
I went with a more agile development approach as opposed to a heavily structured one.
My diorama theme is an oasis. As a kid, I always remembered characters in the desert hallucinating an oasis when they’re on the brink of insanity. I find those really cool so I decided to make my own.
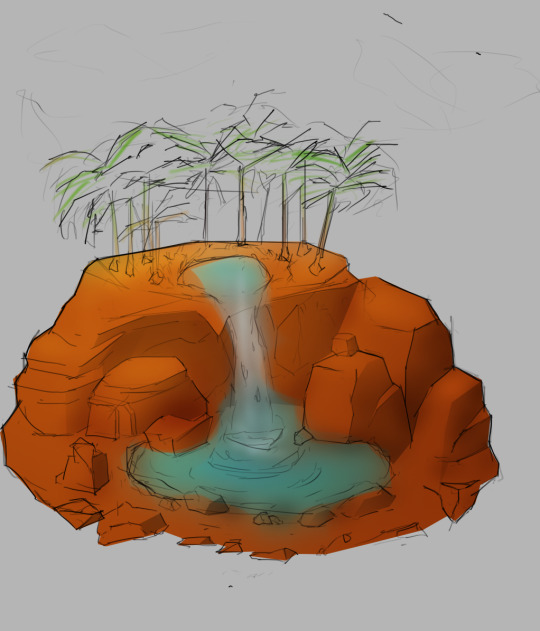
Concept/Blockout Stage

I originally drew some really rough and dirty concepts just to plot down the ideas in my mind. This would be the equivalent to my silhouette stage, seeing which shape I preferred.
As opposed to drawing entirely different shapes, I decided to iterate on an initial design.
1 - A floating small oasis with a pond and trees around it. Ommari said it looked like a piece of poo and I could see that too so I changed it.
2 - The shape of the oasis base was change to make it look less like a floating island.
3 - The pond in the oasis was turned into a waterfall instead of being on full land.
4 - I liked the idea of a waterfall so decided to expand on this, instead of it leaving into nothing, I created a second floor, for the waterfall to expand into a bigger pond.
After my rough concept was complete, I tried drawing a detailed concept, but I struggled getting the forms down as my rough concept was too vague as to its structure. This is when I decided to create my block out. I had no intention of it looking nice, I just wanted to project my idea in a 3D space to assist me in the placement of my polished assets as well as assist me in drawing my polished concept.

Modelling and Development Stage
After I did my blockout and progressed on my polished concept, I could finally plan out what I needed to make. From the concept I knew I needed
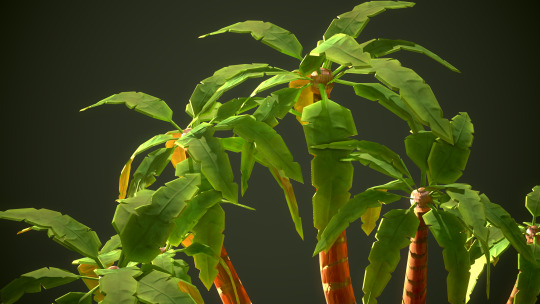
Trees(multiple variants)
Rocks(multiple variants)
Water(pond)
Waterfall
Small plants(multiple variants)
It doesn’t seem like a lot but it would be a lot of rocks. Fortunately I knew I could save time by rotating rocks into certain positions and scaling them so they look different. Making rocks themselves too wasn’t really difficult. This also applied to the trees. The water however, will be the biggest challenge as I have never even explored the idea of real-time water.
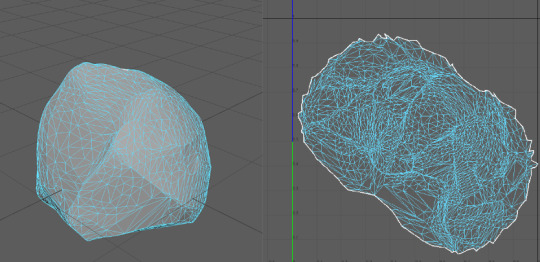
I started with a simple rock to get the terrain workflow down. I used zbrush to sculpt a sphere into a rock shape. I made use out of the TRIM brush and MALLET brush.
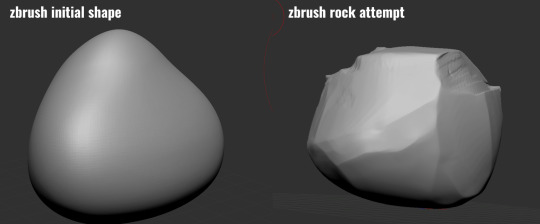
I then decimated the rock to have a lower polycount and uved it in maya. I just used spherical project and then unfolded it and optimised it., then I scaled it to fill out the most of the UV.
After this, I went into substance painter to texture my rock, I used smart materials to save time. Originally my rock had a more realistic and gritty texture but I decided to change it into something more stylised.

I used the smart material “leather stylised” and changed the colours to resemble desert terrain. I liked how it turned out so I saved my modifications as a new smart material so I could just drag and drop every time I had a new object to texture.
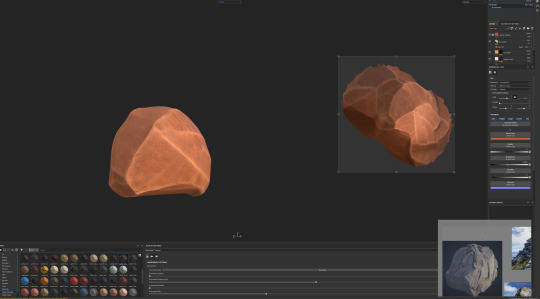
I made 2 more rocks. I wanted to see if the rocks could be combined from being separate into one big structure relatively seamlessly. I decided to test this in marmoset, see if I can get it looking how I wanted.

This was test 1. I used 2 rocks for this and scaled up one of them. I think the two small rocks looks decent. However I needed to make separate meshes for larger rocks as the sharpness loss was apparent on the big rock.
The process was the same for all rocks really, sculpt > decimate > uv > bake > smart material. The only difference was when I had to model the big ground base. I used my blockout as a reference in zbrush.

Disclaimer: The varying aesthetics in my rendered screenshots are me switching between high performance mode and high graphics mode in marmoset. Unless stated otherwise.

For the water, I simply created a flat plane with a blue albedo texture. I then created a height and normal map.
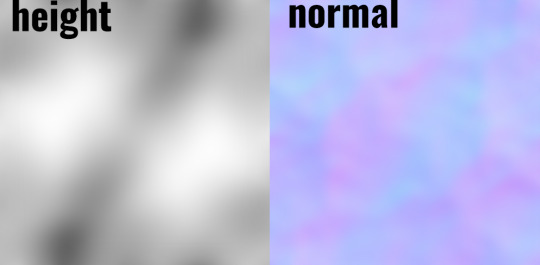
I used these maps to create the water depth effect.
Pictured Below: Raw Albedo > Height and Normal Map applied > Refraction Transparency mode enabled.

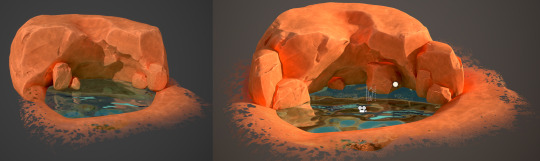
I made some modifications and additions to my design, re-using the rock assets and rotating them to make them unique.
I tried creating a waterfall, I imported my scene into maya then made a plane then soft selected and stretched the corners to my desired placements.

I then applied the same water material to the waterfall as a test. I don’t think it looks good enough so I’ll work on it later on.
For the trees, I use the maya spline tool to create a curved cylinder as the based. I then created the

I created the grass using small planes shaped to the shape of grass. I also recycled those assets to use in the grass bushes and cloned them using MASH commands. I used the grass as a final touch to add more detail and variety to the roots of the trees.
Final Changes
Eventually I decided to make the switch from Marmoset toolbag 3 to marmoset toolbag 4. This means that my whole lighting setup was altered and I had to re do it. However it gave me the opportunity to dabble in ray tracing lighting mixed with real time. Certain problems like the rocks being heavily illuminated were fixed, I also was able to create a different type of lighting setup. I also changed the opacity settings of the water. My new setup up highlights my model in a better and clear way in my opinion. I also did some minor scaling changes and rock placement changes.

3 notes
·
View notes
Text


Salut à tous ! Nouveau concept tiré de ma participation au concours Grand Space Opera Light Age : L'étoile écarlate !
Cette modélisation a été entièrement conçue avec Maya, ZBrush, Substance Painter et rendue sur Marmoset Toolbag 4 !
J'espère sincèrement qu'il vous plait ainsi que le reste de mon travail, n'hésitez surtout pas à me dire si vous voulez d'autres choses du genre ! :)
Merci infiniment d'être passé ! :)
-- -- --
Hi all ! Little concept from my participation to the challenge Grand Space Opera Light Age : The scarlet star !
This modeling as entirely made with Maya, ZBrush, Substance Painter and the rendering on Marmoset Toolbag 4 !
I hope you like it with the rest of my work, don't hesitate to tell me if you want more of this concept ! :)
Really thank you for watching ! :)
-- -- --
My ArtStation : https://www.artstation.com/jeremyfantou
My Twitter : https://twitter.com/FantouJeremy
My Instagram : https://www.instagram.com/jeremyfantou.3d/
#3dmodeling#3dartist#conceptart#digital3d#3d#props#gamedev#indiedev#artwork#texturing#maya#zbrush#substancepainter#marmoset#toolbag#spaceship#scifi#futuristic#gameartist
1 note
·
View note
Photo


-YEAR TWO-
WEEK 21-25
Specialist Pathway/ Personal Project
Progress
Autodesk Maya > Marmoset Toolbag > Substance Painter/ Designer > Unreal Engine 4
So i started off blocking out the main shape of the building of the diorama in Maya after researching the older buildings in Japan from the 80s or 90s and I found these shapes incredibly interesting, therefore I played around with the shapes of the different buildings I’ve found online and ended up with this building, with the little side building on the side that feels like an attachment to the original main building in the centre.
Later on I started playing around with the assets, including blockouts of assets bit by bit while i work on the composition in general. In the beginning I wanted to make a full turntable of the entire diorama, therefore I was planning to create assets all around the building however I realised that it was too ambitious for my current set of skills, so I decided to cut it down and focused on this side of the building as I decided it would be better for me now is to work on as much projects as I can to build up my portfolio.
After texturing my main building and other assets in Substance Painter, I placed them into Unreal Engine 4 to test out how they would look as a whole. I started off trying to go for a more stylised approached but it turned out more realistic as I imagined as I noticed myself go out of track while I was modelling so I decided to just go for it. After placing the assets into UE4, I placed them around to see which works better, and made a floor in Maya and created a material for it in Substance Designer. Placed some vines, flowers and pipes into it to make it look more alive, fixed some textures, played with the lighting and tadaa, I’m done!!!
4 notes
·
View notes
Text
Final Project Blog - Forefront of the Industry - Creating a Weathered Car in ZBrush, Blender & Substance 3D Painter

François Larrieu shared the workflow behind the Toyota FJ60 Offroad project, explained how the rust was made, and showed the rendering setup in Marmoset Toolbag 4.
This is another great article I found on 80.LV, go checck it out!
1 note
·
View note
Photo


“Sleeping Draught”
Yet another mini prop project derail but this time with a purpose. This prop project was based on an original design and concept illustration by 2D artist: Nastasia Makarova. To check out the original piece as well as the rest of Nastasia’s amazing portfolio, please follow her over on her Artstation:

For this mini project, I wanted to experiment with a new workflow----switching out my usual use of 3DCoat and Clip Studio Paint as my go-to combo for hand-painting and replacing both programs with none other than good ole Photoshop; if you can believe it.
Now I know what you might be thinking:
Squiggles, m’dear squiggle meister, using Photoshop for painting isn’t that big of a deal.
And you may be correct.
As a budding stylized 3D artist, I’ve more or less always known that Photoshop is a favourite among 3D hand-painters but what I’ve never realized was that you could actually paint directly on 3D models right inside of Photoshop.
For years, I’ve watched 3D hand-painters only paint their models using the flat 2D texture maps. But it wasn’t until I discovered this fantastic tutorial by fellow 3D artist: Jason Wang that I learnt that you could ALSO paint on your 3D models exactly like one would do in 3D texturing software such as Blender or 3DCoat all inside of Photoshop.

And you know what else? It actually works. IT ACTUALLY WORKS PRETTY FREAKING WELL! BETTER THAN EXPECTED! I mean…sure, Photoshop may not be as powerful as Blender or 3DCoat as a 3D texturing program but for hand-painting especially painting directly on 3D models with all the greatness that Photoshop has to offer (such as painting in Layers and using PS brushes, Text and Smudge Tool), I think it does exceptionally well and I am willing to vouch for it here as someone who used it successfully for this project here.
In case anyone is curious, I used Photoshop CC 2021 for this project. I created my base texture in Substance Painter (like I always do) before importing it to Photoshop along with the .obj file of my 3D model.
And I gotta say, I am absolutely in love with how this turned out. This is the most hand-painted any of my works has looked. Even better than the ones I made using 3DCoat. And for that; I am beyond satisfied since this is what I was going for. I want that graphical and painterly appeal that I use to capture in my digital art in my 3D work as well.
I definitely knew when I chose the design for this piece that I wanted to capture that same aesthetic that Nastasia so masterfully portrayed in her concept. And for what it’s worth, I think I nailed it! I mean…it’s not a one to one exact replica. But in terms of style and overall feel, I believe I achieved what I wanted to achieve from this small assignment. And for that, I’m most pleased.
Needless to say, I will most definitely be experimenting more with Photoshop for future 3D projects moving forward.
---
Tools Used: Maya 2020.4 | Substance Painter 2021 | Photoshop CC 2021 | Marmoset Toolbag 4
---
~SC (2022)
20 notes
·
View notes
Text

Low-poly 3D model of the C-More red dot sight.
The model was made in blender and textured in substance painter.
Marmoset toolbag 4 was used to render the turntable.
CGTrader:
https://www.cgtrader.com/products/barska-red-dot-sight
Sketchfab:
https://sketchfab.com/3d-models/barska-1x-red-dot-sight-05c0dbaf5e99405d942f452dddebd252
0 notes
Text
Marmoset tool bag

Marmoset ships Toolbag 4.0 - CG Channel.
Getting to Know Toolbag 3 | Ep. 6: Subsurface Scattering.
Alternative to Marmoset Toolbag? - polycount.
Marmoset Toolbag - FlippedNormals.
No student license for Marmoset Toolbag? — polycount.
Marmoset Toolbag 4 -- WOW! Substance Painter Has Competition.
How to Make a Turntable in Marmoset Toolbag - CGTrader.
Marmoset Toolbag Scene Importer in Code Plugins - UE Marketplace.
Library | Marmoset.
Intro to Writing Toolbag Plugins.
What Is Marmoset Toolbag Used For - XpCourse.
Change pivot Position.
Toolbag 3 Available Now! - Marmoset.
Marmoset ships Toolbag 4.0 - CG Channel.
Throughout this course we will be exploring all the tools inside of Marmoset Toolbag 4. We will be working with several cinematic and game ready assets as we learn the proper ways to setup and prepare our scenes in order to create amazing renders for your portfolio. In this course you will learn. Marmoset Interface. Lights and Composition. About Marmoset Toolbag. Toolbag provides everything needed to perfect the look, design, and presentation of your 3D assets. From previewing materials, baking texture sets ready for production, to assembling renders ready for showcasing to the world, Toolbag has a place in your workflow. Real-time physically-based rendering and image-based. · The Marmoset Toolbag ROP Houdini Digital Asset (HDA) is a new ROP that allows for rendering geometry and shaders from Houdini to the format, or to a frame range of images. This allows the user to quickly see geometry and shaders made in Houdini in a realtime PBR renderer. The tool features multiple parameters, allowing for a multitude of applications.
Getting to Know Toolbag 3 | Ep. 6: Subsurface Scattering.
HOW TO INSTALL MARMOSET TOOLBAG 4Hope You guys this is helpful for all.Click on link For Download setup for MARMOSET TOOLBAG 4.
Alternative to Marmoset Toolbag? - polycount.
A Toolbag subscription has the benefit of being version-independent. As long as you’re an active subscriber you’ll have access to the latest release of Marmoset Toolbag and all available Toolbag Library assets. As always, email support is included with all licensing models, trials too. Contact our support team any time. The entire Marmoset team is proud to announce the release of Marmoset Toolbag 4! The next generation of our real-time rendering suite introduces a robust int. With this attention to detail and user requests, Marmoset Toolbag 3 is a steal. Toolbag is a staple in my day-to-day workflow. I'd have given it a 5 rating if it weren't for some of the clunkiness in the baker UI. But with that speed, ease and long list of features, I'd heartily recommend it to anyone in need of a speedy and intuitive PBR.
Marmoset Toolbag - FlippedNormals.
The Toolbag Library Content at your Fingertips Curated Content For All Discover Toolbag's free asset library! This time-saving feature offers hundreds of Marmoset-made skies, materials, textures, and presets to assist in creating high-quality artwork and streamlining your workflow. 2. Duplicate the mesh chunks that you want the car paint shader on. 3. Set up a glossy material with additive specular. Add a displacement slot with a grey image and the smallest amount of displacement that pushes it past the base mesh. Works for carbon fiber clear coat type materials too. awesome man!:poly142::thumbup.
No student license for Marmoset Toolbag? — polycount.
Nov 2020 The entire Marmoset team is proud to announce the arrival of the next generation of our real-time rendering suite: Marmoset Toolbag 4! This much-anticipated release broadens Toolbag’s horizons once again into becoming a complete rendering and content creation tool for every 3D artist. We can’t wait for you to try it out.
Marmoset Toolbag 4 -- WOW! Substance Painter Has Competition.
Marmoset Toolbag is a full-featured, real-time rendering toolkit and look-dev suite bundled in an easy-to-use bundle. Put merely, the software program affords digital artists the power to see their 3D fashions in actual time. Editor Setup. First, download Visual Studio Code with the link below: Microsoft Visual Studio Code. Then, install the latest version of Python to your computer. Marmoset Toolbag is designed to run on Python 3.6 and above. Make sure to add Python to your environment variables in the advance options. Python Download.
How to Make a Turntable in Marmoset Toolbag - CGTrader.
Usually in Program Files > Marmoset Toolbag 2 > data > gui > viewport; Edit the watermark in Photoshop, make sure you create a _original just in case you make a mess of it or you want to return to what it used to be. The best way to make sure that you keep the formatting and dimensions right is to edit the original after you make a copy. They also added a cool feature - in Marmoset Toolbag 3, you had the rocket mode to work faster and then the full quality mode, but now you have an extra mode. You'll be able to work with draft quality which is equal to the rocket mode, use the raster mode which is like the good old renderer but with some new stuff to it, and the new star. Description. Our software library provides a free download of Marmoset Toolbag 4.0.2. This PC software can be installed on 64-bit versions of Windows XP/7/8/10. T or are the frequent file names to indicate the Marmoset Toolbag installer. The latest installer that can be downloaded is 141.3 MB in size.
Marmoset Toolbag Scene Importer in Code Plugins - UE Marketplace.
Marmoset Toolbag 4.04 (x64) File Size: 147.5 MB A full-featured 3D real-time rendering, animation, and baking suite, providing artists a powerful and efficient workflow for all stages of production. INTRODUCING TOOLBAG 4 The highly anticipated third version of Marmoset Toolbag is now available for Mac and Windows!. Marmoset toolbag coupon provides a comprehensive and comprehensive pathway for students to see progress after the end of each module. With a team of extremely dedicated and quality lecturers, marmoset toolbag coupon will not only be a place to share knowledge but also to help students get inspired to explore and discover many creative ideas from themselves.Clear and detailed training methods.
Library | Marmoset.
Marmoset has released Toolbag 4.0, the next major version of its real-time rendering toolkit, and the first full-point update to the software in almost four years.. The release adds a new GPU-accelerated ray tracing engine, GPU-accelerated texture baking, a new 3D texture painting system, and a more customisable UI with support for custom workspaces. Marmoset Toolbag 4 - Viewport Aspect Ratio Messed after Update Hi guys,I recently updated the 4.01 update for Marmoset Toolbag and ever since that update, the aspect ratio for the viewport/menus is also enlarged for some strange reason and the text seems slightl….
Intro to Writing Toolbag Plugins.
Marmoset Toolbag 4.04 (x64) | File Size: 147.5 MB A full-featured 3D real-time rendering, animation, and baking suite, providing artists a powerful and efficient workflow for all stages of production. Jan 20, 2017 Marmoset Toolbag is a full-featured, real-time rendering toolkit and look-dev suite bundled in an easy-to-use package. This straightforward and robust software offers digital artists the ability. Marmoset Toolbag™ is a powerful real-time material editor, renderer, and animation editor bundled in a tidy package. From pre. Marmoset Toolbag 4.02 Win x64. Title: Marmoset Toolbag 4.02 Win x64. Info: A full-featured 3D real-time rendering, animation, and baking suite, providing artists a powerful and efficient workflow for all stages of production. INTRODUCING TOOLBAG 3 The highly anticipated third version of Marmoset Toolbag is now available for Mac and Windows!.
What Is Marmoset Toolbag Used For - XpCourse.
Marmoset Toolbag 4.04 (4042) подробнее: Что нового в версии: Список изменений Процедура лечения: 1. Устанавливаем программу. 2. Проверяем, не запущена ли программа в фоновом режиме. 3. Marmoset Toolbag 2 is a focused rendering tool that enables you to create complicated scenes and lighting setups with tools for managing multiple assets and materials, while providing excellent image quality. If you're curious to see how it fits in your workflow,. Throughout this class we will be exploring all the tools inside of Marmoset Toolbag 4. We will be working with several cinematic and game ready assets as we learn the proper ways to setup and prepare our scenes in order to create amazing renders for your portfolio. In this class you will learn. Marmoset Interface.
Change pivot Position.
Program name: Marmoset Toolbag 4 Marmoset Toolbag is a real-time rendering toolkit. It can work seamlessly with other procedural-based software used by game and media developers, such as Quixel, Substance Painter, MARI, and 3D-Coat. Web page: Last update: 3/31/2021 5:43 AM UTC.
Toolbag 3 Available Now! - Marmoset.
Here I leave some HQ images of the renders that I will be uploading of the Material Library of latest Marmoset Toolbag 4 update! I hope you enjoy..
0 notes
Text
DD2000 Route to Industry Blog post 4
For my portfolio I’m going concentrate on making hard surface models. I want to get really into making 3D models look as good and immersive as possible. I want to show of my ability to make high poly bakes to normal maps using Zbrush and Substance. Which is a technique used in many companies throughout the industry. So it is an essential skill to master in order to make compelling detailed models, that aren’t as taxing on the system as pure geometry based detail on models.
I’ve had my work critiqued by some 3D modellers from Foundry 42, the team that made star citizen. Their advice to me on my Mech model was to add a greater sense of scale by using objects on my models that relate to human proportions. Things like handles and tools, things that the viewer can relate too. For my portfolio I’ve been told that poly counts are not important, there are no awards for the most frugal 3D artist. Joe mentioned that back grounds for my Mech model didn’t look so good in just black. He mentioned about making the back-ground relevant to the model you’re presenting. Such as making a warzone with smoke, blurred out to put the focus on the model. But still make it interesting to look at. I need to improve my rendering as well.
I’ve been getting into a rendering program called Marmoset Toolbag 3 and that has been producing much better lighting for my models than the built in software inside Substance Painter. It is also a program that’s used throughout the industry to show off professional looking models to employers, I’ve seen it being used many times on Artstation.com. So spending more time with the program to work out how to use it most efficiently would benefit me immensely. Another point that was raised in response to my Mech, the wear and tear of the Mech seems to be randomly spread throughout the model. This is because I used a Smart Mask supplied by Substance Painter, and didn’t go over it after. If I were to do it again I would use a Smart Mask in conjunction with using hand painting to make the mud, ware and tare more believable. I could build it up in areas that it would realistically settle, and brush it away in areas that it would be scraped off. Using reference pictures in regards to hand painting would also benefit me greatly. Getting first hand images of real world objects would help guide my decisions during the creative process.
Since I am aiming to be a Hard Surface Prop Artist/Vehicle Artist, I’ll be focusing my portfolio on making really well detailed Vehicles both from real life and Fictional. I’ll watch modelling tutorials specifically on techniques for hard surface models to gain valuable skills that I can apply to my own work. I also want to create my own PBR textures in Substance Designer and build my own library of material for use on later projects. Showing these materials in my portfolio will also be another feather in my cap to impress potential employers with. I’m not aiming to be a texture artist, so I would show the material in use with my models to give a deeper insight into its use.
As for 3D I also want to create a library of small modular 3D assets for use on various vehicles. There’s a number of Kit Bash’s made by 3D artist Tor Frick who has worked on games such as Fallout 4 and Wolfenstein. He uses a number of bolts, panels, vents and other machinery components interchangeably. This speeds up his work flow and makes his models look very cohesive and relevant within the world he’s been set. For me this would be very beneficial, and is something I should incorporate into the models I put into my portfolio.
As for subject matter, I would love to come up with my own designs for vehicles. I’m inspired by the world of diesel punk aesthetic of Crimson Skies. I feel I would do a good job of bringing the fantasy aircraft from these games to life. Bearing in mind the game came out over 15 years ago and the technology used for creating these models has improved dramatically. I would also like to include a very well-known real life Car into my portfolio, the Volkswagen Mark 1 Golf would be a prime example of a car I’d like to recreate. This would show that I could use references like photos and blueprints from real life, an essential skill in making vehicles.
I feel these models would interest companies like Slightly Mad Studios and Foundry 42 who are in the business of making compelling vehicles, if they were done to a high enough standard. I would have to show things like wireframe renders to show how my Topology worked, and show I was using my polycount effectively. I’d show my individual maps to convey that I had knowledge of how each texture map worked.
One of the most important lessons that I’ve learnt from talking Sean Barron was to not be worried about applying to studios that I’d consider to be way above my skill level. As he puts it ‘You have nothing to lose’. With this mentality I should send off my portfolio to many studios, regardless of the standard of work they produce. The most important thing to me would be to get a position in the industry, as being a 3D artist is one of the most common roles in a company. I’m confident that if I work hard at improving my skills over the next year I should be at a standard where I could obtain a job.
In companies such as Slightly Mad Studios, it is beneficial to have a passion for the subject matter as described in their job postings. In my cover letters I will provide with each portfolio, I will write about my passion for vehicles and machines. I’m hoping that this will show potential employers I’m a 3D artist because I love doing it. Hopefully this will prompt them to take a look at my portfolio and consider me for a position. It was mentioned in the talk done by Foundry 42 that cover letters do help a lot, and in order to get my dream job I need to make my chances of success as high as possible. It would be worth researching as much as I can about the company I’m applying for as possible in order to tailor my portfolio to them. This would be done by emailing current employees or reading interviews by members of team. This will hopefully show that I am committed to my profession.
0 notes
Text


Salut tout le monde ! Grande refonte d'une vieille modélisation stylisée : La cabane à outils !
Cette modélisation a été entièrement conçue avec Maya, ZBrush, Substance Painter et rendue sur Marmoset Toolbag 4 !
J'espère sincèrement qu'il vous plait ainsi que le reste de mon travail, n'hésitez surtout pas à me dire si vous voulez d'autres choses du genre ! :)
Merci infiniment d'être passé ! :)
-- -- --
Hi all ! Big rework of an old stylized modelisation : The tool shake !
This modeling as entirely made with Maya, ZBrush, Substance Painter and the rendering on Marmoset Toolbag 4 !
I hope you like it with the rest of my work, don't hesitate to tell me if you want more of this concept ! :)
Really thank you for watching ! :)
-- -- --
My ArtStation : https://www.artstation.com/jeremyfantou
My Twitter : https://twitter.com/FantouJeremy
My Instagram : https://www.instagram.com/jeremyfantou.3d/
#3dmodeling#3dartist#conceptart#digital3d#3d#props#stylized#stylizedartist#artwork#maya#zbrush#substancepainter#marmosettoolbag#stylizedart#hut#tree#stylizedtree
1 note
·
View note
Text
Unreal Engine 4
I explained in an earlier post (Marmoset Toolbag 3) in detail why I didn’t continue to use Unreal Engine 4. I did however try to practise using it over the summer break. I do admit that I don’t have anything to show for it which I’ll explain in abit. The following list is of links is to tutorials which I used to try to create simple scenes in the game engine.
https://www.youtube.com/watch?v=5om4EeY-fV0: This is a link to a playlist that contains a 42 part tutorial by TheSargKyle on creating a first person shooter game. I found myself loosing track alot of the time when in UE4 but I still watched a lot of the videos just in spare time to see how the program works.
https://www.youtube.com/watch?v=9PNcnF-2f0g: Part 4 of the tutorials by Joe Hudson shows how to implement particle effects in the UE4 when shooting a gun. This video includes how to create a detection system for bullet impacts. I found this video interesting considering that I wanted to include particle effects and destruction elements.
https://www.youtube.com/watch?v=KHGyVJ4LD6Q&list=PLZlv_N0_O1gb2ZoKzTApbv3LvhaXJ9elg&index=16: This is another playlist of tutorials except it focuses on the advanced rigging tools available between Maya and UE4 and how to get rigged models into it. This is where I was getting concerned the most about using this software. I don’t consider myself great at rigging and this is where I wished focused more on for my animation. There is nothing to say I can’t return to it thought and attempt to make more advanced rigs through tutorials like this.
Through these tutorials I did manage to create a controllable first person camera. I first imported a old hallway from my year 2 Kosmo animation. I then created a rectangular mesh beneath it. I then used UE4′s blueprinting system where I could make the rectangular mesh have collisions. The scene I was using already had artificial gravity applied. I then created a capsule shape with a camera attached that was blueprinted to move forward, backward, left and right when pressing the W,A,S,D keys, the camera would also move in the direction that you move the mouse. When this was set up I could press the play button which would make the capsule hit the collision mesh in the hallway. I could then walk around the scene and of course fall off the edges of my rectangle into infinity. As mentioned before I can’t show this as I lost the saved file around the end of summer when unreal engine updated causing it to crash the moment I launched it, I uninstalled the program forgetting to keep a back up of this scene. I didn’t reinstall UE4 after this as I was so busy over the end of summer.
I feel bad for not continuing on my original intentions to use UE4 but when I started tested in it I got the same feeling that my chat with the games art teacher and student gave me, that this was too much for me to do. Perhaps if I wasn’t so busy over summer and when coming back to uni I could have made a better start on this. Even so I do not think I would have been able to create something in UE4 with all the extra time put in that would have looked how I first imagined it. I would like to say that this post is here for me to come back to when I have more time and can perhaps achieve creating the simple game I originally intended to do.
0 notes
Photo


“Aroma Lamp”
This prop project is based on an original concept by Ruslana Gus; taken from Big Set of Lanterns. This is a companion piece to my last project---Medical Set.

As mentioned last time, Ruslana---also known as Rilun---is a talented 2D artist from Moscow, Russia. This is the second of Ruslana’s designs that she was kind enough to allow this squiggly 3D artist to transform into a stylized 3D model. If you would like to check out more of Ruslana’s amazing art, please check out her portfolio on Artstation.
It was a pleasure working on both of Ruslana’s designs. Between the two, this one is my personal favourite since it allowed me the opportunity to experiment with hand-painting more in 3DCoat as part of my workflow. More than that, I was also able to experiment with using 3D polygon planes to create the effects that you see in the final render---such as the falling flower petals and the fumes emitting from lamp.
Lately I’ve been more interested in playing around with 3D meshes to emulate 2D effects. In respect to Rilun’s art, I knew for a definite fact that I really wanted to capture as much of her concept as possible. This included all the additional final details she added to make the final art as beautiful as it is.
For what it’s worth, I hope I was able to do Ruslana’s art justice in the end. Hope you all like it!
---
Tools Used: Maya 2020.4 | Substance Painter 2021 | 3DCoat | Clip Studio Paint | Marmoset Toolbag 4
---
~SC (2022)
22 notes
·
View notes
Last Seen Blogs

ruvodugevix
Untitled
ruvodugevix
Untitled

cliclwns
pearl :]

kiriko55blog
Kiriko Diary

imnement
iMnement