#magento extensions upload
Explore tagged Tumblr posts
Visit Tumblr Blog
Explore Tumblr blogs with no restrictions, modern design and the best experience.
Last Seen Tumblr Blogs


Fun Fact
28.6 is the average number of monthly visits per US mobile user.
Text
How to add composer.json in magento2?.
Generally when upload custom extensions in magento marketplace then we need to take care some points before the upload extensions, firstly we have account profile where we can manage profile and create a vendor. The custom extension should be similar as vendor name. Here we are providing some points and sample format of the composer.json, Because custom extension validate from the composer.json.…
#composer.json file create when upload extension in magento 2#custom extensions upload#extensions upload#how to create composer.json#how to write composer.json in magento 2#magento extensions upload
0 notes
Text
Elevate Your Business with Expert E-commerce Website Development Services
E-commerce is no longer the future—it’s the present. With online shopping becoming second nature for millions worldwide, businesses must adapt to stay competitive. But creating a thriving e-commerce business takes more than uploading product images and adding a payment option. It demands a carefully crafted platform tailored to customer needs, brand identity, and technological advancements.
This is where an experienced e-commerce website development company like KSoft Technologies can help. We don’t just build websites; we craft experiences that turn casual browsers into loyal customers. In this blog, we’ll explore the importance of e-commerce websites, the role of a development company, and how partnering with KSoft Technologies can help your business thrive.
Why Every Business Needs an E-commerce Website
Let’s start with the basics. Why does your business need an e-commerce platform in the first place?
1. Reach a Global Audience
Your physical store may have geographical limitations, but an online store? The world is your marketplace. With a robust e-commerce website, you can reach customers across continents, breaking barriers like time zones and borders.
2. Operate 24/7
Unlike a traditional brick-and-mortar store, an e-commerce website doesn’t have operating hours. It’s open 24/7, allowing customers to shop anytime, from anywhere.
3. Cost-Effective Expansion
Expanding a physical store involves hefty expenses—rent, staff, utilities. An online store is a fraction of the cost and allows you to scale up without logistical hurdles.
4. Gain Valuable Insights
E-commerce websites are a treasure trove of data. From customer demographics to purchasing trends, analytics tools provide actionable insights to refine your marketing and sales strategies.
What Makes a Great E-commerce Website?
Creating a website is easy; creating an exceptional e-commerce website is not. Here are the must-have features that separate a mediocre website from a great one:
1. Intuitive Navigation
Shoppers shouldn’t need a map to find what they’re looking for. Clear menus, logical product categories, and search filters are non-negotiable.
2. High Performance and Speed
Studies show that a one-second delay in page load time can lead to a 7% drop in conversions. Speed matters, and we optimize every element of your site for peak performance.
3. Responsive E-commerce Website Design
More than half of online shopping happens on mobile devices. Our responsive e-commerce website design ensures your site looks and works beautifully across all devices.
4. Secure Payment Gateway Integration
From credit cards to digital wallets, customers expect secure and versatile payment options. We provide secure payment gateway integration for peace of mind.
5. Customizable Shopping Carts
The shopping cart is where conversions happen. Our customizable carts simplify adding items, applying coupons, and calculating taxes and shipping.
6. SEO-Friendly E-commerce Websites
Your website’s visibility on search engines directly impacts traffic and sales. We build SEO-friendly e-commerce websites with optimized code, meta tags, and fast loading speeds.
Why Work with KSoft Technologies?
Partnering with KSoft Technologies means working with a team that’s as passionate about your success as you are. Here’s what sets us apart:
1. Expertise Across Platforms
Whether you’re looking for Shopify development experts, WooCommerce website development, or Magento e-commerce solutions, we’ve got you covered. Our team has extensive experience with leading platforms.
2. Focus on Customization
Every business has unique needs, and we believe your website should reflect that. Our custom e-commerce solutions are tailored to your specific goals and industry requirements.
3. Scalability and Growth
Your e-commerce website should grow with your business. We build scalable platforms that adapt to increased traffic, product lines, and customer demands.
4. AI-Powered Personalization
We leverage AI to provide personalized shopping experiences, from tailored product recommendations to predictive search functionality.
5. Post-Launch Support
Our relationship doesn’t end at launch. We offer ongoing support and updates to keep your website running smoothly and securely.
Benefits of E-commerce Website Development
If you’re still wondering whether investing in an e-commerce website is worth it, let’s break down the benefits:
1. Increase Sales
A well-designed e-commerce platform makes it easier for customers to browse, buy, and return for more. From intuitive navigation to smooth checkout processes, every feature is geared toward boosting sales.
2. Lower Costs
Compared to traditional retail, an online store saves you money on overhead costs like rent, utilities, and staffing.
3. Build Brand Loyalty
By offering a seamless shopping experience, loyalty programs, and personalized recommendations, your website becomes a trusted destination for customers.
4. Expand Market Reach
With digital tools like social media integration and multi-vendor e-commerce platforms, you can reach more customers and explore new markets.
5. Gain Customer Insights
Analytics tools integrated into your website help you track customer behavior, identify trends, and make data-driven decisions.
Trends Shaping the Future of E-commerce
The e-commerce landscape is constantly evolving, and staying ahead means adopting emerging trends. Here’s what’s shaping the future:
1. Voice Commerce
With devices like Alexa and Google Home becoming household staples, voice search is transforming the way people shop. Optimizing your website for voice commerce ensures you stay relevant.
2. Augmented Reality (AR)
AR is revolutionizing online shopping by letting customers “try” products before they buy. From virtual fitting rooms to 3D product views, AR enhances the online shopping experience.
3. Blockchain Technology
Secure, transparent, and efficient—blockchain is changing the way payments and supply chains are managed in e-commerce.
4. Headless Commerce
This approach decouples the front-end and back-end of your website, giving you greater flexibility and faster load times.
5. Subscription-Based Models
From beauty boxes to meal kits, subscription models are gaining popularity. Adding a subscription option can create consistent revenue streams for your business.
Real-Life Success Stories: How KSoft Technologies Made a Difference
Case Study 1: A Fashion Retailer’s Makeover
A struggling fashion brand approached us with an outdated e-commerce platform that was driving customers away. We revamped their website with a responsive e-commerce design, faster loading times, and secure payment integration. The result? A 200% increase in sales within three months.
Case Study 2: Multi-Vendor Marketplace for Handmade Goods
An artisan collective needed a multi-vendor e-commerce platform to support their growing community of sellers. Our solution included customizable vendor dashboards, real-time inventory management, and integrated analytics. The platform became a go-to destination for handmade goods.
Case Study 3: Expanding a Local Grocery Store Online
A family-owned grocery store wanted to expand online but didn’t know where to start. We built an SEO-friendly website with advanced search filters, subscription options, and mobile optimization. Their monthly sales doubled within the first quarter.
2 notes
·
View notes
Text
SaivionIndia.com – What is Saivion India?

About Saivin India
Saivion India: Data Entry Outsourcing Services Company, is a renowned IT services and solutions provider established in 2013. With almost a decade of experience, we have actively contributed to and benefited from ongoing technological advancements. Our mission is to assist businesses in achieving their digital objectives by bridging the gap between their current position and desired success.
Our comprehensive range of services and solutions includes:
1. Data Entry Services & Management
Effective data entry practices are crucial for businesses that maintain organized and accurate records.
CRM Data Entry
Online data entry
Documents Data Entry
Company Documents Data Entry
Legal Documents Data Entry
2. Listing Services
Listing services are essential tools for businesses looking to expand their online presence and reach more customers.
Amazon Listing Services
Etsy Listing Services
eBay Listing Services
3. E-commerce Product Data Entry
Managing product data entry can be overwhelming, but our company can alleviate your workload by offering a range of services tailored to your needs.
Magento Product Data Entry
WooCommerce Store Product Data Entry
Shopify Product Upload Services
4. Photo Editing Services
At Saivion India, we offer comprehensive photo editing solutions to meet the diverse needs of our clients.
Background Removal Service
Ghost Mannequins Service
Furniture Photo Editing Services
Jewellery Photo Editing Services
Real Estate Photo Editing Service
Portrait Photo Retouching Services
5. Graphic Design Services At Saivion India, we offer professional graphic design services tailored to meet the specific needs of our clients.
Brochure Design Service
Flyer Design Service
Print Media Service
Saivion India: Data Entry Outsourcing Services Company guarantees the effectiveness of every campaign by leveraging a range of exclusive tools, including an extensive in-house B2B database, lead nurturing capabilities, and pipeline management features.
Our main office is situated at: 205, 2nd Floor, Classic Complex, Sector - 5, Rohini, Delhi-110085
Contact info:
Phone No.: +919311759707
Telephone No.: +91-11-43013724
General Inquiries:
0 notes
Text
Enhance Your Store Management with Magento Administration Extensions by ECA Code
Managing an online store can be complex, but with the right tools, it becomes streamlined and efficient. Magento Administration Extensions from ECA Code are designed to empower eCommerce business owners with robust features to enhance backend management, optimize workflows, and improve overall productivity.
Magento is one of the most flexible and scalable eCommerce platforms in the world. However, its default admin interface may lack certain functionalities needed for growing businesses. That’s where ECA Code’s custom Magento Administration Extensions come into play. These tools are developed to simplify and automate essential store operations like order processing, customer management, product updates, and analytics.
With our Magento admin extensions, you can easily track sales, manage bulk product uploads, automate tax rules, customize admin grids, and even control user access with advanced permission settings. This leads to faster operations, fewer errors, and better decision-making based on accurate data.
Our solutions are not just plug-and-play. At ECA Code, we offer tailored extensions based on your specific business needs. Whether you run a small business or a large-scale enterprise, our modules help you gain full control over your Magento backend with minimal technical knowledge.
Key benefits of using ECA Code’s Magento Administration Extensions include:
Streamlined order and inventory management
Improved backend user interface
Role-based access controls
Advanced reporting and analytics
Seamless integration with other Magento plugins
In the fast-moving world of eCommerce, time is money. ECA Code’s Magento Administration Extensions help you save both by making store management more intuitive and efficient. Explore our collection today and discover how you can take your Magento store’s backend performance to the next level. Let ECA Code simplify your eCommerce journey with smart admin tools built for success.
0 notes
Text
Drive Digital Sales with Expert E-commerce Website Development
In today’s digital economy, a robust and user-friendly e-commerce platform is essential for any business aiming to succeed online. With the growing demand for online shopping and digital services, the need for a reliable ecommerce development company in India has never been greater. From startups to large enterprises, everyone seeks a partner that can translate their business goals into powerful, scalable online platforms. That’s why choosing the best ecommerce development company in India is crucial—it ensures your website performs seamlessly and stands out in a crowded market.
An experienced e commerce website development company in India understands how to create online stores that are visually appealing, easy to navigate, and conversion-focused. With growing regional demand, localized solutions such as Magento ecommerce website development in Kerala and Magento ecommerce website development in Kochi are on the rise. These services cater to businesses looking for flexible, scalable, and secure platforms, especially those preferring Magento for its customization and feature-rich capabilities. Whether you're a local seller or an expanding brand, working with the right development partner helps you stay competitive and agile in the ever-evolving e-commerce landscape.
The Foundation of a Successful Online Store
Building a successful e-commerce website goes far beyond uploading products and setting up payment gateways. It requires deep understanding of user behavior, responsive design, SEO integration, and secure infrastructure. A good development company brings together UI/UX designers, developers, and digital marketers to build a cohesive platform that not only functions well but also aligns with your brand identity. When you work with an experienced e commerce website development company in India, you gain access to a team that knows how to balance creativity with performance.
Why Magento Is a Preferred Platform
Magento is one of the most powerful platforms for e-commerce development due to its scalability, flexibility, and extensive feature set. Many businesses in India are turning to Magento ecommerce website development in Kerala and Magento ecommerce website development in Kochi to create personalized and high-performance shopping experiences. Whether you’re managing thousands of products or dealing with complex payment and shipping integrations, Magento provides the tools you need to manage it all effectively. A skilled development team ensures that Magento’s full capabilities are harnessed to meet your specific business needs.
Choosing the Right Development Partner
Selecting the right partner for your e-commerce project can define the success or failure of your digital venture. The best ecommerce development company in India will offer not just technical expertise, but also strategic insights to help you grow. From understanding your customer journey to optimizing your site for speed and SEO, a good development company is your digital growth partner. Especially for businesses in competitive markets, choosing a localized team familiar with platforms like Magento can make all the difference.
Conclusion: Build Your Online Future Today
In the fast-paced world of online commerce, your website is your most valuable asset. Collaborating with a professional ecommerce development company in India ensures your platform is secure, scalable, and customer-centric. Whether you're just starting out or expanding your reach, the best ecommerce development company in India can help turn your vision into a powerful online store. Partnering with an experienced e commerce website development company in India, or seeking specialized services like Magento ecommerce website development in Kerala or Magento ecommerce website development in Kochi, gives your brand the foundation it needs to succeed online. Now is the time to invest in expert development and watch your e-commerce business thrive.
0 notes
Text
How to Integrate a Gift Wrap Magento Extension Seamlessly


To integrate a gift wrap Magento extension seamlessly, start by choosing one that's compatible with your version and has positive reviews. Download the extension and upload it to your server, making sure to back up your store first. Configure the gift wrap options to align with your brand, ensuring ease of access during checkout. Enhance your Magento store with the Magento Gift Wrap Option for better customer experience. Finally, test the functionality across devices. Keep exploring how to optimize this feature for an even better customer experience.
Understanding the Benefits of a Gift Wrap Extension
When it comes to enhancing your e-commerce store, a gift wrap extension can be a game-changer. It not only adds a personal touch to your products but also boosts customer satisfaction. Shoppers appreciate the convenience of having their purchases beautifully wrapped, especially for special occasions. This feature can encourage repeat purchases and attract new customers seeking a seamless gift-giving experience.
Moreover, offering gift wrap options can elevate your brand’s image, making it feel more thoughtful and customer-focused. With the added layer of safety, you’ll reassure customers that their gifts will arrive ready to impress.
Choosing the Right Gift Wrap Extension for Your Store
With the benefits of a gift wrap extension clear, selecting the right one for your store becomes a priority.
Start by considering compatibility with your Magento version; you want a seamless integration https://web30design772.wordpress.com/2025/05/13/magento-gift-wrap-options-with-free-shipping-thresholds/ that won’t compromise your store’s functionality. Next, evaluate user reviews and ratings to gauge reliability and performance.
Look for features that enhance customer experience, like customizable wrapping options and clear pricing. Security is also crucial; ensure the extension follows best practices to safeguard customer data.
Finally, check for responsive customer support; you'll want assistance if any issues arise. By focusing on these aspects, you can confidently choose a gift wrap extension that not only meets your needs but also enhances your customers' shopping experience.
Installing the Gift Wrap Extension in Magento
To successfully install the gift wrap extension in Magento, you’ll first need to ensure that you have the necessary permissions and access to your store's backend.
Begin by downloading the extension from a trusted source, ensuring it’s compatible with your Magento version.
Next, upload the extension files to your server, preferably in a staging environment to minimize risks.
Once uploaded, clear the cache and refresh your indexers to integrate the extension smoothly.
After that, run the necessary installation scripts via SSH or through your Magento admin panel.
Always back up your store before making any changes to safeguard against potential issues.
Finally, check your store’s functionality to confirm everything is working as expected before going live.
Configuring the Gift Wrap Options
As you dive into configuring
1 note
·
View note
Text
CMS Website Design: Building Flexible, Scalable, and Stunning Websites in 2025

In today’s digital-first world, having a dynamic, professional, and easily manageable website is no longer optional — it’s essential. Whether you're running a personal blog, an e-commerce store, or a corporate website, a CMS (Content Management System) website design offers unmatched flexibility, scalability, and control.
With platforms like WordPress, Joomla, Drupal, and Magento, CMS website design empowers both developers and non-tech-savvy users to build visually stunning and content-rich websites without needing to code everything from scratch.
This comprehensive guide from diglip7.com will walk you through everything you need to know about CMS website design, including its benefits, platforms, features, real-world examples, reviews, and frequently asked questions.
What is CMS Website Design?
CMS website design refers to building and managing a website using a Content Management System — a software that enables users to create, edit, publish, and manage digital content with ease.
Instead of manually coding every page, a CMS offers:
A user-friendly interface
Pre-built templates and themes
Drag-and-drop editing
Modular content blocks
Plugin/add-on support
Popular CMS platforms include:
WordPress (most widely used)
Drupal (enterprise-level)
Joomla (versatile)
Magento (e-commerce)
Ghost (for bloggers)
Why Choose CMS Website Design in 2025?
Here’s why businesses, bloggers, and entrepreneurs are choosing CMS platforms:
✅ Ease of Use
No coding knowledge? No problem. With intuitive dashboards and drag-and-drop builders, anyone can manage a CMS website.
✅ Cost-Efficient
No need for full-time developers. Install, customize, and manage without breaking the bank.
✅ Design Flexibility
Thousands of free and premium themes/templates to choose from — customize them to reflect your brand identity.
✅ SEO Friendly
CMS platforms like WordPress offer SEO plugins (Yoast, RankMath) that help you rank higher on search engines.
✅ Mobile Optimization
Most CMS themes are responsive out-of-the-box, ensuring your site looks great on all devices.
✅ Security & Updates
CMS platforms provide regular updates, security patches, and plugins to protect your site from threats.
Top CMS Platforms for Website Design in 2025
Let’s break down the best platforms for CMS website design today:
1. WordPress
Best for: Blogs, portfolios, business sites, e-commerce
Market share: Powers over 43% of all websites globally
Pros: Massive plugin library, user-friendly, huge community
Cons: Requires plugins for advanced features
2. Drupal
Best for: Complex websites with high security needs
Pros: Robust architecture, great for large institutions
Cons: Steeper learning curve
3. Joomla
Best for: Portals, intranets, community websites
Pros: Advanced user management, multi-language support
Cons: Not as beginner-friendly as WordPress
4. Magento (Adobe Commerce Open Source)
Best for: E-commerce businesses
Pros: Scalable, customizable, strong inventory management
Cons: Requires technical know-how
5. Ghost
Best for: Writers, bloggers, digital publications
Pros: Clean UI, focused on speed and performance
Cons: Limited to publishing; not suitable for multi-purpose sites
Key Features of a CMS Website Design
When you choose CMS for your website, here’s what you can expect:
📌 Theme and Template Customization
Choose from thousands of themes or design your own layout. Modify headers, footers, colors, fonts, and more.
📌 Content Creation Tools
Easily create blog posts, product pages, landing pages with WYSIWYG editors and block builders.
📌 Media Management
Upload images, videos, and documents in bulk with organized media libraries.
📌 SEO Tools
Edit meta titles, descriptions, add schema markup, and monitor keyword rankings.
📌 Plugins and Extensions
Add extra features like contact forms, sliders, booking systems, payment gateways.
📌 User Roles and Access
Manage different user roles (admin, editor, contributor) for secure team collaboration.
Step-by-Step Guide to CMS Website Design
1. Define Your Website Goals
What’s the purpose of your site? E-commerce? Portfolio? Blog?
2. Choose a CMS Platform
Select a CMS based on your goals, team expertise, and scalability needs.
3. Purchase Hosting & Domain
Use reliable hosting like Bluehost, SiteGround, or WP Engine. Secure your domain name too.
4. Install CMS
Most web hosts offer one-click CMS installations (especially for WordPress).
5. Select and Install Theme
Pick a responsive theme that aligns with your brand image.
6. Install Plugins
Add plugins for contact forms, SEO, performance, backups, etc.
7. Create Core Pages
Add About Us, Services, Contact, Blog, Privacy Policy, etc.
8. Optimize for SEO
Use SEO tools to configure slugs, headings, alt text, internal links, and speed.
9. Test Across Devices
Ensure your website works well on mobile, tablet, and desktop screens.
10. Launch and Maintain
Go live and update regularly with new content, features, and backups.
Real-Life CMS Website Design Examples
✍️ Blog Website for a Wellness Coach
Built using WordPress + Elementor, featuring client testimonials, articles, and an appointment booking system.
🛍️ E-commerce Store for Handmade Jewelry
Created with Magento CMS, includes custom filters, product zoom, and secure payment integration.
🏫 Educational Portal for Online Courses
Powered by Joomla, offers multi-language support, student dashboards, and certification.
📰 News Platform Using Drupal
Used by a regional media house with advanced categorization, author bios, and editorial workflow.
🌟 CMS Website Design: Reviews from Real Users
“Designing my website with WordPress was smooth and intuitive. With help from Diglip7.com, I had a professional-looking blog up in a week!” – Rina M., Lifestyle Blogger
“We saved thousands of dollars by switching to a CMS-based website. The freedom to update pages ourselves is a game-changer.” – Sahil K., Startup Founder
“Drupal allowed us to build a secure, content-rich portal for our students. The Diglip7 team made the transition seamless.” – Professor Ahuja, Online Education Platform
💬 Frequently Asked Questions (FAQs)
❓ What is a CMS in website design?
A CMS (Content Management System) helps you create and manage digital content on your website without needing to code everything manually.
❓ Do I need coding skills to design a website with CMS?
No. Most CMS platforms offer drag-and-drop builders. However, knowledge of HTML/CSS is helpful for advanced customizations.
❓ Which CMS is best for beginners?
WordPress is the most beginner-friendly CMS, with tons of tutorials, themes, and plugins.
❓ Is CMS website design good for SEO?
Absolutely. With proper plugins, optimized structure, and fast loading speeds, CMS websites perform exceptionally well on search engines.
❓ Can I design an e-commerce website with a CMS?
Yes. CMS platforms like Magento or WordPress (with WooCommerce) are ideal for building full-fledged e-commerce websites.
❓ How much does CMS website design cost?
Basic designs can be done for free (DIY), while professional CMS designs range from $500 to $5000+ depending on complexity.
❓ Can Diglip7.com help me with CMS website design?
Yes! We specialize in CMS development and can create tailored websites for blogs, businesses, and online stores.
🔧 Diglip7.com: Your CMS Design Partner
At Diglip7.com, we offer:
CMS consultation and strategy
Custom WordPress, Drupal, and Joomla design
Theme development and customization
SEO optimization
Security and performance audits
CMS migration services
We’ve helped dozens of clients go from idea to execution, creating high-performance CMS websites tailored to their business needs.
0 notes
Text
Steps to Configure Shop by Brand in Magento 2?
Improving your Magento 2 store with the “Shop by Brand” feature can contribute greatly to improving customer experience, increasing brand awareness, and boosting conversions. Shop by Brand helps buyers to easily navigate and shop through their favorite brands. Here's a straightforward guide to setting up Shop by Brand in Magento 2.
1. Install a Reliable Shop by Brand Extension
Start by selecting and deploying a reliable “shop by brand” module compatible with Magento 2. Start with a reliable shop by brand module like Mageleven. Shop by brand modules make configuration easy and have additional capabilities that work in buyers’ favor when searching for brands.
2. Configure General Settings
After installation, configure the extension to align with your store's requirements:
Enable the Extension: from the admin panel of Magento, navigate to Stores > Configuration.
Select Brand Attribute: Choose the attribute that represents brands in your product catalog.
Set URL Key: Define a user-friendly URL key for brand pages, such as "brand" or "shop-by-brand".
Assign CMS Page: Select or create a CMS page to serve as the "All Brands" listing.
3. Create and Assign Brand Attributes
Organize your products by assigning them to their respective brands:
Navigate to Product Attributes: Go to Stores > Attributes > Product.
Create or Edit Brand Attribute: If a brand attribute doesn't exist, create one. Set the input type to "Dropdown" or "Visual Swatch" for better user experience.
Enable in Layered Navigation: This allows customers to filter products by brand on category pages.
Add Brand Details: Input brand names and upload corresponding logos.

4. Design Brand Pages
Create dedicated pages for each brand to showcase their products:
All Brands Page: Develop a comprehensive page listing all available brands, possibly organized alphabetically or by popularity.
Individual Brand Pages: For each brand, create a page featuring its logo, description, and product listings.
5. Enhance Navigation with Brand Filters
Improve product discoverability by adding brand filters:
Layered Navigation: Integrate brand filters into your store's layered navigation, allowing customers to refine product searches by brand.
Menu Links: Add direct links to popular brands in your main menu or sidebar for quick access.
6. Optimize Brand Pages for SEO
Ensure your brand pages are search-engine friendly:
Unique Meta Titles and Descriptions: Craft distinct meta titles and descriptions for each brand page.
SEO-Friendly URLs: Use clean and descriptive URLs for brand pages.
Rich Content: Include detailed brand descriptions, images, and other relevant content to improve search rankings.
7. Regularly Update and Manage Brands
Keep your brand offerings current:
Add New Brands: As you partner with new brands, promptly add them to your store.
Update Brand Information: Regularly review and update brand logos, descriptions, and product associations.
Monitor Performance: Use analytics to track the performance of brand pages and make data-driven improvements.
By implementing these, your "Shop by Brand" can have a perfect one in your Magento 2 store, driving sales and pleasing your customers.
For a detailed blog, visit:
https://mageleven.com/blog/post/how-to-setup-shop-by-brand-in-magento-2.html
1 note
·
View note
Text
Magento 2 Failed: Installation & Varnish Test and MFTF Adobe Commerce Supplied
Usually When summit custom extension it through error: Failed Technical Review and Marketing Review So we go through the composer.json that is actual issue for that. So before the upload the custom extensions. So before the upload extensions please go through the step to check composer.json. Please follow the below step. Review composer.json “require”. Module name should be match as per vendor…
#custom extensions upload in marketplace#failed MFTF adobe commerce Supplied#failed test installation & Varnish in magento#getting error when upload the extensions in marketplace
0 notes
Text
Magento 2 Co-Branding Extension: Unlock the Power of Personalized Products

In today's competitive eCommerce environment, co-branding has emerged as a crucial strategy for B2B merchants aiming to boost brand visibility. Recognizing this, we've developed a custom Magento 2 co-branding extension that enables businesses to seamlessly incorporate their brand logos onto a variety of products.
For businesses looking to leverage the full potential of co-branding, partnering with a skilled provider of Magento Development Services can make all the difference. By customizing your Magento store to integrate advanced features like the co-branding extension, you can create a more engaging and personalized shopping experience for your customers, ultimately driving sales and strengthening your brand presence.
Understanding Co-Branding and Its Importance for B2B Merchants
Co-branding involves a partnership between two or more brands to create a product or service that embodies the identities and values of all parties involved. In a B2B context, this strategy allows businesses to offer personalized products by embedding their brand elements into existing merchandise.
Benefits for B2B Merchants:
Expanded Product Range: Co-branding enables merchants to diversify their offerings, attracting new customers and creating additional sales opportunities.
Strengthened Business Relationships: Collaborative efforts foster closer ties between businesses, leading to enduring partnerships and shared marketing initiatives.
Enhanced Brand Visibility: Co-branding increases brand exposure and builds buyer trust.
Market Differentiation: Providing co-branding options helps merchants stand out, appealing to businesses seeking customized solutions.
Development of the Magento 2 Co-Branding Extension
Our skilled Magento development team recently delivered a custom extension for a leading wholesale clothing brand in the United States. We focused on creating a user-friendly and intuitive extension, ensuring ease of use for both our client and their customers.
If you're looking to implement similar custom solutions for your eCommerce store, hire Magento developers who specialize in delivering tailored features and exceptional performance. With the right team, you can enhance your online store’s functionality and create a seamless experience that meets the unique needs of your business and customers.
Leveraging Magento 2's capabilities, we built a robust extension that integrates seamlessly with our client's online store.
Key Features of the Magento 2 Co-Branding Extension
Multiple Product Category Options: Users can easily select from various apparel categories, such as t-shirts, jackets, or dresses.
Product Selection for Co-Branding: The extension allows users to choose any apparel item for co-branding, offering flexibility to meet diverse preferences and business needs.
Custom Logo Upload: Users can upload their custom logos, infusing their brand's unique identity into selected products.
Logo Positioning: The extension enables users to set their logo's position according to specific requirements, ensuring alignment with design preferences and branding strategies.
Logo Color Customization: Users can adjust their logo's color to harmonize with the chosen product, ensuring consistent and aesthetically pleasing brand representation.
Live Preview of Printed Logo: A live preview feature allows users to see how their customized logo will appear on the selected product in real-time, providing clarity before finalizing their selection.
Challenges Encountered During Development
Developing the Magento 2 co-branding extension presented several challenges:
Integration Complexity: Ensuring compatibility with Magento 2's diverse ecosystem of themes and customizations required meticulous attention.
Performance Optimization: Delivering a responsive and quick-loading experience, especially during live previews involving high-resolution images, was a top priority.
Customization Flexibility: Balancing user-friendliness with in-depth customization options was essential to cater to users with varying technical expertise.
Advantages for Businesses
This custom-developed Magento 2 extension offers numerous benefits:
Revenue Generation: It enables businesses to expand their offerings with personalized co-branded products, opening new revenue streams as customers seek unique, customized merchandise.
Improved Partnerships: The extension simplifies collaboration with other brands, facilitating the creation of co-branded products and strengthening partnerships with suppliers or manufacturers.
Enhanced Customer Experience: By offering customization options and a live preview feature, the extension enriches the shopping experience, leading to higher customer satisfaction and fostering brand loyalty.
Conclusion
The Magento 2 co-branding extension represents a significant advancement for B2B merchants seeking to thrive in the eCommerce landscape by offering personalized, co-branded products and building strong partnerships. With our extensive expertise in crafting tailor-made Magento extensions, we are well-equipped to assist you in optimizing your Magento store. If you have a similar concept in mind or require custom functionalities for your store, we are here to provide solutions.
0 notes
Text
How to Choose the Best Magento Development Team

When it comes to setting up an online store, the choice of platform is crucial to the success of your business. Magento, a robust and flexible e-commerce platform, is one of the most popular choices for businesses looking to create an exceptional online shopping experience. However, choosing the best Magento development team is equally important to ensure the seamless execution of your Magento project. Whether you need Magento Product Upload Services or require a custom solution for your e-commerce website, selecting the right team can make all the difference.
In this blog, we will guide you through the essential steps for choosing the best Magento development team to ensure your project is a success.
1. Evaluate Their Expertise and Experience
One of the first things to consider when choosing a Magento development team is their expertise and experience. Magento is a complex platform, and building a successful online store requires in-depth knowledge of its features, extensions, and customization options. A professional Magento development service should have a proven track record of delivering successful e-commerce projects.
Look for a team with experience in developing both simple and complex Magento websites. Check their portfolio and ask for case studies or examples of their previous work. If you need specialized services, such as Magento Product Upload Services, ensure that they have experience with those specific tasks as well.
Qdexi Technology, for instance, is known for its expertise in Magento development. They offer a range of services including Magento product upload services and custom Magento development, ensuring your e-commerce store is optimized for performance and scalability.
2. Check for Magento Certification
Magento offers a certification program to validate the skills and knowledge of developers. Certified Magento developers have undergone rigorous testing to prove their expertise in working with the platform. When choosing a Magento development team, it is essential to look for certified Magento developers who are familiar with the latest Magento features and updates.
Certified developers not only have a deep understanding of Magento but also follow best practices for coding and project management. This ensures that the project is completed on time, within budget, and with the highest quality standards.
3. Consider the Team's Communication and Support
Communication is key to the success of any development project. When you work with a Magento development team, you need a team that listens to your needs and understands your business goals. They should be able to communicate effectively and be responsive to any questions or concerns you may have.
Check how the team communicates with clients during the development process. Do they provide regular updates? Are they easy to reach when you need assistance? A team that values communication and provides excellent customer support will ensure a smooth project flow.
Qdexi Technology, for example, is known for its excellent communication channels with clients. Their team provides regular progress updates and is always available for support, ensuring a hassle-free development experience.
4. Understand Their Approach to Customization
Every business is unique, and your e-commerce store should reflect your brand's identity. A good Magento development team will understand the importance of customization and work with you to create a website that is tailored to your needs.
Whether you need custom features, integrations with third-party tools, or a specific design, the development team should be capable of implementing these features seamlessly. It's essential to ask the team about their approach to customization and how they handle complex requirements.
Moreover, if you are looking for services such as Magento Product Upload Services, a good team will be able to provide tailored solutions that fit your inventory needs and help automate product uploads efficiently.
5. Evaluate Their Understanding of SEO and User Experience
A great Magento development team should not only focus on the technical aspects of your website but also understand the importance of search engine optimization (SEO) and user experience (UX). The design and functionality of your e-commerce website should be optimized for both search engines and users.
Ask the development team about their SEO strategies and how they ensure that your site ranks well on search engines. Additionally, they should be able to build a user-friendly interface that provides a seamless shopping experience, encouraging visitors to make a purchase.
6. Review Their Post-Launch Support and Maintenance
The development process does not end once your Magento store is live. Ongoing support and maintenance are essential to ensure your site remains secure, functional, and up to date with the latest Magento updates.
A reputable Magento development service will offer post-launch support, including troubleshooting, bug fixes, and updates. This is particularly important as new versions of Magento are released and security patches are made available. Ensure that the team you choose offers reliable support and can assist you with any future updates or changes to your store.
7. Discuss Pricing and Project Timeline
Cost is always an important consideration when choosing a Magento development team. However, while it’s tempting to opt for the cheapest option, it’s essential to balance cost with quality. A highly skilled team may charge a premium, but their expertise will save you time and money in the long run by delivering a high-quality product.
Be transparent with the team about your budget and timeline, and make sure they can deliver on both. A well-defined project timeline and clear pricing structure will ensure that the project runs smoothly without any surprises.
Conclusion
Choosing the best Magento development team requires careful consideration of their expertise, experience, communication skills, and ability to meet your business needs. With the right team, you can ensure that your Magento store is not only functional and visually appealing but also optimized for SEO, user experience, and scalability.
Qdexi Technology stands out as a reliable Magento development service provider. Whether you need Magento Product Upload Services or a custom Magento solution, their team of certified experts can help you create a successful online store that meets your business goals.
0 notes
Text
Understanding Content Management Systems (CMS): WordPress, Joomla, and More

A Content Management System (CMS) is a powerful tool that simplifies creating, managing, and optimizing digital content. Whether you're a small business or a large enterprise, choosing the right CMS is vital for an effective online presence. This blog explores popular CMS options like WordPress, Joomla, and others while offering insights for businesses looking for web development services in Bhubaneswar.
What is a Content Management System?
A CMS is a software application that allows users to manage website content without requiring extensive technical skills. It enables individuals to upload, edit, and organize content efficiently. These systems are widely used because they streamline website management, saving time and effort for businesses.
Popular CMS Platforms
Several CMS platforms dominate the market, each offering unique features tailored to different needs:
1. WordPress
Overview: WordPress powers over 40% of all websites globally, making it the most popular CMS. Its user-friendly interface and extensive plugin library make it a favorite for both beginners and experts.
Best for: Blogs, small business websites, and even e-commerce platforms.
Key Features:
Customizable themes
SEO-friendly tools
Vast plugin options
2. Joomla
Overview: Joomla is a flexible CMS suitable for websites requiring more customization than WordPress offers. It strikes a balance between user-friendliness and advanced functionality.
Best for: Medium to large businesses and e-commerce sites.
Key Features:
Multi-language support
Extensive developer community
Strong security features
3. Drupal
Overview: Known for its advanced customization capabilities, Drupal is often chosen for complex websites. While it has a steeper learning curve, its flexibility makes it worth considering.
Best for: Large-scale and enterprise-level websites.
Key Features:
Advanced user management
Scalability
High-level security
4. Other CMS Options
Shopify: Ideal for e-commerce sites.
Squarespace: Great for visually appealing websites.
Magento: Tailored for large online stores.
How to Choose the Right CMS?
Selecting a CMS depends on various factors, including:
Business Goals: Identify your primary objective—whether it’s blogging, selling products, or showcasing a portfolio.
Ease of Use: Ensure the platform aligns with your technical expertise.
Customization Needs: Evaluate the flexibility of themes and plugins.
Scalability: Choose a CMS that can grow with your business.
Support and Security: Opt for platforms with reliable support and robust security features.
Why Businesses in Bhubaneswar Need the Right CMS
For businesses in Bhubaneswar, having an efficient CMS is essential for maintaining a competitive edge in the digital space. The right platform can streamline content updates, improve website performance, and enhance user experience. If you're seeking web development services in Bhubaneswar, a professional team can guide you in selecting and implementing the ideal CMS for your needs.
Benefits of Using a CMS
Ease of Use: Manage your website effortlessly with minimal technical skills.
Cost-Effective: Save on hiring developers for minor changes.
SEO-Friendly: Most CMS platforms come with built-in tools for search engine optimization.
Scalability: Easily add features or pages as your business grows.
Accessibility: Update your site from anywhere with an internet connection.
Conclusion
Content Management Systems like WordPress and Joomla empower businesses to create and manage websites efficiently. Each platform has its strengths, and the choice should align with your business goals. If you're unsure where to start, partnering with experts in web development services in Bhubaneswar can ensure you get a CMS that fits your requirements perfectly.
For seamless website development and CMS integration, contact Dzinepixel Webstudios today!
0 notes
Text
Magento 2 WebP Images Support extension allows to upload & display images in the next-gen WebP format. Level up your store performance by uploading WebP images for making the webpages load faster on desktop & mobile devices.
Host WebP images for optimized page loading speed.
Use WebP images for products, categories, CMS pages & static blocks.
Compatible with all web browsers.
0 notes
Text
Best Wholesale eCommerce platform
The emergence of eCommerce has changed how companies function, particularly in the wholesale industry. Platforms for wholesale eCommerce give companies the resources they need to sell goods in large quantities to retailers or other companies. In this cutthroat business, selecting the appropriate platform is crucial to success. These are a few of the top wholesale eCommerce platforms on the market right now.

Shopify Plus Shopify Plus is a high-volume merchant-focused enterprise-level solution. Setting up a wholesale business is made simple by this platform's user-friendly interface and assortment of configurable themes. Shopify Plus facilitates a variety of sales channels, such as social media, in-person, and online. It is a popular option for wholesalers due to its strong capabilities, which include third-party app integrations, automated workflows, and sophisticated reporting. Additionally, Shopify's wealth of information and assistance aids companies in efficiently scaling their operations.
BigCommerce Another well-known eCommerce platform that serves wholesalers with a wealth of integrated capabilities is BigCommerce. It enables companies to build bespoke online storefronts without requiring a deep understanding of coding. BigCommerce provides features for SEO optimization, several payment channels, and strong inventory management. It is perfect for wholesalers because of its capacity to manage large product counts and intricate catalogs. BigCommerce also offers great B2B eCommerce support, with features like pricing tiers and customer segmentation.
WooCommerce With the help of the adaptable and configurable WordPress plugin WooCommerce, companies can turn their websites into fully working online stores. WooCommerce provides wholesalers with a number of add-ons and extensions that improve features like customer accounts, inventory control, and bulk pricing. Because it is open-source, it can be greatly customized, which makes it a fantastic choice for companies with particular requirements. Additionally, a strong content management system is made possible by WooCommerce's interface with WordPress, which makes managing both products and content simple.
Magento Commerce An enterprise-level eCommerce platform with a wealth of capabilities for wholesale companies is Magento Commerce. Magento is well-known for being scalable, making it appropriate for companies of all sizes. Additionally, Magento allows businesses to manage several brands or product lines from a single interface by supporting multiple storefronts. It may need more technical know-how to set up, but its features and adaptability make it a strong option for wholesale eCommerce.
WooCommerce Wholesale Suite A WooCommerce addon specifically designed for wholesale operations is called Wholesale Suite. It offers resources for inventory control, bulk pricing, and wholesale customer management. With features like unique pricing, order minimums, and simple account management, Wholesale Suite enables companies to provide a flawless experience for their wholesale clients. Because of its commitment to wholesale, it's a great choice for companies who already use WooCommerce.
The Odoo Odoo is an all-in-one business administration platform that includes a comprehensive eCommerce module. Odoo's eCommerce platform is flexible and integrates seamlessly with its other business software, such as inventory management, accounting, and CRM. Odoo offers distributors features including bulk product uploads, customizable pricing rules, and customer-specific catalogs. Because of its modular nature, businesses can add more features as needed to grow their operations.
TradeGecko from QuickBooks Commerce Developed specifically for wholesalers and distributors, TradeGecko is now a component of QuickBooks Commerce. This software offers inventory management, order processing, and sales data in a single, integrated package. TradeGecko enables companies to manage pricing tiers, optimize sales processes, and establish online stores for wholesale clients. It is a great option for companies wishing to improve their wholesale operations because of its user-friendly design and robust inventory features.
In conclusion Your company's needs, financial constraints, and level of technological know-how all play a role in selecting the ideal wholesale eCommerce platform. Wholesalers can efficiently manage their online sales and expand their customer base thanks to the distinct features and advantages that each platform offers. Businesses can discover the best alternative to propel growth and success in the wholesale eCommerce sector by weighing the aforementioned options.
0 notes
Text
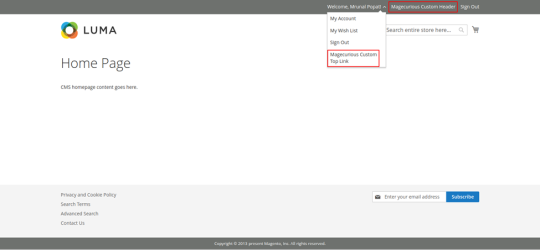
How to Add Custom Header and Top Link in Magento 2
Hello Everyone,
In this blog, we will learn about how to add Custom Header and Top Link in Magento 2.
Header link is displayed for both guest and logged in customer.
Top link is displayed for only logged in customers.
Without wasting your time, let us guide you straight away. Follow the easy step given below to Add Custom Header and Top Link in Magento 2.
STEPS FOR ADD CUSTOM HEADER AND TOP LINK IN MAGENTO 2
Step 1: Create default.xml file
app/code/Vendor/Extension/view/frontend/layout/default.xml
<?xml version=”1.0″?>
<page xmlns:xsi=”http://www.w3.org/2001/XMLSchema-instance” xsi:noNamespaceSchemaLocation=”urn:magento:framework:View/Layout/etc/page_configuration.xsd”>
<body>
<referenceBlock name=”header.links”>
<block class=”Magento\Framework\View\Element\Html\Link” name=”header-menu”>
<arguments>
<argument name=”label” xsi:type=”string” translate=”true”>Custom Header Menu</argument>
<argument name=”path” xsi:type=”string”>*/*/*</argument>
</arguments>
</block>
</referenceBlock>
<referenceBlock name=”top.links”>
<block class=”Magento\Framework\View\Element\Html\Link” name=”top-link”>
<arguments>
<argument name=”label” xsi:type=”string” translate=”true”>Custom Top Link</argument>
<argument name=”path” xsi:type=”string”>*/*/*</argument>
</arguments>
</block>
</referenceBlock>
</body>
</page>
Step 2: Finally run the below commands
$ php bin/magento cache:flush
Step 3: Output:
https://omwebsolution.info/wp-content/uploads/2024/09/image-1.png
If you want to add custom block in your custom header or top link follow the below steps.
Step 1: Create default.xml file
app/code/Vendor/Extension/view/frontend/layout/default.xml
<?xml version=”1.0″?>
<page xmlns:xsi=”http://www.w3.org/2001/XMLSchema-instance” xsi:noNamespaceSchemaLocation=”urn:magento:framework:View/Layout/etc/page_configuration.xsd”>
<body>
<referenceBlock name=”header.links”>
<block class=”Vendor\Extension\Block\Customlink” name=”header-menu”>
<arguments>
<argument name=”label” xsi:type=”string” translate=”true”>Custom Header Menu</argument>
<argument name=”path” xsi:type=”string”>*/*/*</argument>
</arguments>
</block>
</referenceBlock>
</body>
</page>
Step 2: Create Customlink.php file
app/code/Vendor/Extension/Block/Customlink.php
<?php
namespace Vendor\Extension\Block;
class Customlink extends \Magento\Framework\View\Element\Html\Link
{
/**
* Render block HTML.
*
* @return string
*/
protected function _toHtml() {
if (false != $this->getTemplate()) {
return parent::_toHtml();
}
$label = $this->escapeHtml($this->getLabel());
return ‘<li><a ‘ . $this->getLinkAttributes() . ‘ >’ . $label . ‘</a></li>’;
}
}
Final Thoughts:
So this was the easiest way which we have told you in this blog. This is how you can Add Custom Header and Top Links in Magento 2. Hope you liked the blog.
So quickly go to the comment box and tell me how you like this blog?
Stay tuned with us on our site to get new updates of Magento.
Thanks for reading and visiting our site.
0 notes