#meshlight
Explore tagged Tumblr posts
Visit Tumblr Blog
Explore Tumblr blogs with no restrictions, modern design and the best experience.
Last Seen Tumblr Blogs


Fun Fact
Celebrities use Tumblr as well.
Text

#3d #mobile #s23 ultra #s24 ultra #meshlight #transmission #model #3dsmax #maya #rgblight #gaming #feels
0 notes
Photo

Done In Maya Inspired From Star Wars. Movie.... #star #starwarsday #starwars #starwarsfigures #starwarsdaily @starwars @starwarsdaily @starwars_de @starwarsmovies @starwarscelebration @autodesk @autodesk.maya @autodeskuniversity @autodesk_maya_software @autodesk.maya #autodesk #autodeskmaya #autodeskmaya2020 #arnoldrendering #meshlight #starwars @erika_edm___ @erika_edm____ @jisooyya__ @prachi_solanki_ @reny_jamy @f1.4photo ...... https://www.instagram.com/p/B-_7REHhuNm/?igshid=yd5fk26rgmvk
#star#starwarsday#starwars#starwarsfigures#starwarsdaily#autodesk#autodeskmaya#autodeskmaya2020#arnoldrendering#meshlight
1 note
·
View note
Note
Did he just... cum on a dildo, not clean it, and then use it in his valve?? Or use a fleshlight (uhhhh metallight? meshlight??) again not clean it, and then like... rub it against his valve like scissoring?
YOU GUYS ARE GETTING CLOSER :)
10 notes
·
View notes
Photo

Back in stock | Wire Mesh Narrow Wire Chandelier - 36-in | $ 297.95 https://mellowmonkey.com Industrial style wire mesh chandelier integrates wonderfully with both modern and vintage decor A great lighting option for over an apartment counter, hutch or side board Suitable for home or commercial use Measures 36-in W x 17-in H x 4-in D Four light sockets look great when using an vintage Edison bulb (each socket rated for 40 watt incandescent bulb) Available online and in store at The Showroom at Mellow Monkey | 360 Sniffens Lane | Stratford, Connecticut | 888-300-0631 Open daily: Monday-Saturday 10am-7pm Sunday 10am-4pm #meshlight #lamp #light (at The Showroom at Mellow Monkey)
0 notes
Note
You should stab Tarn with anesthetics again. Get a mould of his valve to make meshlight.
“Why the hell would i do that? No, i don’t think so. he’s barely tolerating of it once and to do it again? it’s just wrong. I was wrong to do it in the first place. And as it is... overload denial is possibly the kindest punishment he could give me. I’d rather remove my own array before doing that again.
2 notes
·
View notes
Photo
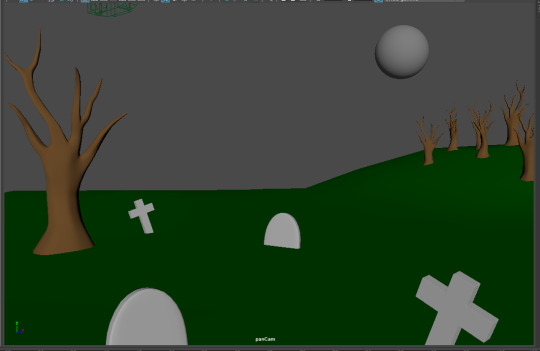
Making a sorta mini-movie (15-20 seconds) for school. I was gonna use Blender, but it keeps crashing and I keep losing progress. Maya is so much more reliable right now. These aren’t the final textures. I just changed the colour of the materials so I can actually see what mesh is where. I’ll be turning the skydome light down more, and making the moon a meshlight. More lights will be added later too. And more graves.
0 notes
Photo


MEGA UPDATE
My routine has been destroyed and I’ve not been keeping up to date with my blog, so first, I’ll update the group part of my work.
I finished the street photogrammetry finally! We got some good shots, some good data from Agisoft (After MANY MANY attempts) after Kieran suggested just redoing the alignments with the exact same setting - every time turned out different but after 5-8 attempts one was near perfect!!
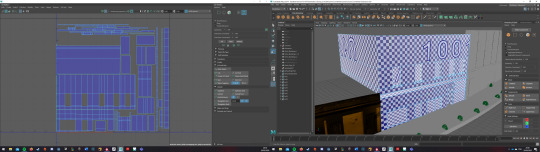
I spent a long time working out the best method of approach for aligning geometry. I eventually learned that not preserving UVs with the move tool allowed me to move geometry while keeping the ‘projection’ or UV image in the same place. What I eventually learned after many many hours was the best method was to create as close an approximation as I could with just the very messy and noisey dense cloud in maya, unwrap this geometry cleanly, then apply the projections one by one, and once the projections covered the entire geometry and the UVs were masked out to create a very clean and continuous texture, go in and edit it slowly with extrusions, moving geometry, etc. The fine tuning really made a big difference.
NOTE TO SELF- DONT BUILD SUCH A DENSE MESH NEXT TIME IN AGISOFT!!! I build a hugely dense mesh, and didnt clean up noise... the result was an absolutely MASSIVE file, and with autosave on, I had a file at one point over 50gb big... mainly just geometry!!
With some help from Michael as the one in charge of bringing the assets together, and Harsh and Mia’s work on the signs, My DMP, the now modelled and textured buildings, and Michaels street, we was able to get our first glimpse of the formation of the scene!
With the imposing DOOM of corona virus, our group made a very rushed decision to film EVERYTHING the next day (Wednesday) as we had been told the green room wouldnt be available after friday. We was lucky to have the talent of Karly Clair @artbykarly agree to help us last minute. Myself, Michael, Harsh and Karly very quickly worked out the shots we’d need, got them filmed, and took some extra filler shots just incase.
The next day we was informed the school would be closing... Good timing!! We’re super lucky we decided to get it done out the way as a precaution...
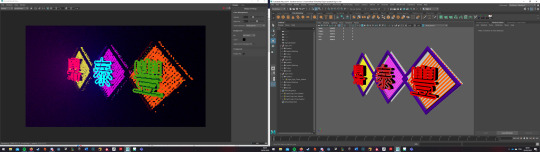
I then had to work on helping out with the lighting of the signs as they were proving troublesome. I didn’t know how to work mesh lights but a few videos later I had some working knowlage. Unfortunately the signs that had been created hadn’t been modelled efficiently and their polygon count was enormous, which made test renders particularly long and troublesome. However, their design was awesome and quite fun to work with. I learned about particular neon colours and tried to remain true to the original design.
Getting the signs to glow was very difficult. Grouping seemed to somehow effect the meshlighting, and I’d often have to ungroup and regroup particular objects to get them to glow fully. Some colours also seemed to provide little to no glow, and it was incredibly frustrating. By the end, I was quite happy with it and felt that they would be more than passable as neon signs.
One particular photo shows the strange issue with the lighting not causing any reflections. The eventual, and simple reason? Applying an aiSurfaceshader instead of the default lambart... oops.
Some of the issues were taking too long to solve with the mesh light, a few of these “errors” were left in ultimately, as they ended up looking like broken neon signs, happy accidents, right Bob Ross?
I got some test renders done by Sean via some hocus pocus to send the data to the render farm remotely. I got a lesson in making stuff work and be efficient; lots of things wrong with my scene! Sean gave me loads of advice on properly testing AOVs, setting up the render layers, and optimising the scene. I eventually got the test footage back, and realised the AOVs werent fully replicating the Beauty render. Aftet some time searching through each AOV on the arnold real time render view, I realised that the Indirect was giving me the missing light i was needing, and after further investigation, it was a shock to find that it was SHEEN!? I’d added sheen to the building surfaces and not rendered it... oops...
With it all finished eventually, and fixing some strange drone movements, and removing extra geometry, and updating the AOVs, I now have a file I’m ready to re-render as the final DMP!
I’ll upload the Beauty pass of the original renderfarm file, it shows the strange drone movement but also quite an atmospheric scene I’m happy with.
I’ll also update the personal work after this too.
0 notes
Text

#3d #mobile #s23 ultra #s24 ultra #meshlight #transmission #model #3dsmax #maya #rgblight #gaming #feels
0 notes

Photo

Done In MAYA..... Morning 🌞 View Night View 😍😍😍 @maya_lover_official #autodesk #autodeskmaya #autodeskmaya2020 #arnoldrendering #meshlight #morning #night #maya2020🔥 @autodesk @autodesk.maya @autodeskuniversity @autodesk_maya_studio @autodesk.maya @autodesk_maya2016 https://www.instagram.com/p/B-_oMgThfg5/?igshid=gf5jzcwoygt0
1 note
·
View note
Photo


Week 11-3D Fundamentals-Basic Lighting and Rendering on objects- Interior Lighting and Exterior Final Outcomes
Interior Lighting Using 3 Point Lighting System-Final Outcomes I decided to redo this topic of rendering as I wanted to gain more understanding of the process and how to create a more effective rendering. The first part shows only a little less understanding of using certain light assets of Maya and rendering in general. Images below show more of my understanding and they also turn out to be more effective.
Process
1.I first began setting up the 3-point lighting system as referred back to the exterior lighting for spheres and cubes in my first attempt in rendering. This shown in the image below

2. I then add a sky-dome to surround the scene with a light

3. I assign materials to the objects so I see how different surfaces react to lighting points.

4. I split the screen up into four panels 3 of them being my camera panels and the other where I edit and move things around to make renders

5. I finally render the images by clicking the render icon just like the attribute editor I can edit the image by playing with lighting. It was important that I use a gamma-based image otherwise it would come around as a raw image.

Interior Light-Mesh Light Render Final Outcome
In this image below I added a Mesh-Light. This allows me to make my objects to emit light. Here I placed the mesh-light onto the lamp.

Image below shows the simple Meshlight process by simply clicking the object you want to light up and then clicking the Mesh-light icon

0 notes
Photo

Here's a great lighting option for a kitchen counter or apartment... Wire Mesh Narrow Wire Chandelier - 36-in ... $ 285 https://mellowmonkey.com/search: ”wire-mesh chandelier” Available now online or in store at Mellow Monkey in Stratford, Connecticut 360 Sniffens Lane Stratford 888-300-0631 Open daily: Mon-Sat 9-am-7pm Sun 9am-3pm #meshlighting #vintage #apartmentlighting #apartmentdecor #counterlighting (at The Showroom at Mellow Monkey)
0 notes
Video
vimeo
Making Of 3D Kaleidoscope in Maya with Arnold Renderer
Things to keep in mind:
1. Use MeshLight and make it visible to the camera. 2. Turn up the Ray Depth value for Spec to increase the bouncing times for a specularly reflected ray in the renderer. In real life, the optical effect of a Kaleidoscope is achieved when three mirrors placed at an equilateral triangle. Although it creates an infinite pattern that fills the entire visual field in reality, it is very limited and expensive in CGI render.
0 notes
Text
The Scene
Not particularly skilled with Arnold or rendering in general – this was a major learning curve in the project- Initially I was set on creating a high quality playblast , but near the end of the project (perhaps after a hard hit on the head) I though it was possible for me to created the cinemating background I wanted in the scene initially.
Short on time I knew I had to create render layers and that Mery was not renderable. The main problem with her being that she was created with and for Maya 2015. Thus making the transition to Arnold very arduous, and even though I attempted to – I was unable to make her ultimately work with the rendered and she had numerous display errors I could not find a workaround.
With the aid of tutorials and AiPhysicalSky I created the sky and clouds I needed for the background – the lamps were already modelled with a meshlight and the materials were all adjusted to resemble wet metal, and had I more time I would have worked on creating puddles that mirrored the final concept.
I decided to render a single frame and use it as a background and have a high quality playblast for mery’s performance – I however had to match the lighting of the scene – so I set up some lights that emulated the lighting in the rendered scene and playblasted her alone with a blue background ready for compositing and keying in aftereffects.


0 notes
Photo

Project No 4....... Done in maya... @autodesk @autodesk_maya_studio @autodesk.maya @autodesk_maya_software #maya #maya2020poweredbykingpower #mayaforever #arnoldrendering #meshlight #autodesk #autodeskmaya #autodeskmaya2020 #may2020 #maya2020✨ #maya2020🔥 ... https://www.instagram.com/p/B-65ossh0sP/?igshid=te5rhyatn131
#maya#maya2020poweredbykingpower#mayaforever#arnoldrendering#meshlight#autodesk#autodeskmaya#autodeskmaya2020#may2020#maya2020✨#maya2020🔥
1 note
·
View note