#meshroom 2021.1.0
Explore tagged Tumblr posts
Visit Tumblr Blog
Explore Tumblr blogs with no restrictions, modern design and the best experience.
Last Seen Tumblr Blogs


Fun Fact
Tumblr has 16.74 million mobile monthly users in the US.
Text

art_maker.exe
#digital collage#software#blender 3.3.1#gimp 2.10.14#meshroom 2021.1.0#to clear up any confusion - these aint wip screenshots#i wanted to make it look like those video games with extra cluttered gui
4 notes
·
View notes
Text
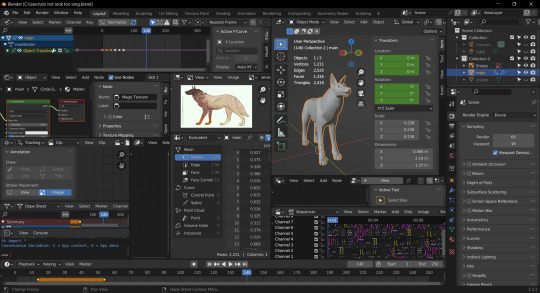
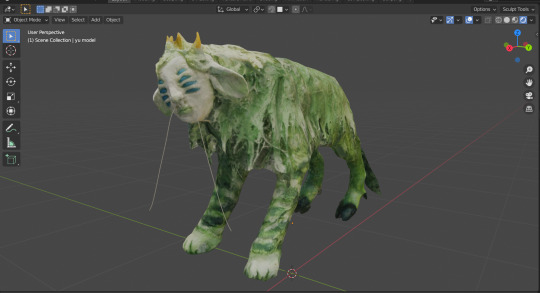
Traditional 3D to Digital 3D - step by step How to Digitalise Your Model
If you are a beginner watch these tutorials first: Photoscanning, Retopology, Unwrapping, Baking Diffuse, Baking Normals, Baking Normals 2
Tools used:
a DSLR camera
photogrammetry software (Meshroom)
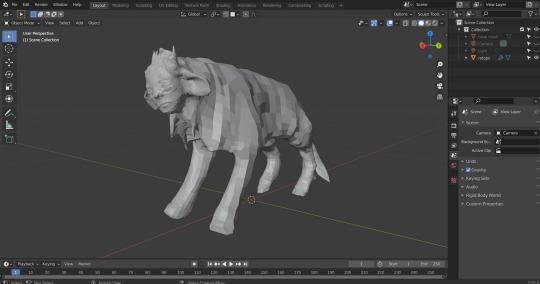
3D editing software (Blender)
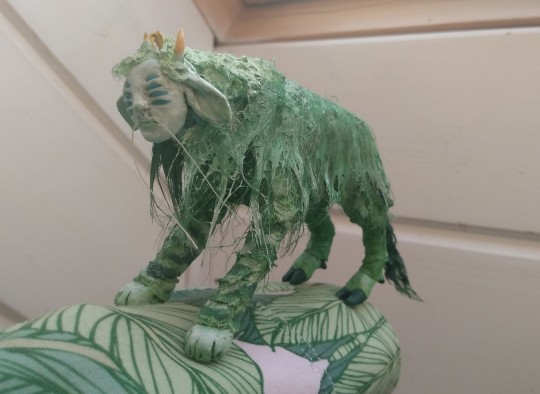
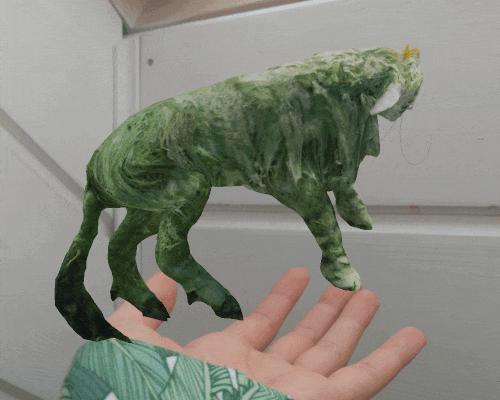
This is Yù and he's gonna be our example model today
_
Step 1: Take photos from every possible angle.
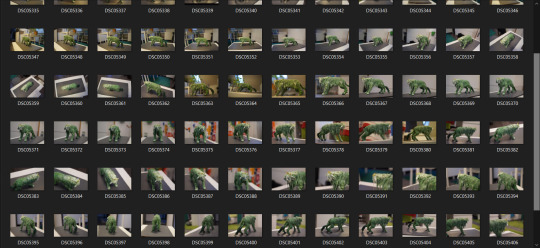
Try to take the photos in a continuous way so that it's easier for Meshroom to figure out what's the camera's position. The more photos, the better. Here I'm using 92 photos. DO NOT move the model. Phone camera doesn't work for me, so I use a DSLR.
_
Step 2: Photoscan.
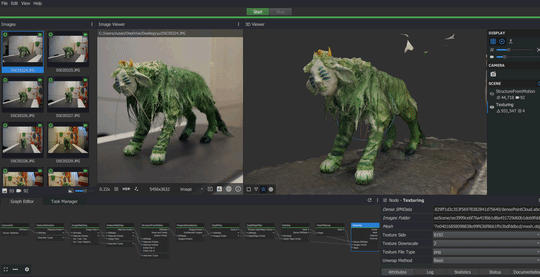
This takes a while. Make sure your PC doesn't overheat.
_
Step 3: Import to 3D editing program and clean the model - decimate the polycount, cut off unnecessary parts of the mesh, fix the origin point and orientation.

This is now the base model. If your model is a static object (and not a creature for example), you finish here. You're done. But Yù is a creature so now we have to...
_
Step 4: Take a deep breath. Retopologise.
The tutorial I linked at the top does a good job of explaining retopology, but I prefer to work without snapping and without the In Front option. And for this particular model I don't use Mirror. I only use a lot of Shrinkwrap.
_
Step 5: Unwrap a UV map of the retopologised model.
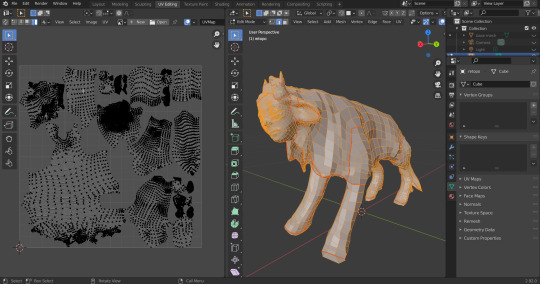
If you plan to add hand painted elements to the texture then place seams by hand, so that later you know better where to paint.
_
Step 6: Bake a diffuse map from the base model onto the retopologised model.
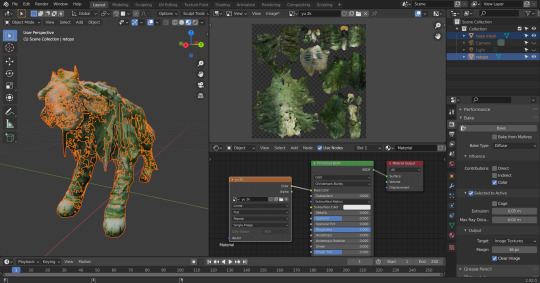
PLEASE use extra Shrinkwrap after Subdivision Surface! It looks uglier and less smooth, I know, but it's important for diffuse baking to keep the retopologised model snap to base model. The model can be smoothed after baking.
If the baked texture looks bad, play with Extrusion and Max Ray Distance. In this particular case I use 0.05m and 0.02m. It's not perfect and there are holes on Yù's back, but this can be fixed by hand in Texture Paint workspace.
_
Step 7: Finishing touches.
It's up to you what you wanna do here. You can bake a normal map from the base model. Or use the diffuse as a bump map. Smooth the model and sculpt extra details. Paint over holes. Remember to save all the textures separately, since Blender doesn't do that automatically.
_
Step 8: Almost done! Time to rig, pose and animate the new model!

The base model can be deleted here.
Hope it helps and feel free to ask questions
#tutorial#meshroom 2021.1.0#blender 2.92#photoscanning#photogrammetry#3d modeling#sculpture#soft sculpture#digitalisation#digitalization#long post#Yù is my OC#my art
50 notes
·
View notes