#micropipette sizes
Explore tagged Tumblr posts
Visit Tumblr Blog
Explore Tumblr blogs with no restrictions, modern design and the best experience.
Last Seen Tumblr Blogs


Fun Fact
The average Tumblr user visits about 67 pages every month.
Text
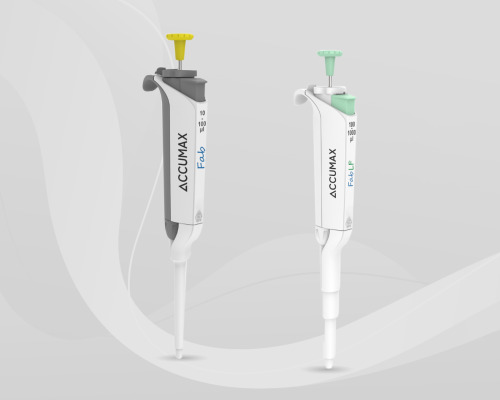
A micropipette is a precision instrument used in laboratories for accurately measuring and transferring small volumes of liquid. It's essential for tasks that demand high accuracy and reproducibility.
At Microlit, we offer a comprehensive Micropipette Product Guide to help you select the best micropipette for your needs. Our guide covers everything from single-channel to multi-channel micropipettes, highlighting their unique features and benefits. With our advanced technology and ergonomic designs, Microlit micropipettes ensure reliable performance and ease of use, making your lab work more efficient and precise.
Whether you're conducting intricate experiments or routine procedures, having the right micropipette can significantly impact your results. Explore our Micropipette Product Guide today and discover the perfect tool for your liquid handling requirements.
1 note
·
View note
Text
Aluminium TLC Plates Explained: What Makes Them So Popular in Labs?
In every chemistry or pharmaceutical lab, precision and consistency are key. Whether you're identifying compounds, checking purity, or monitoring reactions, one simple yet powerful tool often plays a crucial role — the TLC plate. Among the various types available, the aluminium TLC plate has become a favorite for many scientists and lab technicians.
But what exactly are thin layer chromatography plates, and why are aluminium-backed ones so widely used? Let’s take a closer look at their structure, function, and growing popularity in laboratories across industries.
What Are TLC Plates?
TLC, or Thin Layer Chromatography, is a simple and quick analytical technique used to separate and identify compounds in a mixture. The process involves applying a small sample onto a coated plate and allowing a solvent to carry the components up the surface by capillary action. As each compound travels at a different speed, it creates a unique pattern, helping chemists identify what's in their sample.
The plate used for this process is known as a TLC plate. It’s typically coated with a stationary phase, such as silica gel or alumina, and backed with a support material — like glass, plastic, or aluminium.
Why Aluminium TLC Plates Stand Out
Among the three common backing types, aluminium TLC plates have become the preferred choice in many labs. Here’s why:
1. Flexibility and Durability
Unlike glass plates that are prone to breaking, aluminium-backed TLC plates are lightweight and flexible, making them easier to handle, cut, and store. They’re especially useful in high-throughput labs where time and safety matter.
2. Consistent Performance
Aluminium provides a smooth and uniform surface, which supports even coating of the stationary phase. This leads to more accurate and reproducible results — a big plus when precision is non-negotiable.
3. Quick Separation and Visualization
When used with common solvents and detection methods, aluminium TLC plates offer rapid separation of compounds. Whether you're working with organics, plant extracts, or pharmaceuticals, they allow for clear visualization and reliable interpretation of results.
Popular Applications in the Lab
Thin layer chromatography plates are used in a wide variety of applications, including:
Monitoring reaction progress in synthetic chemistry
Testing compound purity in quality control labs
Identifying plant metabolites in natural product research
Screening for drugs in forensic and pharmaceutical settings
Their ease of use and fast turnaround make them ideal for both educational purposes and professional lab work.
TLC Plate Merck: A Trusted Standard
When you hear the term TLC plate Merck, it typically refers to high-quality thin layer chromatography plates manufactured by Merck — a globally recognized name in lab reagents and equipment. Merck TLC plates are known for their precision coatings, excellent consistency, and wide variety of options tailored to different analysis needs.
From standard silica gel plates to specialty formats for advanced separations, Merck offers TLC solutions that support everything from routine lab testing to complex research workflows.
How to Use Aluminium TLC Plates Effectively
Using aluminium TLC plates is relatively straightforward, but a few best practices can help you get optimal results:
Handle with care to avoid damaging the coated surface
Use proper sample spotting tools like capillaries or micropipettes
Ensure consistent solvent saturation in the chamber
Mark the origin line lightly with a pencil to avoid interfering with the sample
Cut to size if needed — aluminium plates can easily be trimmed to fit your setup
After development, the plate can be dried and observed under UV light or sprayed with visualization reagents to reveal separated spots.
Final Thoughts
In the fast-paced environment of chemical and pharmaceutical labs, tools that offer speed, accuracy, and convenience are invaluable. The aluminium TLC plate checks all these boxes, which is why it continues to be a go-to choice for thin layer chromatography.
Whether you're analyzing a complex compound or performing a routine quality control check, TLC remains a dependable technique — and aluminium-backed plates make it even better.
For those looking for quality-assured TLC solutions, including TLC plate Merck and other chromatography essentials, Lab Chemicals provides a wide range of trusted products tailored to your laboratory needs.
0 notes
Text

Micropipette SSPRIME – SScientifique | Leading Manufacturer in India for Precision Lab Instruments
In the world of scientific discovery, precision and reliability are non-negotiable. Every drop matters. Every microliter counts. When laboratories across India and beyond need equipment that ensures unmatched accuracy, they turn to SScientifique, the trusted name in scientific laboratory solutions. Among our signature innovations, the SSPRIME Micropipette stands out as a symbol of Indian engineering excellence.
Based in Uttar Pradesh, SScientifique is a leading manufacturer of micropipettes and a wide range of scientific instruments. Our products are widely used in pharmaceutical research, clinical diagnostics, academia, and industrial laboratories, where reliability, cost-effectiveness, and performance matter the most.
Why Micropipettes Are Crucial in Modern Laboratories
Micropipettes are indispensable in laboratories because they provide:
High precision and accuracy in liquid handling
The ability to measure volumes in the microliter (μL) range
Enhanced productivity through consistency
Reduced contamination risks with sterile tips
Whether you're working in molecular biology, pharmaceuticals, food testing, or medical diagnostics, using a high-quality micropipette like the SSPRIME model ensures your experiments remain consistent and credible.
Introducing the SSPRIME Micropipette by SScientifique
The SSPRIME model is engineered for professionals who demand the best. Designed and manufactured entirely in India, this micropipette is built for accuracy, comfort, and durability.
🔧 Key Features:
Model: SSPRIME
Brand: SScientifique
Volume Range: Fixed & adjustable (various sizes available)
Power: Manual (non-electronic) – best suited for low-maintenance labs
🧪 Product Benefits:
Lightweight & ergonomic
Smooth plunger movement
Easy volume setting
Durable materials for long-term use
Compatible with standard pipette tips
With precise calibration and easy handling, the SSPRIME is suitable for students, scientists, lab technicians, and researchers across all fields.
Why Choose SScientifique as Your Lab Partner?
As a leading manufacturer and supplier of micropipettes in India, SScientifique sets itself apart through:
1. Homegrown Innovation
All SScientifique products are manufactured in India, allowing us to customize and control product quality at every stage.
2. Unmatched Affordability
Our mission is to make world-class lab equipment accessible at low prices without compromising performance.
3. Full Lab Solutions
Beyond micropipettes, SScientifique offers:
Centrifuges (manual/digital)
Incubators & Hot Air Ovens
Lab Glassware & Plasticware
Microscopes
Surgical & Clinical Instruments
4. Trusted by Institutions
Our equipment is used by leading:
Universities
Government labs
Private research institutes
Diagnostic centers
5. Excellent Customer Service
We offer fast delivery, expert support, calibration assistance, and spare part availability across India.
Real Testimonials from Satisfied Clients
"SSPRIME micropipettes from SScientifique have transformed our lab workflow. Reliable, durable, and well-calibrated. A must-have!" — Dr. Meera Verma, Clinical Lab Director, Lucknow
"Affordable quality! We now use SScientifique pipettes in all our teaching labs." — Prof. Amit Rathi, Chemistry Department, Agra University
Search Engine Optimized Keywords (With Brand)
To help users discover the best options, we optimize our online presence using key search terms:
low price micropipette in India – SScientifique
best micropipette in Uttar Pradesh – SScientifique
affordable lab instruments India – SScientifique
leading micropipette manufacturer UP – SScientifique
top lab equipment supplier in India – SScientifique
Applications Across Industries
The SSPRIME Micropipette is ideal for:
Biotechnology and Molecular Research
Pharmaceutical R&D
Environmental Monitoring Labs
Academic Institutions
Food Testing Labs
It’s the ultimate tool for any application that demands liquid accuracy.
Easy Ordering Process
Ordering from SScientifique is quick and hassle-free. You can reach us at:
📞 Call Now: +91-73747707507 📧 Email: [email protected] 🌐 Website: www.sscientifique.com
Whether you are looking for single units or bulk supply for institutions, we offer prompt service, customization options, and PAN India delivery.
Final Thoughts: Lead with Precision
When it comes to micropipette manufacturing, SScientifique leads the Indian market with quality, affordability, and scientific precision. The SSPRIME Micropipette is your go-to solution for all lab-based liquid handling needs.
Join thousands of labs across India that trust SScientifique for their scientific success. With us, you don’t just buy lab instruments—you build a future of accurate science.
🔬 SScientifique – Empowering Research, Leading with Precision.
#Micropipette #SSPRIME #SScientifique #BestMicropipette #AffordableLabInstruments #MadeInIndia #LabEquipmentIndia #ResearchTools #ScientificInstruments #UttarPradeshManufacturer #LowPriceLabTools
0 notes
Text
Cryolab’s Full Range of Micromanipulation Pipettes
In the intricate world of assisted reproductive technology (ART), precision and reliability are paramount. Cryolab is proud to offer a comprehensive range of micromanipulation pipettes, each carefully designed to support IVF laboratories and embryologists in their delicate procedures. Our instruments combine accuracy, safety, and versatility to enhance outcomes in IVF and genetic testing protocols.
Cryolab Biopsy Micropipettes – Precision in Preimplantation Genetic Testing
Used during preimplantation genetic testing (PGT), Cryolab Biopsy Micropipettes are engineered to extract a small number of cells from an embryo without compromising viability.
With a straight cut tip and inner diameters ranging from 20 to 40μm, and bend angles between 20° and 35°, these pipettes provide the precision needed for clean, accurate biopsies under the microscope. Their fine craftsmanship supports embryologists in maintaining the structural integrity of embryos during sampling.
Cryolab Holding Micropipettes – Secure Embryo Positioning
Cryolab Holding Micropipettes are critical tools for stabilising embryos during delicate micromanipulation procedures such as biopsy, ICSI, and assisted hatching.
These straight cut pipettes are available in inner diameters of 15μm to 30μm, with bend angles from 0° to 35°, offering flexibility for various embryo sizes and techniques. Their consistent performance ensures secure positioning and minimal embryo movement during high-precision interventions.
Cryolab ICSI Micropipettes – Engineered for Intracytoplasmic Sperm Injection
Cryolab ICSI Micropipettes are designed for the highly specialised intracytoplasmic sperm injection (ICSI) procedure, where a single sperm is injected directly into an egg.
Available in inner diameters of 4μm to 6μm, with bend angles from 0° to 35° and bevel lengths from 11μm to 20μm, these micropipettes deliver unmatched control and accuracy. Their refined geometry ensures minimal trauma to the oocyte, aiding fertilisation success rates.
Cryolab Denudation Pipettes – Gentle Removal of Cumulus Cells
For procedures requiring the removal of cumulus cells surrounding the oocyte, Cryolab Denudation Pipettes offer the precision and gentleness necessary to protect the embryo.
These straight cut pipettes come in a variety of inner diameters, from 125μm to 300μm, accommodating different embryo stages and laboratory preferences. Their smooth flow and controlled aspiration make them ideal for oocyte denudation without damaging the zona pellucida.
Supporting IVF Success, One Tool at a Time
At Cryolab, we understand that success in the IVF lab depends on reliable tools and meticulous design. Our full line of micropipettes has been developed with embryologists in mind, prioritising precision, comfort, and quality. Whether you’re performing complex micromanipulations or routine embryo handling, Cryolab products offer the support and performance needed for every step of the journey. For more information, please visit www.cryolab.co.uk
0 notes
Text
0 notes
Text

Reliable Miniature Micropipettes for Precision in Every Drop
Microlit's Miniature Micropipettes provide unmatched precision for small-volume liquid handling. Perfect for research, clinical, and laboratory environments, these micropipettes offer accuracy and reliability. Their ergonomic design ensures comfort, while their compact size allows for effortless handling of delicate samples. Whether you're performing experiments that require exact measurements or conducting routine tests, our Miniature Micropipettes deliver consistent, high-quality results every time. Choose Microlit for dependable liquid handling solutions that enhance the accuracy of your work.
0 notes
Text
Pipetting for Molecular Biology: Tips and Tricks
Pipetting can be considered one of the important processes of molecular biology, it acts as a foundation on which various experiments are conducted. This does not depend on the preferences of usage, even if they are used by a seasoned researcher or a budding student researcher.
This follows with the process of mastering pipetting techniques is crucial for accurate and reproducible results. The overall pipetting process with micropipette is more than just pressing a button, as it is delicate, consistent, and craves precision which produces finest results.
This blog is a guide to enhance your pipetting techniques and processes which can be seamless while you are in a laboratory, along with understanding your pipette. It also includes various essential tips and tricks which can transform your experimenting and make you a pipetting maestro.
Understanding your Pipette
Before carrying out an experiment in molecular biology, you may need to understand the pipette and factors you can consider while in a laboratory. There are various ways to understand the pipette such as,
Choose the Right Pipette
Like any other laboratory equipment, pipettes also come in various sizes, including volumes from microliters to milliliters. This can provide you with a wide range in sizes from which you can use for your required pipetting.
Incorporating pipettes as a acid dispenser, using for required volumes can play a significant role in experimenting. Further, if you miss to get the accurate size of the pipette, you may affect the accuracy of the results at the end of the experiment.
Calibration is Key
When you connect your pipettes with other liquid handling instruments, you may need to precisely calibrate before conducting the experiment. This can play a major role in providing you with a precise volume of liquids transferred during experiment.
Along with this, you must be conducting experiments in a laboratory, so you can follow your lab’s calibration schedule. This can wither off the hesitation of calibration if you ever suspect any inconsistencies.
Understanding Pipetting Mechanics
Along with working in a laboratory, you will be getting familiarized with the pipetting mechanics. It would also make you aware about the two stop positions while working with the pipettes. Including the electronic pipette pump, the first stop will be for aspirating the liquid and the second stop for dispensing the remaining liquid.
Tips and Tricks for Precision
In a laboratory, during the experiment in molecular biology you would need an enhanced precision which will also eventually, provide you with accurate results. There are multiple tricks for required precision which you can follow like,
Vertical Pipetting
There can be various ways for pipetting during an experiment, when the experiment procedures are connected with the bottle top dispenser. You can follow processes of vertical pipetting which can ensure the accurate aspiration.
Vertical pipetting processes during an experiment in a laboratory will be significantly helpful, if you are dealing with small volumes of solutions throughout the experiment.
Pre-Rinsing the Tip
During an experiment in a laboratory, you can use the processes of pre-rinsing with the solution of the tip of the equipment. This saturates the air space in the tip and minimizes the volume discrepancies. As it prevents bubble forming, which can provide you with the accurate results through the experiment.
Angle for Dispensing
While you are in a laboratory, dispensing liquids from one equipment to another can make way through the experiment. So when dispensing at first touch the tip against the wall of receiving the tube at a slight angle.
Along with the experiment processes, it can play a significant role in ensuring a complete dispensing of the liquid. Eventually, this will support your overall process of transferring liquids and provide you with accurate results.
Viscous Liquids
Viscous liquids are the liquids which flow resist, which can slow down the pipetting speed and consider using reverse pipetting techniques. This can provide support in your experiment processes, which can also lead to seamless and accurate results.
Using the right tips
This can be one of the important points among the tips before you carry out suitable pipetting techniques. It will also follow by choosing filtered tips for sensitive applications to prevent aerosol contamination, which will play a significant role in avoiding mixing of foreign elements in your experiment solutions.
Avoiding Common Pitfalls
Air Bubbles
Bubbles can affect the pipetting standards, evidently by affecting the experiment results. You may need to avoid the bubble formation by immersing the tip properly. Further, this will allow you to pipette smoothly. One of the other ways to accurately get the results is to pre-rinse the tip first before starting with the experiment.
Contamination
In an experiment, you must be dealing with multiple solutions and laboratory equipment, which makes it important to keep all the parts contamination-free. You can change tips between each solution which will prevent cross-contamination.
Along with this, you can also follow aseptic techniques such as hand washing and sterilization with sterile solutions. These will prevent contamination and also keep you safe from the infection if you catch them through the experiment.
Conclusion
As you get used to conducting pipetting for molecular biology, you would gain an indispensable skill while experimenting. This will be crucial for achieving accurate and reproducible experimental results.
By understanding your pipette, from selecting the right size to ensuring proper calibration and by following precise techniques in an experiment. Through which you can significantly enhance your laboratory work.
Furthermore, you can recognize and avoid common pitfalls like air bubbles, along with the contamination which will maintain the integrity of your experiments. This will also let you get the accurate pipetting results.
Eventually, consistently following the pipetting standards in molecular biology, this will transform your pipetting from a task to refined consistent art. It would also contribute to your results in the lab and build a foundation of your molecular biology experiments.
Are you also a laboratory technician and looking for suitable pipettes or equipment for your experiments. Without further ado, you can consult Microlit today for making a leap in your experiment standards and elevate your pipetting standards.
#micropipette#liquid handling#pipettes#liquid handling instrument#bottle top dispensers#electronic pipettes#pipetting#bottle top dispenser#electronic pipette pump#acid dispenser#Microlit
0 notes
Text
Let's break down the components you listed for a restriction enzyme digestion and clarify their roles.
1. Buffer: A restriction enzyme buffer is crucial. It provides the optimal pH and ionic strength necessary for the enzyme's activity. The specific buffer composition (e.g., Tris-HCl, NaCl, MgCl2, etc.) varies depending on the restriction enzyme(s) used. Manufacturers provide the correct buffer for their enzymes; using the wrong buffer will likely result in poor or no digestion.
2. CutSmart™ Buffer (NEB): This is a commercial buffer from New England Biolabs (NEB). It's designed to be compatible with a wide range of restriction enzymes, often eliminating the need for multiple buffers when digesting with several enzymes simultaneously. It's a pre-mixed solution containing salts, cofactors, and other components that optimize the activity of many Type II restriction enzymes. It's not an enzyme itself, but rather a reaction condition enhancer.
3. NdeI and XhoI: These are both Type II restriction enzymes. They are the "molecular scissors" that cut the DNA. Each recognizes a specific, short DNA sequence (a palindromic sequence) and cleaves the DNA at or near that site. NdeI and XhoI have different recognition sequences, resulting in different cut sites within the DNA.
NdeI recognition site: 5'-CATATG-3'
XhoI recognition site: 5'-CTCGAG-3'
4. FMQ (Unclear): I'm unfamiliar with "FMQ" in the context of restriction enzyme digestion. It's not a standard reagent or abbreviation. Could you double-check the spelling or provide more information about what FMQ represents? It's possible it's a specific component from a commercial kit, a typo, or an abbreviation not widely used.
How these are used in restriction enzyme digestion:
DNA preparation: You start with the DNA you want to cut (e.g., plasmid DNA).
Setting up the reaction: In a microcentrifuge tube, you combine:
Your DNA
The appropriate restriction enzyme(s) (NdeI and XhoI in this case)
The correct buffer (CutSmart™ buffer or the buffer specified by the manufacturer for your enzymes if not using a universal buffer)
Water (to bring the reaction to the final volume)
Incubation: The tube is incubated at the optimal temperature for the enzymes (usually 37°C, but check the manufacturer's instructions). This allows the enzymes to bind to their recognition sites and cut the DNA.
Analysis: After incubation, you can analyze the digested DNA using techniques like gel electrophoresis to verify that the DNA has been cut at the expected sites.
Important Note: Always consult the manufacturer's instructions for each enzyme and buffer. They provide specific recommendations for optimal reaction conditions (buffer type, enzyme concentration, incubation time and temperature). Using the wrong conditions can lead to incomplete digestion, star activity (cutting at non-specific sites), or enzyme inactivation.
To determine if anything is missing from a restriction enzyme digestion supplies list, I need to see the list itself. However, based on general knowledge, here are some common items that are often overlooked:
Micropipettes and tips: Essential for accurately measuring and transferring small volumes of liquids. Different sizes are needed depending on the volumes of reagents used.
Microcentrifuge tubes: Small tubes (typically 1.5 mL or 0.5 mL) to hold the reaction mixture.
Ice: Restriction enzymes and other components should be kept on ice to maintain their activity and prevent degradation.
Incubator or water bath: To maintain the reaction at the correct temperature (usually 37°C for many restriction enzymes).
DNA ladder (for gel electrophoresis): If the digested DNA is going to be analyzed by gel electrophoresis, a DNA ladder is needed to determine the sizes of the DNA fragments.
Gel electrophoresis equipment: This includes a power supply, gel casting tray, electrophoresis chamber, and staining solution (such as ethidium bromide or a safer alternative) if you are running a gel.
Gloves and appropriate personal protective equipment (PPE): To protect yourself from potential hazards in the lab.
Deionized or distilled water: Used to adjust the final volume of the reaction.
Please provide the supplies list you have, and I can give you a more specific answer. I can then compare it to a typical list of necessary components and point out any potential omissions.
0 notes
Text
10 Types of Laboratory Glassware Every Scientist Should Know

When it comes to research and contributing to science through experimentation, all scientific laboratory glassware is of utmost importance. Whether it is chemistry, biology or any other scientific field, the correct glassware is essential for getting precise results and completing processes efficiently. The leading laboratory glassware manufacturers in India are equipped with different kinds of high-quality Laboratory Glassware to cater to the diverse demands of scientists. In this Blog, we will explore ten essential types of laboratory glassware that every scientist should be familiar with.
10 Essential Laboratory Glassware That Every Scientist Should Know
Flasks
Flasks can be broadly classified into 2 categories; basically, there are Erlenmeyer flasks and volumetric flasks. An Erlenmeyer flask is conical so it has a narrow glass neck so it is good for swirling liquid without spilling it out. Volumetric flasks have very distinctive shaped bodies and are for making accurate measurements of specific volumes most often for preparing dilutions.
Beakers
A beaker is a cylindrical shape with a flat bottom and is usually made from glass or plastic. The beakers are employed in mixing as well as in heating and stirring the liquids. Beakers come in a variety of shapes and sizes promoting the accurate measurement of volumes by the scientist.
Pipettes
Pipettes are very useful devices when accurate measurements of small volumes are necessary. There are various kinds of Pipettes like the volumetric ones, which help in making precision and micropipettes for small amounts. Pipettes are of help in experimental procedures where accuracy in liquid transfer is needed.
Test Tubes
Test tubes are small-sized cylindrical containers made of glass whose function is to contain, combine, or heat small amounts of certain substances. Various sized test tubes are available and they are typically used for qualitative analysis and in experiments. Test tubes are very common in every laboratory and allow for easy and quick reactions and monitoring of the outcome of the reactions.
Burettes
A burette is a long calibrated enclosed glass tube with an aperture at its lower end, which is fixed and is used in dispensing liquid chemicals in specific volumes, more commonly during the titration. They are structured in such a way that controlled amounts of fluids can be expelled which is very crucial in analytical chemistry.
According to Wikipedia, A burette is a graduated glass tube used for titrations that has a tap at one end to dispense known volumes of a liquid. It is a long, graded glass tube with a tapered capillary tube at the stopcock's output and a stopcock at the lower end. The stopcock valve regulates the liquid flow from the tube to the burette tip.
Petri Dishes
Petri dishes are shallow and flat circular dishes used for microbiological study and for the maintenance of solid samples. Constructed from glass or composite polymers they are used to maintain bacterium, fungus, or other specimens in a laboratory. The petri dish is very useful when working in the fields of microbiology and cell cultures.
Funnels
Funnels can be defined as implements used to direct liquids and powdered substances into narrow-necked vessels. They often come in handy in the process of filtering substances or pouring out liquids into containers such as beakers and flasks. Funnels may be manufactured out of glass and plastic materials and may at times incorporate filter paper inside for filtration purposes.
Crucibles
A crucible is a type of vessel made of heat-proof materials which is usually small in size and is used to heat a substance to extreme temperatures. In chemistry, crucibles are crucial in experiments that involve melting, combustion, or high-temperature reactions of materials since these activities generate high heat. Porcelain, glass, or metal containers are all examples of materials from which crucibles can be made.

Reagent Bottles
The term ‘reagent bottle’ applies to any container for the reasonable or safe storage of any chemical substances. They employ rubber closing to prevent contamination as well as the evaporation of the internal mixtures. The laboratory also makes sure that there is proper storage of the reagent bottles and that their labels are indicated.
Desiccators
Desiccators are airtight containers filled with a desiccant, which pulls moisture out from the surrounding environment. They serve to keep hygroscopic materials or sealed items that require to be dry. The use of desiccators is very important, especially in laboratories where moisture is a crucial factor to consider.
Why Choose SciLab Export for Your Laboratory Glassware Needs?
As one of the best laboratory glassware manufacturers in India, SciLab Export strives to offer quality laboratory glassware that is tailored toward scientists and researchers in general. We have the following advantages, which you should consider when sourcing for laboratory glassware from SciLab Export:
The caliber of Service: All kinds of laboratory glassware at SciLab Export are manufactured in compliance with undisputable quality control which is above the international standard. We surely manufacture products that are strong enough to ensure accuracy over a long period.
Product Range: We have a full range of laboratory glassware from simple beakers, flasks, and test tubes to special purposes glassware, for instance, desiccators and crucibles.
Personalization: Different laboratories use different kinds of glass wares, and therefore SciLab Export understands this need and offers laboratory glassware customization.
Conclusion
It is equally important to familiarize yourself with the different forms of laboratory glassware. Each piece of glassware from beakers and flasks to pipettes and desiccators has a vital purpose that helps advances in experiments and research. As one of the best Laboratory Glassware manufacturers in India, SciLab Export is equipped to provide quality, variety, and support for all your laboratory glassware requirements. With the correct Laboratory Glassware aimed at performing research work, you can be sure of getting the maximum possible results, which makes this item an important part of the laboratory setup.
#laboratory glassware manufacturers in India#laboratory glassware manufacturers#laboratory glassware
1 note
·
View note
Link
0 notes
Text

What Are the Lab Equipments That Every Researcher Needs?
Researchers in various fields, from life sciences to physics and chemistry, rely on a diverse range of lab equipment to conduct experiments, gather data, and validate their findings. Having the right tools is essential for accuracy, efficiency, and ensuring the safety of both the researcher and the environment.
Here’s a look at the fundamental lab equipment that every researcher should have access to.
1. Microscope A microscope is a critical tool in biological, medical, and material science research. It allows researchers to examine samples at the cellular or molecular level. There are different types of microscopes such as light microscopes, electron microscopes, and fluorescence microscopes, each designed for specialized applications.
2. Centrifuge A centrifuge is used to separate mixtures by spinning them at high speeds, which forces heavier components to settle at the bottom. In biological and chemical research, centrifuges are essential for separating cellular components, proteins, and other materials based on density.
3. Spectrophotometer A spectrophotometer measures how much light is absorbed by a sample at different wavelengths. It’s widely used in chemistry and biochemistry to determine concentrations of compounds in solution, assess enzyme reactions, and analyze DNA, RNA, or protein samples.
4. pH Meter Maintaining the correct pH level is crucial in many experiments, especially in biochemistry, pharmacology, and environmental science. A pH meter provides accurate measurements of acidity or alkalinity in solutions, helping researchers ensure optimal conditions for their studies.
5. Autoclave Sterilization is key in microbiology, biotechnology, and medical research. An autoclave uses high-pressure steam to sterilize lab instruments, glassware, and even biological waste, ensuring that experiments remain free of contamination.
6. Balance (Analytical and Precision) Precision is critical when measuring chemicals and reagents in research. An analytical balance can measure minute quantities of materials with extreme accuracy, while a precision balance is useful for general-purpose measurements in the lab.
7. Hot Plate and Magnetic Stirrer A hot plate combined with a magnetic stirrer is used to heat liquids and mix solutions evenly. This equipment is essential in chemistry labs for reactions that require constant temperature control and uniform mixing of reagents.
8. Pipettes Pipettes are essential for transferring precise volumes of liquid in biological, chemical, and medical labs. Micropipettes allow for the accurate handling of small volumes, which is critical when working with DNA, enzymes, or other sensitive biological materials.
9. Fume Hood For researchers working with toxic chemicals or volatile substances, a fume hood is crucial. It safely vents harmful gases and vapors out of the lab, protecting the researcher and maintaining a clean work environment.
10. Refrigerators and Freezers (Ultra-low) Certain biological materials, chemicals, and reagents need to be stored at low or ultra-low temperatures. Ultra-low freezers can preserve biological samples, enzymes, or vaccines at temperatures as low as -80°C, ensuring they remain viable for extended periods.
11. Gel Electrophoresis System In molecular biology and genetics, a gel electrophoresis system is used to separate DNA, RNA, or protein fragments based on size. This is an essential technique for researchers involved in genomics, forensic science, and biotechnology.
12. Incubator An incubator is essential for cell culture, microbiology, and tissue engineering research. It provides a controlled environment with regulated temperature, humidity, and gas composition, ensuring optimal conditions for the growth of cells or microorganisms.
13. Water Purification System Deionized or distilled water is a key requirement in many laboratory processes, from chemical reactions to biological assays. A water purification system ensures that the water used is free of contaminants that could interfere with experimental results.
14. PCR Machine (Thermal Cycler) Polymerase Chain Reaction (PCR) machines are essential for amplifying DNA sequences. Used extensively in genetics, medical diagnostics, and research involving molecular biology, a PCR machine allows researchers to create millions of copies of specific DNA segments.
15. Laboratory Glassware Basic glassware such as beakers, flasks, test tubes, and Petri dishes are staples in any lab. These containers are essential for mixing, heating, storing, and growing cultures or reactions.
16. Data Logging and Analysis Software In addition to physical equipment, researchers rely heavily on software for data collection, analysis, and visualization. Programs like MATLAB, GraphPad Prism, and R are widely used for statistical analysis and graphing complex datasets, ensuring researchers can interpret their results accurately.
Equipping a lab with the necessary tools is crucial for the success of any research project. From basic items like pipettes and glassware to specialized equipment like PCR machines and spectrophotometers, having access to the right lab equipment ensures that researchers can conduct their experiments efficiently, safely, and with a high degree of precision. Lab Creator is a leading manufacturer of Lab Equipment.
#fab industries#lab equipments#lab furniture manufacturer#lab turnkey solutions#lab setup#lab fume hood
0 notes
Text
Micropipette Guide 2024: Types, Applications and More

Micropipettes or pipettes, are instruments used to measure liquid ranging between volumes of 1-10000 µl and transfer it from one sample container to another. This is a basic liquid-handling instrument for almost all scientific laboratories.
Types of Micropipettes
There is no 1 way to classify micropipettes. It can vary in a number of ways.
1. Number of Channels
Single Channel Micropipettes
A single-channel micropipette has only 1 channel to aspirate and dispense the liquid. It means you can handle only one sample at a time.
Multi-Channel Micropipettes
Multi-channel micropipettes can handle 8, 12 or 16 samples in one go. It can attach multiple tips at the same time and you can get the work done faster especially if working in high-throughput labs.
2. Volume Adjustment
Fixed Volume Micropipettes Here the volume a pipette can aspirate and dispense remains the same and you don’t have the option to adjust or choose between a range. They offer consistent and accurate results for repetitive pipetting.

Variable Volume Micropipettes
Variable volume pipettes give you the flexibility to choose the volume you want to pipette (within the given range). You need to set the volume manually on the dial. High-performance pipettes also come with a volume lock feature for enhanced safety and reliability.

3. Operating Mechanism
Mechanical Pipettes
These are the standard pipettes widely used in all laboratories. Mechanical micropipettes operate on a piston-driven system, where users manually set the desired volume using a dial and apply thumb pressure on the plunger to aspirate and dispense liquids.

Electronic Micropipettes
Electronic micropipettes are more expensive than mechanical ones because they have digital controls, programmability and eliminates the element of human error to a certain extent. It has an electronic display and is ideal for high-throughput labs where reproducibility is paramount.
Components of Micropipette
Plunger
The plunger is one of the main components of the micropipette. Use your thumb to press down on the plunger to aspirate and dispense the liquid.
Then, with a firmer push, sometimes called the “blow-out stop,” it ensures a thorough expulsion of any remaining liquid, guaranteeing accurate measurements—a two-step process of liquid control.
Ergonomics are a key point here since lab professionals will be pipetting repeatedly for long hours. A low-force mechanism which does not require excessive plunge force, will minimize the RSI.
Volume Adjustment Dial
By twisting the volume adjustment dial, you dictate the micropipette’s plunger movement, determining your experiment’s liquid dosage. In micropipettes with adjustable volumes, this feature offers precise measurement control, no matter how small or large the quantity is.
Tip Ejector
Keep your hands and micropipette clean by disposing of used tips promptly. Utilize the convenient tip ejector button to effortlessly remove micropipette tips, ensuring a fuss-free and contamination-free experiment environment.
Tip Cone The tip cone, also known as the shaft, is the crucial component of a micropipette where the disposable tip is inserted. Its primary function is to ensure a snug fit for the tip, ensuring precision in measurements and preventing air leakage. Its adaptable shape accommodates various sizes and styles of tips, allowing for versatile and secure usage without concerns of detachment or disruptions.
Calibration Screw Inside the micropipette lies a crucial component, the calibration screw. This is what makes accuracy possible. Twisting this tiny screw adjusts the liquid output, fine-tuning the micropipette’s performance. Regular checks and tweaks, as advised by the manufacturer, ensure precision in your measurements, keeping everything flowing smoothly.
Applications of Micropipettes in Laboratory
Micropipettes are used to measure any small amount of liquid samples for testing and research. They are crucial in lab settings like molecular biology and diagnostics, precisely transferring tiny liquid volumes, facilitating diverse experiments. Mastery of their principles is key to effective scientific research and analysis.
Some common applications include:
1. Molecular Biology 2. Biochemistry 3. Cell Culture 4. Microbiology 5. Analytical Chemistry 6. Clinical Diagnostics 7. Pharmaceutical Research
How does a Micropipette work?
Micropipettes operate on the principle of air displacement. They consist of a plunger connected to an internal piston, which moves to two distinct positions: Filling Position: When the plunger is depressed to the first stop, the internal piston displaces a volume of air equal to the desired volume shown on the volume indicator dial. This creates a vacuum, drawing the liquid into the tip. Dispensing Position: The second stop on the plunger is used solely for dispensing the contents of the tip without drawing in additional air.
How to use a micropipette?
1. Start with choosing the right micropipette and micropipette tips
Select the one that is best for your application. While pipettes are similar in the way they function, what sets them apart is the accuracy and precision of the measurement, ergonomics and general durability of the instrument.
Set the volume based on your requirement and ensure the tips match the volume of the pipettes.
2. Attach the micropipette tip to the micropipette
Don’t use excessive force here because good quality pipettes will be quick and seamless to attach to the tips and should provide a leak-proof seal.Immerse the pipette in the liquid at 90 degrees Be mindful of your posture and keep the position upright. Aspirate and dispense 2-3 times before actually measuring the liquid
3. Forward or Reverse Pipetting
First let’s talk about forward pipetting:To aspirate the liquid in the tip, press the plunger to the first stop. Immerse the pipette tip vertically in the liquid. Slowly release the plunger while the tip is immersed. The liquid will be aspirated into the pipette tip. To dispense the liquid, place the tip on the inner wall of the receiving vessel at a steep angle Slowly press the plunger to the first stop to dispense the liquid. To empty the tip completely, press the plunger to the second stop.
Now for reverse pipetting
The reverse technique is suitable for dispensing reagents/solutions that have high viscosity or a tendency to foam easily. It is also recommended for dispensing very small volumes.To aspirate the liquid in the tip, press the plunger to the second stop and immerse the pipette tip vertically in the liquid. Slowly release the plunger while the tip is immersed. The liquid will be aspirated into the pipette tip. To dispense the liquid, place the tip on the inner wall of the tube at a steep angle. Slowly press the plunger to the first stop. Finally, eject the tip and dispose it off
Calibration of Micropipettes
Calibration is conducted through gravimetric testing, which involves weighing the amount of pure water delivered in a single operation of the pipette. The obtained mass is divided by the density of water to determine its volume. Variable volume pipettes should undergo testing at three or more points across their designated range, typically at maximum volume, 50% of maximum volume, and the lower limit of their range.
Here’s a general guide on how to calibrate a micropipette:
1. Gather MaterialsMicropipette(s) to be calibrated Appropriate pipette tips Distilled water or a calibration solution Weighing balance with appropriate accuracy (usually in milligrams) Gloves and lab coat for safety
2. Prepare the Micropipette Ensure the micropipette is clean and free from any residue. Attach a fresh and compatible pipette tip to the micropipette.
3. Pre-Wet the Pipette Tip (Optional) For some micropipettes, pre-wetting the tip with the liquid being used can help ensure accuracy. Follow the manufacturer’s recommendations regarding pre-wetting.
4. Prepare the Calibration Solution Use distilled water or a calibration solution recommended by the micropipette manufacturer.
Ensure the calibration solution is at room temperature to minimize density variations.
5. Set the Micropipette to the Desired Volume Adjust the micropipette to the volume you want to calibrate (e.g., if calibrating a 10-100 μL micropipette, set it to 50 μL).
6. Dispense Liquid into a Weighing Boat or Container Dispense the liquid from the micropipette into a weighing boat or a container placed on a weighing balance.
Note down the initial weight (W1) of the liquid dispensed.
7. Weigh the Dispensed Liquid Carefully weigh the liquid dispensed using the weighing balance. Ensure the balance is calibrated and accurate.
Record the final weight (W2) of the liquid.
8. Calculate the Dispensed Volume Subtract the initial weight (W1) from the final weight (W2) to determine the weight of the liquid dispensed (W).
Convert the weight of the liquid dispensed to volume using the density of the liquid or the known density of the calibration solution.
Calculate the actual volume dispensed using the formula:
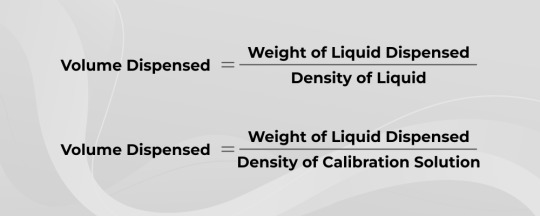
9. Compare with Expected Volume Compare the calculated volume dispensed with the expected volume (e.g., 50 μL for a 10-100 μL micropipette). Calculate the percent error to assess the accuracy of the micropipette calibration:

10. Adjust if Necessary If the percent error is within an acceptable range (typically ±2-5%), the micropipette is calibrated. Otherwise, adjustments may be needed. Consult the micropipette’s user manual for instructions on how to adjust the volume settings. Adjust carefully and recheck the calibration until the desired accuracy is achieved.
11. Record Calibration Data Keep a record of the calibration process, including the micropipette serial number, date of calibration, volume settings, calibration solution used, measured weights, calculated volumes, and any adjustments made.
12. Final Checks After calibration, perform a final check to ensure the micropipette is dispensing accurately and consistently across the volume range.
When is micropipette calibration required?
Micropipette calibration is typically required in the following situations:
Initial Use
New micropipettes should be calibrated before their initial use to ensure accuracy and precision.
Scheduled Calibration
Regular calibration intervals are recommended to maintain the accuracy of micropipettes over time. The frequency of calibration depends on factors such as the frequency of use, the criticality of the measurements, and the manufacturer’s recommendations.
After Maintenance or Repair
Calibration should be performed after any maintenance or repair work on the micropipette to verify that it meets the required specifications.
Change in Operating Conditions
If there is a significant change in the operating conditions, such as temperature or altitude, recalibration may be necessary to account for these factors’ effects on the micropipette’s performance.
Compliance Requirements
Laboratories may have regulatory or quality assurance requirements that mandate regular calibration of micropipettes to ensure traceability and compliance with standards.
Where do we get the best micropipette for the lab?
When purchasing a micropipette for your lab, consider key factors such as accuracy, precision, ergonomics, and ease of maintenance. Research the brands and models, compare specifications, and read user reviews to make an informed decision. Evaluate additional features like adjustable volume settings and compatibility with automation systems. Set a budget and balance costs with desired features. Check warranty coverage and customer support options for added peace of mind.
Cleaning and Maintenance of Micropipettes
1. External CleaningRemove and Clean the Tip Ejector: Begin by detaching the tip ejector and giving it a thorough wipe-down.
Wipe Down All Exposed Surfaces: Take a lint-free cloth or tissue and carefully wipe all visible parts of the micropipette, including the body, buttons, operating rod, and tip holder. Be diligent in cleaning any scuffs, marks, or accumulated debris in hard-to-reach areas.
Use a Brush for Stubborn Debris: If there are persistent stains or dirt, consider using a soft-bristled brush to gently scrub the affected areas.
Reassemble and Allow to Dry: Once the exterior surfaces are clean, reattach the tip ejector and ensure it is securely in place. Leave the pipette to air dry completely before further use. Final Wipe with Cleaning Solution: Finish the cleaning process by wiping down the outer surfaces once more with a cleaning solution to remove any remaining residue. Allow the alcohol to evaporate fully before returning the pipette to service.
2. Internal Cleaning
Cleaning the inside of a pipette should be handled by trained personnel to avoid incorrect reassembly, which can damage the micropipette and affect its performance, leading to decreased accuracy and potential leakage.Disassemble the Micropipette: Carefully take apart the pipette, placing the upper part in a clean, dry area.
Wipe with Alcohol-Coated Wipes: Use alcohol-coated wipes to thoroughly clean the entire interior, including the body, connecting nut, tip holder, O-ring, seal, and the stainless steel surface of the piston. Ensure the piston is completely dry to prevent corrosion.
Allow Alcohol to Evaporate: Let the alcohol evaporate fully from the interior of the pipette. Check for Lubrication Needs: Refer to the instruction manual to determine if any parts, like the piston assembly and seals, require lubrication. Follow the manual’s guidance for reassembly, ensuring proper alignment and placement of components.
Maintaining Micropipettes
When the pipette is not in use it should be stored in an upright position. The pipette should be inspected prior to use each day for any dust or contamination on outside surfaces. Special attention should be given to the tip cone. No solvent other than isopropanol should be used to clean the pipette. If the pipette is used daily, an internal parts inspection should be performed every three months.
Choosing the right micropipette for your applicationEnsure that the micropipette can accommodate the desired range of liquid volumes for your pipetting needs.
Verify if the micropipette features a universal tip cone to accommodate various types of pipette tips.
Check if the micropipette is autoclavable at the necessary temperature to ensure proper sterilization.
Check if the micropipette is UV resistant so that they can be kept inside the hood even when the UV mode is on.
Assess the ergonomic design of the micropipette for smooth and comfortable handling during use. Confirm if the micropipette is calibrated to guarantee precise dispensing of liquids.
Evaluate the accuracy and precision of the micropipette’s readings to ensure compliance with ISO standards.
Ergonomics is a key factor in choosing a pipette because repetitive strain injury is common amongst lab personnel who pipette regularly. Low-force tip ejection and minimal plunge force are crucial.
Accumax Lab Devices specializes in manufacturing high-precision liquid handling instruments for top-tier laboratories worldwide. With a focus on innovation, it offers an advanced range of micropipettes designed to enhance user experience within real-world laboratory settings. Especially our range of FAB and FAB LF pipettes, which are specially designed for accuracy and precision with excellent ergonomics to elevate your pipetting experience like never before.
Micropipette FAQs
1. Can I use any brand of pipette tips with my micropipette?
Whether you can use any brand of pipette tips with your micropipette depends on its tip cone design. If your micropipette has a universal tip cone, it means it’s compatible with a wide range of international pipette tip brands, as long as they’re suitable for your micropipette’s volume capacity.
2. What’s the best way to sterilize my pipette before use?
To clean your micropipette before using it, first, check if it can be sterilized using an autoclave. If it can, follow the instructions in the manual to know the right temperature and duration for sterilization. Make sure to consider the type of liquid you’ll be using it for.
3. Is there a simple way to check if my micropipette is calibrated correctly?
Set it to the usual volume, then dispense water five times. Weigh what you piped out on a scale. If it matches up nicely with the ISO standard, your micropipette is good to go. If not, it’s time for a recalibration.
4. How frequently should I recalibrate my micropipette?
For regular use, it’s good to check your micropipette’s calibration every 3 to 6 months. Following the ISO 8655 standard, it’s recommended to have it calibrated annually.
5. How to adjust the volume of a micropipette?
To adjust the volume on your micropipette, look for the display showing numbers indicating the volume range. If you have a fixed-volume micropipette, the range is predetermined. However, if you have a variable volume micropipette, you can adjust it within the given range by using the rotational dial located at the top of the micropipette plunger. Alternatively, you can consult the manual for specific instructions on changing the volume.
6. Why is it important to avoid touching the tips of the micropipette?
When you touch the tips of a micropipette, you risk transferring oils and other substances from your fingers onto them. This can interfere with the accuracy of volume measurements and potentially contaminate your samples. To maintain precision and avoid contamination, it’s best to handle the micropipette tips only with the instrument itself.
7. What happens if I release the plunger of the micropipette too quickly?
Releasing the micropipette plunger too quickly can lead to inadequate liquid draw up and dispensing, causing potential inaccuracies in your measurements.
8. What should I do if my micropipette isn’t working right?
If your micropipette isn’t working properly, it’s time for some troubleshooting. Start by double-checking if it’s properly calibrated and if the volume setting is correct. Ensure that the pipette tips are securely attached and not damaged. If the issue persists, you might need to clean or maintain the micropipette according to the manufacturer’s instructions. If all else fails, it might be time to consult with a colleague or contact technical support for further assistance.
9. Can my micropipette handle different types of liquids?
Your micropipette is designed to handle a variety of liquids, whether they’re watery solutions, viscous substances, or even oils. As long as you’re using the appropriate tip size and technique, your micropipette can smoothly pipette different types of liquids.
This blog originally posted here: Micropipette Guide 2024: Types, Applications and More
0 notes
Text
A Guide to Analyzing Sds Page for Protein Analysis
Welcome to the comprehensive guide on analyzing SDS-PAGE for protein analysis, brought to you by Kendrick Labs. SDS-PAGE (Sodium Dodecyl Sulfate-Polyacrylamide Gel Electrophoresis) is a widely used technique in the field of protein research and analysis. It allows for the separation and visualization of proteins based on their molecular weights. In this article, we will delve into the principles of SDS-PAGE, the sample preparation process, running the gel, staining and visualization techniques, protein analysis and quantification, troubleshooting tips, and the vital role SDS-PAGE plays in protein research and various applications. Whether you are a beginner starting your journey in protein analysis or an experienced researcher looking for optimization techniques, this guide will provide you with valuable insights and practical knowledge to enhance your understanding and proficiency in SDS-PAGE analysis.
Introduction to SDS-PAGE and Protein Analysis
What is SDS-PAGE?
SDS-PAGE, short for Sodium Dodecyl Sulfate Polyacrylamide Gel Electrophoresis, is a common technique used to separate proteins based on their size. It involves the use of an electric field to drive proteins through a gel matrix, with the addition of sodium dodecyl sulfate (SDS) to denature and impart a uniform negative charge to the proteins.
Importance of Protein Analysis
Protein analysis is crucial for a wide range of scientific disciplines, including biochemistry, genetics, and pharmaceutical research. Understanding the composition and behavior of proteins helps researchers unravel their functions, study protein-protein interactions, diagnose diseases, and develop therapeutic strategies.
Understanding the Principles of SDS-PAGE
Gel Electrophoresis Basics
Gel electrophoresis is a fundamental technique in molecular biology that separates molecules based on their charge and size. In SDS-PAGE, proteins are loaded onto a polyacrylamide gel and subjected to an electric field, causing them to migrate through the gel at different speeds based on their size.
Role of SDS in Protein Denaturation and Charge Neutralization
SDS acts as a detergent that unfolds, or denatures, proteins by disrupting their three-dimensional structure. It also imparts a uniform negative charge to the denatured proteins, allowing them to migrate through the gel based solely on their size.
Sample Preparation and Loading for SDS-PAGE Analysis
Protein Extraction from Biological Samples
To analyze proteins using SDS-PAGE, they first need to be extracted from the biological samples in which they are present. This typically involves disrupting the cells or tissues through methods like sonication, grinding, or enzymatic digestion, followed by centrifugation to separate the soluble protein fraction.
Sample Buffer Preparation and Protein Denaturation
Once the protein extract is obtained, it is mixed with a sample buffer containing SDS and a reducing agent, such as β-mercaptoethanol or dithiothreitol (DTT). The sample buffer denatures the proteins, breaks down protein-protein interactions, and ensures all proteins are negatively charged.
Loading Techniques for SDS-PAGE Gels
To load the denatured protein samples onto the gel, researchers use a micropipette or a small volume-loading tip. Care must be taken to ensure even loading and avoid introducing air bubbles, which can affect the migration of proteins during electrophoresis.
Running the SDS-PAGE Gel and Electrophoresis
Setting up the Gel Electrophoresis System
Preparing the gel electrophoresis system involves assembling the gel apparatus, placing the gel within the gel box or tank, and filling it with an appropriate electrophoresis buffer. This buffer provides the ions necessary for the electrical current to flow, facilitating the migration of proteins.
Gel Casting and Polymerization
Creating the gel involves mixing the appropriate concentrations of acrylamide and bis-acrylamide monomers, along with a catalyst and a crosslinker. This mixture is poured between two glass plates or into precast gel cassettes, where it polymerizes to form the gel matrix.
Loading and Running the Gel
After the gel has polymerized, the samples are carefully loaded into wells created at one end of the gel using a loading buffer. Electrical current is then applied across the gel, causing the proteins to migrate through the gel matrix. The migration distance is inversely proportional to the size of the proteins, resulting in separation.
Remember to have fun in the lab and always embrace the quirks of working with proteins, as they can sometimes be as unpredictable as a reality TV show contestant. Happy gel electrophoresis!
Staining and Visualization of Protein Bands
When it comes to analyzing proteins on SDS-PAGE gels, it's not enough to just separate them. We also need to see them, like a detective needs a magnifying glass. Fortunately, there are different staining methods to help us visualize those elusive protein bands.
Coomassie Brilliant Blue Staining Method
If you're a fan of vivid colors, you'll love the Coomassie Brilliant Blue staining method. It's like a disco party for your protein bands. Simply immerse your gel in a solution containing Coomassie Brilliant Blue dye, and watch as the bands come to life in a beautiful blue hue. It's important to note that this method is best for detecting higher amounts of proteins.
Silver Staining Method
For those who prefer a more understated approach, the silver staining method is the way to go. It's like black and white photography for proteins. This method uses a series of chemical reactions to deposit silver onto the protein bands, making them visible as dark spots on a light background. The silver staining method is known for its sensitivity, allowing detection of even trace amounts of proteins.
Fluorescent Staining Methods
If you want to take your protein visualization to the next level, consider fluorescent staining methods. It's like giving your proteins their own glow sticks. With fluorescent dyes, you can tag your proteins with different colors, allowing for multiplexing and precise detection. Plus, it's just plain cool to see your protein bands glowing under UV light. Just be careful not to get too carried away with the rave party theme.
Protein Analysis and Quantification from SDS-PAGE Gels
Now that you've successfully stained and visualized your protein bands, it's time to dig deeper and extract useful information from those colorful or glowing lines.
Molecular Weight Determination
One of the key pieces of information you can obtain from SDS-PAGE gels is the molecular weight of your proteins. By comparing the migration distances of your protein bands to those of known molecular weight markers, you can estimate the size of your proteins. It's like playing a molecular weight guessing game, but with science.
Protein Quantification Methods
In addition to knowing the size, you might also want to know how much protein you have in your sample. Fear not, for there are various methods available for protein quantification. From colorimetric assays to fluorescence-based techniques, you can choose the method that suits your experimental needs. Just remember to read the instructions carefully and resist the temptation to taste-test the reagents.
Troubleshooting and Optimization Tips for SDS-PAGE Analysis
Ah, the joys of scientific experiments. Sometimes things don't go as planned, and you need to play detective again to solve the mysteries of subpar gel results. But fret not, we have some troubleshooting tips to help you save the day.
Common Issues and Solutions
Have you ever encountered smearing bands or bands that don't show up at all? These are just a couple of the common issues you might face with SDS-PAGE analysis. But don't despair! We've compiled a list of possible causes and solutions to help you overcome these hurdles. Remember, even Sherlock Holmes had his fair share of mysteries to unravel.
Gel Optimization Techniques
If you're looking to optimize your SDS-PAGE analysis, we've got some tricks up our sleeve. From adjusting the pH of your running buffer to fine-tuning the percentage of acrylamide in your gel, there are several variables you can play with to achieve better separation and resolution. Just don't get too carried away and end up with a gel that's more complicated than a Rubik's Cube.
Importance of SDS-PAGE in Protein Research and Applications
Now that you've mastered the art of SDS-PAGE analysis, you might be wondering why it's such a vital technique in the world of protein research. Well, let us enlighten you.
Role of SDS-PAGE in Protein Characterization
SDS-PAGE is like the superhero of protein characterization. It helps scientists determine important details about proteins, such as their size, purity, and subunit composition. It's like peeling off the layers of a protein onion, revealing its hidden secrets.
Applications in Biomedical Research and Pharmaceutical Industry
The applications of SDS-PAGE extend far and wide, reaching into the realms of biomedical research and the pharmaceutical industry. Whether it's analyzing disease markers, studying protein-protein interactions, or ensuring the quality of therapeutic proteins, SDS-PAGE plays a crucial role in advancing our understanding and application of proteins in these fields. So, next time you're in a lab, remember to give SDS-PAGE a high-five for its contributions to science.
In conclusion, SDS-PAGE is a powerful tool for protein analysis that offers valuable insights into the composition and characteristics of biological samples. By understanding the principles, optimizing the techniques, and effectively analyzing the results, researchers can unlock a wealth of information about proteins and their functions. Whether in academic research or industrial applications, SDS-PAGE remains a cornerstone technique in the field of protein analysis. We hope that this guide has provided you with a comprehensive understanding of SDS-PAGE and its various aspects. Armed with this knowledge, you are now equipped to confidently embark on your own protein analysis experiments and contribute to the advancements in scientific discovery and innovation.
FAQs
Can SDS-PAGE be used to analyze proteins of any size?
SDS-PAGE is suitable for the analysis of proteins within a certain size range. Typically, proteins ranging from approximately 5 kDa to 250 kDa can be effectively separated and visualized using SDS-PAGE. However, larger proteins may experience difficulty penetrating the gel matrix, while very small proteins may not migrate well and may require specialized techniques for analysis.
How can I quantify the amount of protein in my SDS-PAGE gel?
There are several methods available for protein quantification from SDS-PAGE gels. One common approach is to use densitometry analysis, which involves measuring the intensity of protein bands using specialized software and comparing them to a known protein standard. Alternatively, you can extract the proteins from the gel and perform quantitative assays such as Bradford, BCA, or Lowry protein assays.
What are some common troubleshooting tips for SDS-PAGE analysis?
Some common issues encountered during SDS-PAGE analysis include poor resolution, uneven or distorted protein bands, and gel artifacts. To address these problems, it is important to ensure proper sample preparation, verify the quality of reagents and equipment, optimize gel conditions such as pH and percentage, and carefully troubleshoot any potential sources of error such as buffer composition or electrical connections.
How long does it take to run an SDS-PAGE gel?
The running time for an SDS-PAGE gel can vary depending on the size of the gel and the desired resolution. Typically, a standard SDS-PAGE gel is run for 1-2 hours at constant voltage (e.g., 100-150 volts) or until the tracking dye reaches the bottom of the gel. However, larger gels or specialized applications may require longer run times. It is important to monitor the progress of the run and ensure that the gel does not overheat or dry out during the process.
Original Source: https://kendricklabs.blogspot.com/2024/02/a-guide-to-analyzing-sds-page-for.html
0 notes
Text
Denudation Pipettes in IVF
In the field of assisted reproductive technology (ART), particularly in vitro fertilisation (IVF), precision and care are of paramount importance. Among the myriad tools used in IVF procedures, denudation pipettes play a crucial role in ensuring the success of various steps, from oocyte preparation to embryo transfer. This article explores the significance, design, and applications of denudation pipettes in IVF.
What Are Denudation Pipettes?
Denudation pipettes are specialised laboratory instruments designed for handling and manipulating oocytes during the IVF process. They are thin, cylindrical tools with precisely controlled diameters, used primarily to remove the cumulus cells surrounding the oocyte. This process, known as denudation, is essential for assessing the maturity of the oocyte and preparing it for subsequent fertilisation steps.
Cryolab Denudation Product Range
Cryolab Denudation Pipettes – Straight Cut – Cryolab Specialised tools for the precise removal of the outer layer surrounding an embryo during assisted reproductive procedures. These straight-cut micropipettes are available in a range of inner diameters (125μm to 300μm) to accommodate various embryo sizes and stages of development. Their ergonomic design ensures precise handling and minimal disruption to embryo integrity during denudation.
Cryolab ICSI Pipettes – Angled Cut – Cryolab Meticulously designed for intracytoplasmic sperm injection (ICSI) procedures, enabling precise injection of a single sperm into an egg. These pipettes have inner diameters ranging from 4 to 6μm, bend angles from 0° to 35°, and bevel lengths from 11 to 20μm, ensuring optimal control and accuracy during ICSI manipulations. The angled cut provides an ideal orientation for smooth sperm delivery and reduced handling time.
Cryolab Holding Pipettes – Straight Cut – Cryolab Specialised tools designed for securely holding embryos during various micromanipulation procedures, including biopsy and assisted hatching. These straight-cut pipettes are available with inner diameters ranging from 15 to 30μm and bend angles from 0° to 35°, providing flexibility and precision in embryo handling. Their robust design allows for steady immobilisation of embryos, critical for success in advanced ART procedures.
Cryolab Biopsy Micropipettes – Straight Cut – Cryolab Specialised tools used for extracting small samples of cells from an embryo during preimplantation genetic testing procedures. These pipettes feature straight cuts with inner diameters from 20 to 40μm and bend angles from 20° to 35°. The carefully controlled dimensions ensure efficient and gentle cell sampling without compromising the embryo’s viability.
Applications of Cryolab Pipettes
Cryolab micropipettes are widely used across ART for various critical steps, including:
Denudation: Preparing oocytes for fertilisation by removing cumulus cells.
ICSI: Directly injecting a single sperm into the oocyte to facilitate fertilisation.
Embryo Holding: Stabilising embryos during procedures such as assisted hatching and genetic biopsies.
Biopsy: Extracting cells for preimplantation genetic diagnosis or screening.
Additional Features of Cryolab Pipettes
Durable Glass Construction: High-quality borosilicate glass ensures precision, durability, and biocompatibility.
Ergonomic Handling: Designed for use with micro-manipulators to ensure ease of operation and maximum control.
Consistent Performance: Each pipette is rigorously tested to meet industry standards, ensuring reliability in sensitive ART procedures.
Why Cryolab Pipettes?
Cryolab’s commitment to quality ensures that IVF specialists and laboratories have access to the best products for their work. With a comprehensive range of pipettes suited for different ART applications, Cryolab continues to support advancements in fertility treatment. Our products are trusted by professionals worldwide for their precision, reliability, and exceptional design.
Contact Us
For more information about our cryogenic products or to place an order, please email us at [email protected] or visit www.cryolab.co.uk. We are committed to providing cryo products that empower healthcare professionals and laboratories to achieve success in assisted reproduction.
0 notes
Text
Lab Equipment
1. Beakers and Flasks: Foundations of Measurement
Beakers and flasks are iconic symbols of laboratory Equipment work, serving as vessels for holding, mixing, and measuring liquids. Beakers come in various sizes, typically marked with volume gradations for accurate measurement. They are versatile, allowing scientists to perform tasks such as stirring, heating, and pouring. Flasks, on the other hand, often have narrower necks and are used for more precise measurements and reactions where evaporation needs to be minimised. Together, these basic containers form the backbone of liquid handling in labs worldwide.
2. Microscopes: Unlocking the Microcosm
Microscopes are indispensable lab equipment tools for exploring the microscopic world. They enable scientists to magnify objects hundreds or even thousands of times, revealing details that are invisible to the naked eye. From examining cells and microorganisms to analyzing materials at the nanoscale, microscopes play a crucial role in fields such as biology, medicine, materials science, and beyond. With advancements like electron microscopy and confocal microscopy, researchers can delve even deeper into the intricacies of the microcosm.
3. Centrifuges: Separating Powerhouses
Centrifuges harness the principles of centrifugal force to separate substances based on their density. By spinning samples at high speeds, centrifuges cause heavier particles to settle at the bottom while lighter components rise to the top. This process is invaluable for tasks such as isolating DNA, purifying proteins, and separating blood components in medical diagnostics. Modern centrifuges offer a range of capabilities, including variable speed settings, temperature control, and specialized rotors for specific applications.
4. Spectrophotometers: Shedding Light on Chemical Analysis
lab equipment Spectrophotometers are instrumental in quantifying the amount of light absorbed or transmitted by a substance across different wavelengths. This information is used to determine the concentration of analytes in solutions, making spectrophotometry a cornerstone technique in fields like biochemistry, environmental science, and pharmaceuticals. UV-visible spectrophotometers are commonly used for measuring organic compounds, while infrared and atomic absorption spectrophotometers cater to different analytical needs.
5. Incubators and Ovens: Cultivating Conditions
lab equipment and ovens provide controlled environments for cultivating cells, growing cultures, and conducting experiments that require specific temperature and humidity conditions. Incubators are crucial for cell culture work, microbiology research, and molecular biology techniques like PCR (polymerase chain reaction). Ovens, on the other hand, are used for sterilization, drying, and heat treatments in applications ranging from sample preparation to materials testing.
6. Pipettes and Dispensers: Precise Liquid Handling
Pipettes and dispensers are precision instruments used for transferring precise volumes of liquids. Manual pipettes are operated by hand and are available in various formats, including micropipettes for small volumes and multichannel pipettes for high-throughput applications. Automated pipetting systems offer increased efficiency and reproducibility, making them ideal for tasks like serial dilutions, liquid handling in high-throughput screening, and molecular biology workflows.
7. Analytical Balances: Weighing with Precision
Analytical balances provide accurate measurements of mass, essential for tasks like preparing solutions, dosing reagents, and determining the purity of substances. These balances offer high precision, often capable of measuring weights down to the microgram or even nanogram level. They are equipped with features such as draft shields to minimize environmental interference and calibration routines to ensure accuracy.
lab equipment, the workhorses of any laboratory. Beakers, test tubes, and flasks, made from durable glass, are used for mixing, storing, and heating various substances. Pipettes, with their precise markings, ensure accurate measurements of even the smallest volumes. And who can forget the ubiquitous Bunsen burner, providing heat for countless experiments?
Delving deeper:
As we move beyond the basics, we encounter a world of specialized equipment. Microscopes, with their powerful lenses, unveil the unseen world of cells and microorganisms. Centrifuges separate mixtures based on density, while spectrometers analyze the composition of materials. Each piece of equipment is designed for a specific purpose, contributing to the scientific process in its own unique way.
The cutting edge:
Modern science is constantly evolving, and so is the equipment that supports it. Advanced tools like 3D printers and gene sequencers are pushing the boundaries of what’s possible. These sophisticated instruments allow scientists to create complex structures, analyze DNA, and unlock the secrets of life itself.
Beyond the tools:
But lab equipment is more than just tools. They are partners in discovery, silent witnesses to countless experiments and breakthroughs. They represent the dedication and ingenuity of scientists, engineers, and technicians who design, build, and use these instruments to push the frontiers of knowledge.
0 notes
Text
Understanding the Distinction: Burette vs. Pipette
In the realm of laboratory liquid handling, understanding the differences between a burette and a pipette is crucial. While both instruments are used for the precise dispensing of liquids, they serve distinct purposes.
A pipette is primarily utilized for accurately measuring and transferring fixed volumes of liquid from one container to another. It typically comes in various sizes and types, such as micropipettes and serological pipettes, catering to different volume requirements.
On the other hand, a burette is designed specifically for dispensing variable volumes of liquid, typically during titration procedures. It allows for precise control over the addition of reagents to a sample, ensuring accurate measurement of the volume added.
In essence, the major difference lies in their functionality: pipettes measure and transfer fixed volumes, while burettes dispense variable volumes. Both instruments play integral roles in laboratory procedures, contributing to the precision and reliability of experimental results.
0 notes