#microsofthyper
Explore tagged Tumblr posts
Visit Tumblr Blog
Explore Tumblr blogs with no restrictions, modern design and the best experience.
Last Seen Tumblr Blogs


Fun Fact
Tumblr has 16.74 million mobile monthly users in the US.
Text
Windows Admin Center Preview 1910.2

Windows Admin Center Preview 1910.2.
What’s new
Cut, copy, and paste in the Files tool

When you select a folder or file in the Files tool, users have the option to cut or copy the file or folder. After the file or folder is cut or copied, the paste option will become available, and a user can paste the file or folder into a different path. Service restart

When managing machines using the Services tool, there is now an option to restart a service. There is no longer a need to start and stop a service in order to restart it. Other major additions Cluster quick update – On the cluster dashboard, updates for connected nodes will appear under the “Alerts” sectionFile upload – when a large file upload fails, you are now able to retry the file uploadVirtual machine filters – When viewing a list of VMs with multiple filters applied, the VMs no longer disappear after some timeAzure Update Management login – Users no longer receive a logon error when they try to setup Azure update management after setting up Azure monitoringActive Directory account creation – We’ve fixed an error in Active Directory Domain Services where accounts could be created with passwords that didn’t meet the complexity requirements In addition to the new features and fixes above, we are continuing to improve usability issues, focusing on making improvements to keyboard navigation and narrator support. We’ve also addressed reported bugs around CredSSP authentication.
Partner extensions
The Windows Admin Center ecosystem continues to expand with the release of new partner extensions and improvements on existing extensions. Azure Security Center is now generally available The Azure Security Center extension is no longer in preview and is now generally available! This extension brings hybrid cloud security capabilities to the WAC-managed servers and allows them to be protected by ASC through a one-click setup. Users of this extension will also see security recommendations and alerts in an embedded view in Windows Admin Center. This integration is part of a larger WAC movement of bringing hybrid Azure services capabilities to on-premises environments. This extends on premise environments into Azure, allowing them to benefit from cutting edge cloud technologies on their on-premises workload, and is an important step as part of a lift and shift motion. HPE WAC extension is now generally available The HPE WAC extension combines the functionality of the HPE Server extension and the HPE Azure Stack HCI extension into a single extension for easier management. This extension utilizes HPE’ iLO technology to give users direct visibility into server inventory and diagnostics to manage and monitor HPE server infrastructure. Using this extension, users can: See the health of their servers and remediation options (if necessary)View the properties of server components (processor, memory, etc.) and BIOS settingsSurface and highlight cluster health and node inconsistencies QCT Management Suite update The QCT Management Suite is designed to help users manage and monitor their Windows Server hyper-converged infrastructure and QCT system configuration information on a single dashboard. With the upgrade to version 2.0.0, fixes and additions include: Bug and typo fixes throughout the toolSupport for HCI mode on the Overview, Disk, Firmware, and Settings tabAdditional tooltipsAddition of dialog panels and drop-down lists in HCI modeBMC account settings for Redfish supportAn updated project site URL
Known issues
Virtual Machines tool performance line charts are styled incorrectly. This will be fixed in the next Release Candidate build.Azure Monitor onboarding – If you’re managing a server or a cluster using “manage as” credentials, the onboarding may fail.Network – If you have configured an Azure Network Adapter, the value under Microsoft Azure Virtual Network Gateway Address will be formatted as a hyperlink but leads to an invalid address.Chrome users may see 403 Forbidden response from WAC after upgrading. The workaround is to close *all* open chrome tabs (make sure there are no chrome.exe processes running). After restarting chrome, everything will function normally. We have an error message that makes this clear, but chrome users with multiple windows admin center tabs open during upgrade will not see the message.Performance Monitor has trouble loading certain v2 perf counter instances.Performance Monitor can slow down less powerful machines (especially client computers).Schedule restart tool in “Updates” restarts immediately Read the full article
#ActiveDirectory#MicrosoftAzure#MicrosoftHyper-V#MicrosoftWindowsAdminCenter#MicrosoftWindowsServer#Windows#Windows10#WindowsServer2012R2#WindowsServer2016#WindowsServer2019
0 notes
Text
Hyper-V CD/DVD drive device driver is missing

Hyper-V CD/DVD drive device driver is missing. In the installation process of Windows as a VM in HyperV, the following error may suddenly come up: (Load driver) A required CD/DVD drive device driver is missing. If you have a driver floppy disk, CD, DVD, or USB flash drive, please insert it now.Note: If the Windows installation media is in the CD/DVD drive, you can safely remove it for this step.

The cause of this error: a corrupted ISO file or the ISO download was incomplete. The easiest solution for this: download the ISO file again from a trusted source. Read the full article
0 notes
Text
Configuration Manager Task Sequence failed with the error code (0x800705AA)

Configuration Manager Task Sequence failed with the error code (0x800705AA). At deployment process you can encounter next error: Task Sequence: Deploy Windows 10 has failed with the error code (0x800705AA) This error may occur when the minimum requirements do not match the current system specs. In most cases it's about HyperV Virtual Machine configured with: Startup memory: 512 MB Minimum memory: 512 MB Maximum memory: 4096MB Configuration Manager Task Sequence requires more memory to install the WIM-file to the drive. To solve this issue you must increase Minimum and Startup memory to 2048 MB or use fixed memory size, also 2048. After increasing Virtual Machine memory the Task Sequence will run successfully. Read the full article
#MECM#MEMCM#MicrosoftEndpointConfigurationManager#MicrosoftHyper-V#SystemCenterConfigurationManager#Windows
0 notes
Text
Hyper-V The version does not support this version of the file format

Hyper-V The version does not support this version of the file format. The following error occurred when trying to start a VM with a preconfigured VHD from the Microsoft website: ” failed to start. Microsoft Emulated IDE Controller (Instance ID x) Failed to Power on with Error ‘The version does not support this version of the file format’. Failed to open attachment…
Solution 1
1. Make a copy of the VHD file; 2. Remove the original VHD from the issued VM; 3. Attach copied early VHD to the VM; 4. Start VM.
Solution 2
Also, you can use Far Manager to clear the sparse attribute. Navigate to the file and press Ctrl + A to open Attribute dialog. Clear Sparse checkbox. And click Set button.

Solution 3
You can use fsutil from Windows PowerShell to clear the sparse attribute: 1. Run Windows PowerShell with elevated rights; 2. Type the next command: fsutil sparse setflag 0 As example fsutil sparse setflag D:\Hyper-V\demo.vhd 0 Read the full article
0 notes
Text
Windows Admin Center 1910

Windows Admin Center 1910.
User Experience
Add connections: A new entry page for the add connection experience simplifies the process of adding any supported connection type in the Windows Admin Center.
Platform
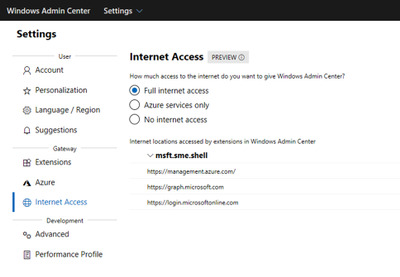
Connectivity settings: Under Settings, Internet Access lets users in completely disconnected environments specify that they are offline so that Windows Admin Center does not try to perform any actions that require internet access.
WinRM over HTTPS: A top user request, you now have the option to choose WinRM over HTTPS (port 5986) as the method of connection to your managed nodes. Optionally select this configuration when installing Windows Admin Center 1910, on the Configure Gateway Endpoint page when running the installer.
Core Tools
Virtual machines tool: Import/Export VM – We’ve added Import/Export buttons to the Virtual Machines tool for importing VMs from and exporting VMs to a local volume or remote file share. When importing VMs, you have the option to create a new VM ID, and copy the VM files or use them in-place. You can also rename VMs during the import process if we detect that the VM’s name already exists.VM tagging – Similar to the UI for tagging connections in Windows Admin Center, you can now tag VMs on a Hyper-V server! In the Virtual machines tool’s Inventory tab, an “Edit tags” button has been added to manage tags. These tags are saved on the Hyper-V host server and can be accessed by other admins. VM tags are also supported for Hyper-V clusters.VM live migration – VM live migration is now supported for Hyper-V clusters and standalone servers! You can live migrate a VM from a server or cluster, to a server or cluster in any combination and Windows Admin Center will take care of clustering the role and live migration configuration if necessary.Performance improvements – Significant performance improvements have been made to reduce page load time in the Virtual machines tool. Updates tool: You can now select individual Windows updates to install.Overview tool: Windows Admin Center now includes a banner on the Overview tool that notifies you when a reboot is pending on the server/computer being managed.Performance Monitor tool: PerfMon has been part of Windows for over 25 years, and in all those years, it hasn’t changed much. For the first time ever, Microsoft is re-imagining the experience of working with performance counters from scratch.

Packet Monitor tool: Packet Monitoring is a new feature that allows you to diagnose your server by capturing and displaying network traffic through the networking stack in a log that is filtered, organized, and easy to follow and manipulate. Currently, only recent SAC versions of Windows Server are supported, but support for Windows Server 2019 is coming soon.IIS tool: A preview release of the IIS tool is now available in the Extensions feed. It provides much of the functionality in IIS Manager to administer and manage your web servers.
Hybrid
Azure hybrid services tool: Content now loads from an online feed to ensure the latest available services are always shown.Switch accounts: From the Account menu in Settings, you can now switch between multiple Azure accounts.Cost estimates: Azure hybrid integrations within Windows Admin Center now include a hyperlink to Azure, to discover and understand the estimated cost of that service once onboarded.Add Azure VM: Azure VMs are now a top-level connection type. When a server is added this way, it appears in the connections list as “Server (Azure VM)” so you can easily see which of your servers are Azure VMs.Create Azure VM: Azure VMs can now be provisioned directly from within Windows Admin Center.Azure Arc for servers: Leverage Azure policies and solutions to manage your servers. Inventory, organize, and manage on-premises servers from Azure. You can govern servers using Azure policy, control access using RBAC, and enable additional management services from Azure. Azure Security Center: Get unified security management and advanced threat protection with Azure Security Center. Monitor security across hybrid workloads, apply policy to ensure compliance, find and fix vulnerabilities, block malicious activity, detect attacks, and simplify investigation for rapid threat response.Azure File Sync: Sync your file server with the cloud. Centralize file shares in Azure while caching frequently accessed files on your local file servers. The updated version of the Azure File Sync extension now enables end-to-end provisioning and configuration within Windows Admin Center.S2S VPN / Azure Extended Network: Previewing in the Extensions feed, added ability in Gateway Connections extension to setup Site to Site VPN connection between SDN virtual network and Azure virtual network, enabling seamless migration of on-prem applications to Azure without any IP address changes thanks to private IP carryover (extends your SDN virtual network into Azure vNet).Azure Monitor: Windows Admin Center can now onboard Cluster connections to Azure Monitor: To configure Azure Monitor for your cluster, navigate to Settings -> Monitoring Alerts. The onboarding process will help set up the log analytics workspace in Azure and install the appropriate local agents on each server in your cluster to help you collect events and performance counters for analysis, reporting, and alerting.Storage Migration Service: Storage Migration Service helps migrate on-premises file servers to Azure, and upgrade to newer versions of Windows Server in the process. You can now create Azure Virtual Machines on the fly during migration, automatically size them, provision them with formatted storage, and join them to your domain – while allowing you to migrate from legacy operating systems, Samba on Linux, and standalone servers to the latest versions of Windows Server and failover clusters.Storage Replica: You can now use Azure as your secondary site for Storage Replica. Windows Admin Center now supports creating Azure Virtual Machines on the fly during setup of new asynchronous replication partnerships so that Azure can help protect your business from disasters with minimal data loss.Azure Cloud Shell: Cloud Shell is now accessible from within Windows Admin Center via the Extensions feed. Cloud Shell provides a browser-based, authenticated, interactive shell experience to manage your Azure resources. Cloud Shell comes with common command-line tools by default, and any new tools or files that you save will be persisted and available during your next session.
Hyperconverged infrastructure (HCI)
Deploy Azure Stack HCI: Get the Cluster Creation preview from the Extensions feed to use Windows Admin Center version 1910 to deploy an Azure Stack HCI cluster using two or more suitable Windows Servers. This new feature takes the form of a multi-stage workflow that guides you through installing features, configuring networking, creating the cluster, and deploying Storage Spaces Direct and/or software-defined networking (SDN) – reducing what used to take hours of complex, error-prone PowerShell to something straightforward even for relative newcomers. This feature is in Preview so you can try it early and share your feedback. Clustering:Unified connection type - The two separate connection types for hyper-converged clusters and failover clusters have been merged into a single, unified connection type. Clusters can be added as a “Windows Server cluster” and the appropriate tools will be loaded and available, primarily based on whether Storage Spaces Direct is enabled or not. Hyper-converged cluster connections and failover cluster connections added from previous versions of Windows Admin Center will be automatically migrated to the new cluster connection type.New tools – Azure Monitor and Performance Monitor tools for clustersCluster settings – Rename cluster, node shutdown behavior, cluster traffic encryption, VM load balancing, quorum witness, in-memory cache, and Get-ClusterS2D Hyper-V: All new features described in the Core Tools section above for standalone Hyper-V hosts are also applicable for hyperconverged clusters: Import/Export VMs, VM tagging, VM live migration, and performance improvements.Storage Spaces Direct: Identify noisy VMs - You can now more easily identify which VMs are consuming resources. For example, on the volume page, VMs using that volume are listed under the Related heading, where you can sort by IOPS, IO throughput, and capacity usage. Likewise, on the server page, related VMs and can be sorted by processor, memory, and network usage. There is also bi-directional cross-linking between the pages for servers, volumes, and VMs to streamline navigation.Storage tiers - You can see individual storage tiers (if any) on the volume detail page. Software Defined Networking: FlowLog Audit - Flowlog auditing is a new capability for the SDN firewall in Windows Server 2019. When you enable SDN firewall, any flow processed by SDN firewall rules (ACLs) that have logging enabled gets recorded. These logs can be used for diagnostics or archived for later analysis. With the new “Flowlog Audit” extension in Windows Admin Center, you can easily manage, search and filter the SDN logs for analysis and diagnostics. It can be difficult to gain insights into flow logging data by manually searching the log files. In this extension, you can also upload the log to Azure Blob, then use Power BI to visualize your most recent flow logs and learn about traffic on your network.SDN Load Balancer - Allows users to create LBs that evenly distribute tenant customer network traffic among virtual or physical network resources. The SDN Load balancer enables multiple servers to host the same workload, providing high availability and scalability.SDN Public IP - Public IPs enable inbound and outbound communication between SDN resources and the Internet. Public IP Addresses can be associated with SDN Gateway pools, Internet-facing load balancers, as well as network interfaces.
Ecosystem
The Windows Admin Center ecosystem continues to grow! Dell EMC, HPE, Thomas-Krenn.AG and BiitOps have newly released Windows Admin Center extensions in the past few months. Dell EMC released the Dell EMC OpenManage Integration v1 extension earlier this year in August. The Dell EMC extension provides a dashboard view of hardware component health, component inventory, iDRAC information and update compliance report for servers and Azure Stack HCI solutions.HPE released preview versions of the HPE Proliant Server extension and HPE Azure Stack HCI extension today. The HPE Proliant Server extension displays server health and remediation options, server component info and BIOS settings. The Azure Stack HCI extension additionally highlights firmware and driver version inconsistencies between nodes.Thomas-Krenn.AG released their Azure Stack HCI extension earlier this year in May. This extension provides detailed information on cluster nodes and drives, cluster information and cluster network connectivity.BiitOps extension provides configuration change tracking for on-premises servers and clusters. Easily zoom in and see full details for software and hardware changes made across your servers using the BiitOps extension’s powerful graphical interface. In addition, the Lenovo XClarity Integrator extension became generally available in August, and DataON, QCT, Pure Storage have also released extension updates recently. Read the full article
#MicrosoftAzure#MicrosoftHyper-V#MicrosoftWindowsAdminCenter#MicrosoftWindowsServer#Network#WindowsServer2019
0 notes
Text
Windows 10 Hyper-V install

Windows 10 Hyper-V install. What tools you can use for Hyper-V Windows 10 installation: Graphical Interface (GUI) Command Prompt (CMD) or DISM PowerShell
Hyper-V System Requirements
Before you can learn how to install Hyper-V, it is imperative to ensure that your computer can meet all the system requirements. The general system requirements are the following: 64-bit Processor with at least 1.4 GHz CPU speedSecond Level Address Translation (SLAT), which is used to reduce the hypervisor overhead and enhance the performance of the virtual machines (VMs)Support for VM Monitor Mode ExtensionsMinimum of 4 GB RAM to ensure that each running VM is allocated enough memory for efficient performanceHardware-assisted virtualization enabled through Intel Virtualization Technology (Intel VT) or AMD Virtualization (AMD-V) technologyHardware-enforced Data Execution Prevention (DEP) with the Intel XD bit (execute disable bit) or the AMD NX bit (no execute bit) To check whether your system meets all the requirements for installing Hyper-V, open Windows PowerShell or Command Prompt and type Systeminfo.exe. Scroll down to find the Hyper-V requirements section and check whether all the Hyper-V requirements read Yes. If they do, you can start to install Hyper-V on your computer. If any of the elements listed indicates No, try to make the necessary adjustments and rectify the issue.
Windows 10 Hyper-V install with Graphical Interface (GUI).
Before we start – LMB (Left Mouse Button) & RMB (Right Mouse Button). 1. Click RMB on Windows button and then LMB on “Control Panel“:

2. In the opened Control Panel LMB on “Programs and Features“:

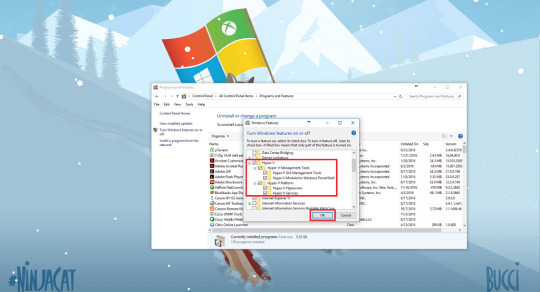
3. Than LMB on “Turn Windows Features on or off” (you must have admin rights for doing this):

4. In the opened window select all in “Hyper-V” and click LMB “OK“:
5. After that begin installation:

6. When installation finished LMB “Restart now” for reboot:

7. After rebooting click LMB on start button and find in application list “Windows Administrative Tools“:

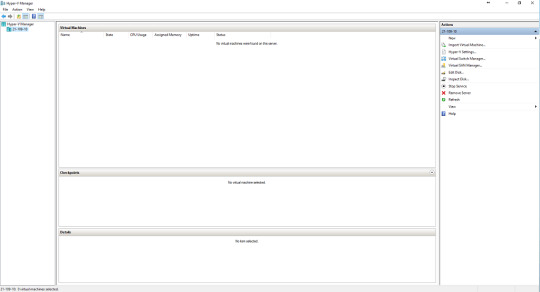
8. In “Windows Administrative Tools” LMB “Hyper-V Manager” (you may pin that where you need):

9. That’s all, we deploy hyper-v in windows 10:
(adsbygoogle = window.adsbygoogle || ).push({});
Windows 10 Hyper-V install with CMD (DISM)
1. Run CMD with admin rights Command Prompt (Admin):

2. In the opened windows insert next string: DISM /Online /Enable-Feature /All /FeatureName:Microsoft-Hyper-V And press Enter:

3. After installation is finished – you need reboot your machine by pressing Enter. You may set “n” and press Enter, and reboot later. Hyper-V will work only after reboot.

4. After reboot is finished – check our Hyper-V. Press Start button to show your apps. In the apps find folder Windows Administrative Tools, in the folder run Hyper-V Manager:

5. And we get that we need:
(adsbygoogle = window.adsbygoogle || ).push({});
Windows 10 Hyper-V install with PowerShell
1. Press Start button, in the programs list find Windows Power Shell folder. Run PowerShell with admin rights:

2. Wait until PowerShell start:

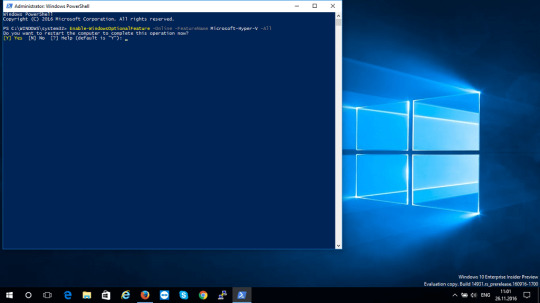
3. After PowerShell start – enter next command: Enable-WindowsOptionalFeature -Online -FeatureName Microsoft-Hyper-V -All

4. Press Enter to start:

5. When installation complete – you must reboot your device, press Enter. Hyper-V will work only after reboot.
6. After reboot is finished – check our Hyper-V. Press Start button to show your apps. In the apps find folder Windows Administrative Tools, in the folder run Hyper-V Manager:
7. After all – we get what we need.
Read the full article
0 notes
Text
Hyper-V VM stuck in Stopping state

Hyper-V VM stuck in Stopping state. It stuck in the Stopping or Running state in and doesn't give any Turn Off, Shutdown, Save, Pause or Reset options. One way its possible to kill off that stuck virtual machine is to open Task Manger and end the task responsible for that machine. Unfortunately its not quite that simple because the Virtual Machine Worker Process which is responsible for running the virtual machine appears numerous times, once for each running guest machine!
Method 1
If you have small amound of VM's: Open Task Manger and view the Details tab;You will see many vmwp.exe running process with Username column including the machine GUIDs;Browse to the location where the virtual machines are stored and open the folder of the virtual machine which is currently hung. From here we can find the machine configuration file and make note of the GUID for that machine;Now we know which GUID relates to the virtual machine that we are looking to stop. Jump back to Task Manger, right click on the correct process and End Process. NOTE: this process should only be used as a last resort as it could cause corruption of the virtual machine!
Method 2
If you have bunch of running VM's. The fastest way is to find needed VM GUID with powersell command. Get-VM | fl *

Now we know which GUID relates to the virtual machine that we are looking to stop. Jump back to Task Manger, right click on the correct process and End Process. This command pulls a list of virtual machine names and GUIDs then compares that to a list of GUIDs in the Command Line of the processes running and returns virtual machine names with the associated Process ID (not VM GUID). Get-WmiObject Win32_Process -Filter "Name like '%vmwp%'" | %{$vm=get-vm -id $_.CommandLine.split(" ");"$($_.processID)`t$($vm.name)"}
Method 3
Use Sysinternals Process Explorer. Read the full article
0 notes