#my solution when giffing was to remove (most of) those frames
Explore tagged Tumblr posts
Visit Tumblr Blog
Explore Tumblr blogs with no restrictions, modern design and the best experience.
Last Seen Tumblr Blogs


Fun Fact
In February 2021, Tumblr had 518.6 million blog accounts.
Text


Mark Owen's Celebrity Scooters Episode 1: Brussels Eight episode series wherein Mark Owen and celebrity mates old and new travel around the eight cities of the Euro 2000 on scooters. In each city they take in the sites and atmosphere, mess about, and play a bit of football.
#mark owen#take that#hoping wishing and waiting for more episodes to one day be available online#the uploader's file had some issues on conversion to digital which meant the video has these weird blue lines throughout#my solution when giffing was to remove (most of) those frames#makes the gifs a bit jumpy sometimes but believe me it's better than keeping them in#short clips incoming as well bc they're moments I thought were neat#nbsd: gif#mine#2000
13 notes
·
View notes
Text
My GIF Making process: Screen capturing using MPV player, Organizing files, 3 Sharpening settings, Basic Coloring PSD + Actions set

This is a very long post so heads up.
I’ll try to be as thorough and true as much as possible to the way I make my gifs (I already use Photoshop Actions which I’ve long since set up but now for this tutorial I’m reviewing them to show you the exact steps I’ve learned to create my gifs 😃) and present them to you in a semi-coherent way. Also, please bear with me since English is my second language.
First things first. Below are the things and tools we need to do this:
Downloaded 4K or 1080p quality videos (let’s all assume we know where to get these—especially for high definition movies and tv series—so this post doesn’t get removed, okay? 😛)
Adobe Photoshop CC or the CS versions can work as well, but full disclosure I haven’t created gifs using the CS versions since 2020. I’m currently using Adobe Photoshop 2024.
mpv player. Use mpv player to get those frames/screenshots or any other video player that has a screen grabber feature. I’ve used adapter for the longest time but I’ve switched to mpv because the press to screenshot feature while the video is playing has been a game changer not to mention ultimate time saver for me. For adapter you need to play it in another video player (like VLC player), to get the start and end timestamps of the scene you want to gif which takes me ages before I can even open Photoshop.
Anyway! Please stop reading this post for a moment and head over to this amazing tutorial by kylos. She perfectly tells you how to install and use mpv player, both for Mac and Windows users.
One thing I have to share though, I had a tough time when I updated my MacOS to Sonoma since MPV is suddenly either duplicating frames or when I delete the duplicates the player seems to be skipping frames :/ I searched and found a solution here, though it didn’t work for me lol. My workaround for this in the meantime is decreasing the speed down to 0.70 then start screenshotting—it’s not the same pre Sonoma update but it works so I’ll have to accept it rather than have jumpy looking gifs.
Now, after this part of kylos’ tutorial:

you can continue reading the following sections of my gif tutorial below.
I want to share this little tip (sorry, this will only cater to Mac users) that I hope will be helpful for organizing the screenshots that MPV saved to the folder you have selected. Because believe me you don’t want to go through 1k+ of screenshots to select just 42-50 frames for your gif.
The Control + Command + N shortcut
This shortcut allows you to create a new folder from files you have pre-selected. As you can see below I have already created a couple of folders, and inside each folder I have selected screenshots that I want to include in one single gif. It's up to you how you want to divide yours, assuming you intend to create and post a Tumblr gifset rather than just one gif.

Another tip is making use of tags. Most of, if not all the time, I make supercorp gifs so I tag blue for Kara and red (or green) for Lena—just being ridiculously on brand and all that.
Before we finally open Photoshop, there's one more thing I want to say—I know, please bear with me for the third? fourth? time 😅
It's helpful to organize everything into their respective folders so you know the total number of items/frames you have. This way, you can add or delete excess or unnecessary shots before uploading them in Photoshop.
For example below there are 80 screenshots of Kara inside this folder and for a 1:1 (540 x 540 px) Tumblr gif, Photoshop can just work around with 42-50 max number of frames with color adjustments applied before it exceeds the 10 MB file size limit of Tumblr.

Sometimes I skip this step because it can be exhausting (haha) and include everything so I can decide visually which frames to keep later on. You'll understand what I mean later on. But it's important to keep the Tumblr 10 MB file size limit in mind. Fewer frames, or just the right amount of frames, is better.
So, with the screenshot organization out of the way, let's finally head over to Photoshop.
Giffing in Photoshop, yay!
Let’s begin by navigating to File > Scripts > Load Files into Stack…

The Load Layers window will appear. Click the Browse button next.
Find your chosen screenshots folder, press Command + A to select all files from that folder then click Open. Then click OK.
After importing and stacking your files, Photoshop should display the following view:

By the way, I'll be providing the clip I've used in this tutorial so if want to use them to follow along be my guest :)
If you haven't already opened your Timeline panel, navigate to Windows > Timeline.
Now, let's focus on the Timeline panel for the next couple of steps.
Click Create Video Timeline, then you’ll have this:

Now click the menu icon on the top right corner then go to Convert Frames > Make Frames from Clips

Still working on the Timeline panel, click the bottom left icon this time—the icon with the three tiny boxes—to Convert to Frame Animation
Select Make Frames From Layers from the top right corner menu button.
So now you have this:

Go and click the top right menu icon again to Select All Frames
Then click the small dropdown icon to set another value for Frame Delay. Select Other…

The best for me and for most is 0.05 but you can always play around and see what you think works for you.
Click the top right menu icon again to Reverse Frames.
I think Photoshop has long since fixed this issue but usually the first animation frame is empty so I just delete it but now going through all these steps there seems to be none of that but anyways, the delete icon is the last one among the line of feature buttons at the bottom part of the Timeline panel.
Yay, now we can have our first proper GIF preview of a thirsty Lena 😜

Press spacebar to watch your gif play for the very first time! After an hour and half of selecting and cutting off screenshots! 😛 Play it some more. No really, I’m serious. I do this so even as early (lol) as this part in the gif making process, I can see which frames I can/should delete to be within the 10 MB file size limit. You can also do it at the end of course 🙂
Now, let’s go to the next important steps of this tutorial post which I’ve numbered below.
Crop and resize to meet Tumblr's required dimensions. The width value should be either 540px, 268px, or 177px.
Convert the gif to a Smart Object for sharpening.
Apply lighting and basic color adjustments before the heavy coloring. I will be sharing the base adjustments layers I use for my gifs 😃.
1. Crop and Resize
Click on the Crop tool (shortcut: the C key)

I like my GIFs big so I always set this to 1:1 ratio if the scene allows it. Press the Enter key after selecting the area of the frame that you want to keep.
Side note: If you find that after cropping, you want to adjust the image to the left or another direction, simply unselect the Delete Cropped Pixels option. This way, you will still have the whole frame area available to crop again as needed and as you prefer.
Now we need to resize our gif and the shortcut for that is Command + Opt + I. Type in 540 as the width measurement, then the height will automatically change to follow the ratio you’ve set while cropping.
540 x 540 px for 1:1
540 x 405 px for 4:3
540 x 304 px for 16:9
For the Resample value I prefer Bilinear—but you can always select the other options to see what you like best.
Click OK. Then Command + 0 and Command + - to properly view the those 540 pixels.

Now we get to the exciting part :) the sharpen settings!
2. Sharpen
First we need to have all these layers “compressed” intro a single smart object from which we can apply filters to.
Select this little button on the the bottom left corner of the Timeline panel.


Select > All Layers
Then go to Filter > Convert for Smart Filters
Just click OK when a pop-up shows up.
Now you should have this view on the Layers panel:

Now I have 3 sharpen settings to share but I’ll have download links to the Action packs at the end of this long ass tutorial so if you want to skip ahead, feel free to do so.
Sharpen v1
Go to Filter > Sharpen > Smart Sharpen…
Below are my settings. I don’t adjust anything under Shadows/Highlights.
Amount: 500
Radius: 0.4
Click OK then do another Smart Sharpen but this time with the below adjustments.
Amount: 12
Radius: 10.0

As you can see Lena’s beautiful eyes are “popping out” now with these filters applied. Click OK.
Now we need to Convert to Frame Animation. Follow the steps below.
Click on the menu icon at the top right corner of the Timeline panel, then click Convert Frames > Flatten Frames into Clips
Then Convert Frames > Convert to Frame Animation
One more click to Make Frames From Layers
Delete the first frame then Select All then Set Frame Delay to 0.05

and there you have it! Play your GIF and make sure it’s just around 42-50 frames. This is the time to select and delete.
To preview and save your GIF go to File > Export > Save for Web (Legacy)…
Below are my Export settings. Make sure to have the file size around 9.2 MB to 9.4 MB max and not exactly 10 MB.

This time I got away with 55 frames but this is because I haven’t applied lighting and color adjustments yet and not to mention the smart sharpen settings aren't to heavy so let’s take that into consideration.
Sharpen v1 preview:

Sharpen v2
Go back to this part of the tutorial and apply the v2 settings.
Smart Sharpen 1:
Amount: 500
Radius: 0.3
Smart Sharpen 2:
Amount: 20
Radius: 0.5
We’re adding a new type of Filter which is Reduce Noise (Filter > Noise > Reduce Noise...) with the below settings.

Then one last Smart Sharpen:
Amount: 500
Radius: 0.3
Your Layers panel should look like this:

Then do the Convert to Frames Animation section again and see below preview.
Sharpen v2 preview:

Sharpen v3:
Smart Sharpen 1:
Amount: 500
Radius: 0.4
Smart Sharpen 2:
Amount: 12
Radius: 10.0
Reduce Noise:
Strength: 5
Preserve Details: 50%
Reduce Color Noise: 0%
Sharpen Details: 50%
Sharpen v3 preview:

And here they are next to each other with coloring applied:
v1

v2

v3

Congratulations, you've made it to the end of the post 😂
As promised, here is the download link to all the files I used in this tutorial which include:
supercorp 2.05 Crossfire clip
3 PSD files with sharpen settings and basic coloring PSD
Actions set
As always, if you're feeling generous here's my Ko-fi link :) Thank you guys and I hope this tutorial will help you and make you love gif making.
P.S. In the next post I'll be sharing more references I found helpful especially with coloring. I just have to search and gather them all.
-Jill
#tutorial#gif tutorial#photoshop tutorial#gif making#sharpening#sharpening tutorial#photoshop#photoshop resources#psd#psd coloring#gif coloring#supercorp#supercorpedit#lena luthor#supergirl#my tutorial#this has been a long time coming#guys. i'm BEGGING you. use the actions set - it was a pain doing all this manually again ngl LMAO#i've been so used to just playing the actions#so this has been a wild refresher course for me too 😆
750 notes
·
View notes
Note
I really wouldn't mind you aiding me with some tutorials love
giffing tutorial/resources
hi anon! sorry it took me so long to answer. i figured this might be helpful for others out there who have asked me similar questions, so i’ve compiled a pretty comprehensive list of tutorials/resources. idk about others but when i was new to giffing, it took me a lot of painful effort to go around and look for resources, so i’m putting it all here to make it a little easier!
i download videos using 4k video downloader. it will download very good quality 1080p videos in .mp4 format. if you’re downloading a 4k video, make sure to change the setting option to .mkv so that you get 4k and not 1080p—for obvious reasons since you want the highest quality.
i rely on kpopexciting to get .ts files — which are basically raw, very high quality video files for live performances. they are much less grainy than .mp4 versions of live performances—which are the ones you’ll see uploaded to youtube. i’ve found that 4k videos (in .mkv) are just as good quality as .ts, but obviously you will rarely see live performances in 4k, so get .ts when you can!! you can also try to find .ts files on twitter, but you may have to do a lot of digging. i wish i could recommend you twitter accounts, but the ones i used to go to have been very inactive/taken down all their drives :( but this website is really nice and updated frequently so i would recommend it!
vapoursynth links + download. the reason you would use vapoursynth is to resize your gif, while maintaining the optimal quality of the gif. if you gif without vapoursynth (.ie only using photoshop), it will still be fine, but the image quality may be grainier. also, you will definitely need vapoursynth to gif .ts files —more will be explained in the tutorial i’ve linked below. i would recommend that you have a high processing/lots of ram/newer desktop or laptop to use vapoursynth so that 1, your computer isn’t fried and 2, your vapoursynth process will go a lot faster. i am using a 2017 macbook pro for all my work, and it runs pretty well, but my laptop still gets pretty hot so just make sure you’re not running a million things in the background while using adobe products and vapoursynth lol. i used a pretty old and beat up 2011 model macbook air back then, and i will say that yes vapoursynth worked and ran on it, but it took much longer, and basically fried the laptop’s battery (aka i had to get the battery changed twice and the laptop would die randomly) but issok it was a school borrowed laptop so i didn’t feel too bad lol. im just saying this as a precaution, to preserve the health of your electronic devices!! but don’t be afraid to use vapoursynth! you should still try it at least once.
thank you to @realstraykids for this super detailed, really nice tutorial! it includes how and where to download videos, how to gif using vapoursynth, using photoshop, comparisons, coloring, and pretty much all you need to know. 10/10 would recommend
thank you to @dreamcolouring for this lifesaver!!! the best and easiest way to blur out unwanted captions/objects in your gifs. i recommend doing this step after converting your frames to video timeline and before you do sharpening and coloring. another tip i’ll add is to feather the selection you’ve made right before you click on “add vector mask” —this will make sense once you’ve read through the tutorial. feathering it will make the blurred spot less noticeable and more subtle.
i use this generator to create gradient colored captions! copy and paste your text, then select the colors you want. generate the code, and copy it. change the settings of the text editor on your post to HTML. paste the code, preview, and voila! add elements <blockquote>,<b>,<i>, etc as needed. see more on colored captions in this tutorial by @kylos --i believe op mentioned a different and better color generator but for some reason it won’t work for me :( hopefully it works for u! basically same idea as the previous generator i mentioned.
my own mini tutorial/workflow process of making gifs. this includes working with a .ts file, vapoursynth, photoshop, coloring, watermarking, etc. and a few of my own tips below:
if you are working with an .mp4, you do not have to make any changes to the preprocessor/denoise filters/sharpening in the resizing part of vapoursynth—it doesn’t make that big of a difference if you do. but if you are working with a .ts file, definitely do make those changes,, that’s the whole reason you have vapoursynth. with an .mp4, i like to use vapoursynth to just resize, but i don’t add any additional settings. i use smart sharpen in photoshop to sharpen it, which is pretty good on it’s own (at least in photoshop 2020!).
my rule of thumb is to do add .02 seconds when i am setting frame delay. so if when you first import the frames, they are at 0.04 seconds, i usually change them to 0.06. of course, this is my personal taste—you can make all your gifs faster or slower depending on how you want em to look.
if you are on a mac, you can screen record by pressing Command+Shift+5 (it’s a shortcut to quicktime screen recording). I only screen record for things like the beyond live concert or other live streamed events. the image quality of the screen recording, in my experience, is actually pretty good. when you gif the screen recording however, you may notice that it adds extra frames that you don’t need. by that i mean duplicate frames. you could keep the duplicate frames but that just means the size of your gif is going to be much bigger (keep in mind the limit is 8mb). in order to remove those duplicates, my only solution has been to remove them manually (by holding Command while selecting), or when you are importing the video to frames, select the option to “limit to every 2 frames”—but this method will be less precise and still not as good as manually removing frames. if you remove the duplicate frames, this means you will need to set the frame delay even slower, to make up for lost frames. in my experience, fps(frames per second) and frame delay work in conjunction. so for example, if i delete every other frame because they are duplicates, but the starting frame delay is 0.02, i am now going to change it to something like 0.05 (so i added 0.03 seconds rather than my usual 0.02). if the duration length and the image dimensions of the gif are short/small, feel free to keep the duplicate frames in—i only delete duplicate frames in order to keep my gif under the 8mb limit. then, if you keep the duplicate frames in, continue with your standard frame delay preferences. now that i’m writing this im realizing this might not make a lot of sense lol.. but don’t worry about it for now and if you run into trouble w screen recorded gifs then you can come back to this for reference. again, this is only my experience recording on a mac—it may be a lot different if you use a screen recording program or are on a pc.
i don’t really use .psd templates because i like to give every gif/gifset it’s own unique coloring—so i remake the coloring every time, but if you get into a rhythm it’s pretty easy. there are a lot of nice coloring tutorials out there, too! my personal coloring adjustments in order: levels, exposure, color balance, selective color (if needed), vibrance, photo filter (if needed), color lookup (i use 2strip most often and i put it on ‘color’ blending mode). don’t forget to adjust the opacities and fills of the ‘color lookup’ adjustment layer in case it’s too strong. go back to correct each adjustment layer as needed. then, when you’re done and satisfied, group all those layers, copy the group (you can do an easy command+c), and paste it onto the next gif you’re working on for easy workflow.
if for some reason you can’t see the frames when you import your layers/video, it’s likely because your ‘timeline’ window isn’t showing up. just go to the window menu on photoshop, go to the bottom and you’ll see ‘timeline.’ make sure it has a check next to it.
i recommend watermarking your gifs because a lot of people like to repost tings these days 😠 - so make sure u got your brand on it! i keep my watermark saved to my ‘libraries’ in photoshop so it’s ready when i need it. i use the blending mode ‘overlay’ and adjust the opacity, but if you don’t want to do that you can also add a stroke/shadow to your watermark/do all sorts.
tag #nctinc for your nct creations and #jenonet for your jeno creations!!
here’s my own mini tutorial (well not much of a tutorial ig more like a work process vid?): took about ten minutes including the time to search and download the video (but i didn’t record that part i trust yall know how to do that), vapoursynth, and exporting. i hope this helps somewhat! feel free to ask more questions whenever :)
youtube
keep in mind that giffing takes a lot of patience, energy, and experience—so don’t worry if it takes you a bit to figure things out or if your gifs don’t turn out the way you want them to the first time around. we all start at the same place and all run into problems. i know giffing can sound intimidating and seem like a lot of work, but i promise, once you get into a routine, giffing is going to happen in minutes—and you’ll get beautiful gifs. have fun! 😊
#anon#answered#tut#tuts#giffing tutorial#should i make a tut/resources post on gfx? not rly sure if gfx can be taught.. it's like a lottt about personal style imo lol#hope this helps!#not just for anon but for anyone
120 notes
·
View notes
Text
Stop Motion - technical post production - my workflow Photoshop
26 March 2021
Follow a tutorial and create a finished product. Having had a practice in your software options, suggest the workflow you are going to use? From Optimisation to Export. Note any problem areas / solutions.
I followed tutorial about stop motion video post production in Photoshop and based on this tutorial and notes taken during today’s afternoon class I created my video. There is my workflow:
1. Download files from sd card onto laptop. Open in Adobe Bridge.
2. Select files I wanted to use for the brief and rename. I renamed files as banana and chose the sequence number starting from 001.

3. Open one of banana raw files in Camera Raw and make basic edition start from optics - remove chromatic aberration, geometry correction, then adjust sliders after applied auto correction.
4. In crop tool chose ratio 16:9 which is required for the brief and standard display option for most of the devices.
5. Saved settings (done) in this file then right click on the thumbnail >Develop Settings >Copy Settings.
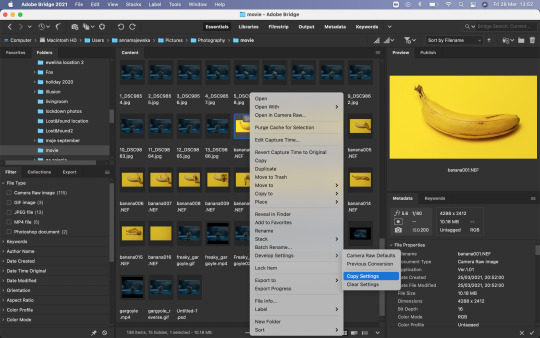
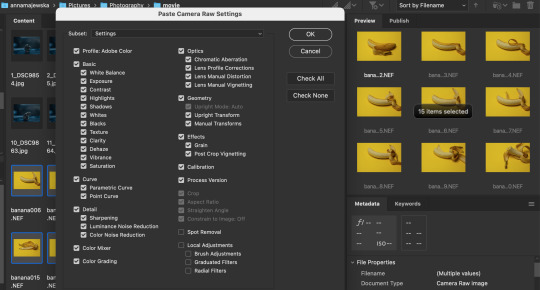
6. Select all banana files, hold shift + cmd and right click >Develop Settings >Paste Settings. I didn’t make any local adjustments so I selected all settings to paste.

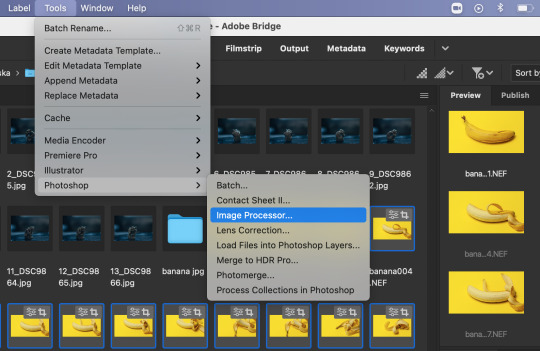
7. Keep all those files selected and go the top Adobe Bridge toolbar >Tools >Photoshop >Image Processor and wait for the Photoshop to open and show the Image Processor window. Choose the location or create new folder where your processed images will be placed. Select save as jpg and make sure to change quality for the highest option which is 12, than click Run. It may take a while to finish the process. Then Photoshop home page will open.

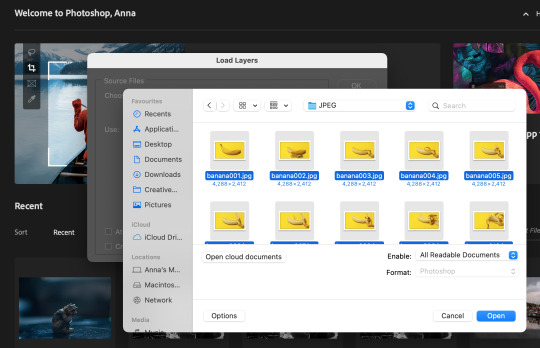
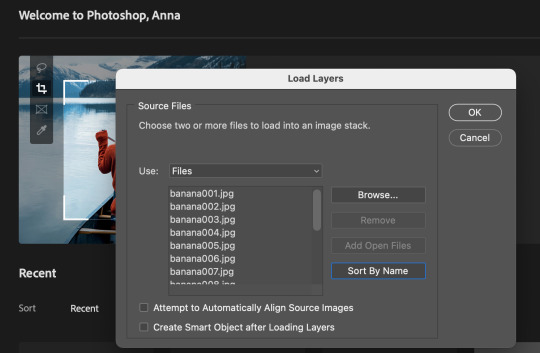
8. From top toolbar choose File > Scripts >Load Files Into Stack, browse files and don’t thick any small boxes. Sort files by names and ok to load layers.

9. Choose Window >Timeline and Timeline panel should open on the bottom of the screen


10. Then select Create Frame Animation and click on the bar, so the first frame should appear in the Timeline. Then go to Timeline option and select Make Frames From Layers.
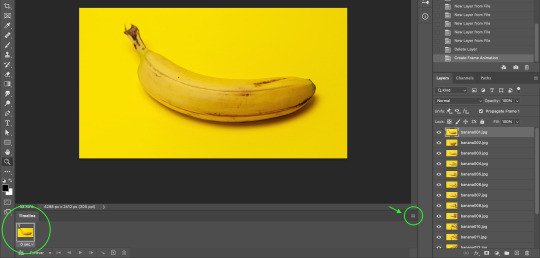

11. In Timeline panel options chose Make Frames From Layers and this should bring all images as frames into Timeline. If they appear not in order, go to Timeline options and select Reverse Frames and they should go in the right sequence.

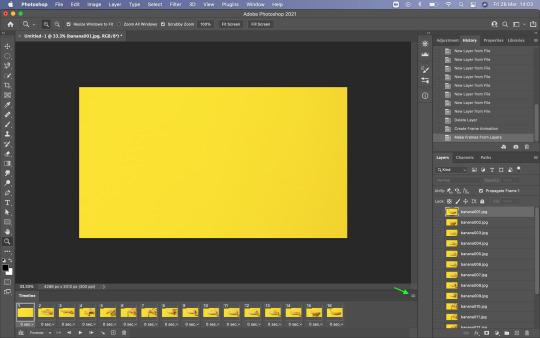


12. On the bottom of each frame is an option to choose frame delay time, that could be set for every frame individually or apply to all selected frames at the same time. You can change duration of the frames if they run too fast. To select all frames select first one and press and hold shift then click on last one.
13. There is an option to duplicate frames, when frame or frames are selected, by click the little square with + icon on the bottom Timeline bar. It is a good option to make video longer when we have just few frames.

14. Once happy with video it is good to save it as psd file, so we could go back to this at anytime if we need to make some changes.
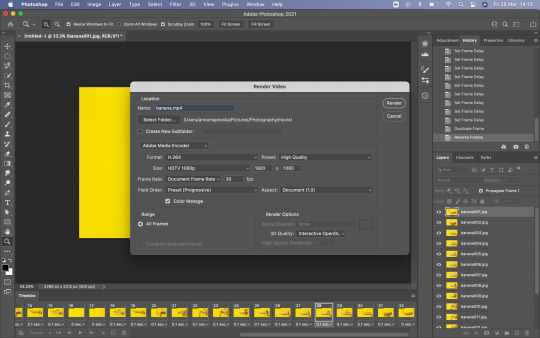
15. To save video, go to the top Photoshop bar File >Export >Render Video and name your video so it would be saved as mp4 file (if you don’t name it Photoshop will save it as default untitled mp4 file). Then you can change the other properties and choose what will suit the best for you video and Render.

Problem occurs when Render Video?
If you see the spinning wheel for wee while that means that Photoshop needs more space in memory of your laptop. Click esc to stop the Render process as it will take forever. Clean up you hard drive from unused large files. You can change option in your Mac system preferences >Security & Privacy >Privacy >Full Disc Access, unlock as an admin and give Photoshop access to full disc, so it could use your laptop hard drive as a scratch disc for the space (it needs a lot of memory when working on large files) when required. If Photoshop is not listed you can add program by click on + and find it in Application, then select Photoshop. Click back on the padlock to lock the access. Close Photoshop and re-open. You can use an external hard drive to use as a scratch disc and you can set this option in Photoshop preferences, but I read that it is good to set scratch disc on the same hard drive where Photoshop is installed because it will improve the performance. Close all other applications if they are not necessary and web browser. That should also help to improve your laptop and Photoshop performance.


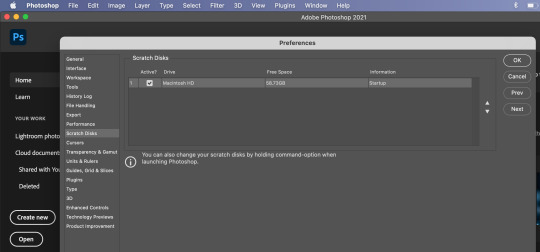
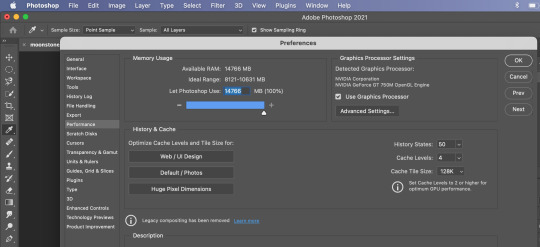
The Photoshop needs a lot memory to work well and fast. In Photoshop Preferences, go to Photoshop >Performance and check how much of your laptop memory usage is set for this program to use. Photoshop requires 4GB - 8GB of RAM. I moved the slider to give Photoshop maximum of RAM to use. Then click ok and reopen Photoshop. I would advise to restart your laptop before reopening Photoshop. If you keep your laptop working for long time it remembers all operations it made, so it is good to give it a reset and improve its performance. That should solve the problem.
16. If you want to export your video as gif you need to go File >Export >Save For Web and you can change resolution or other changes before you save the file.


I decided to use iMovie software to add audio to my stop motion video because it works more intuitive than Photoshop in this field and there is a lot of sound effects to choose from and suit the best audio for the video. I will create another post about it.
1 note
·
View note
Text
10 Tips For Beautiful Brows
March 11, 2020
If the eyes are the window to the soul, then eyebrows are the window frame that will make those peepers pop!
If you’re looking for ways to better define your brows, fill in sparse brows or just want to change up your brow, here are 10 brow tips to consider.
*this post contains affiliate links*
1. Create The Right Shape
Unless you were born with perfectly shaped brows, you will most likely need to do some brow shaping to achieve the look you want. To slow down re-growth and reduce stubble, eyebrow hair should be removed from the root, either by threading, plucking or waxing (lasering brows is a no no!).
I shaped my own brows using tweezers years ago, but I highly recommend going to a professional who can determine what the best brow shape is for you based on your face and current brow situation.
If you are an over-plucker, hide the tweezers and let your brows grow out thoroughly before having them shaped. For super sparse brows that don’t grow back, you may want to consider microblading (tip #6 in this post).
Be sure to do your research and look up reviews and/or get referrals before having someone touch your brows!
Ask to review pictures of their previous work on actual clients and get them to draw out what they plan to do to your brows before they remove any hair so you can decide if you like the shape.
Once you’ve achieved your preferred brow shape, be sure to maintain any stray hairs that grow back regularly – either yourself or by having your brows professionally maintained.
2. Trim Your Brows
Trimming your brows regularly is a great way to keep unruly brows in line. Brow trimming can also make applying brow pencils and pomades easier, because it can cut out any excess thickness or unwanted hairs that can get in the way.
Every couple of weeks, I like to clip my brows to clean up my brow shape. I do this in a couple steps:
1 -I brush my brow hairs upwards with a spoolie brush and then use tapered nail scissors to cut along the top edge of my brows to get any hairs that extend too far above the brow line, following the shape of the brow.
2- (optional step for thicker brows) To thin-out the thicker parts of my brows, I use my spoolie brush and brush the hairs downward and then use my nail scissors to clip any hairs that fall below the underside of the brow, following the shape. This extra trim has really helped thin out my brows in the middle where they grow like thick weeds.
Below is a video clip of how to trim your brows!
youtube
3. Shape Or Fill Brows Using A Pencil or Pomade
If you have parts of your brows that are a little sparse or sections of your brows that need a bit more shaping, consider using a brow pencil or a brow pomade to fill in the gaps.
Brow pencils are a great way to fill brows quickly and are fairly easy to use; I recommend using a brow pencil with a fine tip so you have more control over how and where the pencil applies.
Fine-tip brow pencils (like the L’Oreal Brow Stylist Definer pencil, which I love!) are also great for creating thin, hair-like strokes that can look more natural.
Brow pomades are another great eyebrow defining option and can sometimes be easier to use than a brow pencil. I enjoy using the Anastasia Beverly Hills’ Dip Brow Pomade.
To apply a brow pomade, you will need a sharp, angled eyebrow brush (I use the Anastasia Beverly Hills #7B brow brush).
Similar to a brow pencil, pomades can be used to fill in sparse brows or applied using light strokes to simulate the look of individual hairs.
Below, you can see both a brow pencil and a brow pomade in action by the queen of brows herself, Miss Desi Perkins:
youtube
Shop Brow Pomades and Brow Pencils:
4. Use A Concealer For An Extra-Defined Brow
If you’re looking for that super-sharp, “brows on fleek” look commonly seen on Instagram, consider using a concealer to clean things up.
Apply a touch of concealer onto the end of a small, flat concealer brush and run the brush underneath and above the brows along the edges to clean up any rough bits and create a perfectly smooth brow line.
You can see this concealer technique in action below:
youtube
5. Apply A Brow Gel
Brow gels are a great finishing touch, as they work to hold unruly brow hairs in place.
Some of these gels are tinted to give brows an extra hit of colour, while others can actually make brow hairs appear thicker (like Glossier’s Boy Brow).
If you already have well-shaped, full brows, consider skipping the filling/defining step and simply apply a brow gel to enhance your natural brow shape and texture.
RELATED READING: Glossier Haul ft. Brow Flick, Boy Brow + Cloud Paint
Shop Brow Gels:
6. Microblading
Microblading is a great semi-permanent option for anyone looking to further define their brows or fill in sparse areas that refuse to grow back.
Microblading is a process whereby a skilled professional defines and fills eyebrows by tattooing the area, creating individual hairs onto the brow area to create the perfectly filled eyebrow. While this may sound terrifying, when done by a skilled hand, microbladed brows can totally transform your brow shape and give your perfect, natural looking brows.
Since microbladed eyebrows are tattooed on, you don’t have to worry about washing your brows off each night and having to re-do them each morning – bonus!
Microbladed brows tend to fade over a period of 1-2 years, so maintenance is necessary if you want to maintain this look.
Be sure to find a qualified professional to perform the microblading and take the time to review their work and obtain references!
You can see a sample of microbladed brows before and after below:
7. Brow Lamination
No, this does not involve encasing your brows in plastic!
Brow lamination is the newest trend in brow styling and it involves using a chemical solution to help your brows stay straight up for fuller looking brows – kind of like a perm for your brows.
Basically, your brows are brushed upwards and then a chemical solution is applied on top. A piece of thin, Saran wrap plastic is then placed on top of your brows to hold the hairs upright while the solution works its magic.
When it’s done, you have brows that reach for the sky!
Here is a before and after pic of the difference brow lamination can make (before pic is on the bottom):
Photo from totalbeauty.com
8. Brow Tinting
Brow tints are dyes that you apply to your brows to temporarily tint (dye) them a different colour.
Brow tinting is super easy and a great way to enhance the colour of your brows or change things up a bit on a temporary basis.
Be sure to use a proper brow tint to dye your brows!
DO NOT USE BOXED HAIR DYE to tint your brows – ever! Boxed hair dyes are not safe for use near the eyes and can cause blindness.
9. Shape + Hold Brows With Bar Soap
A really fun way to get your brows to stay up straight, without lamination, is by dipping a spoolie brush into a bar of soap – yes, soap – to lock in that lift.
What the hell am I talking about? You can see this soap bar brow hack in action here:
youtube
10. Condition Your Brows
Applying lubricants like castor oil, jojoba oil, coconut oil or Vaseline create a moisture barrier on the skin to keep it moist, which helps promote brow hair growth.
Apply your oil of choice to your brows before heading to bed and leave it on overnight.
pin me for later!
How do you get beautiful brows?
Source link
The post 10 Tips For Beautiful Brows appeared first on Trends Dress.
from Trends Dress https://trendsdress.com/10-tips-for-beautiful-brows/ from Trends Dress https://trendsdresscom.tumblr.com/post/613753577843900416
0 notes