#netfab
Explore tagged Tumblr posts
Visit Tumblr Blog
Explore Tumblr blogs with no restrictions, modern design and the best experience.
Last Seen Tumblr Blogs


Fun Fact
Tumblr was acquired by Yahoo for $1.1B in 2013.
Text
axtloniqvua netlabfui

InkScape possible totema "svg poddibilities & vectorized & tensorized personalized data" + TinkerCad
{{{}}}
embed [ badanie właściwości mechano-fizycznych obiektów "wpławnych" ]
Możliwości zastosowań układów scalonych. Irracjonalnu, gnu & sistem ant.
Arduino IDE, netfabb;;
"snucie przestrzeni""
0 notes
Text
3D PRINTING WORKSHOP (2)
Our second workshop on 3D printing went through the steps of taking your design (which you may have sculpted on Fusion 360 earlier but here we found already made designs online) to the printers !
THINGIVERSE
1.) Log into Windows.
2.) Open Chrome or Firefox and search ‘Thingiverse’.
3.) Once in Thingiverse, find a file you would like to print and save it as an STL somewhere you will remember.
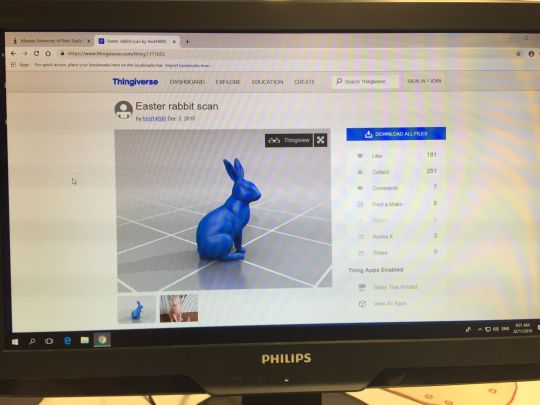
I chose to print this cute little rabbit, following my theme. This could be wearable as earrings or a nice pendant.
NETFAB
4.) Open up the ‘Netfab’ program on the computer.
5.) To scale up or down check measurements on left and press a button up top that looks like a circle with graph arrows and the left and bottom.
6.) If there are errors press the red repair button (looks like a first aid cross) to send an automatic repair script to attempt at fixing it.
7.) To save, press file - export part - and save as STL again.
ULTIMAKER CURA
8.) Open ‘Ultimaker Cura’ and open your saved file. Have it in layer view and line type to have best visibility.
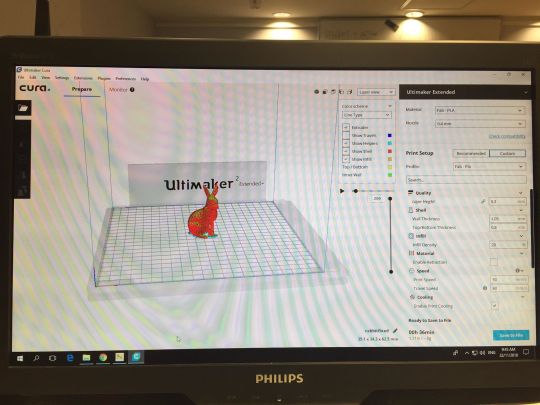
9.) On right hand side of the screen are some essential settings for a successful print.

PRINTER: Choose your printer. MATERIAL: Fab-PLA is the usual one you will pick. NOZZLE: Most of the printers use a standard 0.6 mm nozzle. LAYER HEIGHT: This is the thickness of layers. For a prototype print this would be around 0.3 but a a more detailed print would be 0.1. This number must be a multiple of the nozzle size, so in this case, 0.6. WALL THICKNESS: 0.6 to 1.8 is good. TOP/BOTTOM THICKNESS: A multiple of the layer height. 0.6 to 1.2. INFILL DENSITY: This is the density percentage of the inner lattice. 12% to 30% is good, but will be determined most by how your design is shaped and other factors. PRINT SPEED: For a 0.6 mm nozzle, a speed off between 40 and 55 mm/s is efficient. TRAVEL SPEED: This can be up to 90mm/s though smaller objects could do with less speed due to the vibrations occurring. BUILD PLATE ADHESION TYPE: If printing straight on the glass and your object is small, a brim plate is helpful. this can be cut away later.
Save and convert your edited file into a GCODE and put it on an SD card ready to put in the printer. Here the steps are very easy to follow, and in no time it will start printing !
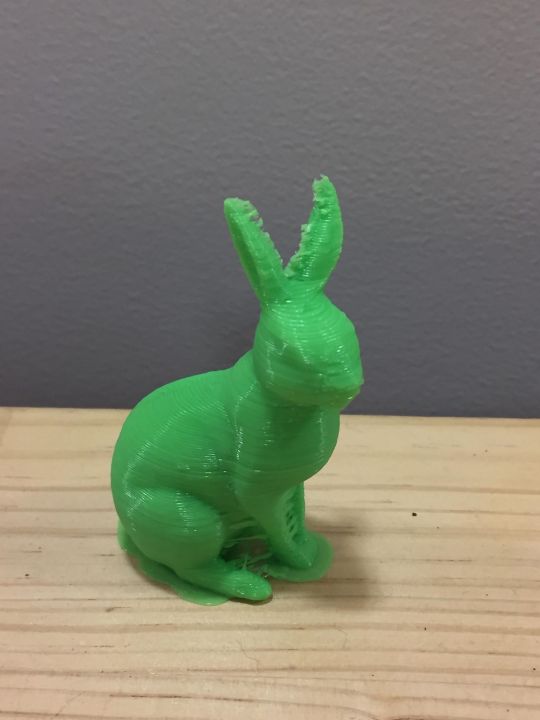

My printed rabbit ! It is so cute and sweet, I love it. Doing this workshop was really exciting for me as it made something I had felt seemed so unattainable into something I truly think I could accomplish. This in the fab lab really reinforces their philosophy of sharing such seemingly impossible equipment and making it achievable and accessible for everyone.
1 note
·
View note
Text
Fusion 360 Moldflow

Fusion 360 Download
Technical Support Specialist, Moldflow and Fusion 360 Autodesk Construction Solutions Portland, OR 2 weeks ago Be among the first 25 applicants. Fusion 360 โปรแกรมเดียวที่รวม CAD, CAM, CAE ไว้ด้วยกัน รวบรวมการออกแบบ การผลิต และ การตรวจสอบไว้ในโปรแกรมเดียว เหมาะสำหรับงานออกแบบ. We at Mechman Solution provide wide-ranging Autodesk line of products such as fusion 360, powershape, featureCAM, Moldflow, Netfab etc. Software Features Links PowerMill Features. On October 22, 2020, the latest Autodesk Moldflow Insight, Moldflow Synergy, and Moldflow Adviser releases became available for subscribers! Some users were able to participate earlier this year in the Moldflow Insight & Synergy 2021 Beta program to help the developers test many of the great new features and functionalities within this latest release.
The principal products are Fusion 360, and its family (Fusion 360 with FeatureCAM, PowerMill, PowerShape, or PowerInspect), Autodesk Alias, Autodesk Inventor, Autodesk Vault, Autodesk CFD (formerly Autodesk Simulation CFD), Moldflow, Netfabb, VRED, and the Product Design & Manufacturing Collection, which includes Inventor Nastran (formerly.

Autodesk® Moldflow® software provides a broad range of simulation tools for injection mold design, plastic part design, and the injection molding design process to help engineers and analysts create better products by enabling them to make crucial decisions earlier in the design process.
Autodesk® Moldflow Features
Autodesk Moldflow has features and tools that allow you to:

Validate and optimize plastic part and mold designs before manufacturing—increasing efficiency, minimizing reliance on physical prototypes, reducing costs, and improving product quality.
Optimize the position of the gates and runner designs to optimize product quality and minimize costs.
Evaluate and optimize plastic part and injection mold designs to help control shrinkage and warpage based on grade-specific materials and processing parameters. You can output accurately compensated models for tooling or further geometry modification.
Calculate the effect of fiber orientation, in fiber re-enforced plastics, on product shrinkage and warpage and make these effects available to structural analysis products to evaluate the performance of the molded part.
Optimize the layout of the cooling system and evaluate the impact of different mold materials to improve product quality and reduce the cycle time. Moldflow Insight supports state of the art cooling technologies, including rapid-temperature cycling, conformal cooling technologies and Induction Heating.
Optimize the injection molding process and part design with Moldflow® Insight’s Design of Experiments (DOE) capabilities.
Use Moldflow Insight to simulate the standard thermoplastic and thermoset molding processes, as well as many variations (e.g. two-shot overmolding, injection compression molding, compression molding, bi-injection molding, MicroCellular injection molding etc.)
Simulate with confidence using precise material data on more than 10,000 grade-specific plastics. Get additional materials tested, expert data-fitting services, and extensive material databases with the Moldflow Plastics Labs.
Moldflow Insight provides direct editing tools in Synergy to evaluate different variations of part designs and the resulting impacts on manufacturability on the fly.
Fusion 360, included with Moldflow Synergy and Adviser subscriptions, enables quick CAD model simplification, cleanup, and editing that can help any user save time on model preparation, improve mesh quality, and explore the impact of design changes more quickly. Fusion 360 can import CAD data in a variety of native and neutral CAD formats, identify potential problems before they occur, and help you quickly remove excess detail.
Moldflow Insight provided cloud enabled options that offers the benefit of expanded solve capacity. Solve many simulations in parallel in the cloud, while freeing up local resources. These cloud capabilities allow the analysis of scenarios and designs overcoming local resource restrictions.
Helius PFA included with Moldflow Insight Ultimate subscription to pass as-manufactured inputs in to a structural analysis.

Purchasing Autodesk Moldflow
Fusion 360 Download
Call or e-mail us if you are interested in purchasing Autodesk® Moldflow™. Applied Engineering is authorized to sell Autodesk products throughout the United States and has offices in Minnesota, North Dakota, South Dakota and Wisconsin.
0 notes
Photo


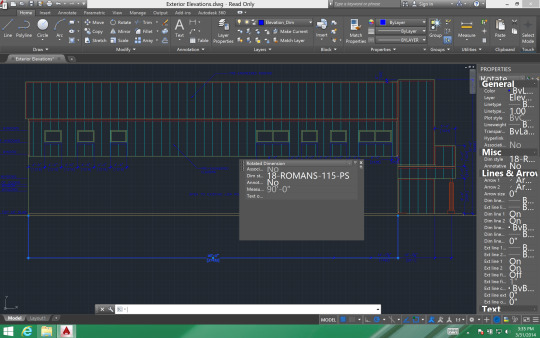
After Rhino, here is my final print before printing on Netfab and Cura.
0 notes
Text
Postdoc: MNH_UFlorida.ScanningSpecimens
CLASSIFICATION TITLE: Postdoctoral Associate JOB DESCRIPTION: The openVertebrate (oVert) Thematic Collection Network (TCN)--funded by the US National Science Foundation--is seeking a postdoctoral scientist that will work with the oVert team to develop and fine-tune protocols for imaging using x-ray computed tomography (CT-scanning) and workflows for sharing digital anatomical datasets using on-line depositories. A portion of this position will be dedicated to project management and grant administration. The successful applicant will be based at the University of Florida (Gainesville, FL) and work directly with Dr. David Blackburn and Dr. Edward Stanley, both faculty at the Florida Museum of Natural History. This will be a highly collaborative environment with interactions with PIs, staff, and students at the 18 participating US institutions, including staff for the on-line depository MorphoSource (based at Duke University). The successful applicant will work with oVert PIs to develop written workflows and on-line tutorials related to accessing and using CT data by the research and educational communities. They will be expected to facilitate on-site training / workshops for students and visitors and engage in some travel for similar training at other institutions in the US. In addition, they will participate in regular in-person and virtual project meetings on a bi-weekly meeting for the oVert TCN. A portion of time will also be dedicated to pursuing independent research related to the CT data generated from the oVert TCN. Following the guidance of the National Academies of Science and Engineering on how to best enhance postdoctoral experiences (http://bit.ly/NASEpostdoc), the PIs will provide: clear communication about the nature of the work to be performed and evaluation processes; career counseling; training in preparation of grant proposals, publications, and presentations; guidance on ways to improve teaching and mentoring skills; guidance on how to effectively collaborate with researchers from diverse backgrounds and disciplinary areas and with members of the local community; and training in responsible professional practices ADVERTISED SALARY: Minimum salary is $48,000 annually; commensurate with qualifications and experience. MINIMUM REQUIREMENTS: PhD required. PREFERRED QUALIFICATIONS: Applicants should have experience with microCT-scanning, including using contrast agents for soft-tissues, segmenting datasets using software like VGStudioMax / Avizo, and mesh-editing with software like meshlab, Maya or Netfab. Python coding, app development and video editing experience as well as a familiarity with research in natural history museums would all be preferred. Applicants should have strong writing and presentation skills and be highly collaborative. SPECIAL INSTRUCTIONS TO APPLICANTS: In order to be considered, you must upload your cover letter, resume and the names and contact information for three references. This is a time-limited position. Application must be submitted by 11:55 p.m. (ET) on 1 October 2018. The University of Florida is an equal opportunity institution dedicated to building a broadly diverse and inclusive faculty and staff. If an accommodation due to a disability is needed to apply for this position, please call 352/392-2477 or the Florida Relay System at 800/955-8771 (TDD). Hiring is contingent upon eligibility to work in the US. Searches are conducted in accordance with Florida's Sunshine Law. Final candidate will be required to provide official transcript to the hiring department upon hire. A transcript will not be considered "official" if a designation of "Issued to Student" is visible. Degrees earned from an education institution outside of the United States are required to be evaluated by a professional credentialing service provider approved by National Association of Credential Evaluation Services (NACES), which can be found at http://bit.ly/2hp8GCG. Applications must be submitted on-line via: http://bit.ly/2wD4EKT For questions, please contact David C. Blackburn, Associate Curator, Florida Museum of Natural History "Blackburn, David C" via Gmail
0 notes
Photo


Learning to 3D print.
Through the break I have spent time learning how to 3D print and program models for physical rendering.
This meant that I had to learn to use the programs: ‘Netfab’ and ‘Cura.’
I hope to further explore this direction to create a resin casting to outline the past ruins of a building with the 3D printed building, the present and future potential of the building will be shown with transparent resin insertion casing the 3D structure.
I plan to explore all three variables within a single model.
The past, the present, and the foreboding future. The past is the 3D printed ruin, the present is the insertion, and finally the future is the water-rise. I am uncertain how I will portray this within a 3D model at this point.
0 notes
Text
Week 2 Thursday:
Today we started off with completing our tutorial from last Thursday’s session with Craig about 3D printing. I already had a save I was happy with to print, but then for those who didn’t, we we’re all introduced to an open source website called thingiverse were designers share their projects online with their own type of licenses. This was new to me as I didn’t realise that every creator can have different licenses on opensource websites, I thought it was just under the platform’s rules and regulations. But on thingiverse there is a wide variety of licenses, from not being able to profit off their creations to not being able to modify it in any way. I found this great to know as I wouldn’t have seen the licences section on the website without Craig telling me, and it’s a super useful tool for artists trying to show their work online but being able to safely get the credit they deserve.


Next I put my 3D model into Autodesk Netfab, too make sure there was no geometric errors as well as to check the physical size of the object was accurate.

Since Everything looked fine in Netfab I switched over into Cura, a Slicing software which can convert a STL file into a Gcode file for the 3D printers to read. While In Cura I also adjusted the height of the flower object slightly and duplicated a few of them with different sizes to see how that would result. While in Cura, Craig also taught a few of the options that we could tweek on the right hand side and talked about all their different functions.

Once I had saved the project as a Gcode file I decided that instead of printing just as it was, I wanted to experiment and print onto some fabric pieces as I’ve been interested to print a design onto fabric to see the outcome and to see if it could possibly be something I wanted to incorporate into my next garment. Even though I forgot to take off the retraction while I was in Cura, I still feel like the flowers came out quite nicely on the fabric and it was super simple to apply.


After my team weekly discussion with Sue and Faith I went back to the Fablab to start transferring my SVG files onto inkscape ready to be put into the embroidery machine. Unfortunely the files took me longer to adjust than I thought as a lot of errors were coming up because I had a very detailed flower pattern design with a few different colours onto it. Also my font wasn’t recognisable for any of the softwares at uni so I couldn’t transform it into a vector file so I had to make do with the default fonts on inkscape.
In the end I didn’t have a lot of time to use the embroidery machine because there was a line to use it once I had finally finished fixing all my design files. But once I got my hands onto it I managed to sew on the leaves from the pattern itself until the machine semi-malfunctioned and Craig had to take the machine apart to trouble shoot it.

It also turned out that I had adjusted the spacing between the stiches too finely, and this was what may have been what caused the malfunction with the machine. So while Craig was so nicely helping us fix the machine I went back to fix my files to make sure all the rest of my stiches were nicely spaced out. I also had a little bit of time to patch a piece of my old cap onto my jeans with the domestic sewing machine, this turned out fairly nicely I thought, and once the Fablab had closed I went back home to hand embroid a little bit of the line work in and around it for some extra detail.

Tomorrow I aim to get up at the crack of dawn in order to complete all of my machine embroidery, fingers crossed!
Research about my correlation with how my piece acts with a consumer:
While on my journey creating this hat, I remembered that there is a type of specific current street fashion today in Tokyo called the vintage remake style, where people like to take pieces of clothing and cut it up and add things onto it, so it’s a very one of a kind style. Where the general vibe is bringing together incongruous pieces into one garment to make something completely new, usually with a new shape as well.


I think the beauty that lies with this style is that there is no end to a piece, everything is timeless. If you want a particular section of one garment on another you can just take it off and sew it on. Everything that you collect or already have can be made into a brand new piece of clothing. Not only that but everything is experimental there’s no boundaries on what piece of fabric goes where it’s completely unique and customisable. This is definitely the way I’d like to go with creating my re-engineered hat.
0 notes
Text
Autodesk University 2017 Showcases 3D Printing Innovation in India
New Post has been published on http://secondcovers.com/autodesk-university-2017-showcases-3d-printing-innovation-in-india/
Autodesk University 2017 Showcases 3D Printing Innovation in India
(adsbygoogle = window.adsbygoogle || []).push();
Architects, designers, and the industry were brought under one roof in Bengaluru last week for the fourth edition of Autodesk University, India and SAARC. At the event, which aimed to showcase the importance of automation and offerings towards a sustainable future, Autodesk showcased samples of machine-human collaboration.
There was a model of Columbia command module Apollo 11 brought by the Smithsonian 3D Digitalisation Programme team that grabbed eyeballs. The 1:100 scale 3D printed model took 14 hours in its development, and the team spent nearly 30 hours in its post-processing.
The Gallery also had some 3D visualisations of Italian Baroque Architecture that was conceptualised by Pennsylvania University Professor Andrew Saunders. The Professor used laser scanners to capture the interior space and geometry of the featured structures, and the recorded data was converted into 3D models using tools such as Autodesk 3Ds Max, Meshimixer, Netfab, Project Play, ReCap, and ReMake.
“The AU Design Gallery provides a glimpse of the future of design by showcasing diverse developments that are built using an advanced mix of software and human efforts,” said Tatjana Dzambazova, AI Strategy, Office of CTO. “It also demonstrates how designers and developers are utilising the advancements offered through Autodesk solutions.”
In addition to the Design Gallery, the event exhibited some developments by design innovators and developers. Bengaluru-based biotech startup Next Big Innovation Labs (NBIL) was one of the major exhibitors at the venue. Funded under Idea2PoC (a grant from the state government of Karnataka), NBIL is in development to bridge the gap between organ availability and demand by offering its native 3D bioprinting solutions. The company has already enabled organ transplantation through invitro organogenesis via 3D bioprinting and is in plans to soon develop 3D bioprinted human skin and even liver tissues.
The startup brought some prototypes of its 3D printed scaffolds and pre-surgical models that were designed to enhance the local healthcare efforts.The printed scaffolds are built using eco-friendly materials for potential in vivo and in vitro studies. The pre-surgical models, on the other hand, are designed algorithm to help maxillofacial surgeons, dentists, andorthopedic surgeons reproduce bone and dental structure, which can then be used to plan a surgery with greater accuracy. The team develops the models by simply scanning patients.
NBIL also demonstrated various areas around the nascent 3D bioprinting space through custom solutions. “With our cost-effective 3D bioprinters, we are set to uplift the experience for researchers and enable the development of human organs using various technological advancements,” NBIL co-founder Pooja Venkatesh told Gadgets 360.
Bleetech Innovations was also present in the exhibition area, and showcased its Android-based smartwatch for people who are hearing-impaired. The smartwatch listens to emergency sounds such as a doorbell, fire alarms, or a baby’s cry, and then notifies users with unique vibration patterns, colours, and icons. There is also the ability to recognise music tracks using the built-in microphone of the smartwatch, and then convert it into vibration patterns, to let the users dance without listening to the tracks. While the chip powering the BleeWatch is natively designed by the Bleetech team, its build is designed using a 3D printing process. “The ease of 3D printing in today’s market has enabled to build the ergonomically designed BleeWatch at an efficient cost,” said Nupura Kirloskar, co-founder, Bleetech Innovation.
Shop On SecondCovers
The BleeWatch will be piloted on 25 people and will be available for a price under-Rs. 10,000.
Apart from the startups, individuals such as Mandeep Singh Kapoor joined the venue with their offerings. Singh, from Malviya National Institute of Technology, Jaipur, designed a personalised healthcare product called 4KARE using 3D printing technologies to overcome the issue of knee pain. He took the original dimensions of a human knee and then modeled the product using Autodesk’s Fusion 360.
“Unlike any traditional knee-pain solution, the 4KARE exoskeleton leverages modern technologies and solutions such as Fusion 360 to offer a better solution,” Singh told Gadgets 360. 4KARE is currently in the second prototype phase, and Singh is planning to reach healthcare organisations to make it publicly available to the masses.
Additionally, Autodesk partnered with Maruti Suzuki to host India Design Challenge 2017 at Autodesk University 2017. The latest India Design Challenge, which was conducted in collaboration with National Institute Design (NID), provided a hands-on experience to Fusion 360. Akhilesh Manchandani and Aravind S of Transportation Design at MIT Institute of Design (MIT), Pune, received the first prize for modeling a rear-wheel driven, compact electronic crossover.
“With the swift growth towards digitalisation and connectivity alongside the development of new tools, creativity can now be leveraged easily to become enablers in the world of design,” said Saurabh Singh, head of design studio, Maruti Suzuki India.
Advising young designers and developers, Singh told Gadgets 360 that there is a need to look locally. “It’s fine to look globally but there is a significant need to look around in India to understand the local challenges and find answers to questions such as how things changed and what we should do to gear-up for the changes customer requirements,” he added.
Disclosure: Autodesk sponsored the correspondent’s flights for the event in Bengaluru.
(adsbygoogle = window.adsbygoogle || []).push();
0 notes
Text
200 Word Reflection
Over the past few weeks, I have enjoyed the challenge of designing, developing and producing a conceptual MP3 player. Throughout my project I used my initial workflow as a base for my work. As I went I was able to tick of the bullet points as I did them. I found this helped with feeling motivated and as though I was improving and getting somewhere. Halfway through the course I found that I had to go back home to Christchurch for my family, initially I was worried about the set back this may give me. However, I found that with the help of my workflow I was able to get back on track the following weeks. I learnt a lot throughout the course, from briefly touching on Rhino, to developing my knowledge of Sketchup, Illustrator, Cura and Netfab. I was able to develop my use and knowledge of LED circuits through this paper, as I used three different circuits all different to each other. My final, with six LEDs, the most challenging, but the most rewarding. If I had more time, I would have changed the colour of the base, perhaps to a dark blue and slightly tightened the fittings of the final enabling it to all click together better. All in all I learned a great deal, and was pleased with my work effort and design outcome.
0 notes
Text
Workflow ideas
Record audio in Processing > use audio to create 3D mesh > Export mesh as .STL > Import into Fusion Slicer > Convert to slices > Laser cut out pieces OR Print out template and cut out > put together physical sound wave
(Added workflow after 3D print intro at fablab) Record audio in processing > End recording> Open recorded file> Analyse audio to create a 3D mesh > Export 3d mesh as .STL > Import .STL into netfab for error check > Perform error fixing if required > Export as .STL > open in Cura to add supports (if required) and other technical bits > Save to SD card > 3D print object!
Import image to Processing > Use Processing to read the rgb levels to create mesh > Export mesh as .STL > Import .STL to netfab for error check > Export to Cura > 3D print
0 notes
Photo

“FAILED IDEAS”
I attempted to show my take on a bulldog clip, but when importing it into Netfab, there were to many errors, meaning the idea was abandoned.
0 notes
Text
Week 1 Friday:
Today I headed out to the fablab to start my printing process for the bracelet. I knew that I had my 3D model ready but I wasn’t too sure what software they commonly use at massey for slicing and making a Gcode file for the 3D printers to use. But with the help from Craig I learnt that to make sure all the sizes are alright we put my STL file into the Autodesk netfab software.

After the sizing looked fine and there wasn’t any weird geometric pop out’s, I chucked the same file into Cura, an easy access slicing software for ultimaker 3D printers that enables users to convert their STL file into a gcode file for the printer to read. Cura also enables users to see the different layers of the model and how they’ll physically print in the machine.

After I had transferred the gcode file onto an SD card, I then went to try my first ever attempt at 3D printing which was interesting as the first machine I attempted to print on messed up as the base model wasn’t sticking to the base of the printer.


After the first attempt Craig suggested that I create a larger brim onto the file. So that there was a larger base for the model when it was being printed.
Below is the 2nd attempt which did look better but it still had the same problem where it wasn’t creating a flat base on the bottom.

I then switched to a different machine because Craig suggested that it might just be that printer that was acting faulty and sure enough when we switched printers the model started to print out fine creating that flat base.

Unfortunately, I had a few errands to run while this was printing so I’ll try and see if it had successfully finished printing tomorrow.
0 notes
Photo


Throughout all of my processes I continued to use Netfab and Cura to fully develop and complete my 3d Printing files.
0 notes