#netgear WiFi Extender Setup
Explore tagged Tumblr posts
Visit Tumblr Blog
Explore Tumblr blogs with no restrictions, modern design and the best experience.
Last Seen Tumblr Blogs


Fun Fact
Celebrities use Tumblr as well.
Text
Netgear WiFi Extender: Maximizing Connectivity for Smart Homes
Plugging your Netgear extender into a power outlet close to your Wi-Fi network will enable you to set it up. Use WPS configuration or join the extender's Wi-Fi network. For configuration, use a web browser or the Netgear installation aid to follow the on-screen instructions. By visiting our website, you can simplify the configuration of your Netgear wifi extender. Should you require more assistance with the process execution, don't hesitate to reach out to our experts.
1 note
·
View note
Text
Netgear wireless extender login
The Netgear wireless extender login is a crucial step in enhancing and optimizing your home or office network. Designed to boost the existing Wi-Fi signal range, Netgear extenders require a seamless setup process, and the login interface serves as the gateway to configuration. To initiate this process, connect your extender to a power source and access its default network using a device like a computer or smartphone. Once connected, open a web browser and enter the default login web address or the extender's IP address. This prompts the Netgear extender login page, where users input their credentials, typically a username and password. After successful authentication, users gain access to the extender's settings, enabling them to customize network parameters, update firmware, and optimize performance. A user-friendly interface ensures a smooth Netgear wireless extender login experience, empowering individuals to tailor their network extension according to specific needs and preferences.
#Netgear wireless extender login#Netgear extender setup#netgear wifi extender setup#netgear extender set up#netgear extender setup wizard#netgear extender not working#wifi extender login netgear#netgear wireless extender login
1 note
·
View note
Text
0 notes
Text
Step-by-Step Guide to Setting Up Your Netgear Extender!
For easy Netgear extender setup, open the web browser and type the mywifiext.net web address in the browser bar. Now, enter the login details and you reach the smart setup dashboard of the repeater. Here, visit the basic and advanced settings to configure the further settings accordingly. To know more information regarding the same, get in touch with us!

0 notes
Text
How To Setup WiFi Range Extender Netgear, plug it in, connect to the default WiFi network, and launch a web browser. Visit mywifiext.net, connect to your existing WiFi network using the setup wizard, and then configure the extender's SSID and password. Once set up, insert the extender halfway between your router and the desired coverage area.
#How To Setup WiFi Range Extender Netgear#How To Setup#WiFi Range Extender Netgear#Netgear WiFi range extender
0 notes
Text
A Guide 2024 on How to Reset Netgear WiFi Extender

Method 1: Soft Reset via Web Interface

Connect to the Extender:
Ensure your device is connected to the Netgear WiFi extender network.
Open a web browser and enter the default web address “http://mywifiext.net" in the address bar.
Log In:
Enter your admin credentials (username and password) to access the extender’s web interface.
Navigate to Reset:
Locate and click on the “Settings” or “Maintenance” option.
Find the “Reset” or “Restore Factory Settings” option.
Confirm Reset:
Follow the on-screen instructions to confirm the reset.
Allow the extender to reboot, and it will be reset to its default settings.
Method 2: Hard Reset Using the Reset Button
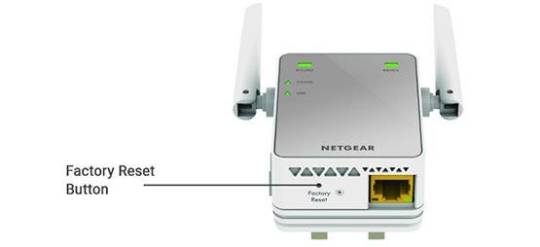
Locate the Reset Button:
On your Netgear WiFi extender, find the reset button. It is usually a small hole labeled “Reset.”
Use a Paperclip or Pin:
With the extender powered on, use a paperclip or pin to press and hold the reset button for about 10 seconds.
Release the Button:
Release the button when the LED lights on the extender start flashing.
The extender will reset to its factory settings.
Method 3: Factory Reset Using Netgear Genie App
Install Netgear Genie:
Download and install the Netgear Genie app on your smartphone or computer.
Launch the App:
Open the Netgear Genie app and log in with your extender’s credentials.
Navigate to Reset:
Find the “WiFi Settings” or “Wireless” option in the app.
Look for the “Reset” or “Restore Factory Settings” option.
Confirm Reset:
Follow the prompts to confirm the reset.
Allow the extender to reboot, completing the factory reset process.
Conclusion:
By following these three methods, you can easily reset Netgear WiFi extender and address various connectivity issues. Remember to reconfigure your extender with the appropriate settings after the reset to ensure optimal performance. Whether you prefer a soft reset through the web interface, a hard reset using the reset button, or a factory reset using the Netgear Genie app, these methods offer flexibility based on your preferences and the extender model you are using.
1 note
·
View note
Text
How do I setup Netgear Ex6110?

The Netgear EX6110 setup is a fast procedure. First, connect it to a power source. Open a web browser and navigate to http://www.mywifiext.net/ after connecting your device to the extender’s WiFi network. To choose and establish a connection to your current WiFi network, adhere to the on-screen directions. After adjusting the extender’s parameters or leaving them as they are, click “Finish” to finish the configuration. Move the extender to a location with a strong WiFi signal for best coverage.
How to setup Netgear EX6110 setup manually?
When the Power LED on the Netgear EX6110 illuminates, it is ready to be used.
Make that your device is connected to the “NETGEAR_EXT” default WiFi network.
Type http://www.mywifiext.net/ or http://192.168.1.250/ into the address bar of an open web browser.
Select the WiFi network you already have and input its password by following the on-screen directions.
You may choose to use the default values or modify the extension settings.
In order to maximize WiFi coverage, move the extender and click “Finish” to finish the manual setup.
Read More:-
1 note
·
View note
Text
mywifiext.net login
Are you struggling to extend your Wi-Fi reach and conquer those dead zones? Well, fret no more, weary traveler! Your journey to seamless connectivity begins with mywifiext.net login. This hidden portal holds the key to unlocking the true potential of your NETGEAR WiFi extender.
But where do you even begin? Don't worry, we've got you covered. This handy guide will equip you with all the knowledge you need to navigate the mywifiext.net login process like a pro.
Step into the portal:
Open your favorite web browser on your laptop or PC. Type in the magic address: mywifiext.net or mywifiext.local. This is your gateway to the extender's inner sanctum. Press enter and brace yourself! You'll be greeted by the mywifiext.net login screen. Now comes the moment of truth:
Enter your username. This is usually the default username printed on a sticker on the extender itself. If not, it's often admin. Password, please! This is also printed on the sticker. If you changed it, enter your custom password instead.
0 notes
Text
Eliminate Dead Zones with Netgear WiFi Extender Setup
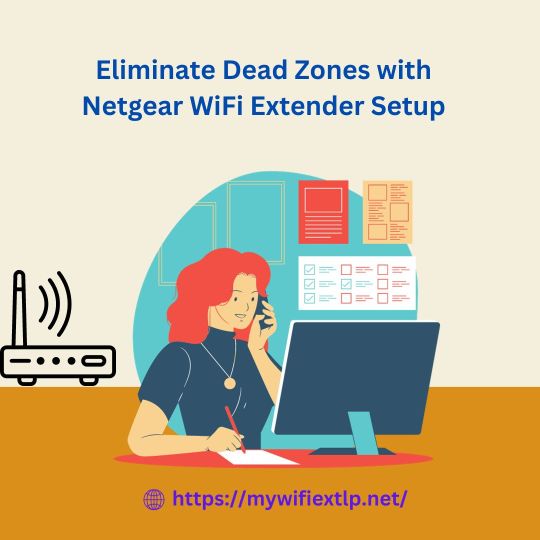
Netgear WiFi extender setup
Are you thinking of carrying out the Netgear WiFi Extender Setup at your home? Well, it will help you boost the wireless internet signal and expand your WiFi network coverage. In addition, the Netgear extender setup will also ensure that you receive a seamless WiFi experience throughout your home.
Unlock the full potential of your home network with the step-by-step process on the Netgear WiFi extender setup in this blog post. It will, further, enhance your WiFi coverage and performance effortlessly.
Netgear WiFi Extender Setup
Now the time has come for you to start learning about the complete Netgear extender setup process. So, go through the steps in this section right away.
First & foremost, plug your Netgear WiFi extender into an electrical outlet.
After that, launch a browser on your device and enter "http://192.168.1.250" in the URL bar.
Next, access your device's Wi-Fi settings and connect to the Netgear Extender's network.
Then press the "Enter" button and you'll be prompted to choose your existing Wi-Fi network and enter the password.
Once you access the setup page, you can customize your extender settings, including network names & passwords.
Finally, you can connect your smart devices to your extender's WiFi network and start using the benefits of an extended network.
With the Netgear Wi-Fi extender, you will enjoy stronger signals, uninterrupted connectivity, and outstretched coverage. It is the key to a seamless online experience in all corners of your office or home.
Bottom Line
This blog post includes the complete Netgear WiFi extender setup process. Thus, follow the steps carefully and make no mistake. But if you are unable to carry out these processes by any chance, feel free to get in touch with our technical team. They will guide you through the complete Netgear WiFi extender setup.
0 notes
Text
Seamless Connections Made Easy: MyWiFiLogon's Router and Extender Troubleshooting ? call for support +1-800-413-3531
Struggling with router and extender glitches? Look no further than MyWiFiLogon. We pride ourselves on being your go-to source for resolving connectivity challenges. Our seasoned professionals are well-versed in diagnosing and remedying a variety of network issues, ensuring that you experience seamless online interactions.call for support +1-800-413-3531

#netgearextendersetup#netgearlogin#rangeextender#wifi_extender#wifi extender#wifi connection#how to setup netgear ac1200#netgearlight
0 notes
Text
In order to access the Netgear router password not working issue, one needs to put the admin login password to use. However, what if the routerlogin.net admin password does not work for you? Well then, you will not be able to log in to your networking device.
#router setup#routersetup#netgear router not working#netgear router setup#netgear wifi extender login
0 notes
Text
Optimizing Your Network: A Guide to Netgear Extender Setup?
Inputting your Netgear WiFi extender into a power outlet that is adjacent to your current wireless internet connection is how you set it up. First, press the WPS button on your router, then on your extender. Await the LED lights turning on to show that the connection was successful. Visiting our website will be a terrific first step towards finding the answers to any additional questions you may have regarding the Netgear extender setup. If you need further help, you may connect with our specialists using the live chat option on our website.
1 note
·
View note
Text
0 notes
Text
Netgear AC3000 Setup: Steps To Follow By Beginners
Netgear AC3000 is a networking device that offers a reliable network connection. Get buffer free internet with the netgear AC3000 setup. Add the device into your existing network to uplift the coverage and eliminate wireless dead zones. Even all persons who are new to networking can perform the setup easily. Step by step guide to configure netgear AC3000 device is sanctioned in this article, check the content further and uplift the home network.
Netgear AC3000 Setup Requirements
Netgear AC3000 devices can easily be set up if you have all the significant items.
Netgear AC3000 Wifi Extender
Ethernet Cable
Power Adapter
Electricity Outlet
Computer/ Laptop/ Smartphone
Netgear AC3000 Installation
Netgear AC3000 installation of the hardware device is super easy. You just have to perform the installation by follow the given steps:
Unbox your netgear AC3000 range extender device first. While unboxing, be sure the box contains ethernet cable, power adapter and user manual also along with the range extender.
Step forward towards the netgear AC3000 setup and start looking for a location.
Choose a position closer to the host router but not too far from the area where you were facing network problems.
A location where the device is able to receive the signals from the router and amplify it to eliminate network trouble is ideal.
Once an ideal location is found, keep the device and look for a nearby power socket to power up the device.
Use the power adapter to turn on the device and wait until it get booted completely.
LED lights get stable when bootup completes.
Step ahead and connect the device with the client device using ethernet cable or wireless network.
Wireless connection requires a wireless network name and password, on the contrary, wired methods need a working ethernet cord.
As the connection is done you may proceed to perform netgear AC3000 setup.
Netgear AC3000 Setup
Netgear AC3000 setup includes easy to follow process as specified:
Embark the netgear AC3000 setup process with the launch of a web browser of your choice.
Rush to the browser’s address bar, mention the default IP or web address “www.mywifiext.net”
On the keyboard connected to the laptop or computer, tap on the enter button to initiate the search.
As the setup page appears on the screen, get its access by entering the username and password in the shown field.
After mentioning the information hit on the login tab and web admin panel appears on the screen.
Netgear installation assistant will help you to complete the setup.
Prior to all choose the language, then change the admin account login details. Default login details may risk your network security.
Once you change the admin security, go to the link device option.
Now you need to search for the SSID of the host router device. Choose your network among all the available networks which you desire to extend.
After selection the screen will ask for the password of the main network with which you wish to connect the extender.
Now, enter the password and step ahead to create a new network name for your netgear ac3000 setup.
After deciding the network name, form a security key as well. Keeping the network secure is very important. While creating a security key you should create at least 8 character passwords.
Once you make changes in the wireless network security, remember to check for the firmware update.
Tap on the submit option at last to end the setup and then test it.
Netgear AC3000 Network Boost
To boost the network you have to perform a network test. This will help you know what exactly you should do to boost the network:
Check the network by using a smartphone, link it with the netgear extender network and browse the internet.
In case the coverage of the device network is weak as before in the area previously you were facing trouble then you need to relocate it.
Again search for the location and then test it again.
In case the device is not receiving proper signals from the router device then relocate it and put it closer to the router device.
Also you should check the firmware version of the extender. If required then update it.
Stepping ahead you need to boost the network by eliminating the nearby radio frequency device or heavy metal objects.
Conclusion
I would like to end my words by saying that the netgear AC3000 range extender device is perfect for the users to create a strong network. This device will eliminate wifi dead zones and offer signals to the location where the router's signals are hard to reach. Above available step by step breakdown of the setup process will help you in adding the device into the network very conveniently. Netgear AC3000 setup will change your online experience and enhance your working.
0 notes
Text

To understand How To Setup Netgear Extender, plug it into a power outlet and connect your device to the extender's temporary WiFi network. Open a web browser and go to mywifiext.net. Follow the on-screen wizard to connect it to your existing WiFi network. For teh full details, come to us!
0 notes
Text
How To Setup WiFi Range Extender Netgear
Learn How to Setup WiFi Range Extender Netgear, plug it into a power outlet within the range of your existing WiFi network. Wait for the power LED to light up solid green. Connect to the extender's WiFi network on your device. Open a web browser and enter "www.mywifiext.net in the address bar. Follow the on-screen instructions to complete the setup process, including connecting the extender to your existing WiFi network.
#How To Setup WiFi Range Extender Netgear#How To Setup WiFi Extender Netgear#How To Setup Extender Netgear#Extender Netgear Setup
1 note
·
View note