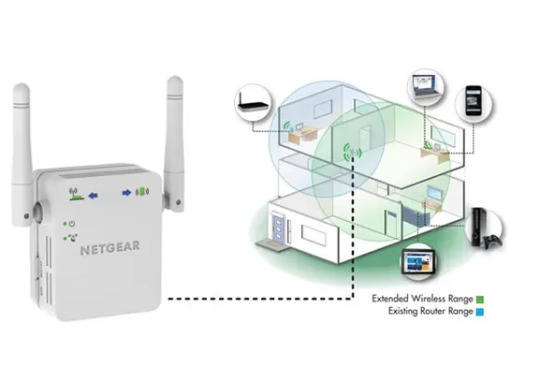
#netgear extender setup with netgear installation assistant
Text
Guide on Mywifiext | www.mywifiext.net Login / Setup
By asking you questions, Guided Assistance assists you in resolving the problem you are experiencing with your NETGEAR equipment.
You can log into your netgear WiFi range extender after installation to examine and modify the settings.
Visit NETGEAR Support and obtain the quick start guide for your model if you haven't installed and connected your WiFi range extender to your current WiFi network before continuing.
Check to see whether your model is listed under "This article pertains to:" If you own a Nighthawk Mesh or Mesh WiFi Extender, check How can I access my Nighthawk Mesh Extender or WiFi Mesh Extender?
To access your WiFi extender, log in as follows:
From a computer or mobile device linked to your extender's network, open a web browser.
It's possible that the names of your router and extender's WiFi networks differ (SSIDs). Check to see if you are linked to the network of your extension.
In the URL bar of your web browser, write www.mywifiext.net if your extender and router have distinct WiFi network names (SSIDs).
Enter http://extender's IP address> (for instance, http://192.168.1.3) into your browser's address bar if your extender and router share the same WiFi network name (SSID).
See How can I find the IP address of a device connected to my router? for additional details.
Hit the Enter key or press.
A login screen appears.
Enter your admin password and user name.
Note: An email address could be part of your user name.
Click the Username & Password Help link if you can't remember your user name or password.
To change your login information, see How can I reset my NETGEAR range extender to factory settings?
Tap or click LOG IN.
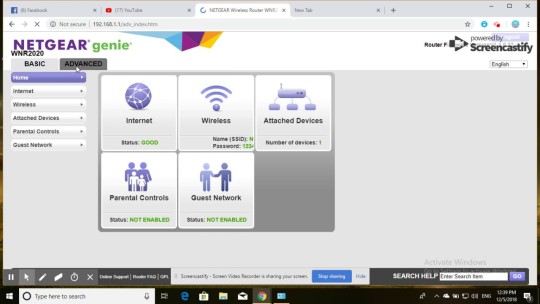
It shows the Status page.
Click or press the Menu symbol if your browser displays it.
A menu for the extender appears.
To view and modify the extender's settings, select Settings.
1 note
·
View note
Text
Resolve Netgear Mywifiext Not Loading Issue
Encountering issues with accessing the Netgear mywifiext page can be frustrating, but worry not, we've got solutions to help you navigate through these hurdles seamlessly. Below, we've outlined various techniques and tips to troubleshoot and access the mywifiext page effortlessly.
Mywifiext serves as the default admin web URL for setting up a Netgear extender. It not only simplifies the installation process but also grants users the ability to manage and modify extender settings post-setup. However, users might face errors such as "unable to connect to the site," "mywifiext.net not functioning," or "you are not linked to your extender Wi-Fi network."
Key Reasons for mywifiext.net Not Working Issue:
Incorrect URL: Ensure that you're entering the correct URL in the browser address bar.
Network Connectivity Issues: Make sure your device is connected to the network of the NETGEAR extender to access mywifiext.net.
Router Configuration: Verify router firewall settings, check for IP address conflicts, and ensure correct login credentials to avoid issues accessing mywifiext.net.
Extender Placement: Optimal network performance requires the extender to be placed within the range of the router. Verify its positioning.
Browser Issues: Clear browser cache or switch to a different browser if you're encountering issues accessing mywifiext.net.
Outdated Firmware: Ensure the extender's firmware is up-to-date to avoid connectivity issues.
Hardware Issues: Any hardware malfunction might hinder access to mywifiext.net. Troubleshoot hardware problems accordingly.
If you find yourself puzzled while attempting to sign into your Netgear Wi-Fi range extender, feel free to ask your questions here in the chat. Assistance is readily available to address your queries and concerns.
0 notes
Text
Netgear WiFi Extender: Maximizing Connectivity for Smart Homes
Plugging your Netgear extender into a power outlet close to your Wi-Fi network will enable you to set it up. Use WPS configuration or join the extender's Wi-Fi network. For configuration, use a web browser or the Netgear installation aid to follow the on-screen instructions. By visiting our website, you can simplify the configuration of your Netgear wifi extender. Should you require more assistance with the process execution, don't hesitate to reach out to our experts.
1 note
·
View note
Text
0 notes
Text
can you load nord vpn to router
🔒🌍✨ Get 3 Months FREE VPN - Secure & Private Internet Access Worldwide! Click Here ✨🌍🔒
can you load nord vpn to router
Nord VPN router compatibility
NordVPN is one of the leading names in the realm of virtual private networks (VPNs), offering users enhanced security, privacy, and access to geo-restricted content. For individuals seeking to safeguard their online activities across multiple devices, including routers, NordVPN provides comprehensive compatibility options.
One of the key advantages of NordVPN is its extensive router compatibility. With NordVPN, users can easily configure their VPN connection directly on their routers, thereby securing the entire network and all connected devices in one fell swoop. This means that devices such as smart TVs, gaming consoles, and IoT devices can also benefit from the protection and anonymity provided by NordVPN.
NordVPN supports a wide range of router brands and models, making it accessible to a broad spectrum of users. Whether you have a router from Asus, Linksys, Netgear, TP-Link, or another major manufacturer, chances are NordVPN is compatible with it. Additionally, NordVPN offers user-friendly setup guides and tutorials to assist individuals in configuring their routers for optimal VPN usage.
By leveraging NordVPN's router compatibility, users can enjoy seamless protection without the need to install the VPN client on each individual device. This not only simplifies the user experience but also ensures that all devices connected to the network are shielded from cyber threats and data surveillance.
Furthermore, NordVPN's router compatibility extends beyond security concerns, enabling users to bypass geographic restrictions and access region-locked content on various streaming platforms. Whether you're at home or on the go, NordVPN empowers you to enjoy a secure and unrestricted internet experience across all your devices.
In conclusion, NordVPN's robust router compatibility reinforces its position as a top-tier VPN provider, offering users unparalleled convenience, security, and freedom online.
Setting up Nord VPN on router
Setting up Nord VPN on your router can provide enhanced security and privacy for all devices connected to your network. By configuring your router with Nord VPN, you can ensure that all internet traffic from devices such as laptops, smartphones, smart TVs, and gaming consoles is encrypted and secure.
To set up Nord VPN on your router, you will first need to ensure that your router is compatible with the VPN service. Most modern routers are compatible, but it's always a good idea to check Nord VPN's website for a list of supported routers.
Once you have confirmed compatibility, you can proceed with the setup by logging into your router's admin panel. From there, you will need to locate the VPN section and enter the necessary configuration details provided by Nord VPN. This usually includes server addresses, login credentials, and encryption settings.
After saving the configuration settings, you can connect your router to Nord VPN's servers. Once connected, all internet traffic from devices on your network will be routed through the VPN, ensuring that your online activities are private and secure.
Setting up Nord VPN on your router can also be beneficial for accessing geo-restricted content and bypassing censorship. By connecting to servers in different countries, you can unblock websites and streaming services that may be restricted in your region.
Overall, setting up Nord VPN on your router is a relatively simple process that can offer a wide range of benefits in terms of security, privacy, and online freedom.
Benefits of using Nord VPN on router
Title: Unlocking the Power of NordVPN on Your Router: A Gateway to Online Freedom
In the digital age, safeguarding your online privacy and security has become paramount. With cyber threats looming large and privacy concerns escalating, using a Virtual Private Network (VPN) has become indispensable. NordVPN stands out as a leading provider, offering robust features and uncompromising security. While using NordVPN on individual devices is common, integrating it directly into your router offers a plethora of benefits that elevate your online experience to new heights.
Comprehensive Protection: By installing NordVPN on your router, every device connected to your home network receives instant protection. This includes smartphones, tablets, laptops, smart TVs, gaming consoles, and more. It ensures that all your internet traffic is encrypted and routed through NordVPN's secure servers, shielding your data from prying eyes.
Enhanced Security: With NordVPN on your router, you fortify your network against cyber threats such as malware, phishing attacks, and data breaches. Its advanced encryption protocols and cutting-edge security features create an impenetrable barrier, safeguarding your sensitive information and preserving your anonymity online.
Access to Geo-Restricted Content: One of the standout benefits of using NordVPN on your router is the ability to bypass geo-blocks and access region-locked content effortlessly. Whether you're streaming your favorite shows, accessing restricted websites, or gaming without limitations, NordVPN empowers you to explore the internet without boundaries.
Seamless Connectivity: With NordVPN running on your router, you no longer need to manually connect each device to the VPN individually. This streamlines the process and ensures seamless connectivity for all your devices, eliminating the hassle of toggling VPN settings and providing uninterrupted protection round the clock.
Cost-Effective Solution: Opting for NordVPN on your router offers a cost-effective solution compared to purchasing multiple VPN subscriptions for individual devices. It allows you to protect numerous devices simultaneously under a single subscription, saving you both time and money in the long run.
In conclusion, integrating NordVPN into your router amplifies your online security, grants you unrestricted access to content, and simplifies the VPN experience across all your devices. It's a smart investment that offers peace of mind in an increasingly interconnected world.
Router specifications for Nord VPN installation
Setting up NordVPN on your router can provide enhanced security and privacy for all devices connected to your network. However, not all routers are compatible with NordVPN, so it's crucial to consider the specifications before installation.
Firstly, ensure that your router supports VPN client capabilities. Look for routers that are compatible with OpenVPN, as NordVPN primarily uses this protocol for its connections. Additionally, check if your router allows for manual configuration of VPN settings, as this will be necessary for setting up NordVPN.
Another important specification to consider is the processor speed and memory of your router. NordVPN encryption can put a strain on the router's resources, so a powerful processor and ample memory are essential for smooth performance. Aim for routers with at least a dual-core processor and 256MB of RAM for optimal operation.
Furthermore, the firmware of your router plays a crucial role in VPN compatibility. Routers running custom firmware like DD-WRT, Tomato, or AsusWRT are often easier to configure for VPN use, including NordVPN. Make sure to check NordVPN's website for specific firmware compatibility before proceeding with installation.
Additionally, pay attention to the number and type of VPN connections supported by your router. NordVPN allows for simultaneous connections on multiple devices, so ensure your router can handle the desired number of connections without compromising performance.
Lastly, consider the availability of dedicated VPN setup guides and support for your router model. NordVPN provides detailed instructions for configuring various routers, but having readily available resources specific to your router can simplify the installation process.
By carefully reviewing and considering these router specifications, you can ensure a smooth and successful installation of NordVPN, providing comprehensive security and privacy for your entire network.
Enhancing security with Nord VPN on router
Enhancing Security with NordVPN on Router
In the digital age, protecting your online privacy and data security is paramount. One of the most effective tools to achieve this is by using a reliable VPN service like NordVPN on your router. By configuring your router to use NordVPN, you can encrypt all the internet traffic flowing through your network, thus providing an additional layer of security for all devices connected to it.
One of the primary benefits of using NordVPN on your router is that it secures devices that do not natively support VPN connections. This means that smart TVs, gaming consoles, IoT devices, and any other gadgets connected to your network can benefit from the VPN encryption without the need for individual setup on each device. This comprehensive protection ensures that all your internet activities are shielded from prying eyes and potential cyber threats.
Moreover, by encrypting your internet traffic with NordVPN, you can bypass geographical restrictions and access content that may be blocked in your region. This can be particularly useful for streaming services, allowing you to unlock a world of entertainment options without compromising your security and privacy.
Setting up NordVPN on your router is a straightforward process that typically involves installing custom firmware provided by NordVPN and configuring the settings through the router's admin panel. Once set up, the VPN connection is established at the router level, ensuring that all data transmitted between your devices and the internet is encrypted and secure.
In conclusion, enhancing security with NordVPN on your router is a proactive step towards safeguarding your online activities and protecting your sensitive information. By utilizing the robust encryption and advanced security features offered by NordVPN, you can enjoy a safer and more private browsing experience across all your connected devices.
0 notes
Text
can nordvpn be used on a vpn enabled router
🔒🌍✨ Get 3 Months FREE VPN - Secure & Private Internet Access Worldwide! Click Here ✨🌍🔒
can nordvpn be used on a vpn enabled router
NordVPN router compatibility
NordVPN is one of the leading names in the VPN industry, known for its robust security features and extensive server network. For users looking to protect all devices connected to their home network, NordVPN router compatibility is a crucial consideration.
Fortunately, NordVPN offers support for a wide range of router models, making it easy for users to secure their entire network with just one subscription. Whether you have a popular router brand like Asus, Netgear, Linksys, or TP-Link, chances are NordVPN supports it.
Setting up NordVPN on your router provides several benefits. Firstly, it ensures that all devices connected to your Wi-Fi network, including smartphones, laptops, smart TVs, and gaming consoles, are automatically protected by the VPN. This means enhanced privacy and security for all your online activities, including browsing, streaming, and gaming.
Moreover, configuring NordVPN on your router allows you to bypass geographic restrictions and access geo-blocked content on devices that typically do not support VPN apps, such as gaming consoles and smart TVs. This opens up a world of streaming possibilities, allowing you to enjoy content from different regions with ease.
NordVPN offers user-friendly tutorials and guides to help you set up the VPN on your router, regardless of your technical expertise. Additionally, their customer support team is available 24/7 to assist with any troubleshooting or setup queries you may have.
In conclusion, NordVPN's router compatibility extends its protection to all devices on your home network, offering convenience, security, and access to geo-restricted content. With NordVPN, safeguarding your online privacy has never been easier or more comprehensive.
VPN-enabled router setup with NordVPN
Setting up a VPN-enabled router with NordVPN can offer enhanced security and privacy for all devices connected to your home network. NordVPN offers step-by-step instructions to make the setup process smooth and hassle-free.
Firstly, ensure your router is compatible with NordVPN. Most modern routers support VPN configurations, but it's always best to double-check compatibility on NordVPN's website or with their customer support.
Once confirmed, log in to your router's admin interface. This is typically done by entering the router's IP address into your web browser's address bar and logging in with your username and password.
Next, locate the VPN settings within your router's admin panel. This might be labeled as "VPN," "OpenVPN," or something similar, depending on your router model.
Follow NordVPN's instructions to download the necessary configuration files for your router. These files contain the settings required to connect to NordVPN's servers securely.
Upload the configuration files to your router's VPN settings. This usually involves selecting the file from your computer and clicking "Upload" or a similar button.
Enter your NordVPN account credentials into the router's VPN settings. This allows the router to authenticate with NordVPN's servers when establishing a connection.
Finally, save your settings and restart your router to apply the changes. Once restarted, all devices connected to your home network will benefit from the security and privacy features provided by NordVPN.
By setting up a VPN-enabled router with NordVPN, you can encrypt your internet traffic, hide your IP address, and access geo-restricted content on all your devices without needing to install individual VPN apps. It's a convenient and effective way to protect your online privacy and security.
Using NordVPN on a router
Using NordVPN on a router can significantly enhance your online privacy and security. NordVPN offers a convenient way to protect all devices connected to your home network by configuring the VPN directly on your router. Here's a comprehensive guide on how to set up NordVPN on your router and the benefits it brings.
Firstly, make sure your router is compatible with NordVPN. Most modern routers support VPN configurations, but it's always wise to check NordVPN's website for compatibility information or consult their customer support.
Next, log in to your router's admin panel. This can usually be done by entering your router's IP address into a web browser and logging in with your username and password. Once logged in, locate the VPN settings section.
In the VPN settings, you'll need to enter the connection details provided by NordVPN. This typically includes the server address, username, and password. NordVPN offers detailed instructions and configuration files for various router models, making the setup process straightforward.
After entering the necessary information, save your settings and establish a connection to the NordVPN server. Once connected, all internet traffic from devices connected to your router will be encrypted and routed through NordVPN's secure servers, protecting your data from prying eyes.
Using NordVPN on your router offers several advantages. It encrypts your internet traffic, preventing ISPs, hackers, and other third parties from monitoring your online activities. It also enables you to bypass geographical restrictions and access geo-blocked content from anywhere in the world.
In conclusion, setting up NordVPN on your router is a simple yet effective way to safeguard your online privacy and security. By encrypting all internet traffic at the router level, you can enjoy a more secure browsing experience on all devices connected to your home network.
Router VPN configurations for NordVPN
Router VPN configurations allow users to protect their online privacy and security by encrypting their internet connection. One popular VPN provider that offers router configuration options is NordVPN. By setting up NordVPN on a router, users can ensure that all devices connected to the network are automatically protected with the VPN connection.
To configure NordVPN on a router, users typically need to access the router's settings through a web browser and enter the NordVPN server details provided by the service. This process may vary depending on the router model and NordVPN's instructions, which can be found on their website.
Setting up a VPN on a router has several advantages. It allows users to secure multiple devices simultaneously without the need to install a separate VPN app on each device. This is especially useful for smart TVs, gaming consoles, and other devices that don't support native VPN apps.
Moreover, using a VPN at the router level encrypts all internet traffic, including devices that cannot run VPN software. This provides a seamless and comprehensive layer of privacy and security for all connected devices.
Overall, configuring NordVPN on a router is a convenient way to extend VPN protection to all devices on a network. It ensures that users can browse the internet anonymously and securely, safeguarding their sensitive data from potential cyber threats.
Compatibility of NordVPN with VPN-enabled routers
Title: Exploring the Compatibility of NordVPN with VPN-Enabled Routers
In the digital age, safeguarding online privacy has become paramount. Virtual Private Networks (VPNs) offer a reliable solution, encrypting internet traffic and masking IP addresses. While VPNs are commonly used on individual devices, integrating them with routers provides enhanced protection for all connected devices in a household or office.
NordVPN, a leading provider in the VPN market, offers compatibility with VPN-enabled routers, catering to users seeking comprehensive network-wide security. This compatibility extends NordVPN's benefits beyond individual devices, ensuring every device connected to the router enjoys encrypted traffic and anonymity.
Setting up NordVPN with a VPN-enabled router is a straightforward process. Users can either purchase a pre-configured router from NordVPN or manually configure their existing router to work with the VPN service. NordVPN provides detailed guides and support for both options, enabling users of varying technical proficiency to set up their router seamlessly.
Once configured, NordVPN secures all internet traffic originating from devices connected to the router. This includes smartphones, tablets, computers, smart TVs, gaming consoles, and IoT devices. By encrypting data at the router level, NordVPN protects against potential threats such as hacking, surveillance, and data interception, regardless of the device being used.
Moreover, integrating NordVPN with a VPN-enabled router offers additional benefits, such as bypassing geo-restrictions and accessing region-locked content on streaming platforms. Users can enjoy unrestricted access to their favorite shows, movies, and websites, irrespective of their geographical location.
In conclusion, the compatibility of NordVPN with VPN-enabled routers enhances online privacy and security for all connected devices. Whether for personal or professional use, integrating NordVPN with a router provides a convenient and effective way to safeguard digital interactions and access online content without restrictions.
0 notes
Text
Ultimate Guide For Netgear Nighthawk X4 ac 2200 Setup Issue
Netgear Nighthawk X4 ac 2200 Setup is quite an easy and straightforward task. In this, you will get a step-by-step guide to do the same. If you are unable to find how to Netgear Nighthawk X4 ac 2200 Setup. Then you are at the right place, here you will learn how to do so. Netgear Nighthawk X4 ac 2200 is a WiFi range extender, that expands your existing WiFi range with speeds up to 2200 Mbps.
It also provides the most steady WiFi and the most instantaneous internet connection. But many users don’t know how to Netgear Nighthawk X4 ac 2200 Setup. And some of them find doing this difficult, especially, those who are non-technical. If you are one of them, then do not get upset. Below is the guide for Netgear Nighthawk X4 ac 2200 Setup. Simply go through the following instructions.
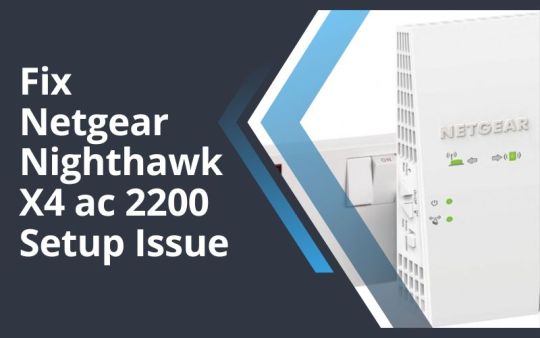
Step-by-Step Guide for Netgear Nighthawk X4 ac 2200 Setup
Netgear Nighthawk X4 ac 2200 Setup is not a complicated task as you think, it is more straightforward than you think. In this, you will get to know how to do this. With this, extender device, you can develop a better vigorous WiFi network at home. This is the most simple and effective way to extend the WiFi range of the router.
There are three methods through which you can easily Netgear Nighthawk X4 ac 2200 Setup. The first is through Netgear Installation Assistance, the second is through the WPS button, and the third is through Fastlane Technology.
Steps for Netgear the Nighthawk X4 ac 2200 Setup Via Installation Assistance
Doing this through the Netgear Installation Through is not a complicated task, it is simpler than you think. Follow the below instruction to do the same via the installation assistance.
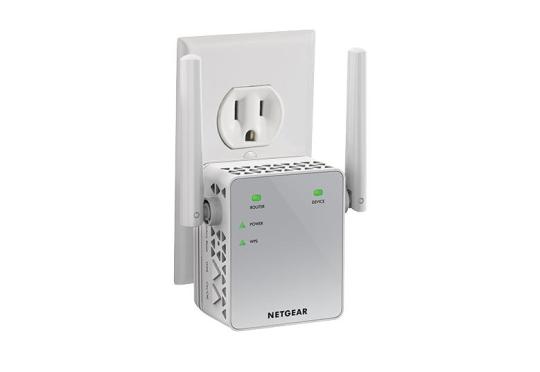
Turn on your Nighthawk X4 ac 2200 by connecting it to the power outlet.
After this, place your wireless router near the extender.
Now you need to plug your Netgear extender into a power outlet.
Then wait for some seconds, until the extender LED light turns green.
Now you have to attach the extender to the router and launch the web browser in your system.
And then enter www.mywifiext.net in the search field, and you will see Netgear installation assistant on the screen.
After this, you have to follow the on-screen instructions and attach the Netgear extender to the existing network.
Now place your extender in the most suitable location.
If still, the connection is poor, then move the extender closer to your router, and try again. Do this, until you see the link status LED light turn white.
Once you have located the most acceptable location, then connect the other device to the extender.
Techniques for the Netgear Nighthawk X4 ac 2200 Setup through the WPS button
If you don’t want to Netgear Nighthawk X4 ac 2200 Setup through the Netgear Installation Assistance. Then here is another method to do the same, that is through the WPS button. To do this, you just need to read and follow all steps.
Turn on the WiFi extender, and place your extender close to the router in the same place.
Then plug in your Netgear WiFi extender into the power source, and wait until the power LED light on the extender turns green.
Now press the WPS on the extender, located on the rear or back side of it.
The white LED light on the Netgear Nighthawk X4 ac 2200 indicates a good connection between the router and the extender.
Now you can move your Netgear extender to a new location.
Try to place it in the location, where you have poor or weak WiFi coverage.
Ways for the Netgear Nighthawk X4 ac 2200 Setup Via FastLane Technology
Setup through FastLane Technology, allows you to enjoy maximum WiFi performance. Here are the steps to do the setup via the FastLane technology.
Firstly, connect your router to the Netgear Nighthawk X4 ac 2200.
After this, use any internet browser, and make sure that you use the latest version of your preferred browser.
After this, in the search field of the web browser, enter mywifiext.net.
Then the login page of the extender will appear, in this fill in your username and password and click on the login button.
Now when the Netgear Genie page appears, click on “Do More” and then on “FastLane.”
Then there are two options for users. The first option is, the device is connected to the extender at 2.4GHz.
And the second is, it is connected to the extender at 5 GHz, and the extender is connected to the router at 2.4 GHz.
You can choose according to your preference. And then click on the button to save the changes you made.
Binding Up
It is quite frustrating when you are unable to set up your Netgear Nighthawk X4 ac 2200. Follow the above instructions for the Netgear Nighthawk X4 ac 2200 Setup. And hopefully, this above guide will help you with the same. You just need to follow the above easy and detailed instructions as given to do the same.
Doing setups of the Netgear Nighthawk X4 ac 2200 extender is not a complicated task, it is simpler than you think. If you don’t know how to do this, then simply obey the above instructions. So, before seeking assistance from someone else, try to go through the techniques, that are given above for Netgear Nighthawk X4 ac 2200 Setup.
1 note
·
View note
Text
Netgear Eax15 setup

The Netgear EAX15 setup instructions should be followed in order to connect your WiFi booster to your home wifi network or modem. Thanks to the wireless booster, your entire home has fantastic internet coverage.It ensures that all of your devices, such as smartphones, iPods, gaming consoles, and other mobile devices, will always have access to the internet.
You can maximise the potential of your wifi network by using this technology. It offers a dedicated channel that connects your router and the extension in addition to frequency responsiveness. Then, based on how your system is set up, you must select between two possibilities.
Installation Netgear EAX15 extender
To configure your Netgear EAX15 AX1800 extender, follow the steps below:
Activate your extension and choose a broadband or wireless connection to connect it to your internet.
Open your preferred web browser once your PC or smartphone has connected.
Use the URL myWiFiext.net setup to access the login page for the extender, and enter your username and password in the appropriate fields.
On your PC, the Netgear Genie page will now appear.
Then, depending on how your system is set up, you have to pick one of two possibilities.
Simply select Save after making your selections to finish configuring your Netgear ax1800 extender.
Note: If you need any help regarding your netgear eax15 ax1800 so contact our technician or visit the official website that is 192.168.1.250.
Netgear eax15 setup using manual method
Web browser installation is another name for the manual approach. Learn how to manually Netgear eax15 Extender Setup by reading the steps listed below:
Start by turning on the Netgear extender and plugging it into a plug box.
Your router and Netgear extender should be connected.
Select the Netgear_ext SSID after logging in to the network management.
Launch any web browser.
You are going to be sent to the mywifiext login page.
If you don't already have one, register.
Press the next button after that, and then the finish button.
Successful completion of the manual Netgear AX1800 Extender Setup procedure.
How to install the Installation Assistant method for Netgear AX1800?
If you want to setup your netgear AX1800 extender using the installation method, follow the instructions below:
Put your Netgear AX1800 in the same location as the router.
If you put it into an electrical socket, it will turn on immediately.
To connect to the Netgear extenders network, your device must first be powered on, the wifi manager must be opened, and last it must be linked.
Visit the website mywifiext.net in a web browser.
Next, enter your login information, including your username and password.
The Netgear installation manager will appear.
Finally, complete configuring your extender by following the on-screen directions.
Finally, utilising the Installation Assistant technique, the NETGEAR AX1800 setup process has been completed.
Netgear EAX15 Setup Using WPS button
WPS is the most efficient method for setup the Netgear wifi extender. Please adhere to the directions below:
Start by turning on your extender.
The WPS button should now be pressed and held for a few seconds.
When your extension and router are properly connected, your LED indicator will turn green.
Utilising the dual band range extender, repeat the process.
Use the same network password for this as you would for the network of your router.
The WIFI extension instructions contain the default username and password.
Connect your wifi devices to the upgraded Netgear_ext SSID at this point.
Troubleshooting steps for netgear eax15:
Use the troubleshooting methods listed below to resolve any setup-related problems with the Netgear eax15 Extender:
Make sure the Netgear extender receives sufficient power from the wall outlet by checking this.
You need a high-speed internet network to connect your PC to.
Keep your extender away from things that have Bluetooth, metal objects, room corners, etc.
Try reconfiguring your Netgear extender after restarting it.
Make sure the most recent version is enabled as soon as you log in to mywifiext.net setup.
After that, restore the Netgear extender's factory default settings.
How do I reset netgear eax15 extender?
To reset the Netgear EAX15 AX1800 Extender setup, adhere to these steps:
The LED lights will change to a green tint when you turn on your extension.
The LED lights on your extension will now need to steady for at least five minutes.
Find the extender's reset button.
The reset button should be pressed and held down for up to 10 seconds to make the LED light blink.
The LED lights on your extender will settle for at least 5 minutes.
Now that you've successfully reset your Netgear wifi extender.
#mywifiext#mywifiext.net setup#netgear nighthawk extender setup#www.mywifiwxt.net setup#netgear eax15 setup#netgear AX1800 setup
0 notes
Text
"Effortless Netgear Nighthawk X4 AC2200 Setup: Step-by-Step Guide"

We know the Netgear Nighthawk X4 AC2200 for its speed. Now it is easier for you to enhance the strength of your internet network by using this modern extender. The Netgear Nighthawk X4 AC2200 extends the range of your router's WiFi. A stronger signal and improved wireless coverage make streaming online without buffering possible. This extender has four powerful external antennas that provide better coverage and signal stability.
It also supports dual-band WiFi, so you can enjoy both 2.4GHz and 5GHz frequencies. It is also easy to complete the Netgear Nighthawk X4 AC2200 setup and use it, so you can get online quickly and enjoy your improved network signal.
It is also crucial for users to know how to Netgear Nighthawk X4 AC 2200 setup process. There are three options for you to set up the Netgear extender. You can use them according to your preferences. You can use the Netgear installation assistant, WPS button, and Fastlane technology for the setup of the Netgear Nighthawk X4 AC 2200.
Netgear Nighthawk X4 AC 2200 Setup By Using WPS Button
A wireless network can be easily and quickly connected via WPS (Wi-Fi Protected Setup), an efficient wireless connection method. It establishes a secure connection between the router and the device using a hardware button or PIN code. By using WPS, it is easy to establish a secure connection without having to manually enter network settings.
It is designed to make the connection process easier and more secure. The router establishes a connection with the device using a hardware button or a PIN code. By eliminating manual network settings, time is saved and errors are reduced. By encrypting the connection, WPS adds a layer of security. For the Netgear Nighthawk X4 AC2200 setup, users can use the WPS method. You can check out the below steps for the WPS setup of the Netgear Nighthawk X4 AC2200.
The Netgear Nighthawk X4 AC2200 extender needs to be turned on.
You can also place your extender near the router.
The power LED light turns green after a few minutes after you plug the extender into the power socket.
Here, users can press the WPS button on their extender.
When a connection is successful, a white LED light illuminates the Netgear Nighthawk X4 AC2200 extender.
Users can also change the location of their extenders.
You can use any Wi-Fi-enabled device to go to a place where WiFi is not available.
It is also important to check whether you completed the Netgear Nighthawk X4 AC2200 setup.
Netgear Nighthawk X4 AC 2200 Setup by Using FastLane Technology
With FastLane technology, you can maximize WiFi performance. A WiFi device is connected to an AC2200 extender via a dedicated band, and an AC2200 extender via a secondary band. You can use FastLane technology if you have a Netgear Nighthawk X4 AC2200. Users must follow the following steps carefully:
You can attach your extender to the router.
Here, users can open their favorite updated web browser.
Using a web browser, you can access mywifiext.net.
Fill out the appropriate fields when prompted with your username and password.
The login button can now be tapped to log in.
Go to the Netgear Genie web page and click "FastLane".
Ultimately, the user gets to choose.
Devices connect to extenders using 2.4 GHz signals. A second option communicates at 5 GHz between the device and the extender, while a 2.4 GHz connection is used between the extender and the router. Which is preferred by users depending on their preferences.
You can also save, so click the button.
After completing the Netgear Nighthawk X4 AC2200 setup, you can use them quickly and also attach different devices to them.
Netgear Nighthawk X4 AC 2200 Setup By Using Netgear Installation Assistant
The Netgear Installation Assistant helps users install and configure Netgear routers and other wireless devices. It includes step-by-step instructions and tools to quickly and easily set up a network.
Your Netgear Nighthawk X4 AC 2200 extender can be turned on by connecting it to the power socket.
The extender is now visible on your wireless router.
Users can now plug Netgear extenders into power sockets.
You can proceed once the extender LED lights turn green.
It is necessary to connect Netgear X4 AC2200 extenders to routers.
Go to www.mywifiext.net by entering the address in your web browser.
It will take a few seconds for the Netgear installation assistant to appear.
Your Netgear extender must be connected to the existing network by following the instructions on the screen.
Netgear wifi extenders can be set up in several locations. This is the step where you determine which location is most suitable for them.
Your Link Status LED light should turn white again once you move your extender closer to your router. You still have a weak or poor WiFi connection in this case.
You can connect the client devices to the extended wireless network as soon as you find the most appropriate location for the extender.
Now you've completed the Netgear Nighthawk X4 AC2200 setup. You can start using the extender quickly and also complete the login process for the Netgear Nighthawk X4AC2200 extender.
Final Words
Users must follow all steps correctly in the Netgear Nighthawk X4 AC2200 setup. When you follow all the steps properly, you can quickly complete the process.
0 notes
Text
How do I setup Netgear genie login?
We'll explain the Netgear genie setup setup app on your laptop, desktop, or smartphone in this blog post. An app called Netgear Genie allows you to easily and quickly manage your Netgear extender and router. Users of this programme will be able to manage and fix their home networks. You may adjust your network settings, identify network problems, and set up parental controls with the aid of the genie application. The application's main function is to manage and set up your Netgear device. If you wish to use a Netgear genie programme to graphically setup and manage Netgear home routers.
Netgear Genie Smart Setup
To set up your extender using the Netgear genie smart setup method, follow the instructions below:
You should join a wireless network with your extender.
Connect any device to the current network.
Launch a web browser.
Enter mywifiext.net as the URL.
Your default username and password should be entered.
The Genie setup page will open on your device.
After that, change the technical setting as necessary.
Don't worry; if you run into any problems while completing the tasks above, we can assist you. Simply get in touch with our technical experts and ask them to set up your Netgear extender.
Note:- If you need any assistance regarding your Netgear genie setup so contact our technician or visit the official website that is www.mywifiext.net setup
Netgear Genie Wizard to set up my Netgear extender?
Here, we explain how to set up your Netgear extender for Netgear Genie setup. For Netgear Genie setup, follow to the instructions displayed on-screen:
Connect your extender first.
Your device must be connected to the accessible network.
Fire up your web browser.
Type 192.168.1.250 or mywifiext.net.
Next, select New Extender Setup.
Your default username and password should be entered.
Then, set upd your Netgear Genie by following the instructions displayed on the screen.
You've now finished the Netgear genie setup procedure. We will discuss how to access Netgear genie in this blog.
What does Netgear Genie be used for?
The objective of Netgear genie is to make managing and configuring Netgear devices simpler than by using the standard way. Netgear genie can be installed on a PC or Macbook as well as Android and iOS smartphones. A dashboard called Netgear Genie makes it simple to control your network. You can control your router's settings with it. enabling you to control and turn on parental controls. If your computer loses connection to the internet, Netgear Genie will be able to assist you in resolving the issue because it continually tracks your internet connectivity. Any wireless network can be accessed using Netgear Genie. The Netgear Genie can set the most typical wireless issues and will be able to automatically remedy the problem.
What is the Netgear genie login procedure?
You should need to download the Netgear genie in order to log in to the app. In Windows 10, Netgear Genie is employed.
The Netgear genie login procedure only takes 5 simple steps:
Connect to the extender first.
Launch your browser.
Visit mywifiext.net now.
Use your username and password to log in.
Click again to log in.
Please remember not to remove your extender while attempting to log in.
How is Netgear Genie firmware updated?
The purpose of a firmware upgrade is initially to boost extender performance. If your internet connection is slow and you have trouble with buffering. If so, just click on firmware upgrade.
Follow the instructions provided to update the most recent firmware for your extender on your Netgear device.
You can upgrade your Netgear extender by following these easy steps:
To the Netgear extender, connect.
Restart your browser.
Visit mywi-ext.net
Use your username and password to log in.
Select "Firmware update" from the menu.
Select the most recent firmware from the administration bar.
The firmware upgrade will take a few minutes, perhaps two.
Don't switch the power off when performing the upgrade.
Your Netgear extender then begins to reboot.
You may upgrade your Netgear firmware using this method. If your Netgear extender is providing you any problems after the setup process. Then you may easily phone or use live chat to speak with our experienced professionals.
0 notes
Text
Netgear EX3700 Setup
One of the most popular extenders is the Netgear EX3700, which lets you extend the range of your wifi and decrease disconnectivity. The best part is that there are no dead zones to prevent you from enjoying yourself when using your laptop, phone, or gaming console. For Netgear EX3700 Setup, there are two practical methods:
WPS allows you to connect to a secure WiFi network without having to enter the network name or password.
Establish a connection with the NETGEAR installation assistant: To utilise the NETGEAR installation assistant, a web browser must be opened from a computer or mobile device.
Setup Guide for the Netgear EX3700
Using installation aid, perform the following steps for Netgear EX3700 setup:
Turn on your Netgear AC750 EX3700 extender.
Put your WiFi extension close to the router.
Connect your extension into an electrical outlet.
Connect your router to the extender.
On a PC or mobile device, open a web browser and type www.mywifiext.net.
Displayed is the NETGEAR installation assistant.
To connect your extender to your current WiFi network, follow the on-screen instructions.
Your extender should be relocated.
Moving the extender closer to your router until the Link Status Light turns white will allow you to retry if you have poor or no connectivity.
After choosing the best location for your extender, connect your client devices to the enlarged WiFi network.
How to Setup Netgear EX3700 using WPS?
WPS setup instructions for the Netgear EX3700 Extender:
Your Netgear AC750 EX3700 WiFi range extender should be turned on.
Put your WiFi extension close to the router.
Connect your extension to a power outlet.
Watch for the Netgear EX3700's Power LED to become green.
The extender's WPS button should be pressed.
If you still have any issue regarding Netgear EX3700 Setup, then don’t feel ashamed to contact our experts via live chat or toll free helpline number.
Common Netgear EX3700 Setup Issues
Not working is Mywifiext.net
Password for mywifiext not correct
Although WiFi is not extended, the Internet is accessible.
Mywifiext.local cannot be contacted
The network is not connected to the WiFi extension.
The Netgear Genie app won't launch.
Accessing 192.168.1.250 IP address has problems
Misplaced configuration CD
WiFi connection problems
Login issues with the Netgear EX3700 extender
Internet connectivity is lost on the EX3700.
Updating Netgear firmware is not possible
With a Netgear EX3700 extender upgrade, mywifiext.net is no longer accessible.
Problems in MAC address filtering
Update failure: Netgear EX3700 not working
How to Solve Netgear AC750 EX3700 Setup Problems?
Use the troubleshooting instructions listed below to solve Netgear EX3700 Setup issues:
Check to see that the Netgear AC750 EX3700 extender is getting the right amount of electricity from the wall outlet.
Before connecting the extension, make sure the wall plug is not broken or short-circuited.
Use your device to get a high-speed internet connection.
Verify each and every electrical connection. Use only undamaged cables.
Keep your extension away from things like aluminium studs, microwaves, fish tanks, cordless phones, room corners, metal items, walls, and walls.
Make sure you put the right URL in the address box if you are experiencing problems with mywifiext.net.
After doing a power cycle, try restarting the extender's configuration on your Netgear AC750.
To log onto My WiFiext.net, only use the most recent version of your web browser.
Upgrade your extender's firmware to the most recent Netgear version.
Restore the factory default settings for the extender.
Netgear EX3700 Firmware Update
The Netgear extender firmware essentially functions as an operating system designed to run on the specific brand and model of the extender. So make sure your extender has the most recent firmware. Follow these procedures to upgrade the Netgear EX3700 firmware:
Turn on your Netgear AC750 EX3700 WiFi extender first.
Attach the extender to your router.
Once finished, open your preferred web browser.
Type "mywifiext.net" into the address area after typing it in.
Use the login and password to access your extender.
Click the Firmware Update option under Settings.
How to reset Netgear EX3700?
One of two approaches will allow you to return your EX3700 to its factory defaults. both through the use of the online user interface and by first selecting the Factory Reset option (GUI).
Hard Reset:
Find anything, like a paper clip or a pen.
On the extender's bottom, locate the Factory Reset button.
Before pushing and holding the reset button with a paper clip or pen, hold the button down for at least five seconds or until the Device to Extender LED begins to flicker amber.
Release the Factory Reset button after the extender has restarted.
After rebooting, the factory default settings for your extender have been reinstated.
Reset Using Web GUI
Utilise a PC that is wired or wirelessly connected to the extension.
Launch a web browser, such as Google Chrome, Mozilla Firefox, or Internet Explorer.
Enter www.mywifiext.net in the address bar of your web browser.
Enter your email address and password on the login screen, then click Log In.
Click Settings and then Additional Settings on the NETGEAR genie page.
Tap Reset. To continue, press Yes.
Wait for the device to finish returning to factory default settings on the web interface.
If you still have any issue regarding Netgear EX3700 Setup, then don’t feel ashamed to contact our experts via live chat or toll free helpline number.
0 notes
Text
Resolve Netgear Mywifiext Not Loading Issue
Encountering issues with accessing the Netgear mywifiext page can be frustrating, but worry not, we've got solutions to help you navigate through these hurdles seamlessly. Below, we've outlined various techniques and tips to troubleshoot and access the mywifiext page effortlessly.
Mywifiext serves as the default admin web URL for setting up a Netgear extender. It not only simplifies the installation process but also grants users the ability to manage and modify extender settings post-setup. However, users might face errors such as "unable to connect to the site," "mywifiext.net not functioning," or "you are not linked to your extender Wi-Fi network."
Key Reasons for mywifiext.net Not Working Issue:
Incorrect URL: Ensure that you're entering the correct URL in the browser address bar.
Network Connectivity Issues: Make sure your device is connected to the network of the NETGEAR extender to access mywifiext.net.
Router Configuration: Verify router firewall settings, check for IP address conflicts, and ensure correct login credentials to avoid issues accessing mywifiext.net.
Extender Placement: Optimal network performance requires the extender to be placed within the range of the router. Verify its positioning.
Browser Issues: Clear browser cache or switch to a different browser if you're encountering issues accessing mywifiext.net.
Outdated Firmware: Ensure the extender's firmware is up-to-date to avoid connectivity issues.
Hardware Issues: Any hardware malfunction might hinder access to mywifiext.net. Troubleshoot hardware problems accordingly.
If you find yourself puzzled while attempting to sign into your Netgear Wi-Fi range extender, feel free to ask your questions here in the chat. Assistance is readily available to address your queries and concerns.
1 note
·
View note
Text
How do connect with mywifiext setup
Simple Login Configuration Mywifiext
To connect to mywifiext.net, follow these steps:
Connect a power supply to the booster.
As you wait for the LED to turn green, hold your breath.
As soon as the power light turns green, connect to the extender.
The device's LED should go completely green.
Any web browser should work. Enter a message in the address bar by clicking on it.
In the address bar, type Mywifiext.net.
LOGIN TO CONFIGURE A MYWIFIEXT WIFI EXTENDER
On the website mywifiext.net, you may create your own wireless network.
To finish the Mywifiext setup procedures, link your device to the Netgear Ext network.
Open any online browser and go to the mywifiext setup page, for example, Google Chrome.
Enter the web URL in the browser's address bar.
Type 192.168.1.250 into the address bar.
You must click the new extension setup button when it appears.
Access the mywifiext setup page by creating an account right away and then clicking Continue.
How can I access www.mywifiext.net?
The Procedure For www.mywifiext.net Account Setup Page
We'll go through a step-by-step tutorial for setting up your Netgear Nighthawk Mesh WiFi Extender using Mywifiext.net or Mywifiext.local, both of which are local login pages for your WiFi Range Extender Setup.
Alternatively, you may log in using Mywifiext.net's default IP address of 192.168.1.250. Observe the following setup instructions to access your Netgear WiFi Range Extender Page:
Your Netgear WiFi extender should be connected to Powerline.
Wait for it to light up right now.
Wait until your Netgear Extender Setup's lights turn completely green.
Grab a laptop or a desktop in the meanwhile.
Open any web browser, such as Mozilla Firefox or Google Chrome.
Now go to www.mywifiext.net or Mywifiext.local, which is the default login URL.
To begin the setup, click the New Extender Setup button.
Complete the configuration of your Netgear Nighthawk WiFi Range Extender by entering the default login information.
Note: If you continue to have issues setting up your new or old Netgear WiFi Range Extender, try using its default login URL, www.mywifiext.net or mywifiext.local, or try using its default login IP address, 192.168.1.250. If you need any assistance, don't.
How can I configure mywifiext.local?
It's easy to set up your Netgear Nighthawk WiFi Extender using Mywifiext.local. The mywifiext.local setup page can only be accessed by MAC or IOS devices. If you want to know how to access mywifiext.local, keep reading our next section.
For the mywifiext.local setting? Following are the steps:
Before turning on your Nighthawk WiFi Extender, watch for the power light to solidify. View a computer or a mobile device.
Use your web browser to go to mywifiext.local.
Make sure your device is connected to the nighthawk extender network.
To finish the Mywifiext local setup procedure, adhere to the directions displayed on the screen.
Once the setup is finished, place the Extender in the desired location.
To get to mywifiext.net, do the following:
After being unpacked, connect the Extender to the power supply.
After turning on the extender, launch a web browser.
Type mywifiext.net into the address bar and wait for it to load.
Mywifiext.net's IP address, 192.168.1.250, should load if it doesn't otherwise.
Your login information will be requested on the Netgear genie screen.
Go to mywifiext.net and log in with your credentials to manage or instal your Wi-Fi extender.
If configured correctly, an extender might expand the reach of your network and provide you access to service outside, such as in your yard.
Extenders don't require a lot of space. The majority are single-piece devices that plug into an outlet and look like oversized plug-in air fresheners.
What is the address 192.168.1.250?
To access 192.168.1.250, follow the instructions below.
*Launch a current web browser on your laptop or computer.
*Then, enter the Mywifiext login IP address (192.168.1.250) in the address box.
*After inputting this IP address and clicking the enter key, you'll be sent to the Mywifiext login screen.
*The list's first item is.
*You must first log in with your username and password in order to access the page.
How can I set up a mywifiext extender?
Mywifiext extender configuration:
The Netgear range extender must first be linked to your wifi device.
Open any web browser and navigate to http://mywifiext.net.
Select New Extender Setup from the menu.
Create a profile on mywifiext.net right now.
Decide on your present Wi-Fi.
Click Next after entering your network security key.
Give the extender two to three minutes to complete the setup.
Both must be right if you see the warning "Username and password is incorrect." Before your login information is shown when you choose the "Forget" option, you will be asked to answer two security questions.
1 note
·
View note
Text
Netgear AC1200 WiFi Range Extender Setup
In this guide, we will share the two methods to set up the Netgear AC1200. The first one will be by the use of an installation assistant and the second one is using the WPS.

Netgear AC1200 Extender Setup: Manual Method
To install the AC1200 Wifi extender, plug it in and turn it on.
Wait for the Netgear ac1200 wifi extender's power light to turn solid green.
Now connect any of your wireless devices to Netgear ext.
On your device, the Netgear Extender Setup screen will appear.
Make an AC1200 login account and connect the Netgear WiFi Extender Setup to your home network.
NOTE: For the AC1200 new extender setup, please place the extender 2-3 feet away from the main router.
Netgear AC1200 Setup Instruction: ( W.P.S )
Connect the Netgear AC1200 to a power outlet and wait for the green light to show.
When you press the W.P.S button on your AC1200, the green light on the extender will blink.
Push the W.P.S button on your wireless router or modem within 1 - 2 minutes.
So the extender is now communicating with your main router.
When the green light on your extender stops flashing.
Your Ac1200 wireless extender will show three green lights.
The Ac1200 is now linked to the wireless network at home.
Netgear AC1200 Setup using NETGEAR Installation Assistant:
Get a PC or mobile device to install Netgear AC1200.
Make sure the EX6120 is plugged in close to the main router or modem.
Once the WIFI repeater has a solid green light.
Now, on your laptop or smartphone, navigate to the WIFI connection manager and search for the "NETGEAR Ext" network.
Open a web browser and connect your device to the AC1200.
Go to mywifiext.net now. The installation assistant from NETGEAR will be displayed.
Follow the on-screen instructions to connect your Netgear EX6120 to your existing WiFi network.
Once the AC1200 configuration is complete. Unplug the repeater and place it in an area with a poor Wi-Fi signal.
For more information and troubleshooting you can visit our website and also chat or call our expert team. They will guide you everywhere.
#Mywifiextsetup#netgearac1200wifirangeextendersetup netgearextendersetup netgearextenderlogin USA Technology
1 note
·
View note
Text
Netgear EX3700 Setup
With an easy-to-use Netgear EX3700 setup you can now connect any device anywhere in your home. There are two helpful ways to set up a Netgear EX3700:
Connect with WPS: WiFi Protected Setup (WPS) lets you join a secure WiFi network without typing in the network name and password.
Connect to the NETGEAR installation assistant: Start a web browser on a computer or mobile device to use the NETGEAR installation assistant.
Netgear EX3700 Setup: WPS Method
For setting up the Netgear EX3700 (AC750) with WPS:
The Netgear AC750 EX3700 WiFi range extender needs to be turned on.
Put your WiFi extender near your WiFi router.
Connect your extender to a power outlet.
Wait for the Netgear EX3700's Power LED to turn green.
Press the extender's WPS button.
If the Link Status LED on the EX3700 is white, your router and extender are working well together. The blue light on the Netgear EX3700 Link Status LED will be on if the connection is good. If the Link Status LED lights up yellow or red, move the extender closer to the router and try again.
You should move your extender to a new place.
Bring your WiFi-enabled computer or mobile device to a place where the WiFi router doesn't work well.
Connect your computer or mobile device that can connect to WiFi to the extended network.
Netgear EX3700 Manual Setup
For manual setup of a Netgear EX3700 using the installation assistant:
The Netgear AC750 EX3700 extender needs to be turned on.
Put your WiFi extender near your WiFi router.
Connect your extender to a power outlet.
Connect the extender to your router.
Open a web browser on your computer or phone and type mywifiext.net into it.
The NETGEAR installation helper shows up.

Follow the on-screen instructions to connect your extender to the WiFi network you already have.
You should move your extender to a new place.
If you have no connection or a bad connection, move the extender closer to your router and try again until the Link Status LED lights up white.
You can connect your client devices to the extended WiFi network once you've chosen where to place your extender.
Netgear EX3700Setup Using Nighthawk App
Not getting enough WiFi from the equipment of your Internet Service Provider (ISP)? Get a WiFi Range Extender to make sure that your WiFi works in every room of your house and keep the same WiFi name. This Mesh Extender AC750 EX3700 makes your WiFi better than it was before.
You can also use the Netgear Nighthawk app to set up and connect to the internet with your Netgear AC750 EX3700 WiFi range extender. The Nighthawk app is available for both the Android and iOS platforms. To set up the Netgear AC750 using the Nighthawk app, do the following:
First, make sure your router is hooked up to the internet.
Write down the SSID or network name and password for the router.
Now, turn on the Netgear AC750 EX3700 extender.
You can get the Nighthawk app for Android or iOS.
Then, go to your phone and open the Nighthawk app.
Follow the steps shown on the screen to set up and connect your Netgear WiFi range extender to the internet.
Netgear EX3700 AC750 Extender Setup Common Issues
Mywifiext.net not working
Password for mywifiext is wrong
The WiFi extender is hooked up, but there's no internet.
Can't connect to mywifiext.local The WiFi extender is not connected to the network
Netgear genie app doesn't open
Problems getting to 192.168.1.250 IP address
Lost configuration CD
Problems with WiFi connections
Even after setting up the Netgear AC750 extender, the Netgear genie smart setup page keeps coming up.
Forgot Netgear extender default password
The LED lights on the extender are not stable.
Mywifiext.com won't start up.
Can't get online with Netgear EX3700 extender EX3700
Not able to update the firmware on Netgear
After updating the Netgear EX3700 extender, I can't get to mywifiext.net.
MAC address filtering errors
Netgear EX3700 doesn't work, update failed
WiFi extender isn't getting online
Can't find the network name for the Netgear range extender
Netgear Extender not working
Netgear EX3700 – no internet
issues with the Netgear extender's red light
Not able to work Netgear EX3700 reset
The Internet is hooked up, but it isn't working.
Troubleshooting Steps to Fix Netgear AC750 EX3700 Setup Issues
Follow the steps below to fix problems with setting up your Netgear AC750 EX3700:
Make sure that the power outlet in the wall is giving the Netgear AC750 EX3700 extender the right amount of power.
Examine the wall plug to see if it is damaged or producing a short circuit where the extension is plugged in.
Use your device to connect to a fast internet connection.
Check all the places where wires connect.
Keep your extender away from walls, room corners, microwaves, fish tanks, cordless phones, Bluetooth devices, metal objects, aluminium studs, etc.
If mywifiext.net is giving you trouble, make sure you put the right URL in the address bar.
Try setting up your Netgear AC750 extender again after you turn it off and on again.
When you log in to mywifiext.net, use only the most recent version of your web browser.
Install the most recent Netgear firmware on your extender.
Set the extender back to the way it was when it came out of the box.
None of the troubleshooting tips above fixed your problems? Don't worry. Just give us a call and we'll help you set up your Netgear EX3700 WiFi range extender..
Netgear EX3700 Firmware Update
Is your WiFi extender suddenly acting funny? Even though you set up your Netgear AC750 manually and it worked, is it still too slow? If so, you need to update the firmware on the Netgear extender right away. Firmware is a set of instructions that are built into the hardware of the Netgear Extender.
In simple terms, Netgear extender firmware is an operating system that is made to run on your specific make and model number of the extender. So make sure that the firmware on your extender is up to date. Here's how to update the Netgear EX3700's firmware:
The first thing you need to do is check to see if your Netgear AC750 EX3700 WiFi extender is active.
Establish a connection between your router and the extender.
After you have finished, you should launch your preferred web browser.
In the box that asks for an address, type "mywifiext.net," then hit the "enter" key.
To log in to your extender, use the login and password that were provided.
To upgrade the device's firmware, access the settings menu and select the option under "Firmware Upgrade."
After that, select the items to check by clicking the Check button.
To upgrade the firmware, you should select the yes option if there is a newer version of the firmware available.
Now, wait for some time and make sure the firmware update for the Netgear EX3700 is completed successfully.
With an easy-to-use Netgear EX3700 AC750 extender, you can now connect any device anywhere in your home. There are two helpful ways to set up a Netgear EX3700:
Connect with WPS: WiFi Protected Setup (WPS) lets you join a secure WiFi network without typing in the network name and password.
Connect to the NETGEAR installation assistant: Start a web browser on a computer or mobile device to use the NETGEAR installation assistant.
Netgear EX3700 Setup: WPS Method
For setting up the Netgear EX3700 (AC750) with WPS:
The Netgear AC750 EX3700 WiFi range extender needs to be turned on.
Put your WiFi extender near your WiFi router.
Connect your extender to a power outlet.
Wait for the Netgear EX3700's Power LED to turn green.
Press the extender's WPS button.
If the Link Status LED on the EX3700 is white, your router and extender are working well together. The blue light on the Netgear EX3700 Link Status LED will be on if the connection is good. If the Link Status LED lights up yellow or red, move the extender closer to the router and try again.
You should move your extender to a new place.
Bring your WiFi-enabled computer or mobile device to a place where the WiFi router doesn't work well.
Connect your computer or mobile device that can connect to WiFi to the extended network.
Netgear EX3700 Manual Setup
For manual setup of a Netgear EX3700 using the installation assistant:
The Netgear AC750 EX3700 extender needs to be turned on.
Put your WiFi extender near your WiFi router.
Connect your extender to a power outlet.
Connect the extender to your router.
Open a web browser on your computer or phone and type www.mywifiext.net into it.
The NETGEAR installation helper shows up.
Follow the on-screen instructions to connect your extender to the WiFi network you already have.
You should move your extender to a new place.
If you have no connection or a bad connection, move the extender closer to your router and try again until the Link Status LED lights up white.
You can connect your client devices to the extended WiFi network once you've chosen where to place your extender.
Netgear EX3700Setup Using Nighthawk App
Not getting enough WiFi from the equipment of your Internet Service Provider (ISP)? Get a WiFi Range Extender to make sure that your WiFi works in every room of your house and keep the same WiFi name. This Mesh Extender AC750 EX3700 makes your WiFi better than it was before.
You can also use the Netgear Nighthawk app to set up and connect to the internet with your Netgear AC750 EX3700 WiFi range extender. The Nighthawk app is available for both the Android and iOS platforms. To set up the Netgear AC750 using the Nighthawk app, do the following:
First, make sure your router is hooked up to the internet.
Write down the SSID or network name and password for the router.
Now, turn on the Netgear AC750 EX3700 extender.
You can get the Nighthawk app for Android or iOS.
Then, go to your phone and open the Nighthawk app.
Follow the steps shown on the screen to set up and connect your Netgear WiFi range extender to the internet.
Netgear EX3700 AC750 Extender Setup Common Issues
Mywifiext.net not working
Password for mywifiext is wrong
The WiFi extender is hooked up, but there's no internet.
Can't connect to mywifiext.local The WiFi extender is not connected to the network
Netgear genie app doesn't open
Problems getting to 192.168.1.250 IP address
Lost configuration CD
Problems with WiFi connections
Even after setting up the Netgear AC750 extender, the Netgear genie smart setup page keeps coming up.
Forgot Netgear extender default password
The LED lights on the extender are not stable.
Mywifiext.com won't start up.
Can't get online with Netgear EX3700 extender EX3700
Not able to update the firmware on Netgear
After updating the Netgear EX3700 extender, I can't get to mywifiext.net.
MAC address filtering errors
Netgear EX3700 doesn't work, update failed
WiFi extender isn't getting online
Can't find the network name for the Netgear range extender
Netgear Extender not working
Netgear EX3700 – no internet
issues with the Netgear extender's red light
Not able to work Netgear EX3700 reset
The Internet is hooked up, but it isn't working.
Troubleshooting Steps to Fix Netgear AC750 EX3700 Setup Issues
Follow the steps below to fix problems with setting up your Netgear AC750 EX3700:
Make sure that the power outlet in the wall is giving the Netgear AC750 EX3700 extender the right amount of power.
Examine the wall plug to see if it is damaged or producing a short circuit where the extension is plugged in.
Use your device to connect to a fast internet connection.
Check all the places where wires connect.
Keep your extender away from walls, room corners, microwaves, fish tanks, cordless phones, Bluetooth devices, metal objects, aluminium studs, etc.
If mywifiext.net is giving you trouble, make sure you put the right URL in the address bar.
Try setting up your Netgear AC750 extender again after you turn it off and on again.
When you log in to mywifiext.net, use only the most recent version of your web browser.
Install the most recent Netgear firmware on your extender.
Set the extender back to the way it was when it came out of the box.
None of the troubleshooting tips above fixed your problems? Don't worry. Just give us a call and we'll help you set up your Netgear EX3700 WiFi range extender..
Netgear EX3700 Firmware Update
Is your WiFi extender suddenly acting funny? Even though you set up your Netgear AC750 manually and it worked, is it still too slow? If so, you need to update the firmware on the Netgear extender right away. Firmware is a set of instructions that are built into the hardware of the Netgear Extender.
In simple terms, Netgear extender firmware is an operating system that is made to run on your specific make and model number of the extender. So make sure that the firmware on your extender is up to date. Here's how to update the Netgear EX3700's firmware:
The first thing you need to do is check to see if your Netgear AC750 EX3700 WiFi extender is active.
Establish a connection between your router and the extender.
After you have finished, you should launch your preferred web browser.
In the box that asks for an address, type "mywifiext.net," then hit the "enter" key.
To log in to your extender, use the login and password that were provided.
To upgrade the device's firmware, access the settings menu and select the option under "Firmware Upgrade."
After that, select the items to check by clicking the Check button.
To upgrade the firmware, you should select the yes option if there is a newer version of the firmware available.
Now, wait for some time and make sure the firmware update for the Netgear EX3700 is completed successfully.
#Netgear EX3700 Setup#Netgear EX3700 Firmware Update#Troubleshooting Steps to Fix Netgear AC750 EX3700 Setup Issues#Netgear EX3700 Manual Setup#Netgear EX3700 Setup: WPS Method
1 note
·
View note
Link
To connect the Netgear Installation Assistant, we must do these things step by step:- Firstly, plug the extender in the electrical outlet. Thereafter, connect your device to extender using wifi router, launch a web browse. Thereafter, click the new extender setup button. Then connect your Wifi device to new wifi network using SSID. Then your device is now successfully connected.
#Netgear Extender Setup#netgear extender login#netgear extender#netgear installation assistant#netgear installation#netgear#Extender Setup#Installation Assistant#assistant#Installation#wifi#router#how to set up#wifi device
2 notes
·
View notes
Last Seen Blogs

barnaut
Sans titre

veneli
✧ your local apothecary ✧

ask-the-scrambler
The Scrambler

smackmybitchvp
NOT NICE

catasteph
L'Eternité dans un flash